CDK-US - bei Berner Torantriebe
CDK-US - bei Berner Torantriebe
CDK-US - bei Berner Torantriebe

You also want an ePaper? Increase the reach of your titles
YUMPU automatically turns print PDFs into web optimized ePapers that Google loves.
4. INSTALLATION SAFETY<br />
To reach the degree of safety required by current standards, read the following prescriptions carefully.<br />
1) Terminal board wiring must be done reading all the instructions given in this manual carefully and observing the general and good<br />
2)<br />
technique standards established for implementing electrical systems.<br />
Install a multi-pole circuit breaker upstream from the installation with an opening distance between the contacts of at least 3 mm.<br />
3) Install, wherever it is not provided for, an RCD with a 30 mA threshold. Install a lockable cut-off switch.<br />
4) Check effectiveness of the earthing system and connect all parts of the automation fi tted with a terminal or earth wire to it.<br />
5) There must be at least one external signalling device, like a traffi c light or fl ashing light, together with a danger or warning sign board.<br />
6) Use all the safety devices required by the type of installation, considering the risks it can cause.<br />
7) Separate the power lines (with a minimum cross section of 1.5 mm2 ) from the low voltage signalling lines (with a minimum cross<br />
section of 0.5 mm2 ) in ducts.<br />
8) Short circuit the N.C. inputs not <strong>bei</strong>ng used.<br />
9) Arrange in series any contacts to be connected to the same N.C. input.<br />
10) Arrange in parallel the inputs to be connected to the same N.O. input.<br />
F<br />
N<br />
+<br />
M<br />
230 V ~<br />
V<br />
AP<br />
C<br />
COM<br />
R<br />
SL<br />
EF<br />
BT<br />
CH<br />
1<br />
2<br />
3<br />
4<br />
5<br />
6<br />
7<br />
8<br />
9<br />
10<br />
11<br />
12<br />
13<br />
14<br />
15<br />
LED<br />
16<br />
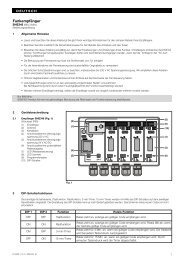
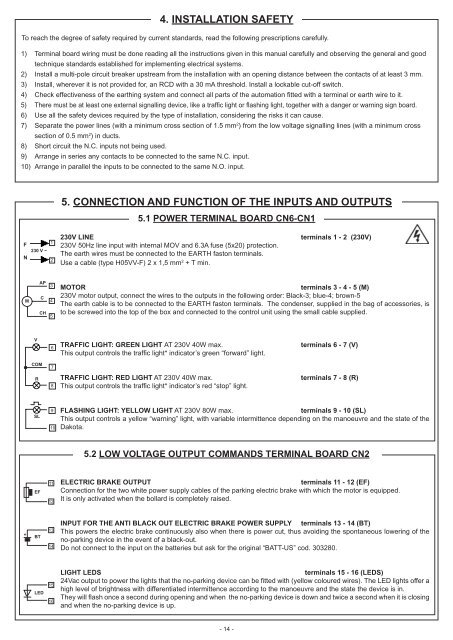
5. CONNECTION AND FUNCTION OF THE INPUTS AND OUTPUTS<br />
5.1 POWER TERMINAL BOARD CN6-CN1<br />
230V LINE terminals 1 - 2 (230V)<br />
230V 50Hz line input with internal MOV and 6.3A fuse (5x20) protection.<br />
The earth wires must be connected to the EARTH faston terminals.<br />
Use a cable (type H05VV-F) 2 x 1,5 mm 2 + T min.<br />
MOTOR terminals 3 - 4 - 5 (M)<br />
230V motor output, connect the wires to the outputs in the following order: Black-3; blue-4; brown-5<br />
The earth cable is to be connected to the EARTH faston terminals. The condenser, supplied in the bag of accessories, is<br />
to be screwed into the top of the box and connected to the control unit using the small cable supplied.<br />
TRAFFIC LIGHT: GREEN LIGHT AT 230V 40W max. terminals 6 - 7 (V)<br />
This output controls the traffi c light* indicator’s green “forward” light.<br />
TRAFFIC LIGHT: RED LIGHT AT 230V 40W max. terminals 7 - 8 (R)<br />
This output controls the traffi c light* indicator’s red “stop” light.<br />
FLASHING LIGHT: YELLOW LIGHT AT 230V 80W max. terminals 9 - 10 (SL)<br />
This output controls a yellow “warning” light, with variable intermittence depending on the manoeuvre and the state of the<br />
Dakota.<br />
5.2 LOW VOLTAGE OUTPUT COMMANDS TERMINAL BOARD CN2<br />
ELECTRIC BRAKE OUTPUT terminals 11 - 12 (EF)<br />
Connection for the two white power supply cables of the parking electric brake with which the motor is equipped.<br />
It is only activated when the bollard is completely raised.<br />
INPUT FOR THE ANTI BLACK OUT ELECTRIC BRAKE POWER SUPPLY terminals 13 - 14 (BT)<br />
This powers the electric brake continuously also when there is power cut, thus avoiding the spontaneous lowering of the<br />
no-parking device in the event of a black-out.<br />
Do not connect to the input on the batteries but ask for the original “BATT-<strong>US</strong>” cod. 303280.<br />
LIGHT LEDS terminals 15 - 16 (LEDS)<br />
24Vac output to power the lights that the no-parking device can be fi tted with (yellow coloured wires). The LED lights offer a<br />
high level of brightness with differentiated intermittence according to the manoeuvre and the state the device is in.<br />
They will fl ash once a second during opening and when the no-parking device is down and twice a second when it is closing<br />
and when the no-parking device is up.<br />
- 14 -