Owner's Manual Manual del Propietario - Ppe-pressure-washer ...
Owner's Manual Manual del Propietario - Ppe-pressure-washer ...
Owner's Manual Manual del Propietario - Ppe-pressure-washer ...

Create successful ePaper yourself
Turn your PDF publications into a flip-book with our unique Google optimized e-Paper software.
Operation<br />
Section<br />
4<br />
HOW TO USE YOUR<br />
PRESSURE WASHER<br />
If you have any problems operating your <strong>pressure</strong> <strong>washer</strong>,<br />
please call the <strong>pressure</strong> <strong>washer</strong> helpline at 1-800-743-4115.<br />
Pressure Washer Location<br />
Pressure Washer Clearance<br />
WARNING<br />
Running engine gives off carbon monoxide, an<br />
odorless, colorless, poison gas.<br />
Breathing carbon monoxide will cause nausea,<br />
fainting or death.<br />
• Operate <strong>pressure</strong> <strong>washer</strong> ONLY outdoors.<br />
• Keep exhaust gas from entering a confined area through<br />
windows, doors, ventilation intakes or other openings.<br />
• DO NOT operate <strong>pressure</strong> <strong>washer</strong> inside any building or<br />
enclosure.<br />
The <strong>pressure</strong> <strong>washer</strong> must be at least 5 ft. (152 cm) from<br />
structures having combustible walls and/or other<br />
combustible materials. Leave at least 3 ft. (92 cm) all around<br />
<strong>pressure</strong> <strong>washer</strong> including overhead, for adequate cooling,<br />
maintenance and servicing.<br />
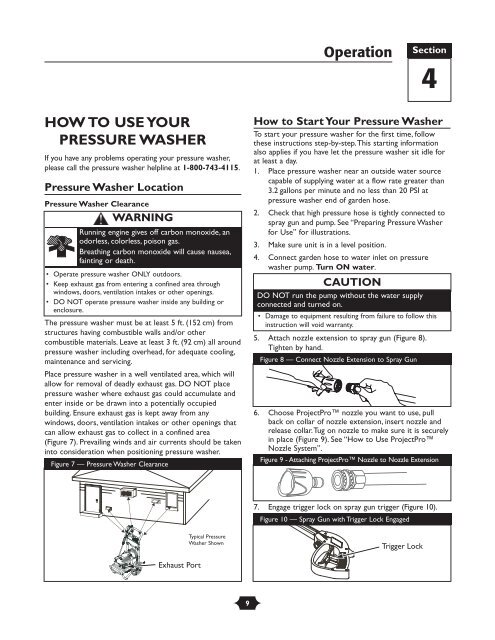
Place <strong>pressure</strong> <strong>washer</strong> in a well ventilated area, which will<br />
allow for removal of deadly exhaust gas. DO NOT place<br />
<strong>pressure</strong> <strong>washer</strong> where exhaust gas could accumulate and<br />
enter inside or be drawn into a potentially occupied<br />
building. Ensure exhaust gas is kept away from any<br />
windows, doors, ventilation intakes or other openings that<br />
can allow exhaust gas to collect in a confined area<br />
(Figure 7). Prevailing winds and air currents should be taken<br />
into consideration when positioning <strong>pressure</strong> <strong>washer</strong>.<br />
Figure 7 — Pressure Washer Clearance<br />
How to Start Your Pressure Washer<br />
To start your <strong>pressure</strong> <strong>washer</strong> for the first time, follow<br />
these instructions step-by-step.This starting information<br />
also applies if you have let the <strong>pressure</strong> <strong>washer</strong> sit idle for<br />
at least a day.<br />
1. Place <strong>pressure</strong> <strong>washer</strong> near an outside water source<br />
capable of supplying water at a flow rate greater than<br />
3.2 gallons per minute and no less than 20 PSI at<br />
<strong>pressure</strong> <strong>washer</strong> end of garden hose.<br />
2. Check that high <strong>pressure</strong> hose is tightly connected to<br />
spray gun and pump. See “Preparing Pressure Washer<br />
for Use” for illustrations.<br />
3. Make sure unit is in a level position.<br />
4. Connect garden hose to water inlet on <strong>pressure</strong><br />
<strong>washer</strong> pump. Turn ON water.<br />
CAUTION<br />
DO NOT run the pump without the water supply<br />
connected and turned on.<br />
• Damage to equipment resulting from failure to follow this<br />
instruction will void warranty.<br />
5. Attach nozzle extension to spray gun (Figure 8).<br />
Tighten by hand.<br />
Figure 8 — Connect Nozzle Extension to Spray Gun<br />
6. Choose ProjectPro nozzle you want to use, pull<br />
back on collar of nozzle extension, insert nozzle and<br />
release collar.Tug on nozzle to make sure it is securely<br />
in place (Figure 9). See “How to Use ProjectPro<br />
Nozzle System”.<br />
Figure 9 - Attaching ProjectPro Nozzle to Nozzle Extension<br />
7. Engage trigger lock on spray gun trigger (Figure 10).<br />
Figure 10 — Spray Gun with Trigger Lock Engaged<br />
Typical Pressure<br />
Washer Shown<br />
Trigger Lock<br />
Exhaust Port<br />
9