ICRRFTSMRN+I - Ppe-pressure-washer-parts.com
ICRRFTSMRN+I - Ppe-pressure-washer-parts.com
ICRRFTSMRN+I - Ppe-pressure-washer-parts.com

You also want an ePaper? Increase the reach of your titles
YUMPU automatically turns print PDFs into web optimized ePapers that Google loves.
Your<strong>pressure</strong> <strong>washer</strong> requires some assembly and is<br />
ready for use only after it has been properly serviced<br />
with the re<strong>com</strong>mended oil and fuel.<br />
If you have any problems with the assembly of<br />
your <strong>pressure</strong> <strong>washer</strong>, please call the <strong>pressure</strong><br />
<strong>washer</strong> helpline at 1-800-222-3t36.<br />
IMPORTANT: Any attempt to run the engine before it<br />
has been serviced with the re<strong>com</strong>mended oil will result<br />
in an engine failure.<br />
REMOVE PRESSURE WASHER<br />
FROM CARTON<br />
Open carton and slice two corners opposite guide<br />
handle from top to bottom so the panel can be<br />
folded down flat.<br />
Remove fillers, accessories and <strong>parts</strong> bag shipped<br />
with your <strong>pressure</strong> <strong>washer</strong>.<br />
Remove the <strong>pressure</strong> <strong>washer</strong> out the open end of<br />
the carton.<br />
Check carton for additional<br />
CARTON<br />
CONTENTS<br />
loose <strong>parts</strong>.<br />
Check all contents, If any <strong>parts</strong> are missing or damaged,<br />
cell the <strong>pressure</strong> <strong>washer</strong> helpline at t-800-222-3136,<br />
The main unit<br />
High <strong>pressure</strong> hose<br />
Spray gun<br />
Nozzle extension with adjustable nozzle<br />
Turbo wand<br />
Accessory holder<br />
Engine oil<br />
Parts bag (which includes<br />
Owner's manual<br />
Registration<br />
card<br />
items listed below)<br />
Be<strong>com</strong>e familiar with each piece before assembling<br />
the <strong>pressure</strong> <strong>washer</strong>. Compare contents against the<br />
view on page 5. If any <strong>parts</strong> are missing or damaged,<br />
call the <strong>pressure</strong> <strong>washer</strong> helpline at 1-800-222_3136.<br />
ASSEMBLING YOUR PRESSURE<br />
WASHER<br />
Your Craftsman <strong>pressure</strong> <strong>washer</strong> was mostly<br />
assembled at the factory, However, you will need to<br />
perform these tasks before you can operate your<br />
<strong>pressure</strong> <strong>washer</strong>:<br />
1. Add oil to engine crankcase.<br />
2. Add fuel to fuel tank.<br />
3. Connect high <strong>pressure</strong> hose to spray gun and<br />
pump.<br />
4. Connect water supply to pump.<br />
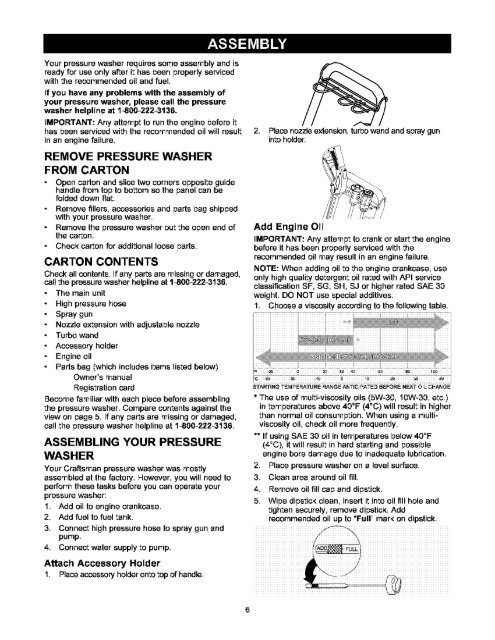
2. Place nozzle extension, turbowand and spray gun<br />
into holder.<br />
Add Engine Oil<br />
IMPORTANT: Any attempt to crank or start the engine<br />
before it has been properly serviced with the<br />
re<strong>com</strong>mended oil may result in an engine failure,<br />
NOTE: When adding oil to the engine crankcase, use<br />
only high quality detergent oil rated with API service<br />
classification SF, SG, SH, SJ or higher rated SAE 30<br />
weight, DO NOT use special additives,<br />
1. Choose a viscosity according to the following table.<br />
STARTING<br />
TE_ FERATURE RANGE AINTICI PATE E) BEFORE NEXT OIL CHANGE<br />
* The use of multi-viscesiN oils (5W-30, 10W-30, etc.)<br />
in temperatures above 40=F (4=C) will result in higher<br />
than normal oil consumption. When using a multiviscosity<br />
oil, check oil more frequently.<br />
** If using SAE 30 oil in temperatures below 40=F<br />
(_=C), it will result in hard starting and possible<br />
engine bore damage due to inadequate lubrication.<br />
2. Place <strong>pressure</strong> <strong>washer</strong> on a level surface.<br />
3. Clean area around oil fill.<br />
4. Remove oil fill cap and dipstick.<br />
5. Wipe dipstick clean, insert it into oil fill hole and<br />
tighten securely, remove dipsticK. Add<br />
re<strong>com</strong>mended oil up to "Fall" mark on dipstick.<br />
Attach Accessory Holder<br />
1, Place accessory holderonto top of handle,<br />
6