Manual de usuario Sunways Solar Inverter NT 2500 ... - Sunways AG
Manual de usuario Sunways Solar Inverter NT 2500 ... - Sunways AG
Manual de usuario Sunways Solar Inverter NT 2500 ... - Sunways AG

You also want an ePaper? Increase the reach of your titles
YUMPU automatically turns print PDFs into web optimized ePapers that Google loves.
6 Sistema <strong>de</strong> monitorización <strong>de</strong> la instalación<br />
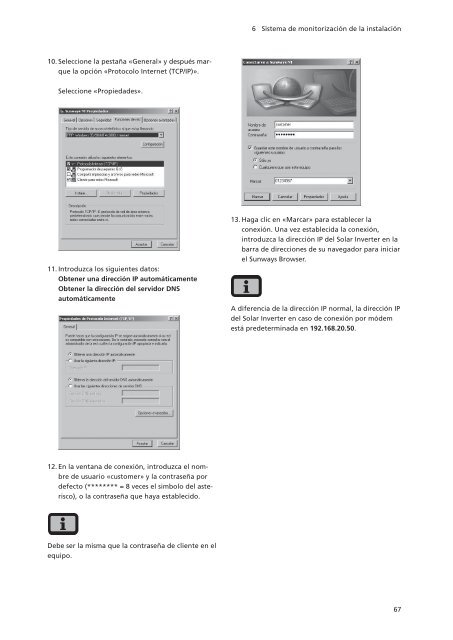
10. Seleccione la pestaña «General» y <strong>de</strong>spués marque<br />
la opción «Protocolo Internet (TCP/IP)».<br />
Seleccione «Propieda<strong>de</strong>s».<br />
11. Introduzca los siguientes datos:<br />
Obtener una dirección IP automáticamente<br />
Obtener la dirección <strong>de</strong>l servidor DNS<br />
automáticamente<br />
13. Haga clic en «Marcar» para establecer la<br />
conexión. Una vez establecida la conexión,<br />
introduzca la dirección IP <strong>de</strong>l <strong>Solar</strong> <strong>Inverter</strong> en la<br />
barra <strong>de</strong> direcciones <strong>de</strong> su navegador para iniciar<br />
el <strong>Sunways</strong> Browser.<br />
A diferencia <strong>de</strong> la dirección IP normal, la dirección IP<br />
<strong>de</strong>l <strong>Solar</strong> <strong>Inverter</strong> en caso <strong>de</strong> conexión por mó<strong>de</strong>m<br />
está pre<strong>de</strong>terminada en 192.168.20.50.<br />
12. En la ventana <strong>de</strong> conexión, introduzca el nombre<br />
<strong>de</strong> <strong>usuario</strong> «customer» y la contraseña por<br />
<strong>de</strong>fecto (******** = 8 veces el simbolo <strong>de</strong>l asterisco),<br />
o la contraseña que haya establecido.<br />
Debe ser la misma que la contraseña <strong>de</strong> cliente en el<br />
equipo.<br />
67