81500 - Universal Sewing Supply
81500 - Universal Sewing Supply
81500 - Universal Sewing Supply

You also want an ePaper? Increase the reach of your titles
YUMPU automatically turns print PDFs into web optimized ePapers that Google loves.
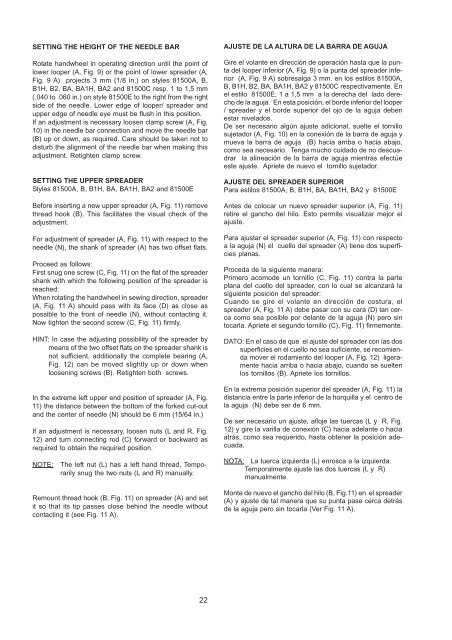
SETTING THE HEIGHT OF THE NEEDLE BAR<br />
Rotate handwheel in operating direction until the point of<br />
lower looper (A, Fig. 9) or the point of lower spreader (A,<br />
Fig. 9 A) projects 3 mm (1/8 in.) on styles <strong>81500</strong>A, B,<br />
B1H, B2, BA, BA1H, BA2 and <strong>81500</strong>C resp. 1 to 1,5 mm<br />
(.040 to .060 in.) on style <strong>81500</strong>E to the right from the right<br />
side of the needle. Lower edge of looper/ spreader and<br />
upper edge of needle eye must be flush in this position.<br />
If an adjustment is necessary loosen clamp screw (A, Fig.<br />
10) in the needle bar connection and move the needle bar<br />
(B) up or down, as required. Care should be taken not to<br />
disturb the alignment of the needle bar when making this<br />
adjustment. Retighten clamp screw.<br />
SETTING THE UPPER SPREADER<br />
Styles <strong>81500</strong>A, B, B1H, BA, BA1H, BA2 and <strong>81500</strong>E<br />
Before inserting a new upper spreader (A, Fig. 11) remove<br />
thread hook (B). This facilitates the visual check of the<br />
adjustment.<br />
For adjustment of spreader (A, Fig. 11) with respect to the<br />
needle (N), the shank of spreader (A) has two offset flats.<br />
Proceed as follows:<br />
First snug one screw (C, Fig. 11) on the flat of the spreader<br />
shank with which the following position of the spreader is<br />
reached:<br />
When rotating the handwheel in sewing direction, spreader<br />
(A, Fig. 11 A) should pass with its face (D) as close as<br />
possible to the front of needle (N), without contacting it.<br />
Now tighten the second screw (C, Fig. 11) firmly.<br />
HINT: In case the adjusting possibility of the spreader by<br />
means of the two offset flats on the spreader shank is<br />
not sufficient, additionally the complete bearing (A,<br />
Fig. 12) can be moved slightly up or down when<br />
loosening screws (B). Retighten both screws.<br />
In the extreme left upper end position of spreader (A, Fig.<br />
11) the distance between the bottom of the forked cut-out<br />
and the center of needle (N) should be 6 mm (15/64 in.)<br />
If an adjustment is necessary, loosen nuts (L and R, Fig.<br />
12) and turn connecting rod (C) forward or backward as<br />
required to obtain the required position.<br />
NOTE:<br />
The left nut (L) has a left hand thread, Temporarily<br />
snug the two nuts (L and R) manually.<br />
Remount thread hook (B, Fig. 11) on spreader (A) and set<br />
it so that its tip passes close behind the needle without<br />
contacting it (see Fig. 11 A).<br />
AJUSTE DE LA ALTURA DE LA BARRA DE AGUJA<br />
Gire el volante en dirección de operación hasta que la punta<br />
del looper inferior (A, Fig. 9) o la punta del spreader inferior<br />
(A, Fig. 9 A) sobresalga 3 mm. en los estilos <strong>81500</strong>A,<br />
B, B1H, B2, BA, BA1H, BA2 y <strong>81500</strong>C respectivamente. En<br />
el estilo <strong>81500</strong>E, 1 a 1,5 mm a la derecha del lado derecho<br />
de la aguja. En esta posición, el borde inferior del looper<br />
/ spreader y el borde superior del ojo de la aguja deben<br />
estar nivelados.<br />
De ser necesario algún ajuste adicional, suelte el tornillo<br />
sujetador (A, Fig. 10) en la conexión de la barra de aguja y<br />
mueva la barra de aguja (B) hacia arriba o hacia abajo,<br />
como sea necesario. Tenga mucho cuidado de no descuadrar<br />
la alineación de la barra de aguja mientras efectúe<br />
este ajuste. Apriete de nuevo el tornillo sujetador.<br />
AJUSTE DEL SPREADER SUPERIOR<br />
Para estilos <strong>81500</strong>A, B, B1H, BA, BA1H, BA2 y <strong>81500</strong>E<br />
Antes de colocar un nuevo spreader superior (A, Fig. 11)<br />
retire el gancho del hilo. Esto permite visualizar mejor el<br />
ajuste.<br />
Para ajustar el spreader superior (A, Fig. 11) con respecto<br />
a la aguja (N) el cuello del spreader (A) tiene dos superficies<br />
planas.<br />
Proceda de la siguiente manera:<br />
Primero acomode un tornillo (C, Fig. 11) contra la parte<br />
plana del cuello del spreader, con lo cual se alcanzará la<br />
siguiente posición del spreader:<br />
Cuando se gire el volante en dirección de costura, el<br />
spreader (A, Fig. 11 A) debe pasar con su cara (D) tan cerca<br />
como sea posible por delante de la aguja (N) pero sin<br />
tocarla. Apriete el segundo tornillo (C), Fig. 11) firmemente.<br />
DATO: En el caso de que el ajuste del spreader con las dos<br />
superficies en el cuello no sea suficiente, se recomienda<br />
mover el rodamiento del looper (A, Fig. 12) ligeramente<br />
hacia arriba o hacia abajo, cuando se suelten<br />
los tornillos (B). Apriete los tornillos.<br />
En la extrema posición superior del spreader (A, Fig. 11) la<br />
distancia entre la parte inferior de la horquilla y el centro de<br />
la aguja (N) debe ser de 6 mm.<br />
De ser necesario un ajuste, afloje las tuercas (L y R, Fig.<br />
12) y gire la varilla de conexión (C) hacia adelante o hacia<br />
atrás, como sea requerido, hasta obtener la posición adecuada.<br />
NOTA: La tuerca izquierda (L) enrosca a la izquierda.<br />
Temporalmente ajuste las dos tuercas (L y R)<br />
manualmente.<br />
Monte de nuevo el gancho del hilo (B, Fig.11) en el spreader<br />
(A) y ajuste de tal manera que su punta pase cerca detrás<br />
de la aguja pero sin tocarla (Ver Fig. 11 A).<br />
22