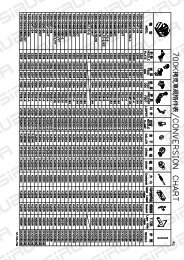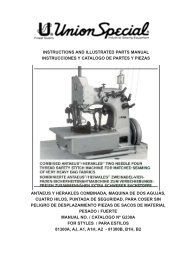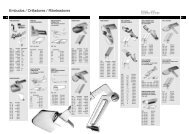
81500 - Universal Sewing Supply
81500 - Universal Sewing Supply
81500 - Universal Sewing Supply

You also want an ePaper? Increase the reach of your titles
YUMPU automatically turns print PDFs into web optimized ePapers that Google loves.
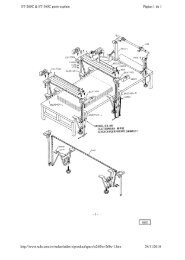
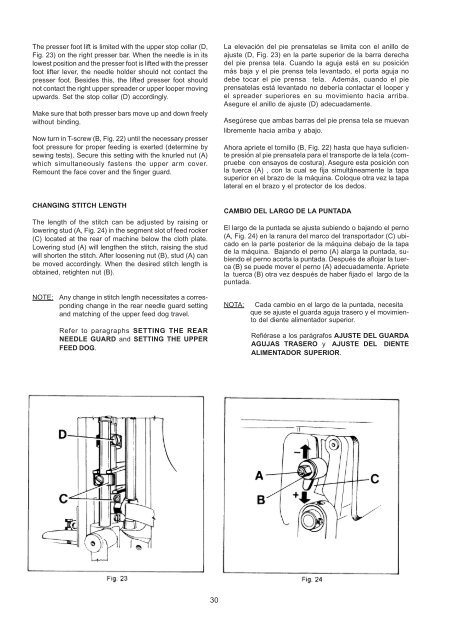
The presser foot lift is limited with the upper stop collar (D,<br />
Fig. 23) on the right presser bar. When the needle is in its<br />
lowest position and the presser foot is lifted with the presser<br />
foot lifter lever, the needle holder should not contact the<br />
presser foot. Besides this, the lifted presser foot should<br />
not contact the right upper spreader or upper looper moving<br />
upwards. Set the stop collar (D) accordingly.<br />
Make sure that both presser bars move up and down freely<br />
without binding.<br />
Now turn in T-screw (B, Fig. 22) until the necessary presser<br />
foot pressure for proper feeding is exerted (determine by<br />
sewing tests). Secure this setting with the knurled nut (A)<br />
which simultaneously fastens the upper arm cover.<br />
Remount the face cover and the finger guard.<br />
La elevación del pie prensatelas se limita con el anillo de<br />
ajuste (D, Fig. 23) en la parte superior de la barra derecha<br />
del pie prensa tela. Cuando la aguja está en su posición<br />
más baja y el pie prensa tela levantado, el porta aguja no<br />
debe tocar el pie prensa tela. Además, cuando el pie<br />
prensatelas está levantado no debería contactar el looper y<br />
el spreader superiores en su movimiento hacia arriba.<br />
Asegure el anillo de ajuste (D) adecuadamente.<br />
Asegúrese que ambas barras del pie prensa tela se muevan<br />
libremente hacia arriba y abajo.<br />
Ahora apriete el tornillo (B, Fig. 22) hasta que haya suficiente<br />
presión al pie prensatela para el transporte de la tela (compruebe<br />
con ensayos de costura). Asegure esta posición con<br />
la tuerca (A) , con la cual se fija simultáneamente la tapa<br />
superior en el brazo de la máquina. Coloque otra vez la tapa<br />
lateral en el brazo y el protector de los dedos.<br />
CHANGING STITCH LENGTH<br />
The length of the stitch can be adjusted by raising or<br />
lowering stud (A, Fig. 24) in the segment slot of feed rocker<br />
(C) located at the rear of machine below the cloth plate.<br />
Lowering stud (A) will lengthen the stitch, raising the stud<br />
will shorten the stitch. After loosening nut (B), stud (A) can<br />
be moved accordingly. When the desired stitch length is<br />
obtained, retighten nut (B).<br />
CAMBIO DEL LARGO DE LA PUNTADA<br />
El largo de la puntada se ajusta subiendo o bajando el perno<br />
(A, Fig. 24) en la ranura del marco del transportador (C) ubicado<br />
en la parte posterior de la máquina debajo de la tapa<br />
de la máquina. Bajando el perno (A) alarga la puntada, subiendo<br />
el perno acorta la puntada. Después de aflojar la tuerca<br />
(B) se puede mover el perno (A) adecuadamente. Apriete<br />
la tuerca (B) otra vez después de haber fijado el largo de la<br />
puntada.<br />
NOTE:<br />
Any change in stitch length necessitates a corresponding<br />
change in the rear needle guard setting<br />
and matching of the upper feed dog travel.<br />
NOTA:<br />
Cada cambio en el largo de la puntada, necesita<br />
que se ajuste el guarda aguja trasero y el movimiento<br />
del diente alimentador superior.<br />
Refer to paragraphs SETTING THE REAR<br />
NEEDLE GUARD and SETTING THE UPPER<br />
FEED DOG.<br />
Refiérase a los parágrafos AJUSTE DEL GUARDA<br />
AGUJAS TRASERO y AJUSTE DEL DIENTE<br />
ALIMENTADOR SUPERIOR.<br />
30