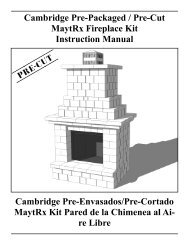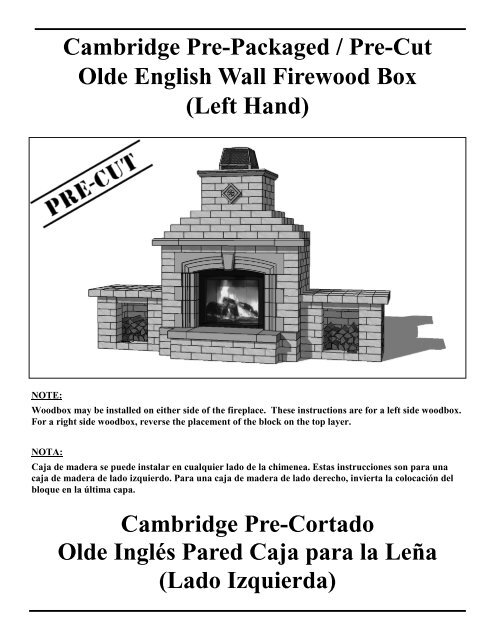
Cambridge Pre-Packaged / Pre-Cut Olde English Wall Firewood Box
Cambridge Pre-Packaged / Pre-Cut Olde English Wall Firewood Box
Cambridge Pre-Packaged / Pre-Cut Olde English Wall Firewood Box

Create successful ePaper yourself
Turn your PDF publications into a flip-book with our unique Google optimized e-Paper software.
<strong>Cambridge</strong> <strong>Pre</strong>-<strong>Packaged</strong> / <strong>Pre</strong>-<strong>Cut</strong><br />
<strong>Olde</strong> <strong>English</strong> <strong>Wall</strong> <strong>Firewood</strong> <strong>Box</strong><br />
(Left Hand)<br />
NOTE:<br />
Woodbox may be installed on either side of the fireplace. These instructions are for a left side woodbox.<br />
For a right side woodbox, reverse the placement of the block on the top layer.<br />
NOTA:<br />
Caja de madera se puede instalar en cualquier lado de la chimenea. Estas instrucciones son para una<br />
caja de madera de lado izquierdo. Para una caja de madera de lado derecho, invierta la colocación del<br />
bloque en la última capa.<br />
<strong>Cambridge</strong> <strong>Pre</strong>-Cortado<br />
<strong>Olde</strong> Inglés Pared Caja para la Leña<br />
(Lado Izquierda)
<strong>Cambridge</strong> <strong>Pre</strong>-<strong>Packaged</strong> / <strong>Pre</strong>-<strong>Cut</strong><br />
<strong>Olde</strong> <strong>English</strong> <strong>Wall</strong> <strong>Firewood</strong> <strong>Box</strong> (Left Hand)<br />
2011<br />
Layer Reference Guide:<br />
Guía de Referencia:<br />
Layer 9<br />
Layer 8<br />
Finished<br />
Grade<br />
Layer 7<br />
Layer 6<br />
Layer 5<br />
Layer 4<br />
Layer 3<br />
Layer 2<br />
Layer 1<br />
2” Above Foundation<br />
6” Compacted 3/4” stone 4” Concrete slab (4000 PSI)<br />
Foundation Layer<br />
1
<strong>Cambridge</strong> <strong>Pre</strong>-<strong>Packaged</strong> / <strong>Pre</strong>-<strong>Cut</strong><br />
<strong>Olde</strong> <strong>English</strong> <strong>Wall</strong> <strong>Firewood</strong> <strong>Box</strong> (Left Hand)<br />
2011<br />
Tools Required for Woodbox Installation:<br />
Safety Goggles<br />
Ear Protection<br />
Dust Mask<br />
Gloves<br />
Shovels (digging & flat)<br />
Metal <strong>Cut</strong>ters for banding on cubes<br />
Mason Hammer (chipping, hammer)<br />
Road Stone Rake<br />
Tamper (Hand or Mechanical)<br />
Wheelbarrow<br />
Level (2’ and 6’ recommended)<br />
Speed Square<br />
Caulk Gun 10 oz or 28 oz (depends on what size<br />
adhesive is purchased)<br />
Rubber Mallet<br />
14” Demo saw with diamond blade<br />
Tape Measure<br />
Marking Device (pencil, soap stone, etc)<br />
Chalk Line<br />
Hand Broom<br />
Concrete Tools (Trowel/Floats)<br />
2 Carpenter Clamps<br />
Drill & 1/16” bit<br />
5/16” nut driver<br />
7 ¼” Circular saw with wood blade<br />
4” Electric grinder<br />
4” Diamond cup grinder<br />
Material Required:<br />
¾” clean stone (approx. 1/4 ton)<br />
Concrete (approx. 9-80 lb bags)<br />
<strong>Cambridge</strong> concrete adhesive (approx. 2-29 oz.<br />
or 6-10.3 oz. tubes)<br />
(4 pcs) 2” x 4” x 8’ lumber<br />
2 ½” wood screws<br />
½” rebar (approx. 8’)<br />
Items Included in the Woodbox Kit:<br />
2 - Reinforced concrete lintels 32” x 4” x 8”<br />
3 - Plastic shim pack sheet for leveling lintels or<br />
block as needed<br />
Imported polished granite tile for facing front of<br />
fireplace (4”x12” and 4”x8” tiles)<br />
1 - Cube of <strong>Cambridge</strong> <strong>Olde</strong> <strong>English</strong> <strong>Wall</strong><br />
1 - Installation manual for concrete pad and <strong>Olde</strong><br />
<strong>English</strong> <strong>Wall</strong><br />
2
<strong>Cambridge</strong> <strong>Pre</strong>-<strong>Packaged</strong> / <strong>Pre</strong>-<strong>Cut</strong><br />
<strong>Olde</strong> <strong>English</strong> <strong>Wall</strong> <strong>Firewood</strong> <strong>Box</strong> (Left Hand)<br />
2011<br />
Herramientas Necesarias para Instalación:<br />
Gafas de seguridad<br />
Protección auditiva<br />
Máscara de polvo<br />
Guantes<br />
Palas (excavación y plano)<br />
Cortadores de Metal de bandas en los cubos<br />
Mason Hammer (astillado, martillo)<br />
Camino del rastrillo de Piedra<br />
Sabotaje (manual o mecánica)<br />
Carretilla<br />
(Nivel (2’y 6’ recomendado)<br />
Velocidad de la Plaza<br />
Pistola para calafatear 10 oz o 28 oz (depende de<br />
qué tamaño es comprar pegamento)<br />
Martillo de goma<br />
14” Demo sierra con disco de diamante<br />
Cinta métrica<br />
Dispositivo de marcado (lápiz, piedra jabón, etc)<br />
Línea de tiza<br />
Escoba de mano<br />
Herramientas concretas (paleta / flotadores)<br />
2 abrazaderas Carpintero<br />
Taladro y 1/16” bits<br />
5/16”tuerca conductor<br />
7 ¼” Sierra circular con hoja de madera<br />
4” molinillo eléctrico<br />
4” Diamante trituradora taza<br />
Material Necesario:<br />
¾”piedra limpia (aprox. 1/4 de tonelada)<br />
Hormigón (aproximadamente 9-bolsas de 80<br />
libras)<br />
<strong>Cambridge</strong> concretas adhesivo (aprox. 2-29oz<br />
o de 6-10.3 oz. tubos)<br />
(4 piezas) de 2”x 4” x 8’de madera<br />
2 ½”tornillos para madera<br />
½”barra de refuerzo (aprox. 8’)<br />
Los Artículos Incluidos en el Kit de la Chimenea:<br />
2 - Dinteles de hormigón armado de 32”x 4” x 8”<br />
3 - Cuña de plástico hoja de paquete para nivelar<br />
dinteles o bloquear cuando sea necesario<br />
Importados baldosas de granito pulido para hacer<br />
frente a frente de la chimenea (4”x 12” y 4”x 8” azulejos)<br />
1 - Cubo de <strong>Olde</strong> <strong>Cambridge</strong> Inglés Pared<br />
1 - Manual de instalación para la plataforma de<br />
concreto y <strong>Olde</strong> Inglés pared<br />
3
<strong>Cambridge</strong> <strong>Pre</strong>-<strong>Packaged</strong> / <strong>Pre</strong>-<strong>Cut</strong><br />
<strong>Olde</strong> <strong>English</strong> <strong>Wall</strong> <strong>Firewood</strong> <strong>Box</strong> (Left Hand)<br />
2011<br />
Concrete Pad Construction:<br />
Call 811 for information on underground utility marking. Select left or right location and excavate a<br />
36”L x 48”W x 12”D area for concrete pad. Fill excavated area with approximately 6” of ¾” clean<br />
gravel, compacting every 3”. Frame remaining 4” with 2”x4” lumber to create a level pad. (Be sure<br />
2”x4” wood frame is perfectly level, front to back and side to side) See attached drawing for details of<br />
steel reinforcement rod placement. Fill 2”x 4” wood frame with a 4,000 psi concrete mix.<br />
*Allow pad to cure for minimum of 48 hours.<br />
48”<br />
14”<br />
36”<br />
14”<br />
4”<br />
6” 10”<br />
La Leña Caja Construcción Base de Concreto:<br />
Llame al 811 para obtener información sobre la utilidad de metro marcado. Seleccione la izquierda oa<br />
la ubicación correcta y excavar de 36”L x 48”W x 12”D área de plataforma de concreto. Llene la zona<br />
excavada con aproximadamente 6” de ¾” limpia grava, compactando cada 3”. Marco restantes 4”con<br />
2”x 4”de madera para crear una plataforma de nivel. (Asegúrese de 2”x 4” marco de madera está perfectamente<br />
horizontal, de adelante hacia atrás y de lado a lado) Véanse los detalles del dibujo para la<br />
colocación de varillas de acero de refuerzo. Llene 2”x 4” marco de madera con una mezcla de concreto<br />
4,000 psi.<br />
*Deje que la almohadilla para curar por un mínimo de 48 horas.<br />
4
<strong>Cambridge</strong> <strong>Pre</strong>-<strong>Packaged</strong> / <strong>Pre</strong>-<strong>Cut</strong><br />
<strong>Olde</strong> <strong>English</strong> <strong>Wall</strong> <strong>Firewood</strong> <strong>Box</strong> (Left Hand)<br />
2011<br />
4” Concrete (4,000 psi.)<br />
Rebar 2” below top of slab<br />
3/4” Crushed stone (6”)<br />
4” Concrete (4,000 psi.)<br />
Rebar 2” below top of slab<br />
5
<strong>Cambridge</strong> <strong>Pre</strong>-<strong>Packaged</strong> / <strong>Pre</strong>-<strong>Cut</strong><br />
<strong>Olde</strong> <strong>English</strong> <strong>Wall</strong> <strong>Firewood</strong> <strong>Box</strong> (Left Hand)<br />
2011<br />
Stones Included In The Kit:<br />
4”x8”x32” Lintel (2 Pieces)<br />
6”x12” Stone <strong>Cut</strong> (4 Pieces)<br />
8”x8” Stone <strong>Cut</strong> (5 Pieces) <strong>Wall</strong> Stones (75 Pieces) 4”x8” Stone <strong>Cut</strong> (10 Pieces)<br />
4”x8”x3/8” Tile (1Piece) 4”x12”x3/8” Tile (1 Piece) 4”x6”x1” Veneer <strong>Cut</strong> (2 Pieces)<br />
6
<strong>Cambridge</strong> <strong>Pre</strong>-<strong>Packaged</strong> / <strong>Pre</strong>-<strong>Cut</strong><br />
<strong>Olde</strong> <strong>English</strong> <strong>Wall</strong> <strong>Firewood</strong> <strong>Box</strong> (Left Hand)<br />
2011<br />
Layer 1:<br />
Piece Count = (9) <strong>Wall</strong> Stones, (1) 8x8 <strong>Cut</strong> Stone,<br />
(1) 4x8 <strong>Cut</strong> Stone<br />
Apply adhesive and install wall stones and cut<br />
stones as shown. The woodbox will be set against<br />
the side of the fireplace. The back of the first<br />
layer will be even with the back of the fireplace.<br />
See photo for details. Be sure to make this and<br />
all layers as level as possible.<br />
Capa 1:<br />
Numero de Piezas = (9) Piedras de Pared, (1) 8x8<br />
Piedra Cortada, (1) 4x8 Piedra Cortada<br />
Aplicar el adhesivo y instale las piedras de la pared<br />
y piedras talladas, como se muestra. La leñera<br />
se establecerá en el lado de la chimenea. La<br />
parte posterior de la primera capa será aún más<br />
con la parte posterior de la chimenea. Vea la foto<br />
para obtener más información, aplicar el adhesivo.<br />
Asegúrese de hacer esto y todas las capas lo<br />
más nivelado posible.<br />
7
<strong>Cambridge</strong> <strong>Pre</strong>-<strong>Packaged</strong> / <strong>Pre</strong>-<strong>Cut</strong><br />
<strong>Olde</strong> <strong>English</strong> <strong>Wall</strong> <strong>Firewood</strong> <strong>Box</strong> (Left Hand)<br />
2011<br />
Layer 2:<br />
Piece Count = (7) <strong>Wall</strong> Stones, (1) 8x8 <strong>Cut</strong> Stone,<br />
(2) 4x8 <strong>Cut</strong> Stones<br />
Apply concrete adhesive and install wall stones<br />
and cut stones as shown. Be sure to make this<br />
and all layers as level as possible.<br />
Capa 2:<br />
Numero de Piezas = (7) Piedras de Pared, (1) 8x8<br />
Piedra Cortada, (2) 4x8 Piedra Cortada<br />
Aplicar el adhesivo y instale las piedras de pared<br />
y talladas, como se muestra. Asegúrese de hacer<br />
esto y todas las capas lo más nivelado posible.<br />
8
<strong>Cambridge</strong> <strong>Pre</strong>-<strong>Packaged</strong> / <strong>Pre</strong>-<strong>Cut</strong><br />
<strong>Olde</strong> <strong>English</strong> <strong>Wall</strong> <strong>Firewood</strong> <strong>Box</strong> (Left Hand)<br />
2011<br />
Layer 3:<br />
Piece Count = (8) <strong>Wall</strong> Stones, (1) 4x8 <strong>Cut</strong> Stone<br />
Apply concrete adhesive and install wall stones<br />
and cut stone as shown. Be sure to make this and<br />
all layers as level as possible.<br />
Capa 3:<br />
Numero de Piezas = (8) Piedras de Pared, (1) 4x8<br />
Piedra Cortada<br />
Aplicar el adhesivo y instale las piedras de pared<br />
y talladas, como se muestra. Asegúrese de hacer<br />
esto y todas las capas lo más nivelado posible.<br />
9
<strong>Cambridge</strong> <strong>Pre</strong>-<strong>Packaged</strong> / <strong>Pre</strong>-<strong>Cut</strong><br />
<strong>Olde</strong> <strong>English</strong> <strong>Wall</strong> <strong>Firewood</strong> <strong>Box</strong> (Left Hand)<br />
2011<br />
Layer 4:<br />
Piece Count = (7) <strong>Wall</strong> Stones, (1) 8x8 <strong>Cut</strong> Stone,<br />
(2) 4x8 <strong>Cut</strong> Stones<br />
Apply concrete adhesive and install wall stones<br />
and cut stones as shown. Be sure to make this<br />
and all layers as level as possible.<br />
Capa 4:<br />
Numero de Piezas = (7) Piedras de Pared, (1) 8x8<br />
Piedra Cortada, (2) 4x8 Piedra Cortada<br />
Aplicar el adhesivo y instale las piedras de pared<br />
y talladas, como se muestra. Asegúrese de hacer<br />
esto y todas las capas lo más nivelado posible.<br />
10
<strong>Cambridge</strong> <strong>Pre</strong>-<strong>Packaged</strong> / <strong>Pre</strong>-<strong>Cut</strong><br />
<strong>Olde</strong> <strong>English</strong> <strong>Wall</strong> <strong>Firewood</strong> <strong>Box</strong> (Left Hand)<br />
2011<br />
Layer 5:<br />
Piece Count = (8) <strong>Wall</strong> Stones, (1) 4x8 <strong>Cut</strong> Stone<br />
Apply concrete adhesive and install wall stones<br />
and cut stone as shown. Be sure to make this and<br />
all layers as level as possible.<br />
Capa 5:<br />
Numero de Piezas = (8) Piedras de Pared, (1) 4x8<br />
Piedra Cortada<br />
Aplicar el adhesivo y instale las piedras de pared<br />
y talladas, como se muestra. Asegúrese de hacer<br />
esto y todas las capas lo más nivelado posible.<br />
11
<strong>Cambridge</strong> <strong>Pre</strong>-<strong>Packaged</strong> / <strong>Pre</strong>-<strong>Cut</strong><br />
<strong>Olde</strong> <strong>English</strong> <strong>Wall</strong> <strong>Firewood</strong> <strong>Box</strong> (Left Hand)<br />
2011<br />
Layer 6:<br />
Piece Count = (7) <strong>Wall</strong> Stones, (1) 8x8 <strong>Cut</strong> Stone,<br />
(2) 4x8 <strong>Cut</strong> Stones<br />
Apply concrete adhesive and install wall stones<br />
and cut stones as shown. Be sure to make this<br />
and all layers as level as possible.<br />
Capa 6:<br />
Numero de Piezas = (7) Piedras de Pared, (1) 8x8<br />
Piedra Cortada, (2) 4x8 Piedra Cortada<br />
Aplicar el adhesivo y instale las piedras de pared<br />
y talladas, como se muestra. Asegúrese de hacer<br />
esto y todas las capas lo más nivelado posible.<br />
12
<strong>Cambridge</strong> <strong>Pre</strong>-<strong>Packaged</strong> / <strong>Pre</strong>-<strong>Cut</strong><br />
<strong>Olde</strong> <strong>English</strong> <strong>Wall</strong> <strong>Firewood</strong> <strong>Box</strong> (Left Hand)<br />
2011<br />
Layer 7:<br />
Piece Count = (8) <strong>Wall</strong> Stones, (1) 4x8 <strong>Cut</strong> Stone<br />
Apply concrete adhesive and install wall stones<br />
and cut stone as shown. Be sure to make this and<br />
all layers as level as possible.<br />
Capa 7:<br />
Numero de Piezas = (8) Piedras de Pared, (1) 4x8<br />
Piedra Cortada<br />
Aplicar el adhesivo y instale las piedras de pared<br />
y talladas, como se muestra. Asegúrese de hacer<br />
esto y todas las capas lo más nivelado posible.<br />
13
<strong>Cambridge</strong> <strong>Pre</strong>-<strong>Packaged</strong> / <strong>Pre</strong>-<strong>Cut</strong><br />
<strong>Olde</strong> <strong>English</strong> <strong>Wall</strong> <strong>Firewood</strong> <strong>Box</strong> (Left Hand)<br />
2011<br />
Layer 8:<br />
Piece Count = (3) <strong>Wall</strong> Stones, (1) 8x8 <strong>Cut</strong> Stone,<br />
(4) 6x12 <strong>Cut</strong> Stones, (2) 4x8x32 Lintels, (2) 4x6x1<br />
Veneer <strong>Cut</strong> Stones (for lintel)<br />
Apply concrete adhesive and install wall stones<br />
and cut stones as shown. Be sure to make this<br />
and all layers as level as possible.<br />
Install the (2) 4x8x32 concrete lintels as shown,<br />
applying adhesive where the ends rest on layer 7.<br />
Shim will be required under lintels so they are<br />
flush with wall stones.<br />
Apply adhesive to the (2) 4x6x1 veneer stones<br />
and install them according to the photo.<br />
Capa 8:<br />
Numero de Piezas = (3) Piedras de Pared, (1) 8x8<br />
Piedra Cortada, (4) 6x12 Piedra Cortada, (2)<br />
4x8x32 Dinteles, (2) 4x6x1 Piedra Cortada de<br />
Chapa (para dintel)<br />
Aplicar el adhesivo y instale las piedras de pared<br />
y talladas, como se muestra. Asegúrese de hacer<br />
esto y todas las capas lo más nivelado posible.<br />
Instale los dos (2) 4x 8x32 dinteles de hormigón<br />
como se muestra, de aplicar el adhesivo en los extremos<br />
de descanso en la capa 7.<br />
Aplique el pegamento a las piedras de chapa (2)<br />
4x6x1 y su instalación de acuerdo a la foto.<br />
14
<strong>Cambridge</strong> <strong>Pre</strong>-<strong>Packaged</strong> / <strong>Pre</strong>-<strong>Cut</strong><br />
<strong>Olde</strong> <strong>English</strong> <strong>Wall</strong> <strong>Firewood</strong> <strong>Box</strong> (Left Hand)<br />
2011<br />
See page 16 for tile facing instructions.<br />
4x8x3/8” Tile<br />
4x12x3/8” Tile<br />
15
<strong>Cambridge</strong> <strong>Pre</strong>-<strong>Packaged</strong> / <strong>Pre</strong>-<strong>Cut</strong><br />
<strong>Olde</strong> <strong>English</strong> <strong>Wall</strong> <strong>Firewood</strong> <strong>Box</strong> (Left Hand)<br />
2011<br />
Granite Tile Facing:<br />
Granite tile are precut to 4”x8” and 4”x12” and<br />
are provided with the fireplace kit. One of each<br />
will be required. Apply adhesive to face of the<br />
exposed lintel and install granite tile as shown.<br />
<strong>Pre</strong>ss tile firmly into adhesive. Using carpenter<br />
clamps, clamp tiles to the lintel. Please ensure<br />
tiles do not sag.<br />
See photo for details. Allow 24 hours for adhesive<br />
to dry, then remove clamps.<br />
Granito Baldosa:<br />
El azulejo del granito es precortado a 4” x8” y 4”<br />
x12” y se proporciona el kit de la chimenea. Uno<br />
de cada uno será requerido. Aplique el pegamento<br />
a la cara del dintel expuesto e instale el azulejo<br />
del granito como se muestra. <strong>Pre</strong>sione el azulejo<br />
firmemente en el pegamento. Usando las<br />
abrazaderas del carpintero, afiance los azulejos<br />
con abrazadera al dintel. Asegúrese por favor<br />
que no cedan los azulejos.<br />
Vea la foto para los detalles. Permita que 24<br />
horas para que el pegamento se seque, después<br />
quite las abrazaderas.<br />
16
<strong>Cambridge</strong> <strong>Pre</strong>-<strong>Packaged</strong> / <strong>Pre</strong>-<strong>Cut</strong><br />
<strong>Olde</strong> <strong>English</strong> <strong>Wall</strong> <strong>Firewood</strong> <strong>Box</strong> (Left Hand)<br />
2011<br />
Layer 9:<br />
Piece Count = (18) wall stones<br />
Apply concrete adhesive and install wall stones<br />
as shown. The wall stones on the front and left<br />
side will have a 4” overhang and flush on the<br />
back. (<strong>Wall</strong> stones on the left side will need to be<br />
supported or held in place from block placed on<br />
top until adhesive dries.) See photo for details.<br />
Capa 9:<br />
Numero de piezas = (18) piedras de pared<br />
Aplique el pegamento concreto e instale las piedras<br />
de la pared como se muestra. Las piedras de<br />
la pared en el lado izquierdo delantero y tendrán<br />
la proyección 4” y rubor en la parte posterior.<br />
(Las piedras de la pared en el lado izquierdo necesitarán<br />
ser apoyadas o ser sostenidas en el<br />
lugar del bloque puesto en tapa hasta que el pegamento<br />
se seque.) Vea la foto para los detalles.<br />
17
<strong>Cambridge</strong> <strong>Pre</strong>-<strong>Packaged</strong> / <strong>Pre</strong>-<strong>Cut</strong><br />
<strong>Olde</strong> <strong>English</strong> <strong>Wall</strong> <strong>Firewood</strong> <strong>Box</strong> (Left Hand)<br />
2011<br />
VIEWS<br />
Front<br />
Left<br />
Right<br />
Rear<br />
18