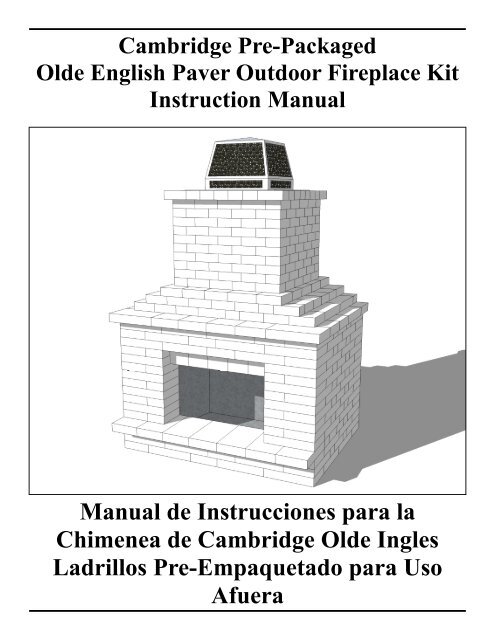
2011 10 Cambridge Pre-Packaged Olde English Paver Fireplace Kit
2011 10 Cambridge Pre-Packaged Olde English Paver Fireplace Kit
2011 10 Cambridge Pre-Packaged Olde English Paver Fireplace Kit

Create successful ePaper yourself
Turn your PDF publications into a flip-book with our unique Google optimized e-Paper software.
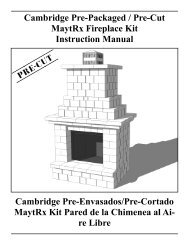
Layer Reference Guide:<strong>Cambridge</strong> <strong>Pre</strong>-<strong>Packaged</strong><strong>Olde</strong> <strong>English</strong> <strong>Paver</strong> <strong>Fireplace</strong> <strong>Kit</strong><strong>2011</strong>Guía de Referencia:32313029282726252423222120191817161514131211<strong>10</strong>98Finished 7Grade6543212 3/4” Above Top of FoundationFoundation Layer1
<strong>Cambridge</strong> <strong>Pre</strong>-<strong>Packaged</strong><strong>Olde</strong> <strong>English</strong> <strong>Paver</strong> <strong>Fireplace</strong> <strong>Kit</strong><strong>2011</strong>Chimenea de <strong>Cambridge</strong>:Esta unidad es capaz de quemar el gas natural, el propano y la madera. Si el propano o el gas natural esel método preferido de quema, busque a un plomero profesional autorizado antes de construcción. También,si usa el propano o el gas natural, un golpe de gracia está situado de cualquier lado de la unidadpara facilitar la instalación de tubos de gas. Toda la tubería y golpes de gracia deben ser terminadosantes de instalar bloques alrededor de la unidad pues la unidad llegará a ser inaccesible cuando se terminala construcción.Herramienta requerida para la instalacion delkit:Anteojos de seguridadProtecci n auditivaMáscara de polvoGuantesPalas (& de excavaci n; Plano) Cortadores delmetal (para congregar en los cubos)Martillo del mas n (que salta el & Martillo)Rastrillo de piedraPis n (mano o mecánicos)CarretillaNivel (2’ y 6’ recomendado)Cuadrado de la velocidadCalafatee el arma <strong>10</strong>oz. o 28oz. (depende encendidose compra qué pegamento del tamaño)Mazo de goma14” Sierra de versi n parcial de programa considercon la lámina del diamanteCinta métricaDispositivo de la marca (lápiz, piedra del jab n,etc.)Línea de tizaEscoba de la manoHerramientas concretas (paletas y flotadores)Escala o andamio de 6Ft según su company’sestado, y de la política de seguridad de OSHA;Taladro y 1/16” pedacito5/16” Aprietatuerca7 1/4” Sierra Circular con la lámina de madera4” Amoladora eléctrica4” Amoladora de la taza del diamanteArtículos Incluidos en el <strong>Kit</strong> de Chimenea:1-Lennox de acero inoxidable de chimenea conmanual de instrucciones1-4 pies chimenea enfriado por aire1-Polvo Negro tapa de terminación de cubierta1-Galvanizado intermitente para la tapa de la chimeneacompleta2-Dinteles de hormigón armado de 48”x4”x 6”4-Dinteles de hormigón armado de 32”x4”x 6”3-Hoja plástico de calza para nivelar dinteles o bloquearcuando sea necesario6-6”x 6” Granito pulido importado3-Cubos de <strong>Olde</strong> Inglés ladrillos1-Manual de instalación para la plataforma de concretoy ladrillos <strong>Olde</strong> InglésMaterial Necesario:¾” piedra limpia (aprox. 1 tonelada)Concreto (aprox. 17 bolsas de 80 libras)<strong>Cambridge</strong> adhesivo (aprox. 6-29 oz. o 17-<strong>10</strong>.3 oz.tubos)(4 piezas) de 2”x 4” x 8’de madera2 ½” tornillos para madera½” barra de refuerzo (aprox. 14’)Silicona para el flasheo*Las horas de trabajo estimadas para la construccionde la chimenea seran 5 a 8 horas con (2, 3, o 4)hombres con experiencia mederada.3
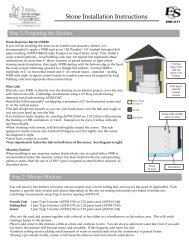
<strong>Cambridge</strong> <strong>Pre</strong>-<strong>Packaged</strong><strong>Olde</strong> <strong>English</strong> <strong>Paver</strong> <strong>Fireplace</strong> <strong>Kit</strong><strong>2011</strong><strong>Fireplace</strong> Concrete Pad Construction:Call 811 for information on underground utility marking. Select desired location and excavate 52” L x65 3/4” W x 12 3/4” D area for concrete pad. Fill excavated area with approximately 6” of ¾” cleangravel, compacting every 3”. Frame remaining 4” with 2” x 4” lumber to create a level pad. (Be sure 2”x 4” wood frame is perfectly level, front to back and side to side) See attached drawing for details ofsteel reinforcement rod placement. Fill 2” x 4” wood frame with a 4,000 psi strong concrete mix.*Allow pad to cure for minimum of 48 hours.*Note: (Wood Box Additions) If you are going to add fire wood box extensions, either a single unit or aset, it will be necessary to construct an additional concrete pad for each unit added.Construccion concreta del cojín de la chimenea:Llamada 811 para la información sobre la marca para uso general subterráneo. Seleccione deseó la local-izacióny excavan 52” L x 65 3/4” W x 12 3/4” D áreas para el cojín concreto. Instale cuatro 8” tubosconcretos del diámetro a la helada-línea según código local. Llene el área excavada de aproximadamente6” de ¾” grava limpia, compactando cada 3”. Capítulo 4” restantes con madera de construcciónde 2” x 4” para crear un cojín nivel. (Sea sure el marco de madera 2” x 4” es perfectamente nivel, frenteha atrás y lado a lado) vea el dibujo atado para los detalles de la colocación de acero de la barra del refuerzo.Llene el marco de madera de los tubos concretos y de 2” x 4” de una mezcla de hormigón fuertede 4,000 PSI.*Permita que el cojín cure para el mínimo de 48 horas.*Note: (Adiciones para la caja de lena) Si usted va a agregar las extensiones de madera de la caja delfuego, una sola unidad o un sistema será necesario construir los cojines concretos adicionales para cadaunidad agregada.4
<strong>Cambridge</strong> <strong>Pre</strong>-<strong>Packaged</strong><strong>Olde</strong> <strong>English</strong> <strong>Paver</strong> <strong>Fireplace</strong> <strong>Kit</strong><strong>2011</strong><strong>Fireplace</strong> Concrete Pad Detail-Cross Section Drawing /Concreta del cojín de lachimenea detail-Dibujo Seccionado TransversalmenteA B C4”<strong>10</strong>”6”A. 1/2” steel reinforcing rod / Barra de refuerzo de 1/2”B. 4” concrete slab / Bloque de cemento de 4”C. 6” of ¾ clean stone / 6” de ¾ grave limpiaTop View-Footing Detail / Vision Superior-Detaile De Pie52”65 3/4”5
<strong>Cambridge</strong> <strong>Pre</strong>-<strong>Packaged</strong><strong>Olde</strong> <strong>English</strong> <strong>Paver</strong> <strong>Fireplace</strong> <strong>Kit</strong>Stones Included In The <strong>Kit</strong>:<strong>2011</strong>48” Lintel (1 Piece)40” Lintel (1 Piece)4”x4”32” Lintel (4 Pieces) 4”x4” Cut Stone (1 Piece)Large (157 Pieces) Large to remove 3 ½” x 5 ½” (2 Pieces) Large to remove 3” x 8” (2 Pieces)6
<strong>Cambridge</strong> <strong>Pre</strong>-<strong>Packaged</strong><strong>Olde</strong> <strong>English</strong> <strong>Paver</strong> <strong>Fireplace</strong> <strong>Kit</strong><strong>2011</strong>5 1/2”x4 1/4” Small (2 Pieces) Small to remove 1”x1 1/2” (1 Piece) 1 1/2”x6 13/16”Small (1 Piece)8 1/4”x5 1/2” Medium (7 Pieces) Cut Medium to remove 1 1/2”x1 1/2” (2 Pieces) Small (247 Pieces)8 1/4”x8 1/4” Large (1 Piece) Medium (82 Pieces) 6 3/4”x6 3/4” Medium (1 Pieces)Large to remove 3”x4” (1 Piece) Large to remove 3”x3” (1 Piece) 8 13/16”x8 13/16” Large (2 Pieces)7
<strong>Cambridge</strong> <strong>Pre</strong>-<strong>Packaged</strong><strong>Olde</strong> <strong>English</strong> <strong>Paver</strong> <strong>Fireplace</strong> <strong>Kit</strong><strong>2011</strong>Layer 1:Piece Count = (2) Small, (11) Medium, (16) LargeMark a line 4” in on all sides on the concrete padto mark the outside perimeter of the fireplace.Apply concrete adhesive and install per photo.Capa 1:Numero de piezas = (2) Pequeño, (11) Mediano,(16) GrandeMarque una línea 4” de todo los lados del cojín deconcreto a marca el perímetro exterior de la chimenea.Aplique el pegamento concreto e instálelo por lafoto.8
<strong>Cambridge</strong> <strong>Pre</strong>-<strong>Packaged</strong><strong>Olde</strong> <strong>English</strong> <strong>Paver</strong> <strong>Fireplace</strong> <strong>Kit</strong><strong>2011</strong>Layer 1-A:Firebox Placement: Install firebox unit 8 ¼”from the front of layer 1 and 9” in on the leftand right side. Attach 4ft air-cooled chimney permanufactures instructions enclosed in the firebox.Capa 1-A:Colocacion de la caja de fuegos:Instale el unidad de la caja de fuegos 8 ¼” de ladel frente de la capa 1 y 9” adentro en ladoizquierdo y derecho. Ate la chimenea refrigeradade 4 pies por fabrica la instruccion.9
<strong>Cambridge</strong> <strong>Pre</strong>-<strong>Packaged</strong><strong>Olde</strong> <strong>English</strong> <strong>Paver</strong> <strong>Fireplace</strong> <strong>Kit</strong><strong>2011</strong>Layer 1-B:Remove firebox top support with a Phillipsscrewdriver. Take the 8 screws out removing thefirebox top face support. This will not be neededfor the install. See photo for details.Capa 1-B:Quite la ayuda de tapa del lugar de la caja de fuegoscon un destornillador de Philips. Tome los 8tornillos hacia fuera que quitan la caja de fuegosayuda de cara superior. Esto no será necesariopara la instalaci n. Vea la foto para los detalles.<strong>10</strong>
<strong>Cambridge</strong> <strong>Pre</strong>-<strong>Packaged</strong><strong>Olde</strong> <strong>English</strong> <strong>Paver</strong> <strong>Fireplace</strong> <strong>Kit</strong><strong>2011</strong>Layer 2:Piece Count = (2) Small, (3) Medium, (<strong>10</strong>) LargeApply concrete adhesive and install per photo.Capa 2:Numero de piezas = (2) Pequeño, (3) Mediano,(<strong>10</strong>) GrandeAplique el pegamento concreto e instálelo por lafoto.11
<strong>Cambridge</strong> <strong>Pre</strong>-<strong>Packaged</strong><strong>Olde</strong> <strong>English</strong> <strong>Paver</strong> <strong>Fireplace</strong> <strong>Kit</strong><strong>2011</strong>Layer 3:Piece Count = (2) Small, (3) Medium, (<strong>10</strong>) LargeApply concrete adhesive and install per photo.Capa 3:Numero de piezas = (2) Pequeño, (3) Mediano,(<strong>10</strong>) GrandeAplique el pegamento concreto e instálelo por lafoto.12
<strong>Cambridge</strong> <strong>Pre</strong>-<strong>Packaged</strong><strong>Olde</strong> <strong>English</strong> <strong>Paver</strong> <strong>Fireplace</strong> <strong>Kit</strong><strong>2011</strong>Layer 4: Hearth LayerPiece Count = (2) Small, (3) Medium, (13) LargeHearth will overhang 5 ¾” past layer 3 in thefront of the fireplace.Apply concrete adhesive and install per photo.Capa 4: Capa del HogarNumero de piezas = (2) Pequeño, (3) Mediano, (13)GrandeEl hogar sobresaldrá por capa 3 del pasado de 5¾” en el frente de la chimenea.Aplique el pegamento concreto e instálelo por lafoto.13
<strong>Cambridge</strong> <strong>Pre</strong>-<strong>Packaged</strong><strong>Olde</strong> <strong>English</strong> <strong>Paver</strong> <strong>Fireplace</strong> <strong>Kit</strong><strong>2011</strong>Layer 5:Piece Count = (2) Small, (3) Medium, (8) LargeCut(1) Medium 8 ¼” x 5 ½”Apply concrete adhesive and install per photo.Capa 5:Numero de piezas = (2) Pequeño, (3) Mediano, (8)GrandeCorte (1) Mediano 8 ¼” x 5 ½”Aplique el pegamento concreto e instálelo por lafoto.14
<strong>Cambridge</strong> <strong>Pre</strong>-<strong>Packaged</strong><strong>Olde</strong> <strong>English</strong> <strong>Paver</strong> <strong>Fireplace</strong> <strong>Kit</strong><strong>2011</strong>5 1/2”Layer 6:Piece Count = (2) Small, (3) Medium, (8) LargeCut , (1) Medium 8 ¼” x 5 ½”Apply concrete adhesive and install per photo.Capa 6:Numero de Piezas = (2) Pequeño, (3) Mediano,(8) Grande Corte, (1) Mediano 8 ¼” x 5 ½”Aplique el pegamento concreto e instálelo por lafoto.15
<strong>Cambridge</strong> <strong>Pre</strong>-<strong>Packaged</strong><strong>Olde</strong> <strong>English</strong> <strong>Paver</strong> <strong>Fireplace</strong> <strong>Kit</strong><strong>2011</strong>Layer 7:Piece Count = (2) Small, (3) Medium, (8) LargeCut(1) Medium 8 ¼” x 5 ½”Apply concrete adhesive and install per photo.Capa 7:Numero de piezas = (2) Pequeño, (3) Mediano,(8) GrandeCorte (1) Mediano 8 ¼” x 5 ½”Aplique el pegamento concreto e instálelo por lafoto.16
<strong>Cambridge</strong> <strong>Pre</strong>-<strong>Packaged</strong><strong>Olde</strong> <strong>English</strong> <strong>Paver</strong> <strong>Fireplace</strong> <strong>Kit</strong><strong>2011</strong>Layer 8:Piece Count = (2) Small, (3) Medium, (8) LargeCut(1) Medium 8 ¼” x 5 ½”Apply concrete adhesive and install per photo.Capa 8:Numero de piezas = (2) Pequeño, (3) Mediano, (8)GrandeCorte (1) Mediano 8 ¼” x 5 ½”Aplique el pegamento concreto e instálelo por lafoto.17
<strong>Cambridge</strong> <strong>Pre</strong>-<strong>Packaged</strong><strong>Olde</strong> <strong>English</strong> <strong>Paver</strong> <strong>Fireplace</strong> <strong>Kit</strong><strong>2011</strong>Layer 9:Piece Count = (2) Small, (3) Medium, (8) LargeCut(1) Medium 8 ¼” x 5 ½”Apply concrete adhesive and install per photo.Capa 9:Numero de piezas = (2) Pequeño, (3) Mediano,(8) GrandeCorte (1) Mediano 8 ¼” x 5 ½”Aplique el pegamento concreto e instálelo por lafoto.18
<strong>Cambridge</strong> <strong>Pre</strong>-<strong>Packaged</strong><strong>Olde</strong> <strong>English</strong> <strong>Paver</strong> <strong>Fireplace</strong> <strong>Kit</strong><strong>2011</strong>Layer <strong>10</strong>:Piece Count = (2) Small, (3) Medium, (8) LargeCut (1) Medium 8 ¼” x 5 ½”Apply concrete adhesive and install per photo.Capa <strong>10</strong>:Numero de piezas = (2) Pequeño, (3) Mediano,(8) GrandeCorte (1) Mediano 8 ¼” x 5 ½”Aplique el pegamento concreto e instálelo por lafoto.19
<strong>Cambridge</strong> <strong>Pre</strong>-<strong>Packaged</strong><strong>Olde</strong> <strong>English</strong> <strong>Paver</strong> <strong>Fireplace</strong> <strong>Kit</strong><strong>2011</strong>Layer 11:Piece Count = (2) Small, (3) Medium, (8) LargeCut (1) Medium 8 ¼” x 5 ½”Apply concrete adhesive and install per photoCapa 11:Numero de piezas = (2) Pequeño, (3) Mediano,(8) GrandeCorte (1) Mediano 8 ¼” x 5 ½”Aplique el pegamento concreto e instálelo por lafoto.20
<strong>Cambridge</strong> <strong>Pre</strong>-<strong>Packaged</strong><strong>Olde</strong> <strong>English</strong> <strong>Paver</strong> <strong>Fireplace</strong> <strong>Kit</strong><strong>2011</strong>Layer 11-A: Lintel PlacementCut (1) 48” lintel down in size to 40”Install lintel 9” from left and right side &4 ¼” from front.Apply concrete adhesive and install per photo.Capa 11-A: Colocacion del DintelCorte (1) 48” dintel ha 40”Instale el dintel 9” de lado izquierdo y derecho &4 ¼” del frente.Aplique el pegamento concreto e instálelo por lafoto.21
<strong>Cambridge</strong> <strong>Pre</strong>-<strong>Packaged</strong><strong>Olde</strong> <strong>English</strong> <strong>Paver</strong> <strong>Fireplace</strong> <strong>Kit</strong><strong>2011</strong>Layer 12:Piece Count = (3) Small, (2) Medium, (8) LargeCut (1) Small 4 ¼” x 5 ½”Cut (1) Large to remove a corner piece that is3 ½” x 5 ½”Apply concrete adhesive and install per photo.Capa 12:Numero de piezas = (3) Pequeño, (2) Mediano, (8)GrandeCorte (1) Pequeño 4 ¼” x 5 ½”Corte (1) Grande para quitar un pedazo de la esquinaque sea 3 ½”x 5 ½”Aplique el pegamento concreto e instálelo por lafoto.22
<strong>Cambridge</strong> <strong>Pre</strong>-<strong>Packaged</strong><strong>Olde</strong> <strong>English</strong> <strong>Paver</strong> <strong>Fireplace</strong> <strong>Kit</strong><strong>2011</strong>Layer 13:Piece Count = (3) Small, (2) Medium, (8) LargeCut (1) Small 4 ¼” x 5 ½”Cut (1) Large to remove a corner piece that is3 ½” x 5 ½”.Apply concrete adhesive and install per photo.Capa 13:Numero de piezas = (3) Pequeño, (2) Mediano,(8) GrandeCorte (1) Pequeño 4 ¼” x 5 ½”Corte (1) Grande para quitar un pedazo de la esquinaque sea 3 ½”x 5 ½”Aplique el pegamento concreto e instálelo por lafoto.23
<strong>Cambridge</strong> <strong>Pre</strong>-<strong>Packaged</strong><strong>Olde</strong> <strong>English</strong> <strong>Paver</strong> <strong>Fireplace</strong> <strong>Kit</strong><strong>2011</strong>Layer 14:Piece Count = (2) Small, (2) Medium, (11) LargeCut (1) Large to 8 1/4”x 8 1/4”Apply concrete adhesive and install per photo.Capa 14:Numero de piezas = (2) Pequeño, (2) Mediano, (11)GrandeCorte (1) Grande 8 1/4”x 8 1/4”24Aplique el pegamento concreto e instálelo por lafoto.
<strong>Cambridge</strong> <strong>Pre</strong>-<strong>Packaged</strong><strong>Olde</strong> <strong>English</strong> <strong>Paver</strong> <strong>Fireplace</strong> <strong>Kit</strong><strong>2011</strong>Layer 15:Piece Count = (2) Small, (3) Medium, (<strong>10</strong>) LargeApply concrete adhesive and install per photo.Capa 15:Numero de piezas = (2) Pequeño, (3) Mediano, (<strong>10</strong>)GrandeAplique el pegamento concreto e instálelo por lafoto.25
<strong>Cambridge</strong> <strong>Pre</strong>-<strong>Packaged</strong><strong>Olde</strong> <strong>English</strong> <strong>Paver</strong> <strong>Fireplace</strong> <strong>Kit</strong><strong>2011</strong>4 3/4”4 3/4”Layer 15-A: Lintel PlacementInstall (1) 48” lintel – 4 ¾” in front and rightsides and 11” in from front face. See photo details.Apply concrete adhesive and install per photo.Capa 15-A: Curso del DintelInstale (1) 48” dintel - 4 ¾” en derechos delanterosy 11” adentro de cara delantera.Vea los detalles de la foto.Aplique el pegamento concreto e instálelo por lafoto.26
<strong>Cambridge</strong> <strong>Pre</strong>-<strong>Packaged</strong><strong>Olde</strong> <strong>English</strong> <strong>Paver</strong> <strong>Fireplace</strong> <strong>Kit</strong><strong>2011</strong>3”x 4” Notchremoved fromLarge1 1/2”x 1” cornerremoved fromSmall4”3”3”3”x 3” cornerremoved fromLargeLayer 16:Piece Count = (2) Small, (3) Medium, (<strong>10</strong>) LargeCut (1) Small piece to remove a 1 ½” x 1” piecefrom a corner.Cut (1) Large piece to remove a 3” x 4” notchedpiece.Cut (1) Large piece to remove a 3” x 3” corner.Apply concrete adhesive and install per photo.27Capa 16:Numero de piezas = (2) Pequeño, (3) Mediano,(<strong>10</strong>) GrandeCorte (1) Pequeño pedazo para quitar un 1 ½ ” x1” pedazo dede una esquina.Corte (1) Pedazo grande para quitar un pedazohecho muescas en de 3” x 4”.Corte (1) Pedazo grande para quitar una esquinade 3” x 3”.Aplique el pegamento concreto e instálelo por lafoto.
<strong>Cambridge</strong> <strong>Pre</strong>-<strong>Packaged</strong><strong>Olde</strong> <strong>English</strong> <strong>Paver</strong> <strong>Fireplace</strong> <strong>Kit</strong><strong>2011</strong>Cut Large to 8 1/4”x8 1/4”8 1/4”8 1/4”Cut Large to 8 1/4”x8 1/4”8 1/4”8 1/4”1 1/2”x 1 1/2” cornerremoved from Medium3”x 8” corner removedfrom LargeLayer 17:Piece Count = (4) Medium, (14) LargeCaution: On the front of the fireplace, overhangingstones will not be able to support themselvesand will require added weight from thenext layer (#18) to hold it in place. Temporarystones can be laid on top of the overhangingstones until the next layer is permanently installed.Cut (1) Medium piece to remove a 1 ½” x 1 ½”piece from a corner.Cut (2) Large pieces to be 8 1/4” x 8 1/4”.Cut (2) Large pieces to remove a 3” x 8” piecefrom a corner.Install 1 ½” over-hang on left and right sides and2 ¾” in front. Back will be flush.Apply concrete adhesive and install per photo.28Capa 17:Numero de Piezas = (4) Mediano, (14) Grande<strong>Pre</strong>cauci n: En el frente de la chimenea las piedrassobresalientes no podrán apoyarse y re-queriránagregaron el peso de la capa siguiente (#18) parallevarla a cabo en el lugar. Las piedras temporalesse pueden poner encima de unidades colgantes excesivashasta que la capa siguiente esté instaladapermanentemente.Corte (1) Pedazo mediano para quitar un 1 ½” x1½” pedazo de una esquina.Corte (2) Pedazos grandes para ser 8 13/16” x 813/16”.Corte (2) Pedazos grandes para quitar un pedazode 3” x 8” de una esquina.Instale 1 ½” proyección en lados izquierdos yderechos y 2 ¾” en frente. La parte posterior serárasante.Aplique el pegamento concreto e instálelo por lafoto.
<strong>Cambridge</strong> <strong>Pre</strong>-<strong>Packaged</strong><strong>Olde</strong> <strong>English</strong> <strong>Paver</strong> <strong>Fireplace</strong> <strong>Kit</strong><strong>2011</strong>Layer 17-A: Lintel PlacementInstall (4) 32” lintels 13” from the left andright side 4” from the back.Apply concrete adhesive and install per photo.Capa 17-A: Colocacion del DintelInstale (4) 32” dinteles 13” el lado izquierdo ydel derecho 4” de la parte posterior.Aplique el pegamento concreto e instálelo por lafoto.29
<strong>Cambridge</strong> <strong>Pre</strong>-<strong>Packaged</strong><strong>Olde</strong> <strong>English</strong> <strong>Paver</strong> <strong>Fireplace</strong> <strong>Kit</strong><strong>2011</strong>Layer 18:Piece Count = (12) Small, (4) Medium, (4) LargeInstall 3 ½” step-in on left and right side and 7”step-in on front. Back is flush.Apply concrete adhesive and install per photo.Capa 18:Numero de piezas = (12) Pequeño, (4) Mediano, (4)GrandeInstale 3 ½” paso en lados izquierdos y derechosy7” paso en frente. La parte posterior es rasante.Aplique el pegamento concreto e instálelo por lafoto.30
<strong>Cambridge</strong> <strong>Pre</strong>-<strong>Packaged</strong><strong>Olde</strong> <strong>English</strong> <strong>Paver</strong> <strong>Fireplace</strong> <strong>Kit</strong><strong>2011</strong>Layer 19:Piece Count = (<strong>10</strong>) Small, (11) MediumCut (1) Small piece to create a 4” x 4” piece.Cut (1) Medium to create a 6 ¾” x 6 ¾” piece.Install 4” step-in on left and right sides. Frontand back are flush.Apply concrete adhesive and install per photo.Capa 19:Numero de piezas = (<strong>10</strong>) Pequeño, (11) MedianoCorte (1) Pequeño pedazo para crear un pedazode 4” x 4”.Corte (1) Medio para crear un 6 ¾” x 6 ¾”pedazo .Instale 4” paso en lados izquierdos y derechos. Elfrente y la parte posterior son rasantes.31Aplique el pegamento concreto e instálelo por lafoto.
<strong>Cambridge</strong> <strong>Pre</strong>-<strong>Packaged</strong><strong>Olde</strong> <strong>English</strong> <strong>Paver</strong> <strong>Fireplace</strong> <strong>Kit</strong><strong>2011</strong>Layer 20:Piece Count = (16) MediumInstall 4 ½” step-in on left and right sides.Front and back are flush.Apply concrete adhesive and install per photo.Capa 20:Numero de piezas = (16) MedianoInstale el 4 ½” paso en lados izquierdos y derechos.El frente y la parte posterior son rasantes.Aplique el pegamento con-creto e instálelo por lafoto.32
<strong>Cambridge</strong> <strong>Pre</strong>-<strong>Packaged</strong><strong>Olde</strong> <strong>English</strong> <strong>Paver</strong> <strong>Fireplace</strong> <strong>Kit</strong><strong>2011</strong>Layer 21:Piece Count = (16) SmallInstall 2” step-in on left and right sides and 4”step-in on front and back.Apply concrete adhesive and install per photo.Capa 21:Numero de piezas = (16) PequeñaInstale 2” paso en lados izquierdos y derechos y 4”paso en frente y detrás.Aplique el pegamento concreto e instálelo por lafoto.33
<strong>Cambridge</strong> <strong>Pre</strong>-<strong>Packaged</strong><strong>Olde</strong> <strong>English</strong> <strong>Paver</strong> <strong>Fireplace</strong> <strong>Kit</strong><strong>2011</strong>Layer 22:Piece Count = (16) SmallApply concrete adhesive and install per photo.Capa 22:Numero de piezas = (16) PequeñaAplique el pegamento concreto e instálelo por lafoto.34
<strong>Cambridge</strong> <strong>Pre</strong>-<strong>Packaged</strong><strong>Olde</strong> <strong>English</strong> <strong>Paver</strong> <strong>Fireplace</strong> <strong>Kit</strong><strong>2011</strong>Layer 23:Piece Count = (16) SmallApply concrete adhesive and install per photo.Capa 23:Numero de piezas = (16) PequeñoAplique el pegamento concreto e instálelo por lafoto.35
<strong>Cambridge</strong> <strong>Pre</strong>-<strong>Packaged</strong><strong>Olde</strong> <strong>English</strong> <strong>Paver</strong> <strong>Fireplace</strong> <strong>Kit</strong><strong>2011</strong>Layer 24:Piece Count = (16) SmallApply concrete adhesive and install per photo.Capa 24:Numero de piezas = (16) PequeñoAplique el pegamento concreto e instálelo por lafoto.36
<strong>Cambridge</strong> <strong>Pre</strong>-<strong>Packaged</strong><strong>Olde</strong> <strong>English</strong> <strong>Paver</strong> <strong>Fireplace</strong> <strong>Kit</strong><strong>2011</strong>Layer 25:Piece Count = (16) SmallApply concrete adhesive and install per photo.Capa 25:Numero de piezas = (16) PequeñoAplique el pegamento concreto e instálelo por lafoto.37
<strong>Cambridge</strong> <strong>Pre</strong>-<strong>Packaged</strong><strong>Olde</strong> <strong>English</strong> <strong>Paver</strong> <strong>Fireplace</strong> <strong>Kit</strong><strong>2011</strong>Layer 26:Piece Count = (16) SmallApply concrete adhesive and install per photo.Capa 26:Numero de piezas = (16) PequeñoAplique el pegamento concreto e instálelo por lafoto.38
<strong>Cambridge</strong> <strong>Pre</strong>-<strong>Packaged</strong><strong>Olde</strong> <strong>English</strong> <strong>Paver</strong> <strong>Fireplace</strong> <strong>Kit</strong><strong>2011</strong>Layer 27:Piece Count = (16) SmallApply concrete adhesive and install per photo.Capa 27:Numero de piezas = (16) PequeñoAplique el pegamento concreto e instálelo por lafoto.39
<strong>Cambridge</strong> <strong>Pre</strong>-<strong>Packaged</strong><strong>Olde</strong> <strong>English</strong> <strong>Paver</strong> <strong>Fireplace</strong> <strong>Kit</strong><strong>2011</strong>Layer 28:Piece Count = (16) SmallApply concrete adhesive and install per photo.Capa 28:Numero de piezas = (16) PequeñoAplique el pegamento concreto e instálelo por lafoto.40
<strong>Cambridge</strong> <strong>Pre</strong>-<strong>Packaged</strong><strong>Olde</strong> <strong>English</strong> <strong>Paver</strong> <strong>Fireplace</strong> <strong>Kit</strong><strong>2011</strong>Layer 29:Piece Count = (16) SmallApply concrete adhesive and install per photo.Capa 29:Numero de piezas = (16) PequeñoAplique el pegamento concreto e instálelo por lafoto.41
<strong>Cambridge</strong> <strong>Pre</strong>-<strong>Packaged</strong><strong>Olde</strong> <strong>English</strong> <strong>Paver</strong> <strong>Fireplace</strong> <strong>Kit</strong><strong>2011</strong>Layer 30:Piece Count = (16) SmallApply concrete adhesive and install per photo.Capa 30:Numero de piezas = (16) PequeñoAplique el pegamento concreto e instálelo por lafoto.42
<strong>Cambridge</strong> <strong>Pre</strong>-<strong>Packaged</strong><strong>Olde</strong> <strong>English</strong> <strong>Paver</strong> <strong>Fireplace</strong> <strong>Kit</strong><strong>2011</strong>Layer 31:Piece Count = (28) SmallCut (1) Small piece to 1 ½” x 6 13/16”.Install a 1 1/4” overhang on left and right side2” overhang on front and back.Apply concrete adhesive and install per photo.Capa 31:Numero de piezas = (28) PequeñoCorte (1) Pequeño pedazo a 1 ½” x 6 13/16”.Instale una 1 1/4”proyeccion de lado izquierdo yderecho y una 2” proyeccion de frente y detrás.Aplique el pegamento concreto e instálelo por lafoto.43
<strong>Cambridge</strong> <strong>Pre</strong>-<strong>Packaged</strong><strong>Olde</strong> <strong>English</strong> <strong>Paver</strong> <strong>Fireplace</strong> <strong>Kit</strong><strong>2011</strong>Chase Flashing • El destellar de la persecuciónChase flashing with collar facing up.Persecucion que destella con el revestimiento del collar para arriba.44
<strong>Cambridge</strong> <strong>Pre</strong>-<strong>Packaged</strong><strong>Olde</strong> <strong>English</strong> <strong>Paver</strong> <strong>Fireplace</strong> <strong>Kit</strong><strong>2011</strong>Layer 32:Once the chimney has been centered, take thechase flashing with the collar up and slide itonto the termination cap sleeve until it is flushwith the bottom of the termination cap. (SeePhoto Bottom Left) See picture detail of howthe termination cap chase flashing and chimneysection should line up inside the blockchimney cavity. (See Photo Bottom Right)Take the entire assembly to the top of the fireplacechimney, carefully slide the terminationcap sleeve into the chimney section while rotatingleft to right so the sections line up andsleeve together.Capa 32:Una vez que se ha centrado la chimenea tome lapersecuci n que destella con el collar para arribay deslícela encendido hacia la manga del casquillode la terminacion hasta que sea rasante con laparte inferior del casquillo de la terminaci n.(Véase la foto inferior) Represente el detalle de cmo el destellar de la persecucion del casquillo dela terminacion y la seccion de la chimenea debenalinearse dentro de la cavidad de la chimenea delbloque. (Véase la foto abajo a la derecha) Lleve ala asamblea entera a la tapa de la chimenea, resbalecuidadosamente la manga del casquillo de laterminacion dentro de la secci n de la chimeneamientras que la rotaci n de izquierda a derecha lassecciones se alinea y envuelve tan junta.45
<strong>Cambridge</strong> <strong>Pre</strong>-<strong>Packaged</strong><strong>Olde</strong> <strong>English</strong> <strong>Paver</strong> <strong>Fireplace</strong> <strong>Kit</strong><strong>2011</strong>Once you have the termination cap sleeved into the chimney section, you can apply silicone between thefinal layer of block and the chase flashing to prevent any water or foreign material from entering chimneycavity. Locate the pre-drilled holes in the termination cap. Then drill into both sides of the chaseflashing. Install sheet metal screws and screw in cap. Do the same on the opposite side.**The first time you go to use your fireplace light a small fire for the first 8 hours of use soyou properly season the inner fire lining of your fire box.Una vez que usted tiene el casquillo de la terminacion envuelto en la secci n de la chimenea, usted puedeaplicar el silicón entre la capa final de bloque y la persecucion que destella para prevenir cu-alquier aguao material extranjero de la cavidad de la chimenea que entra. Localice los agujeros pretaladrados en casquillode la terminacion. Entonces perfore en ambos lados de destellar de la persecuci n. Instale los tornillosy el tornillo de metal de hoja en casquillo. Haga iguales en lado opuesto.** La primera vez que usted va a utilizar su luz de la chimenea un pequeño fuego para lasprimeras 8 horas de uso que usted sazona tan correctamente la guarnicion interna delfuego de su caja del fuego.46
<strong>Cambridge</strong> <strong>Pre</strong>-<strong>Packaged</strong><strong>Olde</strong> <strong>English</strong> <strong>Paver</strong> <strong>Fireplace</strong> <strong>Kit</strong><strong>2011</strong>Facing Lintel with Granite Tile:In your fireplace kit you willfind 5 pieces of 6” x 6” granitetile. The granite tile is to be appliedto the face of the concretelintel (polished side facing out)at the top of the fire box usingconcrete adhesive. (Make sureyou use a retaining wall adhesivethat will not be affected bythe heat from the fire box.)Dintel del Revestimiento con elAzulejo de Granite:En su kit de la chimenea usted encontrará5 pedazos de azulejo del granito6” x 6”. El azulejo del granito debeser aplicado a la cara del dintel concreto,(revestimiento lateral pulidohacia fuera) en la tapa de la caja delfuego usando el pegamento concreto.(Segura se de que usted utilice unpegamento del muro de contencionque no sea afectado por el calor de lacaja del fuego.)Apply concrete adhesive as per the manufacturer’s directions. Be careful not to put on toomuch adhesive so it does not migrate between the tile joints. Firmly press all tiles in position.It will be necessary to brace up the bottom of the tile to prevent it from moving while the adhesiveis curing.(Please refer to the figure below.)Aplique el pegamento concreto según las direcciones de los fabricantes. Tenga cuidado de noponer demasiado pegamento para no hacer que emigre entre los empalmes del azulejo. <strong>Pre</strong>sionefirmemente todos los azulejos en la posicion. Será necesario apoyar encima de la parteinferior del azulejo para evitar que se mueva mientras que el pegamento está curando.(Refiera por favor a la figura abajo.)47
<strong>Cambridge</strong> <strong>Pre</strong>-<strong>Packaged</strong><strong>Olde</strong> <strong>English</strong> <strong>Paver</strong> <strong>Fireplace</strong> <strong>Kit</strong><strong>2011</strong>Now that all the tiles are set, leave the bracing in place for 24 hours to allow the adhesiveproper time to cure. Wait 2 days after tile installation before making a fire in your new fireplace.The first time you go to use your fireplace light a small fire for the first 8 hours of useso you properly season the inner fire lining of your fire box.Ahora que se fijan todos los azulejos, deje apoyar en el lugar por 24 horas para dar un plazode la época apropiada adhesiva de curar. Espere 2 días después de la instalaci n del azulejoantes que tiene un fuego en su nueva chimenea. La primera vez que usted va a utilizar su luzde la chimenea un pequeño fuego por sus primeras 8 horas de uso tan usted sazona correctamenteel interno enciende la guarnicion de su caja del fuego.48
<strong>Cambridge</strong> <strong>Pre</strong>-<strong>Packaged</strong><strong>Olde</strong> <strong>English</strong> <strong>Paver</strong> <strong>Fireplace</strong> <strong>Kit</strong><strong>2011</strong>VIEWSFRONTRIGHTLEFT49BACK