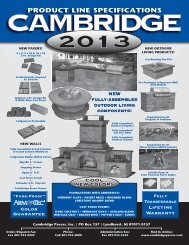

You also want an ePaper? Increase the reach of your titles
YUMPU automatically turns print PDFs into web optimized ePapers that Google loves.
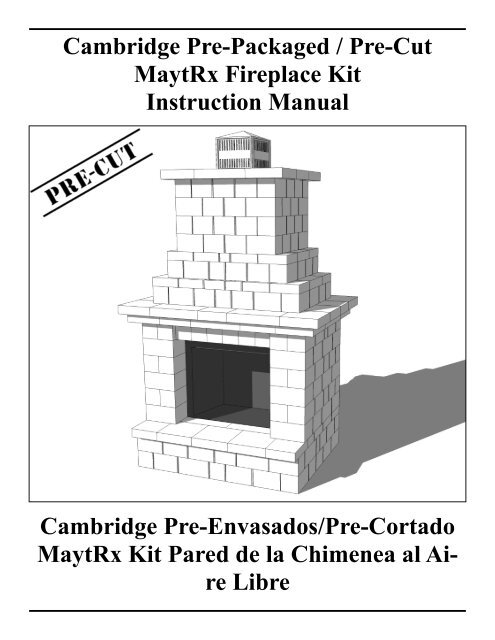
Cambridge Pre-Packaged / Pre-Cut<br />
MaytRx <strong>Fireplace</strong> Kit<br />
Instruction Manual<br />
Cambridge Pre-Envasados/Pre-Cortado<br />
MaytRx Kit Pared de la Chimenea al Aire<br />
Libre
Cambridge Pre-Packaged / Pre-Cut<br />
2011<br />
MaytRx <strong>Fireplace</strong> Kit<br />
Layer Reference Guide:<br />
Guía de Referencia:<br />
Layer 20<br />
Layer 19<br />
Layer 18<br />
Layer 17<br />
Layer 16<br />
Layer 15<br />
Layer 14<br />
Layer 13<br />
Layer 12<br />
Layer 11<br />
Layer 10<br />
Layer 9<br />
Layer 8<br />
Layer 7<br />
Layer 6<br />
Finished<br />
Grade<br />
Layer 5<br />
Layer 4<br />
Layer 3<br />
Layer 2<br />
Layer 1<br />
3” Above Top of<br />
Foundation layer<br />
6” Compacted 3/4” stone 4” Concrete slab (4000 PSI)<br />
1
Cambridge Pre-Packaged / Pre-Cut<br />
MaytRx <strong>Fireplace</strong> Kit<br />
2011<br />
Cambridge <strong>Fireplace</strong>:<br />
This unit is capable of burning natural gas, propane and wood. If either propane or natural gas is the<br />
preferred method of burning, seek a licensed professional to construction. Also, if using propane or<br />
natural gas, a knockout is located on either side of the unit to facilitate gas piping. All piping and<br />
knockouts must be completed before installing blocks around unit as the unit will become inaccessible<br />
when construction is completed.<br />
*NOTE: The Lennox <strong>Fireplace</strong> Installation Manual supplied with this kit is for a house interior installation<br />
which as per Lennox does not apply for this application except for installation of air-cooled<br />
chimney as shown in step 4.<br />
**NOTE: Air-Cooled Chimney extensions are available in 1’, 2’, & 4’ lengths. Call your Cambridge<br />
Distribu-tor for pricing and availability.<br />
Tools required for <strong>Fireplace</strong> Kit Installation:<br />
Safety Goggles<br />
Ear Protection<br />
Dust Mask<br />
Gloves<br />
Shovels (digging & flat)<br />
Metal Cutters for banding on cubes<br />
Mason Hammer (chipping, hammer)<br />
Road Stone Rake<br />
Tamper (Hand or Mechanical)<br />
Wheelbarrow<br />
(Level (2’ and 6’ recommended)<br />
Speed Square<br />
Caulk Gun 10 oz or 28 oz (depends on what size<br />
adhesive is purchased)<br />
Rubber Mallet<br />
14” Demo saw with diamond blade<br />
Tape Measure<br />
Marking Device (pencil, soap stone, etc)<br />
Chalk Line<br />
Hand Broom<br />
Concrete Tools (Trowel/Floats)<br />
6 Foot ladder or scaffold according to your company’s<br />
state, and OSHA safety policy<br />
Drill & 1/16” bit<br />
5/16” nut driver<br />
7 ¼” Circular saw with wood blade<br />
Phillips screwdriver<br />
7 ½” Electric grinder<br />
7 ½” Diamond cup grinder<br />
Material Required:<br />
¾” clean stone (approx. 1 ton)<br />
Concrete (approx. 15-80lb bags)<br />
(4) concrete tubes 8” x 36” long<br />
Concrete adhesive (approx. 6-29 oz. or 17-10.3 oz.<br />
tubes)<br />
(4) pieces of 2” x 4”x 8” lumber<br />
2 ½” wood screws<br />
½” rebar (approx. 12”)<br />
Silicone for flashing<br />
Items included in the <strong>Fireplace</strong> Kit:<br />
(1) Lennox Stainless Steel <strong>Fireplace</strong> with instruction<br />
manual*<br />
(1) Four (4) foot air-cooled chimney**<br />
(1) Galvanized flashing for top of completed fireplace<br />
(2) Reinforced concrete lintels 48 1/2” x 3 5/8” x 5<br />
7/8”<br />
(3) Plastic shim pack sheets for leveling lintels or<br />
block as needed<br />
(4) Cubes of Cambridge <strong>Maytrx</strong> Wall<br />
(1) Installation manual for concrete pad and Cambridge<br />
<strong>Maytrx</strong> Wall<br />
2
Cambridge Pre-Packaged / Pre-Cut<br />
MaytRx <strong>Fireplace</strong> Kit<br />
2011<br />
Chimenea de Cambridge:<br />
Esta unidad es capaz de quemar gas natural, propano, y la madera. Si bien el propano o el gas natural<br />
es el método preferido de la quema, buscar un profesional con licencia para la construcci n. Asimismo,<br />
si utiliza gas propano o gas natural, un golpe de gracia se encuentra a ambos lados de la unidad para<br />
facilitar la tubería de gas. Todas las tuberías y los golpes de gracia debe ser completado antes de instalar<br />
los bloques alrededor de la unidad como la unidad se convertirá en inaccesibles cuando se complete<br />
la construccion.<br />
*Note: (Adiciones para la caja para la lena) Hay que hacer cojines de concreto para cada adicione.<br />
Herramienta Requerida Para la Instalacion del<br />
Kit:<br />
Gafas de seguridad<br />
Proteccion auditiva<br />
Máscara de polvo<br />
Guantes<br />
Palas (excavacion y plano)<br />
Cortadores de Metal de bandas en los cubos<br />
Mason Hammer (astillado, martillo)<br />
Camino del rastrillo de Piedra<br />
Sabotaje (manual o mecánica)<br />
Carretilla<br />
Nivel (2’ y 6’ recomendado)<br />
Velocidad de la Plaza<br />
Pistola para calafatear 10 oz. o 28 oz. (depende<br />
de qué tamaño es comprar pegamento)<br />
Martillo de goma<br />
14” Demo sierra con disco de diamante<br />
Cinta métrica<br />
Dispositivo de marcado (lápiz, piedra jab n, etc)<br />
Línea de tiza<br />
Escoba de mano<br />
Herramientas concretas (paleta / flotadores)<br />
6 pies escalera o andamio de acuerdo al estado<br />
Taladro y 1/16” bits<br />
5/16” Tuerca conductor<br />
7 ¼” Sierra circular con hoja de madera<br />
7 1/2” Amoladora eléctrica<br />
7 1/2” Amoladora de la taza del diamante<br />
Destornillador Phillips<br />
Material Requerido:<br />
¾” Piedra limpia (aprox 1 tonelada)<br />
Concreto (aprox. 15-bolsas de 80 libras)<br />
(4) Tubos de hormigon de 8x36” de largo<br />
Cambridge concretas adhesivo (aprox. 6-29 oz. o 17-<br />
10.3 oz. Tubos)<br />
(4 piezas) de 2” x 4” x 8’ de madera<br />
2 ½” tornillos para madera<br />
½” Barra de refuerzo (aprox. 12”)<br />
Silicona para el flasheo<br />
Artículos Incluidos en el Kit de la Chimenea:<br />
1 - Lennox de acero inoxidable de chimenea con<br />
manual de instrucciones<br />
1 - 4 pies chimenea enfriado por aire<br />
1 - Polvo Negro tapa de terminaci n de cubierta<br />
1 - Galvanizado intermitente para la tapa de la chimenea<br />
completa<br />
(2) dinteles del concreto reforzado 48” x 3 5/8” x 5<br />
7/8”<br />
3 - Cuña de plástico hoja de paquete para nivelar<br />
dinteles o bloquear cuando sea necesario<br />
4- Cubos de MaytRx Pared<br />
1 - Manual de instalacion para la plataforma de concreto<br />
y MaytRx pared<br />
3
Cambridge Pre-Packaged / Pre-Cut<br />
MaytRx <strong>Fireplace</strong> Kit<br />
2011<br />
<strong>Fireplace</strong> Concrete Pad Construction<br />
Call 811 for information on underground utility marking. Select desired location and excavate<br />
68” L x 54” W x 13” D area for concrete pad. Install four 8” diameter concrete tubes to frostline<br />
as per local code. Fill excavated area with approximately 6” of ¾” clean gravel, compacting<br />
every 3”. (Do not fill concrete tubes with gravel). Frame remaining 4” with 2” x 4” lumber to<br />
create a level pad. (Be sure 2”x4” wood frame is perfectly level, front to back and side to side)<br />
See attached drawing for details of steel reinforcement rod placement. Fill concrete tubes and<br />
2” x 4” wood frame with a 4,000 psi strong concrete mix.<br />
*Allow pad to cure for minimum of 48 hours<br />
Construccion Concreta del Cojín de la Chimenea:<br />
Llame al 811 para obtener informacion sobre la utilidad de metro marcado. Seleccione la ubicaci<br />
n deseada y excavar 68” de largo x 54” W x 13” D área de plataforma de concreto. Instale<br />
cuatro 8” de diámetro de los tubos de hormigon a las heladas-line como por el codigo local.<br />
Llene la zona excavada con aproximadamente 6” de ¾” limpia grava, compactando cada 3”.<br />
(No llene los tubos de concreto con grava). Marco restantes 4”con 2” x 4”de madera para crear<br />
una plataforma de nivel. (Asegúrese de 2”x 4” marco de madera está perfectamente horizontal,<br />
de adelante hacia atrás y de lado a lado) Véanse los detalles del dibujo para la colocacion de<br />
varillas de acero de refuerzo. Relleno de concreto y tubos de 2”x 4” marco de madera con una<br />
mezcla de concreto 4000 PSI fuerte.<br />
* Deje que la almohadilla para curar por un mínimo de 48 horas.<br />
4
Cambridge Pre-Packaged / Pre-Cut<br />
MaytRx <strong>Fireplace</strong> Kit<br />
2011<br />
<strong>Fireplace</strong> Concrete Pad Detail-Cross Section Drawing:<br />
Concreta del cojin de la chimenea detail-Dibujo Transversalmente:<br />
A.1/2” steel reinforcing rod / Barra de refuerzo de acero<br />
B.4” concrete slab / Bloque de cement de<br />
C.6” of 3/4 clean stone / 6” de 3/4 grave limpia<br />
D.To frostline as per local code / al frostline segun codigo local<br />
E.8” concrete sonotubes / 8” de sonotubes de concreto<br />
Top View-Footing Detail / Vision Superior-Detaile De Pie<br />
A.8” concrete sonotubes / 8” de sonotubes de concreto<br />
54”<br />
68”<br />
5
Cambridge Pre-Packaged / Pre-Cut<br />
MaytRx <strong>Fireplace</strong> Kit<br />
Stones Included In The Kit:<br />
MaytRx 3” Stones and cuts:<br />
2011<br />
13” Cap (6 Pieces) 18” Large Cap (12 Pieces) 4.5”x12” Cut (2 Pieces) Column Hat (10 Pieces)<br />
Column Cap (14 Pieces) 6”x8” Cut Y Stone (2 Pieces) MaytRx X Stone (6 Pieces)<br />
MaytRx A Stone (5 Pieces) MaytRx Y Stone (7 Pieces) MaytRx B Stone (5 Pieces)<br />
Large Cap Cut 5”x 18”<br />
12”x14” Large Cap Cut (2 Pieces) 12”x12” Cap Cut (4 Piece) 5”x18” Large Cap Cut (2 Pieces)<br />
6
Cambridge Pre-Packaged / Pre-Cut<br />
MaytRx <strong>Fireplace</strong> Kit<br />
MaytRx 3” Stones and cuts:<br />
2011<br />
10”x12” Cut Stone (2 Pieces) 12”x10.5” Cut Stone (2 Pieces) 7”x18” Cut Stone (1 Piece)<br />
4.5”x 18” 4.5”x 12” 4.5”x 10”<br />
4.5”x18” Cut Stone (1 Piece) 4.5”x12” Cut Stone (1 Piece) 4.5”x10” Cut Stone (1 Piece)<br />
Large Cap<br />
Cut<br />
13.25”x 12”<br />
Large Cap Cut 13.25”x 12” (3 Pieces)<br />
7
Cambridge Pre-Packaged / Pre-Cut<br />
MaytRx <strong>Fireplace</strong> Kit<br />
2011<br />
6”x4”x48 1/2” Lintel (2 Pieces)<br />
MaytRx A Stone (33 Pieces) MaytRx Y Stone (46 Pieces) MaytRx B Stone (40 Pieces)<br />
MaytRx X Stone (50 Pieces) 6”x8” Cut Corner Stone (4 Pieces) 8”x12” Special Stone (6 Pieces)<br />
Corner Stone 6”x 10” (50 Pieces) 5”x10” Cut Stone (6 Pieces) 5”x8” Cut Stone (2 Pieces)<br />
10”x5” Cut Stone (2 Pieces) 5”x6” Cut Stone (2 Pieces) 2”x6” Cut Stone (2 Pieces)<br />
8
Cambridge Pre-Packaged / Pre-Cut<br />
MaytRx <strong>Fireplace</strong> Kit<br />
2011<br />
Layer 1:<br />
Piece Count = (7) A, (9) B, (3) X, (6) Y, (4) 6”x10”<br />
Corner stones, (3) 5”x 10” Cut stones, (1) 5”x 8”<br />
Cut stone<br />
Mark a line 4” in on all four sides of the concrete<br />
pad to mark the outside perimeter of fireplace.<br />
Apply concrete adhesive and install wall stones<br />
and cut stones according to the photo.<br />
Keep all lines straight and corners square.<br />
*Take note during the installation wall stones are<br />
installed with either the topside up or the bottom<br />
side up depending on their position in the build.<br />
Capa 1:<br />
Numero de Piezas = (7) A (9) B (3) X (6) Y, (4)<br />
6”x10” Esquinas, (3) 5”x 10” Piedras cortadas, (1)<br />
5”x 8” Piedra cortada<br />
Marque una línea 6” adentro en izquierdo y derecho<br />
en el cojín concreto y 7” adentro en frente y de<br />
nuevo a marca el perímetro exterior de la chimenea.<br />
Aplique el pegamento concreto e instálelo por<br />
la foto demostrada en detalle de la capa 1. Mantenga<br />
todas las líneas cuadrado recto y de las esquinas.<br />
Tome la nota durante las piedras de la<br />
pared de la instalación están instalados con la superestructura<br />
para arriba o el lado inferior para<br />
arriba dependiendo de su posición en la estructura.<br />
9
Cambridge Pre-Packaged / Pre-Cut<br />
MaytRx <strong>Fireplace</strong> Kit<br />
2011<br />
Layer 2:<br />
Piece Count = (11) A, (5) B, (6) X, (3) Y, (4)<br />
6”x10” Corner stones, (3) 5”x 10” Cut stones, (1)<br />
5”x 8” Cut stone<br />
Apply concrete adhesive and install wall stones<br />
and cut stones according to the photo.<br />
Capa 2:<br />
Numero de Piezas = (11) A (5) B (6) X (3) Y (4)<br />
6”x10” Esquinas, (3) 5”x 10” Piedras cortadas,<br />
(1) 5”x 8” Piedras cortadas<br />
Aplique el pegamento concreto e instálelo por la<br />
foto.<br />
10
Cambridge Pre-Packaged / Pre-Cut<br />
MaytRx <strong>Fireplace</strong> Kit<br />
2011<br />
Layer 2-A: Firewood box placement<br />
Install firebox unit 15” from the front of layer 2<br />
and 10” in on left and right side. Install chimney<br />
to firebox per manufacturer’s specifications.<br />
Capa 2-A: Colocación de la caja de la leña<br />
Instale la unidad 15” de la caja de fuegos del<br />
frente de la capa 2 y 10” adentro en lado izquierdo<br />
y derecho. Instale la chimenea a la caja de fuegos<br />
por las especificaciones del fabricante.<br />
11
Cambridge Pre-Packaged / Pre-Cut<br />
MaytRx <strong>Fireplace</strong> Kit<br />
2011<br />
Layer 2-B:<br />
Remove Firebox top face support with a Phillips<br />
screwdriver. Take the eight screws out removing<br />
the firebox top face support. This will not be<br />
needed for the install.<br />
Capa 2-B:<br />
Quite la ayuda de cara superior de la caja de fuegos<br />
con un destornillador Phillips. Tome los ocho<br />
tornillos hacia fuera que quitan la caja de fuegos<br />
ayuda de cara superior. Esto no será necesario<br />
para la instalación. Vea el detalle de la foto.<br />
12
Cambridge Pre-Packaged / Pre-Cut<br />
MaytRx <strong>Fireplace</strong> Kit<br />
2011<br />
13.25” X12” Large Cap Cut Stones<br />
Layer 3:<br />
Note: 3” <strong>Maytrx</strong> block and caps used on this<br />
course<br />
Piece Count = (3) A, (3) B, (2) X, (1) Y, (2) Column<br />
hats, (2) 6”x8” Cut Y stones, (2) 5”x18”<br />
Large cap cut stones, (2) Column cap stones, (3)<br />
13.25”x12” Large cap cut stones<br />
Apply concrete adhesive and install wall stones<br />
and cut stones according to the photo.<br />
Capa 3:<br />
*Por favoe Note que <strong>Maytrx</strong> 3” es usado en este<br />
curso<br />
Numero de Piezas= (3) A (3) B (2) X (1) Y (2) Sombreors<br />
de columnas, (2) 6”x8” Cortads Y piedras,<br />
(2) 5”x18” Piedras caps grandes cortadas,(2) Capas<br />
de columnas, (3) 13.25”x12” Capas grandes<br />
cortadas<br />
Aplique el pegamento concreto e instálelo por la<br />
foto.<br />
13
Cambridge Pre-Packaged / Pre-Cut<br />
MaytRx <strong>Fireplace</strong> Kit<br />
2011<br />
Start Layer 4 here: 9” in from the front face of Layer 3<br />
Layer 4:<br />
Piece Count = (3) A (4) B (2) X (1) Y (2) 6”x10”<br />
Corner stones(2) 8”x12” Special cut corners<br />
Apply concrete adhesive and install wall stones<br />
and cut stones according to the photo.<br />
Make sure the distance between the opening is<br />
36”<br />
Capa 4:<br />
Numero de Piezas = (3) A (4) B (2) X (1) Y (2)<br />
6”x10” Esquinas (2) 8”x12”Esquinas cortadas especiales<br />
Manteniendo todas las piedras llanas. Cerciórese<br />
de le para mantener los 36” abertura como se<br />
muestra.<br />
Aplique el pegamento concreto e instálelo por la<br />
foto.<br />
14
Cambridge Pre-Packaged / Pre-Cut<br />
MaytRx <strong>Fireplace</strong> Kit<br />
2011<br />
Layer 5:<br />
Piece Count = (1) A, (3) B, (4) X, (3) Y, (4) 6”x<br />
10” Corner stones, (2) 6”x8” Cut corner stone<br />
Apply concrete adhesive and install wall stones<br />
and cut stones according to the photo.<br />
Capa 5:<br />
Numero de Piezas = (1) A (3) B (4) X (3) Y (4) 6”x<br />
10” Esquinas, (2) 6”x 8” Esquinas cortadas<br />
Aplique el pegamento concreto e instálelo por la<br />
foto.<br />
15
Cambridge Pre-Packaged / Pre-Cut<br />
MaytRx <strong>Fireplace</strong> Kit<br />
2011<br />
Layer 6:<br />
Piece Count = (3) A, (4) B, (2) X, (1) Y, (2)<br />
6”x10” Corner stones (2) 8”x12” Special cut corners<br />
Apply concrete adhesive and install wall stones<br />
and cut stones according to the photo.<br />
Make sure the distance between the opening is<br />
36”<br />
Capa 6:<br />
Numero de Piezas = (3) A (4) B (2) X (1) Y (2)<br />
6”x10” Esquinas, (2) 8”x12” Esquinas cortadas<br />
especiales<br />
Manteniendo todas las piedras llanas. Cerciórese<br />
de le para mantener los 36” abertura como se<br />
muestra.<br />
Aplique el pegamento concreto e instálelo por la<br />
foto.<br />
16
Cambridge Pre-Packaged / Pre-Cut<br />
MaytRx <strong>Fireplace</strong> Kit<br />
2011<br />
Layer 7:<br />
Piece Count = (1) A, (4) B, (4) X, (2) Y, (4)<br />
6”x10” Corner stones, (2) 6”x8” Cut corner<br />
stones<br />
Apply concrete adhesive and install wall stones<br />
and cut stones according to the photo.<br />
Capa 7:<br />
Numero de Piezas = (1) A (4) B (4) X (2) Y (4)<br />
6”x10” Esquinas, (2) 6”x8” Esquinas cortadas<br />
Aplique el pegamento concreto e instálelo por la<br />
foto.<br />
17
Cambridge Pre-Packaged / Pre-Cut<br />
MaytRx <strong>Fireplace</strong> Kit<br />
2011<br />
Layer 8:<br />
Piece Count = (3) A (4) B (2) X (1) Y (2) 6”x10”<br />
corners, (2) 8”x12” Special cut corners<br />
Apply concrete adhesive and install wall stones<br />
and cut stones according to the photo.<br />
Make sure the distance between the opening is<br />
36”<br />
18<br />
Capa 8:<br />
Numero de Piezas = (3) A (4) B (2) X (1) Y (2)<br />
6”x10” Esquinas, (2) 8”x12” Esquinas cortadas<br />
especiales<br />
Manteniendo todas las piedras llanas. Cerciórese<br />
de le para mantener los 36” abertura como se<br />
muestra.<br />
Aplique el pegamento concreto e instálelo por la<br />
foto.
Cambridge Pre-Packaged / Pre-Cut<br />
MaytRx <strong>Fireplace</strong> Kit<br />
2011<br />
Layer 9:<br />
Piece Count = (1) A, (1) B, (4) X, (3) Y, (4)<br />
6”x10” Corner stones, (2) 5”x6” Cut stones, (2)<br />
10”x5” Cut stones, (2) 2”x6” Cut stones<br />
Apply concrete adhesive and install wall stones<br />
and cut stones according to the photo.<br />
Capa 9:<br />
Numero de Piezas = (1) A (1) B (4) X (3) Y (4)<br />
6”x10” Esquinas, (2) 5”x6” Piezas cortadas, (2)<br />
10”x5” Piezas cortadas, (2) 2”x6” Piezas cortadas<br />
Aplique el pegamento concreto e instálelo por la<br />
foto.<br />
19
Cambridge Pre-Packaged / Pre-Cut<br />
MaytRx <strong>Fireplace</strong> Kit<br />
2011<br />
Layer 9-B: Lintel Placement<br />
Piece Count = (2) 6” x4” x48 1/2” lintels<br />
Apply concrete adhesive and install lintels according<br />
to the photo.<br />
Capa 9-B: Colocación del dintel;<br />
Numero de Piezas = (2) 6” x4” x48 1/2” dintels<br />
Aplique el pegamento concreto e instálelo por la<br />
foto.<br />
20
Cambridge Pre-Packaged / Pre-Cut<br />
MaytRx <strong>Fireplace</strong> Kit<br />
2011<br />
Flush with Rear<br />
3” Overhang<br />
3” Overhang<br />
4.5”x 18” 4.5”x 12” 4.5”x 10”<br />
4” Overhang<br />
Layer 10:<br />
Note: 3” <strong>Maytrx</strong> caps used on this course<br />
Piece Count = (4) 18” Large caps, (4) Column<br />
caps, (4) 12”x12” Cut cap stones, (1) 4.5”x10”<br />
Cut cap stone, (1) 4.5”x12” Cut cap stone, (1)<br />
4.5”x18” Large cap cut stone<br />
Install a 3” overhang on the left and right side,<br />
4” overhang on the front and flush on back.<br />
Apply concrete adhesive and install caps according<br />
to the photo.<br />
21<br />
Capa 10:<br />
*Por Favor Note que <strong>Maytrx</strong> 3” casquillos es usados<br />
en este curso<br />
Numero de Piezas = (4)18” Casquillos grandes, (4)<br />
Casquillos de columna, (4) 12”x12” Piedras cortadas<br />
de casquillo, (1) 4.5”x10” Casquillo cortado,<br />
(1) 4.5”x12” Casquillo cortado,(1) 4.5”x18” Casquillo<br />
cortado<br />
Instale de modo que haya una proyección 3”<br />
proyección en el lado izquierdo y derecho, 4” en el<br />
frente, del resante parte posterior.<br />
Aplique el pegamento concreto e instálelo por la<br />
foto.
Cambridge Pre-Packaged / Pre-Cut<br />
MaytRx <strong>Fireplace</strong> Kit<br />
2011<br />
2” Overhang<br />
10.5”x 12”<br />
3” Overhang<br />
3” Overhang<br />
2.5” Overhang<br />
Layer 11:<br />
Note: 3” <strong>Maytrx</strong> caps used on this course<br />
Piece Count = (2) 13” Caps, (6) 18” Large caps,<br />
(4) Column caps, (2) 10.5”x12" Cut cap stones,<br />
(2) 10”x 12” Cut cap stones, (2) 4.5”x12” Cut<br />
cap stones, (1) 7”x18” Cut cap stone<br />
Apply concrete adhesive and install caps according<br />
to the photo. Install a 3” overhang on the left<br />
and right sides. Install a 2.5” overhang on the<br />
front and 2” overhang on the back.<br />
22<br />
Capa 11:<br />
*Por Favor Note que <strong>Maytrx</strong> 3” casquillos es usados<br />
en este curso<br />
Numero de Piezas = (2) 13” Casquillos, (6) Casquillos<br />
grandes, (4) Casquillos de columna, (2)<br />
10.5” x12" Capas cortadas de casquillo, (2)<br />
10”x12” Piedras cortadas de casquillo, (2) 4 Piedras<br />
cortadas del casquillo 4.5” x12”, (1) 7”x18”<br />
Piedra cortada del casquillo.<br />
Instale la proyección 3” en los lados izquierdas y<br />
derechas . Instale la proyección 2.5” proyección en<br />
el frente y 2” encendido detrás.<br />
Aplique el pegamento concreto e instálelo por la<br />
foto.
Cambridge Pre-Packaged / Pre-Cut<br />
MaytRx <strong>Fireplace</strong> Kit<br />
2011<br />
Layer 12:<br />
Piece Count = (3) A (4) B (3) X (3) Y (4) 6”x 10”<br />
Corner stones<br />
Apply concrete adhesive and install wall stones<br />
according to the photo.<br />
Install an 8” step-in on the left, right and front<br />
sides, and a 5” step-in on back.<br />
Capa 12:<br />
Numero de Piezas = (3) A (4) B (3) X (3) Y (4) 6”x<br />
10” Esquinas<br />
Instale 8” paso en partes izquierdas, derechas y<br />
alante con 5” paso encendido la parte posterior.<br />
Aplique el pegamento concreto e instálelo por la<br />
foto.<br />
23
Cambridge Pre-Packaged / Pre-Cut<br />
MaytRx <strong>Fireplace</strong> Kit<br />
2011<br />
Layer 13:<br />
*Please note 3” <strong>Maytrx</strong> block used on this course<br />
Piece Count = (2) A, (2) B, (2) X, (2) Y, (2)<br />
12”x14” Large cap cut stones, (4) Column hats<br />
Apply concrete adhesive and install wall stones<br />
according to the photo.<br />
24<br />
Capa 13:<br />
*Por Favor Nota que bloque de <strong>Maytrx</strong> 3” es<br />
usado en este curso<br />
Numero de Piezas = (2) A (2) B (2) X (2) Y (2)<br />
14” x12” Casquillo grandes, (4) Sombreros de columna<br />
Aplique el pegamento concreto e instálelo por la<br />
foto.
Cambridge Pre-Packaged / Pre-Cut<br />
MaytRx <strong>Fireplace</strong> Kit<br />
2011<br />
Flush<br />
Layer 14:<br />
Piece Count = (2) B, (4) X, (5) Y, (4)<br />
6”x10”Corner stones<br />
Apply concrete adhesive and install wall stones<br />
according to the photo.<br />
Install a 5” step-in on the left and right side, 2”<br />
step-in on the front and flush on the back.<br />
Capa 14:<br />
Numero de Piezas = (2) B (4) X (5) Y (4) 6”x<br />
10”Esquinas<br />
Instale 5” paso en los lados izquierdos y derechos.<br />
echan a un lado, 2” paso en frente y restantes<br />
alante y detrás.<br />
Aplique el pegamento concreto e instálelo por la<br />
foto.<br />
25
Cambridge Pre-Packaged / Pre-Cut<br />
MaytRx <strong>Fireplace</strong> Kit<br />
2011<br />
Flush<br />
Layer 15:<br />
Note: 3” <strong>Maytrx</strong> block used on this course<br />
Piece Count = (2) X, (4) Y, (2) 13” caps, (4) Column<br />
hats<br />
Apply concrete adhesive and install wall stones<br />
according to the photo.<br />
Capa 15:<br />
*Por Favor Nota casquillo de <strong>Maytrx</strong> 3” usado en<br />
este curso<br />
Numero de Piezas = (2) X (4) Y (2) 13” capas, (4)<br />
Sombreros de la columna<br />
Aplique el pegamento concreto e instále por la<br />
foto.<br />
26
Cambridge Pre-Packaged / Pre-Cut<br />
MaytRx <strong>Fireplace</strong> Kit<br />
2011<br />
Flush<br />
3.5” Step in 3.5” Step in<br />
Flush<br />
Layer 16:<br />
Piece Count = (4) X (5) Y (4) 6”x 10”Corner<br />
stones<br />
Install a 3.5” step-in on the left and right sides.<br />
Front and back edges are flush.<br />
Apply concrete adhesive and install wall stones<br />
according to the photo.<br />
Capa 16:<br />
Numero de Piezas = (4) X (5) Y (4) 6”x 10” Esquinas<br />
Instale un 3.5” paso en lados izquierdos y derechos.<br />
Los bordes delanteros y traseros son rasantes.<br />
Aplique el pegamento concreto e instálelo por la<br />
foto.<br />
27
Cambridge Pre-Packaged / Pre-Cut<br />
MaytRx <strong>Fireplace</strong> Kit<br />
2011<br />
Layer 17:<br />
Piece Count = (4) X (5) Y (4) 6”x10” Corner<br />
stones<br />
Apply concrete adhesive and install wall stones<br />
according to the photo.<br />
Capa 17:<br />
Numero de Piezas = (4) X (5) Y (4) 6”x 10” Esquinas<br />
Aplique el pegamento concreto e instálelo por la<br />
foto.<br />
28
Cambridge Pre-Packaged / Pre-Cut<br />
MaytRx <strong>Fireplace</strong> Kit<br />
2011<br />
Layer 18:<br />
Piece Count = (4) X (5) Y (4) 6”x10” Corner<br />
stones<br />
Apply concrete adhesive and install wall stones<br />
according to the photo.<br />
Capa 18:<br />
Numero de Piezas = (4) X (5) Y (4) 6”x 10” Esquinas<br />
Aplique el pegamento concreto e instálelo por la<br />
foto.<br />
29
Cambridge Pre-Packaged / Pre-Cut<br />
MaytRx <strong>Fireplace</strong> Kit<br />
2011<br />
Layer 19:<br />
Piece Count = (4) X (5) Y (4) 6”x10” Corner<br />
stones<br />
Apply concrete adhesive and install wall stones<br />
according to the photo.<br />
Capa 19:<br />
Numero de Piezas = (4) X (5) Y (4) 6”x 10” Esquinas<br />
Aplique el pegamento concreto e instálelo por la<br />
foto.<br />
30
Cambridge Pre-Packaged / Pre-Cut<br />
MaytRx <strong>Fireplace</strong> Kit<br />
2011<br />
2” Overhang<br />
3” Overhang<br />
3” Overhang<br />
2” Overhang<br />
Layer 20:<br />
Note: 3” <strong>Maytrx</strong> cap used on this course<br />
Piece Count = (2) 13” Caps, (2) 18” Large caps,<br />
(4) Column caps<br />
Install a 3” overhang on the left and right sides<br />
and a 2” overhang on the front and back.<br />
Apply concrete adhesive and install caps according<br />
to the photo.<br />
Capa 20:<br />
*Por Favor Nota casquillo de <strong>Maytrx</strong> 3” usado en<br />
este curso<br />
Numero de Piezas = (2) 13” Casquillos, (2) 18”<br />
Casquillos grandes, (4) Casquillos de columna<br />
Instale una proyección 3” proyección en lado<br />
izquierdo y derecho con 2” en frente y detrás.<br />
Aplique el pegamento concreto e instálelo por la<br />
foto.<br />
31
Cambridge Pre-Packaged / Pre-Cut<br />
MaytRx <strong>Fireplace</strong> Kit<br />
2011<br />
Chase flashing • El destellar de la persecución<br />
Chase flashing with collar facing up.<br />
Persecucion que destella con el revestimiento del collar para arriba.<br />
32
Cambridge Pre-Packaged / Pre-Cut<br />
MaytRx <strong>Fireplace</strong> Kit<br />
2011<br />
Once the chimney has been centered, take the<br />
chase flashing with the collar up and slide it on<br />
to the termination cap sleeve until it is flush<br />
with the bottom of the termination cap. (See<br />
photo top left)<br />
(See photo top right) on how the termination<br />
cap, chase flashing and chimney section should<br />
line up inside the block chimney cavity. Take<br />
the entire assembly to the top of the fireplace<br />
chimney and carefully slide the termination<br />
cap sleeve into the chimney section while rotating<br />
left to right so the sections line up and<br />
sleeve together.<br />
Una vez que la chimenea se ha centrado, tome la<br />
persecuci n intermitente con el cuello hacia arriba<br />
y deslícelo a la manga de la tapa de terminaci n<br />
hasta que quede al ras con la parte inferior de la<br />
tapa de terminaci n. (Ver foto) Imagen detallada<br />
de c mo la tapa de terminaci n, la persecuci n de<br />
parpadear y secci n de la chime-nea deben alinearse<br />
dentro de la cavidad chimenea bloque. (Ver<br />
foto) Tome todo el conjunto de la parte superior<br />
de la chimenea chimenea, deslice con cuidado la<br />
tapa de terminaci n de la manga en la secci n de la<br />
chime-nea mientras gira de izquierda a derecha<br />
por lo que la línea de secciones y manga juntos.<br />
33
Cambridge Pre-Packaged / Pre-Cut<br />
MaytRx <strong>Fireplace</strong> Kit<br />
2011<br />
Once you have the termination cap sleeved into<br />
the chimney section, you can apply silicone between<br />
the final layer of block and the chase<br />
flashing to prevent any water or foreign material<br />
from entering the chimney cavity.<br />
Locate the pre-drilled holes in termination cap.<br />
Then drill into both sides of chase flashing.<br />
Install sheet metal screws and screw in cap.<br />
Do the same on opposite side.<br />
Una vez que usted tiene la tapa de terminaci n de<br />
manga en la secci n de la chimenea, puede aplicar<br />
silicona entre la capa final de bloque y la persecuci<br />
n intermitente para evitar que el agua o material<br />
extraño en la cavidad chimenea.<br />
Busque la pre-agujeros en la tapa de terminaci n.<br />
A continuacion, perfore en ambos lados de la<br />
perse-cuci n a parpadear. Instale los tornillos de<br />
chapa metálica y el tornillo de la tapa. Haga lo<br />
mismo en el lado opuesto.<br />
34
Cambridge Pre-Packaged / Pre-Cut<br />
MaytRx <strong>Fireplace</strong> Kit<br />
2011<br />
Facing Lintel With Granite Tile:<br />
In your fireplace kit you will find 5 pieces of 8”x8” granite tile. The granite is to be applied to the face of<br />
the concrete lintel (polished side facing out) at the top of the fire box using concrete adhesive. Make sure<br />
you use a retaining wall adhesive that will not be affected by the heat from the fire box.<br />
Note: There are 6 pieces of 6”x6” granite tile in your kit as well, these are for the addition of wood boxes<br />
should they be a part of your installation.<br />
Dintel del revestimiento con el azulejo del granito:<br />
En su kit de la chimenea usted encontrará 5 pedazos de azulejo del granito 8” x8”. El granito es ser appliedto<br />
la cara del dintel concreto (revestimiento lateral pulido hacia fuera) en la tapa de la caja del<br />
fuego usando el pegamento concreto. Cerciórese de que usted utilice un pegamento del muro de contención<br />
que no sea afectado por el calor de la caja del fuego.<br />
Nota: Hay 6 pedazos de azulejo del granito 6” x6” en su kit también, éstos es para la adición de cajas de<br />
madera si son una parte de su instalación.<br />
35
Cambridge Pre-Packaged / Pre-Cut<br />
MaytRx <strong>Fireplace</strong> Kit<br />
2011<br />
Apply concrete adhesive being careful not to put too much adhesive to the point it migrates out of the<br />
joints between the tile. Firmly press all tiles into position. It will be necessary to brace up the bottom of<br />
the tile to prevent them from moving while the adhesive is curing. Refer to the photos below. Once the<br />
tiles are set, leave the bracing in place for 24 hours to allow the adhesive proper time to cure. Wait 2<br />
days after the tile installation before making a fire in your new fireplace.<br />
Note: The first time you use your fireplace, light a small fire for the first 8 hours of use so you properly<br />
season the inner fire lining of your fire box. Failure to do so can void the warranty.<br />
Aplique el pegamento concreto que tiene cuidado de no poner demasiado pegamento al punto que emigra<br />
de los empalmes entre el azulejo. Presione firmemente todos los azulejos en la posición. Será necesario<br />
apoyar encima de la parte inferior del azulejo para evitar que se muevan mientras que el pegamento<br />
está curando. Refiera a las fotos abajo. Una vez que se fijan los azulejos, deje apoyar en el lugar por 24<br />
horas para dar un plazo de la época apropiada adhesiva de curar. Espere 2 días después de la instalación<br />
del azulejo antes de hacer un fuego en su nueva chimenea. Nota: La primera vez que usted utiliza<br />
su chimenea, encienda un pequeño fuego para las primeras 8 horas de uso que usted sazona tan correctamente<br />
la guarnición interna del fuego de su caja del fuego. La falta de hacer tan puede anular la garantía<br />
36
Cambridge Pre-Packaged / Pre-Cut<br />
MaytRx <strong>Fireplace</strong> Kit<br />
2011<br />
VIEWS<br />
FRONT<br />
RIGHT<br />
LEFT<br />
37<br />
BACK