instruction manual manual de instrucciones - Avanti Products
instruction manual manual de instrucciones - Avanti Products
instruction manual manual de instrucciones - Avanti Products
- No tags were found...

Create successful ePaper yourself
Turn your PDF publications into a flip-book with our unique Google optimized e-Paper software.
INSTRUCTION MANUALMANUAL DE INSTRUCCIONESMo<strong>de</strong>l Number / No. <strong>de</strong> Mo<strong>de</strong>lo:W892FWASHING MACHINELAVADORABEFORE USE, PLEASE READ AND FOLLOW ALL SAFETY RULES AND OPERATINGINSTRUCTIONS.La sección en español empieza en la página 21.<strong>Avanti</strong> has a policy of continuous improvement on its products and reserves the right to change materials and specificationswithout notice.<strong>Avanti</strong> <strong>Products</strong>, A Division of the Mackle Co., Inc.P.O. Box 520604 - Miami, Florida 33152www.avantiproducts.com
REGISTRATION INFORMATIONThank you for purchasing this fine <strong>Avanti</strong> product. Please fill out this card and return it within 100days of purchase and receive these important benefits to the following address:<strong>Avanti</strong> <strong>Products</strong>, A Division of the Mackle Co., Inc.P.O. Box 520604 - Miami, Florida 33152 USA? Protect your product:We will keep the mo<strong>de</strong>l number and date of purchase of your new <strong>Avanti</strong> product on file to help yourefer to this information in the event of an insurance claim such as fire or theft.? Promote better products:We value your input. Your responses will help us <strong>de</strong>velop products <strong>de</strong>signed to best meet your futureneeds.-------------------------------------------------(<strong>de</strong>tach here)----------------------------------------------------------------<strong>Avanti</strong> Registration Card__________________________________ ________________________________________Name Mo<strong>de</strong>l # Serial #__________________________________ ________________________________________Address Date Purchased Store/Dealer Name__________________________________ ________________________________________City State Zip Occupation__________________________________ As Your Primary Resi<strong>de</strong>nce, Do You:Area Co<strong>de</strong> Phone Number ?Own ?RentDid You Purchase An Additional Warranty: Your Age:?Exten<strong>de</strong>d ?None ?un<strong>de</strong>r 18 ?18-25 ?26-30Reason For Choosing This <strong>Avanti</strong> Product: ?31-35 ?36-50 ?over 50Please indicate the most important factors Marital Status:that influenced your <strong>de</strong>cision to purchase ?Married ?Singlethis product.Is This Product Used In The:?Price ?Home ?Business?Product FeaturesHow Did You Learn About This Product:?<strong>Avanti</strong> Reputation?Advertising?Product Quality ?In Store Demo ?Personal Demo?Salesperson Recommendation?Other_________________________________?Friend/Relative RecommendationComments______________________________?Warranty_______________________________________?Other______________________________________________________________2
HELP US HELP YOU...Read this gui<strong>de</strong> carefully.It is inten<strong>de</strong>d to help you operate and maintainyour new washing machine properly.Keep it handy to answer your questions.If you don't un<strong>de</strong>rstand something or you needmore assistance, please call:<strong>Avanti</strong> Customer Service800-220-5570Keep proof of original purchase date (such asyour sales slip) with this gui<strong>de</strong> to establish thewarranty period.Write down the mo<strong>de</strong>l and serial numbers.You'll find them on a plate located on the rearoutsi<strong>de</strong> wall of the washing machine.Please write these numbers here:____________________________________Date of Purchase____________________________________Mo<strong>de</strong>l Number____________________________________Serial NumberUse these numbers in any correspon<strong>de</strong>nce orservice calls concerning your washingmachine.If you received a damaged washing machine,immediately contact the <strong>de</strong>aler (or buil<strong>de</strong>r) thatsold you the washing machine.Save time and money. Before you call forservice, check the Troubleshooting Gui<strong>de</strong>. Itlists causes of minor operating problems thatyou can correct yourself.IF YOU NEED SERVICEWe're proud of our service and want you to bepleased. If for some reason you are not happywith the service you receive, here are somesteps to follow for further assistance.FIRST, contact the people who serviced yourwashing machine. Explain why you are notpleased. In most cases, this will solve theproblem.NEXT, if you are still not pleased, write all the<strong>de</strong>tails, including your telephone number, andsend it to:Customer Service<strong>Avanti</strong> <strong>Products</strong>10880 NW 30 StreetMiami, FL 33172 USA4
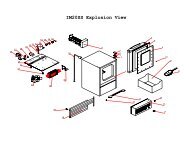
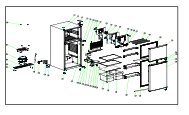
PARTS & FEATURES781293456101. WORKTOP2. CONTROL PANEL3. DETERGENT DRAWER4. DOOR5. BASE COVER6. LEVELING LEGS7. DRAIN HOSE (1 PC)8. INLET HOSE (2 PCS)9. POWER SUPPLY CORD10. PUMP FILTER COVERINLET HOSEACCESSORIESPLASTIC COVERFAUCET ADAPTER2 PIECES4 PIECES2 PIECES6
IMPORTANT SAFETY INSTRUCTIONS?WARNING?To reduce the risk of fire, electrical shock, orinjury when using your portable washer, followthese basic precautions:? Read all <strong>instruction</strong>s before using the appliance.? Do not wash articles that have been previously cleaned in, washed in, soaked in, or spotted withgasoline, dry-cleaning solvents, or other flammable or explosive substances, as they give offvapors that could ignite or explo<strong>de</strong>.? Do not add gasoline, dry-cleaning solvents, or other flammable or explosive substances to thewash water. These substances give off vapours that could ignite or explo<strong>de</strong>.? Un<strong>de</strong>r certain conditions, hydrogen gas may be produced in a hot-water system that h as not beenused for 2 weeks or more. HYDROGEN GAS IS EXPLOSIVE. If the hot-water system has notbeen used for such a period, before using a washing machine, turn on all hot-water faucets and letwater flow from each for several minutes. This will release any accumulated hydrogen gas. As thegas is flammable, do not smoke or use an open flame during this time.? DANGER or WARNING: Risk of child entrapment.Child entrapment and suffocation are not problems of the past. Junked or abandoned appliancesare still dangerous . . . even if they will “just sit in the garage a few days.”? Before you throw away your old portable washer: Take off the lid.? Never allow children to operate, play with, or crawl insi<strong>de</strong> the portable washer. Close supervisionof children is necessary when the washer is used near children.? Do not reach into the washer if the agitator or tub is moving.? Do not install or store this appliance where it will be exposed to the weather.? Do not tamper with controls.? Do not repair or replace any part of the washer or attempt any servicing unless specificallyrecommen<strong>de</strong>d in the user -maintenance <strong>instruction</strong>s or in published user -repair <strong>instruction</strong>s thatyou un<strong>de</strong>rstand and have the skills to carry out.? Never clean portable washer parts with flammable fluids. The fumes can create a fire hazard orexplosion.? Do not place the washer in steamy rooms or where the washer is directly exposed to rain.Moisture may <strong>de</strong>stroy the electrical insulation causing an electrical shock hazard.? Do not store, use gasoline, or any other flammable vapors and liquids in the vicinity of this or anyother portable washer. The fumes can create a fire hazard or explosion.? If the power cord is damaged, it must be replaced by the manufacturer or its service agent or asimilar qualified person in or<strong>de</strong>r to avoid a hazard.-Save these <strong>instruction</strong>s -INSTALLATION INSTRUCTIONS? BEFORE USING YOUR AP PLIANCE? Remove the exterior and interior packing.? You will need the following tools:? Wrench? Pliers? Phillips Head Screwdriver? Check to be sure you have all of the following parts:? 2 Inlet Hoses? 2 Faucet Adapters? 4 Plastic Covers? 1 Instruction Manual? Clean the interior surface with lukewarm water using a soft cloth.? Allow 2 inches of space between the back and si<strong>de</strong>s of the appliance.WRENCHSCREWDRIVERPLIERS7
? Put your l aundry into the washer evenly. Uneven laundry may cause noise or vibration.? Don’t use excessively hot water (50°C or more). Plastic parts may be <strong>de</strong>formed or damaged.Also, clothing may be <strong>de</strong>formed or bleached.? Before washing, check all pockets. If nails or pins remain in pockets, they may damage thewasher or clothes.? Never splash water on the control panel.? Plug the washer into an exclusive properly installed-groun<strong>de</strong>d wall outlet. Do not un<strong>de</strong>r anycircumstances cut or remove the third (ground) prong from the power cord. Any questionsconcerning power and/or grounding should be directed toward a certified electrician or anauthorized <strong>Avanti</strong> <strong>Products</strong> service center.? SELECTING A LOCATIONBefore you install the washing machine, select a location with the following characteristics:? A hard level surface (if the surface is uneven, see Adjusting The Leveling Legs).? Away from direct sunlight. Direct sunlight may affect the acrylic coating, plastic and electricalcomponents.? A<strong>de</strong>quate ventilation.? Room temperature that will not fall belo w 0? .? Away from sources of heat such as coal or gas. Make sure that the washing machine does notstand on its power cord. Ventilation openings must not be obstructed by carpeting when theportable washer is installed on a carpeted floor.? ADJUSTING THE LEVELING LEGSIf the floor is uneven adjust the legs (do not insert pieces of wood, or anyother objects un<strong>de</strong>r the feet) as following:? Loosen the leg bolt by turning it with your hand until it is at the <strong>de</strong>siredheight.? Tighten the locking nut by turning it in the reverse direction with thewrench.Place the washer on a sturdy flat surface.If the washer is placed on an uneven or weak surface, noise or vibrationoccurs (Allowable is 1°).? REMOVING THE SHIPPING BOLTSFor transportation reason, the suspen<strong>de</strong>d part located insi<strong>de</strong> the washingmachine is locked by four shipping bolts and screws. Before using thewashing machine, remove the four shipping bolts as following:? Loosen all bolts with the wrench before removing them.? Take each bolt head and pull it out. Repeat for each bolt.? Fill the holes with the supplied plastic covers.? Keep the shipping bolts for future use.? CONNECTING THE WATER SUPPLY HOSEThe water supply hose must be connected to the washing machine at one end and to the water faucetat the other. Do not stretch the water supply hose. If the hose is too short and you do not wish tomove the water faucet, replace the hose with a longer, high-pressure hose.Select appropriate faucet as shown in the figures below. If none of these faucets are available, usethe faucet adapter provi<strong>de</strong>d.8
The end of faucet spout should be longer than 10mm (0.4”), or the connector cannot be fixed properly.Water leakage could <strong>de</strong>velop.? Con nect the water inlet hoses to the connectors in water inlet valves by turning the connectingnuts.? Connect the other ends of water inlet hoses to the faucets by turning the connecting nuts.? If you have both cold and hot water supplied, please make sure to connect the inlet hoses by coldto cold and hot to hot.NOTE: Be sure the rubber rings are insi<strong>de</strong> the connecting nuts.? WATER CONNECTIONFor normal kitchen-sink tap only use the inlet hose with cold water inlet.Connect the inlet hose to the male hose thread adapter by turning it clockwise to be fixed tightly.Make sure to insert the rubber ring enclosed. Then connect tightly to your sink.Note: Some faucets may require you to also use the female hose thread adapter between the maleadapter and your sink faucet as shown below. Make sure the rubber ring is inserte d andconnect to your sink.If water leaks from faucet connection or washer connection, turn off water andtighten fully using a wrench. Be careful not to over tighten and damage waterconnection. Turn on water supply and make sure no leaks are present.9
? POSITIONING THE DRAIN HOSEThe end of the drain hose may be positioned as following two ways:? Over the edge of a sinkThe drain hose must be placed at a height of between 0.6 ~ 0.9 m. To keep the drain hose spoutbent, use the supplied plastic hose gui<strong>de</strong>. Secure the gui<strong>de</strong> to the wall with a hook or to thefaucet with a piece of string to prevent the drain hose frommoving.? In a drain pipeWe recommend you use a vertical pipe with height between 0.6 ~0.9 m. The insi<strong>de</strong> diameter of the drain pipe must be larger thanthe outsi<strong>de</strong> diameter of the drain hose.NOTE: The outlet of the drain hose must be in the height of 0.6 ~ 0.9m above floor level, otherwise, the washing machine cannot worknormally.? ELECTRICAL CONNECTIO N?Warning?Improper use of th e groun<strong>de</strong>d plug can result in the risk of electrical shock. If the power cord isdamaged, have it replaced by an authorized <strong>Avanti</strong> <strong>Products</strong> service center.This portable washer should be properly groun<strong>de</strong>d for your safety.The power cord of this appliance is equipped with a three-prong plugwhich mates with standard three prong wall outlets to minimize thepossibility of electrical shock.Do not un<strong>de</strong>r any circumstances cut or remove the third ground prongfrom the power cord supplied.This appliance requires a standard 110-120 Volts~A.C./60Hz electricaloutlet with three-prong ground.The cord should be secured behind the appliance and not left exposedor dangling to prevent acci<strong>de</strong>ntal injury.Never unplug the appliance by pulling the power cord. Always grip theplug firmly and pull straight out from the receptacle.STANDARD 120VOLTS, 60 HERTZ,3-WIRE SOCKETL1GROUND120± 120V.A.C.V.A.C.115±12V.A.C.NEUTRALSIDEROUNDGROUNDINGPRONGDo not use an extension cord with this appliance. If the power cord istoo short, have a qualified el ectrician or service technician install anoutlet near the appliance.10
OPERATING YOUR APPLIANCE? CONTROL PANEL1 2 3 4 5 6 7 8 91. Detergent Dispenser2. Display Panel3. Delay Start Selection Button4. Extra Rinse Selection Button5. Water Temperature Selection Button6. Cycle Selection Button7. Fabrics Selection Button8. Start/Pause Selection Button9. Power Selection Button11
? PREPARATION1. Connect the water inlet hoseto the water faucet. Don’tswitch on the power if thewater pressure is lower than0.05MPa and higher than0.5MPa.2. Open the water faucet.2.Turn on the water faucet.3. Insert the plug into thesocket. For safety the plugshould have groundconnection.4. Place the drain hose in thecorrect position.5. Open the door and put thewash load into the tubevenly. Then close the door.6. Pull out the <strong>de</strong>tergent drawer and add the wash <strong>de</strong>tergent andsoftener to the corresponding position as following:? For pre-wash <strong>de</strong>tergent? For wash <strong>de</strong>tergent? For softenerWhen using the liquid <strong>de</strong>tergent (recommen<strong>de</strong>d for programswithout pre-wash process), insert the <strong>de</strong>tergent cup and followthe <strong>instruction</strong>s on the package.7. Push back the <strong>de</strong>tergentdrawer.WARNING: DO NOT pull out the<strong>de</strong>tergent drawer while theappliance is in operation becausethis may cause water to spill out.When using the soap pow<strong>de</strong>r, remember to remove the liquid<strong>de</strong>tergent cup.NOTE: DO NOT overflow the <strong>de</strong>terg ent and softenercompartment.?Warning?When using liquid chlorine bleach you must follow these steps.Failure to follow these directions may result in damaged clothes.1. Insert the load to be washed into the unit2. Turn on the unit to your <strong>de</strong>sired mo<strong>de</strong>.3. Add <strong>de</strong>te rgent or liquid soap (see page 12 for <strong>de</strong>tails).4. Wait for 3 minutes after the washing cycle starts. Then measure the correct amount of liquidchlorine bleach (do not exceed 1/3 cup) otherwise you will damage the clothes.5. Open the drawer and pour the liquid chlorine bleach into center section 2 of drawer12
6. Do not pour undiluted liquid bleach directly into the load or drum.? OPERATING INSTRUCTIONSPRESS DOWN POWER BUTTON.Press once to turn the washing machine ON, press again to turn the washing machine OFF.After the washing program has been finished, the power will automatically turn off.NOTE: If the power is left ON for longer than 10 minutes without any buttons being touched, thepower will turn off automatically.PRESS DOWN FABRICS BUTTON.Choose the right available program according to wash load as following:COTTON PERM PRESS DELICATES KNIT/WOOLThe <strong>de</strong>fault Fabrics is Perm Press.For different FABRICS program, there are different <strong>de</strong>fault water temperature and cycle process asfollowing:FABRICSWATERCYCLETEMPERATURECOTTON HOT/COLD WASH+RINSE+SPINPERM PRESS WARM/COLD WASH+RINSE+SPINDELICATES WARM/COLD WASH+RINSE+SPINKNIT/WOOL COLD/COLD WASH+RINSE+SPINPRESS DOWN CYCLE BUTTON.Press the button repeatedly to select the available wash process as following:WASH+RINSE+SPIN PREWASH+WASH+RINSE+SPIN SPIN RINSE+SPINWASH+RINSEThe <strong>de</strong>fault cycle is WASH+RINSE+SPIN.NOTE: Prewash is only available when washing COTTON and PERM PRESS.PRESS DOWN WASH/RINSE WATER TEMPERATURE BUTTON.Press down the water temperature selection button, you can choose to inlet cold water or hot water forthe wash and rinse process as following:HOT/COLD WARM/WARM WARM/COLD COLD/COLDThe <strong>de</strong>fault water temperature is WARM/COLD.NOTE: HOT/COLD is only available when washing COTTON and PERM PRESS.IMPORTANT: A single cold hose system does not allow the washing machine to automaticallyregulate incoming water temperatures to match those listed on the control panel. Only COLD/COLDcan be available.PRESS DOWN EXTRA RINSE SELECTION BUTTON.Press down the button when Extra Rinse is nee<strong>de</strong>d.When you choose Extra Rinse, you will see the indicator lights up on the control panel.NOTE: Extra Rinse is not available for Spin only process.PRESS DOWN DELAY START SELECT BUTTON.Press this button repeatedly to choose the <strong>de</strong>layed start time (From 1 to 24 hours in one hourincrement).After the Delay Start has been chosen, the Delay Start indicator flashes and the LED displays theremaining <strong>de</strong>lay time.To cancel the Delay Start, press down the power button or press down the Delay Start repeatedly to13
choose zero <strong>de</strong>lay start time and press down the Start/Pause button.PRESS DOWN START/PAUSE BUTTON ONCE AND THE MACHINE WILL BEGIN OPERATION.Press to start and pause the washing programs.During operation, time countdown can be seen in LED display.When the program is finished, open the door and remove the laundry.NOTE: The door will not open until 3 minutes after the appliance stops or the power turns off.The Door Locked indicator lights whenever the door is locked and unable to open.NOTE:? Clothes easily discolored should be washed separately so as to prevent inter-dyeing.? If you want to change a selected program, please press the START/PAUSE button first, thenpress the corresponding buttons to set the program before pushing START/PAUSE button.? When SPIN and RINSE+SPIN cycles are ON, do not use <strong>de</strong>tergent.? If you want to drain water during washing, press the START/PAUSE button, then select SPINcycle. Press START/PAUSE button again to restart.? DELAY START SETTINGSelect this course when you have to go out or do something else.? Press down the power button.? Load the washing machine and select the appropriate wash program.? Press Delay Start button continuously to select the <strong>de</strong>lay start time. (From 1 hour to 24 hours)? Press START/PAUSE button to start the course.14
? WASHING TIPS AND HINTSSort your laundry according to the following characteristics:? Types of fabric care label symbol: Sort laundry into cottons, mixed fibers, synthetics, silks, woolsand rayon.? Color: Divi<strong>de</strong> whites and colors. Wash new, colored items separately.? Size: Placing items of different sizes in the same load will improve the washing action.? Sensitivity: Wash <strong>de</strong>licate i tems separately, using the <strong>de</strong>licate wash program for pure new wool,curtains, and silk articles. Check the labels on the items you are washing or refer to the fabric carechart.EMPTY POCKETSCoins, safety pins and similar items can damage linen, the washing machine drum, and the watertank.SECURING FASTENERSClose zippers and fasten buttons or hooks; Loose belts or ribbons should be tied together.PREWASHING COTTONCotton and Perm Press are not normally necessary. You new washing machine, combined withmo<strong>de</strong>rn <strong>de</strong>tergents, will give perfect washing results, thus saving energy, time, water and <strong>de</strong>tergent.However, if your cotton is particularly dirty, use a prewash with a protein-based <strong>de</strong>tergent.DETERMINING LOAD CAPACITYDo not overload the washing machine or your laundry may not wash properly.DETERGENT TIPSThe type of <strong>de</strong>tergent you use is based on the type of fabric (cotton, Perm Press, <strong>de</strong>licates and wool),color, wash temperature, <strong>de</strong>gree and type of soiling. Always use “low suds” laundry soap, which is<strong>de</strong>signed for automatic washing machine.Follow the <strong>de</strong>tergent manufacturer’s recommendations based upon the weight of the laundry, the<strong>de</strong>gree of soiling, and the hard ness of the water in your area. If you don’t know how hard your wateris, ask your water authority.NOTE: Keep <strong>de</strong>tergents and additives in a safe dry place out of the reach of children.Fabric Care ChartResistant materialDelicate fabricItem may be washed at 95?Item may be washed at 60?Item may be washed at 40?Item may be washed at 30?Item may be hand washedDry clean onlyCan be bleached in cold waterDo not bleachCan be ironed at 200 ? maxCan be ironed at 150 ? max15C an be ironed at 100 ? maxDo not ironCan be dry cleaned using any solventDry clean with perchlori<strong>de</strong>, lighter fuel,pure alcohol or R113 onlyDry clean with aviation fuel, pure alcoholor R113 onlyDo not dry cleanDry flatCan be hung to dayDry on clothes hangerTumble dry, normal heatTumble dry, reduced heatDo not tumble dry
CARE AND MAINTENANCE? CLEANING YOUR APPLIANCE? Clean the surface of your washer regularly with soft fabric.? Clean the inner tub regularly, especially immediately after starch or bleach operation.? Clean the filter in the inlet valve or inlet hose regularly in or<strong>de</strong>r to prevent it from clogging.Unplug the power cord.Remove the inlet hose and cleanthe filter with a brush.Clean the surface ofthe washing machinewith a soft clothregularly.Clean the inner tubregularly, especially afterwashing starched orbleached laundry.? Clean the <strong>de</strong>tergent drawer.Pull out the <strong>de</strong>tergent drawer from its housing, clean an d rinse it thoroughly. Then dry it and insertback to the correct position.? Clean the pump filter.Clean the <strong>de</strong>bris filter 2 or 3 times a year.1. Remove the filter cover from the front of the washing machine. And ensure that there is nowater in the tub and the electricity supply is disconnected.2. Place a pan or cloth un<strong>de</strong>r the filter cover to prevent water from spilling on your floor.3. Remove the filter by rotating it half a cycle in the counterclockwise direction and pulling it out.4. Clean the filter and replace it in its housing reversely.5. Replace the base cover.16
? VACATION TIMEPROBLEMS WITH YOUR APPLIANCE?You can solve many common appliance problems easily, saving you the cost of a possible servicecall. Try the suggestions below to see if you can solve the problem before calling the servicer.TROUBLESHOOTING GUIDEPROBLEMWasher does not operate.No water or insufficient water supply.Water supplies and drains continuouslyThe washing machine does not drain.Detergent remains in the <strong>de</strong>tergent drawer afterthe wash program is complete.Washing machine vibrates or is too noisy.POSSIBLE CAUSENot plugged in.The circuit breaker tripped or a blown fuse.The POWER button is not turned on.The door is not closed.Make sure the water source is turned on.The water source faucet is not turned on.The water source hose is frozen.The water intake hose is bent.The filter on the water intake hose is clogged.The drain hose is not positioned at the correctheight (0.6 ~ 0.9 m).The drain hose is squashed or bent.The water hose mesh filter is clogged.The washing machine is running without sufficientwater pressure.Check to assure that the washer is level.The shipping bolts were not removed.The washing machine is touching another object.The laundry load is not balanced.17
SERVICE FOR YOUR APPLIANCEWe are proud of our customer service organization and the network of professional servicetechnicians that provi<strong>de</strong> service on your <strong>Avanti</strong> portable washers. With the purchase of your <strong>Avanti</strong>portable washer, you can be confi<strong>de</strong>nt that if you ever need additional information or assistance, the<strong>Avanti</strong> <strong>Products</strong> Customer Service Team will be here for you. Just call us toll-free.Product Information800-323-5029Part Or<strong>de</strong>rs800-220-5570In-Home Repair Service800-220-5570AVANTI PRODUCTS CUSTOMER SERVICESWhatever your questions are about our products,help is available.You may or<strong>de</strong>r parts and accessories that will be<strong>de</strong>livered directly to your home by personalcheck, money or<strong>de</strong>r, Master Card, or Visa.An <strong>Avanti</strong> <strong>Products</strong> authorized service center willprovi<strong>de</strong> expert repair service, scheduled at a timethat is convenient for you. Our trained servicersknow your portable washer insi<strong>de</strong> and out.18
YOUR AVANTI PRODUCTS WARRANTYStaple your sales receipt here. Proof oforiginal purchase date is nee<strong>de</strong>d to obtainservice un<strong>de</strong>r warranty.WHAT IS COVEREDLIMITED ONE-YEARWARRANTYFor one year from the date of purchase bythe original owner, <strong>Avanti</strong> <strong>Products</strong> will, atits option, repair or replace any part of theappliance that proves to be <strong>de</strong>fective inmaterial or workmanship un<strong>de</strong>r normaluse. During this period <strong>Avanti</strong> <strong>Products</strong>will provi<strong>de</strong> all parts and labor necessaryto correct such <strong>de</strong>fects free of charge, solong as the appliance has been installedand operated in accordance with thewritten <strong>instruction</strong>s in this <strong>manual</strong>. Inrental or commercial use, the warrantyperiod is 90 days.LIMITED 5 YEAR WARRANTY ON PLASTIC TUBAfter one year and until five years from date ofpurchase, <strong>Avanti</strong> will furnish a replacement plastictub, for one which is <strong>de</strong>fective in material orworkmanship. You will be responsible for labor.LIMITED 7 YEAR WARRANTY ON STAINLESSSTEEL TUBAfter one year and until seven years from date ofpurchase, <strong>Avanti</strong> will furnish a replacement stainlesssteel tub, for one which is <strong>de</strong>fective in material orworkmanship. You will be responsible for labor.WHAT IS NOT COVERED? Inci<strong>de</strong>ntal or consequential damages.? Service calls to:? Correct the installation of your washer.? Instruction on how to use your washer.? Replace house fuses or incorrect housewiring or plumbing.? Repairs performed by unauthorizedservicers.? Repairs when your washer is used in otherthan normal, single-family household use.? Service calls that are related to externalproblems, such as abuse, misuse,ina<strong>de</strong>quate electrical power, acci<strong>de</strong>nts, fire,floods, or acts of God.? Failure of the prod uct if it is used for otherthan its inten<strong>de</strong>d purpose.? Pickup and <strong>de</strong>livery.? Repairs caused by unauthorizedmodifications ma<strong>de</strong> to the appliance.? This warranty does not apply outsi<strong>de</strong> theContinental U.S.A.19
WIRING DIAGRAMCONTROL PCBBR BL R R GR GR R BR GR REVSEVPEVFBLWGR120V~60HzBR BLFILTERFA12 1314Y/G 11WATERLEVEL SWITCHCAPACITORDRAINAGEPUMPHOTMRC MRL MRNHOTWATER VALVEDOOR SWITCHBLACKCOLDWATER VALVEM1TMCMLM8M7M6M5M2M3RRWASH MOTORWWGRGR20
INSTRUCCIONES EN ESPAÑOLIMPORTANTE : Instrucciones <strong>de</strong> SeguridadADVERTENCIA:Mientras opera su lavadora automática, y para reducir el riesgo <strong>de</strong> fuego, <strong>de</strong>scarga eléctrica o dañospersonales, tenga en cuenta estas precauciones básicas.Lea todas las <strong>instrucciones</strong> antes <strong>de</strong> usar su lavadora automática.NO LAVE prendas que hayan sido previamente limpiadas, lavadas, remojadas o manchadas congasolina, solventes para lavado en seco u otras sustancias inflamables o explosivas, ya que estasliberan gases que pue<strong>de</strong>n encen<strong>de</strong>rlas o hacerlas explotar.NO AÑADA gasolina, solventes para lavado en seco u otras sustancias inflamables o explosivas alagua. Estas sustancias emiten gases que podrían encen<strong>de</strong>r o hacer explotar su lavadora automática.Bajo ciertas circunstancias, un sistema <strong>de</strong> agua caliente que no ha sido usado por más <strong>de</strong> dossemanas, pue<strong>de</strong> producir gas hidrógeno. El GAS HIDROGENO ES EXPLOSIVO. Si el sistema <strong>de</strong>agua caliente no ha sido usado por más <strong>de</strong> dos semanas, abra todas las llaves <strong>de</strong> agua caliente y<strong>de</strong>je correr el agua por algunos minutos, antes <strong>de</strong> usar su lavadora automática. Esta acción liberaráel gas hidrógeno que se pueda haber acumulado. Recuer<strong>de</strong> que este gas es inflamable, no <strong>de</strong>befumar ni hacer fuego abierto durante este periodo.PELIGRO – ADVERTENCIA: Riesgo <strong>de</strong> niños atrapados.Niños atrapados o asfixiados no son un riesgo <strong>de</strong>l pasado. Aparatos abandonados o consi<strong>de</strong>radoschatarra todavía son peligrosos… aun cuando “estén en el garaje por unos días”.Antes <strong>de</strong> <strong>de</strong>shacerse <strong>de</strong> su lavadora automática antigua: asegúrese <strong>de</strong> quitarle la tapa.Nunca <strong>de</strong>je que los niños operen, jueguen o gateen <strong>de</strong>ntro <strong>de</strong> la lavadora automática. Es necesariosupervisar <strong>de</strong> cerca a los niños cuando la lavadora automática esta en uso.No toque el interior <strong>de</strong> la lavadora automática si la mezcladora o el cilindro interno <strong>de</strong> lavado están enmovimiento.No instale o almacene esta lavadora automática en un lugar don<strong>de</strong> esté expuesta a las inclemencias<strong>de</strong>l clima.No fuerce los controles.No repare ni reemplace ninguna pieza <strong>de</strong> la lavadora automática, ni trate <strong>de</strong> realizar mantenimientossalvo los específicamente recomendados en las <strong>instrucciones</strong> <strong>de</strong> “Mantenimiento <strong>de</strong> Usuario” o enlas <strong>instrucciones</strong> <strong>de</strong> alguna publicación <strong>de</strong> “Reparación <strong>de</strong> Usuarios” que usted entienda y se sientacalificado para realizar.Nunca limpie las piezas <strong>de</strong> la lavadora automática con líquidos inflamables. El humo pue<strong>de</strong> causar unincendio o una explosión.No ubique la lavadora automática en una habitación en la que esté directamente expuesta al vapor oa la lluvia. La humedad pue<strong>de</strong> <strong>de</strong>struir el aislamiento eléctrico aumentando las posibilida<strong>de</strong>s <strong>de</strong> una<strong>de</strong>scarga eléctrica.No almacene, ni use gasolina o algún otro líquido o gas inflamable cerca <strong>de</strong> esta o alguna otralavadora automática. El humo pue<strong>de</strong> causar un incendio o una explosión.Si el cable eléctrico esta dañado, <strong>de</strong>berá ser reemplazado por el fabricante, por la agencia <strong>de</strong>servicios <strong>de</strong> este o por una persona calificada para evitar peligros que atenten contra su seguridad.-GUARDE ESTAS INSTRUCCIONES-21
INSTRUCCIONES PARA LA INSTALACIONANTES DE USAR SU LAVADORA PORTATILQuite los empaques exteriores e interiores.Necesitará las siguientes herramientas:Llave inglesa (wrench)Alicate / Pinzas (pliers)Destornillador (screwdriver)Aseg úrese <strong>de</strong> tener todas estas piezas:2 mangueras <strong>de</strong> acceso <strong>de</strong> agua2 adaptadores para grifo4 cubiertas plásticas1 <strong>manual</strong> <strong>de</strong> <strong>instrucciones</strong>Limpie las superficies internas <strong>de</strong> la lavadora automática con agua tibia y un paño suaveCuando ubique la lavadora automática asegúrese <strong>de</strong> <strong>de</strong>jar un espacio libre, <strong>de</strong> 2 pulgadas, haciaatrás y hacia los lados.Coloque la ropa <strong>de</strong>ntro <strong>de</strong> su lavadora automática <strong>de</strong> manera uniforme, <strong>de</strong> lo contrario, podría causarruido y/o vibración.No use agua muy caliente (50 C o más). Las piezas plásticas podrían <strong>de</strong>formarse o dañarse.Inclusive, la ropa también podría <strong>de</strong>formarse o <strong>de</strong>steñirse.Antes <strong>de</strong> lavar asegúrese <strong>de</strong> revisar los bolsillos <strong>de</strong> las prendas. Los clavos o pernos <strong>de</strong>jados en losbolsillos podrían dañar la lavadora automática o las prendas durante el proceso <strong>de</strong> lavado.No salpique agua sobre el panel <strong>de</strong> control.Conecte la lavadora automática a un enchufe <strong>de</strong> pared (con conexión a tierra). El enchufe <strong>de</strong> pared<strong>de</strong>berá ser exclusivo para el uso <strong>de</strong> la lavadora automática. Bajo ninguna circunstancia, quite latercera punta (conexión a tierra) <strong>de</strong>l cable eléctrico. Cualquier pregunta que tenga sobre elfuncionamiento eléctrico o sobre la conexión a tierra, <strong>de</strong>berá ser dirigida a un electricista certificado oa un centro <strong>de</strong> servicio autorizado por <strong>Avanti</strong> <strong>Products</strong>.ELIGIENDO LA UBICACIÓNAntes <strong>de</strong> instalar la lavadora automática, elija una ubicación con las siguientes características:Una superficie resistente y plana (si la superficie no es plana, vea “Ajustando las Patas Niveladoras”)Un lugar don<strong>de</strong> los rayos <strong>de</strong>l sol no caigan directamente, estos podrían afectar el recubrimientoacrílico o piezas plásticas o eléctricas <strong>de</strong> la lavadora automática.Ventilación a<strong>de</strong>cuada.La temperatura <strong>de</strong> la habitación no <strong>de</strong>berá caer por <strong>de</strong>bajo <strong>de</strong> los 0 C.Deberá estar alejada <strong>de</strong> fuentes <strong>de</strong> calor, tales como carbón o gas.Asegúrese que la lavadora automática no esté sobre el cable eléctrico.Cui<strong>de</strong> que las aberturas <strong>de</strong> ventilación no estén obstruidas por la alfombra cuando la lavadoraautomática se haya colocado sobre un piso con este material.AJUSTANDO LAS PATAS NIVELADORASSi el piso no está nivelado, no inserte pedazos <strong>de</strong> ma<strong>de</strong>ra u otros objetos, ajuste las patas <strong>de</strong> lalavadora automática <strong>de</strong> la siguiente manera:Desenrosque el tornillo <strong>de</strong> la pata niveladora hasta que llegue a la altura <strong>de</strong>seada.Para fijar la pata en su lugar, enrosque la tuerca con la llave inglesa (Vea Fig. 1)Ubique la lavadora automática en una superficie resistente.Si la lavadora automática no es ubicada en una superficie plana o resistente podría causar ruidos y/ovibraciones.22
QUITANDO LOS PERNOS DE EMBALAJEPara asegurar los accesorios que se encuentran suspendidos <strong>de</strong>ntro <strong>de</strong> la lavadora automáticadurante su transporte, esta cuenta con cuatro pernos.Antes <strong>de</strong> usar su lavadora automática, quite los cuatro pernos <strong>de</strong> la siguiente manera:Desenrosque los cuatro pernos con la llave inglesa.Cuando estén <strong>de</strong>sajustados, hale los pernos por la cabeza.Tape los cuatro orificios con las cubiertas plásticas que vienen con la lavadora automática.Guar<strong>de</strong> los pernos en caso que tenga que transportar la lavadora en el futuro.CONECTANDO LA MANGUERA DE ABASTECIMIENTO DE AGUALa manguera <strong>de</strong> abastecimiento <strong>de</strong> agua <strong>de</strong>be estar conectada por un extremo a la lavadoraautomática y por el otro al grifo <strong>de</strong> agua.No estire la manguera <strong>de</strong> abastecimiento <strong>de</strong> agua.Si la manguera no es lo suficientemente larga, y usted no <strong>de</strong>sea mover la llave <strong>de</strong> agua, reemplace lamanguera original por una mas larga. Esta manguera <strong>de</strong>berá ser <strong>de</strong> alta presión.Seleccione una llave <strong>de</strong> agua a<strong>de</strong>cuada como se indica en las figuras siguientes (vea Fig.2). Si noencuentra ninguna <strong>de</strong> las llaves mostradas use el adaptador <strong>de</strong> llave <strong>de</strong> agua que viene con lalavadora automática.El tubo terminal <strong>de</strong> la llave <strong>de</strong> agua <strong>de</strong>be tener más <strong>de</strong> 10mm (0.4”) <strong>de</strong> largo o el conector nofuncionará correctamente, esto podría producir fugas <strong>de</strong> agua.Conecte la manguera <strong>de</strong> abastecimiento <strong>de</strong> agua a los conectores que se encuentran en las válvulas<strong>de</strong> entrada <strong>de</strong> agua <strong>de</strong> la lavadora automática, para esto tendrá que girar las tuercas conectoras.Conecte el otro extremo <strong>de</strong> la manguera <strong>de</strong> abastecimiento <strong>de</strong> agua al grifo girando las tuercasconectoras.Si usted tiene un sistema <strong>de</strong> grifos <strong>de</strong> agua caliente y fría, asegúrese <strong>de</strong> conectar la manguera quesale <strong>de</strong> la válvula <strong>de</strong> entrada <strong>de</strong> agua caliente con la llave <strong>de</strong> agua caliente y la <strong>de</strong> entrada <strong>de</strong> aguafría con la llave <strong>de</strong> agua fría. (Vea Fig.2).NOTA: Asegúrese que los aros <strong>de</strong> jebe estén <strong>de</strong>ntro <strong>de</strong> las tuercas conectoras.CONEXIÓN DE AGUAPara un grifo <strong>de</strong> cocina standard, conecte su manguera <strong>de</strong> abastecimiento a la válvula <strong>de</strong> entrada <strong>de</strong>agua fría.Conecte la manguera <strong>de</strong> abastecimiento al adaptador <strong>de</strong> rosca “macho” girándola en dirección <strong>de</strong> lasmanillas <strong>de</strong>l reloj hasta que esté bien enroscado.Asegúrese <strong>de</strong> haber colocado el aro <strong>de</strong> jebe entre la manguera <strong>de</strong> abastecimiento y el adaptador <strong>de</strong>rosca “macho”. Luego, conecte la manguera al grifo firmemente.NOTA: Algunos grifos pue<strong>de</strong>n requerir el uso <strong>de</strong> un adaptador <strong>de</strong> rosca “hembra” entre el adaptador“macho” y la llave <strong>de</strong>l lava<strong>de</strong>ro. En ese caso, asegúrese que el aro <strong>de</strong> jebe esté colocado entreambos adaptadores.El siguiente grafico le explicará el procedimiento. (Fig.2A).Si tiene un problema <strong>de</strong> fuga <strong>de</strong> agua en la llave o en la válvula <strong>de</strong> entrada <strong>de</strong> la lavadoraautomática, cierre el ingreso <strong>de</strong> agua y ajuste firmemente las conexiones con una llave inglesa.23
Tenga cuidado <strong>de</strong> no ajustar excesivamente las piezas, esto podría dañar las conexiones <strong>de</strong> agua.Finalmente, abra la llave <strong>de</strong>l agua y verifique que no existan mas fugas <strong>de</strong> agua.UBICANDO LA MANGUERA DE DESAGUEEl extremo final <strong>de</strong> la manguera <strong>de</strong> <strong>de</strong>sagüe <strong>de</strong>berá estar ubicado en una <strong>de</strong> las siguientesposiciones:? Sobre el bor<strong>de</strong> <strong>de</strong>l frega<strong>de</strong>roLa manguera <strong>de</strong> <strong>de</strong>sagüe <strong>de</strong>berá estar ubicada a una altura <strong>de</strong> entre 2 a 3 pies (60 a 90 cm).Para mantener la forma curva <strong>de</strong> la manguera <strong>de</strong> <strong>de</strong>sagüe, use la guía plástica paramangueras que viene con la lavadora automática. Asegure la guía a una pared con ungancho o al grifo con una soguilla, <strong>de</strong> esta manera evitará qu e la manguera <strong>de</strong> <strong>de</strong>sagüe semueva <strong>de</strong> su sitio.? En un tubo <strong>de</strong> <strong>de</strong>sagüeLe recomendamos usar un tubo vertical con una altura <strong>de</strong>entre 2 a 3 pies (60 a 90 cm). El diámetro interior <strong>de</strong>l tubo <strong>de</strong><strong>de</strong>sagüe <strong>de</strong>be ser mayor al diámetro externo <strong>de</strong> la manguera<strong>de</strong> <strong>de</strong>sagüe.NOTA: El extremo final <strong>de</strong> la manguera <strong>de</strong> <strong>de</strong>sagüe <strong>de</strong>berá estar auna altura <strong>de</strong> entre 2 a 3 pies (60 a 90 cm) sobre el nivel <strong>de</strong>l piso, <strong>de</strong>lo contrario, la lavadora automática no funcionará a<strong>de</strong>cuadamente.FIG. 2BCONEXIÓN ELECTRICACUIDADOEl uso inapropiado <strong>de</strong>l cable con conexión a tierra aumenta las probabilida<strong>de</strong>s <strong>de</strong> una <strong>de</strong>scargaeléctrica. Si el cable está dañado, hágalo reemplazar por un centro <strong>de</strong> servicio autorizado por <strong>Avanti</strong><strong>Products</strong>.Esta lavadora automática <strong>de</strong>berá tener una conexión a tierra apropiada para no comprometer suseguridad.El cable eléctrico <strong>de</strong> esta lavadora está equipada con un enchufe <strong>de</strong> tres puntas. Este enchufe encajaperfectamente con los enchufes <strong>de</strong> pared Standard <strong>de</strong> tres entradas, <strong>de</strong> esta manera reducirá laposibilidad <strong>de</strong> una <strong>de</strong>scarga eléctrica.Por ningún motivo corte o retire la tercera punta <strong>de</strong>l enchufe <strong>de</strong>l cordón eléctrico <strong>de</strong> la lavadoraautomática.Esta lavadora requiere un enchufe eléctrico <strong>de</strong> tres entradas <strong>de</strong> 110 a 120 voltios y 60Hz A.C.El cordón eléctrico <strong>de</strong>berá permanecer asegurado a la parte posterior <strong>de</strong> la lavadora automática, no<strong>de</strong>berá estar expuesto o colgando para evitar una lesión acci<strong>de</strong>ntal.Nunca <strong>de</strong>senchufe la lavadora automática tirando <strong>de</strong>l cordón eléctrico. Siempre tome el enchufe yhale <strong>de</strong> él para <strong>de</strong>senchufar la lavadora.No use una extensión con esta lavadora. Si el cable eléctrico es corto, contrate un electricistacalificado y haga instalar un enchufe cerca <strong>de</strong> la lavadora.USANDO SU LAVADORA PORTATILPANEL DE CONTROL24
1. Dispensador <strong>de</strong> <strong>de</strong>tergente2. Panel <strong>de</strong> exhibición3. Botón <strong>de</strong> selección <strong>de</strong> INICIO RETARDADO4. Botón <strong>de</strong> selección <strong>de</strong> enjuague5. Botón <strong>de</strong> selección <strong>de</strong> temperatura <strong>de</strong>l agua6. Botón <strong>de</strong> selección <strong>de</strong> ciclo <strong>de</strong> lavado7. Botón <strong>de</strong> selección <strong>de</strong> tela8. Botón <strong>de</strong> selección inicio/pausa9. Botón <strong>de</strong> encendidoPREPARACION1. Conecte la manguera <strong>de</strong> abastecimiento <strong>de</strong> agua al grifo.2. Abra la llave <strong>de</strong>l agua.Si la presión <strong>de</strong>l agua es menor a 0.05MPa y mayor a 0.5MPa, no encienda la lavadora.3. Por su seguridad, conecte la lavadora solo a un enchufe con conexión a tierra.4. Coloque la manguera <strong>de</strong> <strong>de</strong>sagüe en la posición correcta.5. Abra la puerta <strong>de</strong> la lavadora automática e introduzca y ubique las prendas a lavar <strong>de</strong> manerauniforme. Cierre la puerta.6. Abra el cajón <strong>de</strong>l dispensador <strong>de</strong> <strong>de</strong>tergente, añada el <strong>de</strong>tergente l íquido y el suavizante <strong>de</strong> lasiguiente manera:(1) para el <strong>de</strong>tergente <strong>de</strong>l pre-lavado(2) para el <strong>de</strong>tergente <strong>de</strong>l lavado(3) para el suavizanteCuando use <strong>de</strong>tergente liquido (recomendado para programas sin proceso <strong>de</strong> pre-lavado), añada elrecipiente para <strong>de</strong>tergente liquido y siga las <strong>instrucciones</strong> que aparecen en el empaque.ADVERTENCIACuando use blanqueador líquido siga los siguientes pasos. De no seguir estas indicaciones podríadañar la ropa.1. Coloque las prendas a lavar <strong>de</strong>ntro <strong>de</strong> la lavadora 2. Encienda la lavadora y seleccione el tipo <strong>de</strong>lavado 3. Añada <strong>de</strong>tergente o jabón líquido 4. Espere 3 minutos <strong>de</strong>spués que el ciclo <strong>de</strong> lavado hayaempezado. Luego mida la cantidad correcta <strong>de</strong> blanqueador líquido (sin exce<strong>de</strong>r 1/3 <strong>de</strong> taza) <strong>de</strong> locontrario podría dañar la ropa.5. Abra el cajon y vierta el blanqueador líquido en la sección central <strong>de</strong>l cajón (II) 6. No viertablanqueado líquido sin diluir directamente en la ropa o el cilindro <strong>de</strong> lavarCuando use <strong>de</strong>tergente en polvo, recuer<strong>de</strong> que <strong>de</strong>berá quitar el recipiente para <strong>de</strong>tergente líquido.NOTA: NO llene los recipientes <strong>de</strong> <strong>de</strong>tergente y suavizante hasta el tope, ello causará que estos se<strong>de</strong>sbor<strong>de</strong>n.7. Empuje el cajón dispensador <strong>de</strong> <strong>de</strong>tergente hasta cerrarlo completamente.ADVERTENCIA: NO abra el cajón dispensador mientras la lavadora automática esté enfuncionamiento, esto podría causar que el agua se <strong>de</strong>rrame.INSTRUCCIONES DE FUNCIONAMIENTOPRESIONE EL BOTON DE ENCENDIDO (POWER)Presiónelo una vez para encen<strong>de</strong>r la lavadora automática, presiónelo nuevamente para apagarla.Si el ciclo <strong>de</strong> lavado ha terminado, la lavadora se apagará automáticamente.NOTA: Si la máquina está encendida por 10 minutos, y no se escoge ninguna opción (mediante losbotones <strong>de</strong> selección) esta se apagará automáticamente.25
PRESIONE EL BOTON PARA SELECCIONAR EL TIPO DE TELA (FABRICS)Seleccione el programa tomando en consi<strong>de</strong>ración las prendas a lavar:ALGODÓN – PLANCHADO PERMANENTE – DELICADOS – TEJIDOS DE PUNTO/LANAEl programa pre-seleccionado es PLANCHADO PERMANENTE.Cada programa tiene un ciclo <strong>de</strong> lavado y una temperatura <strong>de</strong> agua especifico:TIPO DE TELATEMPERATURA DEL CICLOAGUAALGODÓN CALIENTE / FRIA LAVAD O+ENJUAGUE+CENTRIFUGADOPLANCHADO PERM TIBIA / FRIA LAVADO+ENJUAGUE+CENTRIFUGADODELICADOS TIBIA / FRIA LAVADO+ENJUAGUE+CENTRIFUGADOTEJ. PTO/LANA FRIA / FRIA LAVADO+ENJUAGUE+CENTRIFUGADOSELECCIONAR EL CICLO DE LAVADO (CYCLE)Presione el botón <strong>de</strong> selección <strong>de</strong> ciclo repetidamente, el or<strong>de</strong>n <strong>de</strong> los ciclos es el siguiente:LAVADO + ENJUAGUE + CENTRIFUGADO >PRELAVADO +LAVADO +ENJUAGUE + CENTRIFUGADO >CENTRIFUGADO >ENJUAGUE + CENTRIFUGADO >LAVADO + ENJUAGUEEl ciclo <strong>de</strong> lavado pre-seleccionado es LAVADO+ENJUAGUE+CENTRIFUGADONOTA: El PRELAVADO podrá ser escogido sólo si es que ha seleccionado los siguientes tipos <strong>de</strong>tela: ALGODÓN y PLANCHADO PERMANTENTE.SELECCIONAR LA TEMPERATURA DEL AGUA PARA EL CICLO LAVAR/ENJUAGAR(WASH/RINSE WATER TEMPERAT URE)Presione el botón <strong>de</strong> selección <strong>de</strong> temperatura <strong>de</strong>l agua, usted pue<strong>de</strong> elegir la temperatura <strong>de</strong>l aguapara el proceso <strong>de</strong> lavado y enjuague <strong>de</strong> la siguiente manera:CALIENTE/FRIA >TIBIA/TIBIA >TIBIA/FRIA >FRIA/FRIALa temperatura pre-seleccionada <strong>de</strong> fábrica es TIBIA/FRIA.NOTA: La temperatura CALIENTE/FRIA podrá ser escogida sólo si es que ha seleccionado lossiguientes tipos <strong>de</strong> tela: ALGODÓN y PLANCHADO PERMANTENTE.IMPORTANTE: Si usted usa el sistema <strong>de</strong> una sola manguera <strong>de</strong> abastecimiento <strong>de</strong> agua (fría), lamáquina no podrá regular la temperatura <strong>de</strong>l agua tal y como se muestra en el panel <strong>de</strong> control. Eneste caso sólo se podrá usar la opción FRIA/FRIA.SELECCIONAR LA OPCION ENJUAGUE ADICIONAL (EXTRA RINSE)Presione este botón cuando la carga requiera un enjuague adicional.Cuando escoja esta opción, vera que la luz indicadora se encien<strong>de</strong> en el panel <strong>de</strong> control.NOTA: La opción ENJUAGUE ADICIONAL no está disponible cuando se eligió solamente el procesoCENTRIFUGADO.SELECCIONAR LA OPCION INICIO RETARDADO (DELAY START)Presione este botón repetidamente para elegir aplazar el inicio <strong>de</strong>l proceso (<strong>de</strong> 1 a 24 horas, en26
incrementos <strong>de</strong> 1 hora).Después <strong>de</strong> haber escogido la hora <strong>de</strong> inicio, el indicador <strong>de</strong> INICIO RETARDADO se encen<strong>de</strong>rá yapagará repetidamente; a<strong>de</strong>más, la pantalla LED indicará el tiempo restante.Para cancelar el INICIO RETARDADO:Presione el botón <strong>de</strong> ENCENDIDOPresione el botón <strong>de</strong> INICIO RETARDADO repetidamente hasta que el contador llegue a 0 (cero),luego, presione el botón INICIO/PAUSA.PRESIONE EL BOTON INICIO/PAUSA UNA VEZ Y LA LAVADORA COMENZARA A FUNCIONAR(START/HOLD)Al presionar este botón usted iniciará o hará una pausa en los programas <strong>de</strong> lavado.Mientras la lavadora esté funcionando, el tiempo restante (para terminar el proceso) se podrá ver enla pantalla LED.Cuando el programa termine, abra la puerta <strong>de</strong> la lavadora y saque sus prendas.NOTA:La puerta no abrirá sino hasta <strong>de</strong>spués <strong>de</strong> 3 minutos <strong>de</strong> haber terminado el proceso o haber apagadola lavadora (presionando el botón <strong>de</strong> encendido – POWER)Cuando el programa haya terminado, abra la puerta y retire las prendas.NOTA:? Las prendas que <strong>de</strong>stiñen fácilmente, se <strong>de</strong>ben lavar por separado, así evitará que manchenotras prendas.? Si usted <strong>de</strong>sea cambiar un programa seleccionado, haga lo siguiente? Presione el botón INICIO/PAUSA? Presione los botones correspondientes al nuevo programa? Presione el botón INICIO/PAUSA? Cuando los ciclos CENTRIFUGADO o ENJUAGUE+CENTRIFUGADO estén activos, no use<strong>de</strong>tergente.? Si usted <strong>de</strong>sea drenar agua durante el ciclo <strong>de</strong> lavado, haga lo siguiente:? Presione el botón INICIO/PAUSA, luego seleccione el ciclo CENTRIFUGADOPresione el botón INICIO/PAUSA para reiniciar el lavadoPROGRAMANDO EL INICIO RETARDADO (DELAY START)Elija esta opción cuando tenga que salir o tenga otra cosa que hacer.? Presione el botón <strong>de</strong> ENCENDIDO? Cargue la lavadora automática con las prendas y seleccione el programa <strong>de</strong> lavadoapropiado? Presione este botón repetidamente para aplazar el inicio <strong>de</strong>l proceso (<strong>de</strong> 1 a 24 horas, enincrementos <strong>de</strong> 1 hora).? Presione el botón INICIO/PAUSA para iniciar este programa (el conteo regresivo apareceráen la pantalla LED)CONSEJOS DE LAVADOSepare sus prendas <strong>de</strong> acuerdo a las siguientes características:? Tipo <strong>de</strong> tela: Algodón, tela mixta, sintética, seda , lana o rayón? Tipo <strong>de</strong> Cuidado requerido durante el lavado? Color: Separe las prendas blancas <strong>de</strong> las <strong>de</strong> color. Lave las prendas nuevas <strong>de</strong> color porseparado? Tamaño: Lavar prendas <strong>de</strong> distinto tamaño mejora los resultados <strong>de</strong>l lavado? Sensibilidad: Lave prendas <strong>de</strong>licadas por separado, use el programa <strong>de</strong> lavado DELICADOpara prendas <strong>de</strong> “pura lana nueva”, seda y cortinas.Revise las etiquetas <strong>de</strong> las prendas que va a lavar o remítase a la cartilla <strong>de</strong> cuidado según27
el tipo <strong>de</strong> tela en este <strong>manual</strong>.VACIE LOS BOLSILLOSMonedas, alfileres <strong>de</strong> seguridad u otros artículos metálicos pue<strong>de</strong>n dañar telas como el lino, elcilindro <strong>de</strong> la lavadora y el tanque <strong>de</strong> agua.CUIDADO CON LOS SUJETADORESAsegure las cremalleras, botones y ganchos <strong>de</strong> las prendas. Las correas no <strong>de</strong>ben estar sueltas y loslazos <strong>de</strong>ben estar atados.PRELAVANDO PRENDAS DE ALGODÓNNormalmente los programas <strong>de</strong> lavado ALGODÓN y PLANCHADO PERMANTENTE no sonnecesarios. Su nueva lavadora automática combinada con los <strong>de</strong>tergentes mo<strong>de</strong>rnos le dará unosresultados <strong>de</strong> lavado perfectos, <strong>de</strong> la misma manera le ahorrarán <strong>de</strong> energía, tiempo, agua y<strong>de</strong>tergente.Sin embargo, si su prenda <strong>de</strong> algodón está particularmente sucia, use el ciclo <strong>de</strong> prelavado con un<strong>de</strong>tergente en base a proteínas.DETERMINE LA CAPACIDAD DE CARGANo sobrecargue la lavadora automática, si lo hace, esta no lavará apropiadamente.CONSEJOS SOBRE EL DETERGENTE A USAREl <strong>de</strong>tergente que use <strong>de</strong>be ser apropiado para el tipo <strong>de</strong> tela <strong>de</strong> las prendas a lavar (algodón,planchado permanente, <strong>de</strong>licados y lana), el color, la temperatura <strong>de</strong> lavado, el grado y tipo <strong>de</strong>manchas.Siempre use un jabón <strong>de</strong> lavado <strong>de</strong> poca espuma, diseñado para lavadoras automáticas.Siga las recomendaciones <strong>de</strong>l fabricante <strong>de</strong> <strong>de</strong>tergente respecto al peso <strong>de</strong> la carga, el grado <strong>de</strong>suciedad, y la dureza <strong>de</strong>l agua en su zona. Si no sabe este dato, diríjale esa pregunta a su autoridadpertinente.NOTA: Mantenga el <strong>de</strong>tergente y otros aditivos <strong>de</strong> limpieza en un lugar seco y fuera <strong>de</strong>l alcance <strong>de</strong>los niños.CARTILLA DE CUIDADO SEGÚN EL TIPO DE TELA (vea pag.15)Material resistentePue<strong>de</strong> ser planchado (100 C máx.)Tela <strong>de</strong>licadaNo plancharLa prenda se <strong>de</strong>be lavar a 95 CLavar en seco con cualquier solventeLa prenda se <strong>de</strong>be lavar a 60 CLavar en seco con percloruro, combustiblepara encen<strong>de</strong>dor, alcohol puro o R113La prenda se <strong>de</strong>be lavar a 40 CLavar en seco con combustible <strong>de</strong> avión,alcohol puro o R113La prenda se <strong>de</strong>be lavar a 30 CNo lavar en secoLa prenda se pue<strong>de</strong> lavar a manoSecar sobre superficie planaBlanqueador solo con agua fríaSe pue<strong>de</strong> colgarNo usar blanqueadorColgar en un percheroPue<strong>de</strong> ser planchado (200 C máx.)Secar a temperatura regularPue<strong>de</strong> ser planchado (150 C máx.)Secar a temperatura reducidaNo usar secadora <strong>de</strong> ropaCUIDADO Y MANTENIMIENTO (vea pg.16)? Limpie regularmente la superficie exterior <strong>de</strong> su lavadora automática con un paño suave.28
? Limpie regularmente el cilindro interior <strong>de</strong> la lavadora, especialmente <strong>de</strong>spués <strong>de</strong> haberusado almidón o blanqueador.? Limpie el filtro que se encuentra <strong>de</strong>ntro <strong>de</strong> la válvula <strong>de</strong> suministro <strong>de</strong> agua o la manguera <strong>de</strong>abastecimiento, <strong>de</strong> esta manera prevendrá obstrucciones.1. Desconecte el enchufe2. Retire la manguera <strong>de</strong> abastecimiento y limpie el filtro con un cepillo3. Limpie el cajón dispensador <strong>de</strong>l <strong>de</strong>tergente.4. Remueva el cajón dispensador <strong>de</strong> su casillero, límpielo profundamente y enjuaguelo.Séquelo e introdúzcalo en nuevamente en su sitio.? Limpie el filtro <strong>de</strong> la bomba.? Limpie el filtro 2 o 3 veces al año.1. Quite el cobertor <strong>de</strong>l filtro que se haya en la parte <strong>de</strong>lantera <strong>de</strong> la lavadora automática.Asegúrese que no queda agua en el cilindro <strong>de</strong> la lavadora y que el enchufe está<strong>de</strong>sconectado.2. Ponga un recipiente o un paño <strong>de</strong>bajo <strong>de</strong>l cobertor <strong>de</strong>l filtro para prevenir que el agua se<strong>de</strong>rrame en el suelo.3. Quite el filtro girándolo media vuelta (en sentido antihorario) y halándolo.4. Limpie el filtro y póngalo nuevamente en su lugar.5. Coloque nuevamente el cobertor <strong>de</strong>l filtro en su sitio.DURANTE LAS VACACIONES1. Cierre la llave <strong>de</strong>l agua, <strong>de</strong>sconecte la manguera <strong>de</strong> abastecimiento <strong>de</strong> agua y <strong>de</strong>je que elagua drene <strong>de</strong> la misma.2. Haga funcionar la lavadora por un minuto en el ciclo centrifugado.3. Desconecte el cordón eléctrico.29
PROBLEMAS CON SU LAVADORA PORTATIL?Usted pue<strong>de</strong> resolver fácilmente algunos problemas <strong>de</strong> su lavadora, <strong>de</strong> esta manera se ahorrará elcosto <strong>de</strong> una posible reparación. Intente resolver los problemas <strong>de</strong> su aparato con las siguientessugerencias antes <strong>de</strong> llamar a un técnico.PROBLEMALa lavadora no funciona.CAUSA POSIBLENo está enchufada.Hubo un corto circuito o un fusible voló.El botón <strong>de</strong> encendido está apagado.La tapa no está cerrada.Asegúrese que la llave <strong>de</strong> agua esté abierta.No hay agua o el nivel <strong>de</strong>agua es muy bajo.La llave <strong>de</strong> agua no está abierta.La manguera <strong>de</strong> abastecimiento está congelada.La manguera <strong>de</strong> abastecimiento está doblada.El filtro <strong>de</strong> la manguera está obstruído.El nivel <strong>de</strong> agua sube ybaja continuamente.La manguera <strong>de</strong> drenaje no está ubicada a la alturacorrecta (entre 2 y 3 pies).La lavadora no <strong>de</strong>sagua.La manguera está doblada.El filtro <strong>de</strong> la manguera está obstruído.Queda <strong>de</strong>tergente en el cajón La lavadora está funcionando sin la suficiente presión <strong>de</strong><strong>de</strong>spués que terminó el lavado. agua.La lavadora vibra o hace mucho Verifique que la lavadora esté nivelada.ruido.Los pernos <strong>de</strong> transporte no se quitaron.La lavadora está tocando otro objeto.La carga <strong>de</strong> prendas no está balanceada.30
SERVICIO PARA SU LAVADORAEstamos orgullosos <strong>de</strong> la organización <strong>de</strong> nuestro servicio al cliente y <strong>de</strong> los técnicos profesionalesque proveen servicio a su lavadora automática <strong>Avanti</strong>. Cuando compra un producto <strong>Avanti</strong>, ustedpue<strong>de</strong> estar seguro que si alguna vez necesita información o asistencia, el equipo <strong>de</strong> servicio alcliente <strong>de</strong> <strong>Avanti</strong> <strong>Products</strong> estará ahí para ayudarlo. Llámenos <strong>de</strong> manera gratuita.SERVICIO AL CLIENTE DE AVANTI PRODUCTSInformación <strong>de</strong> producto Cualquier sea su pregunta sobre nuestros productos, la800-323-5029 ayuda está disponible.Pedido <strong>de</strong> piezasUsted pue<strong>de</strong> or<strong>de</strong>nar piezas y accesorios que serán800-220-5570 enviados directamente a su casa con cargo a un chequepersonal, Giro Postal, Or<strong>de</strong>nes <strong>de</strong> dinero, Mastercard o Visa.Servicio <strong>de</strong> reparación adomicilioUn centro <strong>de</strong> servicio autorizado <strong>de</strong> <strong>Avanti</strong> <strong>Products</strong>le proveerá <strong>de</strong> un servicio <strong>de</strong> reparación experimentado,este será programado a la hora que le sea másconveniente. Nuestro equipo <strong>de</strong> servicio está totalmenteentrenado y conocen su lavadora por <strong>de</strong>ntro y fuera.31
32PRINTED IN CHINA