recuperadores de calor heat recovery units recuperateurs de ...
recuperadores de calor heat recovery units recuperateurs de ...
recuperadores de calor heat recovery units recuperateurs de ...
- No tags were found...

You also want an ePaper? Increase the reach of your titles
YUMPU automatically turns print PDFs into web optimized ePapers that Google loves.
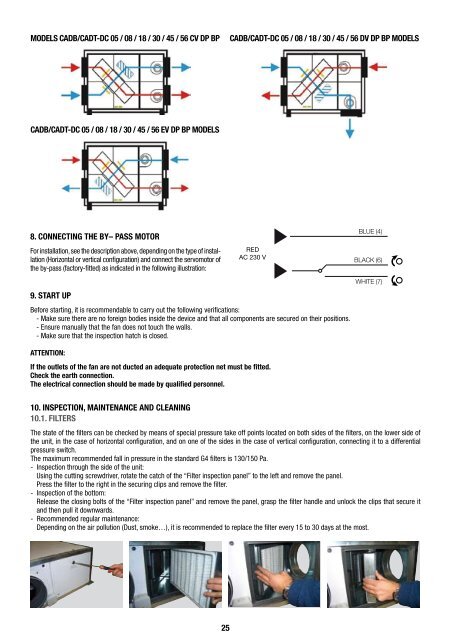
MODELS CADB/CADT-DC 05 / 08 / 18 / 30 / 45 / 56 CV DP BPCADB/CADT-DC 05 / 08 / 18 / 30 / 45 / 56 DV DP BP MODELSCADB/CADT-DC 05 / 08 / 18 / 30 / 45 / 56 EV DP BP MODELS8. CONNECTING THE BY– PASS MOTORFor installation, see the <strong>de</strong>scription above, <strong>de</strong>pending on the type of installation(Horizontal or vertical configuration) and connect the servomotor ofthe by-pass (factory-fitted) as indicated in the following illustration:9. START UPREDAC 230 VBefore starting, it is recommendable to carry out the following verifications:- Make sure there are no foreign bodies insi<strong>de</strong> the <strong>de</strong>vice and that all components are secured on their positions.- Ensure manually that the fan does not touch the walls.- Make sure that the inspection hatch is closed.ATTENTION:If the outlets of the fan are not ducted an a<strong>de</strong>quate protection net must be fitted.Check the earth connection.The electrical connection should be ma<strong>de</strong> by qualified personnel.BLUE (4)Black (6)White (7)10. INSPECTION, MAINTENANCE AND CLEANING10.1. FILTERSThe state of the filters can be checked by means of special pressure take off points located on both si<strong>de</strong>s of the filters, on the lower si<strong>de</strong> ofthe unit, in the case of horizontal configuration, and on one of the si<strong>de</strong>s in the case of vertical configuration, connecting it to a differentialpressure switch.The maximum recommen<strong>de</strong>d fall in pressure in the standard G4 filters is 130/150 Pa.- Inspection through the si<strong>de</strong> of the unit:Using the cutting screwdriver, rotate the catch of the “Filter inspection panel” to the left and remove the panel.Press the filter to the right in the securing clips and remove the filter.- Inspection of the bottom:Release the closing bolts of the “Filter inspection panel” and remove the panel, grasp the filter handle and unlock the clips that secure itand then pull it downwards.- Recommen<strong>de</strong>d regular maintenance:Depending on the air pollution (Dust, smoke…), it is recommen<strong>de</strong>d to replace the filter every 15 to 30 days at the most.25