Quick start guide Guide d'utilisation rapide Guía de ... - telebox-live
Quick start guide Guide d'utilisation rapide Guía de ... - telebox-live
Quick start guide Guide d'utilisation rapide Guía de ... - telebox-live
- No tags were found...

You also want an ePaper? Increase the reach of your titles
YUMPU automatically turns print PDFs into web optimized ePapers that Google loves.
<strong>Quick</strong> <strong>start</strong> <strong>gui<strong>de</strong></strong><strong>Gui<strong>de</strong></strong> <strong>d'utilisation</strong> <strong>rapi<strong>de</strong></strong><strong>Guía</strong> <strong>de</strong> utilización rápidaBedienungsanleitungGuida all'usoGebruikershandleidingManual do utilizador
equire, namely 81 per cent of the eligible population. Eligibility for ART is usually <strong>de</strong>fined as aCD4 count threshold 11 . As shown on table 1, the median life expectancy of an HIV-positive adultbetween 25 and 34 years old who is not taking ART is expected to be 2.6 years when his/her CD4drops below 200 cells/mm 3 . This rises to 4.4 years when the threshold is set below 350 cells/mm 3and 7.7 years when set below 500 cells/mm 3 . Which of these thresholds is sufficiently low anddramatic to generate a wi<strong>de</strong>ly-shared moral duty to rescue is beyond the scope of the paper. Theconventional approach adopted for such issues of medical ethics is the Bolam test, whereby if astandard is wi<strong>de</strong>ly practiced by qualified professionals it is <strong>de</strong>emed to be reasonable. 12 Currently, the350 cell threshold probably best meets this condition. The more ambitious 500 cell threshold nowencouraged by the WHO is not yet wi<strong>de</strong>ly practised (Munthali et al. 2014), and an important part ofits rationale is prevention as distinct from rescue. 13 Prevention will be introduced in sections 4 and 5.In particular, we will discuss the financial impact of providing ART to individuals with CD4 countsuperior to 350 CD4/mm 3 as a prevention strategy. In line with this, this section assumes that thecoverage rates for other preventative interventions against HIV are equal to zero, except fromcircumcision rates which are assumed to remain constant.Median survivaltime without ARTMedian survivaltime without ARTAge at infection 15-24 25-34CD4 count>500 16 12350-500 11.1 7.7250-349 7.5 4.4200-249 5 2.6100-199 3.5 1.950-99 2 1.2Table 1 – CD4 count and median life expectancy (Spectrum estimates)Unit costs of treatment are assumed to be constant over time 14 and are based on Schwartlän<strong>de</strong>r et al.(2011). Transition from 1st line to 2nd line ART was mo<strong>de</strong>lled assuming that 2.64% of people on11 A useful indicator for measuring the progress of the HIV infection relates to the level of <strong>de</strong>pletion of CD4 cells. Thesewhite blood cells are an essential part of the human immune system and can be infected and <strong>de</strong>stroyed by the HIV virus.One mission of the World Health Organization (WHO) is to issue <strong>gui<strong>de</strong></strong>lines <strong>de</strong>fining a CD4 count threshold belowwhich ART is recommen<strong>de</strong>d. The new 2013 <strong>gui<strong>de</strong></strong>lines recommend that drugs be initiated as soon as a patient's CD4count falls below 500 cells/mm 3 . Previously, the 2010 WHO recommendation was to offer treatment at 350 CD4cells/mm 3 , and the 2006 <strong>gui<strong>de</strong></strong>lines set the threshold at 200 cells/mm 3 .12 Segen's Medical Dictionary. (2011). A more general procedural approach than the Bolam test for <strong>de</strong>termining aconsensual threshold is the “accountability for reasonableness framework” of Norman Daniels (Daniels, 2000; Danielsand Sabin, 2014).However, there is little basis for thinking that this framework would lead to a different conclusion.13 In their report justifying the switch from the 350 CD4/mm 3 to 500 CD4/mm 3 , the WHO write: "Expanding theeligibility criteria for ART and the options for using ARV drugs creates opportunities to save <strong>live</strong>s and reduce HIVtransmission" (WHO, 2013)14 The literature is unclear how the unit cost of providing ART is likely to change as coverage is expan<strong>de</strong>d. For a givenlevel of health facilities unit costs can be expected to <strong>de</strong>crease as ART coverage is expan<strong>de</strong>d, thanks to economies of6
<strong>Quick</strong> <strong>start</strong><strong>gui<strong>de</strong></strong>ContentBefore you beginInstallationGetting <strong>start</strong>edPhoneMusicInternetVi<strong>de</strong>oTroubleshootingGeneral informationp.11p.12p.15p.17p.18p.20p.22p.23p.24Before you beginAbout this <strong>gui<strong>de</strong></strong>In or<strong>de</strong>r to limit our paper consumption and aspart of our environmentally friendly andresponsible approach, Parrot prefers to putuser documents online rather than print themout. This simplified <strong>gui<strong>de</strong></strong> to the ParrotASTEROID Smart is therefore limited toproviding you with the main instructions thatwill make it easy for you to use the <strong>de</strong>vice.More information can be found on the supportsection of our website, www.parrot.com: thefull manual, FAQs, tutorials, and more.Note: iPod®, iPhone® (in iPod mo<strong>de</strong>) and iPad®will be referred to as an "iPod" in this manual.Softw are updatesDownload the latest update for free (andconsult the update procedure) on the ParrotASTEROID Smart support page on our websitewww.parrot.com. These updates will enableyou to receive new features and improve theproduct’s compatibility.Note: You can also download the ParrotASTEROID Smart's updates while connected tothe Internet. The availability of an update isindicated on the notification bar.WarningsAll functions requiring an increased attentionshould only be used while the vehicle isstationary. Your safety and the one of the otherroad users prevails over phone calls, music anddriving assistance applications. Be responsible:drive carefully and pay full attention to yoursurrounding. Parrot <strong>de</strong>nies any liability shouldyou choose not to respect this warning.Use the Parrot ASTEROID Smart with areasonable volume level so that you can hear allexternal noises while driving.The Parrot ASTEROID Smart inclu<strong>de</strong>s NdFeBmagnets which can damage objects sensitive tomagnetic fields (pacemakers, credit cards,mechanical clocks…).The Parking Brake wire of Parrot ASTEROIDSmart's ISO cable <strong>de</strong>tects whether or not theparking brake is on. It must be connectedfollowing the installation instructions provi<strong>de</strong>din this document. Incorrect installation orconnection may be dangerous and illegal inmany states / countries. Un<strong>de</strong>r nocircumstances should the screen within thedriver's field of vision broadcast any vi<strong>de</strong>osEnglish11
while the vehicle is moving. The same appliesto any applications other than those for drivingor navigation assistance.If you attempt to use an application that is notinten<strong>de</strong>d for navigation or driving assistancewhen you are driving, an on-screen warning willbe displayed. To watch a vi<strong>de</strong>o on the ParrotASTEROID Smart's screen, make sure that thevehicle is stopped in a safe area and that theparking brake is on.Steering w heel control interfaceA steering wheel control interface can be usedto connect your vehicle’s steering wheelcontrols to your Parrot car stereo. With thisinterface, you will be able to make phone callsvia the steering wheel controls while keepingyour hands on the wheel. Refer to our websitewww.parrot.com for more information.InstallationNote: We advise our customers to have theParrot ASTEROID Smart fitted by a professional.Safety instructionsTurn the ignition off before installing theParrot ASTEROID Smart.Do not install the Parrot ASTEROID Smartwhere it may injure the driver or a passenger ifthe vehicle stops sud<strong>de</strong>nly.Do not install the Parrot ASTEROID Smartwhere it may interfere with the driveroperation of the vehicle.Do not drill holes in the dashboard or any panelwithout first making sure there is nothingbehind it. Do not damage any fuel line,electronic component or cable.If you need to use screws, do not allow them tocome into contact with any power cable.Install the Parrot ASTEROID Smart only onvehicles with a 12 V battery.Place all cables away from hot places (heateroutlet) and moving parts (gear shift, seatrails...). Make sure they will never wind aroundthe steering column or gearstick.Confirm the proper function of your vehicle'sother equipment after installing the ParrotASTEROID Smart.Do not install the Parrot ASTEROID Smart orone of its components where the airbag may<strong>de</strong>ploy.Do not install the Parrot ASTEROID Smart inplaces subject to high temperatures orhumidity.Make sure you leave enough space behind theParrot ASTEROID Smart once installed so thatproper heat dispersal is ensured.Before you beginRemove your car stereo from your vehicle. Youmay need release keys to do so.Try to connect the audio and power connectorsof the Parrot ASTEROID Smart to theconnectors of your vehicle. If this connection isimpossible, you have to obtain an ISO adapterbefore installing the Parrot ASTEROID Smart.Refer to the Vehicle compatibility section onthe Parrot ASTEROID Smart support page formore information.Compare the Parrot ASTEROID Smart antennaconnector to the antenna connector of yourvehicle. If an adapter is necessary, contact your12 English
local car audio specialist.Note : Make sure you also supply power to yourantenna if it is amplified. Power to the antennacan be supplied using the Parrot ASTEROIDSmart ISO cable.Installation using the hol<strong>de</strong>r1. Loosen the 4 screws to remove the ParrotASTEROID Smart hol<strong>de</strong>r.2. Insert the hol<strong>de</strong>r into the dashboard. To doso, bend the tabs 90 <strong>de</strong>grees (diagram A p.7)3. Install the Parrot ASTEROID Smart andfasten the screws (diagram B p.7).4. Attach the trim ring (diagram C p.8).Installation using the si<strong>de</strong> screw holes1. Loosen the 4 screws to remove the ParrotASTEROID Smart hol<strong>de</strong>r.2. Remove the two si<strong>de</strong> brackets (diagram Dp.8).3. Position the Parrot ASTEROID Smart sothat its screw holes are aligned with thescrew holes of the bracket.4. Tighten as many screws as necessary<strong>de</strong>pending on the mo<strong>de</strong>l of your vehicle.Only use the provi<strong>de</strong>d screws.Installing the GPS receiverStick the GPS receiver in an unobstructed areainsi<strong>de</strong> the car.Athermic windshields and windows with abuilt-in antenna can interfere with GPSreception and reduce the reliability ofinformation from navigation applications.The GPS receiver antenna is locatedon the si<strong>de</strong> where "ParrotASTEROID GPS" is written andwhere the star-shaped logo is. Thislogo must always be directedtowards the sky.If your vehicle has an athermic windshield, stickthe GPS receiver on the windshield on the nonathermic area. The si<strong>de</strong> where the star-shapedlogo is must be stuck on the windshield(diagram F p.9).Note : The non athermic area of the windshield<strong>de</strong>pends on the mo<strong>de</strong>l of your vehicle. It isusually located near the rear view mirror.If your vehicle does not have an athermicwindshield, stick the GPS receiver on thedashboard. The si<strong>de</strong> where the star-shapedlogo is must be visible (diagram E p.9).To make sure the adhesive tape adheres well :use the provi<strong>de</strong>d adhesive tape ;clean the area with an appropriate cleaningproduct before sticking the support ;once you have stuck the support on thedashboard, wait for approximately 2 hourswithout handling it.Connecting the parking brake leadThe parking brake lead allows you to use theParrot ASTEROID Smart vi<strong>de</strong>o function orapplications only when the parking brake is set.If this cable is not connected to your vehicleparking brake system, the vi<strong>de</strong>o function willnot be available.1. Connect the parking brake extension leadto the Parrot ASTEROID Smart greencable.2. Locate and test the parking brake signalcable in the vehicle. This cable connectsyour parking brake to the parking brakesignal on your dashboard.3. Route the Parrot ASTEROID Smart parkingbrake extension lead (green) safely andsecurely from the Parrot ASTEROID Smartand connect this to the parking brake signalcable using a suitable method.English13
Warning: An improper connection or use of thiscable is dangerous and illegal in many states.Installing a rear view cameraIf you are to use the Parrot ASTEROID Smartwith a rear view camera (not provi<strong>de</strong>d), theorange cable on the Parrot ASTEROID SmartISO cable will <strong>de</strong>tect when the gearstick ismoved to "reverse". Connect this cable to theone providing power to the reverse lamp ofyour vehicle in or<strong>de</strong>r to display the rear viewcamera image when backing your vehicle.Connect the rear view camera vi<strong>de</strong>o cable tothe Vi<strong>de</strong>o CAM connector located at the backof the Parrot ASTEROID Smart.Installing the microphoneThe optimum location for the microphone is inthe centre of the vehicles roof near the rearview mirror. The microphone i<strong>de</strong>ally needs tobe less than 60cm’s from the users mouthpointing directly towards them with noobstructions.Please take care when routing the microphonecable through the vehicle to the <strong>de</strong>siredlocation, we recommend routing alongsi<strong>de</strong>existing manufacture’s wiring looms securing asyou go making sure the microphone cable is notpinched or trapped.Warning: Do not run the microphone cable insuch a way as to obstruct or interfere with thevehicles operation or cause injury to itsoccupants. In particular vehicle safety <strong>de</strong>vicesuch as airbags and other SRS systems.ISO cable connectionConnect the audio and power connectors of theParrot ASTEROID Smart to the ones of yourvehicle.Note: Use the provi<strong>de</strong>d cable ties to make surethe cables are well fixed to the car stereo. Insertone of the cable ties into the slots in the top ofthe back of the car stereo (refer to the diagramp.4).Once the connections are ma<strong>de</strong>, check yourinstallation. To do so, turn the ignition on thenoff. The "Goodbye" message must bedisplayed. If it is not the case, it is necessary toswap the positions of the red and yellow wires.In<strong>de</strong>ed, the red wire of the power cable mustbe connected to the 12V ignition, the yellowwire to the permanent 12V and the black wire tothe ground. This can be done simply byreversing both bullet connectors located on theParrot wiring.Installing the USB cablesConnect the USB cables to the ParrotASTEROID Smart. We recommend youconnect all audio cables to the ParrotASTEROID Smart even if you do not plan onusing them. Route the audio cables to asuitable location in your vehicle such as theglove box or arm rest compartment. It may benecessary to drill a hole in your dashboard to doso. Avoid using USB extension cables.The USB cable (1.2m - 2A) to which you willconnect the USB / iPod cable extension mustbe connected to its specific white USB port."iPod" is written above it.To guarantee an optimal reception quality werecommend you do not connect your internetUSB key 3G on the Parrot ASTEROID Smartdirectly : use the USB cable to install your<strong>de</strong>vice on the dashboard (or any other openarea).Basic operationsThe Parrot ASTEROID Smart faceplate can beremoved to protect your unit from theft. TheParrot ASTEROID Smart cannot work withoutits faceplate.14 English
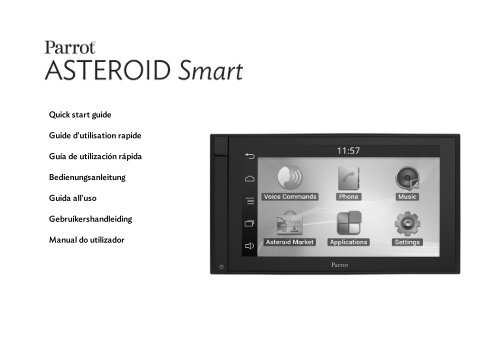
Handle the faceplate with care. Do not forcewhile installing or removing it. Keep it awayfrom sunlight, humidity or high temperatures.To remove the faceplate, hold down the buttonon the top left and sli<strong>de</strong> it downwards (diagramG p.10).To replace the faceplate, insert its magnetedinferior part then press the superior part untilyou hear a click.Getting <strong>start</strong>edHome screenSli<strong>de</strong> your finger horizontally to the left. Youwill discover more space for adding functionsshortcuts.Touch an icon to get to the correspondingfunction. Touch the Applications icon forinstance. The list of the available applicationsis displayed. Sli<strong>de</strong> your finger downward tobrowse through the applications list.Press to get back to previous menu. Pressto get to the home screen.Press to access the pop-up menucorresponding to the current application. Thepop-up menu allows you to change severalsettings or to access more functions.Press to display the last applications usedor currently in use.Press to adjust the volume. Then sli<strong>de</strong> thecursor to the left or to the right.Personalizing the home screenTo add an application shortcut on your homescreen:1. Tap Applications.2. Press and hold the application icon you areinterested in.3. Drag the icon to the home screen whereyou want to add it.To remove an application shortcut:1. Press and hold the shortcut you want toremove.2. Drag the icon upwards to the Removeindication. When the icon turns red, liftyour finger.Changing settingsTo change the Parrot ASTEROID Smartsettings, tap Applications, then Settings. Youcan also tap , then Settings.English15
Connecting a phone via BluetoothNote : Refer to the compatibility page of ourwebsite to check if your phone is compatiblewith the Parrot ASTEROID Smart and to consultthe specific pairing procedures for the mostcommon phones : www.parrot.com/uk/compatibility.If you are using the Parrot ASTEROID Smartwith your phone for the very first time, youmust initially pair both <strong>de</strong>vices. Once yourtelephone is paired with the Parrot ASTEROIDSmart, the 2 <strong>de</strong>vices will automatically connectwhen they are turned on (as well as B luetooth®features) and in proximity of each other.1. In the Settings menu, press Wireless &networks > Bluetooth.2. If necessary, activate the B luetooth andDiscoverable options.3. From your phone, search for B luetoothperipherals and select «Parrot ASTEROIDSmart».4. The pairing procedure <strong>de</strong>pends on whichtelephone mo<strong>de</strong>l you have:If the phone asks you to enter theB luetooth PIN co<strong>de</strong>, enter “0000”.If the Parrot ASTEROID Smart andyour telephone display two co<strong>de</strong>s,verify that the co<strong>de</strong>s are i<strong>de</strong>ntical,then either confirm or invalidate.Note: Depending on the mo<strong>de</strong>l of your phone,you may need to authorize the connection to theParrot ASTEROID Smart to allow furtherautomatic connections. Refer to the user <strong>gui<strong>de</strong></strong>of your phone for more information.Connecting tw o phonesTo activate multipoint telephony and connecttwo phones :1. Tap Phone.2. Tap , then Bluetooth > Options.3. Activate the Multipoint Telephony option.When the Parrot ASTEROID Smart is switchedon, it attempts to connect to all paired phonesin the vehicle. If there are more than two pairedphones in the vehicle, the <strong>de</strong>vice connects tothe two phones with the ol<strong>de</strong>st pairing.When two phones are connected to the ParrotASTEROID Smart, one of them becomes themain phone and the other is the secondaryphone. By <strong>de</strong>fault, the main phone is the onewith the ol<strong>de</strong>st pairing to the Parrot ASTEROIDSmart.You can receive calls to the main or secondaryphones.Only the phonebook for your main phone maybe accessed through the Parrot ASTEROIDSmart. You can only make calls using the mainphone. However, you can easily switchbetween the connected phones. To do so :1. Tap Phone.2. Tap , then Phone.3. Select the main phone.Synchronising the phonebookWith most of the B luetooth phones, thephonebook is automatically synchronized in thesystem’s memory. Each time you change yourdirectory, synchronisation will <strong>start</strong>automatically the next time it is connected.Warning: Only the contacts stored in the phonememory are synchronized. If your contacts arestored in your SIM card memory, transfer themonto your phone memory.The automatic synchronization is limited to5000 contacts (or phone numbers) for eachpaired phone.16 English
PhoneReceiving a callAn incoming call is indicated by a ringtone. Thename of the caller is announced if his number isrecor<strong>de</strong>d in the phonebook of the phoneconnected to the Parrot ASTEROID Smart.If you want to answer the call, tap thegreen button on the Parrot ASTEROIDSmart screen. Then tap the red button toend the call.If you want to refuse this call, tap the redbutton.Making a call via voice recognitionYou can make a call using voice recognitiondirectly after automatic synchronization. TheParrot ASTEROID Smart will automaticallyrecognize the contact you wish to call.1. Tap Voice Command > Contacts to launchthe voice recognition feature.> The Parrot ASTEROID Smart asks you thename of the contact you want to call.2. Say the name of the contact and the type ofnumber («WORK», «CELLPHONE»...) ifthere are several numbers associated to yourcontact.> The call is automatically launched if thevoice tag is correctly un<strong>de</strong>rstood. If it is notthe case, a confirmation message is asked.Confirm by saying «YES» or «CALL».Note: At any time, press the thevoice recognition mo<strong>de</strong>.button to exitMusicNote: Several minutes of loading may benecessary when connecting your audioperipheral (USB / SD / iPod) to the ParrotASTEROID Smart for the first time, particularly ifyou are using audio peripheral with a largecapacity or containing many audio files. Thisloading time will allow your audio files to beaccessible via voice recognition.Using vocal music searchThe voice recognition function allows you toselect the artist / album you want to hear viavoice recognition. This function is onlyavailable if you are using the Parrot ASTEROIDSmart with a USB / SD / iPod peripheral ormusic applications compatible with thisfeature.1. Tap Voice Commands > Music.2. Say the name of the artist / album whenasked to do so.> The list of audio sources connected tothe Parrot ASTEROID Smart andapplications compatible with the vocalmusic search function which contain theartist / album that you selected willappear.English17
Note: Check the albums and artists names in themetadatas of your music files. These names maybe different from the ones displayed on yourmusic files titles.Radio1. Tap Music >Tuner.2. Sli<strong>de</strong> the sli<strong>de</strong>r to the left / right to changethe radio station.To get the list of all available stations:1. Tap Music >Tuner.2. Press the button and select New scan> OK.1. Tap Music > Tuner.2. Select the frequency manually or inFullscan mo<strong>de</strong>.3. Press the button then select Add topresets.> To select a stored station, select thePresets mo<strong>de</strong>.Note: You can store as many stations as youwant.iPod1. Connect the USB / iPod extension lead tothe USB cable connected to the white USBport and connect your iPod to it.2. Tap Music > iPod. You can also tap Browseto browse through the content of your iPod.3. Tap a track to <strong>start</strong> playback.USB storage <strong>de</strong>viceThe Parrot ASTEROID Smart is compatiblewith the majority of USB keys / MP3 audioplayer / external hard drive. There is norestriction in terms of capacity of USB keys.Only MP3, AAC or WMA formats aresupported.1. Connect your USB storage <strong>de</strong>vice to theParrot ASTEROID Smart using the USBcable or the USB connectors on the back ofthe car stereo2. Tap Music > USB. You can also tap Browseto browse through the content of yourUSB <strong>de</strong>vice.3. Tap a track to <strong>start</strong> playback.SD cardThe SD card capacity must not exceed 32Gb.Only MP3, AAC, WAV, OGG or WMA formatsare supported.Note : To remove the SD card, put a fingernailinto the ridge on the exposed end of the SD card.1. Remove the Parrot ASTEROID Smartfaceplate.2. Insert the SD card into the appropriate slotwith the contact surface facing left(diagram H p.10).3. Reattach the faceplate.4. Tap Music > SD. You can also tap Browseto browse through the content of your SDcard.5. Tap a track to <strong>start</strong> playback.Audio player connected via BluetoothNote : The Parrot ASTEROID Smart allows you touse the telephone and audio streamingfunctions from 2 different phones withouthaving to disconnect one of them.You can use the Parrot ASTEROID Smart tolisten to songs stored on your mobile phone orB luetooth audio <strong>de</strong>vice. To do so, your phone /18 English
audio <strong>de</strong>vice must support the B luetooth A2DPprofile (Advanced Audio Distribution Profile).If you are using a B luetooth audio player for thefirst time, you have to pair both <strong>de</strong>vices.If both <strong>de</strong>vices are already paired:1. Tap Music > Bluetooth Audio.2. Start playing a song on your audio player.Screen commandsWhile playing a music track or the radio:tap the screen to pause / resume playbackor mute the radio ;sli<strong>de</strong> your finger upwards to increase thevolume ;sli<strong>de</strong> your finger downwards to <strong>de</strong>creasethe volume.While playing a music track (except audioplayers connected using a jack / jack cable):sli<strong>de</strong> your finger to the right to skip to thenext track ;sli<strong>de</strong> your finger to the left to get back tothe previous track.Note : If you are using the Parrot ASTEROIDSmart with an audio player connected viaBluetooth, these commands are only available ifyour audio player supports the AVRCP profile(Audio/Vi<strong>de</strong>o Remote Control Profile).InternetWarning: Internet connection via a 3G keyrequires a subscription offer with a telephoneoperator. Using this service can result insignificant roaming charges. Check theconditions of your subscription andconsumption tracking with your operator.Parrot disclaims any liability for associatedcosts.Connection w ith a 3G/4G keyNote : Refer to the compatibility section of ourwebsite to see the list of 3G / 4G keys that arecompatible with the Parrot ASTEROID Smart.1. Connect a 3G key to the Parrot ASTEROIDSmart with a USB cable.> A pop-up will appear.Note : To ensure optimum reception quality, donot connect your 3G/4G key to the back of theParrot ASTEROID Smart: use a USB cable toinstall the accessory on the dashboard (or anyother unobstructed area).2. Enter your PIN co<strong>de</strong> using the knob, thenselect ENTER. Check the Memorise PINco<strong>de</strong> option if you would like your PINco<strong>de</strong> to be stored each time you turn onEnglish19
the Parrot ASTEROID Smart.Note: You will be able to change this setting byselecting Settings > Wireless and networksettings > Mobile data networks. Among themobile access <strong>de</strong>vices, select your 3G / 4G key,tap Forget PIN co<strong>de</strong> > Forget.3. Select your APN (Access Point Name)from the suggested list. This informationis available in the documentation provi<strong>de</strong>dwith your 3G / 4G key. If your APN is not inthe list, you can add it by selecting Settings> Wireless and network settings > Mobiledata networks.4. Among the mobile access <strong>de</strong>vices, selectyour 3G / 4G key.5. Select Access point > Other > Presetaccess points.6. Wait approximately 30 seconds until theconnection is established. You can alsopress the button and browse themenus while the connection is beingestablished.Connection via BluetoothIf you have a telephone that supports theB luetooth® profile, DUN (Dial-Up Networking)or PAN (Personal Area Network), theB luetooth connecting your telephone to theParrot ASTEROID Smart will allow for sharingof the telephone's 3G connection.Note : Refer to the compatibility section of ourwebsite to check if your phone allows the 3Gconnection sharing via Bluetooth® and toconsult the corresponding procedure :www.parrot.com/uk/compatibility.1. Connect your telephone to the ParrotASTEROID Smart via B luetooth.2. On the Parrot ASTEROID Smart, selectSettings > Wireless and network settings >Mobile networks settings > Mobile access<strong>de</strong>vices.3. Select your APN (Access Point Name)from the suggested list, then check Select.4. Press the button and select Connect.5. Allow connection sharing on yourtelephone. This procedure will varyaccording to your telephone mo<strong>de</strong>l.Connection via USBNote : Refer to the compatibility section of ourwebsite to check if your phone supports 3Gconnection sharing via USB and to consult thecorresponding procedure for the most commonphones : www.parrot.com/uk/compatibility.1. Make sure that your phone’s keypad isunlocked, then connect the phone to theParrot ASTEROID Smart using the USBcable/micro-USB provi<strong>de</strong>d with yourphone. You can also connect the phoneusing the USB extension cable provi<strong>de</strong>dwith the Parrot ASTEROID Smart. Thisconnection also enables you to rechargeyour phone’s battery.Note: Do not use the white iPod USB port toconnect your phone to the Parrot ASTEROIDSmart.2. Select your APN (Access Point Name)from the suggested list, then check theoption Select. You can then modify thissetting by selecting Settings > Wirelessand networks > Mobile data networks.> A pop-up window indicating that USBconnection sharing has been activated willappear.20 English
Connection to a Wi-Fi netw orkIf your smartphone can be used as a wirelessrouter or if a Wi-Fi® network is available next toyour vehicle:1. Activate the hotspot function on yoursmartphone.2. In the Parrot ASTEROID Smart Settingsmenu, tap Wireless & networks >Wi-Fi.3. Activate the Wi-Fi option.> The list of available Wi-Fi networks isdisplayed.4. Select the Wi-Fi network generated byyour smartphone.5. Enter the password if necessary.Using the applicationsSeveral types of applications are available withthe ASTEROID Market : music, geolocation,driver assistance...All applications may not be available in allcountries. The use of some applications mayneed prior subscription.The Parrot ASTEROID Smart is a multitasking<strong>de</strong>vice: several applications can runsimultaneously. For example, you can listen toa Webradio station and use a driver assistanceapplication at the same time.For more information about installing and usingthe available applications, refer to theASTEROID Market web page :www.parrotasteroid.com/asteroidmarket.Vi<strong>de</strong>oWarning : The Parrot ASTEROID Smart vi<strong>de</strong>ofunction (besi<strong>de</strong>s the vi<strong>de</strong>o stream from the rearview camera) is dangerous and illegal in mostcountries if it is used while driving. Consequentlythis function is only available when the vehicle isstationary. To watch a vi<strong>de</strong>o on the ParrotASTEROID Smart, park your vehicle in a safeplace and set your parking brake.Rear view cameraIf your vehicle is equipped with a rear viewcamera, you can use the Parrot ASTEROIDSmart screen to view the vi<strong>de</strong>o stream of thiscamera in or<strong>de</strong>r to ease your reverse parkings.Consult the installation diagram p.4 and thesection "Installing a rear view camera" for moreinformation about the connection of the rearview camera to the Parrot ASTEROID Smart.The vi<strong>de</strong>o stream of the rear view cameraappears automatically while backing up. Theimage from the rear view camera may appearreversed.Note : At any time, tap Vi<strong>de</strong>o switch to togglebetween the vi<strong>de</strong>o from the rear view cameraand the vi<strong>de</strong>o from an iPod connected with anAV / iPod cable.English21
Playback of a vi<strong>de</strong>o via an external sourceYou can display on the Parrot ASTEROID Smartthe vi<strong>de</strong>o output from an external vi<strong>de</strong>o source.Connect your vi<strong>de</strong>o source to the ParrotASTEROID Smart using an AV / iPod cable(which is not provi<strong>de</strong>d) (diagram p. 4).1. Tap Applications > Vi<strong>de</strong>o IN.2. Start the playback of a vi<strong>de</strong>o on yoursource.Note : At any time, tap Vi<strong>de</strong>o switch to togglebetween the vi<strong>de</strong>o from the rear view cameraand the vi<strong>de</strong>o from an external source connectedwith an AV / iPod cable.Playback of a vi<strong>de</strong>o via a SD cardThe Parrot ASTEROID Smart allows you towatch vi<strong>de</strong>os stored on a SD card. Only theMP2, MP4, H263, H264, WMV and SPARKformats are supported.1. Insert the SD card into the appropriate slot(diagram H p.10).2. Tap Applications > Gallery.3. Select the vi<strong>de</strong>o by tapping thecorresponding icon.Screen connected to vi<strong>de</strong>o output terminalsVi<strong>de</strong>o output terminals allow you to connect ascreen for rear seat passengers to view thevi<strong>de</strong>os recor<strong>de</strong>d on your SD card. Consult theinstallation diagram p.4 for more informationabout the connection of the screen for rearseat passengers to the Parrot ASTEROIDSmart.Warning : Never locate the screen where thedriver could see the vi<strong>de</strong>os while driving.TroubleshootingBefore you beginMake sure the “Goodbye” message is displayedon the Parrot ASTEROID Smart screen whenyou turn the ignition off. Refer to the Checkingthe wiring section for more information.Reset the Parrot ASTEROID Smart. To do so,remove the faceplate then use a paper clip topress the Reset button. Hold down the Resetbutton for 3 seconds (diagram G p.10).Make sure you have the latest software updateon your Parrot ASTEROID Smart. To do so,select Settings > About > Version. Comparethis number with the one on the ParrotASTEROID Smart support page on our website.Problems w hile using the phone functionMake sure your phone is compatible with theParrot ASTEROID Smart. To do so, refer to thecompatibility list of the Parrot ASTEROIDSmart available on our websitewww.parrot.com, in the Support section.If your phone is compatible with the ParrotASTEROID Smart and if you already have thelatest software update:22 English
1. Erase the memory of the ParrotASTEROID Smart. To do so, selectSettings > Advanced settings > Factorysettings.2. On your telephone, erase the Parrotsystem from the list of B luetoothperipherals (or reboot your iPod).3. Repeat the pairing procedure for the 2<strong>de</strong>vices.Problems w hile using the music functionSeveral minutes of loading may be necessarywhen connecting your audio peripheral (USB /SD / iPod) to the Parrot ASTEROID Smart forthe first time, particularly if you are using audioperipheral with a large capacity or containingmany audio files. This loading time will allowyour audio files to be accessible via voicerecognition.Reboot your iPod / iPhone before connecting itto the Parrot ASTEROID Smart. To reboot youriPod / iPhone (this procedure will not erase anyof your data) :iPod: press Menu and the centre buttonsimultaneously until the iPod reboots.iPhone / iPad / iPod touch®: Press the On/Off button and the Home buttonsimultaneously until the iPhone reboots.Do not touch the screen when themessage “Sli<strong>de</strong> to shutdown” appears.Some problems may occur if the iPod / SDcard / USB <strong>de</strong>vice is already connected to theParrot ASTEROID Smart before you turn on theignition. Connect the iPod / SD card / USB<strong>de</strong>vice once the ignition is turned on.For more informationRefer to the Parrot ASTEROID Smart supportpage on our website.General informationWarrantyWithout prejudice of legal warranty, Parrotcontractually warrants during 12 months fromthe date of initial purchase by the consumer(except wearing parts guaranteed for 6months) that the product is free from <strong>de</strong>fectsin materials and workmanship, uponpresentation of proof of purchase (date, placeof purchase, serial number of the product) tothe retailer or Parrot. During the contractualwarranty period, the <strong>de</strong>fective product must bereturned in its original packaging to the aftersalesservice of the retailer. After inspection ofthe product, Parrot will proceed, at its option,to the replacement or the issue a credit note tothe exclusion of any other remedy.Warranty does not cover: upgrading of thesoftware items of the Parrot products withBluetooth cell phones for compatibilitypurpose, data recovery, <strong>de</strong>terioration of theexternal aspect due to normal wear of theproduct, any damage caused by acci<strong>de</strong>nt,misuse, misapplication, or non-Parrotproducts.Parrot is not responsible for storage, loss ordamaged to data during transit or repair. AnyEnglish23
product wrongfully <strong>de</strong>clared to be <strong>de</strong>fectivewill be returned to sen<strong>de</strong>r and inspection,process and carriage costs will be invoiced tohim.Correct disposal of This Product (WasteElectrical & Electronic Equipment)This marking shown on the product or itsliterature, indicates that it should not bedisposed with other household wastes at theend of its working life. To prevent possibleharm to the environment or human health fromuncontrolled waste disposal, please separatethis from other types of wastes and recycle itresponsibly to promote the sustainable reuseof material resources.Household users should contact either theretailer where they purchased this product, ortheir local government office, for <strong>de</strong>tails ofwhere and how they can take this item forenvironmentally safe recycling. Business usersshould contact their supplier and the terms andconditions of the purchase contract. Thisproduct should not be mixed with othercommercial wastes for disposal.ModificationsThe explanations and specifications in this<strong>gui<strong>de</strong></strong> are given for information purposes onlyand may be modified without prior notice. Theyare <strong>de</strong>emed to be correct at time of going topress. The utmost care has been taken whenwriting this <strong>gui<strong>de</strong></strong>,as part of the aim to provi<strong>de</strong>you with accurate information. However,Parrot shall not be held responsible for anyconsequences arising from any errors oromissions in the <strong>gui<strong>de</strong></strong>, nor for any damage oracci<strong>de</strong>ntal loss of data resulting directly orindirectly from the use of the informationherein. Parrot reserves the right to amend orimprove the product <strong>de</strong>sign or user <strong>gui<strong>de</strong></strong>without any restrictions and without anyobligation to notify users. As part of ourongoing concern to upgra<strong>de</strong> and improve ourproducts, the product that you have purchasedmay differ slightly from the mo<strong>de</strong>l <strong>de</strong>scribed inthis <strong>gui<strong>de</strong></strong>. If so, a later version of this <strong>gui<strong>de</strong></strong>might be available in electronic format atParrot’s website at www.parrot.com.FCC Compliance StatementThis <strong>de</strong>vice complies with part 15 of the FCCrules. Operation is subject to the following twoconditions:(1). this <strong>de</strong>vice may not cause harmfulinterference, and(2). this <strong>de</strong>vice must accept any interferencereceived, including interference that may causeun<strong>de</strong>sired operation.Note: The manufacturer is not responsible forany radio or tv interference caused byunauthorized modifications to this equipment.Such modifications could void the user’sauthority to operate the equipment.Canada Class B statement: This Class B digitalapparatus complies with Canadian ICES-003.CopyrightsI<strong>de</strong>ntification N. 394 149 496 R.C.S. PARISParrot S.A.Copyright © 2012 Parrot. All Rights Reserved.Declaration of ConformityWe, Parrot S.A. 174 quai <strong>de</strong> Jemmapes, 75010Paris, France, <strong>de</strong>clare un<strong>de</strong>r our soleresponsibility that our product, the ParrotASTEROID Smart to which this <strong>de</strong>clarationrelates is in conformity with appropriatestandards IEC/EN 60065: 2002 / A1:2006 / A11:2008 / A2: 2010 / A12: 2011, EN 300328 v1.8.1,EN 301 489-1 (2008:V1.8.1) and EN 301 489-1724 English
v1.3.2 following the provision ofRadio&Telecommunication equipmentdirective 1999/5/EC R&TTE, Safety directive2006/95/EC and EMC directive Automotive2009/19/CE.http://www.parrot.com/fr/support/parrotasteroid-smart/asteroidsmart_ce_conformity_<strong>de</strong>claration.pdfRegistered Tra<strong>de</strong>marksParrot and the Parrot logo are registeredtra<strong>de</strong>marks of PARROT SA.The Bluetooth word mark is are registeredtra<strong>de</strong>marks owned by Bluetooth SIG, Inc. andany use of such marks by Parrot S.A. is un<strong>de</strong>rlicense. Bluetooth QDID : B013841, B013839,[-]"Ma<strong>de</strong> for iPod / iPhone / iPad" means that anelectronic accessory has been <strong>de</strong>signed toconnect specifically to iPod, iPhone or iPad,respectively, and has been certified by the<strong>de</strong>veloper to meet Apple performancestandards. Apple is not responsible for theoperation of this <strong>de</strong>vice or its compliance withsafety and regulatory standards.iPad, iPod, iPod Touch and iPhone aretra<strong>de</strong>marks of Apple Inc, registered in the USand others countriesiPad is a tra<strong>de</strong>mark of Apple Inc.Wi-Fi is a registered tra<strong>de</strong>mark of the Wi-FiAlliance.Gracenote, the Gracenote logo and logotypeand "Powered by Gracenote" are eitherregistered tra<strong>de</strong>marks or tra<strong>de</strong>marks ofGracenote Inc. in the United States and/orother countries.All other tra<strong>de</strong>marks mentioned in this <strong>gui<strong>de</strong></strong>are protected and are the property of theirrespective owners.This <strong>de</strong>vice complies with Industry Canadalicence-exempt RSS standard(s). Operation issubject to the following two conditions: (1) this<strong>de</strong>vice may not cause interference, and (2) this<strong>de</strong>vice must accept any interference, includinginterference that may cause un<strong>de</strong>siredoperation of the <strong>de</strong>vice.This equipment complies with FCC’s and IC’sRF radiation exposure limits set forth for anuncontrolled environment.. The antenna(s)used for this transmitter must be installed andoperated to provi<strong>de</strong> a separation distance of atleast 20 cm from all persons and must not becollocated or operating in conjunction with.English25
<strong>Gui<strong>de</strong></strong><strong>d'utilisation</strong><strong>rapi<strong>de</strong></strong>SommaireAvant <strong>de</strong> commencerInstallationPremière utilisationTéléphoneMusiqueInternetVidéoEn cas <strong>de</strong> problèmeInformations généralesp.27p.28p.32p.34p.34p.37p.38p.39p.40Avant <strong>de</strong> commencerA propos <strong>de</strong> ce <strong>gui<strong>de</strong></strong>Afin <strong>de</strong> limiter notre consommation <strong>de</strong> papieret dans le cadre <strong>de</strong> notre démarche aussiresponsable et respectueuse que possible <strong>de</strong>l’environnement, Parrot privilégie la mise enligne <strong>de</strong>s documents utilisateurs plutôt queleur impression. Ce <strong>gui<strong>de</strong></strong> simplifié du ParrotASTEROID Smart se limite donc à vous fournirles principales instructions qui vouspermettront d’utiliser facilement cet appareil.Vous trouverez plus d’informations sur lasection Support <strong>de</strong> notre site webwww.parrot.com : notice complète, FAQ,didacticiels...Note : iPod®, iPhone® (en mo<strong>de</strong> iPod) et iPad®seront désignés par le terme "iPod" dans cemanuel.Mises à jourTéléchargez gratuitement la <strong>de</strong>rnière mise àjour <strong>de</strong> votre produit sur notre site webwww.parrot.com section Support. Ces mises àjour vous permettront <strong>de</strong> bénéficier <strong>de</strong>nouvelles fonctionnalités et d’améliorer lacompatibilité <strong>de</strong> votre produit.Note : Vous pouvez aussi télécharger les mises àjour <strong>de</strong> votre Parrot ASTEROID Smart lorsquecelui-ci est connecté à Internet. La disponibilitéd'une mise à jour vous est indiquée sur la barre<strong>de</strong> notification.AvertissementsLes fonctions requérant une attentionprolongée doivent uniquement être utiliséeslorsque le véhicule est à l’arrêt. Votre sécuritéet celle <strong>de</strong>s autres usagers <strong>de</strong> la route primesur les appels téléphoniques, la musique ou lesapplications d'ai<strong>de</strong> à la conduite. Soyezresponsable : conduisez pru<strong>de</strong>mment et prêtezattention à votre environnement. Parrot dégagetoute responsabilité si vous choisissezd’ignorer cette mise en gar<strong>de</strong>.Utilisez le Parrot ASTEROID Smart avec unniveau <strong>de</strong> volume raisonnable, <strong>de</strong> manière àpouvoir entendre à tout moment les bruitsextérieurs pendant la conduite.Le Parrot ASTEROID Smart comporte <strong>de</strong>saimants <strong>de</strong> type NdFeB qui peuventendommager les objets sensibles aux champsmagnétiques (pacemaker, cartes <strong>de</strong> crédit,montres mécaniques...).Le fil "Parking Brake" du câble ISO du ParrotFrançais27
ASTEROID Smart permet <strong>de</strong> détecter si lefrein à main est enclenché ou non. Il doit êtreconnecté conformément aux instructionsd’installation décrites dans le présentdocument. Toute installation ou connexionincorrecte peut être dangereuse et illégaledans <strong>de</strong> nombreux états / pays. L’écran dans lechamp <strong>de</strong> vision du conducteur ne doit enaucun cas diffuser <strong>de</strong> vidéos lorsque levéhicule est en circulation. Il en est <strong>de</strong> mêmepour toute application web.Si vous essayez d’utiliser une application nondédiée à la navigation ou à l’ai<strong>de</strong> à la conduitependant que vous conduisez, un avertissements’affichera à l’écran. Pour regar<strong>de</strong>r une vidéosur l’écran du Parrot ASTEROID Smart,assurez-vous que le véhicule est à l’arrêt dansun endroit sûr et que le frein à main estenclenché.Interface comman<strong>de</strong> au volantUne interface comman<strong>de</strong> au volant vouspermet d'utiliser les comman<strong>de</strong>s aux volants <strong>de</strong>votre véhicule pour comman<strong>de</strong>r votre produitParrot. Avec cette interface, vous pourrezutiliser le Parrot ASTEROID Smart tout engardant les mains sur le volant. Consultez notresite web www.parrot.com pour plusd’informations sur la date <strong>de</strong> disponibilité <strong>de</strong>cette interface.InstallationNote: Nous vous recommandons <strong>de</strong> faire appel àun professionnel pour cette installation,notamment à l'un <strong>de</strong> notre réseau d'installateursagréés.Instructions <strong>de</strong> sécuritéEteignez le moteur avant d’effectuer lesbranchements.N'installez jamais le Parrot ASTEROID Smart àun emplacement où il risque <strong>de</strong> blesser leconducteur ou un passager en cas d'arrêtbrusque.N'installez jamais le Parrot ASTEROID Smart àun emplacement où il pourrait gêner laconduite.Ne percez jamais une cloison ou le tableau <strong>de</strong>bord sans vérifier auparavant ce qui se trouve<strong>de</strong>rrière. Assurez-vous <strong>de</strong> ne jamaisendommager un composant électronique ou uncâble.Si vous utilisez <strong>de</strong>s vis, assurez-vous qu'ellen'entrent pas en contact avec un câbled'alimentation électrique.Le Parrot ASTEROID Smart est uniquementconçu pour fonctionner sur un véhicule avec28 Français
une batterie <strong>de</strong> 12 V. Si votre véhicule (ex :camion) dispose d'une batterie 24V,l'utilisation d'un dévolteur est nécessaire.Assurez-vous que les câbles sont installés àl’écart <strong>de</strong>s endroits chauds (sorties duchauffage...), <strong>de</strong>s parties mobiles (levier <strong>de</strong>vitesse...) et qu'ils ne risquent pas <strong>de</strong>s'enrouler autour <strong>de</strong> la colonne <strong>de</strong> direction oudu levier <strong>de</strong> vitesse.Vérifiez le bon fonctionnement <strong>de</strong>séquipements du véhicule après l'installation duParrot ASTEROID Smart.N'installez pas le Parrot ASTEROID Smart ouun <strong>de</strong> ses composants à un endroit où l'un <strong>de</strong>sairbags du véhicule peut se déployer.N'installez pas le Parrot ASTEROID Smart à unendroit humi<strong>de</strong> ou soumis à <strong>de</strong>s températuresélevées.Laissez <strong>de</strong>rrière le Parrot ASTEROID Smart unespace suffisant pour permettre la dissipation<strong>de</strong> la chaleur.Avant <strong>de</strong> commencerRetirez l’autoradio d’origine <strong>de</strong> votre véhicule.Cette opération peut nécessiter <strong>de</strong>s clésd’extraction.Vérifiez si la connexion entre les connecteursaudio, l'alimentation du Parrot ASTEROIDSmart et la connectique <strong>de</strong> votre véhicule estpossible en comparant les <strong>de</strong>ux connecteurs. Sicette connexion est impossible, l’utilisationd’un adaptateur ISO est nécessaire afind’adapter le Parrot ASTEROID Smart à laconnectique spécifique <strong>de</strong> votre véhicule.Consultez la section Compatibilité véhiculessur la page support du Parrot ASTEROID Smartpour vérifier la nécessité d'un câble adaptateur.Comparez le connecteur <strong>de</strong> l’antenne du ParrotASTEROID Smart et celui <strong>de</strong> votre véhicule. Sil’utilisation d’un adaptateur antenne estnécessaire, contactez un professionnel <strong>de</strong>l’automobile pour plus d’informations.Note : Si votre antenne est amplifiée, vous avez lapossibilité <strong>de</strong> l'alimenter via le câble ISO fourniavec votre Parrot ASTEROID Smart.Installation avec les supports1. Dévissez les 4 vis pour retirer le support duParrot ASTEROID Smart.2. Insérez le support <strong>de</strong> montage et fixez-ledans l’habitacle. Pour cela, écartez leslanguettes vers l’extérieur en les pliant à 90°(schéma A p.7).3. Installez le Parrot ASTEROID Smart et fixezles 4 vis (schéma B p.7).4. Clipsez le cadre en plastique (schéma C p.8)Installation avec les vis latérales1. Dévissez les 4 vis pour retirer le support duParrot ASTEROID Smart.2. Retirez les 2 supports latéraux (schéma Dp.8).3. Positionnez le Parrot ASTEROID Smart <strong>de</strong>manière à ce que les trous <strong>de</strong> vis soientalignés avec les trous <strong>de</strong> vis du véhicule.4. Vissez autant <strong>de</strong> vis que nécessaire selon lemodèle <strong>de</strong> votre véhicule. Utilisezuniquement les vis fournies.Installation du dongle GPSFixez le dongle GPS sur une surface plane, dansune zone sans obstacle à l'intérieur <strong>de</strong>l'habitacle.Les pare-brises athermiques et les vitres avecantenne incrustée peuvent interférer avec laréception GPS et réduire la fiabilité <strong>de</strong>sinformations liées aux applications <strong>de</strong>navigation.Français29
L'antenne GPS du dongle se trouvesur le côté où est écrit "ParrotASTEROID GPS" et où se trouve lelogo en forme d'étoile. Ce logo doittoujours être orienté vers le ciel.Si votre véhicule dispose d'un pare-briseathermique, fixez le dongle GPS sur le parebriseau niveau <strong>de</strong> la zone non athermique. Lecôté sur lequel se trouve le logo en formed'étoile doit être collé sur le pare-brise(schéma F p.9).Note : La zone non athermique du pare-brisedépend du modèle <strong>de</strong> votre véhicule. Elle setrouve généralement au niveau du rétroviseur.Si votre véhicule ne dispose pas d'un parebriseathermique, fixez le dongle GPS sur letableau <strong>de</strong> bord. Le côté sur lequel se trouve lelogo en forme d'étoile doit être visible (schémaE p.9).Pour assurer une bonne fixation du support :utilisez l'adhésif double face fourni ;nettoyez la surface <strong>de</strong> montage avant <strong>de</strong>coller le support ;après fixation du support, patientezenviron 2 heures sans le manipuler.Connexion du câble <strong>de</strong> frein à mainLe câble <strong>de</strong> frein à main permet d'utiliser lafonction vidéo ou certaines applications duParrot ASTEROID Smart lorsque le frein à mainest serré. Si ce câble n'est pas connecté aucâble <strong>de</strong> signal <strong>de</strong> frein à main <strong>de</strong> votrevéhicule, la fonction vidéo ne sera pasdisponible.1. Connectez la rallonge du câble <strong>de</strong> frein àmain fournie sur le câble vert du ParrotASTEROID Smart.2. Repérez et testez le câble <strong>de</strong> signal <strong>de</strong>frein à main dans votre véhicule. Ce câblerelie votre frein à main au voyant frein àmain sur votre tableau <strong>de</strong> bord.3. Placez la rallonge du câble <strong>de</strong> frein à maindu Parrot ASTEROID Smart (verte) à unemplacement sûr et connectez-la au câble<strong>de</strong> signal <strong>de</strong> frein à main <strong>de</strong> votre véhiculeen utilisant une métho<strong>de</strong> appropriée.Avertissement : Une connexion ou uneutilisation incorrecte du câble <strong>de</strong> frein à mainest dangereuse et illégale dans <strong>de</strong> nombreuxEtats.Installation d'une caméra <strong>de</strong> reculSi vous utilisez le Parrot ASTEROID Smart avecune caméra <strong>de</strong> recul (non fournie), le câbleorange sur le câble ISO du Parrot ASTEROIDSmart permet <strong>de</strong> détecter si votre véhiculeavance ou recule. Connectez ce câble à celuidont la tension permet d'allumer vos feuxarrières afin d'afficher le signal vidéo <strong>de</strong> lacaméra <strong>de</strong> recul lorsque vous effectuez unemarche arrière.Connectez également le câble vidéo <strong>de</strong> lacaméra <strong>de</strong> recul au connecteurs Vi<strong>de</strong>o CAMsitués <strong>de</strong>rrière le Parrot ASTEROID Smart.Installation du microphoneNous vous recommandons <strong>de</strong> faire glisser lecâble dans la gouttière <strong>de</strong>rrière le joint <strong>de</strong> laportière.Si le câble passe au <strong>de</strong>ssus <strong>de</strong>s pédales,assurez-vous qu’il est bien fixé.Avertissement: Ne faites pas passer le câble dumicrophone dans les systèmes <strong>de</strong> chauffage, <strong>de</strong>ventilation, <strong>de</strong> climatisation ou <strong>de</strong>vant lesairbags latéraux.Assurez-vous que le microphone est installé leplus près possible <strong>de</strong> la tête <strong>de</strong> l’utilisateur. La30 Français
distance idéale est <strong>de</strong> 60 cm. Installez <strong>de</strong>préférence le microphone près du rétroviseur.Orientez le microphone vers la bouche <strong>de</strong>l’utilisateur.Connexion du câble ISOReliez les connecteurs audio et alimentation<strong>de</strong> votre véhicule aux connecteurs du ParrotASTEROID Smart.Note: Utilisez les serre câbles fournis pourgarantir la fixation <strong>de</strong>s câbles sur l'autoradio.Insérez un <strong>de</strong>s serre câbles dans l'emplacementprévu à cet effet, en haut à gauche du dos <strong>de</strong>l'autoradio (voir schéma p.4).Vérifiez votre installation. Pour cela, allumezpuis coupez le contact <strong>de</strong> votre véhicule unefois le Parrot ASTEROID Smart installé : lemessage « Au revoir » doit alors s’afficher àl’écran. Si ce n’est pas le cas, vous <strong>de</strong>vezinverser les positions <strong>de</strong>s fils rouge et jaune.En effet, le fil jaune du câble d’alimentationdoit être connecté au 12V permanent, le filrouge au 12V après-contact et le fil noir à lamasse. Cette opération s’effectue simplementen inversant les <strong>de</strong>ux cosses situées sur lecâblage Parrot.Installation <strong>de</strong>s câbles USBConnectez les câbles USB au Parrot ASTEROIDSmart. Nous vous recommandons <strong>de</strong> connectertous les câbles du Parrot ASTEROID Smart,même si vous ne prévoyez pas forcément <strong>de</strong>les utiliser. Faites ressortir les connecteurscorrespondants <strong>de</strong> votre vi<strong>de</strong> poche ou boîte àgant. Pour cela, il peut être nécessaire <strong>de</strong>percer un trou à l’intérieur <strong>de</strong> votre tableau <strong>de</strong>bord. Dans la mesure du possible, évitezl'utilisation <strong>de</strong> rallonges USB <strong>de</strong> plusieursmètres.Le câble USB (1.2m - 2A) sur lequel vousconnecterez la rallonge iPod doitimpérativement être connecté au port USBblanc prévu à cet effet. Vous trouverezl’indication "iPod" au <strong>de</strong>ssus <strong>de</strong> celui-ci.Afin <strong>de</strong> garantir une qualité <strong>de</strong> réceptionoptimale, ne connectez pas votre clé 3Gdirectement sur le Parrot ASTEROID Smart :utilisez un câble USB afin <strong>de</strong> l'installer sur letableau <strong>de</strong> bord (ou toute autre zone dégagée).Protection contre le volLa faça<strong>de</strong> amovible peut être détachée duParrot ASTEROID Smart pour décourager lesvols. Le Parrot ASTEROID Smart ne peut pasfonctionner lorsque cette faça<strong>de</strong> a été retirée.Manipulez la faça<strong>de</strong> amovible avec précautions.Ne forcez pas lors <strong>de</strong> son installation ou <strong>de</strong> sonretrait. Conservez-la dans un endroit sûr, àl'abri <strong>de</strong> la lumière du soleil, <strong>de</strong> températuresélevées et <strong>de</strong> l'humidité.Pour retirer la faça<strong>de</strong>, faire glisser vers le bas lapartie supérieure <strong>de</strong> la faça<strong>de</strong> puis tirez-ladoucement vers l'extérieur (schéma G p. 10).Pour remettre la faça<strong>de</strong> en place, placezd'abord son côté inférieur aimanté puisappuyez sur la partie supérieure jusqu'à ce quevous entendiez un clic.Français31
Première utilisationEcran d'accueilLorsque le Parrot ASTEROID Smart s'allume,vous accé<strong>de</strong>z à l'écran d'accueil. Les boutons <strong>de</strong>navigation se trouvent sur le côté gauche <strong>de</strong>l'écran.Faites glisser votre doigt sur l'écran vers lagauche. Vous découvrirez plus d'espace pourajouter <strong>de</strong>s raccourcis vers vos applications oufonctions favorites.Touchez une icône pour accé<strong>de</strong>r à sa fonctioncorrespondante. Touchez par exemple l'icôneApplications. Vous accé<strong>de</strong>z à la liste <strong>de</strong>sapplications disponibles sur votre ParrotASTEROID Smart. Faites glisser votre doigt surl'écran vers le haut pour parcourir la liste <strong>de</strong> cesapplications.Pour revenir au menu précé<strong>de</strong>nt, appuyez sur. Pour revenir directement à l'écrand'accueil, appuyez sur .Appuyez sur pour accé<strong>de</strong>r au menucontextuel correspondant à l’application encours d’utilisation. Le menu contextuel vouspermet notamment d'avoir accès aux fonctionssupplémentaires <strong>de</strong> l'application ou <strong>de</strong>modifier certains réglages.Appuyez sur la touche pour afficher les<strong>de</strong>rnières applications utilisées ou en cours<strong>d'utilisation</strong>.Appuyez sur la touche pour modifier levolume. Faites ensuite glisser le curseur vers lagauche ou vers la droite.Personnaliser l'écran d'accueilPour ajouter un raccourci vers une application /fonction sur l'écran d'accueil :1. Appuyez sur Applications.2. Appuyez pendant 2 secon<strong>de</strong>s sur l'icône<strong>de</strong> l'application qui vous intéresse.3. Faites glisser l'icône vers l'emplacementsouhaité.Pour supprimer un raccourci :1. Appuyez pendant 2 secon<strong>de</strong>s sur l'icôneque vous souhaitez retirer.2. Faites-la glisser vers le haut, au niveau <strong>de</strong>l'indication Supprimer. Quand l'icône<strong>de</strong>vient rouge, vous pouvez retirer votredoigt.Modifier les paramètresPour modifier les paramètres du ParrotASTEROID Smart, appuyez sur Applications,puis sur Paramètres. Vous pouvez égalementappuyer sur , puis sur Paramètres.Connecter un téléphone via BluetoothNote : Consultez la page compatibilité <strong>de</strong> notresite web pour vérifier si votre téléphone estcompatible avec le Parrot ASTEROID Smart etconsulter la procédure d'appairagecorrespondante : www.parrot.com/fr/compatibility.Si c’est la 1ère fois que vous utilisez untéléphone avec le Parrot ASTEROID Smart,vous <strong>de</strong>vez tout d’abord appairer les <strong>de</strong>uxappareils. Une fois votre téléphone appairéavec le Parrot ASTEROID Smart, la connexionentre les 2 appareils sera automatique dès queles 2 appareils seront allumés à proximité, avecla fonction B luetooth® activée.32 Français
1. Dans le menu Paramètres, appuyez surSans fil et réseau > Bluetooth.2. Si nécessaire, activez les optionsBluetooth et I<strong>de</strong>ntifiable.3. Depuis votre téléphone, lancez unerecherche <strong>de</strong> périphériques B luetooth puissélectionnez «Parrot ASTEROID Smart».4. La procédure d'appairage dépend alors dumodèle <strong>de</strong> votre téléphone :Si le téléphone vous invite à entrer leco<strong>de</strong> PIN Bluetooth, entrez «0000».Si le Parrot ASTEROID Smart et votretéléphone affichent <strong>de</strong>ux co<strong>de</strong>s,vérifiez si ces co<strong>de</strong>s sont i<strong>de</strong>ntiquespuis confirmez ou infirmez.Note : Sur certains téléphones, vous <strong>de</strong>vrezautoriser la connexion au Parrot ASTEROIDSmart pour permettre la connexionautomatique. Consultez le <strong>gui<strong>de</strong></strong> utilisateur <strong>de</strong>votre téléphone pour plus d'informations.Connecter <strong>de</strong>ux téléphonesPour activer le mo<strong>de</strong> permettant la connexion<strong>de</strong> 2 téléphones :1. Appuyez sur Téléphone.2. Appuyez sur , puis sur Bluetooth.3. Appuyer sur Options.4. Activez l'option Téléphonie multipoints.Lorsque le Parrot ASTEROID Smart s’allume, iltente d’établir la connexion avec tous lestéléphones appairés et présents dans levéhicule. Si plus <strong>de</strong> 2 téléphones appairés sontprésents dans le véhicule, il établit laconnexion avec les 2 téléphones dontl'appairage est le plus ancien.Lorsque 2 téléphones sont connectés au ParrotASTEROID Smart, l’un est considéré commetéléphone principal, l’autre comme téléphonesecondaire. Par défaut, le téléphone principalcorrespond au téléphone dont l'appairage avecle Parrot ASTEROID Smart est le plus ancien.Vous avez la possibilité <strong>de</strong> recevoir <strong>de</strong>s appelsprovenant du téléphone principal et dutéléphone secondaire.Seul le répertoire du téléphone principal estdisponible sur le Parrot ASTEROID Smart.Vous pourrez uniquement émettre <strong>de</strong>s appelsà partir du téléphone principal. Vous pouvezcependant facilement basculer d’un téléphoneconnecté à l’autre. Pour cela :1. Appuyez sur Téléphone.2. Appuyez sur , puis sur Téléphone.3. Séléctionnez le téléphone principal.Synchroniser le répertoire du téléphoneAvec la plupart <strong>de</strong>s téléphones B luetooth, lerépertoire est automatiquement synchroniséavec la mémoire du système. Chaque fois quevous modifierez votre répertoire, lasynchronisation se relancera automatiquementà la connexion suivante.Avertissement: Seuls les contacts enregistrésdans la mémoire du téléphone se synchronisentavec le Parrot ASTEROID Smart. Si vos contactssont enregistrés dans la mémoire <strong>de</strong> la carte SIM,transférez-les dans la mémoire du téléphone.Consultez le <strong>gui<strong>de</strong></strong> utilisateur <strong>de</strong> votre téléphonepour plus d'informations.Note : Sur certains téléphones, vous <strong>de</strong>vrezautoriser l'accès du Parrot ASTEROID Smart àvos contacts pour permettre la synchronisation.Consultez le <strong>gui<strong>de</strong></strong> utilisateur <strong>de</strong> votre téléphonepour plus d'informations.La synchronisation automatique est limitée à5000 contacts (ou numéros <strong>de</strong> téléphone) partéléphone appairé.Français33
TéléphoneRecevoir un appelUn appel entrant est indiqué par une sonnerie.Le nom et le numéro du contact sont énoncéssi le numéro <strong>de</strong> ce contact est enregistré dansle répertoire du téléphone connecté au ParrotASTEROID Smart.Pour accepter cet appel, appuyez sur latouche verte qui apparait à l'écran.Appuyez ensuite sur la touche rouge <strong>de</strong>l'écran pour terminer l’appel.Pour refuser cet appel, appuyez sur latouche rouge qui apparait à l'écran.Emettre un appel via reconnaissance vocaleVous pouvez initier un appel parreconnaissance vocale directement après lasynchronisation du répertoire <strong>de</strong> votretéléphone. Le Parrot ASTEROID Smartreconnaitra automatiquement le contact <strong>de</strong>votre répertoire que vous souhaitez appeler.1. Appuyez sur Comman<strong>de</strong> Vocale >Contacts pour initier le processus <strong>de</strong>reconnaissance vocale.> Le Parrot ASTEROID Smart vous<strong>de</strong>man<strong>de</strong> le nom du contact que voussouhaitez appeler.2. Prononcez le nom du contact suivi du type<strong>de</strong> numéro («BUREAU»,«PORTABLE»...) si ce contact dispose <strong>de</strong>plusieurs numéros.> L’appel vers ce contact estautomatiquement initié si la comman<strong>de</strong>vocale a été bien comprise.> Dans le cas contraire, le système mainslibres diffuse un message <strong>de</strong> confirmation.Confirmez en prononçant «OUI»,«APPELLE» ou «APPELER».Note: A tout moment, appuyez sur la touchepour annuler la procédure d'appel.MusiqueNote : Plusieurs minutes <strong>de</strong> chargement peuventêtre nécessaires lors <strong>de</strong> la 1ère connexion <strong>de</strong>votre périphérique audio (USB / SD / iPod) sur leParrot ASTEROID Smart, particulièrement dansle cas <strong>de</strong> périphériques contenant une quantitéimportante <strong>de</strong> fichiers musicaux. Ce temps <strong>de</strong>chargement permet <strong>de</strong> rendre ces morceauxaccessibles via reconnaissance vocale.Utiliser la reconnaissance vocale musicaleLa fonction reconnaissance vocale musicalevous permet <strong>de</strong> sélectionner viareconnaissance vocale les artistes ou albumsque vous souhaitez écouter. Cette fonction estdisponible si vous utilisez le Parrot ASTEROIDSmart avec un périphérique <strong>de</strong> type iPod /USB / SD, ou si vous utilisez une applicationmusicale compatible avec cette fonction.1. Appuyez sur Comman<strong>de</strong>s vocales >Musique.2. Enoncez le nom <strong>de</strong> l'artiste ou <strong>de</strong> l'albumque vous souhaitez écouter lorsque leParrot ASTEROID Smart vous y invite.> La liste <strong>de</strong>s sources audio connectées auParrot ASTEROID Smart et <strong>de</strong>sapplications musique compatibles avec la34 Français
fonction reconnaissance vocale contenantl'artiste / album que vous avez choisiapparait.Note : Vérifiez les noms <strong>de</strong>s artistes et albumsdans les tags (métadonnées) <strong>de</strong> vos fichiersmusicaux. Ceux-ci peuvent être différents <strong>de</strong> ceuxaffichés dans le titre <strong>de</strong> votre morceau.RadioPour sélectionner une fréquence :1. Appuyez sur Musique > Radio.2. Faites glisser le curseur vers la gauche ouvers la droite pour sélectionner unefréquence.Pour obtenir la liste <strong>de</strong> l’ensemble <strong>de</strong>s stationsdisponibles, appuyez sur la touche etappuyez sur Nouveau scan > OK.Pour mémoriser une station, appuyez sur latouche puis sélectionnez l’option Ajouteraux favoris.Pour accé<strong>de</strong>r aux stations mémorisées,appuyez sur la touche et appuyez sur Mo<strong>de</strong>> Favoris.Note: Le nombre <strong>de</strong> stations que vous pouvezenregistrer est illimité.iPod1. Connectez la rallonge USB / iPod sur lecâble USB connecté au port blanc duParrot ASTEROID Smart puis connectez-yvotre iPod.2. Appuyez sur Musique > iPod. Vous pouvezégalement appuyer sur pour naviguerdans le contenu <strong>de</strong> votre iPod.3. Appuyez sur un morceau pour lancer salecture.Note : Appuyez sur la touche pour modifiercertains réglages (audio, répétition, aléatoire).Clé USBLe Parrot ASTEROID Smart est compatibleavec la majorité <strong>de</strong>s clés USB / bala<strong>de</strong>urs MP3 /disques dur externes. Il n’existe aucunerestriction au niveau <strong>de</strong> la capacité <strong>de</strong>s clésUSB. Les fichiers musicaux sur votre clé USBpeuvent être au format MP3, AAC, WAV, OGGou WMA.1. Connectez votre périphérique USB sur lecâble USB.2. Appuyez sur Musique > USB. Vous pouvezégalement appuyer surpour naviguerdans le contenu <strong>de</strong> votre périphériqueUSB.3. Appuyez sur un morceau pour lancer salecture.Note : Appuyez sur la touche pour modifiercertains réglages (audio, répétition, aléatoire).Carte SDLa capacité <strong>de</strong> la carte SD ne doit pas dépasser32Go. Les fichiers musicaux sur votre carte SDpeuvent être au format MP3, AAC, WAV, OGGou WMA.Note : Pour retirer la carte SD, insérez un ongledans la rainure située à l'extrémité <strong>de</strong> la carteSD.1. Retirez la faça<strong>de</strong> amovible du ParrotASTEROID Smart.2. Insérez la carte SD dans l’emplacementprévu à cet effet, situé <strong>de</strong>rrière la faça<strong>de</strong>amovible, en orientant la zone <strong>de</strong> contactvers la gauche (schéma H p.10).3. Replacez la faça<strong>de</strong> amovible.4. Appuyez sur Musique > SD. Vous pouvezégalement appuyer sur pour naviguerdans le contenu <strong>de</strong> votre carte SD.Français35
5. Appuyez sur un morceau pour lancer salecture.Note : Appuyez sur la touche pour modifiercertains réglages (audio, répétition, aléatoire).Comman<strong>de</strong>s(Audio/Vi<strong>de</strong>o Remote Control Profile).Lecteur audio BluetoothNote : Le Parrot ASTEROID Smart vous permetd’utiliser la fonction téléphonie et streamingaudio via Bluetooth avec 2 téléphones différents,sans avoir à déconnecter l’un <strong>de</strong>s 2 appareils.Vous pouvez utiliser le Parrot ASTEROIDSmart pour écouter <strong>de</strong>s fichiers musicauxstockés sur un lecteur audio B luetooth, si celuicisupporte le profil A2DP (Advanced AudioDistribution Profile).Si vous utilisez le lecteur audio pour la 1èrefois, vous <strong>de</strong>vez tout d’abord l'appairer auParrot ASTEROID Smart. Si le lecteur audio estdéjà jumelé au Parrot ASTEROID Smart :1. Appuyez sur Musique > Bluetooth Audio.2. Lancez la lecture d’un morceau sur votrelecteur audio.Pendant la lecture d'un fichier musical ou <strong>de</strong> laradio :appuyez sur l'écran pour mettre en pausele morceau ou couper le son <strong>de</strong> la radio ;faites glisser votre doigt vers le haut pouraugmenter le volume ;faites glisser votre doigt vers le bas pourdiminuer le volume.Pendant la lecture d'un fichier musical (àl'exception <strong>de</strong>s sources audio connectées viaun câble jack / jack):faites glisser votre doigt vers la droitepour passer au morceau suivant ;faites glisser votre doigt vers la gauchepour passer au morceau précé<strong>de</strong>nt.Note : Si vous utilisez le Parrot Parrot ASTEROIDSmart avec un lecteur audio connecté viaBluetooth, ces comman<strong>de</strong>s sont uniquementdisponibles si celui-ci supporte le profil AVRCP36 Français
InternetAvertissement: La connexion à Internet via uneclé 3G requière une offre d’ abonnement auprèsd’un opérateur téléphonique. L’utilisation <strong>de</strong> ceservice peut engendrer <strong>de</strong>s frais <strong>de</strong> roamingimportants. Vérifiez les conditions <strong>de</strong> votreabonnement et votre suivi <strong>de</strong> consommationauprès <strong>de</strong> votre opérateur. Parrot décline touteresponsabilité concernant les coûts associés.Connexion avec une clé 3G / 4GNote : Consultez la section compatibilité duParrot ASTEROID Smart sur notre site web pourafficher la liste <strong>de</strong>s clés 3G / 4G compatibles avecle Parrot ASTEROID Smart.1. Connectez une clé 3G/4G au ParrotASTEROID Smart via le câble USB.> Une pop-up apparait.2. Entrez votre co<strong>de</strong> PIN puis appuyez surVALIDER. Cochez l'option Mémoriser sivous préférez que le co<strong>de</strong> PIN ne vous soitpas <strong>de</strong>mandé à chaque redémarrage duParrot ASTEROID Smart.Note: Vous pourrez par la suite modifier ceréglage en sélectionnant Paramètres > Sans fil etréseaux > Réseaux <strong>de</strong> données mobiles. Parmi lespériphériques <strong>de</strong> connexion, sélectionnez votreclé 3G/4G, sélectionnez Oublier co<strong>de</strong> PIN >Oublier.3. Sélectionnez votre APN (Access PointName) dans la liste proposée. Cetteinformation est disponible dans ladocumentation fournie avec votre clé3G/4G. Si votre APN ne figure pas dans laliste, vous pouvez l'ajouter ensélectionnant Paramètres > Sans fil etréseaux > Réseaux <strong>de</strong> données mobiles.4. Parmi les périphériques <strong>de</strong> connexion,sélectionnez votre clé 3G/4G.5. Sélectionnez Points d'accès > Autre >Points d'accès prédéfinis.6. Patientez jusqu'à ce que la connexion soitétablie. Vous pouvez également appuyersur la touche et naviguer dans lesmenus pendant que la connexion s'établit.Partage <strong>de</strong> connexion 3G via BluetoothSi vous disposez d’un téléphone supportant leprofil B luetooth DUN (Dial-Up Networking) ouPAN (Personal Area Network), la connexionvia B luetooth <strong>de</strong> votre téléphone au ParrotASTEROID Smart vous permettra <strong>de</strong> partagerla connexion 3G du téléphone.Note : Consultez la page compatibilité sur notresite web pour vérifier si votre téléphone permetle partage <strong>de</strong> connexion 3G via Bluetooth etconsulter la procédure correspondante :www.parrot.com/fr/compatibility.1. Connectez votre téléphone au ParrotASTEROID Smart via B luetooth.2. Sur le Parrot ASTEROID Smart,sélectionnez Paramètres > Sans fil etréseaux > Points d'accès personnalisés >Réseaux <strong>de</strong> données mobiles.3. Sélectionnez votre APN (Access PointName) dans la liste proposée puis cochezl'option Sélectionner.4. Autorisez le partage <strong>de</strong> connexion survotre téléphone. Cette procédure diffèreselon le modèle <strong>de</strong> votre téléphone.Partage <strong>de</strong> connexion 3G via USBNote : Consultez la page compatibilité sur notresite web pour vérifier si votre téléphone permetle partage <strong>de</strong> connexion 3G via USB et consulterla procédure correspondante :www.parrot.com/fr/compatibility.1. Assurez-vous que le clavier <strong>de</strong> votretéléphone est déverrouillé puis connectezFrançais37
le au Parrot ASTEROID Smart en utilisantle câble USB / micro-USB fourni avecvotre téléphone. Cette connexion permetégalement <strong>de</strong> recharger la batterie <strong>de</strong>votre téléphone.2. Sélectionnez votre APN (Access PointName) dans la liste proposée puis cochezl’option Sélectionner. Vous pourrez par lasuite modifier ce réglage en sélectionnantParamètres > Sans fil et réseaux > Réseaux<strong>de</strong> données mobiles.> Une pop-up indiquant l’activation dupartage <strong>de</strong> connexion USB apparait.Connexion à un réseau Wi-FiSi votre téléphone permet <strong>de</strong> partager saconnexion 3G via Wi-Fi® ou si un réseau Wi-Fiest disponible à proximité <strong>de</strong> votre véhicule :1. Activez cette fonction sur votretéléphone.2. Dans le menu Paramètres du ParrotASTEROID Smart, appuyez sur Sans fil etréseaux > Wi-Fi.3. Activez l'option Wi-Fi.> La liste <strong>de</strong>s réseaux Wi-Fi s'affiche.4. Sélectionnez le réseau Wi-Fi généré parvotre smartphone.5. Entrez le mot <strong>de</strong> passe si nécessaire.Installer et utiliser les applicationsVous avez la possibilité d'utiliser plusieurstypes d'applications avec le ASTEROIDMarket : musique, géolocalisation, ai<strong>de</strong> à laconduite.Les applications disponibles sont différentesselon le pays <strong>d'utilisation</strong>. Certainesapplications peuvent nécessiter unabonnement.Le Parrot ASTEROID Smart est multitâches :plusieurs applications peuvent être utiliséesen même temps. Vous pouvez par exempleécouter une Webradio et utiliser uneapplication d'ai<strong>de</strong> à la conduite en mêmetemps.Pour plus d'informations sur l'utilisation <strong>de</strong>sapplications disponibles, consultez la page web<strong>de</strong> l'ASTEROID Market :www.parrotasteroid.com/asteroidmarket.VidéoAvertissement : La fonction vidéo (en <strong>de</strong>hors duflux vidéo provenant <strong>de</strong> la caméra <strong>de</strong> recul) duParrot ASTEROID Smart est dangereuse etillégale dans <strong>de</strong> nombreux Etats si elle est utiliséeen cours <strong>de</strong> conduite. Cette fonction est doncinaccessible pendant que le véhicule est endéplacement. Pour regar<strong>de</strong>r une vidéo sur leParrot ASTEROID Smart, stationnez votrevéhicule en lieu sûr et serrez le frein à main.Caméra <strong>de</strong> reculSi votre véhicule est équipé d'une caméra <strong>de</strong>recul, vous pouvez utiliser l'écran du ParrotASTEROID Smart pour visualiser le flux vidéo<strong>de</strong> cette caméra afin <strong>de</strong> faciliter vosstationnements en marche arrière. Consultezle schéma d'installation p.4 et la section"Installation d'une caméra <strong>de</strong> recul" pour plusd'informations sur la connexion <strong>de</strong> la caméra <strong>de</strong>recul au Parrot ASTEROID Smart.Le flux vidéo <strong>de</strong> la caméra <strong>de</strong> recul apparaitautomatiquement lorsque vous roulez enmarche arrière. L'image provenant <strong>de</strong> la caméra<strong>de</strong> recul peut paraitre inversée.Note : A tout moment, appuyez sur Vi<strong>de</strong>o switchpour basculer entre la vidéo provenant <strong>de</strong> la38 Français
caméra <strong>de</strong> recul et la vidéo provenant d'un iPodconnecté via un câble AV / iPod.Lecture d'une vidéo <strong>de</strong>puis une source externeVous pouvez afficher sur le Parrot ASTEROIDSmart une vidéo provenant d'une source vidéoexterne.Connectez votre source vidéo au ParrotASTEROID Smart en utilisant un câble AV(non fourni) (schéma p. 4).1. Appuyez sur Applications > Entrée vidéo.2. Lancez la lecture d'une vidéo sur votresource.Note : A tout moment, appuyez sur Vi<strong>de</strong>o switchpour basculer entre la vidéo provenant <strong>de</strong> lacaméra <strong>de</strong> recul et la vidéo provenant d'unesource externe connecté via un câble AV / iPod.Lecture <strong>de</strong> fichiers vidéo <strong>de</strong>puis une carte SDVous pouvez lire sur le Parrot ASTEROIDSmart les fichiers vidéo enregistrés sur unecarte SD. Les fichiers vidéos sur votre carte SDpeuvent être au format MP2, MP4, H263,H264, WMV et SPARK.1. Insérez la carte SD dans l’emplacementprévu à cet effet, situé <strong>de</strong>rrière la faça<strong>de</strong>amovible (schéma p.5).2. Appuyez sur Applications > Galerie.3. Sélectionnez la vidéo en appuyant surl'icône correspondante.Utilisation d'un écran branché à la sortie vidéoLes bornes <strong>de</strong> sortie vidéo permettent <strong>de</strong>brancher un écran pour les passagers arrièreafin qu'ils puissent visualiser les vidéosenregistrées sur votre carte SD. Consultez leschéma d'installation p.4 pour plusd'informations sur la connexion <strong>de</strong> l'écran pourles passagers arrière au Parrot ASTEROIDSmart.Avertissement : N'installez jamais l'écran à unendroit où le conducteur pourrait voir les vidéospendant la conduite.En cas <strong>de</strong> problèmeAvant <strong>de</strong> commencerAssurez-vous que le message “Au revoir”apparait bien sur l’écran du Parrot ASTEROIDSmart lorsque vous coupez le contact duvéhicule. Consultez la section Vérifierl’installation pour plus d’informations.Réinitialisez l’appareil. Pour cela, retirez lafaça<strong>de</strong> puis utilisez un stylo ou autre objetpointu pour appuyer sur la touche Reset.Appuyez sur le bouton Reset pendant 3secon<strong>de</strong>s (schéma p.5). Vous pouvezégalement restaurer les paramètres initiaux, ensélectionnant Paramètres > Paramètresavancés > Confi<strong>de</strong>ntialité > Restaurer valeursd'usine.Vérifiez que vous avez la <strong>de</strong>rnière mise à joursur le Parrot ASTEROID Smart. Pour cela,sélectionnez Paramètres > A propos > Version.Comparez ce numéro <strong>de</strong> version avec celuiindiqué sur la page support du ParrotASTEROID Smart.Français39
Problème liés à la fonction téléphonieConsultez la page compatibilité <strong>de</strong> notre siteweb pour vérifier si votre téléphone estcompatible avec le Parrot ASTEROID Smart.Si votre téléphone est indiqué compatible, et sivotre Parrot ASTEROID Smart dispose déjà <strong>de</strong>la <strong>de</strong>rnière mise à jour, supprimez l'appairageentre les 2 appareils sur le Parrot ASTEROIDSmart et sur votre téléphone, redémarrez les 2appareils puis réétablissez la connexion entreles 2 appareils.Problèmes liés à la fonction musiqueRéinitialisez votre iPod / iPhone avant <strong>de</strong> lereconnecter au Parrot ASTEROID Smart. Pourréinitialiser un iPod / iPhone (cette procéduren’effacera aucune donnée):iPod : appuyer simultanément sur Menu etsur le bouton central jusqu’à ce que l’iPodredémarre.iPhone / iPad / iPod touch® : appuyersimultanément sur le bouton On/Off et lebouton Home jusqu’à ce que l’iPhoneredémarre. Ne touchez pas l’écran quandle message “Sli<strong>de</strong> to shutdown“ apparaît.Certains problèmes peuvent apparaitre si lepériphérique est déjà connecté au ParrotASTEROID Smart lorsque vous mettez lecontact. Réessayez en connectant lepériphérique après avoir mis le contact.Pour plus d'informationsConsultez la FAQ disponible sur la pagesupport du Parrot ASTEROID Smart.Informations généralesGarantieSans préjudice <strong>de</strong> la garantie légale et <strong>de</strong>l’application <strong>de</strong>s articles L.211-4, L.211-5 etL.211-12 du co<strong>de</strong> <strong>de</strong> la consommation et <strong>de</strong>sarticles 1641 à 1646 du co<strong>de</strong> civil français,PARROT garantit contractuellement pendantune durée <strong>de</strong> 12 mois à compter <strong>de</strong> la dated’achat initial effectué par le consommateur(sauf pièces d’usure garanties 6 mois), que leproduit est exempt <strong>de</strong> défaut <strong>de</strong> matériaux et<strong>de</strong> fabrication, sur présentation <strong>de</strong> la preuved’achat (date, lieu d’achat, n° <strong>de</strong> série duproduit) au reven<strong>de</strong>ur ou à Parrot. Pendant ladurée <strong>de</strong> garantie contractuelle, le produitdéfectueux <strong>de</strong>vra être retourné dans sonemballage d’origine auprès du service aprèsventedu reven<strong>de</strong>ur. Après inspection duproduit, Parrot procè<strong>de</strong>ra, à son choix, auremplacement ou à l’émission d’un avoir àl’exclusion <strong>de</strong> tout autre dédommagement.La garantie ne couvre pas la mise à jour <strong>de</strong>slogiciels inclus dans les produits Parrot avec<strong>de</strong>s téléphones mobiles Bluetooth à <strong>de</strong>s fins<strong>de</strong> compatibilité, la récupération <strong>de</strong> données,la détérioration extérieure due à une usurenormale du produit, tout dommage causé par40 Français
acci<strong>de</strong>nt, une utilisation anormale ou nonautorisée du produit, un produit non Parrot.Parrot n’est pas responsable du stockage, <strong>de</strong> laperte ou <strong>de</strong> l’endommagement <strong>de</strong>s donnéesdurant le transport ou la réparation. Toutproduit s’avérant non défectueux sera retournéà l’expéditeur et les frais <strong>de</strong> traitement, <strong>de</strong>vérification et <strong>de</strong> transport lui seront facturé.ModificationsLes explications et spécifications contenuesdans ce <strong>gui<strong>de</strong></strong> utilisateur ne sont fournies qu’àtitre d’information et peuvent être modifiéessans notification préalable. Ces informationssont correctes au moment <strong>de</strong> l’impression et leplus grand soin est apporté lors <strong>de</strong> leur rédaction afin <strong>de</strong> vous fournir <strong>de</strong>s informations lesplus précises possible.Cependant, Parrot S.A. ne saurait être tenuresponsable, directement ou indirectement,<strong>de</strong>s éventuels préjudices ou pertes <strong>de</strong> donnéesacci<strong>de</strong>ntelles résultant d’une erreur ouomission au sein du présent document. ParrotS.A. se réserve le droit d’amen<strong>de</strong>r ou améliorerle produit ainsi que son <strong>gui<strong>de</strong></strong> utilisateur sansaucune restriction ou obligation <strong>de</strong> prévenirl’utilisateur. Dans le cadre <strong>de</strong> l’attention portéepar Parrot S.A. sur l’amélioration <strong>de</strong> nosproduits, il est possible que le produit que vousavez acheté diffère légèrement <strong>de</strong> celui décritau sein du présent document. Dans ce cas, vouspourrez éventuellement trouver une nouvelleversion du <strong>gui<strong>de</strong></strong> utilisateur au formatélectronique sur le site www.parrot.com.Comment recycler ce produit - Déchetsd’équipements électriques et électroniquesLe symbole sur le produit ou sadocumentation indique qu’il ne doit pas êtreéliminé en fin <strong>de</strong> vie avec les autres déchetsménagers. L’élimination incontrôlée <strong>de</strong>sdéchets pouvant porter préjudice àl’environnement ou à la santé humaine, veuillezle séparer <strong>de</strong>s autres types <strong>de</strong> déchets et lerecycler <strong>de</strong> façon responsable. Vousfavoriserez ainsi la réutilisation durable <strong>de</strong>sressources matérielles. Les particuliers sontinvités à contacter le distributeur leur ayantvendu le produit ou à se renseigner auprès <strong>de</strong>leur mairie pour savoir où et comment ilspeuvent se débarrasser <strong>de</strong> ce produit afin qu’ilsoit recyclé en respectant l’environnement.Les entreprises sont invitées à contacter leursfournisseurs et à consulter les conditions <strong>de</strong>leur contrat <strong>de</strong> vente. Ce produit ne doit pasêtre éliminé avec les autres déchetscommerciaux.Marques déposéesParrot et les logos Parrot sont <strong>de</strong>s marquesenregistrées <strong>de</strong> PARROT SA en France et dansd’autres pays.Le nom et le logo B luetooth sont <strong>de</strong>s marquesdéposées <strong>de</strong> B luetooth® SIG, Inc. et touteutilisation <strong>de</strong> ces <strong>de</strong>rniers par Parrot S.A. estfaite sous licence."Ma<strong>de</strong> for iPod / iPhone / iPad" signifie qu'unaccessoire électronique a été spécialementconçu pour se connecter, respectivement, avecun iPod, un iPhone ou un iPad et est certifié parle concepteur comme répondant aux normes<strong>de</strong> performance d'Apple. Apple décline touteresponsabilité relative au fonctionnement <strong>de</strong>ces accessoires ou à leur conformité auxnormes réglementaires et <strong>de</strong> sécurité.iPad, iPod, iPod Touch et iPhone sont <strong>de</strong>smarques d’Apple, Inc. déposées aux États-Uniset dans d’autres pays.iPad est une marque d'Apple Inc.Wi-Fi est une marque déposée <strong>de</strong> Wi-FiAlliance.Français41
Le nom « Gracenote », le logo Gracenote, legraphisme Gracenote, la mention « Powered byGracenote » sont <strong>de</strong>s marques ou <strong>de</strong>s marquesdéposées <strong>de</strong> Gracenote aux États-Unis et/oudans d’autres pays.Toutes les autres marques <strong>de</strong> commerce etmarques déposées mentionnées dans leprésent document sont protégées parCopyright et sont la propriété <strong>de</strong> leurspropriétaires respectifs.Déclaration <strong>de</strong> conformité FCCLe présent appareil est conforme aux CNRd'Industrie Canada applicables aux appareilsradio exempts <strong>de</strong> licence. L'exploitation estautorisée aux <strong>de</strong>ux conditions suivantes : (1)l'appareil ne doit pas produire <strong>de</strong> brouillage, et(2) l'utilisateur <strong>de</strong> l'appareil doit accepter toutbrouillage radioélectrique subi, même si lebrouillage est susceptible d'en compromettrele fonctionnement.CopyrightsI<strong>de</strong>ntification N. 394 149 496 R.C.S. PARISParrot S.A.Copyright © 2012 Parrot. Tous droits réservés.Déclaration <strong>de</strong> conformitéParrot SA, 174 quai <strong>de</strong> Jemmapes, 75010 Paris,France, déclare sous son unique responsabilitéque le produit, le Parrot ASTEROID Smart,décrit dans le présent <strong>gui<strong>de</strong></strong> utilisateur est enconformité avec les normes techniques IEC/EN 60065: 2002 / A1:2006 / A11: 2008 / A2:2010 / A12: 2011, EN 300328 v1.8.1, EN 301 489-1 (2008:V1.8.1) et EN 301 489-17 v1.3.2 suivantles dispositions <strong>de</strong> la directiveRadio&Telecommunication 1999/5/EC R&TTE,ainsi qu’avec les exigences <strong>de</strong> la directiverelative à la sécurité 2006/95/EC et <strong>de</strong> ladirective Automobile 72/245/CEE amendée parla directive 2009/19/CE.http://www.parrot.com/fr/support/parrotasteroid-smart/asteroidsmart_ce_conformity_<strong>de</strong>claration.pdfLe présent appareil est conforme aux CNRd'Industrie Canada applicables aux appareilsradio exempts <strong>de</strong> licence. L'exploitation estautorisée aux <strong>de</strong>ux conditions suivantes : (1)l'appareil ne doit pas produire <strong>de</strong> brouillage, et(2) l'utilisateur <strong>de</strong> l'appareil doit accepter toutbrouillage radioélectrique subi, même si lebrouillage est susceptible d'en compromettrele fonctionnement.Cet appareil est conforme aux limitesd’exposition au rayonnement RF stipulées parla FCC et l’IC pour une utilisation dans unenvironnement non contrôlé. Les antennesutilisées pour cet émetteur doivent êtreinstallées et doivent fonctionner à au moins 20cm <strong>de</strong> distance <strong>de</strong>s utilisateurs et ne doiventpas être placées près d’autres antennes ouémetteurs ou fonctionner avec ceux-ci. Lesinstallateurs doivent s’assurer qu’une distance<strong>de</strong> 20 cm sépare l’appareil (à l’exception ducombiné) <strong>de</strong>s utilisateurs.42 Français
<strong>Guía</strong> <strong>de</strong>utilizaciónrápidaÍndiceAntes <strong>de</strong> comenzarInstalaciónPrimera utilizaciónTeléfonoMúsicaInternetVi<strong>de</strong>oEn caso <strong>de</strong> problemaInformación generalp.43p.44p.48p.50p.51p.53p.54p.55p.56Antes <strong>de</strong> comenzarA propósito <strong>de</strong> este manualCon el fin <strong>de</strong> limitar nuestro consumo <strong>de</strong> papely como parte <strong>de</strong> nuestra actuación lo másresponsable y respetuosa posible con el medioambiente, Parrot prefiere poner en línea losdocumentos para los usuarios en lugar <strong>de</strong>imprimirlos.Este manual simplificado <strong>de</strong>l Parrot ASTEROIDSmart se limita por tanto a aportarle lasprincipales instrucciones que le permitiránutilizar el aparato con facilidad. Podrá encontrarmás información en la sección Apoyo al cliente<strong>de</strong> nuestra página web www.parrot.com:manual completo, preguntas frecuentes,softwares didácticos...Nota: En este manual, se utiliza el término "iPod"para <strong>de</strong>nominar tanto a iPod como a iPhone.AdvertenciasLas funciones que requieran una atenciónprolongada se <strong>de</strong>ben utilizar únicamentecuando <strong>de</strong>tenido. Su seguridad y la <strong>de</strong> las<strong>de</strong>más personas que circulan por la carretera esmás importante que las llamadas telefónicas, lamúsica o que las instrucciones <strong>de</strong>l GPS. Searesponsable: conduzca con pru<strong>de</strong>ncia y presteatención a su entorno. Parrot no asumiráninguna responsabilidad si usted opta porignorar esta advertencia.Utilice el Parrot ASTEROID Smart con un nivel<strong>de</strong> volumen razonable, que <strong>de</strong>je oír en todomomento los ruidos exteriores mientrasconduce.El Parrot ASTEROID Smart contiene imanes <strong>de</strong>tipo NdFeB que podrían dañar objetossensibles a los campos magnéticos(marcapasos, tarjetas <strong>de</strong> crédito, relojesmecánicos...).El Parrot ASTEROID Smart dispone <strong>de</strong> un cablepara conectar con el cable ISO, con el fin <strong>de</strong><strong>de</strong>tectar si el freno <strong>de</strong> mano está puesto o no.Este <strong>de</strong>be conectarse siguiendo lasinstrucciones <strong>de</strong> instalación que se <strong>de</strong>scribenen el presente documento. Cualquierinstalación o conexión incorrecta pue<strong>de</strong> serpeligrosa e ilegal en muchos estados/países. Lapantalla situada en el campo <strong>de</strong> visión <strong>de</strong>lconductor en ningún caso <strong>de</strong>be reproducirví<strong>de</strong>os mientras el vehículo esté en marcha.Esta norma es válida también para cualquieraplicación que no sea <strong>de</strong> ayuda a la conduccióno a la navegación.Si intenta utilizar una aplicación no específicaEspañol43
<strong>de</strong> navegación o <strong>de</strong> ayuda a la conducciónmientras conduce, aparecerá un aviso en lapantalla. Para ver un ví<strong>de</strong>o en la pantalla <strong>de</strong>lParrot ASTEROID Smart, asegúrese <strong>de</strong> que elvehículo está <strong>de</strong>tenido en un lugar seguro y <strong>de</strong>que el freno <strong>de</strong> mano está puesto.Actualización <strong>de</strong>l softw areDescargue gratis la última actualización <strong>de</strong>lproducto en nuestra página webwww.parrot.com, sección Apoyo al cliente. Lasactualizaciones le permitirán disfrutar <strong>de</strong>nuevas funciones y mejorar la compatibilidad<strong>de</strong>l producto.Nota: También pue<strong>de</strong> <strong>de</strong>scargar lasactualizaciones <strong>de</strong>l Parrot ASTEROID Smartcuando se conecta a Internet. La disponibilidad<strong>de</strong> una actualización se indica en la barra <strong>de</strong>notificación.Tarjeta SDSe incluye una tarjeta SD con el ParrotASTEROID Smart. Esta permite grabar música yciertas aplicaciones que no se encuentrandirectamente en el Parrot ASTEROID Smart. Esnecesario insertar la tarjeta SD en el ParrotASTEROID Smart para utilizar las aplicaciones<strong>de</strong> música a <strong>de</strong>manda y <strong>de</strong> navegación.Interfaz <strong>de</strong> mando <strong>de</strong> control al volantePronto estará disponible una interfaz <strong>de</strong> mando<strong>de</strong> control al volante que le permitirá conectarel kit manos libres Parrot al volante <strong>de</strong> suvehículo. Con esta interfaz, podrá realizarllamadas telefónicas utilizando los botones <strong>de</strong>control <strong>de</strong>l mando sin quitar las manos <strong>de</strong>lvolante. Consulte nuestro sitio webwww.parrot.com para más información.InstalaciónNota: Le recomendamos que acuda a unprofesional para realizar esta instalación,especialmente a alguno <strong>de</strong> nuestra red <strong>de</strong>instaladores certificados.Instrucciones <strong>de</strong> seguridadApague el motor antes <strong>de</strong> realizar lasconexiones.Nunca instale el Parrot ASTEROID Smart en unlugar con riesgo <strong>de</strong> causar lesiones al conductoro a alguno <strong>de</strong> los pasajeros en caso <strong>de</strong> paradabrusca.Nunca instale el Parrot ASTEROID Smart en unlugar susceptible <strong>de</strong> interferir con laconducción.Nunca taladre un panel o el cuadro <strong>de</strong> mandossin comprobar antes lo que hay <strong>de</strong>trás.Asegúrese <strong>de</strong> no dañar ningún componenteelectrónico ni ningún cable.Si utiliza tornillos, asegúrese <strong>de</strong> que losmismos no entren en contacto con un cable <strong>de</strong>alimentación eléctrica.El Parrot ASTEROID Smart está diseñadoexclusivamente para funcionar en un vehículocon una batería <strong>de</strong> 12 V. Si su vehículo (p. e.:44 Español
camión) dispone <strong>de</strong> una batería <strong>de</strong> 24 V, esnecesario utilizar un adaptador <strong>de</strong> corriente.Asegúrese <strong>de</strong> que los cables están alejados <strong>de</strong>zonas calientes (salidas <strong>de</strong> calefacción, etc.),<strong>de</strong> partes móviles (palanca <strong>de</strong> cambios, etc.) yque no corren el riesgo <strong>de</strong> enrollarse en lacolumna <strong>de</strong> dirección o en la palanca <strong>de</strong>cambios.Verifique el buen funcionamiento <strong>de</strong> losequipamientos <strong>de</strong>l vehículo tras instalar elParrot ASTEROID Smart.No instale el Parrot ASTEROID Smart nininguno <strong>de</strong> sus componentes en un lugar don<strong>de</strong>pueda <strong>de</strong>splegarse alguno <strong>de</strong> los airbags <strong>de</strong>lvehículo.No instale el Parrot ASTEROID Smart en unlugar húmedo o sometido a temperaturaselevadas.Deje <strong>de</strong>trás <strong>de</strong>l Parrot ASTEROID Smart unespacio suficiente para permitir la disipación<strong>de</strong>l calor.Antes <strong>de</strong> comenzarQuite la radio <strong>de</strong> origen <strong>de</strong>l vehículo. Sepue<strong>de</strong>n necesitar llaves <strong>de</strong> extracción pararealizar esta operación.Compruebe que la conexión entre losconectores <strong>de</strong> audio, la alimentación <strong>de</strong>l ParrotASTEROID Smart y las conexiones <strong>de</strong>l vehículoes posible comparando los dos conectores. Sino fuera posible conectarlos, necesitará utilizarun adaptador ISO para adaptar el ParrotASTEROID Smart a las conexiones específicas<strong>de</strong> su vehículo. Consulte la secciónCompatibilidad <strong>de</strong> vehículos en la página <strong>de</strong>soporte <strong>de</strong>l Parrot ASTEROID Smart paracomprobar la necesidad <strong>de</strong> un cable adaptador.Compare el conector <strong>de</strong> la antena <strong>de</strong>l ParrotASTEROID Smart con el <strong>de</strong>l vehículo. Si senecesita utilizar un adaptador <strong>de</strong> antena,consulte a un profesional <strong>de</strong>l automóvil paramás información.Nota: Si su antena está amplificada, tiene laposibilidad <strong>de</strong> alimentarla con el cable ISOincluido con el Parrot ASTEROID Smart.Instalación con los soportes1. Afloje los 4 tornillos para retirar el soporte<strong>de</strong>l Parrot ASTEROID Smart.2. Inserte el soporte <strong>de</strong> montaje y fíjelo en elhabitáculo. Para ello, separe las lengüetashacia el exterior doblándolas a 90° (esquemaA p.7).3. Instale el Parrot ASTEROID Smart y fije los 4tornillos (esquema B p.7).4. Encaje el marco <strong>de</strong> plástico (esquema C p.8).Instalación con los tornillos laterales1. Afloje los 4 tornillos para retirar el soporte<strong>de</strong>l Parrot ASTEROID Smart.2. Retire los 2 soportes laterales (esquema Dp.8).3. Posicione el Parrot ASTEROID Smart <strong>de</strong>modo que los dos orificios para los tornillosque<strong>de</strong>n alineados con los orificios para lostornillos <strong>de</strong>l vehículo.4. Atornille el número <strong>de</strong> tornillos querequiera su mo<strong>de</strong>lo <strong>de</strong> vehículo. Utiliceúnicamente los tornillos facilitados.Instalación <strong>de</strong>l dongle GPSInstale la mochila GPS en una superficie plana,en una zona libre <strong>de</strong> obstáculos en el interior<strong>de</strong>l habitáculo.Los parabrisas térmicos y las lunas con antenaintegrada pue<strong>de</strong>n interferir con la recepciónGPS y reducir la fiabilidad <strong>de</strong> los datosrelacionados con las aplicaciones <strong>de</strong>navegación.Español45
La antena GPS <strong>de</strong> la mochila seencuentra <strong>de</strong>l lado en el que sepue<strong>de</strong> leer "Parrot ASTEROIDGPS" y don<strong>de</strong> figura el logo en forma<strong>de</strong> estrella. Este logo siempre <strong>de</strong>bequedar orientado hacia el cielo.Si su vehículo dispone <strong>de</strong> parabrisas atérmico,instale la mochila GPS en el parabrisas, a laaltura <strong>de</strong> la zona no atérmica. El lado en el quefigura el logo en forma <strong>de</strong> estrella <strong>de</strong>be pegarseen el parabrisas (esquema F p.9).Nota: La zona no atérmica <strong>de</strong>l parabrisas pue<strong>de</strong>variar según el mo<strong>de</strong>lo <strong>de</strong> vehículo.Normalmente suele estar a la altura <strong>de</strong>lretrovisor.Si su vehículo no dispone <strong>de</strong> parabrisasatérmico, instale la mochila GPS en el cuadro<strong>de</strong> mandos. El lado en el que figura el logo enforma <strong>de</strong> estrella <strong>de</strong>be quedar visible(esquema E p.9).Para garantizar una buena fijación <strong>de</strong>l soporte:Utilice el adhesivo suministrado ;limpie la superficie <strong>de</strong> montaje antes <strong>de</strong>pegar el soporte;tras la fijación <strong>de</strong>l soporte, espere unasdos horas sin manipularlo.Conexión <strong>de</strong>l cable <strong>de</strong> freno <strong>de</strong> manoEl cable <strong>de</strong> freno <strong>de</strong> mano permite utilizar lafunción <strong>de</strong> ví<strong>de</strong>o <strong>de</strong>l Parrot ASTEROID Smartcuando el freno <strong>de</strong> mano está puesto. Si estecable no está conectado al cable <strong>de</strong> señal <strong>de</strong>lfreno <strong>de</strong> mano <strong>de</strong>l vehículo, la función <strong>de</strong> ví<strong>de</strong>ono estará disponible en ningún caso.1. Conecte el alargador <strong>de</strong>l cable <strong>de</strong> freno <strong>de</strong>mano incluido con el cable ver<strong>de</strong> <strong>de</strong>l ParrotASTEROID Smart (con la indicación <strong>de</strong>freno <strong>de</strong> estacionamiento “ParkingBrake”)2. Localice y pruebe el cable <strong>de</strong> señal <strong>de</strong>freno <strong>de</strong> mano <strong>de</strong>l vehículo. Este cableconecta el freno <strong>de</strong> mano con el testigo <strong>de</strong>freno <strong>de</strong> mano <strong>de</strong>l cuadro <strong>de</strong> mandos.3. Pase el alargador <strong>de</strong>l cable <strong>de</strong> freno <strong>de</strong>mano (ver<strong>de</strong>) <strong>de</strong> forma segura <strong>de</strong>s<strong>de</strong> elParrot ASTEROID Smart y conéctelo alcable <strong>de</strong> señal <strong>de</strong>l freno <strong>de</strong> mano a través<strong>de</strong> un método a<strong>de</strong>cuado.Instalación <strong>de</strong> una cámara <strong>de</strong> retrocesoSi utiliza el Parrot ASTEROID Smart con unacámara <strong>de</strong> retroceso (no incluida), el hilonaranja <strong>de</strong>l cable ISO <strong>de</strong>l Parrot ASTEROIDSmart permite <strong>de</strong>tectar si su vehículo avanza oretroce<strong>de</strong>. Conecte este cable con el cablecuya tensión permite encen<strong>de</strong>r las lucestraseras para visualizar la señal <strong>de</strong> ví<strong>de</strong>o <strong>de</strong> lacámara <strong>de</strong> retroceso cuando maniobra marchaatrás.Conecte también el cable <strong>de</strong> ví<strong>de</strong>o <strong>de</strong> la cámara<strong>de</strong> retroceso a los conectores Vi<strong>de</strong>o CAMsituados <strong>de</strong>trás <strong>de</strong>l Parrot ASTEROID Smart.Instalación <strong>de</strong>l doble micrófonoSe aconseja pasar el cable por la canaleta queestá por <strong>de</strong>trás <strong>de</strong> la junta <strong>de</strong> la puerta.Si el cable pasa por encima <strong>de</strong> los pedales,asegúrese <strong>de</strong> que que<strong>de</strong> bien sujeto.Advertencia: No pase el cable <strong>de</strong>l micrófono porlos sistemas <strong>de</strong> calefacción, ventilación oclimatización o por <strong>de</strong>lante <strong>de</strong> los airbagslaterales.Asegúrese <strong>de</strong> que el micrófono que<strong>de</strong>colocado lo más cerca posible <strong>de</strong> la cabeza <strong>de</strong>lusuario. La distancia i<strong>de</strong>al es <strong>de</strong> 60 cm. Instaleel micrófono preferentemente cerca <strong>de</strong>lretrovisor interior.Oriente el micrófono hacia la boca <strong>de</strong>l usuario.46 Español
Conexión <strong>de</strong>l cable ISOConecte los conectores <strong>de</strong> audio yalimentación <strong>de</strong>l vehículo a los conectores <strong>de</strong>lParrot ASTEROID Smart.Nota: Utilice los sujetacables suministradospara garantizar la sujeción <strong>de</strong> los cables a laradio. Introduzca uno <strong>de</strong> los sujetacables en ellugar previsto para ello, en la parte superiorizquierda <strong>de</strong> la trasera <strong>de</strong> la radio (ver esquema)p.4).Compruebe la instalación. Para ello, encienda yapague el contacto <strong>de</strong> su vehículo una vezinstalado el Parrot ASTEROID Smart: elmensaje “Adiós” <strong>de</strong>be aparecer en la pantalla.Si no es así, <strong>de</strong>berá invertir las posiciones <strong>de</strong>los hilos rojo y amarillo. El hilo amarillo <strong>de</strong> laalimentación <strong>de</strong>be estar conectado a los 12 Vpermanentes, el hilo rojo a los 12 V <strong>de</strong>spués <strong>de</strong>contacto y el hilo negro a masa. Esta operaciónse realiza fácilmente invirtiendo los dosterminales <strong>de</strong>l cableado Parrot.Instalación <strong>de</strong> los cables USBConecte los cables USB al Parrot ASTEROIDSmart. Le recomendamos que conecte todoslos cables <strong>de</strong>l Parrot ASTEROID Smart, aunqueno tenga previsto utilizarlos. Haga salir losconectores correspondientes <strong>de</strong> la ban<strong>de</strong>ja o<strong>de</strong> la guantera. Para ello, pue<strong>de</strong> ser necesariohacer un agujero <strong>de</strong>ntro <strong>de</strong>l salpica<strong>de</strong>ro. Eviteutilizar alargadores USB siempre que seaposible.El cable USB (1.2m - 2A) al que conecta elalargador <strong>de</strong>l iPod <strong>de</strong>be conectarseobligatoriamente al puerto USB blanco previstopara tal fin. Encontrará la indicación "iPod" en laparte superior <strong>de</strong>l mismo.Para garantizar una calidad <strong>de</strong> recepciónóptima, no conecte su pendrive 3Gdirectamente al Parrot ASTEROID Smart,utilice un cable USB para instalar el accesorioen el salpica<strong>de</strong>ro (u otra zona <strong>de</strong>spejada).Protección antirroboEl frontal extraíble pue<strong>de</strong> separarse <strong>de</strong>l ParrotASTEROID Smart para disuadir los robos. ElParrot ASTEROID Smart no pue<strong>de</strong> funcionar sise ha retirado el frontal.Manipule el frontal extraíble con precaución.No lo fuerce ni al instalarlo ni al retirarlo.Guar<strong>de</strong> el frontal en un lugar seguro y protegido<strong>de</strong> la luz solar, <strong>de</strong> temperaturas elevadas y <strong>de</strong> lahumedad.Para retirar el frontal, <strong>de</strong>slice hacia abajo laparte superior <strong>de</strong>l frontal y tire <strong>de</strong> élsuavemente hacia fuera (esquema G p. 10).Para volver a colocar el frontal en su sitio,coloque primero el lado inferior imantado ypresione la parte superior hasta oír un clic.Español47
Primera utilizaciónPantalla <strong>de</strong> inicioCuando el Parrot ASTEROID Smart seencien<strong>de</strong>, acce<strong>de</strong>rá a la pantalla <strong>de</strong> inicio. Losbotones <strong>de</strong> navegación se encuentran en ellado izquierdo <strong>de</strong> la pantalla.Desplace el <strong>de</strong>do por la pantalla hacia laizquierda. Descubrirá más espacio para añadiraccesos directos a sus aplicaciones o funcionesfavoritas.Toque un icono para acce<strong>de</strong>r a su funcióncorrespondiente. Toque por ejemplo el iconoAplicaciones. Acce<strong>de</strong>rá a la lista <strong>de</strong>aplicaciones disponibles en el ParrotASTEROID Smart. Deslice el <strong>de</strong>do por lapantalla hacia arriba para <strong>de</strong>splazarse por la lista<strong>de</strong> aplicaciones.Para volver al menú anterior, pulse . Paravolver directamente a la pantalla <strong>de</strong> inicio,pulse .Pulse para acce<strong>de</strong>r al menú <strong>de</strong> contextocorrespondiente a la aplicación que se estáutilizando. El menú <strong>de</strong> contexto le permitesobre todo acce<strong>de</strong>r a las funcionessuplementarias <strong>de</strong> la aplicación o modificar<strong>de</strong>terminados ajustes.Pulse el botón para ver las últimasaplicaciones utilizadas o que están en uso.Pulse el botón para modificar el volumen. Acontinuación, <strong>de</strong>splace el cursor a la izquierda oa la <strong>de</strong>recha.Personalización <strong>de</strong> la pantalla <strong>de</strong> inicioPara añadir un acceso directo a una aplicación/función en la pantalla <strong>de</strong> inicio:1. Pulse Aplicaciones.2. Pulse durante 2 segundos el icono <strong>de</strong> laaplicación que le interese.3. Desplace el icono hasta la posición<strong>de</strong>seada.Para eliminar un acceso directo:1. Pulse durante 2 segundos el icono que<strong>de</strong>sea quitar.2. Desplácelo hacia arriba, hasta el nivel <strong>de</strong> laindicación Suprimir. Cuando el iconoaparezca en rojo, ya pue<strong>de</strong> retirar el <strong>de</strong>do.Modificar los parámetrosPara modificar los parámetros <strong>de</strong>l ParrotASTEROID Smart, pulse en Aplicaciones yluego en Ajustes. También pue<strong>de</strong> pulsarluego en Ajustes.Conectar un teléfono vía BluetoothNota: Consulte la página <strong>de</strong> compatibilidad <strong>de</strong>nuestra página web para verificar si su teléfonoes compatible con el Parrot ASTEROID Smart yconsultar el procedimiento <strong>de</strong> emparejamientocorrespondiente: www.parrot.com/es/compatibility.Si es la primera vez que utiliza el teléfono conel Parrot ASTEROID Smart, primero <strong>de</strong>beráemparejar ambos aparatos. Una vezemparejado el teléfono con el ParrotASTEROID Smart, la conexión entre los dosaparatos será automática en cuanto los dosaparatos estén encendidos y a proximidad conla función B luetooth activada.1. En el menú Ajustes, pulse Conexionesy48 Español
inalámbricas y re<strong>de</strong>s > Ajustes <strong>de</strong>Bluetooth.2. En caso necesario, active las opcionesBluetooth e I<strong>de</strong>ntificable.3. Active <strong>de</strong>s<strong>de</strong> su teléfono una búsqueda <strong>de</strong>periféricos B luetooth® y a continuaciónseleccione “Parrot ASTEROID Smart”.4. El procedimiento <strong>de</strong> emparejamiento<strong>de</strong>pen<strong>de</strong> <strong>de</strong>l mo<strong>de</strong>lo <strong>de</strong> teléfono:Si el teléfono le solicita el código PINB luetooth, introduzca "0000".Si el Parrot ASTEROID Smart y elteléfono muestran dos códigos,compruebe si los códigos sonidénticos y confirme o invali<strong>de</strong>.> La pantalla <strong>de</strong>l Parrot ASTEROIDSmart indica "Emparejamientocorrecto".Nota: En algunos teléfonos, <strong>de</strong>berá autorizar laconexión al Parrot ASTEROID Smart parapermitir la conexión automática.Consulte la guía <strong>de</strong> usuario <strong>de</strong> su teléfono paramás información.Conectar dos teléfonosPara activar el modo que permite la conexión <strong>de</strong>dos teléfonos:1. Pulse Teléfono.2. Pulse , y luego en Bluetooth.3. Pulse Opciones.4. Active la opción Telefonía multipuntos.Cuando el Parrot ASTEROID Smart seencien<strong>de</strong>, éste intenta establecer la conexióncon todos los teléfonos emparejados ypresentes en el vehículo. Si hay más <strong>de</strong> 2teléfonos emparejados presentes en elvehículo, se establece la conexión con los 2teléfonos cuyo emparejamiento sea másantiguo.Cuando hay 2 teléfonos conectados al ParrotASTEROID Smart, uno se consi<strong>de</strong>ra comoteléfono activo y el otro como teléfonosecundario. Por <strong>de</strong>fecto, el teléfono activo secorrespon<strong>de</strong> con el teléfono cuyoemparejamiento con el Parrot ASTEROIDSmart sea más antiguo.Tiene la posibilidad <strong>de</strong> recibir llamadasproce<strong>de</strong>ntes <strong>de</strong>l teléfono activo y <strong>de</strong>l teléfonosecundario.La agenda <strong>de</strong>l teléfono activo es la única queestará disponible en el Parrot ASTEROIDSmart. Sólo se pue<strong>de</strong>n realizar llamadas <strong>de</strong>s<strong>de</strong>el teléfono activo. No obstante, podrá cambiarfácilmente <strong>de</strong> un teléfono conectado a otro.Para ello:1. Pulse Teléfono.2. Pulse , y luego en Teléfono.3. Seleccione el teléfono activo.Sincronización <strong>de</strong> la agenda <strong>de</strong>l teléfonoEn la mayoría <strong>de</strong> teléfonos B luetooth, la agendase sincroniza automáticamente con la memoria<strong>de</strong>l sistema. Cada vez que modifique la agenda,la sincronización se reiniciará automáticamenteen la próxima conexión.Advertencia: Los contactos guardados en lamemoria <strong>de</strong>l teléfono son los únicos que sesincronizan con el Parrot ASTEROID Smart. Si suscontactos están guardados en la memoria <strong>de</strong> latarjeta SIM, <strong>de</strong>berá pasarlos a la memoria <strong>de</strong>lteléfono. Consulte el manual <strong>de</strong>l usuario <strong>de</strong> suteléfono para más información.Nota: En algunos teléfonos, <strong>de</strong>berá autorizar elacceso <strong>de</strong>l Parrot ASTEROID Smart a suscontactos para permitir la sincronización.Consulte el manual <strong>de</strong>l usuario <strong>de</strong> su teléfonoEspañol49
para más información.La sincronización automática está limitada a5.000 contactos (o números <strong>de</strong> teléfono) porcada teléfono emparejado.TeléfonoRecibir una llamadaLas llamadas entrantes se anuncian con unmensaje <strong>de</strong> voz. El nombre <strong>de</strong>l contacto seráanunciado si su número está memorizado en laagenda <strong>de</strong>l teléfono conectado al ParrotASTEROID Smart.Si <strong>de</strong>sea aceptar esa llamada, pulse elbotón ver<strong>de</strong> que aparece en la pantalla.Después, pulse el botón rojo <strong>de</strong> la pantallapara acabar la comunicación.Si <strong>de</strong>sea rechazar esa llamada, pulse elbotón rojo que aparece en la pantalla.2. Diga el nombre <strong>de</strong>l contacto seguido <strong>de</strong>ltipo <strong>de</strong> número (“OFICINA”,“MÓVIL”…) si el contacto tiene variosnúmeros.> La llamada a ese contacto se haráautomáticamente si la instrucción <strong>de</strong> vozha sido comprendida.> En caso contrario, el sistema manoslibres emitirá un mensaje <strong>de</strong> confirmación.Confirme diciendo “SÍ”, “LLAMA” o“LLAMAR”.Nota: En cualquier momento, pue<strong>de</strong> pulsar elbotón <strong>de</strong> la pantalla para anular elprocedimiento <strong>de</strong> llamada.Hacer una llamada por reconocimiento <strong>de</strong> vozPue<strong>de</strong> hacer una llamada por reconocimiento<strong>de</strong> voz directamente <strong>de</strong>spués <strong>de</strong> sincronizar laagenda <strong>de</strong>l teléfono. El Parrot ASTEROIDSmart reconocerá automáticamente el contacto<strong>de</strong> su agenda al que <strong>de</strong>sea llamar.1. Seleccione Comandos Vocales >Contactos para iniciar el proceso <strong>de</strong>reconocimiento <strong>de</strong> voz.> El Parrot ASTEROID Smart le pedirá elnombre <strong>de</strong>l contacto al que <strong>de</strong>sea llamar.50 Español
MúsicaNota: Es posible que tar<strong>de</strong> unos minutos encargar la primera vez que conecte un dispositivo<strong>de</strong> audio (iPod/ USB/SD) al Parrot ASTEROIDSmart, particularmente en caso <strong>de</strong> dispositivoscon gran capacidad y que contienen unacantidad importante <strong>de</strong> archivos <strong>de</strong> música. Estetiempo <strong>de</strong> carga permite que las canciones esténaccesibles con el reconocimiento <strong>de</strong> voz.Utilización <strong>de</strong>l reconocimiento <strong>de</strong> voz musicalEl reconocimiento <strong>de</strong> voz y la función <strong>de</strong>reconocimiento <strong>de</strong> voz musical le permiteseleccionar los artistas o los álbumes que<strong>de</strong>sea escuchar. Esta función se encuentradisponible cuando utiliza el Parrot ASTEROIDSmart con un dispositivo tipo iPod/USB/SD, osi utiliza una aplicación musical compatible conesta función.1. Seleccione Comandos Vocales > Música.2. Pronuncie el nombre <strong>de</strong>l artista o <strong>de</strong>lálbum que <strong>de</strong>sea escuchar cuando elParrot ASTEROID Smart se lo indique.> La lista <strong>de</strong> fuentes <strong>de</strong> audio conectadas alParrot ASTEROID Smart y <strong>de</strong> aplicaciones <strong>de</strong>música compatibles con la función <strong>de</strong>reconocimiento <strong>de</strong> voz que contienen elartista/álbum elegido se muestran enpantalla.Nota: Compruebe los nombre <strong>de</strong> artistas yálbumes en los tags (metadatos) <strong>de</strong> sus archivosmusicales. Estos pue<strong>de</strong>n diferir <strong>de</strong> los mostradosen el título <strong>de</strong> su canción.RadioPara seleccionar una frecuencia:1. Pulse Música > Radio.2. Mueva el cursor hacia la izquierda o haciala <strong>de</strong>recha para seleccionar una frecuencia.Para obtener la lista <strong>de</strong> todas las emisorasdisponibles, pulse el botón y pulse Nuevoescaneado > OK.Para memorizar una emisora, pulse el botóny seleccione la opción Añadir a favoritos.Para acce<strong>de</strong>r a las emisoras memorizadas, pulseel botón y pulse Modo > Favoritos.Nota: El número <strong>de</strong> emisoras memorizables esilimitado.Utilización con un iPod1. Conecte el iPod al cable iPod.2. Seleccione Música > iPod. También pue<strong>de</strong>pulsar en Explorar para navegar por elcontenido <strong>de</strong> su iPod.3. Pulse sobre la canción para iniciar lareproducción.Nota: Pulse el botón para modificar<strong>de</strong>terminados ajustes (audio, repetición,aleatoria).Memoria USBEl Parrot ASTEROID Smart es compatible conla mayoría <strong>de</strong> memorias USB/reproductores <strong>de</strong>MP3/discos duros externos. No existe ningunarestricción sobre la capacidad <strong>de</strong> losdispositivos <strong>de</strong> memoria USB. Los archivos <strong>de</strong>música <strong>de</strong> su memoria SD pue<strong>de</strong>n estar enformato MP3, AAC, WAV, OGG o WMA.1. Conecte su dispositivo USB al cable USB.2. Seleccione Música > USB. También pue<strong>de</strong>pulsar en Explorar para navegar por elcontenido <strong>de</strong> su dispositivo USB.3. Pulse sobre la canción para iniciar lareproducción.Español51
Tarjeta SDLa capacidad <strong>de</strong> la tarjeta SD no <strong>de</strong>be superarlos 32 Gb. Los archivos <strong>de</strong> música <strong>de</strong> su tarjetaSD pue<strong>de</strong>n estar en formato MP3, AAC, WAV,OGG o WMA.Nota: Extraiga la tarjeta SD introduciendo lauña en la ranura.1. Inserte la tarjeta SD en el alojamientoprevisto para ello situado en el lado<strong>de</strong>recho <strong>de</strong> la pantalla (esquema H p.10).2. Seleccione Música > SD. También pue<strong>de</strong>pulsar en Explorar para navegar por elcontenido <strong>de</strong> su tarjeta SD.3. Pulse sobre la canción para iniciar lareproducción.Utilización con un lector <strong>de</strong> audio BluetoothNota: El Parrot ASTEROID Smart le permiteutilizar la función <strong>de</strong> telefonía y streaming audioa través <strong>de</strong> Bluetooth con 2 teléfonos diferentes,sin que sea necesario <strong>de</strong>sconectar alguno <strong>de</strong> los2 aparatos.Pue<strong>de</strong> utilizar el Parrot ASTEROID Smart paraescuchar archivos <strong>de</strong> música almacenados enun reproductor <strong>de</strong> audio B luetooth, si éstesoporta el perfil A2DP (Advanced AudioDistribution Profile). Si utiliza el reproductor<strong>de</strong> audio por primera vez, primero tendrá queemparejarlo con el Parrot ASTEROID Smart. Siel reproductor <strong>de</strong> audio ya está emparejado conel Parrot ASTEROID Smart :1. Seleccione Música > Audio Bluetooth.2. Active la reproducción <strong>de</strong> una canción ensu reproductor <strong>de</strong> audio.MandosMientras se está reproduciendo un archivo <strong>de</strong>música o <strong>de</strong> radio:toque la pantalla para poner la canción enpausa o para interrumpir el sonido <strong>de</strong> laradio;<strong>de</strong>slice el <strong>de</strong>do hacia arriba para subir elvolumen;<strong>de</strong>slice el <strong>de</strong>do hacia abajo para bajar elvolumen.Mientras se está reproduciendo un archivo <strong>de</strong>música (a excepción <strong>de</strong> las fuentes <strong>de</strong> audioconectadas por cable jack/jack):<strong>de</strong>slice el <strong>de</strong>do hacia la <strong>de</strong>recha para pasara la canción siguiente;<strong>de</strong>slice el <strong>de</strong>do hacia la izquierda parapasar a la canción anterior.Nota: Si instala el Parrot Parrot ASTEROID Smartcon un reproductor <strong>de</strong> audio conectado porBluetooth, estos mandos estarán disponiblesúnicamente si este soporta el perfil AVRCP(Audio/Vi<strong>de</strong>o Remote Control Profile).52 Español
InternetAdvertencia: La conexión a Internet a través <strong>de</strong>un dispositivo 3G/4G requiere un contrato conun operador <strong>de</strong> telefonía. La utilización <strong>de</strong> esteservicio pue<strong>de</strong> generar costes <strong>de</strong> roamingimportantes. Compruebe las condiciones <strong>de</strong> sucontrato y haga un seguimiento <strong>de</strong> su consumocon su operador. Parrot <strong>de</strong>clina cualquierresponsabilidad <strong>de</strong>rivada <strong>de</strong> los costesasociados.Conexión con un dispositivo 3G/4GNota: Consulte la sección <strong>de</strong> compatibilidad <strong>de</strong>lParrot ASTEROID Smart en nuestra página webpara ver la lista <strong>de</strong> dispositivos 3G compatiblescon el Parrot ASTEROID Smart.1. Conecte un dispositivo 3G/4G al ParrotASTEROID Smart a través <strong>de</strong>l cable USB.> Aparecerá una ventana emergente (popup).2. Introduzca su código PIN y pulseVALIDAR. Marque la opción Memorizar siprefiere que no se le pida el código PINcada vez que se encienda el ParrotASTEROID Smart.Nota: Más a<strong>de</strong>lante, podrá modificar este ajusteseleccionando Ajustes > Inalámbrico y re<strong>de</strong>s >Ajustes <strong>de</strong> re<strong>de</strong>s móviles. En los dispositivos <strong>de</strong>conexión, seleccione su dispositivo 3G/4G,seleccione Ignorar código PIN y <strong>de</strong>spués Ignorar.3. Seleccione su APN (Access Point Name)en la lista que aparece. Esta información seencuentra disponible en la documentaciónfacilitada con su dispositivo 3G/4G. Si suAPN no figura en la lista, pue<strong>de</strong> añadirloseleccionando Ajustes > Conexionesinalámbricas y re<strong>de</strong>s > Mobile datanetworks.4. En los dispositivos <strong>de</strong> conexión,seleccione su dispositivo 3G/4G.5. Seleccione Puntos <strong>de</strong> acceso > Otro >Puntos <strong>de</strong> acceso pre<strong>de</strong>finidos.6. Espere a que se haya establecido laconexión. También pue<strong>de</strong> pulsar el botóny navegar por los menús mientras seestablece la conexión.Conexión vía BluetoothSi su teléfono soporta el perfil B luetooth DUN(Dial-Up Networking) o PAN (Personal AreaNetwork), la conexión vía B luetooth <strong>de</strong>lteléfono con el Parrot ASTEROID Smart lepermitirá compartir la conexión 3G <strong>de</strong>lteléfono.Nota: Consulte la sección <strong>de</strong> compatibilidad <strong>de</strong>lParrot ASTEROID Smart en nuestra página webpara ver la lista <strong>de</strong> dispositivos 3G compatiblescon el Parrot ASTEROID Smart.1. Autorice compartir la conexión en suteléfono. Este procedimiento pue<strong>de</strong>diferir según el mo<strong>de</strong>lo <strong>de</strong> móvil.2. Conecte el teléfono al Parrot ASTEROIDSmart vía B luetooth.3. En el Parrot ASTEROID Smart, seleccioneAjustes > Conexiones inalámbricas y re<strong>de</strong>s> Mobile data networks.4. Seleccione su APN (Access Point Name)en la lista que aparece y marque la opciónSeleccionar.Compartir una conexión 3G vía USBNota: Consulte la página <strong>de</strong> compatibilidad ennuestra web para comprobar si su teléfonopermite compartir la conexión 3G vía USB yconsultar el procedimiento correspondiente:www.parrot.com/es/compatibility.1. Asegúrese <strong>de</strong> que el teclado <strong>de</strong> suteléfono está <strong>de</strong>sbloqueado y <strong>de</strong>spuésconéctelo al Parrot ASTEROID SmartEspañol53
utilizando un cable USB/micro-USB. Estaconexión también permite recargar labatería <strong>de</strong>l teléfono.2. Seleccione su APN (Access Point Name)en la lista que aparece y marque la opciónSeleccionar. Más a<strong>de</strong>lante, podrámodificar este ajuste seleccionandoAjustes > Conexiones inalámbricas y re<strong>de</strong>s> Mobile data networks.> Aparecerá una ventana emergente (popup)indicando la activación <strong>de</strong> la conexióncompartida vía USB.Nota: Consulte la guía <strong>de</strong> usuario <strong>de</strong> su teléfonopara más información.Conexión a una red Wi-FiSi su teléfono permite compartir su conexión3G vía Wi-Fi® o si hay una red Wi-Fi disponiblea proximidad <strong>de</strong> su vehículo:1. Active esta función en el teléfono.2. En el menú Ajustes <strong>de</strong>l Parrot ASTEROIDSmart, pulse Conexiones inalámbricas yre<strong>de</strong>s > Wi-Fi.3. Active la opción Wi-Fi.4. Pulse Ajustes <strong>de</strong> Wi-Fi.> Aparecerá la lista <strong>de</strong> las re<strong>de</strong>s Wi-Fi.5. Seleccione la red Wi-Fi generada por susmartphone.6. Introduzca la contraseña en casonecesario.Utilizar las aplicacionesPue<strong>de</strong> utilizar varios tipos <strong>de</strong> aplicaciones conel ASTEROID Market : música, geolocalización,ayuda a la conducción, navegación embarcada ypuntos <strong>de</strong> interés conectados. Las aplicacionesdisponibles son diferentes según el país <strong>de</strong>utilización.Algunas aplicaciones pue<strong>de</strong>n necesitar unasuscripción.El Parrot ASTEROID Smart es multitarea: sepue<strong>de</strong>n utilizar varias aplicaciones a la vez. Porejemplo, pue<strong>de</strong> escuchar una Radio porinternet mientras utiliza una aplicación <strong>de</strong>ayuda a la conducción.Para más información sobre la utilización y lainstalación <strong>de</strong> las aplicaciones disponibles,consulte la página web <strong>de</strong>l soporte <strong>de</strong>lASTEROID Market : www.parrotasteroid.com/asteroidmarketVi<strong>de</strong>oAdvertencia : La función vi<strong>de</strong>o <strong>de</strong>l ParrotASTEROID Smart es peligrosa e ilegal en lamayoría <strong>de</strong> los paises si la utiliza durante laconducción. Por lo tanto, esta función solo estádisponible cuando el vehículo esté parado. Paraver un vi<strong>de</strong>o en el Parrot ASTEROID Smart,estacione su vehículo y ponga su freno <strong>de</strong> mano.Cámara <strong>de</strong> retrocesoSi su vehículo está equipado con cámara <strong>de</strong>retroceso, pue<strong>de</strong> utilizar la pantalla <strong>de</strong>l ParrotASTEROID Smart para visualizar el flujo <strong>de</strong>ví<strong>de</strong>o <strong>de</strong> esta cámara y facilitar así losestacionamientos marcha atrás. Consulte elesquema <strong>de</strong> instalación p.4 y la sección"Instalación <strong>de</strong> una cámara <strong>de</strong> retroceso" paramás información sobre la conexión <strong>de</strong> la cámara<strong>de</strong> retroceso al Parrot ASTEROID Smart.El flujo <strong>de</strong> ví<strong>de</strong>o <strong>de</strong> la cámara <strong>de</strong> retrocesoaparece automáticamente cuando se maniobramarcha atrás. La imagen proce<strong>de</strong>nte <strong>de</strong> lacámara <strong>de</strong> retroceso pue<strong>de</strong> aparecer invertida.Nota: En todo momento pue<strong>de</strong> pulsar en Vi<strong>de</strong>oswitch para cambiar <strong>de</strong>l ví<strong>de</strong>o proce<strong>de</strong>nte <strong>de</strong> lacámara <strong>de</strong> retroceso al ví<strong>de</strong>o proce<strong>de</strong>nte <strong>de</strong> uniPod conectado a través <strong>de</strong> un cable AV/iPod.54 Español
Lectura <strong>de</strong> ví<strong>de</strong>os <strong>de</strong>s<strong>de</strong> una fuente externaEl Parrot ASTEROID Smart permite lavisualización <strong>de</strong> ví<strong>de</strong>o proce<strong>de</strong>nte <strong>de</strong> unafuente <strong>de</strong> ví<strong>de</strong>o externa.Conecte su fuente <strong>de</strong> ví<strong>de</strong>o al ParrotASTEROID Smart utilizando un cable AV (noincluido) (esquema p. 4).1. Pulse en Aplicaciones > Entrada <strong>de</strong> ví<strong>de</strong>o.2. Reproduzca el ví<strong>de</strong>o en su fuente.Nota: En todo momento pue<strong>de</strong> pulsar en Vi<strong>de</strong>oswitch para cambiar <strong>de</strong>l ví<strong>de</strong>o proce<strong>de</strong>nte <strong>de</strong> lacámara <strong>de</strong> retroceso al ví<strong>de</strong>o proce<strong>de</strong>nte <strong>de</strong> unafuente externa conectada a través <strong>de</strong> un cableAV/iPod.Lectura <strong>de</strong> ví<strong>de</strong>os <strong>de</strong>s<strong>de</strong> una tarjeta SDPue<strong>de</strong> leer en el Parrot ASTEROID Smart losarchivos <strong>de</strong> ví<strong>de</strong>o grabados en una tarjeta SD.Los archivos <strong>de</strong> ví<strong>de</strong>o <strong>de</strong> la tarjeta SD pue<strong>de</strong>nestar en formato MP2, MP4, H263, H264, WMVy SPARK.1. Introduzca la tarjeta SD en el alojamientoprevisto para ello (esquema H p.10).2. Pulse en Aplicaciones > Galería.3. Seleccione el ví<strong>de</strong>o pulsando sobre elicono correspondiente.Pantalla conectada a la salida <strong>de</strong> ví<strong>de</strong>oLas conexiones <strong>de</strong> salida <strong>de</strong> ví<strong>de</strong>o permitenconectar una pantalla para los pasajeros <strong>de</strong> lasplazas traseras y que estos vean ví<strong>de</strong>osgrabados en su tarjeta SD. Consulte el esquema<strong>de</strong> instalación p.4 para más información sobrela conexión <strong>de</strong> la pantalla para los pasajeros <strong>de</strong>las plazas traseras al Parrot ASTEROID Smart.Advertencia: Nunca instale la pantalla en unlugar don<strong>de</strong> el conductor pueda ver los ví<strong>de</strong>osmientras conduce.En caso <strong>de</strong> problemaAntes <strong>de</strong> comenzarAsegúrese <strong>de</strong> que aparece el mensaje “Adiós”en la pantalla <strong>de</strong>l Parrot ASTEROID Smart alquitar el contacto <strong>de</strong>l vehículo. Consulte lasección Comprobar la instalación para másinformación.Reinicie el equipo. Para ello, saque el frontal yutilice un bolígrafo u otro objeto puntiagudopara presionar el botón Reset. Presione elbotón Reset durante 3 segundos (esquema p.5). También pue<strong>de</strong> restaurar los parámetrosiniciales seleccionando Ajustes > Parámetrosavanzados > Privacidad > Restablecer datos <strong>de</strong>fábrica.Compruebe que tiene instalada la últimaactualización en el Parrot ASTEROID Smart.Para ello, seleccione Ajustes > Acerca <strong>de</strong> >Versión <strong>de</strong> software. Compare este número <strong>de</strong>versión con el indicado en la página <strong>de</strong> soporte<strong>de</strong>l Parrot ASTEROID Smart en nuestra páginaweb www.parrot.com.Español55
Problemas relacionados con la función <strong>de</strong> telefonía estén accesibles por reconocimiento <strong>de</strong> voz.Compruebe la compatibilidad <strong>de</strong> su teléfonocon el Parrot ASTEROID Smart. Encontrará lalista <strong>de</strong> compatibilidad <strong>de</strong>l Parrot ASTEROIDSmart en nuestra página web www.parrot.com,sección Soporte y Descarga.Si su teléfono aparece como compatible, esposible que tenga que actualizar su ParrotASTEROID Smart. Encontrará elprocedimiento <strong>de</strong> actualización <strong>de</strong>l ParrotASTEROID Smart en nuestra página webwww.parrot.com, sección Soporte y Descarga.Si su teléfono aparece como compatible y elParrot ASTEROID Smart ya cuenta con la últimaactualización, elimine, en el Parrot ASTEROIDSmart y en el teléfono, el emparejamientoentre los 2 aparatos y vuelva <strong>de</strong>spués aestablecer la conexión entre ambos.Problemas relacionados con la función <strong>de</strong> músicaLa primera vez que conecte su periférico <strong>de</strong>audio (USB / SD / iPod) al Parrot ASTEROIDSmart el proceso pue<strong>de</strong> tardar varios minutos,sobre todo si se trata <strong>de</strong> periféricos con grancapacidad y que contengan una cantidadimportante <strong>de</strong> archivos <strong>de</strong> música. Este tiempo<strong>de</strong> carga permitirá <strong>de</strong>spués que las cancionesReinicie el iPod / iPhone® antes <strong>de</strong> volverlo aconectar al Parrot ASTEROID Smart. Parareiniciar un iPod / iPhone (el proceso noborrará ningún dato):iPod: pulse simultáneamente Menu y elbotón central hasta que el iPod se reinicie.iPhone / iPad / iPod touch®: pulsesimultáneamente el botón On/Off y elbotón Home hasta que el iPhone sereinicie. No toque la pantalla cuandoaparezca el mensaje "Sli<strong>de</strong> to shutdown”.Pue<strong>de</strong>n surgir algunos problemas si eldispositivo ya está conectado al ParrotASTEROID Smart cuando se pone el contacto.Pruebe <strong>de</strong> nuevo conectando el dispositivo unavez puesto el contacto.Para más informaciónConsulte la página <strong>de</strong> soporte <strong>de</strong>l ParrotASTEROID Smart en nuestra página webwww.parrot.com.Información generalGarantíaSin perjuicio <strong>de</strong> la garantía legal, el productotienen una garantía contractual <strong>de</strong> 12 meses<strong>de</strong>s<strong>de</strong> la fecha <strong>de</strong> compra inicial efectuada porel usuario, que cubre cualquier <strong>de</strong>fecto <strong>de</strong>materiales y <strong>de</strong> fabricación presentando laprueba <strong>de</strong> compra (ticket <strong>de</strong> caja, factura) aldistribuidor. Mientras esté vigente la garantíacontractual, el producto <strong>de</strong>fectuoso <strong>de</strong>berá ser<strong>de</strong>vuelto en su embalaje original al servicioposventa <strong>de</strong>l distribuidor. PARROT proce<strong>de</strong>rá,a su elección, a la sustitución o la emisión <strong>de</strong> unabono con exclusión <strong>de</strong> cualquier otracompensación. La garantía no cubre la pérdida<strong>de</strong> datos, los daños causados por acci<strong>de</strong>nte, unuso anormal o no autorizado <strong>de</strong>l producto o unproducto que no sea Parrot. Parrot no seresponsabiliza <strong>de</strong>l almacenaje, pérdida o<strong>de</strong>terioro <strong>de</strong> los datos durante el transporte ola reparación. Cualquier producto consi<strong>de</strong>radono <strong>de</strong>fectuoso será <strong>de</strong>vuelto al remitente y leserán facturados los gastos <strong>de</strong> gestión, <strong>de</strong>comprobación y <strong>de</strong> transporte.Modificaciones56 Español
Las explicaciones y especificacionescontenidas en este manual son meramenteinformativas y pue<strong>de</strong>n ser modificadas sinprevio aviso. Se consi<strong>de</strong>ran correctas en elmomento <strong>de</strong> enviar la publicación a imprenta.Este manual se ha redactado con el máximocuidado, con el fin <strong>de</strong> proporcionarle unainformación precisa. Sin embargo, Parrot noasume responsabilidad alguna por lasconsecuencias <strong>de</strong>rivadas <strong>de</strong> los errores uomisiones que pueda haber en el manual, ni porlos daños o pérdidas acci<strong>de</strong>ntales <strong>de</strong> datos quese produzcan como consecuencia directa oindirecta <strong>de</strong>l uso <strong>de</strong> la información aquícontenida. Parrot se reserva el <strong>de</strong>recho amodificar o mejorar el diseño <strong>de</strong>l producto o elmanual <strong>de</strong> usuario sin restricciones y sin laobligación <strong>de</strong> notificárselo a los usuarios. Enaras <strong>de</strong> actualizar y mejorar nuestrosproductos, es posible que el producto queusted haya adquirido sea ligeramente distintoal mo<strong>de</strong>lo que se <strong>de</strong>scribe en este manual. Ental caso, tiene a su disposición una versión másreciente <strong>de</strong> este manual en formatoelectrónico en la página web <strong>de</strong> Parrot:www.parrot.com.Eliminación correcta <strong>de</strong> este producto(material eléctrico y electrónico <strong>de</strong> <strong>de</strong>scarte)La presencia <strong>de</strong> esta marca en el producto o enel material informativo que lo acompaña, indicaque al finalizar su vida útil no <strong>de</strong>berá eliminarsejunto con otros residuos domésticos. Paraevitar los posibles daños al medio ambiente o ala salud humana que representa la eliminaciónincontrolada <strong>de</strong> residuos, separe este producto<strong>de</strong> otros tipos <strong>de</strong> residuos y recíclelocorrectamente para promover la reutilizaciónsostenible <strong>de</strong> recursos materiales. Losusuarios particulares pue<strong>de</strong>n contactar con elestablecimiento don<strong>de</strong> adquirieron elproducto, o con las autorida<strong>de</strong>s localespertinentes, para informarse sobre cómo ydón<strong>de</strong> pue<strong>de</strong>n llevarlo para que sea sometido aun reciclaje ecológico y seguro. Los usuarioscomerciales pue<strong>de</strong>n contactar con suproveedor y consultar las condiciones <strong>de</strong>lcontrato <strong>de</strong> compra. Este producto no <strong>de</strong>beeliminarse mezclado con otros residuoscomerciales.Marcas registradasParrot y los logos Parrot son marcas registradas<strong>de</strong> PARROT SA en Francia y en otros países.El nombre y el logo Bluetooth son marcasregistradas <strong>de</strong> Bluetooth ® SIG, Inc. que ParrotS.A. utiliza bajo licencia.“Ma<strong>de</strong> for iPod / iPhone / iPad” significa que unaparato electrónico fue especialmentediseñado para conectarse a un iPod, un iPhoneo un iPad, respectivamente, y fue certificadopor un <strong>de</strong>sarrollador con el fin <strong>de</strong> satisfacer losresultados estándares <strong>de</strong> Apple. Apple no esresponsable <strong>de</strong>l funcionamiento <strong>de</strong> estedispositivo o <strong>de</strong> su conformidad con las normas<strong>de</strong> seguridad y regulatorios.iPad, iPod, iPod Touch e iPhone son marcas <strong>de</strong>Apple, Inc. registradas en Estados Unidos y enotros países.iPad es una marca <strong>de</strong> Apple Inc.Wi-Fi es una marca registrada <strong>de</strong> Wi-FiAlliance.Gracenote®, el logo y el logotipo <strong>de</strong> Gracenote,y el logo "Powered by Gracenote" son marcasregistradas o marcas comerciales <strong>de</strong>Gracenote, Inc. en Estados Unidos y/o en otrospaíses.El resto <strong>de</strong> marcas comerciales y marcasregistradas citadas en el presente documentoestán protegidas por Copyright y pertenecen asus propietarios respectivos.Español57
Declaración <strong>de</strong> conformidadParrot SA, 174 quai <strong>de</strong> Jemmapes, 75010 Paris,France, <strong>de</strong>clara bajo su única responsabilidadque el producto Parrot ASTEROID Smart<strong>de</strong>scrito en la presente guía <strong>de</strong>l usuario cumplelas normas técnicas IEC/EN 60065: 2002 /A1:2006 / A11: 2008 / A2: 2010 / A12: 2011, EN300328 v1.8.1, EN 301 489-1 (2008:V1.8.1) y EN301 489-17 v1.3.2 según las disposiciones <strong>de</strong> ladirectiva sobre equipos <strong>de</strong> radio ytelecomunicaciones 1999/5/EC R&TTE, asícomo con las exigencias <strong>de</strong> la directiva relativa ala seguridad 2006/95/EC y <strong>de</strong> la directiva sobreautomóviles 72/245/CEE modificada por ladirectiva 2009/19/CE.CopyrightsI<strong>de</strong>ntification N. 394 149 496 R.C.S. PARISParrot S.A.Copyright © 2012 Parrot.58 Español
BedienungsanleitungInhaltBevor Sie beginnenInstallationErste NutzungTelefonMusikInternetVi<strong>de</strong>oBei ProblemenAllgemeine Hinweisep.59p.60p.64p.66p.67p.69p.71p.72p.73Bevor Sie beginnenZu diesem Leitfa<strong>de</strong>nWir wollen unseren Papierverbraucheinschränken und so verantwortungsbewusstund umweltfreundlich wie möglich han<strong>de</strong>ln.Daher zieht Parrot es vor, Dokumente für dieBenutzer im Internet zu veröffentlichen,anstatt sie auszudrucken. Diese vereinfachteAnleitung <strong>de</strong>s Parrot ASTEROID Smartbeschränkt sich daher auf die wichtigstenAnweisungen, damit Sie dieses Gerät leichtbenutzen können. Weitere Angaben fin<strong>de</strong>n Sieim Bereich Support auf unserer Websitewww.parrot.com: Vollständige Anleitung,häufige Fragen, Lernsoftware...Hinweis: Aus Grün<strong>de</strong>n <strong>de</strong>r besseren Leserlichkeitwer<strong>de</strong>n <strong>de</strong>r iPod® und das iPhone® (imMusikmodus) in dieser Anleitung als „iPod“bezeichnet. Kompatible Telefone o<strong>de</strong>r Tablet-Computer wer<strong>de</strong>n als „Smartphone“ bezeichnet.Update <strong>de</strong>r Softw areDas letzte Update Ihres Parrot ASTEROIDSmart können Sie kostenlos von unsererWebsite www.parrot.com aus <strong>de</strong>m BereichSupport herunter la<strong>de</strong>n (und sich gleichzeitigüber das Update-Verfahren informieren).Dank dieser Updates können Sie neueFunktionen nutzen und die Kompatibilität <strong>de</strong>sParrot ASTEROID Smart verbessern.Sie können Aktualisierungen auchherunterla<strong>de</strong>n wenn das Parrot ASTEROIDSmart mit <strong>de</strong>m Internet verbun<strong>de</strong>n ist. DieVerfügbarkeit wird in <strong>de</strong>r Informationsleisteangezeigt.Warnhinw eiseFunktionen, die Ihre Aufmerksamkeit fürlängere Zeit in Anspruch nehmen, dürfen nurbei stehen<strong>de</strong>m Fahrzeug ausgeführt wer<strong>de</strong>n.Ihre eigene Sicherheit und die <strong>de</strong>r an<strong>de</strong>renVerkehrsteilnehmer hat Vorrang vorTelefonanrufen, Musik o<strong>de</strong>r Anwendungen zurFahrhilfe. Seien Sie verantwortungsvoll:Fahren Sie vorsichtig und achten Sie auf IhreUmgebung. Parrot übernimmt keinerleiHaftung, falls Sie beschließen, diese Warnungzu ignorieren.Über die Handbrems-Signalleitung <strong>de</strong>s ISO-Kabels vom Parrot ASTEROID Smart kannerkannt wer<strong>de</strong>n, ob die Handbremseeingerastet ist o<strong>de</strong>r nicht. Der Anschluss mussentsprechend <strong>de</strong>r in diesem Dokumentbeschriebenen Einbauanleitung erfolgen. EinDeutsch59
nicht richtiger Einbau o<strong>de</strong>r eine nicht richtigeVerbindung kann eine Gefahr darstellen und invielen Staaten/Län<strong>de</strong>rn gesetzeswidrig sein.Während <strong>de</strong>r Fahrt darf das Display imSichtfeld <strong>de</strong>s Fahrers auf keinen Fall Vi<strong>de</strong>oswie<strong>de</strong>rgeben. Dies gilt ebenso für jeglicheWeb-Anwendungen.Wenn Sie während <strong>de</strong>r Fahrt versuchen, eineAnwendung aufzurufen, die nicht <strong>de</strong>rNavigation o<strong>de</strong>r <strong>de</strong>r Fahrhilfe dient, erscheintauf <strong>de</strong>m Display eine Warnung. Um auf <strong>de</strong>mDisplay <strong>de</strong>s Parrot ASTEROID Smart ein Vi<strong>de</strong>oanzuschauen, vergewissern Sie sich, dass dasFahrzeug an einem sicheren Ort steht und dieHandbremse eingerastet ist.Nutzen Sie <strong>de</strong>n Parrot ASTEROID Smart ineiner vernünftigen Lautstärke, so dass Sieje<strong>de</strong>rzeit während <strong>de</strong>r Fahrt auch nochAußengeräusche wahrnehmen können.Der Parrot ASTEROID Smart enthält Magneten<strong>de</strong>s Typs NdFeB, die empfindlicheGegenstän<strong>de</strong> innerhalb von Magnetfel<strong>de</strong>rnbeschädigen können (Schrittmacher,Kreditkarten, mechanische Uhren, etc.).SteuerungsschnittstelleEine Steuerungsschnittstelle am Lenkradbietet die Möglichkeit, die Steuerung amLenkrad Ihres Fahrzeugs mit <strong>de</strong>r ParrotFreisprechanlage zu verbin<strong>de</strong>n. Dank dieserSchnittstelle (verfügbar im 1. Halbjahr 2012)können Sie über die Steuerungstasten anIhrem Lenkrad einen Anruf tätigen, ohnedieHän<strong>de</strong> vom Steuer zu nehmen. WeitereInformationen fin<strong>de</strong>n Sie auf unserer Websitewww.parrot.com.InstallationHinweis: Wir empfehlen, sich für die Installationan einen Fachmann zu wen<strong>de</strong>n, insbeson<strong>de</strong>re aneine Person aus <strong>de</strong>m Netz <strong>de</strong>r zugelassenenInstallateure.Sicherheitshinw eiseSchalten Sie vor <strong>de</strong>m Herstellen vonAnschlüssen <strong>de</strong>n Motor aus.Installieren Sie <strong>de</strong>n Parrot ASTEROID Smartniemals an einem Ort, wo er <strong>de</strong>n Fahrer o<strong>de</strong>reinen Beifahrer im Falle einer Notbremsungverletzen könnte.Installieren Sie <strong>de</strong>n Parrot ASTEROID Smartniemals an einem Ort, wo er beim Fahrenstören könnte.Bohren Sie niemals in eine Wand o<strong>de</strong>r dasArmaturenbrett, ohne vorher zu überprüfen,was sich dahinter befin<strong>de</strong>t. Vergewissern Siesich, dass Sie niemals einen elektronischenBestandteil o<strong>de</strong>r ein Kabel beschädigen.Wenn Sie Schrauben verwen<strong>de</strong>n, stellen Siesicher, das sie nie mit einem elektrischenKabel in Kontakt gelangen.Der Parrot ASTEROID Smart ist ausschließlichzur Verwendung in einem Fahrzeug mit einer60 Deutsch
12V-Batterie vorgesehen. Wenn Ihr Fahrzeug(z.B. LKW) eine 24V-Batterie hat, benötigenSie einen Spannungserniedriger.Vergewissern Sie sich, dass die Kabel nicht in<strong>de</strong>r Nähe von Wärmequellen(z.B.Heizungsausgängen) o<strong>de</strong>r beweglichenTeilen (z.B. Schalthebel) installiert sind undsich auch nicht um die Lenksäule o<strong>de</strong>r <strong>de</strong>nSchalthebel verwickeln können.Überprüfen Sie <strong>de</strong>n korrekten Betrieb <strong>de</strong>rEinrichtungen <strong>de</strong>s Fahrzeugs nach <strong>de</strong>rInstallation <strong>de</strong>s Parrot ASTEROID Smart.Installieren Sie <strong>de</strong>n Parrot ASTEROID Smarto<strong>de</strong>r einen seiner Bestandteile nicht an einemOrt, wo sich einer <strong>de</strong>r Airbags <strong>de</strong>s Fahrzeugsausbreiten könnte.Installieren Sie <strong>de</strong>n Parrot ASTEROID Smartnicht an einem Ort, <strong>de</strong>r feucht ist o<strong>de</strong>r hohenTemperaturen ausgesetzt ist.Lassen Sie hinter <strong>de</strong>m Parrot ASTEROID Smartgenügend Raum, damit die Wärme entweichenkann.VorbemerkungEntfernen Sie das Original-Autoradio ausIhrem Auto. Dieser Vorgang kann dieVerwendung von Ausbauschlüsseln erfor<strong>de</strong>rn.Überprüfen Sie, ob die Verbindung zwischen<strong>de</strong>n Audiosteckern, <strong>de</strong>r Stromversorgung <strong>de</strong>sParrot ASTEROID Smart und <strong>de</strong>rAnschlusstechnik Ihres Fahrzeugs möglich ist,in<strong>de</strong>m Sie die bei<strong>de</strong>n Stecker vergleichen.Wenn diese Verbindung nicht möglich ist,müssen Sie einen ISO-Adapter verwen<strong>de</strong>n, um<strong>de</strong>n Parrot ASTEROID Smart an diespezifischen Anschlüsse Ihres Fahrzeugsanzupassen. Schauen Sie auf <strong>de</strong>r Support-Seiteunter "Kompatibilität Fahrzeuge" <strong>de</strong>s ParrotASTEROID Smart, um die Notwendigkeit einesAdapterkabels zu überprüfen.Vergleichen Sie <strong>de</strong>n Antennenstecker <strong>de</strong>sParrot ASTEROID Smart und <strong>de</strong>njenigen IhresFahrzeugs. Sollte die Verwendung einesAntennenadapters erfor<strong>de</strong>rlich sein, wen<strong>de</strong>nSie sich bitte für weitere Informationen aneinen Automobil-Experten.Hinweis: Wenn Ihre Antenne verstärkt ist,können Sie sie über ein ISO-Kabel versorgen, dasmit Ihrem Parrot ASTEROID Smart mitgeliefertwird.Installation mit <strong>de</strong>n Halterungen1. Lösen Sie die 4 Schrauben, um die Halterung<strong>de</strong>s Parrot ASTEROID Smart zu entfernen.2. Fügen Sie das Montagegestell ein undbefestigen Sie es im Fahrerraum. Biegen Siedafür die Laschen um 90° nach außen(Abbildung A S.7).3. Installieren Sie <strong>de</strong>n Parrot ASTEROID Smartund befestigen Sie die 4 Schrauben(Abbildung B S.7).4. Klipsen Sie <strong>de</strong>n Plastikrahmen an(Abbildung C S.8).Installation mit Seitenschrauben1. Lösen Sie die 4 Schrauben, um das Gestells<strong>de</strong>s Parrot ASTEROID Smart zu entfernen.2. Entfernen Sie die 2 Seitengestelle(Abbildung D S.8).3. Bringen Sie <strong>de</strong>n Parrot ASTEROID Smart soan, dass die Schraubenlöcher nach <strong>de</strong>nSchraubenlöchern <strong>de</strong>s Fahrzeugsausgerichtet sind.4. Befestigen Sie so viele Schrauben, wie fürdas Mo<strong>de</strong>ll Ihres Fahrzeugs erfor<strong>de</strong>rlichsind. Verwen<strong>de</strong>n Sie nur die mitgeliefertenSchrauben.Deutsch61
Installation <strong>de</strong>s GPS-EmpfängersBefestigen Sie <strong>de</strong>n GPS-Dongle im Inneren <strong>de</strong>rFahrgastzelle auf einer ebenen Oberfläche ineinem Bereich ohne Hin<strong>de</strong>rnisse.Die athermischen Windschutzscheiben undFensterscheiben, mit integrierter Antenne,können mit <strong>de</strong>m GPS-Empfang interferierenund die Zuverlässigkeit, <strong>de</strong>r mit <strong>de</strong>nNavigationsanwendungen verbun<strong>de</strong>nenInformationen, beeinträchtigen.Die GPS-Antenne <strong>de</strong>s Empfängersbefin<strong>de</strong>t sich auf <strong>de</strong>r Seite, wo"Parrot ASTEROID GPS" steht undsich das sternförmige Logobefin<strong>de</strong>t. Dieses Logo muss immerzum Himmel zeigen.Wenn Ihr Fahrzeug eine athermischeWindschutzscheibe hat, befestigen Sie <strong>de</strong>nGPS-Dongle auf <strong>de</strong>r Höhe <strong>de</strong>s nichtathermischenBereichs an <strong>de</strong>rWindschutzscheibe. Die Seite, auf <strong>de</strong>r sich dassternförmige Logo befin<strong>de</strong>t, muss auf dieWindschutzscheibe geklebt wer<strong>de</strong>n(Abbildung F S.9).Hinweis: Wo sich <strong>de</strong>r nicht-athermische Bereich<strong>de</strong>r Windschutzscheibe befin<strong>de</strong>t, hängt vomMo<strong>de</strong>ll Ihres Fahrzeugs ab. Er befin<strong>de</strong>t sich imAllgemeinen auf <strong>de</strong>r Höhe <strong>de</strong>s Rückspiegels.Wenn Ihr Fahrzeug keine athermischeWindschutzscheibe hat, befestigen Sie <strong>de</strong>nGPS-Dongle am Armaturenbrett. Die Seite, auf<strong>de</strong>r sich das sternförmige Logo befin<strong>de</strong>t, musssichtbar sein (Abbildung E S.9).Für die ordnungsgemäße Befestigung <strong>de</strong>rHalterung wie folgt vorgehen:Verwen<strong>de</strong>n Sie unbedingt <strong>de</strong>n mit <strong>de</strong>mParrot ASTEROID Smart mitgelieferteISO-Kabel ;Die Montagefläche vor <strong>de</strong>m Aufkleben<strong>de</strong>r Halterung reinigen ;Nach <strong>de</strong>r Befestigung <strong>de</strong>r Halterung ca. 2Stun<strong>de</strong>n warten.Anschluss an die HandbremseMit <strong>de</strong>m Anschlusskabel zur Handbremse,kann die Vi<strong>de</strong>o-Funktion <strong>de</strong>s Parrot ASTEROIDSmart, nur bei angezogener Handbremsegenutzt wer<strong>de</strong>n. Wenn dieses Kabel nicht andas Signalkabel <strong>de</strong>r Handbremse IhresFahrzeugs angeschlossen ist, ist die Vi<strong>de</strong>o-Funktion in keinem Fall verfügbar.1. Schließen Sie das Handbrems-Anschlusskabel (grün) an das grüne Kabel<strong>de</strong>s Parrot ASTEROID Smart (mit <strong>de</strong>rBezeichnung Parking Brake) an.2. Suchen und testen Sie das Signalkabel fürdie Handbremse Ihres Fahrzeugs. (DiesesKabel verbin<strong>de</strong>t Ihre Handbremse mit <strong>de</strong>rKontrollleuchte <strong>de</strong>r Handbremse an IhremArmaturenbrett).3. Verlegen Sie das Handbrems-Anschlusskabel (grün) <strong>de</strong>s Asteroid Smartsicher und zuverlässig, und verbin<strong>de</strong>n esanschließend mit <strong>de</strong>m Handbrems-Signalkabel Ihres Fahrzeugs, durchein geeignetes Verfahren.Installation einer RückkameraWenn Sie <strong>de</strong>n Parrot ASTEROID Smart miteiner Rückkamera (nicht mitgeliefert)verwen<strong>de</strong>n, ermöglicht das orange Kabel (auf<strong>de</strong>m ISO-Kabel <strong>de</strong>s Parrot ASTEROID Smart)zu erkennen, ober <strong>de</strong>r Rückwärtsgang eingelegtwur<strong>de</strong>. Verbin<strong>de</strong>n Sie dieses Kabel mit <strong>de</strong>m,Stromkabel Ihrer Rücklichter, um einVi<strong>de</strong>osignal <strong>de</strong>r Rückkamera zu erhalten,sobald Sie rückwärts fahren.Verbin<strong>de</strong>n Sie auch das Vi<strong>de</strong>okabel <strong>de</strong>rRückkamera mit <strong>de</strong>n Steckern <strong>de</strong>r Vi<strong>de</strong>o-CAM62 Deutsch
hinter <strong>de</strong>m Parrot ASTEROID Smart.Installation <strong>de</strong>s Doppel-MikrofonsWir empfehlen, das Kabel entlang <strong>de</strong>rVertiefung <strong>de</strong>r Türdichtung zu führen.Wenn das Kabel oberhalb <strong>de</strong>r Pedalen verläuft,darauf achten, dass es richtig befestigt ist.Hinweis: Das Mikrofonkabel darf nicht in <strong>de</strong>rHeizungs-, Belüftungs- o<strong>de</strong>r Klimaanlage o<strong>de</strong>rvor <strong>de</strong>n seitlichen Airbags verlaufen.Achten Sie darauf, dass das Mikrofon so nahwie möglich in <strong>de</strong>r Nähe <strong>de</strong>s Kopfes <strong>de</strong>sBenutzers installiert ist. Die i<strong>de</strong>ale Entfernungbeträgt 60 cm. Das Mikrofon wird am Besten in<strong>de</strong>r Nähe <strong>de</strong>s Rückspiegels im Innenraumangebracht.Das Mikrofon auf <strong>de</strong>n Mund <strong>de</strong>s Benutzersausrichten.Anschluss <strong>de</strong>s ISO-KabelsVerbin<strong>de</strong>n Sie die Audio- undStromversorgungsstecker Ihres Fahrzeugs mit<strong>de</strong>n Steckern <strong>de</strong>s Parrot ASTEROID Smart.Hinweis: Sichern Sie die Befestigung <strong>de</strong>r Kabelam Autoradio mit <strong>de</strong>n mitgeliefertenKabelklemmen. Fügen Sie eine <strong>de</strong>rKabelklemmen in die dazu vorgesehene Stelleoben links auf <strong>de</strong>r Rückseite <strong>de</strong>s Autoradios ein(siehe Abbildung S.4).Überprüfen Sie Ihre Installation. Dazu schaltenSie nach <strong>de</strong>m Einbau <strong>de</strong>s Parrot ASTEROIDSmart die Zündung Ihres Fahrzeugs ein undwie<strong>de</strong>r aus. Auf <strong>de</strong>m Bildschirm wird „AufWie<strong>de</strong>rsehen“ angezeigt. Ist dies nicht <strong>de</strong>r Fall,müssen die Anschlüsse <strong>de</strong>r roten und gelbenKabela<strong>de</strong>r vertauscht wer<strong>de</strong>n. Die gelbe A<strong>de</strong>r<strong>de</strong>s Stromkabels muss mit <strong>de</strong>m 12V-Dauerstrom, die Rote mit <strong>de</strong>m 12V über dieZündung, und die schwarze mit <strong>de</strong>r Masseverbun<strong>de</strong>n wer<strong>de</strong>n. Dazu brauchen nur diebei<strong>de</strong>n Kabelschuhe <strong>de</strong>r Parrot-Verkabelungvertauscht zu wer<strong>de</strong>n.Anbrigen die USB-KabelSchließen Sie die USB-Kabel sowie <strong>de</strong>n GPS –Empfänger an <strong>de</strong>n Parrot ASTEROID Smart an.Wir empfehlen, alle Kabel <strong>de</strong>s ParrotASTEROID Smart anzuschließen, auch wennSie nicht unbedingt planen, sie zu verwen<strong>de</strong>n.Führen Sie die entsprechen<strong>de</strong>nSteckverbindungen über das Ablage- o<strong>de</strong>rHandschuhfach heraus. Dazu kann eserfor<strong>de</strong>rlich sein, ein Loch im Inneren <strong>de</strong>sArmaturenbretts zu bohren. Wenn möglich,sollte <strong>de</strong>r Gebrauch von USB-Verlängerungenvermie<strong>de</strong>n wer<strong>de</strong>n.Das USB-Kabel (1.2m - 2A), an das Sie dasiPod-Verlängerungskabel anschließen, mussunbedingt am dafür vorgesehenen weißenUSB-Port angeschlossen wer<strong>de</strong>n. Der USB-Port ist mit "iPod" gekennzeichnet.Um eine optimale Empfangsqualität zugewährleisten, schließen Sie Ihren 3G-Sticko<strong>de</strong>r GPS-Empfänger nicht direkt an <strong>de</strong>n ParrotASTEROID Smart an: Verbin<strong>de</strong>n Sie dasZubehör mit einem USB-Kabel amArmaturenbrett (o<strong>de</strong>r einer an<strong>de</strong>renübersichtlichen Stelle).DiebstahlsicherungDie abnehmbare Frontblen<strong>de</strong> kann vom ParrotASTEROID Smart entfernt wer<strong>de</strong>n, umDiebstähle zu verhin<strong>de</strong>rn. Der ParrotASTEROID Smart funktioniert nicht, wenndiese Frontblen<strong>de</strong> abgenommen ist.Behan<strong>de</strong>ln Sie die abnehmbare Frontblen<strong>de</strong>mit Vorsicht. Nicht mit Gewalt installiereno<strong>de</strong>r entfernen! Bewahren Sie sie an einemsicheren Ort auf, ohne Sonnenlicht, hoheTemperaturen und Feuchtigkeit.Zum Entfernen <strong>de</strong>r Frontblen<strong>de</strong> schieben SieDeutsch63
<strong>de</strong>n oberen Teil <strong>de</strong>r Frontblen<strong>de</strong> nach untenund ziehen Sie ihn dann vorsichtig nach außen(Abbildung G S. 10).Zum Wie<strong>de</strong>reinsetzen <strong>de</strong>r Frontblen<strong>de</strong>bringen Sie zuerst seine magnetischeUnterseite an und drücken Sie dann auf <strong>de</strong>noberen Teil, bis Sie ein Klicken hören.Erste NutzungBegrüßungsbildschirmBeim Einschalten <strong>de</strong>s Parrot ASTEROID Smarterscheint <strong>de</strong>r Begrüßungsbildschirm. DieNavigationsschaltflächen befin<strong>de</strong>n sich amlinken Bildschirmrand.Um zum vorherigen Menü zurückzukehren,drücken Sie auf . Um direkt zurBegrüßungsbildschirm zu gelangen,drücken.Drücken Sie auf , um ins Kontextmenü <strong>de</strong>rgera<strong>de</strong> verwen<strong>de</strong>ten Anwendung zu gelangen.Über das Kontextmenü könnenAnwendungsfunktionen verän<strong>de</strong>rt o<strong>de</strong>r hinzugefügt wer<strong>de</strong>n.Drücken Sie die Taste , um die letzte o<strong>de</strong>rin Benutzung befindliche Anwendunganzuzeigen.Drücken Sie die Taste , um die Lautstärkezu regeln. Dazu bewegen Sie <strong>de</strong>n Cursor nachlinks o<strong>de</strong>r rechts.Mit <strong>de</strong>m Finger auf <strong>de</strong>m Bildschirm nach linksgleiten. Sie erhalten mehr Platz zumHinzufügen von Verknüpfungen für IhreAnwendungen o<strong>de</strong>r bevorzugten Funktionen.Um zur entsprechen<strong>de</strong>n Funktion zu gelangen,das Icon berühren. Berühren Sie z. B. das Icon"Anwendungen", gelangen Sie zur Liste, <strong>de</strong>r aufIhrem Parrot ASTEROID Smart verfügbarenAnwendungen. Gleiten Sie, um die Liste allerAnwendungen einzusehen, mit <strong>de</strong>m Fingerüber <strong>de</strong>n Bildschirm.Personalisierung <strong>de</strong>s BegrüßungsbildschirmsUm einer Anwendung/Funktion auf <strong>de</strong>mBegrüßungsbildschirm eine Verknüpfungzuzuweisen, ist wie folgt vorzugehen:1. Drücken Sie auf "Anwendungen".2. Drücken Sie 2 Sekun<strong>de</strong>n auf das Icon <strong>de</strong>rAnwendung, die Sie interessiert.3. Bewegen Sie das Icon zum gewünschtenOrt.64 Deutsch
Vorgehensweise zum Löschen einerVerknüpfung:1. Drücken Sie 2 Sekun<strong>de</strong>n auf das Icon, dasSie entfernen möchten.2. Schieben Sie es nach oben in <strong>de</strong>n Bereich"Löschen". Wenn das Icon rot wird,können Sie Ihren Finger wegnehmen.Än<strong>de</strong>rung <strong>de</strong>r EinstellungenZur Än<strong>de</strong>rung <strong>de</strong>r Einstellungen <strong>de</strong>s ParrotASTEROID Smart erst auf Anwendungen, dannauf Einstellungen drücken. Sie könnenebenfalls die TasteEinstellungen.drücken und dann aufEin Telefon über Bluetooth anschließenHinweis: Prüfen Sie auf unserer Website unter<strong>de</strong>m Thema „Kompatibilität“, ob Ihr Telefon mit<strong>de</strong>m Parrot ASTEROID Smart kompatibel ist, undbeachten Sie die jeweilige Zuordnungsmetho<strong>de</strong>:www.parrot.com/<strong>de</strong>/compatibility.Wenn Sie zum ersten Mal ein Telefon mit <strong>de</strong>mParrot ASTEROID Smart nutzen, dann müssenSie zunächst die bei<strong>de</strong>n Gerät zuordnen. WennIhr Telefon <strong>de</strong>m Parrot ASTEROID Smartzugeordnet ist, dann erfolgt die Verbindungbei<strong>de</strong>r Geräte automatisch, sobald die bei<strong>de</strong>nGeräte nicht weit voneinan<strong>de</strong>r entfernteingeschaltet wer<strong>de</strong>n und die B luetooth®-Funktion aktiviert ist.1. Im Menü Einstellungen auf Wireless undohne Netz > Bluetooth drücken.2. Falls notwendig die Optionen Bluetoothund Optionen > Erkennbar aktivieren.3. Von Ihrem Bluetooth-Telefon aus eineSuche nach B luetooth®-Peripheriegeräten<strong>start</strong>en, dann wählen Sie <strong>de</strong>n ParrotASTEROID Smart.4. Die Zuordnungsmetho<strong>de</strong> hängt von IhremTelefonmo<strong>de</strong>ll ab:Wenn das Telefon <strong>de</strong>n B luetooth-PIN-Co<strong>de</strong> verlangt , "0000"eingeben.Falls <strong>de</strong>r Parrot ASTEROID Smart undIhr Telefon zwei Co<strong>de</strong>s anzeigen,müssen Sie sicherstellen, dass dieCo<strong>de</strong>s i<strong>de</strong>ntisch sind und dannbestätigen, o<strong>de</strong>r ablehnen.> Das Display <strong>de</strong>s Parrot ASTEROIDSmart zeigt an "Zuordnung erfolgt".Hinweis: Bei bestimmten Telefonen müssen Siedie Herstellung <strong>de</strong>r Verbindung mit <strong>de</strong>m ParrotASTEROID Smart für die automatischeVerbindungsherstellung gestatten. NähereInformationen entnehmen Sie bitte <strong>de</strong>mBenutzerhandbuch Ihres Telefons.Anschluss von zw ei TelefonenVorgehensweise zur Aktivierung <strong>de</strong>s Modusfür die Verbindung von 2 Telefonen:1. Drücken Sie auf Telefon.2. Drücken Sie auf , dann auf Bluetooth.3. Drücken Sie auf Optionen.4. Aktivieren Sie die Option Multipoint-Telefonie.Wenn <strong>de</strong>r Parrot ASTEROID Smarteingeschaltet wird, versucht das Gerät mitsämtlichen, <strong>de</strong>m Fahrzeug zugeordneten undvorhan<strong>de</strong>nen Telefonen, eine Verbindungherzustellen. Wenn mehr als 2 zugeordneteTelefone im Fahrzeug vorhan<strong>de</strong>n sind, stelltdas Gerät die Verbindung zu <strong>de</strong>n 2 Telefonenmit <strong>de</strong>r ältesten Zuordnung her.Wenn 2 Telefone an das Parrot ASTEROIDSmart angeschlossen sind, dann wird einTelefon als aktiviert und das an<strong>de</strong>re alsNebentelefon betrachtet. Standardmäßig istdas aktive Telefon das Telefon, <strong>de</strong>ssenZuordnung zum Parrot ASTEROID Smart amDeutsch65
ältesten ist.Sie haben die Möglichkeit Telefongesprächeam aktiven Telefon und am Nebentelefonentgegen zu nehmen.Am Parrot ASTEROID Smart ist nur dasVerzeichnis <strong>de</strong>s aktiven Telefons verfügbar.Sie können nur vom aktiven Telefon aus Anrufetätigen. Sie können jedoch einfach von einemangeschlossenen Telefon zum an<strong>de</strong>renTelefon umschalten. Vorgehensweise:1. Drücken Sie auf Telefon.2. Drücken Sie auf , dann auf Telefon.3. Das zu aktivieren<strong>de</strong> Telefon auswählen.Synchronisation <strong>de</strong>s TelefonverzeichnissesBei <strong>de</strong>n meisten B luetooth-Telefonen wird dasVerzeichnis automatisch mit <strong>de</strong>mSystemspeicher synchronisiert. Bei je<strong>de</strong>rÄn<strong>de</strong>rung Ihres Verzeichnisses wird beimnächsten Einschalten automatisch eineSynchronisation durchgeführt.Hinweis: Nur die im Speicher Ihres Telefonserfassten Kontakte wer<strong>de</strong>n mit <strong>de</strong>m ParrotASTEROID Smart synchronisiert. Wenn IhreKontakte im Speicher <strong>de</strong>r SIM-Karte abgelegtsind, dann übertragen Sie diese in <strong>de</strong>nTelefonspeicher. Nähere Informationenentnehmen Sie bitte <strong>de</strong>r BedienungsanleitungIhres Telefons.Hinweis: Bei manchen Telefonen müssen Sie <strong>de</strong>nZugriff <strong>de</strong>s Parrot ASTEROID Smart auf IhreKontakte zulassen, um die Synchronisationdurchführen zu können. Nähere Informationenentnehmen Sie bitte <strong>de</strong>r BedienungsanleitungIhres Telefons.Die automatische Synchronisation ist auf 5000Kontakte (o<strong>de</strong>r Telefonnummern) prozugeordnetem Telefon begrenzt.TelefonAnrufannahmeEin eingehen<strong>de</strong>r Anruf wird durch einenKlingelton angezeigt. Der Name <strong>de</strong>s Kontaktswird angesagt, wenn die Nummer diesesKontakts in <strong>de</strong>m mit <strong>de</strong>m Parrot ASTEROIDSmart verbun<strong>de</strong>nen Telefonverzeichnisaufgeführt ist.Zur Annahme <strong>de</strong>s Anrufs die im Displayerscheinen<strong>de</strong> grüne Taste drücken. ZumBeen<strong>de</strong>n <strong>de</strong>s Gesprächs die im Displayerscheinen<strong>de</strong> rote Taste drücken.Um <strong>de</strong>n Anruf nicht anzunehmen, die imDisplay erscheinen<strong>de</strong> rote Taste drücken.Einen Anruf über Spracherkennung tätigenSie können einen Anruf direkt nach <strong>de</strong>rSynchronisation Ihres Telefonverzeichnissesdurch Spracherkennung initiieren. Der ParrotASTEROID Smart erkennt automatisch <strong>de</strong>nKontakt Ihres Verzeichnisses, <strong>de</strong>n Sie anrufenwollen.1. Wählen Sie Sprachanweisungen >Kontakts um die Spracherkennung zuinitiieren.> Der Parrot ASTEROID Smart fragt Sie66 Deutsch
nach <strong>de</strong>m Namen <strong>de</strong>s Kontakts, <strong>de</strong>n Sieanrufen wollen.2. Sagen Sie <strong>de</strong>n Kontaktnamen undanschließend die Art <strong>de</strong>r Nummer("BÜRO", "HANDY"...), sofern diesemKontakt mehrere Nummern zugeordnetsind.> Der Kontakt wird automatischangerufen, wenn die Sprachanweisungrichtig verstan<strong>de</strong>n wur<strong>de</strong>.> Ansonsten kommt vomFreisprechsystem eine Bestätigsmeldung.Bestätigen Sie mit "JA", "RUF AN" o<strong>de</strong>r"ANRUFEN".Hinweis: Durch Drücken <strong>de</strong>r Taste kann <strong>de</strong>rAnrufvorgang zu je<strong>de</strong>r Zeit abgebrochen wer<strong>de</strong>n.MusikHinweis: Beim ersten Anschließen Ihres Audio-Peripheriegeräts (iPod / USB / SD) an <strong>de</strong>n ParrotASTEROID Smart können mehrere MinutenLa<strong>de</strong>zeit verstreichen, beson<strong>de</strong>rs wenn SiePeripheriegeräte mit großem Speicher und einergroßen Anzahl von Musikdateien verwen<strong>de</strong>n.Diese Ladung ermöglicht jedoch <strong>de</strong>n Zugriff aufalle Titel mit Hilfe <strong>de</strong>r Spracherkennung.Verw endung <strong>de</strong>r SpracherkennungsfunktionMit <strong>de</strong>r Musik-Spracherkennungsfunktionkönnen Sie über die Spracherkennung Künstlero<strong>de</strong>r Alben auswählen, die Sie sich gerneanhören möchten. Diese Funktion istverfügbar, wenn Sie <strong>de</strong>n Parrot ASTEROIDSmart mit einem Anschlussgerät vom Typ iPod/USB/SD verwen<strong>de</strong>n o<strong>de</strong>r wenn Sie eine mitdieser Funktion kompatible Musikanwendungnutzen.1. Wählen Sie Sprachanweisungen > Musik.2. Sagen Sie <strong>de</strong>n Namen <strong>de</strong>s Künstlers o<strong>de</strong>r<strong>de</strong>s Albums, <strong>de</strong>n/das Sie gerne hörenmöchten, wenn <strong>de</strong>r Parrot ASTEROIDSmart Sie dazu auffor<strong>de</strong>rt.> Es erscheint die Liste mit <strong>de</strong>n an <strong>de</strong>nParrot ASTEROID Smart angeschlossenenAudioquellen sowie die mit <strong>de</strong>rSpracherkennungsfunktion kompatiblenMusikanwendungen mit <strong>de</strong>mausgewählten Künstler/Album.Hinweis: Überprüfen Sie die Namen <strong>de</strong>r Künstlerund Alben in <strong>de</strong>n Tags (Metadaten) IhrerMusikdateien. Diese können von <strong>de</strong>r Anzeige imTitel Ihres Stückes abweichen.RadioZur Wahl einer Frequenz:1. Drücken Sie auf Musik > Radio.2. Bewegen Sie anschließend <strong>de</strong>n Cursornach links o<strong>de</strong>r rechts, um eine Frequenzzu wählen.Um die Liste aller verfügbaren Sen<strong>de</strong>r zuerhalten,drücken Sie die Taste und drückenSie dann auf Neuer Scan > OK.Zum Speichern eines Sen<strong>de</strong>rs drücken Sie dieTaste und wählen Sie die Option Zu <strong>de</strong>nFavoriten hinzufügen.Um zu <strong>de</strong>n gespeicherten Sen<strong>de</strong>rn zu gelangen,drücken Sie die Taste und drücken Sie aufModus > Favoriten.Hinweis: Die Anzahl <strong>de</strong>r Sen<strong>de</strong>r, die Sie speichernkönnen, ist unbegrenzt.Deutsch67
iPod1. Schließen Sie Ihren iPod an das iPod-Kabelan.2. Drücken Sie auf <strong>de</strong>m Display Musik undwählen Sie iPod. Sie können ebenfalls dieTaste Durchsuchen drücken, um imVerzeichnis Ihres iPod zu navigieren.3. Drücken Sie auf <strong>de</strong>n Titel, um dieWie<strong>de</strong>rgabe zu <strong>start</strong>en.Hinweis: Drücken Sie die Taste , umbestimmte Einstellungen (Audio, Wie<strong>de</strong>rholung,Random) zu än<strong>de</strong>rn.USB-StickDer Parrot ASTEROID Smart ist mit <strong>de</strong>nmeisten USB-Sticks/MP3-Playern/externenFestplatten kompatibel. Hinsichtlich <strong>de</strong>rKapazität <strong>de</strong>r USB-Sticks bestehen keineBeschränkungen. Die Musikdateien auf IhremUSB-Stick können im Format MP3, AAC, WAV,OGG o<strong>de</strong>r WMA abgespeichert sein.1. Schließen Sie Ihr USB-Anschlussgerät andas USB-Kabel an.2. Wählen Sie Musik > USB. Sie könnenebenfalls die Taste Durchsuchen drücken,um im Verzeichnis Ihres USB-Anschlussgerätes zu navigieren.3. Drücken Sie auf <strong>de</strong>n Titel, um dieWie<strong>de</strong>rgabe zu <strong>start</strong>en.Hinweis: Drücken Sie die Taste , umbestimmte Einstellungen (Audio, Wie<strong>de</strong>rholung,Random) zu än<strong>de</strong>rn.SD-KarteDie maximale Speicherkapazität <strong>de</strong>r SD-Kartebeträgt 32 GB. Die Musikdateien auf Ihrer SD-Karte können im Format MP3, AAC, WAV,OGG o<strong>de</strong>r WMA abgespeichert sein.Hinweis: Um die Speicherkarte zu entfernen,fin<strong>de</strong>n Sie die kleine Kante am En<strong>de</strong> <strong>de</strong>rSpeicherkarte. Setzen Sie <strong>de</strong>m Fingernagel in dieKante und ziehen Sie die Speicherkarte aus.1. Entfernen Sie das Gehäuse <strong>de</strong>s ParrotASTEROID Smart.2. Stecken Sie die SD-Karte in <strong>de</strong>n dafürvorgesehenen Steckplatz hinter <strong>de</strong>mGehäuse ein und halten Sie dabei dieKontaktfläche nach links (Abbildung HS.10)3. Setzen Sie das Gehäuse wie<strong>de</strong>r auf.4. Drücken Sie auf Musik > SD. Sie könnenebenfalls die Taste drücken, um imVerzeichnis Ihrer SD-Karte zu navigieren.5. Drücken Sie auf einen Titel, um dieWie<strong>de</strong>rgabe zu <strong>start</strong>en.Hinweis: Drücken Sie die Taste , umbestimmte Einstellungen (Audio, Wie<strong>de</strong>rholung,Random) zu än<strong>de</strong>rn.Bluetooth-Audio-Laufw erkHinweis: Mit <strong>de</strong>m Parrot ASTEROID Smartkönnen Sie die Funktion Telefon und Audio-Streaming über Bluetooth mit 2 verschie<strong>de</strong>nenTelefonen nutzen, ohne die Verbindung zu einem<strong>de</strong>r bei<strong>de</strong>n Geräte trennen zu müssen.Sie können <strong>de</strong>n Parrot ASTEROID Smartverwen<strong>de</strong>n, um Musikdateien anzuhören, dieauf einem Bluetooth-Audio-Laufwerkgespeichert sind, wenn es das Profil A2DP(Advanced Audio Distribution Profile)unterstützt. Vor <strong>de</strong>r ersten Verwendung <strong>de</strong>sAudio-Laufwerks müssen Sie dieses zunächstmit <strong>de</strong>m Parrot ASTEROID Smart koppeln.Wenn das Audio-Laufwerk bereits mit <strong>de</strong>mParrot ASTEROID Smart verkoppelt ist:1. Wählen Sie Musik > Bluetooth-Audio.2. Starten Sie die Wie<strong>de</strong>rgabe eines Titels68 Deutsch
auf Ihrem Audio-Laufwerk.SteuerungenWährend <strong>de</strong>r Wie<strong>de</strong>rgabe einer Musikdateio<strong>de</strong>r während <strong>de</strong>r Wie<strong>de</strong>rgabe <strong>de</strong>s Tuners:Auf das Display drücken, um <strong>de</strong>n Titel zuunterbrechen o<strong>de</strong>r um <strong>de</strong>n Ton <strong>de</strong>sTuners auszuschalten.Mit <strong>de</strong>m Finger nach oben gleiten, um dieLautstärke zu erhöhen.Mit <strong>de</strong>m Finger nach unten gleiten, um dieLautstärke zu reduzieren.Während <strong>de</strong>r Wie<strong>de</strong>rgabe einer Musikdatei(mit Ausnahme von über ein Jack/Jack Kabelangeschlossenen Audioquellen):Mit <strong>de</strong>m Finger nach rechts gleiten, umzum nächsten Titel zu gelangen.Mit <strong>de</strong>m Finger nach links gleiten, um zumvorherigen Titel zu gelangen.Hinweis: Wenn Sie <strong>de</strong>n Parrot Parrot ASTEROIDSmart mit einem über Bluetoothangeschlossenem Audio-Laufwerk verwen<strong>de</strong>n,dann sind diese Befehle nur verfügbar, wenn dasLaufwerk das AVRCP-Profil (Audio/Vi<strong>de</strong>o RemoteControl Profile) unterstützt.InternetHinweis: Die Verbindung an das Internet miteinem 3G/4G-Stick benötigt ein Abonnement beieinem Telefondienstbetreiber. Die Nutzungdieses Service kann sehr hohe Roaming-Kostenverursachen. Prüfen Sie die Bedingungen IhresAbos und überwachen Sie Ihren Verbrauch beiIhrem Betreiber. Parrot lehnt je<strong>de</strong> Haftung fürdie entstehen<strong>de</strong>n Kosten ab.Verbindung mit einem 3G/4G-StickHinweis: Auf unserer Website, unterKompatibilität <strong>de</strong>s Parrot ASTEROID Smart,können Sie die Liste mit <strong>de</strong>n 3G/4G-Stickseinsehen, die mit <strong>de</strong>m Parrot ASTEROID Smartkompatibel sind.1. Schließen Sie über das USB-Kabel einen3G/4G-Stick an das Parrot ASTEROIDSmart an.> Es erscheint ein Popup-Fenster.2. Geben Sie <strong>de</strong>n PIN-Co<strong>de</strong> ein und drückenSie auf BESTÄTIGEN. Haken Sie dieOption Speichern an, wenn Sie vermei<strong>de</strong>nmöchten, dass Sie bei je<strong>de</strong>m Neu<strong>start</strong> <strong>de</strong>sParrot ASTEROID Smart nach <strong>de</strong>m PIN-Co<strong>de</strong> gefragt wer<strong>de</strong>n.Deutsch69
Hinweis: Sie können diese Einstellung späterän<strong>de</strong>rn, in<strong>de</strong>m Sie Parameter > Wireless undohne Netz > Mobiles Datennetz auswählen.Wählen Sie aus <strong>de</strong>n Anschlussgeräten Ihren3G/4G-Stick, wählen Sie PIN vergessen,anschließend Vergessen.3. Gegebenenfalls wählen Sie Ihren APN(Access Point Name) in <strong>de</strong>r angezeigtenListe aus. Diese Information ist in <strong>de</strong>r mitIhrem 3G/4G-Stick mitgeliefertenDokumentation verfügbar. Wenn Ihr APNnicht in <strong>de</strong>r Liste enthalten ist, können Siediesen hinzufügen, in<strong>de</strong>m SieEinstellungen > Wireless und ohne Netz >Mobiles Datennetz anwählen.4. Wählen Sie aus <strong>de</strong>n AnschlussgerätenIhren 3G/4G-Stick aus.5. Wählen Sie Zugangspunkte > Sonstige >Festgelegte Zugangspunkte.6. Warten Sie, bis sich die Verbindungaufgebaut hat. Sie können ebenfalls dieTaste drücken und während <strong>de</strong>sVerbindungsaufbaus in <strong>de</strong>n Menüsblättern.Anschluss über BluetoothWenn Sie ein Telefon besitzen, welches dasProfil B luetooth® DUN (Dial-Up Networking)o<strong>de</strong>r PAN (Personal Area Network)unterstützt, haben Sie anhand <strong>de</strong>r Verbindungüber B luetooth Ihres Telefons an das ParrotASTEROID Smart, die Möglichkeit <strong>de</strong>rgemeinsamen Nutzung einer 3G-Verbindung<strong>de</strong>s Telefons.Hinweis: Überprüfen Sie auf unserer Website,unter Kompatibilität, ob Ihr Telefon für diegemeinsame Nutzung von 3G-Verbindungenüber Bluetooth geeignet ist und beachten Sie dieentsprechen<strong>de</strong> Vorgehensweise:www.parrot.com/<strong>de</strong>/compatibility.1. Lassen Sie die gemeinsame Nutzung <strong>de</strong>rVerbindung auf Ihrem Telefon zu. DieserVorgang ist je nach <strong>de</strong>m Mo<strong>de</strong>ll IhresTelefons unterschiedlich.2. Schließen Sie Ihr Telefon an <strong>de</strong>n ParrotASTEROID Smart über B luetooth an.3. Auf <strong>de</strong>m Parrot ASTEROID Smart wählenSie Einstellungen > Wireless & ohne Netz> Mobiles Datennetz.4. Wählen Sie Ihren APN (Access PointName) in <strong>de</strong>r angezeigten Liste aus.Anschluss über USBFalls Ihr Telefon die gemeinsame Nutzungeiner 3G-Verbindung über USB unterstützt,schließen Sie Ihr Telefon mit einem USB-Kabel/USB-Mikrokabel (nicht mitgeliefert) an<strong>de</strong>n Parrot ASTEROID Smart an, um somit diegemeinsame Nutzung <strong>de</strong>r 3G-Verbindung <strong>de</strong>sTelefons nutzen zu können.Hinweis: Überprüfen Sie auf unserer Website,unter Kompatibilität, ob Ihr Telefon für diegemeinsame Nutzung von 3G-Verbindungenüber USB geeignet ist und beachten Sie dieentsprechen<strong>de</strong> Vorgehensweise:www.parrot.com/<strong>de</strong>/compatibility.1. Überprüfen Sie, dass die Tastatur IhresTelefons gesperrt ist und schließen Sie esmit <strong>de</strong>m USB-Kabel/USB-Mikrokabel an<strong>de</strong>n Parrot ASTEROID Smart an. DieseVerbindung erlaubt auch das Aufla<strong>de</strong>n <strong>de</strong>rBatterie Ihres Telefons.2. Falls notwendig, wählen Sie Ihren APN(Access Point Name) in <strong>de</strong>r angezeigtenListe aus und haken Sie die OptionAuswählen an. Sie können dieseEinstellung später än<strong>de</strong>rn, in<strong>de</strong>m SieEinstellungen > Wireless & ohne Netz >Mobiles Datennetz > Anschlussgeräte70 Deutsch
wählen.> Es erscheint ein Popup-Fenster, das dieAktivierung <strong>de</strong>r gemeinsamen Nutzungvon 3G-Verbindungen über USB anzeigt.Hinweis: Nähere Informationen entnehmen Siebitte <strong>de</strong>r Bedienungsanleitung Ihres Telefons.Verbindung an ein Wi-Fi-NetzWenn Ihr Telefon die gemeinsame Nutzungeiner 3G-Verbindung über Wi-Fi® zulässt o<strong>de</strong>rwenn in <strong>de</strong>r Nähe Ihres Fahrzeugs ein Wi-Fi-Netz verfügbar ist:1. Im Menü Einstellungen <strong>de</strong>s ParrotASTEROID Smart auf Wireless und ohneNetz > Wi-Fi drücken.2. Aktivieren Sie die Option Wi-Fi.3. Drücken Sie auf Wi-Fi-Einstellungen.> Es erscheint eine Liste <strong>de</strong>r verfügbarenWi-Fi-Netzwerke.4. Wählen Sie das Wi-Fi-Netzwerk aus.5. Falls erfor<strong>de</strong>rlich, das Kennwort eingeben.Gebrauch <strong>de</strong>r Parrot Asteroid-Anw endungenSie können mit <strong>de</strong>m ASTEROID Marketmehrere Anwendungstypen nutzen: Musik,Geolokalisierung, Fahrhilfe. Die verfügbarenAnwendungen hängen vom Land ab, in <strong>de</strong>m sieangewen<strong>de</strong>t wer<strong>de</strong>n.Für bestimmte Anwendungen ist einAbonnement erfor<strong>de</strong>rlich.Der Parrot ASTEROID Smart kann für mehrereAnwendungen gleichzeitig genutzt wer<strong>de</strong>n. Siekönnen z. B. ein Webradio hören undgleichzeitig eine Anwendung zur Fahrhilfenutzen.Weitere Informationen über die Nutzung <strong>de</strong>rverfügbaren Anwendungen sind <strong>de</strong>r Websitevon ASTEROID Market zu entnehmen:www.parrotasteroid.com/asteroidmarket.Vi<strong>de</strong>oAchtung: Die Nutzung <strong>de</strong>r Vi<strong>de</strong>o-Funktion <strong>de</strong>sParrot ASTEROID Smart während <strong>de</strong>r Fahrtgefährlich und daher in zahlreichen Staatenverboten. Diese Funktion ist folglich nichtverfügbar, wenn das Fahrzeug fährt. Um auf <strong>de</strong>mParrot ASTEROID Smart ein Vi<strong>de</strong>o anzusehen,muß das Fahrzeug an einem sicheren Ortabgestellt und die Handbremse angezogenwer<strong>de</strong>n.RückkameraWenn Ihr Fahrzeug mit einer Rückkameraausgestattet ist, kann die Viedoaufnahme beimRückwärtseinparken auf <strong>de</strong>m Bildschirm <strong>de</strong>sParrot ASTEROID Smart übertragen wer<strong>de</strong>n.Sehen Sie sich das Installationsschema auf S.4und <strong>de</strong>n Abschnitt "Installation einerRückkamera" an, um weitere Informationenüber <strong>de</strong>n Anschluss <strong>de</strong>r Rückkamera an <strong>de</strong>nParrot ASTEROID Smart zu erhalten.Die Vi<strong>de</strong>oübertragung <strong>de</strong>r Rückkameraerscheint automatisch, wenn Sie rückwärtsfahren. Das Bild <strong>de</strong>r Rückkamera kannseitenverkehrt erscheinen.Hinweis: Sie können je<strong>de</strong>rzeit auf Vi<strong>de</strong>o-Switchdrücken, um zwischen einem Vi<strong>de</strong>o von einerDeutsch71
Kamera und einem Vi<strong>de</strong>o von einem iPod, dasüber ein AV-Kabel bzw. einen iPod verbun<strong>de</strong>n ist,umzuschalten.Vi<strong>de</strong>odateien von einer externen DatenquelleSie können auf <strong>de</strong>m Parrot ASTEROID Smartein Vi<strong>de</strong>o von einer externen Vi<strong>de</strong>oquelleanzeigen.Verbin<strong>de</strong>n Sie Ihre Vi<strong>de</strong>oquelle mit <strong>de</strong>mParrot ASTEROID Smart , in<strong>de</strong>m Sie ein AV-Kabel (nicht mitgeliefert) verwen<strong>de</strong>n(Abbildung S. 4).1. Drücken Sie auf Anwendungen >Vi<strong>de</strong>oeingang.2. Starten Sie die Wie<strong>de</strong>rgabe eines Vi<strong>de</strong>osauf Ihrer Quelle.Hinweis: Sie können je<strong>de</strong>rzeit auf Vi<strong>de</strong>o-Switchdrücken, um zwischen einem Vi<strong>de</strong>o von einerKamera und einem Vi<strong>de</strong>o von einer externenQuelle, das über ein AV-Kabel bzw. einen iPodverbun<strong>de</strong>n ist, umzuschalten.Vi<strong>de</strong>odateien einer SD-KarteAuf <strong>de</strong>m Parrot ASTEROID Smart können SieVi<strong>de</strong>odateien ansehen, welche auf einer SD-Karte gespeichert sind. Die Vi<strong>de</strong>odateien aufIhrer SD-Karte können die Formate MP2, MP4,H263, H264, WMV und SPARK haben.1. Legen Sie Ihre SD-Karte in <strong>de</strong>n dafürvorgesehenen Platz ein (Abbildung HS.10).2. Drücken Sie auf Anwendungen und dannauf Galerie.3. Zur Auswahl <strong>de</strong>s Vi<strong>de</strong>o dasentsprechen<strong>de</strong> Icon drücken.Bildschirm an Vi<strong>de</strong>oausgang anschließenDie Anschlüsse <strong>de</strong>r Vi<strong>de</strong>oausgängeermöglichen es, für die hinteren Beifahrereinen Bildschirm anzuschließen, um die aufIhrer SD-Karte aufgezeichneten Vi<strong>de</strong>osanzusehen. Betrachten Sie dasInstallationsschema auf S.4. Für weitereInformationen zum Anschluss einesBildschirms für die hinteren Beifahrer amParrot ASTEROID Smart.Achtung: Installieren Sie niemals <strong>de</strong>n Bildschirman einem Ort, wo <strong>de</strong>r Fahrer während <strong>de</strong>r Fahrtdie Vi<strong>de</strong>os sehen könnte.Bei ProblemenVorbemerkungÜberprüfen Sie, dass die Mitteilung "AufWie<strong>de</strong>rsehen" richtig auf <strong>de</strong>m Display <strong>de</strong>sParrot ASTEROID Smart angezeigt wird, wennSie die Zündung <strong>de</strong>s Fahrzeugs ausschalten.Weitere Angaben enthält <strong>de</strong>r Abschnitt"Prüfung <strong>de</strong>r Installation".Reinitialisieren Sie das Gerät. Entfernen Siedafür die Frontblen<strong>de</strong> und drücken Sie miteinem Kugelschreiber o<strong>de</strong>r einem an<strong>de</strong>renspitzen Gegenstand die „Reset“-Taste.Drücken Sie 3 Sekun<strong>de</strong>n lang auf die TasteReset (Abbildung S.5). Sie können auch dieursprünglichen Parameter wie<strong>de</strong>rherstellen,in<strong>de</strong>m Sie folgen<strong>de</strong> Optionen wählen:Parameter > Fortgeschrittene Parameter >Vertraulich > Betriebseinstellungenwie<strong>de</strong>rherstellen.Stellen Sie sicher, dass Sie über die neuesteAktualisierung <strong>de</strong>s Parrot ASTEROID Smartverfügen. Wählen Sie dafür Einstellungen >Allgemeines > Version. Vergleichen Sie dieseVersionsnummer mit <strong>de</strong>r Nummer auf <strong>de</strong>rSupport-Seite <strong>de</strong>s Parrot ASTEROID Smart aufunserer Website www.parrot.com.72 Deutsch
Probleme in Verbindung mit <strong>de</strong>r Telefonie-FunktionPrüfen Sie, ob Ihr Telefon mit <strong>de</strong>m ParrotASTEROID Smart kompatibel ist. Gehen Siehierzu auf unsere Website, auf Kompatibilität:www.parrot.com/<strong>de</strong>/compatibility.Wenn Ihr Telefon als kompatibel angegebenwird und wenn Ihr Parrot ASTEROID Smartbereits über die letzte Aktualisierung verfügt,dann löschen Sie die Zuordnung zwischen <strong>de</strong>n2 Geräten am Parrot ASTEROID Smart und anIhrem Telefon. Starten Sie die 2 Geräte erneutund stellen Sie die Verbindung zwischen <strong>de</strong>n 2Geräten wie<strong>de</strong>r her.Probleme in Verbindung mit <strong>de</strong>r Musik-FunktionReinitialisieren Sie Ihren iPod/Ihr iPhone,bevor das Gerät wie<strong>de</strong>r mit <strong>de</strong>m ParrotASTEROID Smart verbun<strong>de</strong>n wird.Vorgehensweise zur Reinitialisierung <strong>de</strong>s iPod/iPhone (hierdurch wer<strong>de</strong>n keine Datengelöscht):iPod: Gleichzeitig auf Menü und diemittlere Taste drücken, bis <strong>de</strong>r iPod sichwie<strong>de</strong>r einschaltet.iPhone / iPad / iPod touch®: Gleichzeitigdie Taste On/Off und die Taste Homedrücken, bis sich das iPhone wie<strong>de</strong>reinschaltet. Das Display nicht berühren,wenn die Meldung „Zum Ausschaltenschieben“ erscheint.Manche Probleme können entstehen, wenndas Anschlussgerät beim Einschalten <strong>de</strong>rZündung bereits mit <strong>de</strong>m Parrot ASTEROIDSmart verbun<strong>de</strong>n ist. Wie<strong>de</strong>rholen Sie <strong>de</strong>nVorgang und verbin<strong>de</strong>n Sie dabei das Gerät erstnach <strong>de</strong>m Einschalten <strong>de</strong>r Zündung.Weitere InformationenWeitere Informationen fin<strong>de</strong>n Sie auf <strong>de</strong>rSupport-Seite <strong>de</strong>s Parrot ASTEROID Smart aufunserer Website www.parrot.com.Allgemeine HinweiseÄn<strong>de</strong>rungenDie in dieser Anleitung enthaltenenBeschreibungen und technischen Kenndatendienen ausschließlich <strong>de</strong>r Information undkönnen Än<strong>de</strong>rungen ohne vorhergehen<strong>de</strong>Ankündigung unterliegen. Zum Zeitpunkt <strong>de</strong>sDrucks galten die enthaltenen Angaben alszutreffend. Bei <strong>de</strong>r Verfassung dieserAnleitung wur<strong>de</strong> größte Sorgfalt auf <strong>de</strong>renInhalt angewen<strong>de</strong>t, damit Ihnen möglichstpräzise Informationen bereitgestellt wer<strong>de</strong>nkönnen. Parrot haftet jedoch we<strong>de</strong>r für Folgen,die sich aus ggf. in dieser Anleitungenthaltenen Fehlern o<strong>de</strong>r Unterlassungenergeben, noch für Schä<strong>de</strong>n o<strong>de</strong>r <strong>de</strong>nversehentlichen Verlust von Daten als direkteo<strong>de</strong>r indirekte Folge <strong>de</strong>r Verwendung <strong>de</strong>renthaltenen Informationen. Parrot behält sichdas Recht vor, das Produkt<strong>de</strong>sign o<strong>de</strong>r dieBedienungsanleitung zu än<strong>de</strong>rn bzw. zuverbessern, ohne dass diesbezüglichBeschränkungen vorliegen und ohne je<strong>de</strong>Verpflichtung, die Benutzer hiervon inKenntnis zu setzen.Korrekte Entsorgung dieses ProduktsDeutsch73
(Elektromüll)Die Kennzeichnung auf <strong>de</strong>m Produkt bzw. auf<strong>de</strong>r dazugehörigen Literatur gibt an, dass esnach seiner Lebensdauer nicht zusammen mit<strong>de</strong>m normalen Haushaltsmüll entsorgt wer<strong>de</strong>ndarf. Entsorgen Sie dieses Gerät bitte getrenntvon an<strong>de</strong>ren Abfällen, um <strong>de</strong>r Umwelt bzw. <strong>de</strong>rmenschlichen Gesundheit nicht durchunkontrollierte Müllbeseitigung zu scha<strong>de</strong>n.Recyceln Sie das Gerät, um die nachhaltigeWie<strong>de</strong>rverwertung von stofflichen Ressourcenzu för<strong>de</strong>rn. Private Nutzer sollten <strong>de</strong>n Händler,bei <strong>de</strong>m das Produkt gekauft wur<strong>de</strong>, o<strong>de</strong>r diezuständigen Behör<strong>de</strong>n kontaktieren, um inErfahrung zu bringen, wie Sie das Gerät aufumweltfreundliche Weise recyceln können.Gewerbliche Nutzer sollten sich an IhrenLieferanten wen<strong>de</strong>n und die Bedingungen <strong>de</strong>sVerkaufsvertrags konsultieren. Dieses Produktdarf nicht zusammen mit an<strong>de</strong>remGewerbemüll entsorgt wer<strong>de</strong>n.GarantieUnbescha<strong>de</strong>t <strong>de</strong>r gesetzlichen Garantie sichertPARROT für eine Dauer von 12 Monaten ab<strong>de</strong>m ursprünglichen Datum <strong>de</strong>s Kaufs durch<strong>de</strong>n Konsumenten bei Vorlage einesKaufnachweises (mit Datum, Ort <strong>de</strong>s Kaufsund Seriennummer <strong>de</strong>s Artikels) an <strong>de</strong>nHändler o<strong>de</strong>r an Parrot (Verschleißteile habeneine Garantie von 6 Monaten) vertraglich zu,dass das Produkt keine Material- o<strong>de</strong>rHerstellungsfehler aufweist. Während <strong>de</strong>sGarantiezeitraums muss das fehlerhafteProdukt in seiner ursprünglichen Verpackung<strong>de</strong>m Kun<strong>de</strong>nservice <strong>de</strong>s Händlers retourniertwer<strong>de</strong>n. Nach Inspektion <strong>de</strong>s Produkts kannParrot dieses nach eigenem Ermessen ersetzeno<strong>de</strong>r erstatten, je<strong>de</strong> weitere Entschädigung istausgeschlossen.Eingetragene MarkenParrot und die Parrot-Logos sind in Frankreichund in an<strong>de</strong>ren Län<strong>de</strong>rn eingetragene Marken<strong>de</strong>r Firma PARROT SA.Der Name „Bluetooth“ und das Bluetooth-Logo sind eingetragene Marken <strong>de</strong>r FirmaBluetooth® SIG, Inc., und jegliche Nutzungdieses Namens und dieses Logos durch dieParrot SA erfolgt im Rahmen einer Lizenz."Ma<strong>de</strong> for iPod / iPhone / iPad" be<strong>de</strong>utet, dassein elektronisches Zusatzgerät für <strong>de</strong>nAnschluss an iPod-, iPhone- und iPad-Mo<strong>de</strong>llekonstruiert ist und vom Entwicklerdahingehend zertifiziert wur<strong>de</strong>, dass es <strong>de</strong>nApple-Leistungsnormen entspricht. Appleübernimmt keine Verantwortung für <strong>de</strong>nBetrieb dieses Geräts o<strong>de</strong>r die Einhaltung vonSicherheits- und gesetzlichen Standards.iPad, iPod, iPod Touch und iPhone sind in <strong>de</strong>nUSA und in an<strong>de</strong>ren Län<strong>de</strong>rn eingetrageneMarken <strong>de</strong>r Firma Apple, Inc.iPad ist eine eingetragene Marke <strong>de</strong>r Apple Inc.Wi-Fi ist eine eingetragene Marke <strong>de</strong>rOrganisation „Wi-Fi Alliance“.Gracenote®, das Gracenote-Logo und dieLogoschriftart sowie das Logo „Powered byGracenote“ sind eingetragene Marken o<strong>de</strong>rMarken von Gracenote in <strong>de</strong>n VereinigtenStaaten von Amerika und/o<strong>de</strong>r an<strong>de</strong>renLän<strong>de</strong>rn.Alle an<strong>de</strong>ren Han<strong>de</strong>lsmarken un<strong>de</strong>ingetragenen Marken, die in diesemDokument vorkommen, sind urheberrechtlichgeschützt und das Eigentum ihrer jeweiligenEigentümer.KonformitätserklärungParrot SA, 174 Quai <strong>de</strong> Jemmapes, 75010 Paris,Frankreich, erklärt in alleiniger Verantwortung,dass das Produkt Parrot ASTEROID Smart, das74 Deutsch
im vorliegen<strong>de</strong>n Benutzerleitfa<strong>de</strong>nbeschrieben wird, mit <strong>de</strong>n technischenNormen IEC/EN 60065 übereinstimmt: 2002 /A1:2006 / A11: 2008 / A2: 2010 / A12: 2011, EN300328 v1.8.1, EN 301 489-1 (2008:V1.8.1) undEN 301 489-17 v1.3.2 gemäß <strong>de</strong>n Bestimmungen<strong>de</strong>r Direktive 1999/5/EC R&TTE (Radio &Telekommunikation), sowie mit <strong>de</strong>nAnfor<strong>de</strong>rungen <strong>de</strong>r Direktive für Sicherheit2006/95/EC und <strong>de</strong>r Automobildirektive72/245/CEE, geän<strong>de</strong>rt durch die Direktive2009/19/CE.CopyrightCopyright © 2012 Parrot. Alle Rechtevorbehalten.Deutsch75
Guida all'usoPrima di iniziareA proposito di questa guidainternet. La disponibilità di eventualiaggiornamenti sarà indicata nella barra <strong>de</strong>llenotifiche.IndicePrima di iniziareInstallazionePrimo utilizzoTelefonoMusicaInternetVi<strong>de</strong>oProblemi frequentiInformazioni generalip.77p.78p.81p.84p.84p.87p.89p.90p.91Per limitare il nostro consumo di carta enell’ambito <strong>de</strong>lla nostra azione responsabilevolta alla tutela <strong>de</strong>ll’ambiente, abbiamo sceltol’immissione on line <strong>de</strong>i documenti <strong>de</strong>stinatiagli utenti, che quindi non saranno piùstampati. La presente guida semplificata <strong>de</strong>lParrot ASTEROID Smart si limita quindi a darele principali istruzioni che vi consentiranno diutilizzare facilmente questo apparecchio.Troverete maggiori informazioni nella sezioneSupporto <strong>de</strong>l nostro sito web www.parrot.com.Nota: In questo manuale, il termine "iPod" verràutilizzato per indicare iPod e iPhone.Aggiornamento <strong>de</strong>l softw areScaricate gratuitamente l’ultimo aggiornamento<strong>de</strong>l Parrot ASTEROID Smart nel nostro sitoweb www.parrot.com, alla sezione Supporto.Questi aggiornamenti vi permetteranno diutilizzare le nuove funzionalità e di migliorarela compatibilità <strong>de</strong>l Parrot ASTEROID Smart.Nota: é anche possibile scaricare gliaggiornamenti tramite il Parrot ASTEROIDSmart quando quest'ultimo è connesso adAvvertenzaLe funzioni che richiedono un'attenzioneprolungata <strong>de</strong>vono essere utilizzate solo aveicolo fermo. La propria sicurezza e quella<strong>de</strong>gli altri utenti <strong>de</strong>lla strada sono piùimportanti <strong>de</strong>lle telefonate, <strong>de</strong>lla musica o<strong>de</strong>lle applicazioni di assistenza alla guida.Mantenere un comportamento responsabile:guidare con pru<strong>de</strong>nza e prestare attenzione alproprio ambiente. Parrot <strong>de</strong>clina ogniresponsabilità nel caso in cui si <strong>de</strong>cida diignorare tali avvertenze.Utilizzare il Parrot ASTEROID Smart con un<strong>live</strong>llo di volume ragionevole, in maniera dapoter sentire in qualsiasi momento i rumoriesterni durante la guida.Il Parrot ASTEROID Smart contiene magneti ditipo NdFeB che possono danneggiare glioggetti sensibili ai campi magnetici(pacemaker, carte di credito, orologimeccanici...).Il filo Parking Brake presente sul cavo ISO <strong>de</strong>lParrot ASTEROID Smart consente di rilevareItaliano77
se il freno a mano è tirato o meno. Questo filo<strong>de</strong>ve essere collegato conformemente alleistruzioni di installazione illustrate nelpresente documento. Un'installazione o uncollegamento errati possono essere pericolosie illegali in molti stati/paesi. Il display presentenel campo visivo <strong>de</strong>l conducente non <strong>de</strong>ve inalcun caso diffon<strong>de</strong>re vi<strong>de</strong>o mentre il veicolo èin marcia. Lo stesso dicasi per eventualiapplicazioni web.Se durante la marcia <strong>de</strong>l veicolo si tenta diutilizzare un'applicazione non <strong>de</strong>dicata allanavigazione o all'assistenza alla guida, suldisplay apparirà un'apposita avvertenza. Perguardare un vi<strong>de</strong>o sul display <strong>de</strong>l ParrotASTEROID Smart, assicurarsi che il veicolo siafermo in un luogo sicuro e che il freno a manosia tirato.Interfaccia di comando sul volanteUn’interfaccia di comando sul volante permettedi collegare i comandi <strong>de</strong>l veicolo installati sulvolante al kit viva voce Parrot. Con questainterfaccia potete effettuare <strong>de</strong>lle chiamateusando i tasti di comando posti sul volante,senza staccare le mani da quest’ultimo.Consultare il nostro sito web www.parrot.comper maggiori informazioni.InstallazioneNota: Per eseguire l'installazione, si raccomandadi ricorrere ad un professionista esperto,rivolgendosi in particolar modo alla nostra retedi installatori autorizzati.Istruzioni di sicurezzaPrima di effettuare i collegamenti, spegnere ilmotore.Non installare mai il Parrot ASTEROID Smart inuna posizione in cui potrebbe causare lesioni alconducente o ad un passeggero in caso diarresto improvviso <strong>de</strong>l veicolo.Non installare mai il Parrot ASTEROID Smart inuna posizione in cui potrebbe intralciare laguida.Non forare mai un pannello o il quadro comandisenza avere prima controllato cosa vi sia sulretro. Assicurarsi di non danneggiare mai icomponenti elettronici o i cavi.Se si utilizzano viti, accertarsi che non entrinoin contatto con un cavo di alimentazioneelettrica.Il Parrot ASTEROID Smart è stato progettatoesclusivamente per funzionare su un veicolocon batteria da 12 V. Se il veicolo (ad es. unautocarro) possie<strong>de</strong> una batteria da 24 V, ènecessario servirsi di un <strong>de</strong>voltore.Assicurarsi che i cavi siano installati a distanzada elementi caldi (bocchette <strong>de</strong>lriscaldamento, ecc.) e da organi mobili (leva<strong>de</strong>l cambio, ecc.) e che non rischino diavvolgersi attorno al piantone <strong>de</strong>llo sterzo o allaleva <strong>de</strong>l cambio.Controllare il corretto funzionamento <strong>de</strong>gliimpianti <strong>de</strong>l veicolo dopo avere installato ilParrot ASTEROID Smart.Non installare il Parrot ASTEROID Smart o uno<strong>de</strong>i suoi componenti in una posizione in cuipotrebbe essere colpito dall'apertura di unairbag.Non installare il Parrot ASTEROID Smart in unpunto umido o soggetto a temperature elevate.Lasciare dietro il Parrot ASTEROID Smart unospazio sufficiente per consentire ladissipazione <strong>de</strong>l calore.Prima di iniziareTogliere l'autoradio originale dal veicolo.Questa operazione può richie<strong>de</strong>re l'uso dichiavi di estrazione.Verificare che sia possibile collegare iconnettori audio, l'alimentazione <strong>de</strong>l Parrot78 Italiano
ASTEROID Smart e i collegamenti <strong>de</strong>l veicoloconfrontando i due connettori. Se ilcollegamento risulta impossibile, è necessarioutilizzare un adattatore ISO per adattare ilParrot ASTEROID Smart ai collegamenti <strong>de</strong>lveicolo. Consultare la sezione Compatibilitàveicoli nella pagina di assistenza <strong>de</strong>l ParrotASTEROID Smart per verificare l'eventualenecessità di un cavo adattatore.Confrontare il connettore <strong>de</strong>ll'antenna <strong>de</strong>lParrot ASTEROID Smart con quello <strong>de</strong>l veicolo.Se è necessario utilizzare un adattatore perantenna, rivolgersi ad un professionista <strong>de</strong>lsettore automobilistico per maggioriinformazioni.Nota: Se l'antenna è amplificata, è possibilealimentarla tramite il cavo ISO fornito indotazione con il Parrot ASTEROID Smart.Installazione con supporti1. Svitare le 4 viti per rimuovere il supporto <strong>de</strong>lParrot ASTEROID Smart.2. Inserire il supporto di montaggio e fissarlonell'abitacolo. A tale scopo, aprire lelinguette verso l'esterno piegandole a 90°(schema A a pag.7).3. Installare il Parrot ASTEROID Smart efissare le 4 viti (schema B a pag.7).4. Agganciare il telaio in plastica (schema C apag.8).Installazione con viti laterali1. Svitare le 4 viti per rimuovere il supporto <strong>de</strong>lParrot ASTEROID Smart.2. Rimuovere i 2 supporti laterali (schema D apag.8).3. Posizionare il Parrot ASTEROID Smart inmodo tale che i fori <strong>de</strong>lle viti siano allineatirispetto ai fori <strong>de</strong>lle viti <strong>de</strong>l veicolo.4. Avvitare il numero di viti necessarie aseconda <strong>de</strong>l mo<strong>de</strong>llo di veicolo. Utilizzareesclusivamente le viti fornite in dotazione.Installazione <strong>de</strong>l dongle GPSFissare il dongle GPS su una superficie piana, inuna zona priva di ostacoli all'interno<strong>de</strong>ll'abitacolo.I parabrezza atermici e i vetri con antennaintegrata possono interferire con la ricezioneGPS e ridurre l'affidabilità <strong>de</strong>lle informazionilegate alle applicazioni di navigazione.L'antenna GPS è situata sul lato incui compaiono la dicitura "ParrotASTEROID GPS" e il logo a forma distella. Questo logo <strong>de</strong>ve sempreessere rivolto verso l'alto.Se il veicolo possie<strong>de</strong> un parabrezza atermico,fissare il dongle GPS sul parabrezza a <strong>live</strong>llo<strong>de</strong>lla zona non atermica. Il lato su cui compare illogo a forma di stella <strong>de</strong>ve essere incollato alparabrezza (schema F a pag.9).Nota: La zona non atermica <strong>de</strong>l parabrezzadipen<strong>de</strong> dal mo<strong>de</strong>llo <strong>de</strong>l veicolo. Questa zona èsolitamente situata a <strong>live</strong>llo <strong>de</strong>l retrovisore.Se il veicolo non possie<strong>de</strong> un parabrezzaatermico, fissare il dongle GPS sul quadrocomandi. Il lato su cui compare il logo a forma distella <strong>de</strong>ve essere visibile (schema E a pag.9).Per assicurare un corretto fissaggio <strong>de</strong>lsupporto:utilizzare il a<strong>de</strong>sivo fornito ;pulire la superficie di montaggio prima diincollare il supporto;dopo avere fissato il supporto, atten<strong>de</strong>recirca 2 ore senza maneggiarlo.Italiano79
Collegamento <strong>de</strong>l cavo <strong>de</strong>l freno a manoIl cavo <strong>de</strong>l freno a mano consente di utilizzare lafunzione vi<strong>de</strong>o <strong>de</strong>l Parrot ASTEROID Smartquando il freno a mano è tirato. Se questo cavonon è collegato al cavo di segnale <strong>de</strong>l freno amano <strong>de</strong>l veicolo, la funzione vi<strong>de</strong>o non saràmai disponibile.1. Collegare la prolunga <strong>de</strong>l cavo <strong>de</strong>l freno amano fornita al cavo ver<strong>de</strong> <strong>de</strong>l ParrotASTEROID Smart (con l'indicazioneParking Brake).2. Individuare dove è situato il cavo disegnale <strong>de</strong>l freno a mano nel veicolo.Questo cavo collega il freno a mano allarelativa spia presente sul quadro comandi.3. Collegare il cavo <strong>de</strong>l freno a mano <strong>de</strong>lParrot ASTEROID Smart al segnale <strong>de</strong>lfreno a mano <strong>de</strong>l veicolo in modoappropriato e sicuro.Installazione di una telecamera di retromarciaSe si utilizza il Parrot ASTEROID Smart con unatelecamera di retromarcia (non fornita), il cavoarancione presente sul cavo ISO <strong>de</strong>l ParrotASTEROID Smart consente di rilevare se ilveicolo proce<strong>de</strong> in avanti o all'indietro.Collegare questo cavo a quello la cui tensionepermette di accen<strong>de</strong>re i fari posteriori, in modotale da visualizzare il segnale vi<strong>de</strong>o <strong>de</strong>llatelecamera di retromarcia quando si proce<strong>de</strong>all'indietro.Collegare anche il cavo vi<strong>de</strong>o <strong>de</strong>lla telecameraai connettori Vi<strong>de</strong>o CAM situati dietro il ParrotASTEROID Smart.Installazione <strong>de</strong>l doppio microfonoSi raccomanda di fare scivolare il cavo nellacanalina di scolo dietro la guarnizione <strong>de</strong>llaportiera.Se il cavo passa sopra i pedali, assicurarsi chesia saldamente fissato.Avvertenza: Non fare passare il cavo <strong>de</strong>lmicrofono negli impianti di riscaldamento,ventilazione e climatizzazione o davanti agliairbag laterali.Assicurarsi che il microfono sia installato il piùvicino possibile alla testa <strong>de</strong>ll'utilizzatore. Ladistanza i<strong>de</strong>ale è di 60 cm. Installare ilmicrofono preferibilmente accanto alretrovisore interno.Orientare il microfono verso la bocca<strong>de</strong>ll'utilizzatore.Collegamento <strong>de</strong>l cavo ISOCollegare i connettori audio e di alimentazione<strong>de</strong>l veicolo ai connettori <strong>de</strong>l Parrot ASTEROIDSmart.Nota: Per assicurare il fissaggio <strong>de</strong>i caviall'autoradio, utilizzare le fascette serracavifornite in dotazione. Inserire una <strong>de</strong>lle fascettenell'apposito alloggiamento, in alto a sinistrasul retro <strong>de</strong>ll'autoradio (schema a pag.4).Controllare l'installazione. A tale scopo,accen<strong>de</strong>re e quindi spegnere il motore <strong>de</strong>lveicolo dopo avere installato il ParrotASTEROID Smart : sul display dovrà comparireil messaggio "Arrive<strong>de</strong>rci". Se il messaggio noncompare, invertire le posizioni <strong>de</strong>i fili rosso egiallo. Infatti, il filo giallo <strong>de</strong>l cavo dialimentazione <strong>de</strong>ve essere collegato al 12Vpermanente, il filo rosso al 12V post-contatto eil filo nero alla massa. Questa operazione sieffettua semplicemente invertendo i duecapicorda posti sul cablaggio Parrot.Installazione <strong>de</strong>l cavo USBCollegare i cavi USB nonché l'antenna GPS alParrot ASTEROID Smart Si consiglia dicollegare tutti i cavi <strong>de</strong>l Parrot ASTEROIDSmart anche se non si preve<strong>de</strong>80 Italiano
necessariamente di utilizzarli. Tirare fuori iconnettori corrispon<strong>de</strong>nti dal proprioripostiglio o vano portaoggetti. A tale scopo,potrebbe essere necessario realizzare un foroall’interno <strong>de</strong>l cruscotto. Nei limiti <strong>de</strong>lpossibile, evitare l’utilizzo di prolunghe USB.Il cavo USB (1.2m - 2A) al quale si collegherà laprolunga iPod <strong>de</strong>ve essere obbligatoriamentecollegato all'apposita porta USB bianca. Al disopra di quest'ultima è riportata l'indicazione"iPod".Per garantire una qualità ottimale <strong>de</strong>llaricezione, non collegare la propria chiave 3Gdirettamente sul Parrot ASTEROID Smart:utilizzate un cavo USB per installarel’accessorio sul cruscotto (o altra zona libera)Protezione antifurtoIl frontalino amovibile può essere estratto dalParrot ASTEROID Smart per scoraggiare itentativi di furto. Il Parrot ASTEROID Smartnon può infatti funzionare se il frontalino èstato rimosso.Maneggiare con cura il frontalino amovibile.Non forzare durante le operazioni diinstallazione o di rimozione <strong>de</strong>l frontalino.Conservarlo in un luogo sicuro, al riparo dallaluce <strong>de</strong>l sole, dalle temperature elevate edall'umidità.Per rimuovere il frontalino, fare scorrere versoil basso la parte superiore <strong>de</strong>llo stesso e quinditirarlo <strong>de</strong>licatamente verso l'esterno (schemaG a pag. 10).Per riposizionare il frontalino, appoggiarneinnanzitutto il lato inferiore magnetico e quindipremere sulla parte superiore fino ad avvertireun clic.Primo utilizzoSchermata inizialeQuando il Parrot ASTEROID Smart si accen<strong>de</strong>,si apre la schermata iniziale. I pulsanti dinavigazione si trovano sulla sinistra <strong>de</strong>l display.Fare scorrere il dito verso sinistra sul display. Siscoprirà ulteriore spazio per aggiungere opzionidi scelta rapida per le applicazioni o le funzionipreferite.Toccare un'icona per acce<strong>de</strong>re alla funzionecorrispon<strong>de</strong>nte. Toccare ad esempio l'iconaApplicazioni. Si acce<strong>de</strong>rà all'elenco <strong>de</strong>lleapplicazioni disponibili sul Parrot ASTEROIDSmart. Fare scorrere il dito sul display perconsultare l'elenco <strong>de</strong>lle applicazioni.Per ritornare al menu prece<strong>de</strong>nte, premereItaliano81
. Per ritornare direttamente alla vi<strong>de</strong>atainiziale, premere .Premere per acce<strong>de</strong>re al menu contestualecorrispon<strong>de</strong>nte all'applicazione in uso. Il menucontestuale consente in particolar modo diacce<strong>de</strong>re alle funzioni aggiuntive<strong>de</strong>ll'applicazione o di modificare alcuneimpostazioni.Premere il tasto per visualizzare le ultimeapplicazioni utilizzate o ancora in uso.Premere il tasto per modificare il volume.Fare quindi scorrere il cursore verso sinistra overso <strong>de</strong>stra.Personalizzazione <strong>de</strong>lla schermata inizialePer aggiungere sulla schermata inizialeun'opzione di scelta rapida versoun'applicazione/una funzione:1. Premere Applicazioni.2. Tenere premuta per 2 secondi l'icona<strong>de</strong>ll'applicazione <strong>de</strong>si<strong>de</strong>rata.3. Fare scorrere l'icona verso la posizionevoluta.Per rimuovere un'opzione di scelta rapida:1. Tenere premuta per 2 secondi l'icona chesi <strong>de</strong>si<strong>de</strong>ra rimuovere.2. Farla scorrere verso l'alto, a <strong>live</strong>llo<strong>de</strong>ll'indicazione Elimina. Quando l'iconadiventerà rossa, sarà possibile togliere ildito.Modifica <strong>de</strong>i parametriPer modificare i parametri <strong>de</strong>l ParrotASTEROID Smart, premere Applicazioni equindi Impostazioni. È anche possibilepremeree quindi Impostazioni.Collegamento di un telefono tramite BluetoothNota: Consultate la pagina Compatibilità <strong>de</strong>lnostro sito web per verificare se il telefono ècompatibile con il Parrot ASTEROID Smart equindi consultare la relativa procedura diabbinamento: www.parrot.com/it/compatibility.Se è la prima volta che si utilizza un telefonocon il Parrot ASTEROID Smart, è innanzituttonecessario abbinare i 2 apparecchi. Una voltaabbinato il telefono con il Parrot ASTEROIDSmart, la connessione tra i 2 apparecchi sistabilirà automaticamente non appena sitroveranno accesi nelle vicinanze e con lafunzione B luetooth® attivata.1. Nel menu Impostazioni premere Wirelesse rete > Bluetooth.2. Se necessario, attivare le opzioniBluetooth e Opzioni > I<strong>de</strong>ntificabile.3. Dal telefono lanciare una ricerca diperiferiche B luetooth® e quindiselezionare "Parrot ASTEROID Smart".4. La procedura di abbinamento dipen<strong>de</strong> dalmo<strong>de</strong>llo <strong>de</strong>l telefono:Se il telefono chie<strong>de</strong> di inserire ilcodice PIN B luetooth, digitare "0000".Se il Parrot ASTEROID Smart e iltelefono visualizzano due codici,assicurarsi che siano i<strong>de</strong>ntici e quindiconfermare o annullare.> Sul display <strong>de</strong>l Parrot ASTEROIDSmart apparirà "Abbinamentoriuscito".Nota: Su alcuni telefoni, per consentire laconnessione automatica, occorre autorizzare laconnessione a Parrot ASTEROID Smart. Permaggiori informazioni consultate ladocumentazione <strong>de</strong>l telefono.82 Italiano
Connessione di 2 telefoniPer attivare la modalità che consente diconnettere 2 telefoni:1. Premere Telefono.2. Premere e quindi Bluetooth.3. Premere Opzioni.4. Attivare l'opzione Telefonia multipunto.Quando il Parrot ASTEROID Smart si accen<strong>de</strong>,tenta di stabilire la connessione con tutti itelefoni abbinati e presenti nel veicolo. Se nelveicolo sono presenti più di 2 telefoni abbinati,l'apparecchio stabilisce la connessione con i 2telefoni con abbinamento meno recente.Quando 2 telefoni sono connessi al ParrotASTEROID Smart, uno viene consi<strong>de</strong>rato cometelefono attivo, mentre l'altro risulta cometelefono secondario. Per <strong>de</strong>fault, il telefonoattivo corrispon<strong>de</strong> al telefono con abbinamentoal Parrot ASTEROID Smart meno recente.È possibile ricevere chiamate provenienti siadal telefono attivo che dal telefono secondario.Soltanto la rubrica <strong>de</strong>l telefono attivo è peròdisponibile sul Parrot ASTEROID Smart. Èpossibile effettuare chiamate soltanto daltelefono attivo. È comunque possibile passarefacilmente da un telefono connesso all'altro.Proce<strong>de</strong>re come segue:1. Premere Telefono.2. Premere e quindi Telefono.3. Selezionare il telefono attivo.Sincronizzazione <strong>de</strong>lla rubrica <strong>de</strong>l telefonoCon la maggior parte <strong>de</strong>i telefoni B luetooth, larubrica viene automaticamente sincronizzatacon la memoria <strong>de</strong>l sistema. Ogni volta che larubrica viene modificata, la sincronizzazione siriesegue automaticamente alla connessionesuccessiva.Avvertenza: Solo i contatti salvati nellamemoria <strong>de</strong>l telefono si sincronizzano con ilParrot ASTEROID Smart. Se i contatti sonosalvati nella memoria <strong>de</strong>lla scheda SIM, ènecessario trasferirli nella memoria <strong>de</strong>l telefono.Per maggiori informazioni consultare ladocumentazione <strong>de</strong>l telefono.Nota: Su alcuni telefoni è necessario autorizzarel'accesso <strong>de</strong>l Parrot ASTEROID Smart ai contattiper consentire la sincronizzazione. Per maggioriinformazioni consultare la documentazione <strong>de</strong>ltelefono.La sincronizzazione automatica è limitata a5.000 contatti (o numeri telefonici) pertelefono abbinato.Italiano83
TelefonoRicevimento di una chiamataLe chiamate in entrata sono segnalate da unasuoneria. Viene pronunciato il nome <strong>de</strong>lcontatto se il numero di tale contatto èregistrato nella rubrica <strong>de</strong>l telefono collegato alParrot ASTEROID Smart.Per accettare la chiamata, premere il tastover<strong>de</strong> che compare sul display. Premerequindi il tasto rosso <strong>de</strong>l display perterminare la chiamata.Per rifiutare la chiamata, premere il tastorosso che compare sul display.Effettuare una chiamata a riconoscimento vocaleÈ possibile iniziare una chiamata tramite ilriconoscimento vocale subito dopo lasincronizzazione <strong>de</strong>lla rubrica <strong>de</strong>l telefono. IlParrot ASTEROID Smart riconosceràautomaticamente il contatto <strong>de</strong>lla rubrica che si<strong>de</strong>si<strong>de</strong>ra chiamare.1. Selezionare Comandi Vocali > Contattosper iniziare il processo di riconoscimentovocale.> Il Parrot ASTEROID Smart chie<strong>de</strong>rà ilnome <strong>de</strong>l contatto che si inten<strong>de</strong>chiamare.2. Pronunciare il nome <strong>de</strong>l contatto seguitodal tipo di numero ("LAVORO","CELLULARE", ecc.) se per il contattosono disponibili diversi numeri.> La chiamata di questo contatto iniziaautomaticamente se il comando vocale èstato compreso correttamente.> In caso contrario, il kit viva voce emetteun messaggio di richiesta di conferma.Confermare pronunciando "SÌ","CHIAMA" o "CHIAMARE".Nota: In qualunque momento è possibilepremere il tasto sul display per annullare laprocedura di chiamata.MusicaNota: Il caricamento può richie<strong>de</strong>re diversiminuti durante la prima connessione <strong>de</strong>llaperiferica audio (iPod/ USB/SD) a ParrotASTEROID, in particolar modo in caso diperiferiche ad elevata capacità e contenenti unanotevole quantità di file musicali. Questo tempodi caricamento consente di ren<strong>de</strong>re i braniaccessibili tramite riconoscimento vocale.Ricerca musicale ad attivazione vocaleLa ricerca musicale ad attivazione vocaleconsente di selezionare, mediantericonoscimento vocale, gli artisti o gli albumche si <strong>de</strong>si<strong>de</strong>ra ascoltare. Questa funzione èdisponibile se si utilizza il Parrot ASTEROIDSmart con una periferica <strong>de</strong>l tipo iPod/USB/SDo se si utilizza un'applicazione musicalecompatibile con questa funzione.1. Selezionare Comandi vocali > Musica.2. Pronunciare il nome <strong>de</strong>ll'artista o<strong>de</strong>ll'album che si <strong>de</strong>si<strong>de</strong>ra ascoltarequando il Parrot ASTEROID Smart invita afarlo.> Comparirà l'elenco <strong>de</strong>lle sorgenti audioconnesse al Parrot ASTEROID Smart e <strong>de</strong>lle84 Italiano
applicazioni musicali compatibili con lafunzione di riconoscimento vocale econtenenti l'artista/l'album prescelto.Nota: Verificare i nomi <strong>de</strong>gli artisti e <strong>de</strong>gli albumnei tag (metadati) <strong>de</strong>i file musicali. Possonoinfatti esservi differenze rispetto a quantovisualizzato nel titolo <strong>de</strong>l brano.RadioPer selezionare una frequenza:1. Premere Musica > Radio.2. Fare scorrere il cursore verso sinistra overso <strong>de</strong>stra per selezionare unafrequenza.Per ottenere l'elenco di tutte le stazionidisponibili,premere il tasto e premere suNuova ricerca > OK.Per memorizzare una stazione, premere iltasto e quindi selezionare l'opzioneAggiungere ai preferiti.Per acce<strong>de</strong>re alle stazioni memorizzate,premere il tasto e premere Modalità >Preferiti.Nota: Il numero di stazioni memorizzabili èillimitato.iPod1. Collegare l'iPod al cavo iPod.2. Selezionare Musica > iPod. È anchepossibile premere Sfoglia per navigare nelcontenuto <strong>de</strong>ll'iPod.3. Premere il brano per avviarne lariproduzione.Nota: Premere il tasto per modificare alcuneimpostazioni (audio, ripetizione, riproduzionecasuale).Chiavetta USBIl Parrot ASTEROID Smart è compatibile con lamaggior parte <strong>de</strong>lle chiavette USB, <strong>de</strong>i lettoriMP3 e <strong>de</strong>gli hard disk esterni. Non esiste alcunlimite per quanto concerne la capacità <strong>de</strong>llechiavette USB. I file musicali presenti sullachiavetta USB possono essere in formato MP3,AAC, WAV, OGG o WMA.1. Collegare la periferica USB al cavo USB.2. Selezionare Musica > USB. È anchepossibile premere Sfoglia per navigare nelcontenuto <strong>de</strong>lla periferica USB.3. Premere il brano per avviarne lariproduzione.Nota: Premere il tasto per modificare alcuneimpostazioni (audio, ripetizione, riproduzionecasuale).Scheda SDLa capacità <strong>de</strong>lla scheda SD non <strong>de</strong>ve superare i32 GB. I file musicali presenti sulla scheda SDpossono essere in formato MP3, AAC, WAV,OGG o WMA.Nota: Per rimuovere la scheda di memoria, trovala piccola cresta sul lato esposto <strong>de</strong>lla scheda dimemoria. Metti il tuo un'unghia nella cresta etirare <strong>de</strong>licatamente la scheda di memoria.1. Togliere il frontalino rimovibile dal ParrotASTEROID Smart.2. Inserire la scheda SD nell'apposito slot,situato dietro il frontalino rimovibile,rivolgendo la superficie di contatto versosinistra (schema H a pag.10).3. Riposizionare il frontalino amovibile.4. Premere su Musica > SD. È anchepossibile premere su per navigare nelcontenuto <strong>de</strong>lla scheda SD.5. Premere su un brano per avviarne lariproduzione.Italiano85
Nota: Premere il tasto per modificare alcuneimpostazioni (audio, ripetizione, riproduzionecasuale).ComandiVi<strong>de</strong>o Remote Control Profile).Utilizzo con un lettore audio BluetoothNota: Il Parrot ASTEROID Smart consente diutilizzare la funzione telefonia e streaming audiotramite Bluetooth con 2 telefoni diversi, senzache sia necessario scollegare uno <strong>de</strong>i 2apparecchi.È possibile utilizzare il Parrot ASTEROID Smartper ascoltare file musicali archiviati su unlettore audio B luetooth se quest'ultimosupporta il profilo A2DP (Advanced AudioDistribution Profile). Se il lettore audio vieneutilizzato per la prima volta, è innanzituttonecessario abbinarlo al Parrot ASTEROIDSmart. Se il lettore audio è già abbinato alParrot ASTEROID Smart :1. Selezionare Musica > Audio Bluetooth.2. Avviare la riproduzione di un brano sullettore audio.Durante la riproduzione di un file musicale o<strong>de</strong>lla radio:premere il display per mettere in pausa ilbrano o interrompere l'audio <strong>de</strong>lla radio;fare scorrere il dito verso l'alto peraumentare il volume;fare scorrere il dito verso il basso perdiminuire il volume.Durante la riproduzione di un file musicale (a<strong>de</strong>ccezione <strong>de</strong>lle sorgenti audio collegatetramite un cavo Jack/Jack):fare scorrere il dito verso <strong>de</strong>stra perpassare al brano successivo;fare scorrere il dito verso sinistra perpassare al brano prece<strong>de</strong>nte.Nota: Se si utilizza il Parrot ASTEROID Smart conun lettore audio connesso tramite Bluetooth,questi comandi sono disponibili soltanto sequest'ultimo supporta il profilo AVRCP (Audio/86 Italiano
InternetAvvertenza: La connessione ad internetmediante una chiavetta 3G/4G richie<strong>de</strong> lasottoscrizione di un abbonamento con unoperatore telefonico. L'utilizzo di questo serviziopuò comportate spese di roaming consistenti. Viinvitiamo a verificare con il vostro operatore lecondizioni di abbonamento e il <strong>de</strong>ttaglio <strong>de</strong>iconsumi. Parrot <strong>de</strong>clina ogni responsabilità inmerito ai costi che ne <strong>de</strong>rivano.Connessione con chiavetta 3G/4GNota: Consultare la sezione Compatibilità <strong>de</strong>lParrot ASTEROID Smart sul nostro sito web pervisualizzare l'elenco <strong>de</strong>lle chiavette 3G/4Gcompatibili con il Parrot ASTEROID Smart.1. Collegare una chiavetta 3G/4G al ParrotASTEROID Smart mediante il cavo USB.> Apparirà un pop-up.2. Inserire il proprio codice PIN e quindipremere CONFERMA. Spuntare l'opzioneMemorizzare se si preferisce che il codicePIN non venga richiesto ad ogni riavvio <strong>de</strong>lParrot ASTEROID Smart.Nota: Questa impostazione può esseremodificata anche in seguito selezionandoImpostazioni > Wireless e rete > Reti mobili. Trale periferiche di connessione selezionare lachiavetta 3G/4G, dopodiché selezionareDimenticare il codice PIN e quindi Omettere.3. Se necessario, selezionare il proprio APN(Access Point Name) dall'elencoproposto. Questa informazione èdisponibile nella documentazione fornitacon la chiavetta 3G/4G. Se l'APN noncompare nell'elenco, è possibileaggiungerlo selezionando Impostazioni >Wireless e rete > Reti mobili.4. Tra le periferiche di connessioneselezionare la chiavetta 3G/4G.5. Selezionare Access point > Altro > Accesspoint pre<strong>de</strong>finiti.6. È necessario atten<strong>de</strong>re affinché sistabilisca la connessione. È anchepossibile premere il tasto e spostarsinei menu mentre si stabilisce laconnessione.Connessione tramite BluetoothSe si possie<strong>de</strong> un telefono che supporta ilprofilo B luetooth® DUN (Dial-Up Networking)o PAN (Personal Area Network), laconnessione tramite B luetooth <strong>de</strong>l telefono alParrot ASTEROID Smart consente dicondivi<strong>de</strong>re la connessione 3G <strong>de</strong>l telefonostesso.Nota: Consultare la pagina Compatibilità sulnostro sito web per verificare se il telefonoconsente di condivi<strong>de</strong>re la connessione 3Gtramite Bluetooth e quindi consultare la relativaprocedura: www.parrot.com/it/compatibility.1. Autorizzare la condivisione <strong>de</strong>llaconnessione sul telefono. Questaprocedura può essere diversa a seconda<strong>de</strong>l mo<strong>de</strong>llo di telefono.2. Connettere il telefono al ParrotASTEROID Smart tramite B luetooth.3. Sul Parrot ASTEROID Smart selezionareImpostazioni > Wireless e rete > Retimobili.4. Selezionare il proprio APN (Access PointName) dall'elenco proposto e quindispuntare l'opzione Seleziona.Condivisione <strong>de</strong>lla connessione 3G tramite USBSe si possie<strong>de</strong> un telefono che supporta lacondivisione <strong>de</strong>lla connessione 3G tramiteUSB, collegare il telefono al Parrot ASTEROIDSmart con un cavo USB/micro-USB (nonfornito) per condivi<strong>de</strong>re la connessione 3G <strong>de</strong>lItaliano87
telefono stesso.Nota: Consultare la pagina Compatibilità sulnostro sito web per verificare se il telefonoconsente di condivi<strong>de</strong>re la connessione 3Gtramite USB e consultare la relativa procedura:www.parrot.com/it/compatibility.1. Accertarsi che la tastiera <strong>de</strong>l telefono siasbloccata, quindi collegarlo al ParrotASTEROID Smart servendosi di un cavoUSB/micro-USB. Questa connessioneconsente anche di ricaricare la batteria <strong>de</strong>ltelefono.2. Se necessario, selezionare il proprio APN(Access Point Name) dall'elenco propostoe quindi spuntare l'opzione Seleziona.Questa impostazione può esseremodificata anche in seguito selezionandoImpostazioni > Wireless e rete > Retimobili > Periferica di connessione.> Apparirà un pop-up che indical’attivazione <strong>de</strong>lla condivisione <strong>de</strong>llaconnessione USB.Nota: Per maggiori informazioni consultare ladocumentazione <strong>de</strong>l telefono.Connessione ad una rete Wi-FiSe il proprio telefono consente di condivi<strong>de</strong>rela connessione 3G tramite Wi-Fi® o se nellevicinanze <strong>de</strong>l veicolo è disponibile una rete Wi-Fi:1. Nel menu Impostazioni <strong>de</strong>l ParrotASTEROID Smart premere Wireless erete > Wi-Fi.2. Attivare l'opzione Wi-Fi.3. Premere Impostazioni Wi-Fi.> Apparirà l'elenco <strong>de</strong>lle reti Wi-Fi.4. Selezionare la rete Wi-Fi.5. Se necessario, inserire la password.Utilizzare le applicazioniÈ possibile utilizzare diversi tipi di applicazionicon il ASTEROID Market : musica,geolocalizzazione, assistenza alla guida. Leapplicazioni disponibili sono diverse a seconda<strong>de</strong>l paese di utilizzo.Alcune applicazioni possono richie<strong>de</strong>re unabbonamento.Il Parrot ASTEROID Smart è un sistemamultitasking: possono infatti essere utilizzatepiù applicazioni in contemporanea. A<strong>de</strong>sempio, è possibile ascoltare una Webradio eutilizzare al tempo stesso un'applicazione diassistenza alla guida.Per ulteriori informazioni sull'utilizzo <strong>de</strong>lleapplicazioni disponibili è possibile consultarela pagina web <strong>de</strong>ll'ASTEROID Market:www.parrotasteroid.com/asteroidmarket.88 Italiano
Vi<strong>de</strong>oAvvertenza: La funzione vi<strong>de</strong>o <strong>de</strong>l ParrotASTEROID Smart è pericolosa e illegale in moltistati se viene utilizzata durante la guida. Questafunzione è pertanto inaccessibile mentre ilveicolo è in marcia. Per guardare un vi<strong>de</strong>o sulParrot ASTEROID Smart, parcheggiare il veicoloin un luogo sicuro e tirare il freno a mano.Telecamera di retromarciaSe il veicolo è dotato di una telecamera diretromarcia, è possibile utilizzare il display <strong>de</strong>lParrot ASTEROID Smart per visualizzare lostreaming vi<strong>de</strong>o <strong>de</strong>lla telecamera, facilitandopertanto le manovre di parcheggio inretromarcia. Consultare lo schema diinstallazione a pag.4 e la sezione "Installazionedi una telecamera di retromarcia" per ulterioriinformazioni sul collegamento <strong>de</strong>lla telecameraal Parrot ASTEROID Smart.Lo streaming vi<strong>de</strong>o <strong>de</strong>lla telecamera diretromarcia compare automaticamente quandosi proce<strong>de</strong> in retromarcia. L'immagineproveniente dalla telecamera di retromarciapuò apparire invertita.Nota: È possibile premere in qualunquemomento Vi<strong>de</strong>o switch per passare dal il vi<strong>de</strong>oproveniente dalla telecamera di retromarcia aquello proveniente da un iPod collegatomediante un cavo AV/iPod.Riproduzione di file vi<strong>de</strong>o da una sorgente esternaSul Parrot ASTEROID Smart è possibileriprodurre un vi<strong>de</strong>o proveniente da unasorgente vi<strong>de</strong>o esterna.Collegare la sorgente vi<strong>de</strong>o al ParrotASTEROID Smart utilizzando un cavo AV(non fornito) (schema a pag. 4).1. Premere su Applicazioni > Ingresso vi<strong>de</strong>o.2. Avviare la riproduzione di un vi<strong>de</strong>o sullasorgente.Nota: È possibile premere in qualunquemomento Vi<strong>de</strong>o switch per passare dal vi<strong>de</strong>oproveniente dalla telecamera di retromarcia aquello proveniente da una sorgente esternacollegata mediante un cavo AV/iPod.Riproduzione di file vi<strong>de</strong>o da una scheda SDSul Parrot ASTEROID Smart è possibileriprodurre i file vi<strong>de</strong>o memorizzati su unascheda SD. I file vi<strong>de</strong>o contenuti nella schedaSD possono essere nei formati MP2, MP4,H263, H264, WMV e SPARK.1. Inserire la scheda SD nell'apposito slot(schema H a pag.10).2. Premere Applicazioni e quindi Galleria.3. Selezionare il vi<strong>de</strong>o premendo l'iconacorrispon<strong>de</strong>nte.Utilizzo di un display collegato all'uscita vi<strong>de</strong>oI morsetti di uscita vi<strong>de</strong>o consentono dicollegare un display per i passeggeri posteriori,permettendo loro di guardare i vi<strong>de</strong>o registratisulla scheda SD. Consultare lo schema diinstallazione a pag.4 per ulteriori informazionisul collegamento <strong>de</strong>l display per i passeggeriposteriori al Parrot ASTEROID Smart.Avvertenza: non installare mai il display in unaposizione in cui il conducente potrebbeguardare i vi<strong>de</strong>o durante la guida.Italiano89
Problemi frequentiPrima di iniziareAssicurarsi che il messaggio "Arrive<strong>de</strong>rci"compaia sul display <strong>de</strong>l Parrot ASTEROIDSmart al momento <strong>de</strong>llo spegnimento <strong>de</strong>lmotore <strong>de</strong>l veicolo. Per maggiori informazioniconsultare la sezione "Verifica<strong>de</strong>ll'installazione".Resettare l'apparecchio. A tale scopo,rimuovere il frontalino e quindi servirsi di unapenna o altro oggetto appuntito per premere ilpulsante Reset. Tenere premuto il pulsanteReset per 3 secondi (schema a pag.5). Èpossibile ripristinare i parametri iniziali ancheselezionando Impostazioni > Impostazioniavanzate > Privacy > Ripristina valori di fabbrica.Verificare che l'ultimo aggiornamentodisponibile sia stato installato sul ParrotASTEROID Smart. A tale scopo, selezionareImpostazioni > Informazioni su > Versione.Confrontare questo numero di versione conquello indicato nella pagina di assistenza <strong>de</strong>lParrot ASTEROID Smart sul nostro sito webwww.parrot.com.Problemi relativi alla funzione telefoniaVerificare la compatibilità <strong>de</strong>l telefono con ilParrot ASTEROID Smart. A tale scopo,consultare la pagina Compatibilità sul nostrosito web: www.parrot.com/it/compatibility.Se il telefono viene indicato come compatibilee il Parrot ASTEROID Smart possie<strong>de</strong> giàl'ultimo aggiornamento, rimuoverel'abbinamento tra i 2 apparecchi sul ParrotASTEROID Smart e sul telefono, riavviarlientrambi e quindi ripristinare la connessionetra di essi.Problemi relativi alla funzione musicaResettare l'iPod/iPhone prima di riconnetterloal Parrot ASTEROID Smart. Per resettare uniPod/iPhone (procedura che non cancella alcundato):iPod: premere contemporaneamenteMenu e il tasto centrale fino a quandol'iPod non si riavvia.iPhone/iPod touch: premerecontemporaneamente i tasti Accendi/Spegni e Home fino a quando l'iPhone nonsi riavvia. Non toccare il display quandoappare il messaggio "Scorrere perspegnere".Alcuni problemi possono comparire se laperiferica è già connessa al Parrot ASTEROIDSmart quando si accen<strong>de</strong> il motore. Ripetere laprocedura connettendo la periferica dopoavere acceso il motore.Per ulteriori informazioniConsultare la pagina di assistenza <strong>de</strong>l ParrotASTEROID Smart sul nostro sito webwww.parrot.com.90 Italiano
Informazioni generaliGaranziaSenza pregiudizio alcuno per la garanzia legale,Parrot garantisce contrattualmente per 12 mesi,a partire dalla data <strong>de</strong>ll'acquisto inizialeeffettuato dal consumatore (ad esclusione <strong>de</strong>icomponenti soggetti ad usura, garantiti per 6mesi), che questo prodotto è privo di difetti<strong>de</strong>l materiale e di fabbricazione, dietropresentazione al rivenditore o a Parrot <strong>de</strong>llaprova d'acquisto (data, luogo d'acquisto enumero di serie <strong>de</strong>l prodotto). Per l'interadurata <strong>de</strong>lla garanzia contrattuale, il prodottodifettoso dovrà essere riconsegnatonell'imballo originale al servizio di assistenzapost-vendita <strong>de</strong>l rivenditore. Dopo avereispezionato il prodotto, Parrot proce<strong>de</strong>rà, a suadiscrezione, alla sostituzione o all'emissione diuna nota di credito, ad esclusione di ogni altraforma di risarcimento.ModificheLe spiegazioni e le specifiche riportate nellapresente guida sono solo a scopo informativo epossono subire modifiche senza preavviso. Taliinformazioni sono da consi<strong>de</strong>rarsi corrette almomento <strong>de</strong>lla pubblicazione. La presenteguida è stata redatta prestando gran<strong>de</strong>attenzione, al fine di fornire ai clientiinformazioni precise e attendibili. Tuttavia,Parrot non può essere ritenuta responsabileper eventuali conseguenze <strong>de</strong>rivanti daomissioni o errori nella presente guida, né pereventuali danni o perdite acci<strong>de</strong>ntali di daticausati direttamente o indirettamente dall’uso<strong>de</strong>lle informazioni ivi contenute. Parrot siriserva il diritto di modificare/ migliorare ilprodotto o la guida per l’utente senzalimitazione alcuna e senza l’obbligo di notificaagli utenti. Poiché il costante impegno<strong>de</strong>ll’azienda è volto a garantire continuiaggiornamenti e miglioramenti, il prodottoacquistato dall’utente potrebbe risultareleggermente diverso dal mo<strong>de</strong>llo <strong>de</strong>scrittonella presente guida. In tal caso, verificare ladisponibilità di una versione aggiornata <strong>de</strong>llaguida in formato elettronico nel sito Web diParrot all’indirizzo www.parrot.com.Corretto smaltimento <strong>de</strong>l prodotto(rifiuti elettrici ed elettronici) (Applicabile neiPaesi <strong>de</strong>ll’Unione Europea e in quelli consistema di raccolta differenziata) Il marchioriportato sul prodotto o sulla suadocumentazione indica che il prodotto non<strong>de</strong>ve essere smaltito con altri rifiuti domesticial termine <strong>de</strong>l ciclo di vita. Per evitare eventualidanni all‘ambiente o alla salute causatidall‘inopportuno smaltimento <strong>de</strong>i rifiuti, siinvita l‘utente a separare questo prodotto daaltri tipi di rifiuti e di riciclarlo in manieraresponsabile per favorire il riutilizzosostenibile <strong>de</strong>lle risorse materiali. Gli utentidomestici sono invitati a contattare ilrivenditore presso il quale è stato acquistato ilprodotto o l‘ufficio locale preposto per tutte leinformazioni relative alla raccolta differenziatae al riciclaggio per questo tipo di prodotto. Gliutenti aziendali sono invitati a contattare ilproprio fornitore e verificare i termini e lecondizioni <strong>de</strong>l contratto di acquisto. Questoprodotto non <strong>de</strong>ve essere smaltito unitamentead altri rifiuti commerciali.Marchi <strong>de</strong>positatiParrot, Parrot Zikmu Solo e i loghi Parrot sonomarchi registrati di PARROT SA in Francia e inaltri paesi.Il nome e il logo Bluetooth® sono marchi<strong>de</strong>positati di Bluetooth® SIG, Inc. e il loroutilizzo da parte di Parrot S.A. avviene incondizioni di licenza.Italiano91
“Ma<strong>de</strong> for iPod / iPhone / iPad” significa chel’accessorio elettronico è stato appositamenteprogettato per collegarsi all’iPod / iPhone / iPa<strong>de</strong> che è stato certificato dal produttore comeconforme agli standard prestazionali di Apple.Apple non è responsabile <strong>de</strong>l funzionamento<strong>de</strong>l dispositivo o <strong>de</strong>lla sua conformità airequisiti di sicurezza.iPad, iPod, iPod Touch e iPhone sono marchi diApple, Inc. <strong>de</strong>positati negli Stati Uniti e in altripaesi.iPad è un marchio di Apple Inc.Wi-Fi è un marchio <strong>de</strong>positato di Wi-FiAlliance.Gracenote®, il logo e il logotipo Gracenote e illogo "Powered by Gracenote" sono marchicommerciali registrati o marchi commerciali diGracenote, Inc. negli Stati Uniti e/o in altripaesi.Tutti gli altri marchi commerciali e marchi<strong>de</strong>positati citati nel presente documento sonoprotetti da copyright e sono di proprietà <strong>de</strong>irispettivi titolari.(Francia), dichiara sotto la sua esclusivaresponsabilità che il prodotto ParrotASTEROID Smart <strong>de</strong>scritto nella presenteguida per l'utente è conforme alle normetecniche IEC/EN 60065: 2002 / A1:2006 / A11:2008 / A2: 2010 / A12: 2011, EN 300328 v1.8.1,EN 301 489-1 (2008:V1.8.1) e EN 301 489-17v1.3.2 secondo le disposizioni <strong>de</strong>lla direttivaR&TTE 1999/5/CE, nonché ai requisiti <strong>de</strong>lladirettiva sugli obiettivi di sicurezza 2006/95/CEe <strong>de</strong>lla direttiva Automotive 72/245/CEEemendata dalla direttiva 2009/19/CE.CopyrightsI<strong>de</strong>ntification N. 394 149 496 R.C.S. PARISParrot S.A.Copyright © 2012 Parrot.Dichiarazione di conformitàParrot SA, 174 quai <strong>de</strong> Jemmapes, 75010 Parigi92 Italiano
GebruikershandleidingInhoudsopgaveVoordat u begintInstallatieHet eerste gebruikTelefoonMuziekInternetVi<strong>de</strong>oProblemen vehelpenAlgemene informatiep.93p.94p.97p.99p.100p.102p.104p.105p.106Voordat u begintOver <strong>de</strong>ze gidsOm ons papierverbruik te beperken en in hetka<strong>de</strong>r van onze zo verantwoor<strong>de</strong>lijk mogelijkeaanpak op het gebied van milieubehoud, geeftParrot er <strong>de</strong> voorkeur aan om documentatieonline beschikbaar te stellen in plaats van <strong>de</strong>zeaf te drukken. Deze vereenvoudig<strong>de</strong> gids voor<strong>de</strong> Parrot ASTEROID Smart geeft u dus slechts<strong>de</strong> belangrijkste instructies die u nodig heeftom dit apparaat makkelijk te gebruiken. U vindtmeer informatie in het on<strong>de</strong>r<strong>de</strong>el Support vanonze website www.parrot.com: completedocumentatie, FAQ…Opmerking: Ten behoeve van <strong>de</strong> leesbaarheidwor<strong>de</strong>n <strong>de</strong> iPod® en <strong>de</strong> iPhone® in <strong>de</strong>zehandleiding aangeduid met <strong>de</strong> term "iPhone".UpdatesDownload gratis <strong>de</strong> laatste update voor uwproduct op onze website www.parrot.comge<strong>de</strong>elte Hulp. Via <strong>de</strong>ze updates profiteert uvan nieuwe functies en een verbeter<strong>de</strong>compatibiliteit van uw product.Opmerking: U kunt <strong>de</strong> updates voor uw ParrotASTEROID Smart ook downloa<strong>de</strong>n als hetapparaat verbon<strong>de</strong>n is met internet. In <strong>de</strong>meldingsbalk wordt aangegeven of er eenupdate beschikbaar is.Waarschuw ingenDe functies die langere tijd <strong>de</strong> aandachtopeisen, mogen alleen gebruikt wor<strong>de</strong>nwanneer <strong>de</strong> auto stilstaat. Uw veiligheid en dievan <strong>de</strong> an<strong>de</strong>re weggebruikers is belangrijkerdan telefoongesprekken, muziek ofrijhulpmid<strong>de</strong>len. Wees verantwoor<strong>de</strong>lijk: rijdvoorzichtig en let op uw omgeving. Parrot wijstelke verantwoor<strong>de</strong>lijkheid af indien u <strong>de</strong>zewaarschuwing negeert.Gebruik <strong>de</strong> Parrot ASTEROID Smart met eenre<strong>de</strong>lijk geluidsvolume. Zo kunt tij<strong>de</strong>ns hetrij<strong>de</strong>n altijd horen wat zich buiten afspeelt.De Parrot ASTEROID Smart bevat magnetenvan het type NdFeB, die scha<strong>de</strong> kunnentoebrengen aan voorwerpen die gevoelig zijnvoor magnetische vel<strong>de</strong>n (pacemaker,creditcards, mechanische horloges, ...).Met <strong>de</strong> draad Parking Brake van <strong>de</strong> ISO-kabelvan <strong>de</strong> Parrot ASTEROID Smart kange<strong>de</strong>tecteerd wor<strong>de</strong>n of <strong>de</strong> handrem isaangetrokken of niet. De draad moet wor<strong>de</strong>naangesloten volgens <strong>de</strong> installatie-instructiesDutch93
in dit document. Een onjuiste installatie ofaansluiting kan gevaarlijk zijn en bovendienillegaal in een groot aantal staten/lan<strong>de</strong>n. Hetscherm in het gezichtsveld van <strong>de</strong> bestuur<strong>de</strong>rmag in geen geval vi<strong>de</strong>o's tonen wanneer hetvoertuig aan het verkeer <strong>de</strong>elneemt. Hetzelf<strong>de</strong>geldt voor alle internettoepassingen.Als u probeert een toepassing te gebruiken dieniet gericht is op navigatie of hulp bij hetautorij<strong>de</strong>n, wordt er een waarschuwing op hetscherm weergegeven. Als u een vi<strong>de</strong>o wiltbekijken op het scherm van <strong>de</strong> ParrotASTEROID Smart, zorg dan dat het voertuigstilstaat op een veilige plek en dat <strong>de</strong> handremis aangetrokken.Interface voor stuurbedieningMet een stuurbedieningsinterface kunt u <strong>de</strong>knoppen op het stuur van uw auto gebruikenom uw Parrot-product te bedienen. Met <strong>de</strong>zeinterface kunt u <strong>de</strong> Parrot ASTEROID Smartgebruiken zon<strong>de</strong>r uw han<strong>de</strong>n van het stuur tehalen. Ga naar onze website www.parrot.comvoor meer informatie over <strong>de</strong>beschikbaarheidsdatum van <strong>de</strong>ze interface.InstallatieOpmerking: Wij adviseren om <strong>de</strong>ze installatie telaten uitvoeren door een vakman, met name eeninstallateur die is aangesloten bij ons netwerkvan erken<strong>de</strong> installateurs.VeiligheidsinstructiesZet het contact uit voordat u <strong>de</strong> aansluitingenaanbrengt.Installeer <strong>de</strong> Parrot ASTEROID Smart nooitzodanig dat het apparaat <strong>de</strong> bestuur<strong>de</strong>r of eenpassagier kan verwon<strong>de</strong>n in geval van eenabrupte stop.Installeer <strong>de</strong> Parrot ASTEROID Smart nooitzodanig dat het autorij<strong>de</strong>n erdoor wordtbelemmerd.Boor nooit in scheidingswan<strong>de</strong>n of hetdashboard zon<strong>de</strong>r eerst te controleren wat zicherachter bevindt. Let op dat u nooit kabels ofelektronische componenten beschadigt.Let op dat schroeven nooit contact maken meteen elektrische voedingskabel.De Parrot ASTEROID Smart is uitsluitendbedoeld voor gebruik in voertuigen met eenaccuspanning van 12V. Als <strong>de</strong> accuspanning vanuw voertuig (bv. een vrachtwagen) 24V is, moeter een reductietransformator wor<strong>de</strong>n gebruikt.Plaats <strong>de</strong> kabels niet op warme plaatsen (zoalsbij <strong>de</strong> uitlaatopeningen van <strong>de</strong> verwarming) ofin <strong>de</strong> buurt van beweegbare <strong>de</strong>len (zoals <strong>de</strong>versnellingspook) en zorg dat ze niet rond <strong>de</strong>stuurkolom of versnellingspook gewikkeldkunnen raken.Controleer of alles in <strong>de</strong> auto goed werkt naaansluiting van <strong>de</strong> Parrot ASTEROID Smart.Installeer <strong>de</strong> Parrot ASTEROID Smart ofon<strong>de</strong>r<strong>de</strong>len ervan niet binnen het bereik vaneen airbag.Installeer <strong>de</strong> Parrot ASTEROID Smart niet opeen vochtige of warme plaats.Laat achter <strong>de</strong> Parrot ASTEROID Smartvoldoen<strong>de</strong> ruimte over om <strong>de</strong> warmte af tekunnen voeren.Voordat u begintVerwij<strong>de</strong>r <strong>de</strong> originele autoradio uit uwvoertuig. Mogelijk heeft u hiervoor specialesleutels nodig.Controleer of audioaansluitingen en <strong>de</strong>voedingsaansluiting van <strong>de</strong> Parrot ASTEROIDSmart overeenkomen met <strong>de</strong> aansluitingen vanuw voertuig door ze met elkaar te vergelijken.Als het apparaat niet kan wor<strong>de</strong>n aangesloten,94 Dutch
moet er een ISO-adapter wor<strong>de</strong>n gebruikt om<strong>de</strong> Parrot ASTEROID Smart te verbin<strong>de</strong>n met<strong>de</strong> aansluitingen van uw voertuig. Zie hetge<strong>de</strong>elte over voertuigcompatibiliteit op <strong>de</strong>hulppagina van <strong>de</strong> Parrot ASTEROID Smart omte controleren of u een ISO-adapterkabel nodigheeft.Vergelijk <strong>de</strong> antenne-aansluiting van <strong>de</strong> ParrotASTEROID Smart met die van uw voertuig.Neem contact op met een autospeciaalzaak alsu een antenneadapter nodig heeft.Opmerking: Als uw antenne wordt versterkt,kunt u <strong>de</strong> ISO-voedingskabel gebruiken diegeleverd is bij uw Parrot ASTEROID Smart.Installatie met <strong>de</strong> steunen1. Schroef <strong>de</strong> 4 schroeven los om <strong>de</strong> steun van<strong>de</strong> Parrot ASTEROID Smartverwij<strong>de</strong>ren.2. Plaats <strong>de</strong> montagesteun en zet hem vast in<strong>de</strong> cabine. Buig daartoe <strong>de</strong> lipjes haaks naarbuiten toe om (figuur A pag.7).3. Plaats <strong>de</strong> Parrot ASTEROID Smart en draai<strong>de</strong> 4 schroeven vast (figuur B pag.7).4. Klem het plastic frame vast (figuur C pag.8)Installatie met schroeven aan <strong>de</strong> zijkant1. Draai <strong>de</strong> 4 schroeven los om <strong>de</strong> steun van <strong>de</strong>Parrot ASTEROID Smartte verwij<strong>de</strong>ren.2. Verwij<strong>de</strong>r <strong>de</strong> 2 zijsteunen (figuur D pag.8).3. Plaats <strong>de</strong> Parrot ASTEROID Smart zo dat <strong>de</strong>schroefgaten uitgelijnd zijn met <strong>de</strong>schroefgaten van het voertuig.4. Gebruik zo veel schroeven als nodig is vooruw voertuigmo<strong>de</strong>l Gebruik alleen <strong>de</strong>meegelever<strong>de</strong> schroeven.Installeren van <strong>de</strong> gps-dongleBevestig <strong>de</strong> gps-dongle in <strong>de</strong> auto op een vlakoppervlak zon<strong>de</strong>r obstakels.Warmteweren<strong>de</strong> voorruiten en voorruiten metgeïntegreer<strong>de</strong> antenne kunnen zorgen voorstoring van <strong>de</strong> gps-ontvangst, waardoor <strong>de</strong>gegevens van navigatietoepassingen min<strong>de</strong>rbetrouwbaar wor<strong>de</strong>n.De antenne van <strong>de</strong> gps-donglebevindt zich aan <strong>de</strong> kant van hetsterlogo en <strong>de</strong> inscriptie "ParrotASTEROID GPS". Dit logo moetaltijd naar <strong>de</strong> lucht gericht zijn.Bevestig <strong>de</strong> gps-dongle op het nietwarmteweren<strong>de</strong><strong>de</strong>el van <strong>de</strong> voorruit als uwvoertuig een warmteweren<strong>de</strong> voorruit heeft.De kant met het sterlogo moet op <strong>de</strong> voorruitgeplakt wor<strong>de</strong>n (zie figuur F pag.9).Opmerking: De plaats van <strong>de</strong> nietwarmteweren<strong>de</strong>zone op <strong>de</strong> voorruit verschiltper automo<strong>de</strong>l. Meestal zit <strong>de</strong>ze zone bij <strong>de</strong>achteruitkijkspiegel.Bevestig <strong>de</strong> gps-dongle op het dashboard alsuw voertuig geen warmteweren<strong>de</strong> voorruitheeft. De kant met het sterlogo moet zichtbaarzijn (zie figuur E pag.9).Zorg dat <strong>de</strong> steun goed vastzit door:Gebruik alleen <strong>de</strong> bij <strong>de</strong> Parrot ASTEROIDSmart gelever<strong>de</strong> plakband ;het montageoppervlak te reinigen voordatu <strong>de</strong> steun vastlijmt;wacht na het lijmen van <strong>de</strong> steun ongeveer2 uur voor u <strong>de</strong> steun manipuleert.De handremkabel aansluitenVia <strong>de</strong> handremkabel kan <strong>de</strong> vi<strong>de</strong>ofunctie van<strong>de</strong> Parrot ASTEROID Smart wor<strong>de</strong>n gebruiktwanneer <strong>de</strong> handrem aangetrokken is. Als <strong>de</strong>kabel niet op <strong>de</strong> signaalkabel van <strong>de</strong> handremvan uw voertuig is aangesloten, is <strong>de</strong>Dutch95
vi<strong>de</strong>ofunctie nooit beschikbaar.1. Sluit <strong>de</strong> gelever<strong>de</strong> verlengkabel voor <strong>de</strong>handremkabel aan op <strong>de</strong> groene kabel van<strong>de</strong> Parrot ASTEROID Smart (met <strong>de</strong>aanduiding Parking Brake).2. Zoek <strong>de</strong> signaalkabel van <strong>de</strong> handrem vanuw voertuig. Deze kabel verbindt <strong>de</strong>handrem met het controlelampje van <strong>de</strong>handrem op het dashboard.3. Sluit <strong>de</strong> verlengkabel voor <strong>de</strong> handrem en<strong>de</strong> signaalkabel van <strong>de</strong> handrem aan op <strong>de</strong>gelever<strong>de</strong> aansluiting, ter hoogte van <strong>de</strong>aanslag.Installatie van een achteruitrijcameraAls u <strong>de</strong> Parrot ASTEROID Smart gebruikt meteen (niet meegelever<strong>de</strong>) achteruitrijcamera,kan via <strong>de</strong> oranje draad in <strong>de</strong> ISO-kabel van <strong>de</strong>Parrot ASTEROID Smart ge<strong>de</strong>tecteerd wor<strong>de</strong>nof uw voertuig vooruit of achteruit rijdt. Sluit<strong>de</strong>ze kabel aan op <strong>de</strong> voedingskabel van uwachterlichten om het vi<strong>de</strong>osignaal van <strong>de</strong>camera weer te geven tij<strong>de</strong>ns hetachteruitrij<strong>de</strong>n.Sluit <strong>de</strong> vi<strong>de</strong>okabel ook aan op <strong>de</strong> aansluitingenvan <strong>de</strong> vi<strong>de</strong>ocamera achter <strong>de</strong> ParrotASTEROID Smart.Installatie van <strong>de</strong> dubbele microfoonWij ra<strong>de</strong>n u aan om het snoer door <strong>de</strong> gootachter <strong>de</strong> afdichting van <strong>de</strong> <strong>de</strong>ur te lei<strong>de</strong>n.Als het snoer boven <strong>de</strong> pedalen langs loopt,maak het dan goed vast.Waarschuwing: Leid het microfoonsnoer nietdoor het verwarmings-, ventilatie- ofaircosysteem en laat het niet voor <strong>de</strong> zijairbagslangs lopen.Installeer <strong>de</strong> microfoon zo dicht mogelijk bijhet hoofd van <strong>de</strong> gebruiker. De i<strong>de</strong>ale afstand is60 cm. Installeer <strong>de</strong> microfoon bij voorkeurdicht bij <strong>de</strong> achteruitkijkspiegel.Richt <strong>de</strong> microfoon op <strong>de</strong> mond van <strong>de</strong>gebruiker.Aansluiting van <strong>de</strong> ISO-kabelSluit <strong>de</strong> audioaansluitingen en <strong>de</strong> voeding vanuw voertuig aan op <strong>de</strong> aansluitingen van <strong>de</strong>Parrot ASTEROID Smart.Opmerking: Gebruik <strong>de</strong> meegelever<strong>de</strong>kabelklemmen om <strong>de</strong> kabels op <strong>de</strong> autoradio tebevestigen. Plaats een van <strong>de</strong> kabelklemmen in<strong>de</strong> daartoe aangebrachte uitsparing, linksbovenaan op <strong>de</strong> achterzij<strong>de</strong> van <strong>de</strong> autoradio(zie figuur pag.4).Controleer of het product juist geïnstalleerd is.Zet daartoe het contact van uw voertuig aan enuit zodra <strong>de</strong> Parrot ASTEROID Smartgeïnstalleerd is. Het bericht “Tot ziens" moetnu op het scherm verschijnen. Als dat niet zois, moet u <strong>de</strong> ro<strong>de</strong> en gele draad omwisselen.De gele draad van <strong>de</strong> voedingskabel moetwor<strong>de</strong>n aangesloten op <strong>de</strong> 12Vcontinuspanning, <strong>de</strong> ro<strong>de</strong> draad op het 12Vinschakelcontact en <strong>de</strong> zwarte draad op <strong>de</strong>massa. Dit doet u door <strong>de</strong> twee kabelschoenenop op <strong>de</strong> kabels van Parrot te verwisselen.Installatie van <strong>de</strong> USB-snoerenSluit <strong>de</strong> USB-snoeren aan op <strong>de</strong> ParrotASTEROID Smart. Wij ra<strong>de</strong>n u aan om allesnoeren van <strong>de</strong> Parrot ASTEROID Smart aan tesluiten, zelfs als u niet noodzakelijk van planbent om ze te gebruiken. Trek <strong>de</strong>overeenkomstige aansluitingen door uwrommelbakje of handschoenenkastje naarbuiten. Mogelijk moet u daarvoor een gat in uwdashboard boren. Vermijd indien mogelijk hetgebruik van USB-verlengsnoeren.Het iPod-snoer (1.2m - 2A) moet absoluut op<strong>de</strong> daartoe voorziene, witte USB-poortaangesloten wor<strong>de</strong>n. Boven <strong>de</strong>ze poort staat"iPod".96 Dutch
Voor een optimale kwaliteit van <strong>de</strong> ontvangstmag u uw 3Gstick niet rechtstreeks op <strong>de</strong> ParrotASTEROID Smart aansluiten: gebruik eenUSB-kabel om het accessoire op het dashboard(of een an<strong>de</strong>re vrije zone) te plaatsen.DiefstalbeveiligingHet frontje van <strong>de</strong> Parrot ASTEROID Smart kanwor<strong>de</strong>n verwij<strong>de</strong>rd om diefstal teontmoedigen. De Parrot ASTEROID Smart isonbruikbaar zon<strong>de</strong>r het frontje.Behan<strong>de</strong>l het verwij<strong>de</strong>rbare frontjevoorzichtig. Gebruik geen kracht wanneer u hetplaatst of verwij<strong>de</strong>rt. Bewaar het frontje op eenveilige plaats waar het niet blootstaat aanzonlicht, hoge temperaturen en vocht.Om het frontje te verwij<strong>de</strong>ren, schuift u <strong>de</strong>on<strong>de</strong>rkant van het boven<strong>de</strong>el naar bene<strong>de</strong>n,waarna u het frontje voorzichtig van hetapparaat trekt (figuur G pag. 10).Om het frontje weer aan te brengen, plaatst ueerst <strong>de</strong> magnetische on<strong>de</strong>rkant en drukt uvervolgens op <strong>de</strong> bovenkant tot u een klikhoort.Het eerste gebruikWelkomstschermWanneer <strong>de</strong> Parrot ASTEROID Smartingeschakeld wordt, opent hetwelkomstscherm. De navigatieknoppenbevin<strong>de</strong>n zich aan <strong>de</strong> linkerkant van het scherm.Schuif uw vinger over het scherm naar links. Uzult zien dat er meer plaats is voorsnelkoppelingen naar uw favorietetoepassingen of functies.Raak een pictogram aan om <strong>de</strong> bijbehoren<strong>de</strong>functie te openen. Druk bijvoorbeeld op hetpictogram Toepassingen. Daarmee opent u <strong>de</strong>lijst met beschikbare toepassingen op uwParrot ASTEROID Smart. Schuif uw vinger overhet scherm om door <strong>de</strong> lijst met toepassingente scrollen.Om naar het vorige menu terug te keren drukt uop. Om direct naar het welkomstschermterug te keren drukt u op .Druk op om het contextmenu te openenvan <strong>de</strong> toepassing die u op dat momentgebruikt. Via het contextmenu krijgt u toegangtot extra functies van <strong>de</strong> toepassing en kunt ubepaal<strong>de</strong> instellingen wijzigen.Druk op <strong>de</strong> toets <strong>de</strong> laatst gebruikte ofactieve toepassingen weer te geven.Druk op <strong>de</strong> toets om het volume wijzigen.Beweeg <strong>de</strong> cursor vervolgens naar links of naarrechts.Het w elkomstscherm aanpassenOm een snelkoppeling naar een toepassing/functie op het welkomstscherm toe te voegen:1. Druk op Toepassingen.2. Druk 2 secon<strong>de</strong>n lang op het pictogram van<strong>de</strong> <strong>de</strong>sbetreffen<strong>de</strong> toepassing.3. Sleep het pictogram naar <strong>de</strong> gewenstelocatie.Om een snelkoppeling te verwij<strong>de</strong>ren:1. Druk 2 secon<strong>de</strong>n lang op het pictogram datu wilt verwij<strong>de</strong>ren.Dutch97
2. Sleep het pictogram naar boven tot aan <strong>de</strong>aanduiding Verwij<strong>de</strong>ren. Wanneer hetpictogram rood wordt, kunt u uw vinger vanhet scherm halen.De instellingen w ijzigenOm <strong>de</strong> instellingen van <strong>de</strong> Parrot ASTEROIDSmart te wijzigen, drukt u op Toepassingendrukken en vervolgens op Instellingen. U kuntook op drukken en vervolgens opInstellingen.Een telefoon verbin<strong>de</strong>n via BluetoothOpmerking: Raadpleeg <strong>de</strong>compatibiliteitspagina op onze website om tecontroleren of uw telefoon compatibel is met <strong>de</strong>Parrot ASTEROID Smart en raadpleeg <strong>de</strong>bijbehoren<strong>de</strong> koppelingsprocedure:www.parrot.com/nl/compatibility.Als u voor het eerst een telefoon met <strong>de</strong> ParrotASTEROID Smart gebruikt, moet u <strong>de</strong> tweeapparaten eerst koppelen. Als uw telefoon met<strong>de</strong> Parrot ASTEROID Smart gekoppeld is,wor<strong>de</strong>n <strong>de</strong> 2 apparaten automatisch met elkaarverbon<strong>de</strong>n wanneer ze in elkaars nabijheidwor<strong>de</strong>n ingeschakeld, met <strong>de</strong> functieB luetooth® geactiveerd.1. Druk in het menu Instellingen opDraadloos en netwerk > Bluetooth.2. Activeer indien nodig <strong>de</strong> opties Bluetoothen Opties > Waarneembaar.3. Zoek via uw telefoon naar B luetooth® enselecteer vervolgens Parrot ASTEROIDSmart.4. De koppelingsprocedure hangt van uwtelefoon af:Als uw telefoon vraagt om <strong>de</strong> pinco<strong>de</strong>voor B luetoothvoert u"0000" in.Als <strong>de</strong> Parrot ASTEROID Smart en uwtelefoon allebei een co<strong>de</strong> weergeven,moet u controleren of <strong>de</strong> twee co<strong>de</strong>sgelijk zijn en een bevestiging ofontkenning geven.> Het scherm van <strong>de</strong> ParrotASTEROID Smart toont "Koppelengelukt".Opmerking: Op sommige telefoons moet uverbinding met <strong>de</strong> Parrot ASTEROID Smarttoestaan om automatisch verbinding te kunnenmaken. Zie <strong>de</strong> gebruikershandleiding van uwtelefoon voor meer informatie.Tw ee telefoons aansluiten op <strong>de</strong> Parrot ASTEROIDDe modus voor 2 telefoons inschakelen:1. Druk op Telefoon.2. Druk op , en vervolgens op Bluetooth.3. Druk op Opties.4. Schakel <strong>de</strong> optie Multipunt telefonie.Wanneer <strong>de</strong> Parrot ASTEROID Smart wordtingeschakeld, probeert het apparaat verbindingte maken met alle gekoppel<strong>de</strong> telefoons die inhet voertuig aanwezig zijn. Als er meer dan 2gekoppel<strong>de</strong> telefoons in het voertuig aanwezigzijn, maakt het apparaat verbinding met <strong>de</strong> 2telefoons die het eerst gekoppeld zijn.Wanneer er 2 telefoons zijn aangesloten op <strong>de</strong>Parrot ASTEROID Smart, wordt een van <strong>de</strong>telefoons beschouwd als hoofdtelefoon en <strong>de</strong>an<strong>de</strong>re als secundaire telefoon. Gewoonlijk is<strong>de</strong> hoofdtelefoon <strong>de</strong> telefoon die het eerstmet <strong>de</strong> Parrot ASTEROID Smart gekoppeldwerd.U kunt oproepen ontvangen via <strong>de</strong>hoofdtelefoon en <strong>de</strong> secundaire telefoon.Alleen <strong>de</strong> contacten van <strong>de</strong> hoofdtelefoon zijnbeschikbaar op <strong>de</strong> Parrot ASTEROID Smart.Alleen met <strong>de</strong> hoofdtelefoon kunt u zelf98 Dutch
ellen. U kunt echter gemakkelijk schakelentussen <strong>de</strong> twee aangesloten telefoons. Doedaartoe het volgen<strong>de</strong>:1. Druk op Telefoon.2. Druk op , en vervolgens op Telefoon.3. Selecteer <strong>de</strong> hoofdtelefoon.De contacten van <strong>de</strong> telefoon synchroniserenBij <strong>de</strong> meeste B luetooth telefoons wor<strong>de</strong>n <strong>de</strong>contacten automatisch gesynchroniseerd methet systeemgeheugen. Wanneer u uwcontacten wijzigt, wor<strong>de</strong>n ze bij <strong>de</strong> volgen<strong>de</strong>verbinding automatisch opnieuwgesynchroniseerd.Waarschuwing: Alleen <strong>de</strong> contacten uit hettelefoongeheugen wor<strong>de</strong>n gesynchroniseerd met<strong>de</strong> Parrot ASTEROID Smart. Breng uw contactenover naar het telefoongeheugen als ze zijnopgeslagen op <strong>de</strong> simkaart. Raadpleeg <strong>de</strong>gebruikershandleiding van uw telefoon voormeer informatie.Opmerking: Op sommige telefoons moet u <strong>de</strong>Parrot ASTEROID Smart toegang tot uwcontacten verlenen om <strong>de</strong> synchronisatie tekunnen uitvoeren. Raadpleeg <strong>de</strong>gebruikershandleiding van uw telefoon voormeer informatie.De automatische synchronisatie is beperkt tot5000 contacten (of telefoonnummers) pergekoppel<strong>de</strong> telefoon.TelefoonEen gesprek aannemenEen inkomend gesprek wordt aangegeven dooreen beltoon. De naam van het contact wordtgemeld als het nummer van het contactopgeslagen is in <strong>de</strong> contactenlijst van <strong>de</strong>telefoon die is aangesloten op <strong>de</strong> ParrotASTEROID Smart.Om het gesprek aan te nemen drukt u op<strong>de</strong> groene toets die op het schermverschijnt. Druk vervolgens op <strong>de</strong> ro<strong>de</strong>toets op het scherm om het gesprek tebeëindigen.Om het gesprek te weigeren drukt u op <strong>de</strong>ro<strong>de</strong> toets die op het scherm verschijnt.Bellen via spraakherkenningDirect na synchronisatie met <strong>de</strong> contactenlijstvan uw telefoon kunt u bellen viaspraakherkenning. De Parrot ASTEROID Smartherkent automatisch het contact uit uwcontactenlijst dat u wilt bellen.1. Selecteer Gesproken Commando's >Contacten om <strong>de</strong> spraakherkenning te<strong>start</strong>en.Dutch99
De Parrot ASTEROID Smart vraagt u naar<strong>de</strong> naam van het contact dat u wilt bellen.2. Spreek <strong>de</strong> naam van het contact uit,gevolgd door het soort nummer("KANTOOR", "GSM"...) als dat contactverschillen<strong>de</strong> nummers heeft.> Als het gesproken commando goedbegrepen is, wordt automatisch begonnenmet bellen.> Is dat niet het geval, dan wordt ombevestiging gevraagd door het handsfreesysteem. Bevestig door "JA", "BEL" of"BELLEN" TE ZEGGEN.Opmerking: U kunt altijd op <strong>de</strong> toets op hetscherm drukken om het bellen te annuleren.MuziekOpmerking: Wanneer u uw audioapparaat (USB/SD/iPod) voor het eerst aansluit op <strong>de</strong> ParrotASTEROID Smart, kan het la<strong>de</strong>n verschillen<strong>de</strong>minuten duren, vooral als <strong>de</strong> randapparatenveel muziekbestan<strong>de</strong>n bevatten. Na <strong>de</strong>ze laadtijdkunnen <strong>de</strong> muzieknummers viaspraakherkenning opgeroepen wor<strong>de</strong>n.De spraakherkenning voor muziek gebruikenMet <strong>de</strong> spraakherkenningsfunctie voor muziekkunt u <strong>de</strong> artiesten of albums die u wiltbeluisteren, via spraakherkenning selecteren.Deze functie is beschikbaar als u <strong>de</strong> ParrotASTEROID Smart gebruikt met eenrandapparaat zoals iPod / USB / SD, of als u eenmuziektoepassing gebruikt die compatibel ismet <strong>de</strong>ze functie.1. Selecteer Gesproken Commando's >Muziek.2. Noem <strong>de</strong> naam van <strong>de</strong> artiest of het albumdat u wilt beluisteren wanneer <strong>de</strong> ParrotASTEROID Smart u daarom vraagt.> De lijst met audiobronnen van <strong>de</strong> ParrotASTEROID Smart verschijnt, waarop <strong>de</strong>muziektoepassingen metspraakherkenningsfunctie wor<strong>de</strong>naangegeven die <strong>de</strong> door u gekozen artiest ofhet album kunnen aanbie<strong>de</strong>n.Opmerking: Controleer <strong>de</strong> namen van <strong>de</strong>artiesten en albums in <strong>de</strong> tags (metadata) vanuw muziekbestan<strong>de</strong>n. Ze kunnen verschillen van<strong>de</strong> weergave in <strong>de</strong> titel van het nummer.RadioOm een frequentie te selecteren:1. Druk op Muziek > Radio.2. Beweeg <strong>de</strong> cursor vervolgens naar links ofnaar rechts om een frequentie teselecteren.Om <strong>de</strong> lijst met alle beschikbare zen<strong>de</strong>rs op tevragen,drukt u op <strong>de</strong> toets en daarna opOpnieuw scannen > OK.Om een zen<strong>de</strong>r op te slaan, drukt u op <strong>de</strong> toetsen selecteert u <strong>de</strong> optie Aan favorietentoevoegen.Om <strong>de</strong> opgeslagen zen<strong>de</strong>rs te bekijken, drukt uop <strong>de</strong> toets en daarna op Modus >Favorieten.Opmerking: Het aantal zen<strong>de</strong>rs dat u kuntopslaan is onbeperkt.100 Dutch
iPod1. Sluit uw iPod aan op <strong>de</strong> iPod-kabel.2. Selecteer Muziek > iPod. U kunt ook opBla<strong>de</strong>ren drukken om door <strong>de</strong> inhoud vanuw iPod te bla<strong>de</strong>ren.3. Druk op het nummer om het af te spelen.Opmerking: Druk op <strong>de</strong> toets om bepaal<strong>de</strong>instellingen te wijzigen (audio, herhalen, shuffle)USB-stickDe Parrot ASTEROID Smart is compatibel met<strong>de</strong> meeste USB-sticks, MP3-spelers enexterne har<strong>de</strong> schijven. U kunt USB-sticks vanelke capaciteit gebruiken. De muziekbestan<strong>de</strong>nop uw USB-stick kunnen <strong>de</strong> in<strong>de</strong>ling MP3,AAC, WAV, OGG of WMA hebben.1. Sluit uw USB-randapparaat aan op <strong>de</strong>USB-kabel.2. Selecteer Muziek > USB. U kunt ook opBla<strong>de</strong>ren drukken om door <strong>de</strong> inhoud vanuw USB-randapparaat te bla<strong>de</strong>ren.3. Druk op het nummer om het af te spelen.Opmerking: Druk op <strong>de</strong> toets om bepaal<strong>de</strong>instellingen te wijzigen (audio, herhalen, shuffle)SD-kaartDe capaciteit van <strong>de</strong> SD-kaart mag niet groterzijn dan 32 GB. De muziekbestan<strong>de</strong>n op uw SDkaartkunnen <strong>de</strong> in<strong>de</strong>ling MP3, AAC, WAV,OGG of WMA hebben.Opmerking: Om <strong>de</strong> geheugenkaart teverwij<strong>de</strong>ren, zoek <strong>de</strong> kleine richel op <strong>de</strong>geheugenkaart. Zet uw nagel in <strong>de</strong> richel en trek<strong>de</strong> geheugenkaart uit.1. Verwij<strong>de</strong>r het afneembare frontje van <strong>de</strong>Parrot ASTEROID Smart.2. Steek <strong>de</strong> SD-kaart in <strong>de</strong> daarvoorbestem<strong>de</strong> sleuf achter het afneembarefrontje, met het contactvlak naar linksgericht (figuur H pag.10).3. Plaats het afneembare frontje terug.4. Druk op Muziek > SD. U kunt ook opdrukken om door <strong>de</strong> inhoud van uw SDkaartte bla<strong>de</strong>ren.5. Druk op een nummer om het af te spelen.Opmerking: Druk op <strong>de</strong> toets om bepaal<strong>de</strong>instellingen te wijzigen (audio, herhalen, shuffle)Audiospeler via BluetoothOpmerking: Met <strong>de</strong> Parrot ASTEROID Smart kuntu telefoneren en audio streamen via Bluetoothop 2 verschillen<strong>de</strong> telefoons, zon<strong>de</strong>r dat u eenvan <strong>de</strong> twee apparaten hoeft los te koppelen.U kunt <strong>de</strong> Parrot ASTEROID Smart gebruikenom muziekbestan<strong>de</strong>n te beluisteren die opeen B luetoothaudiospeler opgeslagen zijn, als<strong>de</strong>ze het A2DP-profiel (Advanced AudioDistribution Profile) on<strong>de</strong>rsteunt. Als u <strong>de</strong>audiospeler voor het eerst gebruikt, moet uhem eerst koppelen aan <strong>de</strong> Parrot ASTEROIDSmart. Als <strong>de</strong> audiospeler al gekoppeld is aan<strong>de</strong> Parrot ASTEROID Smart :1. Selecteer Muziek > Audio Bluetooth.2. Speel een nummer af op uw audiospeler.BedieningTij<strong>de</strong>ns het afspelen van een muziekbestand of<strong>de</strong> radio:druk op het scherm om het nummer opDutch101
pauze te zetten of <strong>de</strong> radio teon<strong>de</strong>rbreken;schuif uw vinger naar boven om hetvolume te verhogen;schuif uw vinger naar bene<strong>de</strong>n om hetvolume te verlagen.Tij<strong>de</strong>ns het afspelen van een muziekbestand(behalve via een jackkabel/jack aangeslotenaudiobronnen):schuif uw vinger naar rechts om naar hetvolgen<strong>de</strong> nummer te gaan;schuif uw vinger naar links om naar hetvorige nummer te gaan.Opmerking: Als u <strong>de</strong> Parrot Parrot ASTEROIDSmart gebruikt met een via Bluetooth verbon<strong>de</strong>naudiospeler, zijn <strong>de</strong>ze opdrachten alleenbeschikbaar als <strong>de</strong> speler het profiel AVRCP(Audio/Vi<strong>de</strong>o Remote Control Profile)on<strong>de</strong>rsteunt.InternetWaarschuwing: Om verbinding met internet temaken via een 3G/4G-stick, moet u geabonneerdzijn bij een mobiele operator. Aan het gebruikvan <strong>de</strong>ze dienst kunnen aanzienlijkeroamingkosten verbon<strong>de</strong>n zijn. Controleer <strong>de</strong>voorwaar<strong>de</strong>n van uw abonnement en houd <strong>de</strong>gebruikskosten bij via uw operator. Parrot wijstelke verantwoor<strong>de</strong>lijkheid af met betrekking tot<strong>de</strong> bijbehoren<strong>de</strong> kosten.Verbinding maken met een 3G-stickOpmerking: Zie het compatibiliteitsge<strong>de</strong>elte van<strong>de</strong> Parrot ASTEROID Smart op onze website voor<strong>de</strong> lijst van 3G/4G-sticks die compatibel zijn met<strong>de</strong> Parrot ASTEROID Smart.1. Sluit een 3G/4G-stick aan op <strong>de</strong> ParrotASTEROID Smart via <strong>de</strong> USB-kabel.> Er verschijnt een pop-upvenster.2. Voer uw pinco<strong>de</strong> in en druk op VALID.Vink <strong>de</strong> optie Onthou<strong>de</strong>n aan als u nietwilt dat steeds om <strong>de</strong> pinco<strong>de</strong> wordtgevraagd bij elke her<strong>start</strong> van <strong>de</strong> ParrotASTEROID Smart.Opmerking: U kunt <strong>de</strong>ze instelling later wijzigenvia Instellingen > Draadloos en netwerk >Mobiele datanetwerken. Selecteer in <strong>de</strong>randapparaten uw 3G/4G-stick en selecteervervolgens Pinco<strong>de</strong> en daarna Vergeten.3. Selecteer indien nodig uw APN (AccessPoint Name) in <strong>de</strong> lijst. Deze informatiestaat in <strong>de</strong> bij uw 3G/4G-stick gelever<strong>de</strong>documentatie. Als uw APN niet in <strong>de</strong> lijststaat kunt u hem toevoegen viaInstellingen > Draadloos en netwerk >Mobiele datanetwerken.4. Selecteer uw 3G/4G-stick in <strong>de</strong>randapparaten.5. Selecteer Toegangspunten > Overig >Voorge<strong>de</strong>finieer<strong>de</strong> toegangspunten.6. Wacht even tot <strong>de</strong> verbinding tot standgebracht is. U kunt ook op <strong>de</strong> toetsdrukken en door <strong>de</strong> menu's navigerenterwijl <strong>de</strong> verbinding tot stand wordtgebracht.Verbin<strong>de</strong>n via BluetoothIndien uw telefoon het profiel B luetooth® DUN(Dial-Up Networking) of PAN (Personal AreaNetwork) on<strong>de</strong>rsteunt, kunt u via <strong>de</strong> B luetoothverbinding van uw telefoon Parrot ASTEROIDSmart het 3G-netwerk van <strong>de</strong> telefoon <strong>de</strong>len.102 Dutch
Opmerking: Ga naar <strong>de</strong> compatibiliteitspaginaop onze website om te controleren of uwtelefoon <strong>de</strong>ling van <strong>de</strong> 3G-verbinding viaBluetooth on<strong>de</strong>rsteunt. Daar vindt u ook <strong>de</strong>bijbehoren<strong>de</strong> procedure: www.parrot.com/nl/compatibility.1. Geef op uw telefoon toestemming voorhet <strong>de</strong>len van <strong>de</strong> verbinding. Dezeprocedure verschilt per telefoontype.2. Verbind uw telefoon met <strong>de</strong> ParrotASTEROID Smart via B luetooth.3. Op <strong>de</strong> Parrot ASTEROID Smartselecteertu Instellingen > Draadloos en netwerk >Mobiele datanetwerken.4. Selecteer uw APN (Access Point Name)in <strong>de</strong> lijst en vink vervolgens <strong>de</strong> optieSelecteren aan.3G-verbinding <strong>de</strong>len via USBAls uw telefoon <strong>de</strong>len van <strong>de</strong> 3G-verbinding viaUSB on<strong>de</strong>rsteunt, kunt via een USB-kabel ofmicro-USB-kabel (niet meegeleverd) ParrotASTEROID Smart <strong>de</strong> 3G-verbinding van <strong>de</strong>telefoon <strong>de</strong>len.Opmerking: Ga naar <strong>de</strong> compatibiliteitspaginaop onze website om te controleren of uwtelefoon <strong>de</strong>ling van <strong>de</strong> 3G-verbinding via USBon<strong>de</strong>rsteunt. Daar vindt u ook <strong>de</strong> bijbehoren<strong>de</strong>procedure: www.parrot.com/nl/compatibility.1. Ontgren<strong>de</strong>l <strong>de</strong> toetsen van uw telefoon enverbind hem met <strong>de</strong> Parrot ASTEROIDSmart met behulp van <strong>de</strong> USB/micro-USB-kabel. Via <strong>de</strong>ze verbinding kunt utevens <strong>de</strong> batterij van uw telefoonopla<strong>de</strong>n.2. Selecteer indien nodig uw APN (AccessPoint Name) in <strong>de</strong> lijst en vink vervolgens<strong>de</strong> optie Selecteren aan. U kunt <strong>de</strong>zeinstelling later wijzigen via Instellingen >Draadloos en netwerk > Mobieledatanetwerken > Mobile Access <strong>de</strong>vice.> Er verschijnt een pop-up die activeringvan <strong>de</strong> ge<strong>de</strong>el<strong>de</strong> USB-verbinding aangeeft.Opmerking: Raadpleeg <strong>de</strong>gebruikershandleiding van uw telefoon voormeer informatie.Verbinding maken met een Wi-Fi-netw erkAls u <strong>de</strong> 3G-verbinding van uw telefoon kunt<strong>de</strong>len via Wi-Fi® of als er een Wi-Fi-netwerk in<strong>de</strong> buurt van uw voertuig beschikbaar is:1. Druk in het menu Instellingen van <strong>de</strong>Parrot ASTEROID Smart op Draadloos ennetwerk > Wi-Fi.2. Activeer <strong>de</strong> optie Wi-Fi.3. Druk op Wi-Fi-instellingen.> De lijst met Wi-Fi-netwerken wordtgetoond.4. Selecteer het Wi-Fi-netwerk.5. Voer indien nodig het wachtwoord in.De toepassingen gebruikenU kunt meer<strong>de</strong>re soorten toepassingengebruiken met <strong>de</strong> ASTEROID Market : muziek,geolocatie, rijhulp. De beschikbaretoepassingen verschillen per land waarin <strong>de</strong>autoradio gebruikt wordt.Voor bepaal<strong>de</strong> toepassingen hebt u mogelijkeen abonnement nodig.De Parrot ASTEROID Smart kan multitasken: erkunnen verschillen<strong>de</strong> toepassingen tegelijkwor<strong>de</strong>n gebruikt. U kunt bijvoorbeeld eenwebradio beluisteren en tegelijkertijd eenrijhulptoepassing gebruiken.Ga voor meer informatie over het gebruik van<strong>de</strong> beschikbare toepassingen naar <strong>de</strong>webpagina van <strong>de</strong> ASTEROID Market:www.parrotasteroid.com/asteroidmarket.Dutch103
Vi<strong>de</strong>oWaarschuwing: De vi<strong>de</strong>ofunctie van <strong>de</strong> ParrotASTEROID Smart is gevaarlijk en illegaal in eengroot aantal lan<strong>de</strong>n als <strong>de</strong>ze wordt gebruikttij<strong>de</strong>ns het rij<strong>de</strong>n. Deze functie is dus nietbeschikbaar wanneer het voertuig rijdt. Als u eenvi<strong>de</strong>o wilt bekijken op <strong>de</strong> Parrot ASTEROIDSmart, parkeer dan uw auto op een veilige pleken trek <strong>de</strong> handrem aan.AchteruitrijcameraAls uw voertuig is uitgerust met eenachteruitrijcamera, kunt u <strong>de</strong> vi<strong>de</strong>obeel<strong>de</strong>n vandie camera op het scherm van <strong>de</strong> ParrotASTEROID Smart weergeven om het achteruitinparkeren te vereenvoudigen. Zie hetinstallatieschema op pag.4 en <strong>de</strong> paragraaf"Installatie van een achteruitrijcamera" voormeer informatie over het aansluiten van <strong>de</strong>achteruitrijcamera op <strong>de</strong> Parrot ASTEROIDSmart.De vi<strong>de</strong>obeel<strong>de</strong>n van <strong>de</strong> achteruitrijcamerawor<strong>de</strong>n automatisch weergegeven wanneer uachteruit rijdt. Het beeld van <strong>de</strong>achteruitrijcamera kan omgekeerd lijken.Opmerking: U kunt altijd op Vi<strong>de</strong>o switchdrukken om te schakelen tussen <strong>de</strong> vi<strong>de</strong>obeel<strong>de</strong>nvan <strong>de</strong> achteruitrijcamera en <strong>de</strong> vi<strong>de</strong>obeel<strong>de</strong>nvan een via een AV/iPod-kabel aangesloten iPod.Vi<strong>de</strong>obestan<strong>de</strong>n afspelen van een externe bronU kunt op <strong>de</strong> Parrot ASTEROID Smart vi<strong>de</strong>o'safspelen van een externe vi<strong>de</strong>obron.Sluit <strong>de</strong> vi<strong>de</strong>obron aan op <strong>de</strong> ParrotASTEROID Smart met een (nietmeegelever<strong>de</strong>) AV-kabel(zie figuur pag.) 4)1. Druk op Toepassingen > Vi<strong>de</strong>oingang.2. Speel <strong>de</strong> vi<strong>de</strong>o van <strong>de</strong> geselecteer<strong>de</strong> bronaf.Opmerking: U kunt altijd op Vi<strong>de</strong>o switchdrukken om te schakelen tussen <strong>de</strong> vi<strong>de</strong>obeel<strong>de</strong>nvan <strong>de</strong> achteruitrijcamera en <strong>de</strong> vi<strong>de</strong>obeel<strong>de</strong>nvan een via een AV/iPod-kabel aangeslotenexterne bron.Vi<strong>de</strong>obestan<strong>de</strong>n afspelen van een SD-kaartOp <strong>de</strong> Parrot ASTEROID Smart kunt uvi<strong>de</strong>obestan<strong>de</strong>n afspelen die op een SD-kaartzijn opgeslagen. De vi<strong>de</strong>obestan<strong>de</strong>n op uw SDkaartkunnen <strong>de</strong> in<strong>de</strong>ling MP2, MP4, H263,H264, WMV en SPARK hebben.1. Steek <strong>de</strong> SD-kaart in <strong>de</strong> daarvoorbestem<strong>de</strong> sleuf (figuur H pag.10).2. Druk op Toepassingen en vervolgens opGalerij.3. Selecteer <strong>de</strong> vi<strong>de</strong>o door op hetbijbehoren<strong>de</strong> pictogram te drukken.Vi<strong>de</strong>o-uitgang aangesloten schermOp <strong>de</strong> vi<strong>de</strong>o-uitgangen kan een scherm wor<strong>de</strong>naangesloten waarop <strong>de</strong> passagiers achterinvi<strong>de</strong>o's kunnen bekijken vanaf een SD-kaart.Zie het installatieschema op pag.4 voor meerinformatie over het aansluiten van het schermvoor <strong>de</strong> passagiers achterin op <strong>de</strong> ParrotASTEROID Smart.Waarschuwing: Installeer een scherm nooitzodanig dat <strong>de</strong> bestuur<strong>de</strong>r <strong>de</strong> vi<strong>de</strong>o's kan zientij<strong>de</strong>ns het rij<strong>de</strong>n.104 Dutch
Problemen vehelpenVoordat u begintControleer of het bericht"Tot ziens"op hetscherm van <strong>de</strong> Parrot ASTEROID Smartverschijnt wanneer u het contact van hetvoertuig uitzet. Raadpleeg het on<strong>de</strong>r<strong>de</strong>el "Deinstallatie controleren" voor meer informatie.Reset het apparaat. Verwij<strong>de</strong>r daartoe <strong>de</strong>voorkant en druk vervolgens op <strong>de</strong> toets Resetmet een pen of een an<strong>de</strong>r puntig voorwerp.Druk geduren<strong>de</strong> 3 secon<strong>de</strong>n op <strong>de</strong> resetknop(zie figuur pag.5). U kunt ook <strong>de</strong>fabrieksinstellingen terugzetten viaInstellingen > Geavanceer<strong>de</strong> instellingen >Vertrouwelijkheid > Fabrieksinstellingenterugzetten.Controleer of <strong>de</strong> laatste update geïnstalleerd isop <strong>de</strong> Parrot ASTEROID Smart. Selecteerdaartoe Instellingen > Informatie > Versie.Vergelijk dit versienummer met het nummerop <strong>de</strong> hulppagina van <strong>de</strong> Parrot ASTEROIDSmart op onze website www.parrot.com.Problemen met <strong>de</strong> telefoonfunctieControleer of uw telefoon compatibel is met<strong>de</strong> Parrot ASTEROID Smart. Ga daarvoor naar<strong>de</strong> compatibiliteitspagina op onze website:www.parrot.com/nl/compatibility.Als aangegeven wordt dat uw telefooncompatibel is en als uw Parrot ASTEROIDSmart al van <strong>de</strong> laatste update voorzien is,maakt u <strong>de</strong> koppeling tussen <strong>de</strong> twee apparatenongedaan op <strong>de</strong> Parrot ASTEROID Smart en uwtelefoon, <strong>start</strong> u bei<strong>de</strong> apparaten opnieuw open brengt u <strong>de</strong> verbinding tussen <strong>de</strong> tweeapparaten opnieuw tot stand.Problemen met <strong>de</strong> muziekfunctieReset uw iPod/iPhone voordat u opnieuwverbinding maakt met <strong>de</strong> Parrot ASTEROIDSmart. Een iPod / iPhone resetten doet u alsvolgt (met <strong>de</strong>ze procedure wor<strong>de</strong>n geengegevens gewist):iPod: druk gelijktijdig op Menu en op <strong>de</strong>mid<strong>de</strong>lste knop tot <strong>de</strong> iPod opnieuwop<strong>start</strong>.iPhone / iPad / iPod touch®: druktegelijkertijd op <strong>de</strong> knop On/Off en op <strong>de</strong>knop Home tot <strong>de</strong> iPhone opnieuwop<strong>start</strong>. Raak het scherm niet aan,wanneer het bericht "Zet uit" verschijnt.Sommige problemen kunnen zich voordoen alshet randapparaat al met <strong>de</strong> Parrot ASTEROIDSmart is verbon<strong>de</strong>n wanneer u het aanzet.Probeer het nogmaals door pas verbinding temaken nadat u het apparaat heeft aangezet.Voor meer informatieZie <strong>de</strong> hulppagina van <strong>de</strong> Parrot ASTEROIDSmart op onze website www.parrot.com.Dutch105
Algemene informatieGarantieOnvermin<strong>de</strong>rd <strong>de</strong> wettelijke garantie, geeftPARROT voor dit product een contractuelegarantie van 12 maan<strong>de</strong>n op materiaal- enproductiefouten (met uitzon<strong>de</strong>ring vanslijt<strong>de</strong>len, waarvoor een garantie van 6maan<strong>de</strong>n geldt). De garantie gaat in op <strong>de</strong>aankoopdatum en kan wor<strong>de</strong>n opgeëist doorhet aankoopbewijs (datum, aankoopplaats,serienummer van het product) te tonen aan <strong>de</strong>verkoper of aan Parrot. Tij<strong>de</strong>ns <strong>de</strong> contractuelegarantieperio<strong>de</strong> wordt het <strong>de</strong>fecte product in<strong>de</strong> oorspronkelijk verpakking teruggestuurdnaar <strong>de</strong> klantenservice van <strong>de</strong> verkoper. Nainspectie van het product gaat Parrot naar eigenkeuze over tot vervanging of uitgifte van eentegoedbon, met uitsluiting van elke an<strong>de</strong>rescha<strong>de</strong>loosstelling.WijzigingenDe uitleg en <strong>de</strong> specificaties in <strong>de</strong>zegebruikershandleiding wor<strong>de</strong>n uitsluitendgegeven ter informatie en kunnen zon<strong>de</strong>rvoorafgaan<strong>de</strong> kennisgeving wor<strong>de</strong>n gewijzigd.Deze informatie was correct bij het ter persegaan en <strong>de</strong> grootste zorg werd gewijd aan <strong>de</strong>samenstelling ervan, om u zo nauwkeurigmogelijke informatie te verschaffen.Parrot S.A. kan echter niet direct of indirectverantwoor<strong>de</strong>lijk wor<strong>de</strong>n gehou<strong>de</strong>n vooreventuele scha<strong>de</strong> of toevallig verlies vangegevens voortvloeiend uit een fout ofweglating in dit document. Parrot S.A. behoudtzich het recht voor het product of <strong>de</strong>gebruikershandleiding te wijzigen ofverbeteren zon<strong>de</strong>r enige beperking en zon<strong>de</strong>rverplichting om <strong>de</strong> gebruiker daarover teinformeren. In het ka<strong>de</strong>r van <strong>de</strong> aandacht dieParrot S.A. schenkt aan <strong>de</strong> verbetering van onzeproducten, kan het product dat u hebt gekochtenigszins verschillen van het in dit documentbeschreven product. In dat geval kunt umisschien een nieuwe versie van <strong>de</strong>elektronische gebruikershandleiding vin<strong>de</strong>n op<strong>de</strong> website www.parrot.com.Hoe dit product te recycleren - afvoer vanelektrische en elektronische productenHet symbool op het product of <strong>de</strong>documentatie geeft aan dat het product aan hetein<strong>de</strong> van <strong>de</strong> levensduur niet weggegooid magwor<strong>de</strong>n met het gewone huisvuil.Ongecontroleer<strong>de</strong> afvoer van afval kan hetmilieu of <strong>de</strong> gezondheid scha<strong>de</strong>n. Scheid ditafval daarom van an<strong>de</strong>re afvalsoorten enrecycleer het op verantwoor<strong>de</strong> wijze. Zo draagtu bij tot duurzaam hergebruik van grondstoffen.Particulieren wor<strong>de</strong>n verzocht contact op tenemen met <strong>de</strong> verkoper die hen het productverkocht heeft of bij <strong>de</strong> gemeente inlichtingenin te winnen over hoe en waar ze dit product zokunnen afvoeren dat het op milieuvrien<strong>de</strong>lijkewijze kan wor<strong>de</strong>n hergebruikt. Bedrijvenwor<strong>de</strong>n verzocht contact op te nemen met hunleveranciers en <strong>de</strong> voorwaar<strong>de</strong>n in hetverkoopcontract te raadplegen. Het productmag niet samen met an<strong>de</strong>r commercieel afvalwor<strong>de</strong>n weggegooid.Ge<strong>de</strong>poneer<strong>de</strong> han<strong>de</strong>lsmerkenParrot en <strong>de</strong> logo's van Parrot zijngeregistreer<strong>de</strong> merken van PARROT SA inFrankrijk en an<strong>de</strong>re lan<strong>de</strong>n.De naam en het logo van Bluetooth zijnge<strong>de</strong>poneer<strong>de</strong> han<strong>de</strong>lsmerken van Bluetooth ®SIG, Inc. en elk gebruik hiervan door Parrot S.A.gebeurt on<strong>de</strong>r licentie.Het logo “Ma<strong>de</strong> for iPod / iPhone / iPad”betekent dat een elektronisch accessoirespecifiek voor iPod / iPhone / iPad, isontwikkeld en dat zijn ontwikkelaar voldoet aan106 Dutch
<strong>de</strong> prestatienormen van Apple. Apple is nietverantwoor<strong>de</strong>lijk voor het functioneren van ditsysteem of <strong>de</strong> conformiteit ervan met <strong>de</strong>veiligheidsnormen.iPad, iPod, iPod Touch en iPhone Apple zijnge<strong>de</strong>poneer<strong>de</strong> han<strong>de</strong>lsmerken van Apple, Inc.in <strong>de</strong> Verenig<strong>de</strong> Staten en an<strong>de</strong>re lan<strong>de</strong>n.iPad is een han<strong>de</strong>lsmerk van Apple Inc.Wi-Fi is een ge<strong>de</strong>poneerd han<strong>de</strong>lsmerk vanWi-Fi Alliance.Gracenote®, het Gracenote-logo en -logotypeen het logo "Powered by Gracenote" zijnhan<strong>de</strong>lsmerken of ge<strong>de</strong>poneer<strong>de</strong>han<strong>de</strong>lsmerken van Gracenote in <strong>de</strong> Verenig<strong>de</strong>Staten en/of an<strong>de</strong>re lan<strong>de</strong>n.Alle an<strong>de</strong>re in dit document genoem<strong>de</strong>han<strong>de</strong>lsmerken en ge<strong>de</strong>poneer<strong>de</strong>han<strong>de</strong>lsmerken zijn eigendom van hunrespectieve eigenaren en wor<strong>de</strong>n beschermddoor auteursrecht.Parrot ASTEROID Smart, voldoet aan <strong>de</strong>technische normen IEC/EN 60065: 2002 /A1:2006 / A11: 2008 / A2: 2010 / A12: 2011, EN300328 v1.8.1, EN 301 489-1 (2008:V1.8.1) enEN 301 489-17 v1.3.2 volgens <strong>de</strong> bepalingen vanR&TTE-richtlijn 1999/5/EG met betrekking totradioapparatuur en telecommunicatieeindapparatuur,evenals aan <strong>de</strong> eisen van <strong>de</strong>veiligheidsrichtlijn 2006/95/EG en richtlijn72/245/CEE betreffen<strong>de</strong> door voertuigenveroorzaakte radiostoring zoals gewijzigd doorrichtlijn 2009/19/CE.CopyrightsI<strong>de</strong>ntification N. 394 149 496 R.C.S. PARISParrot S.A.Copyright © 2012 Parrot.ConformiteitsverklaringParrot SA, 174 quai <strong>de</strong> Jemmapes, 75010 Parijs,Frankrijk, verklaart geheel op eigenverantwoor<strong>de</strong>lijkheid dat het in <strong>de</strong>zegebruikershandleiding beschreven product, <strong>de</strong>Dutch107
108
Manual doutilizadorÌndiceAntes <strong>de</strong> começarInstalaçãoPrimeira utilizaçãoTelefoneMúsicaInternetVí<strong>de</strong>oNo caso <strong>de</strong> problemasInformação geralp.109p.110p.113p.115p.116p.118p.120p.121p.122Antes <strong>de</strong> começarAcerca <strong>de</strong>ste guiaDe modo a limitar o nosso consumo <strong>de</strong> papel, eno ambito do nosso procedimento tambemresponsavel e respeitando ao maximo oambiente, a Parrot privilegia a colocacao onlinedos documentos para os utilizadores, em vez<strong>de</strong> os imprimir. Este guia simplificado do ParrotASTEROID Smart limita-se a fornecer-lhe asprincipais instrucoes, que lhe irao permitirutilizar facilmente este aparelho. Encontraramais informacoes na seccao Suporte do nossowebsite www.parrot.com: Manual completo,perguntas frequentes, software didactico…Nota: Para uma melhor legibilida<strong>de</strong>, iPod® eiPhone® serão <strong>de</strong>signados pelo termo "iPhone"neste manual.ActualizaçõesDescarregue gratuitamente a últimaactualização do seu produto no nosso websitewww.parrot.com na secção Suporte. Estasactualizações irão permitir-lhe beneficiar <strong>de</strong>novas funcionalida<strong>de</strong>s e melhorar acompatibilida<strong>de</strong> do seu produto.Nota: Também po<strong>de</strong> <strong>de</strong>scarregar asactualizações do seu Parrot ASTEROID Smartquando este estiver ligado à Internet. Adisponibilida<strong>de</strong> <strong>de</strong> uma actualização é-lheindicada na barra <strong>de</strong> notificação.AvisosAs funções que necessitam <strong>de</strong> uma atençãoprolongada <strong>de</strong>vem ser utilizadas apenas quandoo veículo está parado. A sua segurança e a dosoutros condutores está acima das chamadastelefónicas, música ou aplicações <strong>de</strong> ajuda àcondução. Seja responsável: Conduza comprudência e preste atenção ao que o ro<strong>de</strong>ia. AParrot recusa qualquer responsabilida<strong>de</strong> casoescolha ignorar esta advertência.Utilize o Parrot ASTEROID Smart com um nível<strong>de</strong> volume razoável, <strong>de</strong> modo a po<strong>de</strong>r ouvir aqualquer momento os ruídos exterioresdurante a condução.O Parrot ASTEROID Smart inclui ímanes dotipo NdFeB que po<strong>de</strong>m danificar objectossensíveis aos campos magnéticos (pacemaker,cartões <strong>de</strong> crédito, relógios mecânicos...).O fio "Parking Brake" do cabo ISO do ParrotASTEROID Smart permite <strong>de</strong>tectar se otravão-<strong>de</strong>-mão foi activado ou não. Ele <strong>de</strong>ve serconectado <strong>de</strong> acordo com as instruções <strong>de</strong>Português109
instalação <strong>de</strong>scritas no presente documento.Qualquer instalação ou conexão incorrectapo<strong>de</strong> ser perigosa e ilegal em vários estados/países. O ecrã no campo <strong>de</strong> visão do condutornão <strong>de</strong>ve, em caso algum, difundir ví<strong>de</strong>osquando o veículo estiver em circulação. Omesmo acontece para qualquer aplicação web.Se tentar utilizar uma aplicação que não seja<strong>de</strong>dicada à navegação ou ajuda à conduçãoenquanto conduz, aparece um aviso no ecrã.Para ver um ví<strong>de</strong>o no ecrã do Parrot ASTEROIDSmart, certifique-se <strong>de</strong> que o veículo estáparado num local seguro e que o travão-<strong>de</strong>-mãoestá activado.Interface <strong>de</strong> comando ao volanteUm interface <strong>de</strong> comando ao volante permitelheligar os comandos no volante do seuautomóvel para controlar o seu produto daParrot. Com este interface, po<strong>de</strong>rá utilizar oParrot ASTEROID Smart mantendo as mãos novolante. Consulte o nosso websitewww.parrot.com para obter mais informaçõessobre a data <strong>de</strong> disponibilida<strong>de</strong> <strong>de</strong>ste interface.InstalaçãoNota: Recomendamos que contacte umprofissional para proce<strong>de</strong>r a esta instalação, emespecial na nossa re<strong>de</strong> <strong>de</strong> instaladorescertificados.Instruções <strong>de</strong> segurançaDesligue o motor antes <strong>de</strong> proce<strong>de</strong>r àsligações.Nunca instale o Parrot ASTEROID Smart numlocal on<strong>de</strong> possa lesionar o condutor ou umpassageiro no caso <strong>de</strong> paragem brusca.Nunca instale o Parrot ASTEROID Smart numlocal on<strong>de</strong> possa impedir a condução.Nunca perfure uma pare<strong>de</strong> ou o painel <strong>de</strong>instrumentos sem verificar previamente o queestá atrás. Certifique-se <strong>de</strong> nunca danificar umcomponente electrónico ou um cabo.Se utilizar parafusos, certifique-se <strong>de</strong> que nãoestão em contacto com um cabo <strong>de</strong> alimentaçãoeléctrica.O Parrot ASTEROID Smart apenas foiconcebido para funcionar num veículo com umabateria <strong>de</strong> 12 V. Se o seu veículo (por ex.:camião) possuir uma bateria <strong>de</strong> 24 V, énecessário utilizar um redutor <strong>de</strong> voltagem.Certifique-se <strong>de</strong> que os cabos estão instaladosafastados <strong>de</strong> locais quentes (saídas <strong>de</strong>aquecimento, etc.), peças móveis (alavanca <strong>de</strong>velocida<strong>de</strong>s, etc.) e <strong>de</strong> não haver qualquer risco<strong>de</strong> se enrolarem na coluna <strong>de</strong> direcção ou naalavanca <strong>de</strong> velocida<strong>de</strong>s.Certifique-se do correcto funcionamento dosequipamentos do veículo após a instalação doParrot ASTEROID Smart.Não instale o Parrot ASTEROID Smart ou umdos seus componentes num local on<strong>de</strong> possaabrir um dos airbags do veículo.Não instale o Parrot ASTEROID Smart numlocal húmido ou sujeito a temperaturaselevadas.Deixe atrás do Parrot ASTEROID Smart espaçosuficiente para permitir a dissipação do calor.Antes <strong>de</strong> começarRetire o auto-rádio <strong>de</strong> origem do seu veículo.Esta operação po<strong>de</strong> necessitar <strong>de</strong> chaves <strong>de</strong>extracção.Certifique-se <strong>de</strong> que a conexão entre osconectores <strong>de</strong> áudio, a alimentação do ParrotASTEROID Smart e as ligações do seu veículo épossível, comparando os dois conectores. Seessa conexão não for possível, é necessário110 Português
utilizar um adaptador ISO para adaptar o ParrotASTEROID Smart às ligações específicas doseu veículo. Consulte a secção <strong>de</strong>Compatibilida<strong>de</strong> dos veículos na página <strong>de</strong>suporte do Parrot ASTEROID Smart paraverificar se é necessário um cabo adaptador.Compare o conector da antena do ParrotASTEROID Smart e o do seu veículo. Se fornecessário utilizar um adaptador <strong>de</strong> antena,contacte um profissional automóvel para obtermais informações.Nota: Se a sua antena estiver amplificada, po<strong>de</strong>fazer a alimentação através do cabo ISOfornecido com o seu Parrot ASTEROID Smart.Instalação com os suportes1. Desaperte os 4 parafusos para remover osuporte do Parrot ASTEROID Smart.2. Insira o suporte <strong>de</strong> montagem e fixe-o nohabitáculo. Para isso, afaste as linguetas parao exterior, dobrando-as em 90° (esquema Apág.7).3. Instale o Parrot ASTEROID Smart e fixe os 4parafusos (esquema B pág.7).4. Encaixe o quadro <strong>de</strong> plástico (esquema Cpág.8).Instalação com os parafusos laterais1. Desaperte os 4 parafusos para remover osuporte do Parrot ASTEROID Smart.2. Remova os 2 suportes laterais (esquema Dpág.8).3. Posicione o Parrot ASTEROID Smart <strong>de</strong> talforma que os orifícios <strong>de</strong> parafusos estejamalinhados com os orifícios <strong>de</strong> parafusos doveículo.4. Aperte todos os parafusos necessáriosconsoante o mo<strong>de</strong>lo do seu veículo. Utilizeapenas os parafusos fornecidos.Instalação do dongle GPSFixe o dongle GPS sobre uma superfície plana,numa zona sem obstáculos no interior dohabitáculo.Os pára-brisas atérmicos e os vidros comantena incrustada po<strong>de</strong>m interferir com arecepção do GPS e reduzir a fiabilida<strong>de</strong> dasinformações ligadas às aplicações <strong>de</strong>navegação.A antena GPS do dongle está nolado on<strong>de</strong> está indicado "ParrotASTEROID GPS" e on<strong>de</strong> seencontra o logótipo em forma <strong>de</strong>estrela. Este logótipo <strong>de</strong>ve sersempre orientado para cima.Se o seu veículo possuir um pára-brisasatérmico, fixe o dongle GPS no pára-brisas aonível da zona não atérmica. O lado on<strong>de</strong> está ologótipo em forma <strong>de</strong> estrela <strong>de</strong>ve estar coladono pára-brisas (esquema F pág.9).Nota: A zona não atérmica do pára-brisas<strong>de</strong>pen<strong>de</strong> do mo<strong>de</strong>lo do seu veículo. Ela encontrasehabitualmente ao nível do retrovisor.Se o seu veículo não possuir um pára-brisasatérmico, fixe o dongle GPS no painel <strong>de</strong>instrumentos. O lado on<strong>de</strong> está o logótipo emforma <strong>de</strong> estrela <strong>de</strong>ve estar visível (esquema Epág.9).Para assegurar uma boa fixação do suporte:Utilize obrigatoriamente o a<strong>de</strong>sivofornecido com o Parrot ASTEROID Smart ;Limpe a superfície <strong>de</strong> montagem antes <strong>de</strong>colar o suporte;Após a fixação do suporte, espere cerca <strong>de</strong>2 horas sem o manusear.Português111
Ligar o cabo do travão-<strong>de</strong>-mãoO cabo do travão-<strong>de</strong>-mão permite utilizar afunção <strong>de</strong> ví<strong>de</strong>o do Parrot ASTEROID Smartquando o travão-<strong>de</strong>-mão é puxado. Se o cabonão for ligado ao cabo do sinal do travão-<strong>de</strong>mãodo seu veículo, a função <strong>de</strong> ví<strong>de</strong>o nuncaficará disponível.1. Ligue a extensão do cabo do travão-<strong>de</strong>mãofornecido ao cabo ver<strong>de</strong> do ParrotASTEROID Smart (com a indicação ParkingBrake).2. Assinale o cabo do sinal do travão-<strong>de</strong>-mãodo seu veículo. Este cabo liga o seu travão<strong>de</strong>-mãoao indicado luminoso do travão<strong>de</strong>-mãono seu painel <strong>de</strong> instrumentos.3. Coloque a extensão do cabo do travão-<strong>de</strong>mãoe o cabo do sinal do travão-<strong>de</strong>-mão naligação fornecida, no batente.Instalação <strong>de</strong> uma câmara <strong>de</strong> marcha-atrásSe utilizar o Parrot ASTEROID Smart com umacâmara <strong>de</strong> marcha-atrás (não fornecida), o cabocor-<strong>de</strong>-laranja no cabo ISO do ParrotASTEROID Smart permite <strong>de</strong>tectar se o seuveículo avança ou recua. Ligue esse cabo aocabo cuja tensão permite ligar as suas luzes <strong>de</strong>marcha-atrás para apresentar o sinal <strong>de</strong> ví<strong>de</strong>oda câmara <strong>de</strong> marcha-atrás quando efectua umamanobra <strong>de</strong> marcha-atrás.Ligue igualmente o cabo <strong>de</strong> ví<strong>de</strong>o da câmara <strong>de</strong>recuo aos conectores Vi<strong>de</strong>o CAM localizadosatrás do Parrot ASTEROID Smart.Instalação do duplo microfoneRecomendamos que faça <strong>de</strong>slizar o cabo pelaranhura atrás da junta da porta.Se o cabo passar por cima dos pedais,certifique-se <strong>de</strong> que fica bem fixado.Aviso: Não passe o cabo do microfone pelossistemas <strong>de</strong> aquecimento, ventilação ou arcondicionado, ou à frente dos airbags laterais.Certifique-se <strong>de</strong> que o microfone fica instaladoo mais próximo possível da cabeça doutilizador. A distância i<strong>de</strong>al é <strong>de</strong> 60 cm. Instale,<strong>de</strong> preferência, o microfone perto do retrovisorinterior.Oriente o microfone para a boca do utilizador.Conexão do cabo ISOLigue os conectores <strong>de</strong> áudio e alimentação doseu veículo aos conectores do ParrotASTEROID Smart.Nota: Utilize os serra-cabos fornecidos paragarantir a fixação dos cabos no auto-rádio.Insira um dos serra-cabos no local previsto paraeste efeito, na parte superior esquerda traseirado auto-rádio (consulte o esquema na pág.4).Verifique a sua instalação. Para isso, ligue e<strong>de</strong>pois corte o contacto do seu veículo quandotiver o Parrot ASTEROID Smart instalado: amensagem "A<strong>de</strong>us" <strong>de</strong>ve aparecer no ecrã. Senão for o caso, <strong>de</strong>ve inverter as posições dosfios vermelho e amarelo. Na verda<strong>de</strong>, o fioamarelo do cabo <strong>de</strong> alimentação <strong>de</strong>ve estarligado ao <strong>de</strong> 12 V permanente, o fio vermelho ao<strong>de</strong> 12 V pós-contacto e o fio preto à terra. Estaoperação é efectuada simplesmenteinvertendo os dois terminais que se encontramnos cabos Parrot.Instalação do cabo USBConecte os cabos do iPod® e USB ao ParrotASTEROID Smart. Recomendamos queconecte todos os cabos do Parrot ASTEROIDSmart, mesmo que ache que não os vai utilizar.Faça os conectores correspon<strong>de</strong>ntes saírempelo compartimento para moedas ou portaluvas.Para isso, po<strong>de</strong>rá ser necessário fazer umburaco no interior do seu painel <strong>de</strong> bordo. Namedida do possível, evite a utilização <strong>de</strong>extensões USB.112 Português
O cabo USB (1.2m - 2A) para iPod <strong>de</strong>veobrigatoriamente ser ligado à porta USB brancaprevista para este efeito. Encontrará aindicação iPod na parte superior <strong>de</strong>sta.De modo a garantir uma qualida<strong>de</strong> <strong>de</strong> recepçãoóptima, não conecte a sua pen 3G directamenteno Parrot ASTEROID Smart: Utilize um caboUSB, <strong>de</strong> modo a instalar o acessório no painel<strong>de</strong> bordo (ou outra zona afastada).<strong>de</strong> seguida, pressione a parte superior até ouvirum clique.Primeira utilizaçãoEcrã inicialQuando Parrot ASTEROID Smart se ligar,ace<strong>de</strong> ao ecrã inicial. Os botões <strong>de</strong> navegaçãoencontram-se do lado esquerdo do ecrã.Protecção contra rouboA parte dianteira po<strong>de</strong> ser removida do ParrotASTEROID Smart para <strong>de</strong>sencorajarassaltantes. O Parrot ASTEROID Smart nãopo<strong>de</strong> funcionar uma vez esta parte dianteiraremovida.Manipule a parte dianteira amovível comprecauções. Não force aquando da suainstalação ou remoção. Guar<strong>de</strong>-a num localseguro, ao abrigo da luz solar, temperaturaselevadas e humida<strong>de</strong>.Para remover a parte dianteira, faça <strong>de</strong>slizarpara baixo a parte superior da parte dianteira e,<strong>de</strong> seguida, puxe-a lentamente para fora(esquema G pág. 10).Para voltar a instalar a parte dianteira, coloqueem primeiro o seu lado inferior magnetizado e,Faça <strong>de</strong>slizar o seu <strong>de</strong>do no ecrã para aesquerda. Irá <strong>de</strong>scobrir mais espaço paraadicionar atalhos para as suas aplicações oufunções preferidas.Toque num ícone para ace<strong>de</strong>r à sua funçãocorrespon<strong>de</strong>nte. Por exemplo, toque no íconeAplicações. Ace<strong>de</strong> à lista <strong>de</strong> aplicaçõesdisponíveis no seu Parrot ASTEROID Smart.Faça <strong>de</strong>slizar o <strong>de</strong>do no ecrã para percorrer alista <strong>de</strong>stas aplicações.Para voltar ao menu anterior, prima. ParaPortuguês113
voltar directamente ao ecrã inicial, prima .Prima para ace<strong>de</strong>r ao menu contextual,correspon<strong>de</strong>nte à aplicação a ser utilizada. Omenu contextual permite-lhe ter acesso àsfunções suplementares da aplicação, oumodificar algumas <strong>de</strong>finições.Prima o botão para visualizar as últimasaplicações utilizadas ou que estão actualmentea ser utilizadas.Prima o botão para modificar o volume. Aseguir <strong>de</strong>slize o cursor para a esquerda ou paraa direita.Personalizar o ecrã inicialPara adicionar um atalho para uma aplicação/função no ecrã inicial:1. Prima Aplicações.2. Prima durante 2 segundos o ícone daaplicação que lhe interessa.3. Faça <strong>de</strong>slizar o ícone para o local <strong>de</strong>sejado.Para eliminar um atalho:1. Prima durante 2 segundos o ícone que<strong>de</strong>seja retirar.2. Faça-o <strong>de</strong>slizar para cima, ao nível daindicação Eliminar. Quando o ícone ficarvermelho, po<strong>de</strong> retirar o seu <strong>de</strong>do.Modificar os parâmetrosPara modificar os parâmetros do ParrotASTEROID Smart, prima Aplicações, <strong>de</strong>poisParâmetros. Também po<strong>de</strong> premirParâmetros.Conectar um telemóvel por Bluetooth, <strong>de</strong>poisNota: Consulte a página <strong>de</strong> compatibilida<strong>de</strong> donosso website para verificar se o seu telemóvel écompatível com o Parrot ASTEROID Smart econsulte o processo <strong>de</strong> emparelhamentocorrespon<strong>de</strong>nte: www.parrot.com/uk/compatibility.Se for a 1ª vez que utiliza um telemóvel com oParrot ASTEROID Smart, <strong>de</strong>ve primeiroemparelhar os dois aparelhos. Quando otelemóvel estiver emparelhado ao ParrotASTEROID Smart, a conexão entre os 2aparelhos será automática quando os 2aparelhos forem ligados perto um do outro coma função B luetooth® activada.1. No menu Parâmetros, prima Sem fios ere<strong>de</strong> > Bluetooth.2. Se for necessário, active as opçõesBluetooth e Opções > I<strong>de</strong>ntificável.3. A partir do seu telemóvel, inicie umaprocura <strong>de</strong> dispositivos B luetooth® Depoisseleccione "Parrot ASTEROID Smart".4. O processo <strong>de</strong> emparelhamento <strong>de</strong>pen<strong>de</strong>então do mo<strong>de</strong>lo do seu telemóvel:Se o telemóvel o convidar a inserir ocódigo PIN B luetooth, insira "0000".Se o Parrot ASTEROID Smart e o seutelemóvel apresentarem dois códigos,verifique se os códigos são idênticos e<strong>de</strong>pois confirme ou anule.> O ecrã do Parrot ASTEROID Smartapresenta "Emparelhamentoefectuado com sucesso".Nota: Nalguns telemóveis, <strong>de</strong>verá autorizar aconexão ao Parrot ASTEROID Smart parapermitir a conexão automática. Consulte omanual <strong>de</strong> utilizador do seu telemóvel para maisinformações.Conectar dois telemóveisPara activar o modo que permite a conexão <strong>de</strong> 2telemóveis:1. Prima Telemóvel.2. Prima , <strong>de</strong>pois Bluetooth.114 Português
3. Prima Opções.4. Active a opção Telefonia multipontos.Quando Parrot ASTEROID Smart se liga, tentaestabelecer a conexão com todos ostelemóveis emparelhados e presentes noveículo. Se houver mais <strong>de</strong> 2 telemóveisemparelhados no veículo, ele estabelece aconexão com os 2 telemóveis emparelhados hámais tempo.Quando estiverem conectados 2 telemóveis aoParrot ASTEROID Smart, um é consi<strong>de</strong>radotelemóvel principal e o outro telemóvelsecundário. Por <strong>de</strong>feito, o telemóvel principalcorrespon<strong>de</strong> ao telemóvel com oemparelhamento ao Parrot ASTEROID Smartmais antigo.Po<strong>de</strong> receber chamadas proveniente dotelemóvel principal ou telemóvel secundário.Apenas o directório do telemóvel principal estádisponível no Parrot ASTEROID Smart. Sópo<strong>de</strong>rá fazer chamadas a partir do telemóvelprincipal. No entanto, po<strong>de</strong> passar facilmente<strong>de</strong> um telemóvel conectado para outro. Paratal:1. Prima Telemóvel.2. Prima , <strong>de</strong>pois Telemóvel.3. Seleccione o telemóvel principal.Sincronizar o directório do telemóvelCom a maioria dos telemóveis B luetooth, odirectório é sincronizado automaticamentecom a memória do sistema. Sempre quemodificar o seu directório, a sincronização éiniciada automaticamente na conexão seguinte.Aviso: Apenas os contactos gravados namemória do telemóvel são sincronizados com oParrot ASTEROID Smart. Se os seus contactosestiverem guardados na memória do cartãoSIM, transfira-os para a memória do telemóvel.Consulte o manual <strong>de</strong> utilizador do seutelemóvel para mais informações.Nota: Nalguns telemóveis, <strong>de</strong>verá autorizar oacesso do Parrot ASTEROID Smart aos seuscontactos para permitir a sincronização.Consulte o manual <strong>de</strong> utilizador do seutelemóvel para mais informações.A sincronização automática está limitada a5000 contactos (ou números <strong>de</strong> telemóvel)por telemóvel emparelhado.TelefoneReceber uma chamadaQuando receber uma chamada, ouvirá umtoque. O nome do contacto é anunciado se onúmero <strong>de</strong>ste contacto fizer parte dodirectório do telemóvel ligado ao ParrotASTEROID Smart.Para aceitar esta chamada, prima o botãover<strong>de</strong> que aparece no ecrã. A seguir, primao botão vermelho do ecrã para terminar achamada.Para recusar esta chamada, prima o botãovermelho que aparece no ecrã.Fazer uma chamada por reconhecimento vocalPo<strong>de</strong> iniciar uma chamada por reconhecimentovocal directamente após a sincronização dodirectório do seu telemóvel. O ParrotASTEROID Smart irá reconhecerautomaticamente o contacto do seu directórioque <strong>de</strong>seja contactar.1. Seleccione Comandos <strong>de</strong> voz > Contactospara iniciar o processo <strong>de</strong> reconhecimentovocal.> O Parrot ASTEROID Smart pe<strong>de</strong>-lhe oPortuguês115
nome do contacto que <strong>de</strong>seja contactar.2. Pronuncie o nome do contacto, seguido dotipo <strong>de</strong> número ("TRABALHO","TELEMÓVEL"...) se este contacto tivervários números.> A chamada para este contacto é iniciadaautomaticamente, caso o comando <strong>de</strong> vozseja compreendido correctamente.> Caso contrário, o kit mãos-livres emiteuma mensagem <strong>de</strong> confirmação. Confirme,pronunciado "SIM", "CHAMAR" ou"TELEFONAR".Nota: A qualquer momento, prima o botãono ecrã para cancelar o processo <strong>de</strong> chamada.MúsicaNota: Po<strong>de</strong>rão ser necessários vários minutos <strong>de</strong>carregamento durante a 1ª conexão do seudispositivo <strong>de</strong> áudio (USB / SD / iPod) no ParrotASTEROID Smart, em especial no caso <strong>de</strong>periféricos que contenham uma gran<strong>de</strong>quantida<strong>de</strong> <strong>de</strong> ficheiros musicais. Este tempo <strong>de</strong>carregamento permite tornar estas faixasacessíveis através <strong>de</strong> reconhecimento vocal.Utilizar o reconhecimento vocal musicalA função <strong>de</strong> reconhecimento vocal musicalpermite-lhe seleccionar através doreconhecimento vocal os artistas ou álbuns que<strong>de</strong>sejar escutar. Esta função está disponível seutilizar o Parrot ASTEROID Smart com umperiférico do tipo iPod / USB / SD, ou se utilizaruma aplicação musical compatível com estafunção.1. Seleccione Comandos <strong>de</strong> voz > Música.2. Diga o nome do artista ou do álbum que<strong>de</strong>seja escutar quando Parrot ASTEROIDSmart lho pedir.> A lista das fontes <strong>de</strong> áudio conectadas aoParrot ASTEROID Smart e das aplicaçõesmusicais compatíveis com a função <strong>de</strong>reconhecimento vocal com o artista/álbumque escolheu aparece.Nota: Verifique os nomes dos artistas e álbunsnas tags (metadados) dos seus ficheirosmusicais. Estes po<strong>de</strong>m ser diferentes dosapresentados no título da sua faixa.RadioPara seleccionar uma frequência:1. Prima Música > Rádio.2. Faça <strong>de</strong>slizar o cursor para a esquerda oupara a direita para seleccionar umafrequência.Para obter a lista <strong>de</strong> todas as estaçõesdisponíveis,prima o botão e prima Novoscan > OK.Para memorizar uma estação, prima o botãoe, <strong>de</strong> seguida, seleccione a opção Adicionar aosfavoritos.Para ace<strong>de</strong>r às estações memorizadas, prima obotão e prima Modo > Favoritos.Nota: O número <strong>de</strong> estações que po<strong>de</strong> guardar éilimitado.116 Português
iPod1. Conecte o seu iPod ao cabo do iPod.2. Seleccione Música > iPod. Também po<strong>de</strong>premir Percorrer para navegar no conteúdodo seu iPod.3. Prima a faixa para iniciar a sua reprodução.Nota: Prima o botão para modificaralgumas <strong>de</strong>finições (áudio, repetição, aleatório)Pen USBO Parrot ASTEROID Smart é compatível com amaioria das pens USB / leitores <strong>de</strong> MP3 / discosrígidos externos. Não existe qualquer restriçãoao nível da capacida<strong>de</strong> das pens USB. Osficheiros musicais na sua pen USB po<strong>de</strong>m estarno formato MP3, AAC, WAV, OGG ou WMA.1. Conecte o seu periférico USB no caboUSB.2. Seleccione Música > USB. Também po<strong>de</strong>premir Percorrer para navegar no conteúdodo seu periférico USB.3. Prima a faixa para iniciar a sua reprodução.Nota: Prima o botão para modificaralgumas <strong>de</strong>finições (áudio, repetição, aleatório)Cartão SDA capacida<strong>de</strong> do cartão SD não <strong>de</strong>ve sersuperior a 32 Gb. Os ficheiros musicais no seucartão SD po<strong>de</strong>m estar no formato MP3, AAC,WAV, OGG ou WMA.Nota: Insira a unha do polegar na ranhura pararetirar seu cartão SD.1. Remova parte dianteira amovível do ParrotASTEROID Smart.2. Insira o cartão SD no local previsto para oefeito, situado atrás da parte dianteiraamovível, orientando a zona <strong>de</strong> contactopara a esquerda (esquema H pág.10).3. Volte a colocar a parte dianteira amovível.4. Prima Música > SD. Também po<strong>de</strong> premirpara navegar no conteúdo do seu cartãoSD.5. Prima uma faixa para iniciar a suareprodução.Nota: Prima o botão para modificaralgumas <strong>de</strong>finições (áudio, repetição, aleatório)Utilizar com um leitor <strong>de</strong> áudio BluetoothNota: O Parrot ASTEROID Smart permite-lheutilizar a função <strong>de</strong> telefonia e streaming <strong>de</strong>áudio através <strong>de</strong> Bluetooth com 2 telemóveisdiferentes, sem que tenha <strong>de</strong> <strong>de</strong>sconectar um dos2 aparelhos.Po<strong>de</strong> utilizar o Parrot ASTEROID Smart paraescutar ficheiros musicais armazenados numleitor <strong>de</strong> áudio B luetooth, caso este suporte operfil A2DP (Advanced Audio DistributionProfile). Se utilizar o leitor <strong>de</strong> áudio pela 1ª vez,<strong>de</strong>ve primeiro emparelhá-lo ao ParrotASTEROID Smart. Se o leitor <strong>de</strong> áudio jáestiver emparelhado ao Parrot ASTEROIDSmart :1. Seleccione Música > Audio Bluetooth.2. Inicie a reprodução <strong>de</strong> uma faixa no seuleitor <strong>de</strong> áudio.ComandosDurante a reprodução <strong>de</strong> um ficheiro musicalou <strong>de</strong> rádio:Prima o ecrã para colocar a faixa em pausaou cortar o som do rádio;Português117
Faça <strong>de</strong>slizar o seu <strong>de</strong>do para cima paraaumentar o volume;Faça <strong>de</strong>slizar o seu <strong>de</strong>do para baixo paradiminuir o volume.Durante a reprodução <strong>de</strong> um ficheiro musical(excepto fontes <strong>de</strong> áudio conectadas por cabojack/jack):Faça <strong>de</strong>slizar o seu <strong>de</strong>do para a direita parapassar para a faixa seguinte;Faça <strong>de</strong>slizar o seu <strong>de</strong>do para a esquerdapara voltar à faixa anterior.Nota: Se utilizar o Parrot Parrot ASTEROID Smartcom um leitor <strong>de</strong> áudio conectado porBluetooth, estes comandos estão disponíveisapenas se este suportar o perfil AVRCP (Audio/Vi<strong>de</strong>o Remote Control Profile).InternetAviso: A conexão à Internet através <strong>de</strong> uma pen3G/4G requer uma oferta <strong>de</strong> subscrição numoperador telefónico. A utilização <strong>de</strong>ste serviçopo<strong>de</strong> dar origem a gran<strong>de</strong>s <strong>de</strong>spesas <strong>de</strong>roaming. Verifique as condições da suasubscrição e o seu seguimento do consumo noseu operador. A Parrot rejeita qualquerresponsabilida<strong>de</strong> relativa aos custos associados.Conexão com uma pen 3GNota: Consulte a secção <strong>de</strong> compatibilida<strong>de</strong> doParrot ASTEROID Smart no nosso website paraconhecer a lista <strong>de</strong> pens 3G/4G compatíveis como Parrot ASTEROID Smart.1. Ligue uma pen 3G / 4G ao ParrotASTEROID Smart com o cabo USB.> Abre-se uma janela pop-up.2. Insira o seu código PIN, <strong>de</strong>pois primaVALID. Escolha a opção Memorizar sepreferir que o código PIN não lhe sejapedido em cada ligação do ParrotASTEROID Smart.Nota: A seguir, po<strong>de</strong> modificar esta <strong>de</strong>finição,seleccionando Parâmetros > Sem fios e re<strong>de</strong>s >Re<strong>de</strong>s <strong>de</strong> dados móveis. Entre os periféricos <strong>de</strong>conexão, seleccione a sua pen 3G / 4G,seleccione Esquecer código PIN e <strong>de</strong>poisEsquecer.3. Se for necessário, seleccione o seu APN(Access Point Name) na lista proposta.Esta informação está disponível nadocumentação fornecida com a sua pen3G / 4G. Se o seu APN não aparecer nalista, po<strong>de</strong> adicioná-la, seleccionandoParâmetros > Sem fios e re<strong>de</strong>s > Re<strong>de</strong>s <strong>de</strong>dados móveis.4. Entre os periféricos <strong>de</strong> conexão,seleccione a sua pen 3G / 4G.5. Seleccione Pontos <strong>de</strong> acesso > Outro >Pontos <strong>de</strong> acesso pre<strong>de</strong>finidos.6. Espere até que a conexão sejaestabelecida. Também po<strong>de</strong> premir obotãoe navegar nos menus enquanto aconexão é estabelecida.Conexão por BluetoothSe tiver um telemóvel que suporte o perfilB luetooth® DUN (Dial-Up Networking) ouPAN (Personal Area Network), a conexãoatravés <strong>de</strong> B luetooth do seu telemóvel ao ParrotASTEROID Smart permite-lhe partilhar aconexão 3G do telemóvel.118 Português
Nota: Consulte a página da compatibilida<strong>de</strong> nonosso website para verificar se o seu telemóvelpermite partilhar a conexão 3G por Bluetooth econsultar o respectivo procedimento:www.parrot.com/uk/compatibility.1. Autorize a partilha <strong>de</strong> conexão no seutelemóvel. Este procedimento difere, <strong>de</strong>acordo com o mo<strong>de</strong>lo do seu telemóvel.2. Conecte o seu telemóvel ao ParrotASTEROID Smart por B luetooth.3. No Parrot ASTEROID Smart, seleccioneParâmetros > Sem fios e re<strong>de</strong>s > Re<strong>de</strong>s <strong>de</strong>dados móveis.4. Seleccione o seu APN (Access PointName) na lista proposta, <strong>de</strong>pois escolha aopção Seleccionar.Partilha da conexão 3G por USBSe tiver um telemóvel que suporte a partilha daconexão 3G por USB, conectar o seu telemóvelao Parrot ASTEROID Smart com um cabo USB /micro USB (não fornecido) permite-lhepartilhar a conexão 3G do telemóvel.Nota: Consulte a página da compatibilida<strong>de</strong> nonosso website para verificar se o seu telemóvelpermite partilhar a conexão 3G por USB econsultar o respectivo procedimento:www.parrot.com/uk/compatibility.1. Certifique-se <strong>de</strong> que o teclado do seutelemóvel está <strong>de</strong>sbloqueado, <strong>de</strong>poisconecte-o ao Parrot ASTEROID Smartutilizando um cabo USB / micro-USB. Estaconexão permite também recarregar abateria do seu telemóvel.2. Se for necessário, seleccione o seu APN(Access Point Name) na lista proposta,<strong>de</strong>pois escolha a opção Seleccionar. Aseguir, po<strong>de</strong>rá modificar esta <strong>de</strong>finiçãoseleccionando Parâmetros > Sem fios ere<strong>de</strong>s > Re<strong>de</strong>s <strong>de</strong> dados móveis > MobileAccess <strong>de</strong>vice.> Aparece uma janela pop-up a indicar aactivação da partilha <strong>de</strong> conexão USB.Nota: Consulte o manual <strong>de</strong> utilizador do seutelemóvel para mais informações.Conexão a uma re<strong>de</strong> Wi-FiSe o seu telemóvel permitir partilhar a suaconexão 3G por Wi-Fi®, ou se uma re<strong>de</strong> Wi-Fiestiver disponível perto do seu veículo:1. No menu Parâmetros do ParrotASTEROID Smart, prima Sem fios e re<strong>de</strong> >Wi-Fi.2. Active a opção Wi-Fi.3. Prima Parâmetros Wi-Fi.> A lista das re<strong>de</strong>s Wi-Fi é apresentada.4. Seleccione a re<strong>de</strong> Wi-Fi.5. Insira a palavra-passe, se necessário.Utilizar as aplicações do Parrot ASTEROIDPo<strong>de</strong> utilizar vários tipos <strong>de</strong> aplicações com oASTEROID Market : Música, geolocalização,ajuda à condução. As aplicações disponíveis sãodiferentes <strong>de</strong> acordo com o país <strong>de</strong> utilização.Algumas aplicações po<strong>de</strong>m necessitar <strong>de</strong> umasubscrição.O Parrot ASTEROID Smart é multi-tarefas:Várias aplicações po<strong>de</strong>m ser utilizadas emsimultâneo. Por exemplo, po<strong>de</strong> escutar umaWebradio e utilizar uma aplicação <strong>de</strong> ajuda àcondução em simultâneo.Para obter mais informações acerca dautilização das aplicações disponíveis, consultea página web do ASTEROID Market:www.parrotasteroid.com/asteroidmarket.Português119
Ví<strong>de</strong>oAviso: A função <strong>de</strong> ví<strong>de</strong>o do Parrot ASTEROIDSmart é perigosa e ilegal em vários estados se forutilizada durante a condução. Assim, estafunção fica inacessível enquanto o veículoestiver em movimento. Para ver um ví<strong>de</strong>o noParrot ASTEROID Smart, estacione o seu veículonum local seguro e puxe o travão-<strong>de</strong>-mão.Câmara <strong>de</strong> marcha-atrásSe o seu veículo estiver equipado com umacâmara <strong>de</strong> marcha-atrás, po<strong>de</strong> utilizar o ecrã doParrot ASTEROID Smart para visualizar o fluxo<strong>de</strong> ví<strong>de</strong>o <strong>de</strong>sta câmara para facilitar os seusestacionamentos em marcha-atrás. Consulte oesquema <strong>de</strong> instalação na pág.4 e a secção"Instalação <strong>de</strong> uma câmara <strong>de</strong> marcha-atrás"para obter mais informações sobre a conexãoda câmara <strong>de</strong> marcha-atrás ao ParrotASTEROID Smart.O fluxo <strong>de</strong> ví<strong>de</strong>o da câmara <strong>de</strong> marcha-atrásaparece automaticamente quando efectua umamarcha-atrás. A imagem da câmara <strong>de</strong> marchaatráspo<strong>de</strong> parecer invertida.Nota: A qualquer momento, prima Vi<strong>de</strong>o switchpara passar do ví<strong>de</strong>o da câmara <strong>de</strong> marchaatráspara o ví<strong>de</strong>o <strong>de</strong> um iPod ligado através <strong>de</strong>um cabo AV/iPod.Fonte externaPo<strong>de</strong> visualizar no Parrot ASTEROID Smart umví<strong>de</strong>o <strong>de</strong> uma fonte <strong>de</strong> ví<strong>de</strong>o externa.Ligue a sua fonte <strong>de</strong> ví<strong>de</strong>o ao ParrotASTEROID Smart utilizando um cabo AV(não fornecido) (esquema pág. 4).1. Prima Aplicações > Entrada <strong>de</strong> ví<strong>de</strong>o.2. Inicie a reprodução <strong>de</strong> um ví<strong>de</strong>o na suafonte.Nota: A qualquer momento, prima Vi<strong>de</strong>o switchpara passar do ví<strong>de</strong>o da câmara <strong>de</strong> marchaatráspara o ví<strong>de</strong>o <strong>de</strong> um uma fonte externaligada através <strong>de</strong> um cabo AV/iPod.Cartão SDPo<strong>de</strong> reproduzir no Parrot ASTEROID Smart osficheiros <strong>de</strong> ví<strong>de</strong>o guardados num cartão SD.Os ficheiros <strong>de</strong> ví<strong>de</strong>o no seu cartão SD po<strong>de</strong>mestar no formato MP2, MP4, H263, H264, WMVe SPARK.1. Insira o cartão SD no local previsto paraeste efeito (imagem H p.10).2. Prima Aplicações , <strong>de</strong>pois em Galeria.3. Seleccione o ví<strong>de</strong>o, premindo o íconecorrespon<strong>de</strong>nte.Utilização <strong>de</strong> um ecrã ligado à saída <strong>de</strong> ví<strong>de</strong>oOs terminais <strong>de</strong> saída <strong>de</strong> ví<strong>de</strong>o permitem ligarum ecrã para os passageiros traseiros po<strong>de</strong>remver os ví<strong>de</strong>os gravados no seu cartão SD.Consulte o esquema <strong>de</strong> instalação na pág.4 paraobter mais informações sobre a conexão doecrã para os passageiros traseiros ao ParrotASTEROID Smart.Aviso: Nunca instale o ecrã num local on<strong>de</strong> ocondutor possa ver os ví<strong>de</strong>os enquanto conduz.120 Português
No caso <strong>de</strong> problemasAntes <strong>de</strong> começarCertifique-se <strong>de</strong> que a mensagem "A<strong>de</strong>us"aparece no ecrã do Parrot ASTEROID Smartquando cortar o contacto do veículo. Consulte asecção "Verificar instalação" para obter maisinformações.Reinicie o aparelho. Para isso, retire a partedianteira e <strong>de</strong>pois utilize uma caneta ou outroobjecto pontiagudo para premir o botão Reset.Prima o botão Reset durante 3 segundos(esquema pág.5). Po<strong>de</strong> igualmente restaurar osparâmetros iniciais, seleccionando Parâmetros> Parâmetros avançados > Confi<strong>de</strong>ncialida<strong>de</strong> >Restaurar valores <strong>de</strong> fábrica.Verifique se tem a última actualização no ParrotASTEROID Smart. Para isso, seleccioneParâmetros > Acerca > Versão. Compare estenúmero da versão com aquele indicado napágina <strong>de</strong> suporte do Parrot ASTEROID Smartno nosso website www.parrot.com.Problemas ligados à função <strong>de</strong> telefoniaVerifique a compatibilida<strong>de</strong> do seu telemóvelcom o Parrot ASTEROID Smart. Para isso,consulte a página da compatibilida<strong>de</strong> no nossowebsite: www.parrot.com/uk/compatibility.Se o seu telemóvel for indicado comocompatível, e se o seu Parrot ASTEROID Smartjá tiver a última actualização, elimine oemparelhamento entre os 2 aparelhos no ParrotASTEROID Smart e no seu telemóvel, reinicieos 2 aparelhos e <strong>de</strong>pois volte a estabelecer aconexão entre os 2 aparelhos.Problemas ligados à função da músicaReinicie o seu iPod / iPhone antes <strong>de</strong> voltar afazer a ligação ao Parrot ASTEROID Smart. Parareiniciar um iPod / iPhone (este procedimentonão apagará quaisquer dados):iPod: Prima em simultâneo Menu e obotão central até que o iPod sejareiniciado.iPhone / iPad / iPod touch®: Prima emsimultâneo o botão On/Off e o botãoHome até que o iPhone seja reiniciado.Não toque no ecrã quando a mensagem"Faça <strong>de</strong>slizar para <strong>de</strong>sligar" aparecer.Po<strong>de</strong>m aparecer alguns problemas se operiférico já estiver conectado ao ParrotASTEROID Smart quando efectuar o contacto.Volte a tentar, conectando o dispositivo apóster efectuado o contacto.Para obter mais informaçõesConsulte a página <strong>de</strong> suporte do ParrotASTEROID Smart no nosso websitewww.parrot.com.Português121
Informação geralGarantiaSem prejuízo da garantia legal, a PARROTgarante contratualmente, por um período <strong>de</strong> 12meses a partir da data <strong>de</strong> compra inicialefectuada pelo consumidor (excepto peças <strong>de</strong><strong>de</strong>sgaste garantidas 6 meses), que o produtoestá isento <strong>de</strong> <strong>de</strong>feitos no que respeita aosmateriais e ao fabrico, mediante apresentaçãodo comprovativo <strong>de</strong> compra (data, local <strong>de</strong>compra, nº <strong>de</strong> série do produto) ao reven<strong>de</strong>dorou à Parrot. Durante a vigência da garantiacontratual, o produto <strong>de</strong>feituoso <strong>de</strong>verá ser<strong>de</strong>volvido na sua embalagem <strong>de</strong> origem aoserviço pós-venda do reven<strong>de</strong>dor. Apósinspecção do produto, a Parrot proce<strong>de</strong>rá, à suaescolha, à substituição ou emissão <strong>de</strong> umhaver, excluindo qualquer outro dano.ModificaçõesAs explicações e especificações contidas nestemanual do utilizador apenas são fornecidas atítulo informativo e po<strong>de</strong>m ser modificadassem aviso prévio. Estas informações estãocorrectas aquando da impressão e foi prestadaa maior atenção aquando da sua redacção paralhe fornecer informações com a maior precisãopossível.No entanto, a Parrot S.A. não irá assumirqualquer responsabilida<strong>de</strong>, directa ouindirecta, por prejuízos ou perdas <strong>de</strong> dadosaci<strong>de</strong>ntais resultantes <strong>de</strong> um erro ou omissãono presente documento. A Parrot S.A. reservaseo direito <strong>de</strong> alterar ou melhorar o produto,bem como o respectivo manual do utilizador,sem qualquer restrição ou obrigação <strong>de</strong> avisar outilizador. No âmbito da atenção prestada pelaParrot S.A. para melhorar os nossos produtos, épossível que o produto que adquiriu sejaligeiramente diferente do <strong>de</strong>scrito no presentedocumento. Neste caso, po<strong>de</strong>ráeventualmente encontrar uma nova versão domanual do utilizador em formato electrónico nowebsite www.parrot.com.Como reciclar este produto – Resíduos <strong>de</strong>equipamentos eléctricos e electrónicosO símbolo no produto ou respectivadocumentação indica que não <strong>de</strong>ve sereliminado, no termo da sua vida útil, com osoutros resíduos domésticos. Tendo conta que aeliminação incontrolada dos resíduos po<strong>de</strong>prejudicar o ambiente ou a saú<strong>de</strong> humana, porfavor, separe-o dos outros tipos <strong>de</strong> resíduos erecicle-o <strong>de</strong> forma responsável. Dessa forma,irá favorecer a reutilização sustentável dosrecursos materiais. Pe<strong>de</strong>-se aos particularesque contactem o distribuidor que lhes ven<strong>de</strong>uo produto ou que se informem junto da câmarada sua residência para saberem on<strong>de</strong> e comopo<strong>de</strong>m eliminar este produto para que sejareciclado respeitando o ambiente. Pe<strong>de</strong>-seigualmente às empresas que contactem os seusfornecedores e consultem as condições dorespectivo contrato <strong>de</strong> venda. Este produto não<strong>de</strong>ve ser eliminado com os restantes resíduoscomerciais.Marcas registradasParrot, os logótipos Parrot são marcasregistradas da PARROT SA em França enoutros países.O nome e o logótipo Bluetooth são marcasregistradas da Bluetooth ® SIG, Inc. e qualquerutilização <strong>de</strong>stas pela Parrot S.A. é feita soblicença.O logótipo “Ma<strong>de</strong> for iPod / iPhone / iPad”significa que foi <strong>de</strong>senvolvido um acessórioelectrónico especificamente para o iPod /iPhone / iPad e que o seu fabricante certificaque respon<strong>de</strong> às normas <strong>de</strong> <strong>de</strong>sempenho122 Português
Apple. A Apple não se responsabiliza pelofuncionamento <strong>de</strong>ste dispositivo ou pela suaconformida<strong>de</strong> com as normas <strong>de</strong> segurança.iPad, iPod, iPod Touch e iPhone são marcas daApple, Inc. registradas nos Estados Unidos enoutros países.Wi-Fi é uma marca registrada da Wi-FiAlliance.Gracenote®, o logo e logótipo Gracenote, e ologo "Powered by Gracenote" são marcascomerciais registadas ou marcas comerciais daGracenote nos Estados Unidos e/ou outrospaíses.Todas as marcas comerciais e marcasregistradas mencionadas no presentedocumento são protegidas por Direitos <strong>de</strong>Autor e são proprieda<strong>de</strong> dos seus respectivosproprietários.300328 v1.8.1, EN 301 489-1 (2008:V1.8.1) e EN301 489-17 v1.3.2, <strong>de</strong> acordo com as disposiçõesda directiva Rádio e Telecomunicação 1999/5/CE R&TTE, bem como com as exigências dadirectiva relativa à segurança 2006/95/CE e dadirectiva Automóvel 72/245/CEE rectificadapela directiva 2009/19/CE.CopyrightsI<strong>de</strong>ntification N. 394 149 496 R.C.S. PARISParrot S.A.Copyright © 2012 Parrot.Declaração <strong>de</strong> conformida<strong>de</strong>A Parrot SA, 174 quai <strong>de</strong> Jemmapes, 75010Paris, France, <strong>de</strong>clara, sob sua únicaresponsabilida<strong>de</strong>, que o produto ParrotASTEROID Smart <strong>de</strong>scrito no presente manualdo utilizador se encontra em conformida<strong>de</strong>com as normas técnicas IEC/EN 60065: 2002 /A1:2006 / A11: 2008 / A2: 2010 / A12: 2011, ENPortuguês123
Technical supportIf you have any questions regarding your Parrot product, contact our hotline by phone or using our technical contact formavailable on our website (support section).China : [+86] 755 8203 3307Europe :[+33] 1 48 03 60 69 (Spoken languages : French, English and Spanish)France : 01 48 03 60 69Germany : 0900 1727768Hong Kong : [+852] 2736 1169Italy : [+39] 02 59 90 15 97Spain : [+34] 902 404 202UK : [+44] (0)844 472 2360USA :[+1] (877) 9 Parrot (toll free)Our hotline is at your disposal from Monday to Friday. Refer to our website for more information about the service hours.FCC ID: RKXRNB5