Timer Light Switch Interrupteur-minuterie Interruptor de Luz con ...
Timer Light Switch Interrupteur-minuterie Interruptor de Luz con ...
Timer Light Switch Interrupteur-minuterie Interruptor de Luz con ...

Create successful ePaper yourself
Turn your PDF publications into a flip-book with our unique Google optimized e-Paper software.
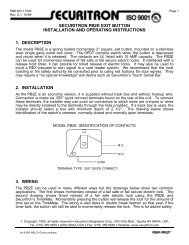
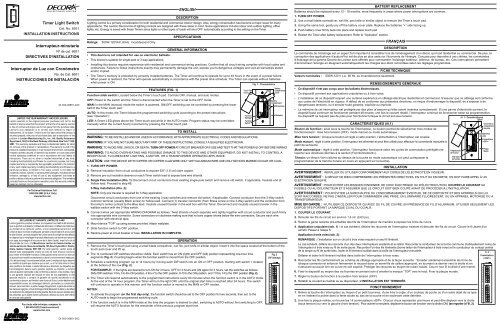
AUTOMANOFF1413121110987654321ONAUTOMANOFF1413121110987654321ON<strong>Timer</strong> <strong>Light</strong> <strong>Switch</strong>Cat. No. 6651INSTALLATION INSTRUCTIONS<strong>Interrupteur</strong>-<strong>minuterie</strong>Nº <strong>de</strong> cat. 6651DIRECTIVES D'INSTALLATION<strong>Interruptor</strong> <strong>de</strong> <strong>Luz</strong> <strong>con</strong> CronómetroNo. <strong>de</strong> Cat. 6651INSTRUCCIONES DE INSTALACIÓNFor Technical Assistance Call:1-800-824-3005 (U.S.A. Only)www.leviton.comPour toute ai<strong>de</strong> technique, composer le:1 800 405-5320 (Canada seulement)www.leviton.comDI-000-06651-22CLIMITED FIVE YEAR WARRANTY AND EXCLUSIONSLeviton warrants to the original <strong>con</strong>sumer purchaser and not for thebenefit of anyone else that this product at the time of its sale by Levitonis free of normal and proper use for five years from the purchase date.Leviton’s only obligation is to correct such <strong>de</strong>fects by repair orreplacement, at its option, if within such five year period the product isreturned prepaid, with proof of purchase date, and a <strong>de</strong>scription of theproblem to Leviton Manufacturing Co., Inc., Att: Quality AssuranceDepartment, 59-25 Little Neck Parkway, Little Neck, New York 11362-2591. This warranty exclu<strong>de</strong>s and there is disclaimed liability for laborfor removal of this product or reinstallation. This warranty is void if thisproduct is installed improperly or in an improper environment, overloa<strong>de</strong>d,misused, opened, abused, or altered in any manner, or is not used un<strong>de</strong>rnormal operating <strong>con</strong>ditions or not in accordance with any labels orinstructions. There are no other or implied warranties of any kind,including merchantability and fitness for a particular purpose, but if anyimplied warranty is required by the applicable jurisdiction, the durationof any such implied warranty, including merchantability and fitness for aparticular purpose, is limited to five years. Leviton is not liable forinci<strong>de</strong>ntal, indirect, special, or <strong>con</strong>sequential damages, including withoutlimitation, damage to, or loss of use of, any equipment, lost sales orprofits or <strong>de</strong>lay or failure to perform this warranty obligation. The remediesprovi<strong>de</strong>d herein are the exclusive remedies un<strong>de</strong>r this warranty, whetherbased on <strong>con</strong>tract, tort or otherwise.EXCLUSIONS ET GARANTIE LIMITÉE DE 5 ANSLeviton garantit au premier acheteur, et uniquement au crédit du dit acheteur,que ce produit ne présente ni défauts <strong>de</strong> fabrication ni défauts <strong>de</strong> matériauxau moment <strong>de</strong> sa vente par Leviton, et n’en présentera pas tant qu’il estutilisé <strong>de</strong> façon normale et adéquate, pendant une pério<strong>de</strong> <strong>de</strong> 5 ans suivantla date d’achat. La seule obligation <strong>de</strong> Leviton sera <strong>de</strong> corriger les dits défautsen réparant ou en remplaçant le produit défectueux si ce <strong>de</strong>rnier est retournéport payé, accompagné d’une preuve <strong>de</strong> la date d’achat, avant la fin <strong>de</strong> ladite pério<strong>de</strong> <strong>de</strong> 5 ans, à la Manufacture Leviton du Canada Limitée, ausoin du service <strong>de</strong> l’Assurance Qualité, 165, Boul. Hymus Blvd., Pointe-Claire, Québec Canada, H9R 1E9. Par cette garantie, Leviton exclut etdécline toute responsabilité envers les frais <strong>de</strong> main d’oeuvre encouruspour retirer et réinstaller le produit. Cette garantie sera nulle et non avenuesi le produit est installé incorrectement ou dans un environnement inadéquat,s’il a été surchargé, incorrectement utilisé, ouvert, employé <strong>de</strong> façon abusiveou modifié <strong>de</strong> quelle que manière que ce soit, ou s’il n’a été utilisé ni dans<strong>de</strong>s <strong>con</strong>ditions normales ni <strong>con</strong>formément aux directives ou étiquettes quil’accompagnent. Aucune autre garantie, explicite ou implicite, y compriscelle <strong>de</strong> qualité marchan<strong>de</strong> et <strong>de</strong> <strong>con</strong>formité au besoin, n’est donnée, maissi une garantie implicite est requise en vertu <strong>de</strong> lois applicables, la ditegarantie implicite, y compris la garantie <strong>de</strong> qualité marchan<strong>de</strong> et <strong>de</strong><strong>con</strong>formité au besoin, est limitée à une durée <strong>de</strong> 5 ans. Leviton décline touteresponsabilité envers les dommages indirects, particuliers ou <strong>con</strong>sécutifs,incluant, sans restriction, la perte d’usage d’équipement, la perte <strong>de</strong> ventes oules manques à gagner, et tout dommage-intérêt découlant du délai ou du défaut<strong>de</strong> l’exécution <strong>de</strong>s obligations <strong>de</strong> cette garantie. Seuls les recours stipulés dansles présentes, qu’ils soient d’ordre <strong>con</strong>tractuel, délictuel ou autre, sont offertsen vertu <strong>de</strong> cette garantie.ENGLISHDESCRIPTION<strong>Light</strong>ing <strong>con</strong>trol is a primary <strong>con</strong>si<strong>de</strong>ration for both resi<strong>de</strong>ntial and commercial interior <strong>de</strong>sign. Also, energy <strong>con</strong>servation has become a major issue for manyapplications. The Leviton Decora line of lighting <strong>con</strong>trols are <strong>de</strong>signed with these i<strong>de</strong>as in mind. Some applications inclu<strong>de</strong> indoor and outdoor lighting, officelights, etc. Energy is saved with these <strong>Timer</strong>s since lights or other types of loads will shut OFF automatically according to the setting on the <strong>Timer</strong>.Ratings:500W-120VAC, 60Hz Incan<strong>de</strong>scent OnlySPECIFICATIONSGENERAL INFORMATION• This <strong>de</strong>vice is not inten<strong>de</strong>d for use on electronic ballasts.• This <strong>de</strong>vice is suitable for single-pole or 3-way applications.• Installing this <strong>de</strong>vice requires experience with resi<strong>de</strong>ntial and commercial wiring practices. Confirm that all circuit wiring complies with local co<strong>de</strong>s andordinances. Failure to follow instructions exactly may permanently damage the unit, expose you to dangerous voltages and void all warranties statedand/or implied.• The <strong>Timer</strong>’s memory is protected by correctly installed batteries. The <strong>Timer</strong> will <strong>con</strong>tinue to operate for up to 48 hours in the event of a power failure.When power is restored, the <strong>Timer</strong> will operate automatically in accordance with the preset time schedule. The <strong>Timer</strong> can operate without batterieswhen power is ON.Fig. 1 - CharacteristicsFEATURES (FIG. 1)Function sli<strong>de</strong> switch: Located below the <strong>Timer</strong>’s touch pad. Controls OFF, manual, and auto mo<strong>de</strong>s.OFF: Power to the switch and the <strong>Timer</strong> is dis<strong>con</strong>nected when the <strong>Timer</strong> is set to the OFF mo<strong>de</strong>.MAN: In the MAN (manual) mo<strong>de</strong> the switch is powered. ON/OFF switching can be <strong>con</strong>trolled by pressing the lowerhalf of the <strong>Timer</strong> touch pad.AUTO: In this mo<strong>de</strong>, the <strong>Timer</strong> follows the programmed switching cycle according to the preset instructions(see “Operation”).LED: A Green LED glows above the <strong>Timer</strong> touch pad while in the AUTO mo<strong>de</strong>. Program status may be overrid<strong>de</strong>nmanually within the current hourly increment by pressing the <strong>Timer</strong> touch pad.TO INSTALLWARNING: TO BE INSTALLED AND/OR USED IN ACCORDANCE WITH APPROPRIATE ELECTRICAL CODES AND REGULATIONS.WARNING: IF YOU ARE NOT SURE ABOUT ANY PART OF THESE INSTRUCTIONS, CONSULT A QUALIFIED ELECTRICIAN.WARNING: TO AVOID FIRE, SHOCK, OR DEATH; TURN OFF POWER AT CIRCUIT BREAKER OR FUSE AND TEST THAT THE POWER IS OFF BEFORE WIRING!WARNING: TO AVOID OVERHEATING AND POSSIBLE DAMAGE TO THIS DEVICE AND OTHER EQUIPMENT, DO NOT INSTALL TO CONTROL ARECEPTACLE, FLOURESCENT LIGHTING, A MOTOR, OR A TRANSFORMER OPERATED APPLIANCE.CAUTION: USE THIS DEVICE WITH COPPER OR COPPER CLAD WIRE ONLY. WITH ALUMINUM WIRE USE ONLY DEVICES MARKED CO/ALR OR CU/AL.1. TURN OFF POWER.2. Remove insulation from circuit <strong>con</strong>ductors to expose 5/8" (1.6 cm) bare copper.3. Remove pre-cut insulation sleeves on each <strong>Timer</strong> switch lead to expose bare wire strands.4. Single Pole Installation (Dia. 1): Dis<strong>con</strong>nect circuit <strong>con</strong>ductors from existing single-pole switch and remove old switch, if applicable. Insulate end ofYellow lead. Proceed to step #5.3-Way Installation (Dia. 2):NOTE: Only one traveler is required for 3-Way application.Dis<strong>con</strong>nect circuit <strong>con</strong>ductors from one of the existing 3-way switches and remove old switch, if applicable. Connect <strong>con</strong>ductor from the 3-Way switchcommon terminal (usually Black screw) to Yellow lead. Connect (1) traveler <strong>con</strong>ductor (from Brass screw on the 3-Way switch) and the <strong>con</strong>ductor fromthe lamp's center <strong>con</strong>tact to the Blue lead. Insulate unused traveler in the wall box with the <strong>Timer</strong>. Dis<strong>con</strong>nect and insulate unused traveler in thewallbox switch with the 3-Way switch.5. Connect wires per appropriate WIRING DIAGRAM as follows: Twist strands of each separate wire tightly together with circuit <strong>con</strong>ductor and push firmlyinto appropriate wire <strong>con</strong>nector. Screw <strong>con</strong>nectors on clockwise making sure that no bare copper shows below the wire <strong>con</strong>nectors. Secure each wire<strong>con</strong>nector with electrical tape.6. Mount <strong>de</strong>vice “TOP” up using screws provi<strong>de</strong>d. Attach wallplate.7. Sli<strong>de</strong> function switch to OFF position.8. Restore power at circuit breaker or fuse. INSTALLATION IS COMPLETE.OPERATION1. Remove the <strong>Timer</strong>’s touch pad using a small bla<strong>de</strong> screwdriver, nail file, pen knife or similar object. Insert it into the space located at the bottom of thetouch pad cover and lift up.Touch PadCoverFunctionSettingsFunction<strong>Switch</strong>2. The 14 numbered DIP switches should be visible. Each switch has an ON (right) and OFF (left) position representing one-hour timesegments (Fig. 2). Counting begins when the function switch is moved from the OFF position.3. Schedule a switching program (up to 14 hours) by moving each DIP switch into an ON or OFF position, starting with switch 1 locatedat the bottom of the row (Fig. 2).FOR EXAMPLE: If the lights are <strong>de</strong>sired to turn ON for 3 hours, OFF for 4 hours and ON again for 3 hours, set the switches as follows:Sli<strong>de</strong> DIP switches 1 thru 3 to the ON position, 4 thru 7 to the OFF position, 8-10 to the ON position, and 11 thru 14 to the OFF position (Fig. 2).4. The <strong>Timer</strong> will respond automatically to the programmed instructions every 60 minutes when the function switch is in the AUTO mo<strong>de</strong>.At the end of the 14 hour program, the <strong>Timer</strong> will turn the light OFF until the original start time is reached after 24 hours. The switchwill <strong>con</strong>tinue to operate in this manner until the function switch is moved to the MAN or OFF mo<strong>de</strong>s.NOTES:• To activate the program (on the first day only), the function switch should be set to the OFF position for two se<strong>con</strong>ds, then set to theAUTO mo<strong>de</strong> to begin the programmed switching cycle.• If the function switch is in the MAN mo<strong>de</strong> at the time the program is <strong>de</strong>sired to start, switching to AUTO without first switching to OFF,will resume the AUTO function for the remain<strong>de</strong>r of the previous program start time.LEDON DIP ON DIPBATTERIESFig. 2DIP Settings1413121110987654321BatteryCompartmentCoverBatteryCompartmentONDIP <strong>Switch</strong>esWallplateBATTERY REPLACEMENTBatteries should be replaced every 12 - 18 months, more frequently in areas where power interruptions are common.1. TURN OFF POWER.2. Use a small bla<strong>de</strong> screwdriver, nail file, pen knife or similar object to remove the <strong>Timer</strong>’s touch pad.3. Using the same tool, gently pry off the battery cover plate. Replace the batteries “+” si<strong>de</strong> facing up.4. Push battery cover firmly back into place and replace touch pad.5. Restart the <strong>Timer</strong> after battery replacement. Refer to “Operation” section.FRANÇAISDESCRIPTIONLa comman<strong>de</strong> <strong>de</strong> l’éclairage est un aspect fort important à <strong>con</strong>sidérer lors <strong>de</strong> l’aménagement d’un décor, qu’il soit rési<strong>de</strong>ntiel ou commercial. De plus, la<strong>con</strong>ception <strong>de</strong>s applications d’aujourd’hui est <strong>de</strong> plus en plus axée sur l’é<strong>con</strong>omie <strong>de</strong> l’énergie. Conçues pour répondre à ces critères, les comman<strong>de</strong>sd’éclairage <strong>de</strong> la gamme Decora <strong>de</strong> Leviton sont offertes pour comman<strong>de</strong>r l’éclairage extérieur, intérieur, <strong>de</strong> bureau, etc. Ces interrupteurs permettentd’é<strong>con</strong>omiser l’énergie en éteignant automatiquement les charges leur étant raccordées selon les réglages programmés.Valeurs nominales : 500W-120 V c.a., 60 Hz au incan<strong>de</strong>scence seulement.FICHE TECHNIQUERENSEIGNEMENTS GÉNÉRAUX• Ce dispositif n’est pas <strong>con</strong>çu pour les ballasts électroniques.• Ce dispositif <strong>con</strong>vient aux applications unipolaires ou à trois voies.• L’installation <strong>de</strong> ce dispositif requiert une certaine expérience en câblage électrique rési<strong>de</strong>ntiel et commercial. S’assurer que ce câblage soit <strong>con</strong>formeaux co<strong>de</strong>s <strong>de</strong> l’électricité en vigueur. À défaut <strong>de</strong> se <strong>con</strong>former aux présentes directives, on risque d’endommager le dispositif, <strong>de</strong> s’exposer à <strong>de</strong>dangereuses tensions, ou d’annuler toute garantie, explicite ou implicite.• La mémoire <strong>de</strong> cet interrupteur est protégée par <strong>de</strong>s piles (s’assurer qu’elles soient insérées correctement). Si une panne d’électricité survient, ledispositif peut <strong>con</strong>tinuer <strong>de</strong> fonctionner pendant 48 heures; une fois le courant rétabli, l’interrupteur <strong>con</strong>tinue <strong>de</strong> fonctionner selon sa programmation.Ce dispositif ne requiert pas <strong>de</strong> piles pour fonctionner lorsque le circuit est sous tension.ill. 1 - CaractéristiquesTémoinCARACTÉRISTIQUES (ill.1)ToucheBouton <strong>de</strong> fonction : situé sous la touche <strong>de</strong> l’interrupteur, ce bouton permet <strong>de</strong> sélectionner trois mo<strong>de</strong>s <strong>de</strong>fonctionnement : mise hors tension (OFF), mo<strong>de</strong> manuel ou mo<strong>de</strong> automatique.Mise hors tension : lorsque le bouton et réglé à cette position, l’alimentation à l’interrupteur est coupée.Mo<strong>de</strong> manuel : réglé à cette position, l’interrupteur est alimenté et peut être utilisé pour effectuer la comman<strong>de</strong> manuelle àpartir <strong>de</strong> sa touche.Mo<strong>de</strong> automatique : réglé à cette position, l’interrupteur fonctionne selon les cycles <strong>de</strong> commutation préréglés (sereporter aux directives décrites à la section (Fonctionnement»).Témoin: un témoin Vert s’allume au-<strong>de</strong>ssus <strong>de</strong> la touche en mo<strong>de</strong> automatique (on peut outrepasser laprogrammation <strong>de</strong> la tranche horaire en cours en appuyant sur la touche).Programación<strong>de</strong> Función<strong>Interruptor</strong><strong>de</strong> FunciónINSTALLATIONAVERTISSEMENT : INSTALLER OU UTILISER CONFORMÉMENT AUX CODES DE L’ÉLECTRICITÉ EN VIGUEUR.AVERTISSEMENT : À DÉFAUT DE BIEN COMPRENDRE LES PRÉSENTES DIRECTIVES, EN TOUT OU EN PARTIE, ON DOIT FAIRE APPEL À UNÉLECTRICIEN QUALIFIÉ.AVERTISSEMENT : POUR ÉVITER LES RISQUES D’INCENDIE, DE CHOC ÉLECTRIQUE OU D’ÉLECTROCUTION, COUPER LE COURANT AUFUSIBLE OU AU DISJONCTEUR ET S’ASSURER QUE LE CIRCUIT SOIT BIEN COUPÉ AVANT DE PROCÉDER À L’INSTALLATION.ON DIP ON DIPBATTERIESCouvercle ducompartiment<strong>de</strong>s pilesCompartiment<strong>de</strong>s pilesCommutateursAVERTISSEMENT : POUR ÉVITER LA SURCHAUFFE OU L'ENDOMMAGEMENT ÉVENTUEL DE CE DISPOSITIF ET DES APPAREILS QUI LUISONT RACCORDÉS, NE PAS L'INSTALLER POUR COMMANDER UNE PRISE, UN LUMINAIRE FLUORESCENT, OU UN APPAREIL MOTORISÉ OU ÀTRANSFORMATEUR.MISE EN GARDE : N’UTILISER CE DISPOSITIF QU’AVEC DU FIL DE CUIVRE; EN PRÉSENCE DE FIL D’ALUMINIUM, UTILISER SEULEMENT LESDISPOSITIFS PORTANT LA MARQUE CU/AL OU CO/ALR.1. COUPER LE COURANT.2. Dénu<strong>de</strong>r les fils du circuit sur environ 1,6 cm (0,63 po).3. Retirer la gaine isolante pré-entaillée <strong>de</strong>s fils <strong>de</strong> l’interrupteur <strong>de</strong> manière à exposer les brins <strong>de</strong> cuivre.4. Application unipolaire (sch. 1) : le cas échéant, défaire les raccords <strong>de</strong> l’interrupteur existant et dénu<strong>de</strong>r les fils du circuit. Couvrir le fil Jaune d'unserrefil. Passer à l’étape 5.Application à trois voies (sch. 2) :REMARQUE : l’installation sur un circuit à trois voies requiert un seul fil itinèrant.Le cas échéant, défaire les raccords d’un <strong>de</strong>s <strong>de</strong>ux interrupteurs existants et le retirer. Raccor<strong>de</strong>r le <strong>con</strong>ducteur <strong>de</strong> la borne commune (habituellement noire) <strong>de</strong>l’interrupteur à trois voies au fil <strong>de</strong> sortie jaune. Raccor<strong>de</strong>r l'un <strong>de</strong>s fils itinérants (borne laiton <strong>de</strong> l'interrupteur à trois voies) et le <strong>con</strong>ducteur du <strong>con</strong>tact central<strong>de</strong> la lampe au fil <strong>de</strong> sortie bleu. Isoler le fil itinérant inutilisé dans la boîte <strong>de</strong> l’interrupteur-<strong>minuterie</strong>.Défairer et isoler le fil itinérant inutilisé dans boîte <strong>de</strong> l’interrupteur à trois voies.5. Raccor<strong>de</strong>r les fils <strong>con</strong>formément au schéma <strong>de</strong> câblage approprié et <strong>de</strong> la façon suivante : Torsa<strong>de</strong>r soli<strong>de</strong>ment ensemble les brins <strong>de</strong>tchaque <strong>con</strong>nexion et enfoncer fermement le raccord dans un serre-fils <strong>de</strong> calibre approprié, en tournant ce <strong>de</strong>rnier vers la droite et ens’assurant qu’aucun brin <strong>de</strong> cuivre ne soit exposé. Protéger les raccords au moyen <strong>de</strong> ruban isolant. Couvrir tout fil inutilisé d’une marret.6. Fixer le dispositif au moyen <strong>de</strong>s vis fournies en prenant soin d’orienter la marque “TOP” vers le haut. Fixer la plaque murale.7. Régler le bouton <strong>de</strong> fonction à la position hors tension (OFF).8. Rétablir le courant au fusible ou au disjoncteur; L’INSTALLATION EST TERMINÉE.FONCTIONNEMENT1. Retirer la touche <strong>de</strong> l’interrupteur au moyen d’un petit tournevis, d’une lime à ongle, d’un couteau <strong>de</strong> poche ou d’un autre objet <strong>de</strong> ce typeen en insérant la pointe dans la fente située au bas <strong>de</strong> la touche et en soulevant cette <strong>de</strong>rnière.2. Une fois la plaque retirée, on trouve les 14 commutateurs «DIP». Chacun d’eux représente une heure et peut être déplacé vers la droite(sous tension) ou vers la gauche (hors tension). Pour activer la <strong>minuterie</strong>, déplacer le bouton <strong>de</strong> fonction vers la droite (ON) (se reporter à l’Ill. 2).1413121110987654321PlaqueMuraleill. 2CommutateursONDI-000-06651-20C
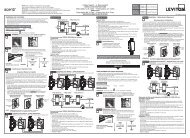
AUTOMANOFF1413121110987654321ON3. Effectuer la programmation (maximum <strong>de</strong> 14 heures) en déplaçant les commutateurs appropriés à la position voulue, en commençant par le commutateur nº 1 situé au bas <strong>de</strong> la colonne(se reporter à l’Ill. 2).EXEMPLE : si on veut que le luminaire commandé soit allumé pendant 3 heures, puis éteint pendant 4 heures et ensuite allumé pendant 3 heures, on doit régler les commutateurs 1 à 3 àla position sous tension, les commutateurs 4 à 7 à la position hors tension, les commutateurs 8 à 10 à la position sous tension, et les commutateurs 11 à 14 à la position hors tension(se reporter à l’Ill. 2).4. Une fois le bouton <strong>de</strong> fonction réglé à la position <strong>de</strong> mo<strong>de</strong> automatique, l’interrupteur effectue la commutation automatique à chaque intervalle <strong>de</strong> 60 minutes, selon l’horaireprogrammé. Une fois le cycle <strong>de</strong> 14 heures écoulé, l’interrupteur éteint le luminaire commandé, jusqu’à l’heure du début <strong>de</strong> la programmation, 24 heures plus tard. Le dispositif <strong>con</strong>tinue<strong>de</strong> fonctionner ainsi jusqu’à ce que le bouton <strong>de</strong> fonction soit déplacé à la position <strong>de</strong> mo<strong>de</strong> manuel ou <strong>de</strong> mise hors tension.REMARQUES :• Pour activer le cycle <strong>de</strong> programmation (le première jour seulement), le bouton <strong>de</strong> fonction doit être mis à la position (OFF) pendant <strong>de</strong>ux se<strong>con</strong><strong>de</strong>s, puis à la position pour débuter le cycle <strong>de</strong> commutation programmé.• Si, au moment où le cycle <strong>de</strong> programmation <strong>de</strong>vrait commencer, le bouton <strong>de</strong> fonction est réglé à la position <strong>de</strong> mo<strong>de</strong> manuel et qu’on le déplace à la position <strong>de</strong> mo<strong>de</strong> automatique sans lerégler d’abord à la position hors tension, l’interrupteur reprendra la programmation précé<strong>de</strong>nte du début.REMPLACEMENT DES PILESLes piles doivent être remplacées à tous les 12 à 18 mois, ou plus fréquemment si <strong>de</strong>s pannes <strong>de</strong> courant se produisent souvent.1. COUPER LE COURANT.2. Utiliser un petit tournevis, une lime à ongle, un couteau <strong>de</strong> poche ou un autre objet <strong>de</strong> ce type pour retirer la touche.3. Toujours avec le même outil, soulever délicatement le couvercle du compartiment <strong>de</strong>s piles. Remplacer ces <strong>de</strong>rnières, en orientant le côté positif vers le haut.4. Replacer le couvercle en appuyant fermement et réinstaller la touche.ESPAÑOLDESCRIPCIONEl <strong>con</strong>trol <strong>de</strong> iluminación es una <strong>con</strong>si<strong>de</strong>ración primaria en el diseño <strong>de</strong> interiores resi<strong>de</strong>nciales y comerciales. A<strong>de</strong>más, el ahorro <strong>de</strong> energía es un asunto principal para muchasaplicaciones. La línea <strong>de</strong> <strong>con</strong>troles <strong>de</strong> iluminación <strong>de</strong> Leviton Decora está diseñada <strong>con</strong> estas i<strong>de</strong>as en mente. Algunas aplicaciones incluyen iluminación interior y exterior, luces <strong>de</strong>oficina, etc. Se ahorra energía <strong>con</strong> estos cronómetros ya que las luces u otras cargas se apagan automáticamente según la programación <strong>de</strong>l cronómetro.OPERACION1. Remueva la placa <strong>de</strong> toque <strong>de</strong>l Cronómetro usando un <strong>de</strong>sarmador <strong>de</strong> cuchilla pequeña, lima <strong>de</strong> uñas, cuchillo u objeto similar. Insértelo en el espacio ubicado enla base <strong>de</strong> la placa <strong>de</strong> toque y levántela.2. Los 14 mini interruptores numerados están visibles. Cada interruptor tiene la posición <strong>de</strong> ENCENDIDO (<strong>de</strong>recha) APAGADO (izquierda) representando segmentos<strong>de</strong> tiempo <strong>de</strong> 1 hora (Fig. 2). El <strong>con</strong>teo empieza cuando el interruptor <strong>de</strong> función se mueve <strong>de</strong> la posición <strong>de</strong> APAGADO.3. Fije un programa <strong>de</strong> <strong>con</strong>mutación (hasta 14 horas) moviendo cada interrutor DIP a la posición <strong>de</strong> ENCENDIDO o APAGADO, empezando <strong>con</strong> el interruptor No. 1ubicado en la base <strong>de</strong> la columna (Fig. 2).POR EJEMPLO: Si <strong>de</strong>sea las luces ENCENDIDAS por 3 horas, APAGADAS por 4 horas y ENCENDIDAS otra vez por 3 horas fije los interruptores como sigue:Deslice los mini interruptores <strong>de</strong>l 1 al 3 a la posición <strong>de</strong> ENCENDIDO, 4 al 7 a la posición <strong>de</strong> APAGADO, 8 al 10 a la posición <strong>de</strong> ENCENDIDO y 11 al 14 a la posición<strong>de</strong> APAGADO (Fig. 2).4. El Cronómetro respon<strong>de</strong>rá automáticamente a las instrucciones programadas cada 60 minutos cuando el interruptor está en el modo AUTO. Al final <strong>de</strong>l programa<strong>de</strong> 14 horas, el Cronómetro APAGARA las luces hasta que el tiempo original <strong>de</strong> inicio se alcance <strong>de</strong>spués <strong>de</strong> 24 horas. El interruptor seguirá operando <strong>de</strong> estamanera hasta que el interruptor se mueva a los modos <strong>de</strong> MANUAL o APAGADO.NOTAS:• Para activar el programa (sólo el primer día), el interruptor <strong>de</strong>berá fijarse en el modo <strong>de</strong> APAGADO por dos segundos y luego en el modo AUTO para empezar elciclo <strong>de</strong> <strong>con</strong>mutación programado.Fig. 2Programacion<strong>de</strong> mini<strong>Interruptor</strong>es• Si el interruptor está en el modo MANUAL en el momento que <strong>de</strong>sea empezar el programa, cambiar al modo AUTO sin cambiar primero a APAGADO reanudará la función <strong>de</strong> AUTO por elresto <strong>de</strong> tiempo que queda <strong>de</strong>l programa previo al inicio.REEMPLAZO DE LAS BATERIASLas baterías se <strong>de</strong>ben reemplazar cada 12-18 meses, más frecuentemente don<strong>de</strong> las interrupciones <strong>de</strong> energía son comunes.1. INTERRUMPA LA CORRIENTE.2. Use un <strong>de</strong>sarmador <strong>de</strong> cuchilla pequeña, lima <strong>de</strong> uñas, cuchillo u objeto similar para remover la placa <strong>de</strong> toque <strong>de</strong>l Cronómetro.3. Usando la misma herramienta, quite la cubierta <strong>de</strong> la batería suavemente. Reemplace las baterías <strong>con</strong> “+” hacia arriba.4. Presione firmemente la cubierta <strong>de</strong> las baterías en su sitio y coloque otra vez la placa <strong>de</strong> toque.5. Después <strong>de</strong> cambiar las baterías reinicie el Cronómetro. Vea la sección "Operación".1413121110987654321ONCapacidad:500W-120VCA, 60Hz Sólo Incan<strong>de</strong>scenteESPECIFICACIONESINFORMACION GENERAL• Este producto no está hecho para uso en balastras electrónicas.• Este producto es compatible <strong>con</strong> aplicaciones Unipolares o <strong>de</strong> 3-Vías.• La instalación <strong>de</strong> este producto requiere <strong>de</strong> la experiencia práctica <strong>de</strong> cableado resi<strong>de</strong>ncial y comercial. Compruebe que el cableado <strong>de</strong> todos los circuitos cumplen <strong>con</strong> los códigoslocales y or<strong>de</strong>nanzas. Cualquier <strong>de</strong>scuido en no seguir las instrucciones exactamente pue<strong>de</strong> causar daños permanentes a la unidad, exponerlo a voltajes peligrosos y anula toda garantíacitada y/o implicada.• La memoria <strong>de</strong> este Cronómetro está protegida por baterías instaladas correctamente. El cronómetro seguirá trabajando hasta 48 horas en elcaso <strong>de</strong> un corte <strong>de</strong> energía. Cuando la energía se restablece, el Cronómetro operará automáticamente <strong>de</strong> acuerdo <strong>con</strong> el horario programado. ElCronómetro pue<strong>de</strong> trabajar sin baterías cuando hay energía.CARACTERISTICAS (FIG. 1)<strong>Interruptor</strong> <strong>de</strong> Función, Deslizante: Ubicado <strong>de</strong>bajo <strong>de</strong> la placa <strong>de</strong> toque. Controla los modos <strong>de</strong> APAGADO, manual y auto.APAGADO: Cuando el Cronómetro se programa en APAGADO la energía <strong>de</strong>l interruptor y <strong>de</strong>l Cronómetro se <strong>de</strong>s<strong>con</strong>ecta.MANUAL: En el modo MAN (manual) el interruptor está energizado. La <strong>con</strong>mutación <strong>de</strong> ENCENDIDO/APAGADO se <strong>con</strong>trola presionando la parteinferior <strong>de</strong> la placa <strong>de</strong> toque <strong>de</strong>l Cronómetro.AUTO: En este modo el Cronómetro sigue el ciclo <strong>de</strong> <strong>con</strong>mutación programado <strong>de</strong> acuerdo <strong>con</strong> las instrucciones fijadas. (vea “Operación”).Placa<strong>de</strong> ToqueProgramación<strong>de</strong> Función<strong>Interruptor</strong><strong>de</strong> FunciónFig. 1 - CaracterísticasLEDON DIP ON DIPBATTERIESCubierta <strong>de</strong>lCompartimiento <strong>de</strong>BateríasCompartimiento<strong>de</strong> Baterías<strong>Interruptor</strong>es DIPPlaca<strong>de</strong> ParedHot (Black)Actif (Noir)Fase (Negro)Line / Ligne / Línea120V AC/CA, 60 HzNeutral (White)Neutre (Blanc)Neutro (Blanco)Dia. 1 - Single Pole ApplicationSch. 1 - Application unipolaireDia. 1 - Aplicación UnipolarBlackNoirNegroYellowJauneAmarilloBlueBleuAzulGreen GroundVert MALTVer<strong>de</strong> TierraBlackNoirNegroLoadChargeCargaWhiteBlancBlancoGARANTIA LEVITON POR 5 AÑOS LIMITADALeviton garantiza al <strong>con</strong>sumidor original <strong>de</strong> sus productos y no parabeneficio <strong>de</strong> nadie más que este producto en el momento <strong>de</strong> su ventapor Leviton, está libre <strong>de</strong> <strong>de</strong>fectos en materiales o fabricación por unperíodo <strong>de</strong> cinco años <strong>de</strong>s<strong>de</strong> la fecha <strong>de</strong> la compra original. La únicaobligación <strong>de</strong> Leviton es corregir tales <strong>de</strong>fectos ya sea <strong>con</strong> reparacióno reemplazo, como opción, si <strong>de</strong>ntro <strong>de</strong> tal período <strong>de</strong> cinco años elproducto pagado se <strong>de</strong>vuelve, <strong>con</strong> la prueba <strong>de</strong> compra fechada y la<strong>de</strong>scripción <strong>de</strong>l problema a Leviton Manufacturing Co., Inc., Att.:Quality Assurance Department, 59-25 Little Neck Parkway, LittleNeck, New York 11362-2591, U.S.A. Esta garantía excluye y renunciatoda responsabilidad <strong>de</strong> mano <strong>de</strong> obra por remover o reinstalar esteproducto. Esta garantía es inválida si este producto es instaladoinapropiadamente o en un ambiente ina<strong>de</strong>cuado, sobrecargado, malusado, abierto, abusado o alterado en cualquier manera o no es usadobajo <strong>con</strong>diciones <strong>de</strong> operación normal o no <strong>con</strong>forme <strong>con</strong> las etiquetaso instrucciones. No hay otras garantías implicadas <strong>de</strong> cualquier otrotipo, incluyendo mercadotecnia y propiedad para un propósito enparticular pero si alguna garantía implicada se requiere por lajurisdicción pertinente, la duración <strong>de</strong> cualquiera garantía implicada,incluyendo mercadotecnia y propiedad para un propósito en particular,es limitada a cinco años. Leviton no es responsable por daños inci<strong>de</strong>ntales,indirectos, especiales o <strong>con</strong>secuentes, incluyendo sin limitación, daños a,o pérdida <strong>de</strong> uso <strong>de</strong>, cualquier equipo, pérdida <strong>de</strong> ventas o ganancias oretraso o falla para llevar a cabo la obligación <strong>de</strong> esta garantía. Los remediosprovistos aquí son remedios exclusivos para esta garantía, ya sea basadoen <strong>con</strong>trato, agravio o <strong>de</strong> otra manera.LED: Una luz Ver<strong>de</strong> se encien<strong>de</strong> arriba <strong>de</strong> la placa <strong>de</strong> toque <strong>de</strong>l Cronómetro cuando está en el modo AUTO. El estatus <strong>de</strong>l programa se pue<strong>de</strong>anular manualmente <strong>de</strong>ntro <strong>de</strong>l horario corriente <strong>de</strong> incremento presionando la placa <strong>de</strong> toque <strong>de</strong>l Cronómetro.Para Asistencia Técnica llame al:1-800-824-3005 (Sólo en EE.UU. )www.leviton.comPARA INSTALARADVERTENCIA: PARA INSTALARSE Y/O USARSE DE ACUERDO CON LOS CODIGOS ELECTRICOS Y NORMAS APROPIADOS.ADVERTENCIA: SI USTED NO ESTÁ SEGURO ACERCA DE ALGUNA DE LAS PARTES DE ESTAS INSTRUCCIONES, CONSULTE A UN ELECTRICISTA CALIFICADO.ADVERTENCIA: PARA EVITAR DESCARGA ELECTRICA, FUEGO, O MUERTE, INTERRUMPA EL PASO DE ENERGIA MEDIANTE EL INTERRUPTOR DE CIRCUITO O FUSIBLE.¡ASEGURESE DE QUE EL CIRCUITO NO ESTE ENERGIZADO ANTES DE INICIAR LA INSTALACION!ADVERTENCIA: PARA EVITAR SOBRECALIENTAMIENTO Y POSIBLE DAÑO A ESTE APARATO Y OTRO EQUIPO, NO INSTALE PARA CONTROLAR UN RECEPTÁCULO, LUZFLUORESCENTE O APARATO OPERADO POR UN MOTOR O TRANSFORMADOR.PRECAUCION: USE ESTE PRODUCTO SOLO CON CABLE DE COBRE O REVESTIDO DE COBRE. PARA CABLE DE ALUMINIO USE SOLO PRODUCTOS MARCADOS CON ELSÍMBOLO CO/ALR O CU/AL.1. INTERRUMPA LA CORRIENTE.2. Pele 1.6 cm (5/8") <strong>de</strong> aislante <strong>de</strong> la punta <strong>de</strong> cada <strong>con</strong>ductor <strong>de</strong>l circuito.3. Quite el aislante precortado <strong>de</strong> los <strong>con</strong>ductores <strong>de</strong>l Cronómetro.4. Instalación Unipolar (Dia. 1): Des<strong>con</strong>ecte los <strong>con</strong>ductores <strong>de</strong>l circuito <strong>de</strong>l interruptor unipolar existente y saque el interruptor, si es necesario. Aisle la punta <strong>de</strong>l <strong>con</strong>ductor Amarillo.Proceda <strong>con</strong> el paso #5.Instalación <strong>de</strong> 3-Vías (Dia. 2):NOTA: Sólo un viajero se necesita para aplicación <strong>de</strong> 3 vías.Des<strong>con</strong>ecte los <strong>con</strong>ductores <strong>de</strong>l circuito <strong>de</strong> uno <strong>de</strong> los <strong>Interruptor</strong>es <strong>de</strong> 3-Vías y saque el interruptor, si es necesario.Conecte el <strong>con</strong>ductor <strong>de</strong>l terminal común (usualmente tornillo Negro) <strong>de</strong>l interruptor <strong>de</strong> 3-Vías al <strong>con</strong>ductor Amarillo. Conecte el <strong>con</strong>ductor viajero (<strong>de</strong>l tornillo <strong>de</strong> Latón <strong>de</strong>l interruptor<strong>de</strong> 3-Vías) y el <strong>con</strong>ductor <strong>de</strong>l <strong>con</strong>tacto <strong>de</strong>l centro <strong>de</strong> la lámpara al <strong>con</strong>ductor Azul. Aisle el <strong>con</strong>ductor viajero que no se usa en la caja <strong>de</strong> pared <strong>con</strong> el cronómetro. Des<strong>con</strong>ecte y aisle el<strong>con</strong>ductor viajero que no se usa en la caja <strong>de</strong> pared <strong>con</strong> el interruptor <strong>de</strong> 3-Vías.5. Conecte los cables <strong>de</strong> acuerdo al diagrama apropiado y como sigue: Tuerce todos los hilos <strong>de</strong> cada <strong>con</strong>exión y bien apretados <strong>con</strong> el <strong>con</strong>ductor <strong>de</strong>l circuito y empújelos fírmemente en el<strong>con</strong>ector <strong>de</strong> alambres. Enrosque cada <strong>con</strong>ector hacia la <strong>de</strong>recha, asegurando que no se vea ningún <strong>con</strong>ductor <strong>de</strong>snudo <strong>de</strong>bajo <strong>de</strong>l <strong>con</strong>ector. Asegure cada <strong>con</strong>ductor <strong>con</strong> cinta aislante.6. Monte el producto <strong>con</strong> “TOP” hacia arriba usando los tornillos largos provistos. Monte la placa <strong>de</strong> pared.7. Deslice el interruptor a la posición <strong>de</strong> APAGADO.8. Restablezca la energía <strong>con</strong> el interruptor <strong>de</strong> circuitos o fusible. LA INSTALACIÓN ESTÁ COMPLETA.DI-000-06651-22CHot (Black)Actif (Noir)Fase (Negro)Line / Ligne / Línea120V AC/CA, 60 HzNeutral (White)Neutre (Blanc)Neutro (Blanco)<strong>Timer</strong> <strong>Switch</strong><strong>Interrupteur</strong>-<strong>minuterie</strong><strong>Interruptor</strong> <strong>con</strong> CronómetroYellowJauneAmarilloDia. 2 - 3-Way ApplicationSch. 2 - Application à trois voiesDia. 2 - Aplicación <strong>de</strong> 3 ViasBlueBleuAzulGreen GroundVert MALTVer<strong>de</strong> Tierra<strong>Switch</strong><strong>Interrupteur</strong><strong>Interruptor</strong>OFFGreen GroundVert MALTVer<strong>de</strong> TierraCommon TerminalBorne communeTerminal ComúnBlackNoirNegroLoadChargeCargaWhiteBlancBlancoSÓLO PARA MÉXICOPOLIZA DE GARANTIA:LEVITON, S. DE R.L. DE C.V.,RFC LEV-920526651, ARISTA 54-A, MÉXICO 11270 D.F., MÉXICO,DATOS DEL USUARIONOMBRE:DIRECCION:TEL. (55) 5 386-0073. Garantizaeste producto por el término <strong>de</strong> unCOL: C.P.año en todas sus partes y mano <strong>de</strong>obra <strong>con</strong>tra cualquier <strong>de</strong>fecto <strong>de</strong>fabricación y funcionamiento a partir<strong>de</strong> la fecha <strong>de</strong> entrega o instalaciónCIUDAD:ESTADO:TELEFONO:<strong>de</strong>l producto bajo las siguientes.CONDICIONES:DATOS DE LA TIENDA O VENDEDORRAZON SOCIAL: PRODUCTO:1. Para hacer efectiva esta MARCA: MODELO:garantía, no podrán exigirsemayores requisitos que laNO DE SERIE:presentación <strong>de</strong> esta póliza juntoNO. DEL DISTRIBUIDOR:<strong>con</strong> el producto en el lugar don<strong>de</strong> DIRECCION:fue adquirido en cualquiera <strong>de</strong> COL: C.P.los centros <strong>de</strong> servicio que seindican a <strong>con</strong>tinuación.2. La empresa se compromete aCIUDAD:ESTADO:reemplazar o cambiar el producto TELEFONO:<strong>de</strong>fectuoso sin ningún cargo parael <strong>con</strong>sumidor, los gastos <strong>de</strong>transportación que se <strong>de</strong>riven <strong>de</strong>FECHA DE VENTA:FECHA DE ENTREGA O INSTALACION:su cumplimiento serán cubiertospor: LEVITON S. DE R.L. DE C.V.3. El tiempo <strong>de</strong> reemplazo en ningún caso será mayor a 30 días <strong>con</strong>tados a partir <strong>de</strong> la recepción <strong>de</strong>lproducto en cualquiera <strong>de</strong> los sitios en don<strong>de</strong> pueda hacerse efectiva la garantía.4. Cuando se requiera hacer efectiva la garantía mediante el reemplazo <strong>de</strong>l producto, esto se podrá llevara cabo en: LEVITON S. DE R.L. DE C.V.5. Esta garantía no es válida en los siguientes casos: A) Cuando el producto ha sido utilizado en<strong>con</strong>diciones distintas a las normales. B) Cuando el producto no ha sido operado <strong>de</strong> acuerdo <strong>con</strong> elinstructivo <strong>de</strong> uso en idioma español proporcionado. C) Cuando el producto ha sido alterado oreparado por personas no autorizadas por LEVITON S. DE R.L. DE C.V.6. El <strong>con</strong>sumidor podrá solicitar que se haga efectiva la garantía ante la propia casa comercial don<strong>de</strong>adquirió el producto.7. En caso <strong>de</strong> que la presente garantía se extraviara el <strong>con</strong>sumidor pue<strong>de</strong> recurrir a su proveedor paraque se le expida otra póliza <strong>de</strong> garantía previa presentación <strong>de</strong> la nota <strong>de</strong> compra o factura respectiva.
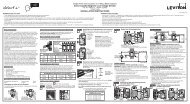
FOLD SCHEME17.0¨Front PanelLEVITON INSTRUCTION SHEET/MANUALSPECIFICATIONSDI-000-06651-22CBlack11.0¨Cat. No.654321Helvetica50 Lb. offsetPaper size:Overall size: 17" X 11"Final fold size: 2.8" X 3.6"DOCUMENTATIONN/AH2D 2/7/05Front PanelCat. No.2.8¨Front Panel3.6¨Cat. No.Fold LinePanel Line#'s =Fold Sequence