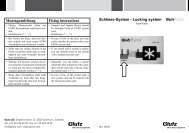
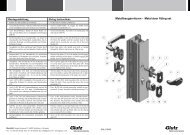
Panikdorn - Panic spindle Montageanleitung Fixing instructions - Glutz
Panikdorn - Panic spindle Montageanleitung Fixing instructions - Glutz
Panikdorn - Panic spindle Montageanleitung Fixing instructions - Glutz

Create successful ePaper yourself
Turn your PDF publications into a flip-book with our unique Google optimized e-Paper software.
<strong>Montageanleitung</strong> <strong>Fixing</strong> <strong>instructions</strong><br />
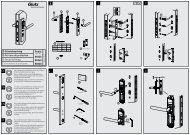
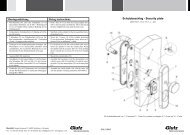
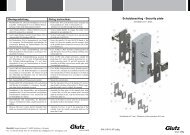
• Die beiden 4-Kt.-Teile (1,2) mit ei- • Unscrew both square parts (1,2) by<br />
nem Inbusschlüssel (3) SW 3 mm<br />
auseinander schrauben.<br />
means of an Allan key (3) SW 3.<br />
• Schloss montieren.<br />
• Install the lock case.<br />
• 4-Kt.-Teil (1) von der Aussenseite der • Insert the square part (1) into the fol-<br />
Tür in die Schlossnuss stecken. lower from the outside of the door.<br />
• 4-Kt.-Teil (2) von der Innenseite der • Insert the square part (2) into the fol-<br />
Tür in die Schlossnuss stecken. lower from the inside of the door.<br />
• Achtung: Die Schlitze der 4-Kt.-Teile • Caution: the grooves of the square<br />
(1,2) müssen beide gegen den Tür- parts (1,2) must look against the door<br />
spalt zeigen.<br />
frame.<br />
• Beschlag und Drücker (4) montieren. • Assemble handle and rose.<br />
• Achtung: Wegen der hohen Belastung • Caution: Because of the high load on<br />
auf geteilte Dorne, sind nur Beschläge split <strong>spindle</strong>s, use only fixed mobile<br />
mit drehbarfesten Verbindungen einzusetzen.<br />
solutions.<br />
• Die Heso-Schrauben (5) der Drücker • Fix tight the Heso screw (5) of the<br />
(4) fest anziehen. Der zylindrische handle (4). The cylindrical part of the<br />
Ansatz der Schrauben verankert sich screw anchor into the grooves of the<br />
dabei in den Schlitzen der 4-Kt.-<br />
Dorne.<br />
square <strong>spindle</strong>.<br />
<strong>Glutz</strong> AG, Segetzstrasse 13, 4502 Solothurn, Schweiz<br />
Tel. +41 32 625 65 20, Fax +41 32 625 65 35<br />
info@glutz.com, www.glutz.com<br />
MA 10028<br />
4<br />
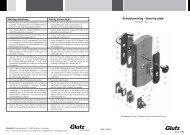
<strong>Panikdorn</strong> - <strong>Panic</strong> <strong>spindle</strong><br />
5<br />
1<br />
5920 - 9 mm<br />
2<br />
3
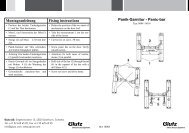
Mode d`emploi Istruzioni di montaggio<br />
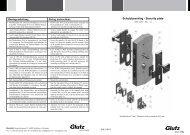
• Dévisser les deux pièces carrées (1,2) • Con una brugola (3) SW 3 mm svitare<br />
au moyen d’une clé inbus (3) SW 3. i due elementi quadrati (1,2).<br />
• Monter la serrure.<br />
• Montare la serratura.<br />
• Enfiler la pièce carrée (1) dans le • Inserire l‘elemento quadrato (1) nella<br />
fouillot depuis l’extérieur de la porte. noce dalla parte esterna della porta.<br />
• Enfiler la pièce carrée (2) dans le • Inserire l‘elemento quadrato (2) nella<br />
fouillot depuis l’intérieur de la porte. noce dalla parte interna della porta.<br />
• Attention: Les fentes des pièces • Attenzione: le fessure degli elementi<br />
carrées doivent être orientés contre quadrati (1,2) devono essere rivolte<br />
l’huisserie.<br />
verso il telaio della porta.<br />
• Monter la poignée (4) et l’entrée. • Montare la ferramenta e la maniglia<br />
(4).<br />
• Attention: A cause de la haute char- • Attenzione: in considerazione delle<br />
ge sur tiges partagées, il convient elevate sollecitazioni sui perni divisi,<br />
d’utiliser des ferrements rivé mobi- utilizzare soltanto ferramenta con racles.cordi<br />
resistenti alla torsione.<br />
• Bien serrer les vis Heso (5) de la poig- • Serrare bene le viti Heso (5) della<br />
née (4). La partie cylindrique des vis maniglia (4). La parte cilindrica delle<br />
s’ancre dans les fentes des tiges car- viti si aggancia alle fessure dei perni<br />
rées.<br />
quadrati.<br />
<strong>Glutz</strong> AG, Segetzstrasse 13, 4502 Solothurn, Schweiz<br />
Tel. +41 32 625 65 20, Fax +41 32 625 65 35<br />
info@glutz.com, www.glutz.com<br />
MA 10028<br />
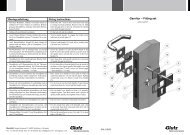
Tige anti panique - Perno antipanico<br />
4<br />
5<br />
1<br />
5920 - 9 mm<br />
2<br />
3