Panikgarnitur 8600 / 8610 - Glutz
Panikgarnitur 8600 / 8610 - Glutz
Panikgarnitur 8600 / 8610 - Glutz

You also want an ePaper? Increase the reach of your titles
YUMPU automatically turns print PDFs into web optimized ePapers that Google loves.
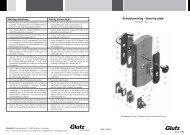
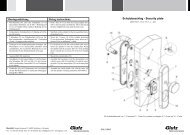
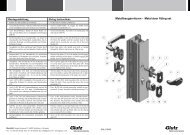
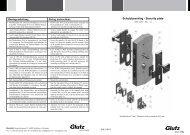
Montageanleitung Fixing instructions<br />
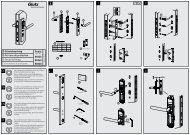
• Position der beiden Umlenkgetriebe • Define the position of the two cases of<br />
(1) auf der Türe bestimmen.<br />
mechanisms on the door leaf.<br />
• Mass L (auf Aussenseite der Hebel !)<br />
messen.<br />
• Stange (2) auf Mass L-30 mm kürzen.<br />
<strong>Glutz</strong> AG, Segetzstrasse 13, 4502 Solothurn, Schweiz<br />
Tel. +41 32 625 65 20, Fax +41 32 625 65 35<br />
info@glutz.com, www.glutz.com<br />
• Take the measurement L (on the outside<br />
of the lever).<br />
•<br />
Cut bar (2) on size L-30 mm.<br />
• Panik-Garnitur auf Türe schrauben. • Screw panic bar on the door. Verify<br />
Auf leichte Gängigkeit prüfen. smooth action.<br />
• Achtung: Die beiden Umlenkgetriebe • Attention: fix both cases of mecha-<br />
(3) parallel zueinander montieren. nisms (3) in parallel.<br />
• Durch Gewinde (4) im Stangenhalter<br />
mit Bohrer 4 (5) die Wandung der<br />
Stange (2) durchbohren.<br />
• Gewindestifte<br />
stark anziehen.<br />
einschrau¬ben und<br />
• Durch die 2 Schrauben (6) oben im<br />
Gehäuse, kann die Kraft zum Heben<br />
der Stange eingestellt werden.<br />
• Drill side of the bar (2) through thread<br />
(4) in the support of the bar with a<br />
drill diam 4 (5).<br />
•<br />
Screw set screw and drive home.<br />
• The leverage of the bar can be adjusted<br />
with the 2 screws (6) on top of the<br />
cases of mechanisms.<br />
MA 10008<br />
Panik-Garnitur - Panic-bar<br />
Typ: <strong>8600</strong> / <strong>8610</strong>
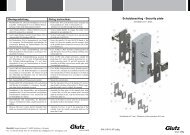
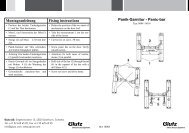
Mode d`emploi Istruzioni di montaggio<br />
• Déterminer la position des deux boîtiers<br />
(1) sur le battant.<br />
• Mesurer la distance L (à l’extérieur<br />
des leviers).<br />
• Couper la barre (2) sur la mesure L-30<br />
mm.<br />
• Visser la garniture anti-panique sur<br />
le battant. Vérifier le bon fonctionnement.<br />
• Attention: monter les deux boîtiers (3)<br />
bien parallèlement.<br />
• Percer la paroi de la barre (2) au moyen<br />
du pas de vis (4) à travers du support<br />
de barre du levier avec un foret<br />
diam. 4 (5).<br />
<strong>Glutz</strong> AG, Segetzstrasse 13, 4502 Solothurn, Schweiz<br />
Tel. +41 32 625 65 20, Fax +41 32 625 65 35<br />
info@glutz.com, www.glutz.com<br />
• Determinare la posizione dei due ingranaggi<br />
di rinvio (1) sulla porta.<br />
• Rilevare la misura L (sul lato esterno<br />
della leva).<br />
• Tagliare la barra (2) alla misura L-30<br />
mm .<br />
• Avvitare la barra antipanico sulla porta.<br />
Verificare che sia azionabile con<br />
facilità.<br />
• Attenzione: montare i due ingranaggi<br />
di rinvio (3) paralleli tra loro.<br />
• Utilizzando un trapano con Ø 4 (5)<br />
perforare la parete dell‘asta (2) a<br />
livello del filetto (4) nel supporto della<br />
barra.<br />
• Visser la tige fileté et serrer très fort. • Avvitare e stringere i perni filettati.<br />
• Au moyen des 2 vis de réglage (6)<br />
placé au haut bout du boîtier la force<br />
de retour de la barre peut être réglée.<br />
• La forza necessaria per sollevare la<br />
barra può essere regolata con le 2 viti<br />
(6) in alto sulla scatola.<br />
Gâche encloisonné à bas - Barra antipanico<br />
MA 10008<br />
Typ: <strong>8600</strong> / <strong>8610</strong>