NOTICE D'INSTRUCTIONS MOUNTING ... - Look Cycle
NOTICE D'INSTRUCTIONS MOUNTING ... - Look Cycle
NOTICE D'INSTRUCTIONS MOUNTING ... - Look Cycle

Create successful ePaper yourself
Turn your PDF publications into a flip-book with our unique Google optimized e-Paper software.
INSTALLATION<br />
OF THE VARIOUS COMPONENTS<br />
A. INSTALLATION OF THE BOTTOM BRACKET<br />
For accessory assembly we recommend that you use the services<br />
of a professional.<br />
Check that the threads are clean and free of paint.<br />
Follow the manufacturer’s instructions for assembly, adjustment,<br />
and maintenance.<br />
We would recommend for pedal cup installation the use of a stand<br />
holding the frame by the front and rear wheels attachments.<br />
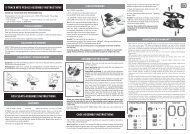
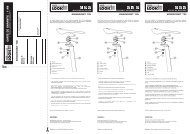
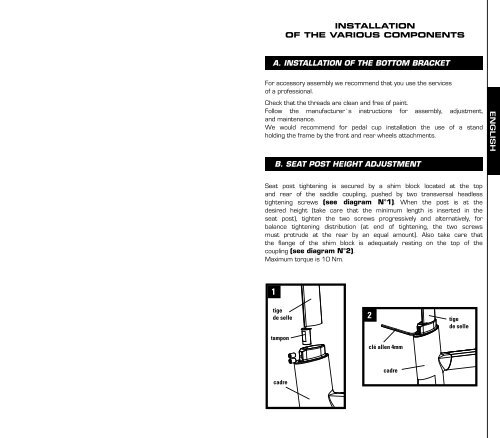
B. SEAT POST HEIGHT ADJUSTMENT<br />
Seat post tightening is secured by a shim block located at the top<br />
and rear of the saddle coupling, pushed by two transversal headless<br />
tightening screws (see diagram N°1). When the post is at the<br />
desired height (take care that the minimum length is inserted in the<br />
seat post), tighten the two screws progressively and alternatively, for<br />
balance tightening distribution (at end of tightening, the two screws<br />
must protrude at the rear by an equal amount). Also take care that<br />
the flange of the shim block is adequately resting on the top of the<br />
coupling (see diagram N°2).<br />
Maximum torque is 10 Nm.<br />
1<br />
tige<br />
de selle<br />
tampon<br />
cadre<br />
2 tige<br />
de selle<br />
clé allen 4mm<br />
cadre<br />
ENGLISH