Instructions de montage / Mode d'emploi - Truma Gerätetechnik ...
Instructions de montage / Mode d'emploi - Truma Gerätetechnik ...
Instructions de montage / Mode d'emploi - Truma Gerätetechnik ...

You also want an ePaper? Increase the reach of your titles
YUMPU automatically turns print PDFs into web optimized ePapers that Google loves.
Solar Battery Charger SC 3<br />
Gebrauchsanweisung Seite 4<br />
Einbauanweisung Seite 13<br />
Im Fahrzeug mitzuführen!<br />
Operating instructions Page 15<br />
Installation instructions Page 25<br />
To be kept in the vehicle!<br />
Mo<strong>de</strong> d‘emploi Page 26<br />
<strong>Instructions</strong> <strong>de</strong> <strong>montage</strong> Page 36<br />
À gar<strong>de</strong>r dans le véhicule !<br />
Istruzioni per l‘uso Pagina 37<br />
Istruzioni di montaggio Pagina 47<br />
Da tenere nel veicolo!
2<br />
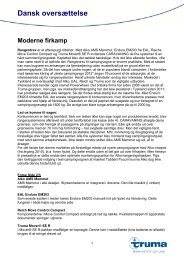
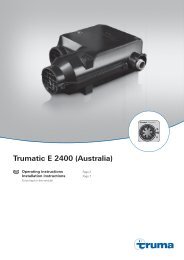
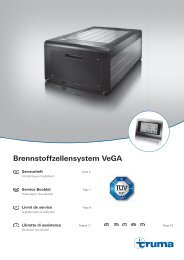
A<br />
MADE IN GERMANY<br />
G1<br />
X1 X2 X3<br />
F1<br />
*<br />
X1 - X3 max Ø 6 mm²<br />
* > 10 mm²<br />
a<br />
12 V
B<br />
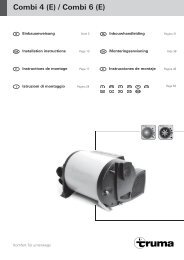
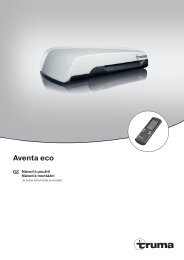
Ø 4<br />
5<br />
MADE IN GERMANY<br />
GERMANY<br />
5<br />
146<br />
136<br />
5<br />
50<br />
33<br />
5<br />
80<br />
C<br />
50<br />
50<br />
50<br />
50<br />
3
4<br />
Solar-La<strong>de</strong>automat SC 3<br />
Inhaltsverzeichnis<br />
Gebrauchsanweisung<br />
Glossar .................................................................................. 4<br />
Verwen<strong>de</strong>te Symbole ............................................................ 4<br />
Sicherheitshinweise .......................................................... 5<br />
Verwendungszweck .......................................................... 6<br />
Bestimmungswidriger Gebrauch .......................................... 6<br />
Batteriepflege .................................................................... 6<br />
Geräteelemente .................................................................. 7<br />
Funktion ............................................................................... 7<br />
La<strong>de</strong>vorgang ....................................................................... 8<br />
Schalten <strong>de</strong>s optionalen Verbraucherausganges ......... 9<br />
Funktionsanzeige ............................................................... 9<br />
Wartung ............................................................................... 9<br />
Technische Daten ............................................................. 10<br />
La<strong>de</strong>diagramm .................................................................... 11<br />
Entsorgung ........................................................................ 11<br />
Konformitätserklärung .................................................... 11<br />
<strong>Truma</strong> Hersteller Garantieerklärung ............................. 12<br />
Einbauanweisung<br />
Sicherheitshinweise ........................................................ 13<br />
Lieferumfang .................................................................... 13<br />
Montage ............................................................................ 13<br />
Anschluss .......................................................................... 14<br />
Anschlussplan ..................................................................... 14<br />
Inbetriebnahme ................................................................ 14<br />
Gebrauchsanweisung<br />
Vor Anschluss und Inbetriebnahme <strong>de</strong>s Gerätes unbedingt<br />
die Einbau und Gebrauchsanweisung lesen!<br />
Glossar<br />
AGM-Batterie Blei-Säure-Batterie, bei <strong>de</strong>r <strong>de</strong>r<br />
Elektrolyt in einem Mikroglasvlies<br />
(absorbed glass mat) gebun<strong>de</strong>n ist.<br />
Batterie OPTIMA® YT S entspricht einer AGM-Batterie.<br />
Verwen<strong>de</strong>te Symbole<br />
Symbol weist auf mögliche Gefahren hin.<br />
Hinweis mit Informationen und Tipps.
Sicherheitshinweise<br />
Beim Gebrauch von elektrischen Geräten sind zum<br />
Schutz vor elektrischem Schlag, Verletzung und Brandgefahr<br />
folgen<strong>de</strong> grundsätzliche Sicherheitsmaßnahmen zu<br />
beachten. Lesen und beachten Sie diese Hinweise, bevor Sie<br />
das Gerät benutzen.<br />
Aufstellen<br />
Achten Sie darauf, dass die Geräte sicher aufgestellt wer<strong>de</strong>n,<br />
nicht herabfallen o<strong>de</strong>r umstürzen können. Legen Sie Leitungen<br />
stets so, dass keine Stolpergefahr entsteht. Setzen Sie<br />
Elektrogeräte nicht <strong>de</strong>m Regen aus. Betreiben Sie Elektrogeräte<br />
nicht in feuchter o<strong>de</strong>r nasser Umgebung. Betreiben Sie<br />
Elektrogeräte nicht in <strong>de</strong>r Nähe von brennbaren Flüssigkeiten<br />
o<strong>de</strong>r Gasen.<br />
Schutz vor elektrischem Schlag<br />
Betreiben Sie nur Geräte <strong>de</strong>ren Gehäuse und Leitungen unbeschädigt<br />
sind. Achten Sie auf sichere Verlegung <strong>de</strong>r Kabel.<br />
Ziehen Sie nicht an <strong>de</strong>n Kabeln.<br />
Solarmodule erzeugen bei Lichteinfall Strom. Auch bei geringem<br />
Lichteinfall steht die volle Spannung an. Die Leerlaufspannung<br />
kann doppelt so hoch sein. Keine stromführen<strong>de</strong>n<br />
Teile berühren. Solarmodule vor Montage- und Installationsarbeiten<br />
z. B. mit einem Karton ab<strong>de</strong>cken.<br />
Gebrauch<br />
Dieses Gerät ist nicht dafür bestimmt durch Personen (einschließlich<br />
Kin<strong>de</strong>r) mit eingeschränkten physischen, sensorischen<br />
o<strong>de</strong>r geistigen Fähigkeiten o<strong>de</strong>r mangels Erfahrung<br />
und / o<strong>de</strong>r mangels Wissen benutzt zu wer<strong>de</strong>n, es sei <strong>de</strong>nn,<br />
sie wer<strong>de</strong>n durch eine für ihre Sicherheit zuständige Person<br />
beaufsichtigt o<strong>de</strong>r erhielten von ihr Anweisungen, wie das<br />
Gerät zu benutzen ist.<br />
Kin<strong>de</strong>r sollten beaufsichtigt wer<strong>de</strong>n, um sicherzustellen, dass<br />
sie nicht mit <strong>de</strong>m Gerät spielen.<br />
Benutzen Sie keine elektrischen Geräte entgegen <strong>de</strong>m, vom<br />
Hersteller angegebenen Verwendungszweck. Die Lüftungsschlitze<br />
am Gehäuse müssen frei sein und dürfen nicht durch<br />
Gepäckstücke, Handtücher o<strong>de</strong>r Kleidungsstücke etc. ver<strong>de</strong>ckt<br />
wer<strong>de</strong>n.<br />
Achtung<br />
Batterien können explosive Gase beim La<strong>de</strong>n und während<br />
<strong>de</strong>s Betriebs erzeugen. Flammen und Zündquellen fernhalten.<br />
Für eine ausreichen<strong>de</strong> Belüftung <strong>de</strong>s Batterieraumes sorgen.<br />
Instandsetzung<br />
Nehmen Sie keine Instandsetzungsarbeiten o<strong>de</strong>r Verän<strong>de</strong>rungen<br />
am Gerät vor. Wen<strong>de</strong>n Sie sich an Ihren Händler o<strong>de</strong>r an<br />
<strong>de</strong>n <strong>Truma</strong> Service (siehe Serviceheft o<strong>de</strong>r www.truma.com).<br />
Zubehör<br />
Benutzen Sie nur Zubehörteile und Zusatzgeräte die vom<br />
Hersteller geliefert o<strong>de</strong>r empfohlen wer<strong>de</strong>n.<br />
5
Verwendungszweck<br />
Der Solar-La<strong>de</strong>automat dient <strong>de</strong>m La<strong>de</strong>n von 12 V Bleiakkumulatoren,<br />
bestehend aus 6 Einzelzellen (z. B. Autobatterie),<br />
mit einer Kapazität von 30 – 75 Ah. Das Gerät wur<strong>de</strong> für<br />
<strong>de</strong>n Anschluss von Solarmodulen entwickelt. Nur geeignete<br />
Module z. B. <strong>Truma</strong> SM 23 verwen<strong>de</strong>n. Die maximalen Spannungs-<br />
und Stromaufnahmewerte beachten. Das bevorzugte<br />
Einsatzgebiet <strong>de</strong>s La<strong>de</strong>automaten sind Batterien mit Gel-,<br />
AGM- o<strong>de</strong>r Flüssigelektrolyt.<br />
Das Gerät ist für <strong>de</strong>n Einbau im Innenraum bestimmt.<br />
Beim Anschluss an die Stromversorgung über Kabelbäume<br />
eines KFZ z. B. Zugfahrzeug ist darauf zu achten, dass dies<br />
ausschließlich über eine typgenehmigte Schnittstelle erfolgt.<br />
6<br />
Bestimmungswidriger Gebrauch<br />
Das Gerät ist nicht geeignet zum La<strong>de</strong>n von z. B.:<br />
– 6 V-Batterien o<strong>de</strong>r 6 V-Bleiakkumulatoren,<br />
– nicht-aufladbaren Batterien,<br />
– Nickel-Cadmium-Batterien.<br />
Wer<strong>de</strong>n Batterien mit einer Nennspannung von 6 V mit<br />
diesem Gerät gela<strong>de</strong>n, so setzt die Gasung sofort ein.<br />
Es kann explosives Knallgas entstehen.<br />
Das Gerät ist nur für die Regelung von Solarmodulen geeignet.<br />
Keine an<strong>de</strong>re Spannungsquellen (z.B. Netzspannung<br />
230 V) an das Gerät anschließen. Dies kann zur Zerstörung<br />
<strong>de</strong>s Geräts und / o<strong>de</strong>r <strong>de</strong>r Quellen führen. Sollen an<strong>de</strong>re Spannungsquellen<br />
zusammen mit <strong>de</strong>m Gerät genützt wer<strong>de</strong>n, fragen<br />
Sie Ihren Händler.<br />
Batteriepflege<br />
(auch wartungsfreie Batterien)<br />
Um eine lange Batterielebensdauer zu erreichen, sind folgen<strong>de</strong><br />
Punkte zu beachten:<br />
– Batterien sollten vor und nach einer Stromentnahme voll<br />
aufgela<strong>de</strong>n wer<strong>de</strong>n.<br />
– Bei längeren Stillstandszeiten (ohne Sonneneinstrahlung),<br />
muss die Batterie abgeklemmt und spätestens alle 12 Wochen<br />
für 24 Stun<strong>de</strong>n gela<strong>de</strong>n wer<strong>de</strong>n.<br />
Im Winter voll gela<strong>de</strong>ne Batterien kühl und frostfrei<br />
lagern und regelmäßig (alle 12 Wochen) nachla<strong>de</strong>n.
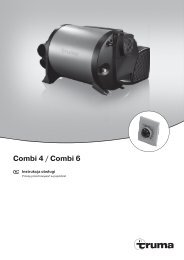
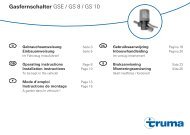
Geräteelemente<br />
MADE IN IN GERMANY<br />
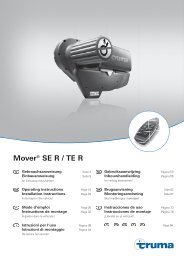
Bild 1: Geräteelemente<br />
H1 H2 H3 T<br />
X1 X2 X3<br />
H1 LED- Solar La<strong>de</strong>anzeige<br />
H2 LED- Batterie La<strong>de</strong>zustandsanzeige<br />
H3 LED- Batterie La<strong>de</strong>zustandsanzeige<br />
T Taste optionaler Verbraucherausgang<br />
X1 Anschluss Solarmodul<br />
X2 Anschluss Batterie<br />
X3 Anschluss optionaler Verbraucherausgang für<br />
Gleichstromverbraucher (z. B. Lampe)<br />
Funktion<br />
Das Gerät ist mit mo<strong>de</strong>rner pulsbreiten modulierter drei Phasen<br />
La<strong>de</strong>technik ausgestattet. Diese Technik ermöglicht hohe<br />
Leistung bei geringem Gewicht und kleinen Abmessungen.<br />
Durch Verwendung hochwertiger Elektronik arbeitet es mit<br />
einem hohen Wirkungsgrad. Das automatische La<strong>de</strong>n erfolgt<br />
schonend und ohne schädliches Überla<strong>de</strong>n <strong>de</strong>r Batterien. So<br />
wird die Lebensdauer <strong>de</strong>r Batterien wesentlich verlängert.<br />
Es ist für Batterien mit Flüssig-, Gel- o<strong>de</strong>r AGM-Technologie<br />
geeignet. Der La<strong>de</strong>vorgang wird mittels eines internen Temperaturfühlers<br />
automatisch angepasst.<br />
Das Gerät ist für Dauerbetrieb und Parallelbetrieb konzipiert.<br />
Verbraucher können ständig angeschlossen blei ben, dazugeschaltet<br />
o<strong>de</strong>r weggeschaltet wer<strong>de</strong>n. Es wer<strong>de</strong>n gleichzeitig<br />
die Verbraucher versorgt und die Batterien gela<strong>de</strong>n. Der<br />
Verbraucherstrom soll hierbei kleiner als <strong>de</strong>r Solar-La<strong>de</strong>strom<br />
sein, da sonst keine Ladung <strong>de</strong>r Batterien erfolgt.<br />
Über die Taste kann <strong>de</strong>r optionale Verbraucherausgang geschaltet<br />
wer<strong>de</strong>n. Dieses dient nur zum Anschluss kleiner, am<br />
La<strong>de</strong>automaten zu schalten<strong>de</strong>r Verbraucher wie z. B. einer<br />
Lampe.<br />
Beachten Sie hierbei die maximalen Spannungs- und<br />
Stromaufnahmewerte.<br />
7
La<strong>de</strong>vorgang<br />
Das Gerät besitzt einen elektronischen Verpolungs-, Rückstrom-<br />
und Solarkurzschlussschutz. Nur wenn die Batterie<br />
richtig angeschlossen ist und ausreichend Leistung aus Sonnenlicht<br />
zur Verfügung steht, wird <strong>de</strong>r La<strong>de</strong>strom freigegeben<br />
(siehe „La<strong>de</strong>diagramm“).<br />
Hauptla<strong>de</strong>phase<br />
Ladung mit maximal verfügbarem Solar-La<strong>de</strong>strom bis die<br />
La<strong>de</strong>endspannung erreicht wird.<br />
Nachla<strong>de</strong>phase<br />
Die La<strong>de</strong>spannung wird in Abhändigkeit von <strong>de</strong>r Entladungstiefe<br />
gesteuert.<br />
Erhaltungsla<strong>de</strong>phase<br />
Die La<strong>de</strong>spannung ist auf 13,7 V eingestellt. Der La<strong>de</strong>strom<br />
sinkt dabei auf <strong>de</strong>n für die Batterie zum Ausgleich <strong>de</strong>r Selbstentladung<br />
notwendigen Wert ab. Verbraucher wer<strong>de</strong>n weiterhin<br />
versorgt. Übersteigt <strong>de</strong>r verbrauchte Strom <strong>de</strong>n verfügbaren<br />
Solar-La<strong>de</strong>strom, kann die Ladung nicht mehr aufrecht<br />
erhalten wer<strong>de</strong>n.<br />
Unterschreitet die Batteriespannung 12,5 V schaltet das Gerät<br />
– bei ausreichen<strong>de</strong>m Solar-La<strong>de</strong>strom – automatisch in die<br />
Hauptla<strong>de</strong>phase.<br />
8<br />
Gasungsregelung<br />
Die La<strong>de</strong>endspannung wird in Abhängigkeit <strong>de</strong>r Entla<strong>de</strong>tiefe<br />
verän<strong>de</strong>rt. Wenn eine Batterie lange Zeit ohne je<strong>de</strong> Gasentwicklung<br />
betrieben wird, besteht die Gefahr, dass sich eine<br />
schädliche Säureschichtung ausbil<strong>de</strong>t. Diese Säureschichtung<br />
kann durch begrenztes, kontrolliertes Gasen beseitigt wer<strong>de</strong>n.<br />
Diese Funktion wird von <strong>de</strong>r Gasungsregelung erfüllt. Die Gasungsregelung<br />
setzt dann, wenn die Batterie stärker entla<strong>de</strong>n<br />
war und die „Gasung-Aktiv“- Spannung unterschritten wur<strong>de</strong><br />
<strong>de</strong>n Überla<strong>de</strong>schutz so lange außer Kraft, bis die sogenannte<br />
Gasungsendspannung erreicht wird. Außer<strong>de</strong>m sorgt <strong>de</strong>r<br />
Gasungsregler bei starker Zyklisierung für die Erhöhung <strong>de</strong>r<br />
La<strong>de</strong>spannung, dadurch wird die Batteriekapazität besser<br />
ausgenutzt. Diese Regelung ist ebenfalls temperaturgeführt<br />
und auch für Gelbatterien geeignet.<br />
Parallelbetrieb<br />
Wird während <strong>de</strong>r Batterieladung Verbraucherstrom entnommen,<br />
so wird dieser aus <strong>de</strong>m verfügbaren Solar-La<strong>de</strong>strom<br />
bedient. Übersteigt <strong>de</strong>r verbrauchte Strom <strong>de</strong>n verfügbaren<br />
Solar-La<strong>de</strong>strom, kann das Gerät die Batterie nicht la<strong>de</strong>n. Das<br />
Gerät beginnt automatisch mit <strong>de</strong>r Ladung, wenn wie<strong>de</strong>r ausreichend<br />
Solar-La<strong>de</strong>strom verfügbar ist.
Schalten <strong>de</strong>s optionalen<br />
Verbraucherausganges<br />
Durch Drücken <strong>de</strong>r Taste (T) wird <strong>de</strong>r Verbraucherausgang<br />
eingeschaltet. Durch nochmaliges Drücken <strong>de</strong>r Taste (T) wird<br />
<strong>de</strong>r Verbraucherausgang abgeschaltet.<br />
Funktionsanzeige<br />
Die grüne LED (H3) und die rote LED (H2) innerhalb <strong>de</strong>s Batteriesymbols<br />
zeigen <strong>de</strong>n aktuellen La<strong>de</strong>zustand (SOC) <strong>de</strong>r<br />
Batterie an.<br />
SOC Anzeige Ursache<br />
rote LED (H2) und<br />
grüne LED (H3) leuchten<br />
nicht<br />
Keine Batterie angeschlossen.<br />
Anschlüsse und Batterie<br />
prüfen.<br />
Auf richtige Polung achten.<br />
rote LED (H2) leuchtet Batterie ist entla<strong>de</strong>n.<br />
Optionaler Verbraucherausgang<br />
ist <strong>de</strong>aktiviert<br />
(Tiefentla<strong>de</strong>schutz)<br />
rote LED (H2) und<br />
grüne LED (H3) leuchten<br />
Die Ladung <strong>de</strong>r Batterie wird<br />
durch das Leuchtverhältnis<br />
<strong>de</strong>r LEDs visualisiert.<br />
grüne LED (H3) leuchtet Die Batterie ist voll gela<strong>de</strong>n<br />
> 13,7 V<br />
Die gelbe LED (H1) innerhalb <strong>de</strong>s Sonnensymbols zeigt die<br />
Ladung <strong>de</strong>r Batterie an.<br />
La<strong>de</strong>anzeige Ursache<br />
gelbe LED (H1) aus Nicht ausreichend Solarenergie<br />
vorhan<strong>de</strong>n. Die Batterie<br />
wird nicht gela<strong>de</strong>n.<br />
gelbe LED (H1) leuchtet Batterie wird gela<strong>de</strong>n<br />
gelbe LED (H1) blinkt Die La<strong>de</strong>endspannung und<br />
damit die Nachla<strong>de</strong>- / Erhaltungsla<strong>de</strong>phase<br />
ist erreicht.<br />
Je kürzer die LED blinkt, <strong>de</strong>sto<br />
weniger wird gela<strong>de</strong>n.<br />
H1<br />
H3<br />
H2<br />
13,7 V<br />
≈11 V<br />
Wartung<br />
Display<br />
Vor allen Wartungsarbeiten am Gerät unbedingt die<br />
Stromzufuhr unterbrechen. Solarmodule z. B. mit einem<br />
Karton ab<strong>de</strong>cken.<br />
Reinigen Sie das Gerät mit einem trockenen, fusselfreien Tuch.<br />
9
Technische Daten<br />
Angaben gelten bei einer Umgebungstemperatur von 25 °C<br />
Elektrische Werte<br />
Betriebsspannung 12 V<br />
max. Eingangsspannung 47 V<br />
Spannungsbereich 8 – 15 V<br />
Abschaltschwelle optionaler<br />
Verbraucherausgang<br />
(Tiefentla<strong>de</strong>schutz)<br />
11 – 11,5 V<br />
Wie<strong>de</strong>reinschaltung<br />
12,5 V<br />
zul. Umgebungstemperaturbereich<br />
-25 °C – +50 °C<br />
zul. Lagertemperaturbereich -35 °C – +80 °C<br />
Eigenverbrauch 3 mA<br />
Ströme<br />
max. Modulstrom 3 A (ca. 45 Wp)<br />
max. Ausgangsstrom 3 A<br />
optionaler<br />
Verbraucherausgang<br />
max. 3 A geschaltet<br />
Batteriekapazität 30 – 75 Ah<br />
10<br />
La<strong>de</strong>spannungen<br />
Nachla<strong>de</strong>phase 14,4 V<br />
Erhaltungsla<strong>de</strong>phase 13,7 V<br />
Hauptla<strong>de</strong>phase<br />
Umschaltspannung<br />
12,5 V<br />
Maximale La<strong>de</strong>spannung 15,6 V<br />
Temperaturkompensation -24 mV / K<br />
Mechanische Werte<br />
Schutzart IP 32<br />
Montage Wand<strong>montage</strong><br />
Gewicht 160 g<br />
Anschlussklemmen 6 mm² (feindrahtig)<br />
10 mm² (einzeldrahtig)<br />
Abmessungen L x B x H 146 x 90 x 33 mm<br />
Maximale Feuchtigkeit<br />
(nicht kon<strong>de</strong>nsierend)<br />
95 %
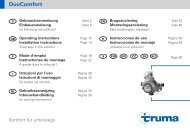
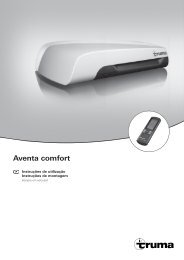
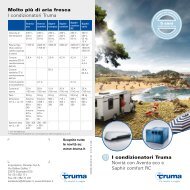
La<strong>de</strong>diagramm<br />
HL = Hauptla<strong>de</strong>phase<br />
NL = Nachla<strong>de</strong>phase<br />
EL = Erhaltungsladung<br />
U[V]<br />
UNL UEL UHL 0<br />
HL<br />
NL<br />
EL<br />
Bild 2: La<strong>de</strong>diagramm (prinzipieller Verlauf)<br />
Technische Än<strong>de</strong>rungen vorbehalten!<br />
Entsorgung<br />
t[h]<br />
Das Gerät ist gemäß <strong>de</strong>n administrativen Bestimmungen<br />
<strong>de</strong>s jeweiligen Verwendungslan<strong>de</strong>s zu entsorgen. Nationale<br />
Vorschriften und Gesetze (in Deutschland ist dies z. B. die<br />
Altfahrzeug-Verordnung) müssen beachtet wer<strong>de</strong>n.<br />
Konformitätserklärung<br />
1. Stammdaten <strong>de</strong>s Herstellers<br />
Name: <strong>Truma</strong> <strong>Gerätetechnik</strong> GmbH & Co. KG<br />
Anschrift: Wernher-von-Braun-Str. 12, D-85640 Putzbrunn<br />
2. I<strong>de</strong>ntifikation <strong>de</strong>s Gerätes<br />
Typ / Ausführung:<br />
Solar-La<strong>de</strong>automat SC 3<br />
3. Erfüllt die Anfor<strong>de</strong>rungen folgen<strong>de</strong>r EG-Richtlinien<br />
3.1 EMV-Richtlinie 2004/108/EG<br />
3.2 Elektrische Sicherheit (LVD) 2006/95/EG<br />
3.3 Altfahrzeug-Richtlinie 2000/53/EG<br />
und trägt das CE-Zeichen.<br />
4. Grundlage <strong>de</strong>s Konformitätsnachweises<br />
DIN EN 60730-1, DIN EN 60730-2-11, DIN EN 55014-1, DIN<br />
EN 55022, DIN EN 61000-3-2, -3-3, -4-2, -4-4, -4-5, -4-6, -4-11<br />
5. Angaben zur Funktion <strong>de</strong>s Unterzeichners<br />
Unterschrift: Dirk Brunner Putzbrunn, 07.01.2013<br />
Leitung Produktcenter Strom<br />
11
<strong>Truma</strong> Hersteller Garantieerklärung<br />
1. Garantiefall<br />
Der Hersteller gewährt Garantie für Mängel <strong>de</strong>s Gerätes, die auf Material-<br />
o<strong>de</strong>r Fertigungsfehler zurückzuführen sind. Daneben bestehen<br />
die gesetzlichen Ge währ leis tungsansprüche gegen <strong>de</strong>n Verkäufer fort.<br />
Der Garantieanspruch besteht nicht:<br />
– für Verschleißteile und bei natürlicher Abnutzung,<br />
– infolge Verwendung von an<strong>de</strong>ren als <strong>Truma</strong> Originalteilen in <strong>de</strong>n<br />
Geräten,<br />
– bei Gasdruck-Regelanlagen infolge Schä<strong>de</strong>n durch Fremdstoffe<br />
(z. B. Öle, Weichmacher) im Gas,<br />
– infolge Nichteinhaltung <strong>de</strong>r <strong>Truma</strong> Einbau- und<br />
Gebrauchsanweisungen,<br />
– infolge unsachgemäßer Behandlung,<br />
– infolge unsachgemäßer Transportverpackung.<br />
2. Umfang <strong>de</strong>r Garantie<br />
Die Garantie gilt für Mängel im Sinne von Ziffer 1, die innerhalb von<br />
24 Monaten seit Abschluss <strong>de</strong>s Kaufvertrages zwischen <strong>de</strong>m Verkäufer<br />
und <strong>de</strong>m Endverbraucher eintreten. Der Hersteller wird solche<br />
Mängel durch Nacherfüllung beseitigen, das heißt nach seiner Wahl<br />
durch Nachbesserung o<strong>de</strong>r Ersatzlieferung. Leistet <strong>de</strong>r Hersteller Garantie,<br />
beginnt die Garantiefrist hinsichtlich <strong>de</strong>r reparierten o<strong>de</strong>r ausgetauschten<br />
Teile nicht von neuem, son<strong>de</strong>rn die alte Frist läuft weiter.<br />
Weitergehen<strong>de</strong> Ansprüche, insbeson<strong>de</strong>re Scha<strong>de</strong>nsersatzansprüche<br />
<strong>de</strong>s Käufers o<strong>de</strong>r Dritter sind ausgeschlossen. Die Vorschriften <strong>de</strong>s<br />
Produkthaf tungsge setzes bleiben unbe rührt.<br />
Die Kosten <strong>de</strong>r Inanspruchnahme <strong>de</strong>s <strong>Truma</strong> Werkskun<strong>de</strong>ndienstes<br />
zur Beseitigung eines unter die Garantie fallen<strong>de</strong>n Mangels – insbeson<strong>de</strong>re<br />
Transport-, Wege-, Arbeits- und Materialkosten – trägt<br />
<strong>de</strong>r Hersteller, soweit <strong>de</strong>r Kun<strong>de</strong>ndienst innerhalb von Deutschland<br />
12<br />
eingesetzt wird. Kun<strong>de</strong>ndiensteinsätze in an<strong>de</strong>ren Län<strong>de</strong>rn sind nicht<br />
von <strong>de</strong>r Garantie ge<strong>de</strong>ckt.<br />
Zusätzliche Kosten aufgrund erschwerter Aus- und Einbaubedingungen<br />
<strong>de</strong>s Gerätes (z. B. De<strong>montage</strong> von Möbel- o<strong>de</strong>r Karosserieteilen)<br />
können nicht als Garantielei stung anerkannt wer<strong>de</strong>n.<br />
3. Geltendmachung <strong>de</strong>s Garantiefalles<br />
Die Anschrift <strong>de</strong>s Herstellers lautet:<br />
<strong>Truma</strong> <strong>Gerätetechnik</strong> GmbH & Co. KG,<br />
Wernher-von-Braun-Straße 12,<br />
85640 Putzbrunn, Deutschland<br />
Bei Störungen wen<strong>de</strong>n Sie sich bitte an das <strong>Truma</strong> Servicezentrum<br />
o<strong>de</strong>r an einen unserer autorisierten Servicepartner (siehe <strong>Truma</strong> Serviceheft<br />
o<strong>de</strong>r www.truma.com). Bezeichnen Sie bitte Ihre Beanstandungen<br />
im Detail und geben Sie die Fabriknummer <strong>de</strong>s Gerätes sowie<br />
das Kaufdatum an.<br />
Damit <strong>de</strong>r Hersteller prüfen kann, ob ein Garantiefall vorliegt, ist durch<br />
<strong>de</strong>n Endverbraucher das Gerät auf seine Gefahr zum Hersteller /<br />
Servicepartner zu bringen o<strong>de</strong>r ihm zu übersen<strong>de</strong>n. Bei Schä<strong>de</strong>n am<br />
Wärmetauscher ist <strong>de</strong>r verwen<strong>de</strong>te Gasdruckregler mit einzusen<strong>de</strong>n.<br />
Bei Klimageräten:<br />
Zur Vermeidung von Transportschä<strong>de</strong>n darf das Gerät nur nach Rücksprache<br />
mit <strong>de</strong>m <strong>Truma</strong> Servicezentrum Deutschland o<strong>de</strong>r <strong>de</strong>m jeweiligen<br />
autorisierten Servicepartner versandt wer<strong>de</strong>n. An<strong>de</strong>rnfalls trägt<br />
das Risiko für eventuell entstehen<strong>de</strong> Transportschä<strong>de</strong>n <strong>de</strong>r Versen<strong>de</strong>r.<br />
Bei Einsendung ins Werk bitte per Frachtgut versen<strong>de</strong>n. Im Garantiefall<br />
übernimmt das Werk die Kos ten <strong>de</strong>r Einsendung und Rücksendung.<br />
Liegt kein Garantiefall vor, gibt <strong>de</strong>r Hersteller <strong>de</strong>m Kun<strong>de</strong>n<br />
Bescheid und nennt die vom Hersteller nicht zu übernehmen<strong>de</strong>n<br />
Reparatur kosten; in diesem Fall gehen auch die Versandkosten zu<br />
Lasten <strong>de</strong>s Kun<strong>de</strong>n.
Einbauanweisung<br />
Sicherheitshinweise<br />
In diesem Gerät sind Bauteile eingebaut, die einen<br />
Funken o<strong>de</strong>r Lichtbogen erzeugen können!<br />
Die Montage und <strong>de</strong>r Anschluss von elektrischen Geräten<br />
muss grundsätzlich durch geeignetes Fachpersonal erfolgen!<br />
Solarmodule erzeugen bei Lichteinfall Strom. Auch bei geringem<br />
Lichteinfall steht die volle Spannung an. Die Leerlaufspannung<br />
kann doppelt so hoch sein. Keine stromführen<strong>de</strong>n<br />
Teile berühren. Solarmodule vor Montage- und Installationsarbeiten<br />
z. B. mit einem Karton ab<strong>de</strong>cken.<br />
Das Gerät wur<strong>de</strong> für <strong>de</strong>n Anschluss von Solarmodulen entwickelt.<br />
Nur geeignete Module z. B. <strong>Truma</strong> SM 23 verwen<strong>de</strong>n.<br />
Die maximalen Spannungs- und Stromaufnahmewerte<br />
beachten.<br />
Nur vorgeschriebene Leitungsquerschnitte und Sicherungsstärken<br />
verwen<strong>de</strong>n!<br />
Das Gerät nicht in Feuchträumen (z. B. Bä<strong>de</strong>r) o<strong>de</strong>r in Räumen,<br />
in <strong>de</strong>nen leicht entzündliche Gasgemische entstehen<br />
können installieren o<strong>de</strong>r betreiben.<br />
Der Einbau <strong>de</strong>s Gerätes muss <strong>de</strong>n technischen und administrativen<br />
Bestimmungen <strong>de</strong>s jeweiligen Verwendungslan<strong>de</strong>s<br />
entsprechen (z. B. EN 1648). Nationale Vorschriften und Regelungen<br />
müssen beachtet wer<strong>de</strong>n.<br />
Lieferumfang<br />
– 1 Solar-La<strong>de</strong>automat<br />
– 1 Gebrauchs- und Einbauanweisung<br />
Montage<br />
Siehe Seite 3, Bild B, C<br />
Das Gerät ist vor Feuchtigkeit und Nässe geschützt aufzustellen.<br />
Der Aufstellungsort muss sauber, trocken und gut belüftet<br />
sein. Das Gerät sollte in <strong>de</strong>r Nähe <strong>de</strong>r Batterie angebracht<br />
wer<strong>de</strong>n. Bei Betrieb kann sich das Gehäuse auf ca. 80 °C<br />
erwärmen.<br />
Achten sie darauf, dass die Lüftungsschlitze frei bleiben!<br />
Unzureichen<strong>de</strong> Belüftung kann zur Überhitzung<br />
<strong>de</strong>s Gerätes führen!<br />
Der Einbauraum für das Gerät muss oben und seitlich mit<br />
Lüftungsöffnungen versehen sein, die eine Gesamtöffnung<br />
von 100 cm² ergeben.<br />
Steigt die Geräteinnentemperatur durch mangeln<strong>de</strong> Luftzirkulation<br />
o<strong>de</strong>r zu hohe Umgebungstemperatur, kann das Gerät<br />
beschädigt wer<strong>de</strong>n.<br />
Flüssigelektrolytbatterien müssen in einer separaten Box mit<br />
einer Entlüftung nach außen aufgestellt wer<strong>de</strong>n. Eine separate<br />
Box ist bei Gel- und AGM-Batterien nicht notwendig. Die Installationsvorschriften<br />
<strong>de</strong>s Batterieherstellers beachten.<br />
Das Gerät mit zwei Schrauben (Durchmesser 4 mm – keine<br />
Senkkopfschrauben) sicher befestigen. Schraubenlänge und<br />
Drehmoment abhängig vom Untergrund.<br />
13
Anschluss<br />
Leitungslängen und -querschnitte<br />
Ausführung gemäß EN 1648-1 und VDE 0100, Teil 721.<br />
Sicherungen F1<br />
5 A, träge<br />
Sicherungen unbedingt nahe <strong>de</strong>r Energiequelle<br />
(z. B. Batterie) anbringen. Nur vorgeschriebene Leitungsquerschnitte<br />
und Sicherungsstärken verwen<strong>de</strong>n!<br />
Anschluss Energiequelle / Verbraucher<br />
Verbin<strong>de</strong>n Sie das Gerät gemäß Anschlussplan mit <strong>de</strong>n Solarmodulen<br />
und <strong>de</strong>n Batterien. Achten Sie auf <strong>de</strong>n richtigen<br />
Anschluss <strong>de</strong>r Pole.<br />
Verschalten Sie mehrere Solarmodule immer parallel. Verwen<strong>de</strong>n<br />
Sie hierzu nur Module gleicher typischer Spannungswerte<br />
(ca. 18 V). Fragen Sie Ihren Händler nach <strong>de</strong>m <strong>Truma</strong><br />
Kabelset Erweiterung.<br />
Anschlussreihenfolge beachten. Schließen Sie die<br />
Verbraucher <strong>de</strong>s Wohnwagens (Bild A, a) direkt an die<br />
Batterie an. Verwen<strong>de</strong>n Sie <strong>de</strong>n optionalen Verbraucherausgang<br />
nur für nicht geer<strong>de</strong>te Kleinverbraucher z. B. Lampe.<br />
1. Batterie an <strong>de</strong>n La<strong>de</strong>regler anschließen –<br />
Plus und Minus<br />
2. Solarmodule an <strong>de</strong>n La<strong>de</strong>regler anschließen –<br />
Plus und Minus<br />
3. Gleichstromverbraucher an optionalen Verbraucherausgang<br />
anschließen Plus - Minus<br />
Bei <strong>de</strong>r Deinstallation gilt die umgekehrte Reihenfolge.<br />
14<br />
Kabelfixierung<br />
Alle Leitungen (z. B. zu Energiequellen, Verbrauchern und Zubehör)<br />
mit Kabelbin<strong>de</strong>rn sichern.<br />
Anschlussplan<br />
Siehe Seite 2, Bild A<br />
Inbetriebnahme<br />
Das Gerät ist in Betrieb, sobald eine Batterie angeschlossen<br />
ist (Anschlussreihenfolge beachten).
Solar Battery Charger SC 3<br />
Contents<br />
Operating instructions<br />
Glossary ............................................................................... 15<br />
Symbols used ...................................................................... 15<br />
Safety instructions ........................................................... 16<br />
Inten<strong>de</strong>d use ..................................................................... 17<br />
Use for incorrect purpose .................................................... 17<br />
Battery care ...................................................................... 17<br />
Device components ......................................................... 18<br />
Operation ........................................................................... 18<br />
Charging procedure ......................................................... 19<br />
Switching the optional consumer output .................... 20<br />
Operating indicator .......................................................... 20<br />
Maintenance ..................................................................... 20<br />
Technical data ................................................................... 21<br />
Charge diagram ................................................................... 22<br />
Disposal ............................................................................. 22<br />
Declaration of conformity ............................................... 22<br />
<strong>Truma</strong> manufacturer warranty <strong>de</strong>claration .................. 23<br />
Installation instructions<br />
Safety instructions ........................................................... 24<br />
Scope of <strong>de</strong>livery .............................................................. 24<br />
Assembly ........................................................................... 24<br />
Connection ........................................................................ 25<br />
Connection diagram ............................................................ 25<br />
Taking into operation ...................................................... 25<br />
Operating instructions<br />
Before connecting and starting up the <strong>de</strong>vice, please be sure<br />
to read the installation and operating instructions!<br />
Glossary<br />
AGM battery Lead-acid battery in which the<br />
electrolyte is held in an Absorbed<br />
Glass Mat.<br />
Battery OPTIMA® YT S corresponds to an AGM battery.<br />
Symbols used<br />
Symbol indicates a possible hazard.<br />
Note containing information and tips.<br />
15
Safety instructions<br />
When using electrical <strong>de</strong>vices, the following basic<br />
safety measures must be taken to provi<strong>de</strong> protection<br />
from electric shock, injury and the risk of fire. Please read and<br />
note these instructions before using the <strong>de</strong>vice.<br />
Set-up<br />
Please ensure that the equipment is properly set up and cannot<br />
fall over or fall down. Always route the cables so that they<br />
cannot be tripped over. Do not leave electrical <strong>de</strong>vices out in<br />
the rain. Do not operate electrical <strong>de</strong>vices in a damp or wet<br />
environment. Do not operate electrical <strong>de</strong>vices in the vicinity<br />
of flammable liquids or gases.<br />
Protection from electric shock<br />
Do not use <strong>de</strong>vices with damaged housings or cables. Please<br />
ensure that the cables are properly routed. Do not pull on the<br />
cables.<br />
Solar modules generate electricity when sunlight falls on<br />
them. The full voltage is present, even if little light is present.<br />
The idle voltage can be twice as high. Do not touch live components.<br />
Cover solar modules with a cardboard box, for example,<br />
before carrying out assembly or installation work.<br />
Usage<br />
This <strong>de</strong>vice is not inten<strong>de</strong>d for persons (including children)<br />
with limited physical, sensory or mental capabilities or lack<br />
of experience / knowledge, unless they are supervised by a<br />
person who is responsible for their safety or provi<strong>de</strong>d with instructions<br />
on how to use the <strong>de</strong>vice.<br />
Children should be supervised in or<strong>de</strong>r to ensure that they do<br />
not use the <strong>de</strong>vice as a plaything.<br />
16<br />
Please do not use electrical <strong>de</strong>vice for any purpose other than<br />
the one stipulated by the manufacturer. The ventilation slits in<br />
the housing must be kept free and must not be covered with<br />
luggage, towels or clothing etc.<br />
Attention<br />
Batteries can generate explosive gas during charging and operation.<br />
Keep away from flames and ignition sources. Ensure<br />
that the battery compartment is sufficiently ventilated.<br />
Repairs<br />
Do not make any repairs or modifications to the <strong>de</strong>vice.<br />
Please contact your <strong>de</strong>aler or <strong>Truma</strong> Service (see service book<br />
or www.truma.com).<br />
Accessories<br />
Please only use accessories and auxiliary <strong>de</strong>vices that have<br />
been supplied or recommen<strong>de</strong>d by the manufacturer.
Inten<strong>de</strong>d use<br />
The Solar Battery Charger is used to charge 12 V lead batteries<br />
consisting of 6 individual parts (e.g. car battery) with<br />
a capacity of 30 – 75 Ah. The <strong>de</strong>vice has been <strong>de</strong>veloped<br />
for connecting solar modules. Only suitable modules may<br />
be used, e.g. <strong>Truma</strong> SM 23. Please pay attention to the maximum<br />
voltage and power consumption values. The preferred<br />
usage area for the battery charger is batteries with gel, AGM<br />
or liquid electrolyte.<br />
The <strong>de</strong>vice is inten<strong>de</strong>d for interior installation.<br />
If the <strong>de</strong>vice is being connected to the power supply using<br />
motor vehicle cable harnesses, e.g. those of a tractor vehicle,<br />
it must always be ensured that a type-approved interface is<br />
used.<br />
Use for incorrect purpose<br />
The <strong>de</strong>vice is not suitable for charging:<br />
– 6 V batteries or 6 V lead batteries,<br />
– non-rechargeable batteries,<br />
– nickel-cadmium batteries, for example.<br />
If batteries with a nominal voltage of 6 V are charged using<br />
this <strong>de</strong>vice, gassing will start immediately.<br />
Explosive <strong>de</strong>tonating gas will occur.<br />
The <strong>de</strong>vice is only suitable for controlling solar modules. Do<br />
not connect any other voltage sources (e.g. 230 V mains<br />
voltage) to the <strong>de</strong>vice. This can lead to <strong>de</strong>struction of the<br />
<strong>de</strong>vice and / or the sources. If other voltage sources are going<br />
to be used with the <strong>de</strong>vice, please consult your <strong>de</strong>aler.<br />
Battery care<br />
(including maintenance-free batteries)<br />
In or<strong>de</strong>r to achieve a long battery service life, attention must<br />
be paid to the following points:<br />
– Batteries should be fully charged before and after removing<br />
power.<br />
– During long periods of inactivity (no sun) the battery must<br />
be disconnected and charged for 24 hours at least every<br />
12 weeks.<br />
In winter, store fully charged battery in a cool and frost-free<br />
place and recharge at regular intervals (every 12 weeks).<br />
17
Device components<br />
18<br />
MADE IN IN GERMANY<br />
Fig. 1: Device components<br />
H1 H2 H3 T<br />
X1 X2 X3<br />
H1 LED- Solar charge indicator<br />
H2 LED- Battery charge level indicator<br />
H2 LED- Battery charge level indicator<br />
T Optional consumer outlet button<br />
X1 Solar module connection<br />
X2 Battery connection<br />
X3 Connection of optional consumer outlet for<br />
DC consumers (e.g. lamp)<br />
Operation<br />
The <strong>de</strong>vice is equipped with mo<strong>de</strong>rn pulse width modulated<br />
three-phase charging technology. This technology makes it<br />
possible to have high power with light weight and compact<br />
dimensions. It uses high-quality electronics to achieve a high<br />
<strong>de</strong>gree of efficiency. Automatic charging takes place in a protective<br />
way without damaging the batteries by overcharging<br />
them. This increases the service life of the batteries consi<strong>de</strong>rably.<br />
The <strong>de</strong>vice is suitable for batteries with liquid, gel or<br />
AGM technology The charging procedure is adapted automatically<br />
using an internal temperature sensor.<br />
The <strong>de</strong>vice is <strong>de</strong>signed for continuous and parallel operation.<br />
Consumers can remain permanently connected or can be<br />
switched on / switched off. Consumers are supplied and the<br />
battery is charged at the same time. The consumer current<br />
should be less than the solar charging current when this takes<br />
place, otherwise the batteries will not be charged.<br />
The optional consumer outlet can be enabled using the button.<br />
This is only used to connect small consumers to the battery<br />
charger, such as a lamp.<br />
Please pay attention to the maximum voltage and power consumption<br />
values.
Charging procedure<br />
The <strong>de</strong>vice has electronic polarity reversal protection, return<br />
current protection and solar short circuit protection. The<br />
charge current is only enabled if the the battery is correctly<br />
connected and sufficient sunlight power is available (see<br />
"charge diagram").<br />
Main charging phase<br />
Charging with the maximum available solar charging current<br />
until the final charging voltage is reached.<br />
Post-charging phase<br />
The post-charging phase is controlled <strong>de</strong>pending on the discharge<br />
<strong>de</strong>pth.<br />
Trickle charge phase<br />
The charge voltage is set to 13,7 V. The charge current is<br />
reduced to the level that is nee<strong>de</strong>d for the battery to compensate<br />
for self-discharging. The consumers continue to be<br />
supplied. If the consumed current exceeds the available solar<br />
charging current, the charge can no longer be maintained.<br />
If the battery voltage drops below 12.5 V the <strong>de</strong>vice automatically<br />
switches to the main charging phase (if enough solar<br />
charging current is available).<br />
Gassing control<br />
The charging end voltage is modified <strong>de</strong>pending on the discharge<br />
<strong>de</strong>pth. If a battery is operated for a long time without<br />
any gas <strong>de</strong>velopment, there is a risk of damaging acid stratification<br />
building up. This acid stratification can be remedied<br />
by means of limited, controlled gassing. This function is<br />
carried out by the gassing control. If the battery charge is<br />
low and the "gassing active" voltage has been un<strong>de</strong>rshot, the<br />
gassing control disables the overcharging protection until the<br />
so-called gassing end voltage has been reached. The gassing<br />
controller also increases the charge voltage in the event of<br />
strong cyclization, which makes better use of the battery capacity.<br />
This control is also temperature-<strong>de</strong>pen<strong>de</strong>nt, and also<br />
suitable for gel batteries.<br />
Parallel operation<br />
If consumer current is removed during battery charging, it is<br />
taken from the available solar charge current. If the consumed<br />
current exceeds the available solar charging current, the<br />
<strong>de</strong>vice cannot charge the battery. The <strong>de</strong>vice automatically<br />
starts charging when enough solar charge current is available<br />
again.<br />
19
Switching the optional consumer output<br />
Pressing the button (T) enables the consumer output. Pressing<br />
the button (T) again disables the consumer output.<br />
Operating indicator<br />
The green LED (H3) and the red LED (H2) insi<strong>de</strong> the battery<br />
symbol show the current state of charge (SOC) of the battery.<br />
SOC indicator Cause<br />
Red LED (H2) and<br />
green LED (H3) not<br />
illuminated<br />
20<br />
No battery connected.<br />
Check connections and<br />
battery.<br />
Check that polarity is<br />
correct.<br />
Red LED (H2) illuminated Battery is discharged.<br />
Optional consumer output is<br />
<strong>de</strong>activated (<strong>de</strong>ep discharge<br />
protection)<br />
Red LED (H2) and<br />
green LED (H3) illuminated<br />
Charge of the battery is indicated<br />
by the illumination<br />
relationship of the LEDs.<br />
Green LED (H3) illuminated Battery is fully charged<br />
> 13.7 V<br />
The yellow LED (H1) insi<strong>de</strong> the sun symbol indicates the<br />
charge of the battery.<br />
Charge indicator Cause<br />
Yellow LED off Insufficient solar energy<br />
available. Battery is not<br />
being charged.<br />
Yellow LED illuminated Battery is being charged<br />
Yellow LED (H1) flashing Charge voltage and therefore<br />
post-charging / trickle charge<br />
phase has been reached. The<br />
quicker the LED flashes, the<br />
lower the charging level.<br />
H1<br />
H3<br />
H2<br />
13,7 V<br />
≈11 V<br />
Display<br />
Maintenance<br />
Always be sure to shut the power off before carrying<br />
out any maintenance work on the <strong>de</strong>vice. Cover solar<br />
module with a cardboard box.<br />
Clean the <strong>de</strong>vice with a dry, lint-free cloth.
Technical data<br />
The information applies at an ambient temperature of 25 °C<br />
Electrical values<br />
Operating voltage 12 V<br />
Max. input voltage 47 V<br />
Voltage range 8 – 15 V<br />
Shut-off threshold of optional<br />
consumer output<br />
(<strong>de</strong>ep discharge protection)<br />
11 – 11.5 V<br />
Reactivation<br />
12.5 V<br />
Perm. ambient temperature<br />
range<br />
-25 °C – +50 °C<br />
Perm. storage temperature<br />
range<br />
-35 °C – +80 °C<br />
Own consumption 3 mA<br />
Currents<br />
Max. module current 3 A (approx. 45 Wp)<br />
Max. output current 3 A<br />
Optional consumer output max. 3 A switched<br />
Battery capacity 30 – 75 Ah<br />
Charge voltages<br />
Post-charging phase 14.4 V<br />
Trickle charge phase 13.7 V<br />
Main charging phase<br />
changeover voltage<br />
12.5 V<br />
Maximum charge voltage 15.6 V<br />
Temperature compensation -24 mV / K<br />
Mechanical values<br />
Protection class: IP 32<br />
Assembly Wall mounting<br />
Weight 160 g<br />
Connecting terminals 6 mm² (fine-wire)<br />
10 mm² (single-wire)<br />
Dimensions L x W x H: 146 x 90 x 33 mm<br />
Maximum humidity<br />
(non-con<strong>de</strong>nsing)<br />
95 %<br />
21
Charge diagram<br />
HL = Main charging phase<br />
NL = Post-charging phase<br />
EL = Trickle charge<br />
22<br />
U[V]<br />
UNL UEL UHL 0<br />
HL<br />
NL<br />
Fig. 2: Charge diagram (basic trend)<br />
EL<br />
The right to effect technical modifications is reserved!<br />
Disposal<br />
t[h]<br />
The <strong>de</strong>vice must be disposed of in line with the administrative<br />
regulations of the respective country in which it is used. National<br />
regulations and laws (in Germany, for example, the Endof-life<br />
Vehicle Regulation) must be observed.<br />
Declaration of conformity<br />
1. Information about the manufacturer<br />
Name: <strong>Truma</strong> <strong>Gerätetechnik</strong> GmbH & Co. KG<br />
Address: Wernher-von-Braun-Str. 12, D-85640 Putzbrunn<br />
2. Device i<strong>de</strong>ntification<br />
Type / mo<strong>de</strong>l:<br />
Solar Battery Charger SC 3<br />
3. Meets the requirements of the following EC Directives<br />
3.1 EMC directive 2004/108/EC<br />
3.2 Electrical safety (LVD) 2006/95/EC<br />
3.3 End-of-life vehicle directive 2000/53/EC<br />
and bears the CE symbol.<br />
4. Basis of the conformity assessment<br />
DIN EN 60730-1, DIN EN 60730-2-11, DIN EN 55014-1, DIN<br />
EN 55022, DIN EN 61000-3-2, -3-3, -4-2, -4-4, -4-5, -4-6, -4-11<br />
5. Signatory <strong>de</strong>tails<br />
Signature: Dirk Brunner Putzbrunn, 07.01.2013<br />
Electricity Product Center Manager
<strong>Truma</strong> manufacturer warranty <strong>de</strong>claration<br />
1. Case of warranty<br />
The manufacturer grants a warranty for malfunctions in the appliance<br />
which are based on material or production faults. In addition to this,<br />
the statutory warranty claims against the seller remain valid.<br />
A claim un<strong>de</strong>r warranty shall not pertain<br />
– to parts subject to wear and in cases of natural wear and tear,<br />
– as a result of using components in the units that are not original<br />
<strong>Truma</strong> parts,<br />
– to gas pressure regulation systems as a result of damage by foreign<br />
substances (e.g. oils, plasticisers) in the gas,<br />
– as a consequence of failure to respect <strong>Truma</strong> instructions for installation<br />
and use,<br />
– as a consequence of improper handling,<br />
– as a consequence of improper transport packing.<br />
2. Scope of warranty<br />
The warranty is valid for malfunctions as stated un<strong>de</strong>r item 1, which<br />
occur within 24 months after conclusion of the purchase agreement<br />
between the seller and the final consumer. The manufacturers will<br />
make good such <strong>de</strong>fects by subsequent fulfilment, i.e. at their discretion<br />
either by repair or replacement. In the event of manufacturers<br />
providing service un<strong>de</strong>r warranty, the term of the warranty shall not<br />
recommence anew with regard to the repaired or replaced parts;<br />
rather, the old warranty period shall continue to run. More extensive<br />
claims, in particular claims for compensatory damages by purchasers<br />
or third parties, shall be exclu<strong>de</strong>d. This does not affect the rules of the<br />
product liability law.<br />
The manufacturer shall bear the cost of employing the <strong>Truma</strong> customer<br />
service for the removal of a malfunction un<strong>de</strong>r warranty – in<br />
particular transportation costs, travelling expenses, job and material<br />
costs, as long as the service is carried out in Germany. The warranty<br />
does not cover customer service work in other countries.<br />
Additional costs based on complicated removal and installation conditions<br />
of the appliance (e.g. removal of furniture or parts of the vehicle<br />
body) do not come un<strong>de</strong>r warranty.<br />
3. Raising the case of warranty<br />
The manufacturer‘s address is:<br />
<strong>Truma</strong> <strong>Gerätetechnik</strong> GmbH & Co. KG,<br />
Wernher-von-Braun-Straße 12,<br />
85640 Putzbrunn, Germany<br />
Always notify the <strong>Truma</strong> Service Centre or one of our authorised service<br />
partners if problems are encountered (see <strong>Truma</strong> Service book or<br />
www.truma.com). Please <strong>de</strong>scribe you complaint in <strong>de</strong>tail and state<br />
the factory number of the <strong>de</strong>vice and the purchase date.<br />
In or<strong>de</strong>r for the manufacturer to be able to <strong>de</strong>termine whether an<br />
inci<strong>de</strong>nt subject to guarantee has occurred, the end user must, at his<br />
own risk, bring or send the <strong>de</strong>vice to the manufacturer or service partner.<br />
If there is damage to heat exchangers, the gas pressure regulator<br />
must also be sent back to the factory.<br />
With air conditioning systems:<br />
To avoid transportation damage, the unit may only be sent to the<br />
<strong>Truma</strong> Service Centre Germany or one of our authorised service partners<br />
if agreed beforehand. Otherwise the sen<strong>de</strong>r bears the risk for any<br />
transportation damage.<br />
Please send all shipment to the factory as freight. In cases un<strong>de</strong>r<br />
guarantee, the works shall bear the costs of <strong>de</strong>livery and return. If the<br />
damage is <strong>de</strong>emed not to be a warranty case, the manufacturer shall<br />
notify the customer and shall specify repair costs which shall not be<br />
borne by the manufacturer; in this case, the customer shall also bear<br />
the shipping costs.<br />
23
Installation instructions<br />
Safety instructions<br />
24<br />
This <strong>de</strong>vice contains components that can generate a<br />
spark or an arc!<br />
The installation and connection of electrical <strong>de</strong>vices must always<br />
be carried out by suitable electrical experts!<br />
Solar modules generate electricity when sunlight falls on<br />
them. The full voltage is present, even if little light is present.<br />
The idle voltage can be twice as high. Do not touch live components.<br />
Cover solar modules with a cardboard box, for example,<br />
before carrying out assembly or installation work.<br />
The <strong>de</strong>vice has been <strong>de</strong>veloped for connecting solar modules.<br />
Only suitable modules may be used, e.g. <strong>Truma</strong> SM 23.<br />
Please pay attention to the maximum voltage and power consumption<br />
values.<br />
Only use the prescribed line cross-sections and fuse<br />
strengths!<br />
Do not install or operate the <strong>de</strong>vice in wet rooms (e.g. bathrooms)<br />
or in rooms in which easily flammable gas mixtures<br />
can occur.<br />
The installation of the <strong>de</strong>vice must comply with the technical<br />
and administrative regulations of the respective country of<br />
use (e.g. EN 1648). National regulations and rules must be<br />
followed.<br />
Scope of <strong>de</strong>livery<br />
– 1 Solar Battery Charger<br />
– 1 Set of operating and installation instructions<br />
Assembly<br />
See page 3, fig. B, C<br />
The <strong>de</strong>vice must be protected from moisture and damp. The<br />
installation site must be clean, dry and well ventilated. The<br />
<strong>de</strong>vice should be installed in the vicinity of the battery. The<br />
housing can heat up to approx. 80 °C during operation.<br />
Ensure that the ventilation slits are kept free! Ina<strong>de</strong>quate<br />
ventilation can make the <strong>de</strong>vice overheat!<br />
The installation room the the <strong>de</strong>vice must have ventilation<br />
openings at the top and the si<strong>de</strong>s with a total opening size<br />
of 100 cm².<br />
If the internal temperature of the <strong>de</strong>vice increases because of<br />
lack of air circulation or an ambient temperature that is too<br />
high, the <strong>de</strong>vice may be damaged.<br />
Liquid electrolyte batteries must be installed in a separate box<br />
with ventilation leading to the outsi<strong>de</strong>. A separate box is not<br />
required for gel or AGM batteries. Pay attention to the battery<br />
manufacturer's installation instructions.<br />
Fix the <strong>de</strong>vice in place with two screws (diameter 4 mm – do<br />
not use countersunk head screws). The screw length and<br />
torque <strong>de</strong>pend on the subsurface.
Connection<br />
Line lengths and cross-sections<br />
Implementation in accordance with EN 1648-1 and VDE 0100,<br />
part 721.<br />
Fuses F1<br />
5 A, slow-acting<br />
The fuses must be installed close to the energy source<br />
(e.g. battery). Only use the prescribed line cross-sections<br />
and fuse strengths!<br />
Energy source / consumer connection<br />
Connect the <strong>de</strong>vice to the solar modules and the battery<br />
as per the connection diagram. Ensure that the polarity is<br />
correct.<br />
Multiple solar modules must always be connected in parallel.<br />
For this purpose, only use modules with the same typical<br />
voltage values (approx. 18 V). Ask your <strong>de</strong>aler about the<br />
<strong>Truma</strong> wiring loom extension.<br />
Pay attention to the connecting or<strong>de</strong>r. Connect the consumers<br />
of the caravan (fig. A, a) directly to the battery,<br />
The optional consumer output must only be used for nonearthed<br />
small consumers (e.g. lamp).<br />
1. Connect battery to charge controller –<br />
plus and minus<br />
2. Connect solar modules to charge controller –<br />
plus and minus<br />
3. Connect DC current consumers to the optional consumer<br />
output plus - minus<br />
Deinstallation takes place in the reverse or<strong>de</strong>r.<br />
Cable fixing<br />
Secure all cables (e.g. to power sources, consumers and accessories)<br />
with cable bin<strong>de</strong>rs.<br />
Connection diagram<br />
See page 2, fig. A<br />
Taking into operation<br />
The <strong>de</strong>vice is in operation as soon as a battery is connected<br />
(pay attention to connecting or<strong>de</strong>r).<br />
25
Chargeur automatique solaire SC 3<br />
Table <strong>de</strong>s matières<br />
Mo<strong>de</strong> <strong>d'emploi</strong><br />
Glossaire .............................................................................. 26<br />
Symboles utilisés ................................................................. 26<br />
Informations concernant la sécurité ............................. 27<br />
Utilisation .......................................................................... 28<br />
Utilisation non conforme .................................................... 28<br />
Entretien <strong>de</strong>s batteries ................................................... 28<br />
Éléments <strong>de</strong> l'appareil ..................................................... 29<br />
Fonctionnement ................................................................ 29<br />
Opération <strong>de</strong> recharge .................................................... 30<br />
Commutation <strong>de</strong> la sortie <strong>de</strong> consommateur<br />
optionnelle ........................................................................ 31<br />
Affichage <strong>de</strong> fonctions .................................................... 31<br />
Maintenance ..................................................................... 31<br />
Caractéristiques techniques ........................................... 32<br />
Diagramme <strong>de</strong> charge ......................................................... 33<br />
Mise au rebut .................................................................... 33<br />
Déclaration <strong>de</strong> conformité .............................................. 33<br />
Déclaration <strong>de</strong> garantie du fabricant <strong>Truma</strong> ................ 34<br />
<strong>Instructions</strong> <strong>de</strong> <strong>montage</strong><br />
Informations concernant la sécurité ............................. 35<br />
Volume <strong>de</strong> livraison ......................................................... 35<br />
Montage ............................................................................. 35<br />
Raccor<strong>de</strong>ment ................................................................... 36<br />
Plan <strong>de</strong> raccor<strong>de</strong>ment ......................................................... 36<br />
Mise en service ................................................................. 36<br />
26<br />
Mo<strong>de</strong> <strong>d'emploi</strong><br />
Impérativement lire les instructions <strong>de</strong> <strong>montage</strong> et le<br />
mo<strong>de</strong> <strong>d'emploi</strong> avant le raccor<strong>de</strong>ment et la mise en service<br />
<strong>de</strong> l'appareil !<br />
Glossaire<br />
Batterie AGM Batterie plomb-gel dans laquelle<br />
l'électrolyte est immobilisé dans<br />
un mat en fibre <strong>de</strong> verre (absorbed<br />
glass mat).<br />
La batterie OPTIMA® YT S correspond à une batterie AGM.<br />
Symboles utilisés<br />
Ce symbole indique <strong>de</strong>s risques possibles.<br />
Indication avec informations et conseils.
Informations concernant la sécurité<br />
Prendre les mesures <strong>de</strong> sécurité fondamentales suivantes<br />
lors <strong>de</strong> l'utilisation d'appareils électriques pour se<br />
protéger contre les chocs électriques, les blessures et le danger<br />
d'incendie. Lisez et observez ces indications avant d'utiliser<br />
l'appareil.<br />
Mise en place<br />
Veillez à la mise en place sûre <strong>de</strong>s appareils, à ce qu'ils ne<br />
puissent pas chuter ou se renverser. Posez les conduites toujours<br />
<strong>de</strong> sorte à éviter tout danger <strong>de</strong> trébuchement. N'exposez<br />
jamais les appareils électriques à la pluie. Ne faites jamais<br />
fonctionner les appareils électriques dans un environnement<br />
humi<strong>de</strong> ou mouillé. Ne faites pas fonctionner les appareils<br />
électriques à proximité <strong>de</strong> liqui<strong>de</strong>s ou <strong>de</strong> gaz combustibles.<br />
Protection contre les chocs électriques<br />
Faites fonctionner seulement les appareils dont le boîtier et les<br />
conduites sont intacts. Veillez à une pose sûre <strong>de</strong>s câbles. Ne<br />
tirez pas sur les câbles.<br />
Les modules solaires exposés à la lumière génèrent du courant.<br />
Une faible inci<strong>de</strong>nce <strong>de</strong> la lumière suffit pour produire<br />
à pleine tension. La tension à vi<strong>de</strong> peut être <strong>de</strong>ux fois plus<br />
élevée. Ne pas toucher <strong>de</strong> pièces conduisant du courant.<br />
Avant les travaux <strong>de</strong> <strong>montage</strong> et d'installation, recouvrir les<br />
modules solaires par exemple avec un carton.<br />
Utilisation<br />
Cet appareil n'est pas <strong>de</strong>stiné à être utilisé par <strong>de</strong>s personnes<br />
(y compris <strong>de</strong>s enfants) aux capacités physiques, sensorielles<br />
ou mentales limitées ou manquant d'expérience et/ou<br />
<strong>de</strong> connaissances à moins d'être sous la surveillance d'une<br />
personne responsable <strong>de</strong> leur sécurité ou d'avoir reçu <strong>de</strong>s instructions<br />
sur la manière d'utiliser l'appareil.<br />
Surveiller les enfants pour être sûr qu'ils ne jouent pas avec<br />
l'appareil.<br />
N'utilisez aucun appareil électrique hors <strong>de</strong> l'usage mentionné<br />
par le fabricant. Les fentes <strong>de</strong> ventilation sur le boîtier doivent<br />
être libres et ne doivent pas être recouvertes par <strong>de</strong>s bagages,<br />
serviettes ou vêtements etc.<br />
Attention<br />
Les batteries peuvent générer <strong>de</strong>s gaz explosifs lors <strong>de</strong> leur<br />
recharge et pendant le fonctionnement. Tenir les flammes et<br />
sources d'allumage à l'écart. Assurer une ventilation suffisante<br />
du compartiment <strong>de</strong> batteries.<br />
Réparation<br />
Ne procé<strong>de</strong>z à aucun travail <strong>de</strong> réparation ou <strong>de</strong> modification<br />
sur l'appareil. Adressez-vous à votre concessionnaire ou au<br />
service après-vente <strong>Truma</strong> (voir livret <strong>de</strong> service après-vente<br />
ou www.truma.com).<br />
Accessoires<br />
Utilisez uniquement <strong>de</strong>s accessoires et appareils supplémentaires<br />
fournis ou recommandés par le fabricant.<br />
27
Utilisation<br />
Le chargeur automatique solaire sert à charger <strong>de</strong>s accumulateurs<br />
au plomb 12 V composés <strong>de</strong> 6 cellules individuelles<br />
(par exemple une batterie <strong>de</strong> voiture) d'une capacité <strong>de</strong> 30 à<br />
75 Ah. L'appareil a été développé pour le raccor<strong>de</strong>ment <strong>de</strong><br />
modules solaires. Utiliser uniquement <strong>de</strong>s modules appropriés,<br />
par exemple <strong>Truma</strong> SM 23. Observer les valeurs maximales<br />
<strong>de</strong> tension et <strong>de</strong> consommation. Le domaine d'utilisation<br />
préférentiel du chargeur automatique sont les batteries à<br />
électrolyte au gel, AGM ou liqui<strong>de</strong>.<br />
L'appareil est <strong>de</strong>stiné au <strong>montage</strong> en intérieur.<br />
Lors du raccor<strong>de</strong>ment <strong>de</strong> l'alimentation en courant via <strong>de</strong>s<br />
faisceaux <strong>de</strong> câble, par exemple d'un véhicule tracteur, veiller<br />
à ce que celui-ci se fasse exclusivement via une interface<br />
homologuée.<br />
28<br />
Utilisation non conforme<br />
L'appareil ne se prête pas au chargement <strong>de</strong> batteries<br />
telles que :<br />
– <strong>de</strong>s batteries 6 V ou <strong>de</strong>s accumulateurs au plomb 6 V,<br />
– <strong>de</strong>s batteries non rechargeables,<br />
– <strong>de</strong>s batteries nickel-cadmium.<br />
En cas <strong>de</strong> recharge <strong>de</strong> batteries d'une tension nominale <strong>de</strong><br />
6 V avec cet appareil, le gazage survient immédiatement.<br />
Un gaz détonnant peut se produire.<br />
L'appareil se prête seulement à la régulation <strong>de</strong> modules<br />
solaires. Ne raccor<strong>de</strong>r aucune autre source <strong>de</strong> tension (par<br />
exemple tension secteur 230 V) à l'appareil. Cela peut provoquer<br />
la <strong>de</strong>struction <strong>de</strong> l'appareil et/ou <strong>de</strong>s sources. Si d'autres<br />
sources <strong>de</strong> tension doivent être utilisées en même temps avec<br />
l'appareil, interrogez votre concessionnaire.<br />
Entretien <strong>de</strong>s batteries<br />
(y compris les batteries sans entretien)<br />
Observer les points suivants pour parvenir à une longévité <strong>de</strong><br />
batterie élevée :<br />
– Les batteries doivent être entièrement chargées avant et<br />
après un prélèvement <strong>de</strong> courant.<br />
– En cas <strong>de</strong> pério<strong>de</strong> d'arrêt prolongée (sans soleil), débrancher<br />
la batterie et la charger pendant 24 heures au plus tard<br />
toutes les 12 semaines.<br />
En hiver, stocker les batteries entièrement chargées au<br />
frais et à l'abri du gel et les recharger régulièrement<br />
(toutes les 12 semaines).
Éléments <strong>de</strong> l'appareil<br />
MADE IN IN GERMANY<br />
H1 H2 H3 T<br />
X1 X2 X3<br />
Figure 1 : Éléments <strong>de</strong> l'appareil<br />
H1 DEL- Affichage <strong>de</strong> charge module solaire<br />
H2 DEL- Témoin d'état <strong>de</strong> charge <strong>de</strong> la batterie<br />
H3 DEL- Témoin d'état <strong>de</strong> charge <strong>de</strong> la batterie<br />
T Touche sortie <strong>de</strong> consommateur optionnelle<br />
X1 Raccor<strong>de</strong>ment module solaire<br />
X2 Raccor<strong>de</strong>ment batterie<br />
X3 Raccor<strong>de</strong>ment sortie <strong>de</strong> consommateur optionnelle pour<br />
consommateur à courant continu (par exemple lampe)<br />
Fonctionnement<br />
L'appareil est équipé d'une technique <strong>de</strong> charge à trois phases<br />
à modulation <strong>de</strong> largeur d'impulsion. Cette technique permet<br />
une puissance élevée associée à un faible poids et <strong>de</strong> petites<br />
dimensions. L'utilisation <strong>de</strong> composants électroniques <strong>de</strong><br />
qualité supérieure le fait fonctionner avec un haut <strong>de</strong>gré d'efficacité.<br />
La recharge automatique se fait en douceur et sans<br />
surcharge dommageable <strong>de</strong>s batteries. La longévité <strong>de</strong>s batteries<br />
s'en retrouve ainsi nettement prolongée. Elle se prête<br />
aux batteries à technologie d'électrolyte liqui<strong>de</strong>, gel ou AGM.<br />
L'opération <strong>de</strong> recharge est automatiquement adaptée au<br />
moyen d'une son<strong>de</strong> <strong>de</strong> température interne.<br />
L'appareil est conçu pour le fonctionnement continu et parallèle.<br />
Des consommateurs peuvent être constamment raccordés,<br />
rajoutés ou enlevés. L'alimentation <strong>de</strong>s consommateurs<br />
et la recharge <strong>de</strong>s batteries se font en même temps. Le courant<br />
<strong>de</strong> consommateur doit ici être inférieur au courant <strong>de</strong><br />
charge solaire, sans quoi aucune charge <strong>de</strong>s batteries n'a lieu.<br />
La touche permet <strong>de</strong> commuter la sortie <strong>de</strong> consommateur<br />
optionnelle. Celle-ci ne sert qu'au raccor<strong>de</strong>ment <strong>de</strong> petits<br />
consommateurs à brancher sur le chargeur automatique,<br />
comme une lampe.<br />
Observez à cet effet les valeurs maximales <strong>de</strong> tension et <strong>de</strong><br />
consommation.<br />
29
Opération <strong>de</strong> recharge<br />
L'appareil possè<strong>de</strong> une protection électronique contre les<br />
inversions <strong>de</strong> polarité, le courant <strong>de</strong> retour et le court-circuit<br />
solaire. C'est seulement si la batterie est correctement raccordée<br />
et si suffisamment <strong>de</strong> puissance issue <strong>de</strong> la lumière<br />
solaire est disponible que le courant <strong>de</strong> charge est libéré (voir<br />
« Diagramme <strong>de</strong> charge »).<br />
Phase <strong>de</strong> charge principale<br />
Charge avec courant <strong>de</strong> charge solaire disponible au maximum<br />
jusqu'à ce que la tension finale <strong>de</strong> charge soit atteinte.<br />
Phase <strong>de</strong> post-charge<br />
La phase <strong>de</strong> post-charge est commandée en fonction <strong>de</strong> la<br />
profon<strong>de</strong>ur <strong>de</strong> décharge.<br />
Phase <strong>de</strong> charge d'entretien<br />
La tension <strong>de</strong> charge est réglée sur 13,7 V. Le courant <strong>de</strong><br />
charge baisse alors sur la valeur nécessaire à la batterie<br />
pour compenser la décharge spontanée. L'alimentation <strong>de</strong>s<br />
consommateurs se poursuit. Si le courant consommé dépasse<br />
le courant <strong>de</strong> charge solaire disponible, la charge ne peut plus<br />
être maintenue.<br />
Si la tension <strong>de</strong> batterie sous-dépasse 12,5 V, l'appareil passe<br />
automatiquement en phase <strong>de</strong> charge principale, à condition<br />
que le courant <strong>de</strong> charge solaire soit suffisant.<br />
30<br />
Régulation <strong>de</strong> gazage<br />
La tension finale <strong>de</strong> charge change en fonction <strong>de</strong> la profon<strong>de</strong>ur<br />
<strong>de</strong> décharge. Si une batterie fonctionne longtemps<br />
sans le moindre développement <strong>de</strong> gaz, une couche d'aci<strong>de</strong><br />
nuisible risque <strong>de</strong> se former. Cette couche d'aci<strong>de</strong> peut être<br />
supprimée par un gazage limité et contrôlé. Cette fonction est<br />
prise en charge par la régulation <strong>de</strong> gazage. La régulation <strong>de</strong><br />
gazage neutralise la protection contre la surcharge lorsque<br />
la batterie a été fortement déchargée et la tension « gazage<br />
actif » sous-dépassée jusqu'à ce que que la tension finale <strong>de</strong><br />
gazage soit atteinte. En outre, le régulateur <strong>de</strong> gazage assure<br />
en cas <strong>de</strong> cyclage important l'augmentation <strong>de</strong> la tension <strong>de</strong><br />
charge, ce qui permet <strong>de</strong> mieux exploiter la capacité <strong>de</strong> batterie.<br />
Cette régulation est également guidée par la température<br />
et se prête aussi aux batteries gel.<br />
Fonctionnement parallèle<br />
Si du courant <strong>de</strong> consommateur est prélevé pendant la charge<br />
<strong>de</strong> batterie, le courant <strong>de</strong> charge solaire disponible est mis à<br />
contribution. Si le courant consommé dépasse le courant <strong>de</strong><br />
charge solaire disponible, l'appareil ne peut plus charger la<br />
batterie. L'appareil commence la charge automatiquement<br />
lorsque suffisamment <strong>de</strong> courant <strong>de</strong> charge solaire est <strong>de</strong><br />
nouveau disponible.
Commutation <strong>de</strong> la sortie <strong>de</strong><br />
consommateur optionnelle<br />
Presser la touche (T) pour activer la sortie <strong>de</strong> consommateur.<br />
Presser <strong>de</strong> nouveau la touche (T) pour désactiver la sortie <strong>de</strong><br />
consommateur.<br />
Affichage <strong>de</strong> fonctions<br />
La DEL verte (H3) et la DEL rouge (H2) dans le symbole <strong>de</strong><br />
batterie affichent l'état <strong>de</strong> charge actuel (SOC) <strong>de</strong> la batterie.<br />
Affichage SOC Cause<br />
la DEL rouge (H2) et<br />
la DEL verte (H3) ne sont pas<br />
allumées<br />
Aucune batterie raccordée.<br />
Vérifier les raccor<strong>de</strong>ments et<br />
la batterie.<br />
Veiller à ce que la polarité<br />
soit bonne.<br />
la DEL rouge (H2) est allumée La batterie est déchargée. La<br />
sortie <strong>de</strong> consommateur optionnelle<br />
est désactivée (protection<br />
contre la décharge<br />
profon<strong>de</strong>)<br />
la DEL rouge (H2) et<br />
la DEL verte (H3) sont<br />
allumées<br />
La charge <strong>de</strong> la batterie est<br />
visualisée par le comportement<br />
lumineux <strong>de</strong>s DEL.<br />
la DEL verte (H3) est allumée La batterie est entièrement<br />
chargée > 13,7 V<br />
La DEL jaune (H1) à l'intérieur du symbole <strong>de</strong> soleil affiche la<br />
charge <strong>de</strong> la batterie.<br />
Affichage <strong>de</strong> charge Cause<br />
la DEL jaune (H1) est éteinte Quantité insuffisante<br />
d'énergie solaire présente.<br />
La batterie ne se charge pas.<br />
la DEL jaune (H1) est allumée La batterie se charge<br />
la DEL jaune (H1) clignote La tension finale <strong>de</strong> charge<br />
et ainsi la phase <strong>de</strong> post-charge<br />
/ d'entretien est<br />
atteinte. Plus la DEL clignote<br />
brièvement moins l'opération<br />
<strong>de</strong> charge est importante.<br />
H1<br />
H3<br />
H2<br />
13,7 V<br />
≈11 V<br />
Display<br />
Maintenance<br />
Impérativement couper l'alimentation en courant avant<br />
tout travail <strong>de</strong> maintenance sur l'appareil. Les modules<br />
solaires doivent par exemple être recouverts d'un carton.<br />
Nettoyez l'appareil avec un chiffon sec et non pelucheux.<br />
31
Caractéristiques techniques<br />
Les indications s'appliquent à une température ambiante <strong>de</strong><br />
25 °C<br />
Valeurs électriques<br />
Tension <strong>de</strong> fonctionnement 12 V<br />
Tension d'entrée max. 47 V<br />
Plage <strong>de</strong> tensions 8 – 15 V<br />
Seuil <strong>de</strong> déclenchement 11 – 11,5 V<br />
sortie <strong>de</strong> consommateur<br />
optionnelle<br />
(protection contre la<br />
décharge profon<strong>de</strong>)<br />
Remise sous tension 12,5 V<br />
plage <strong>de</strong> températures am- -25 °C – +50 °C<br />
biantes admissibles<br />
plage <strong>de</strong> températures <strong>de</strong> -35 °C – +80 °C<br />
stockage admissibles<br />
Consommation propre 3 mA<br />
Courants<br />
Courant <strong>de</strong> module max. 3 A (environ 45 Wp)<br />
Courant <strong>de</strong> sortie max. 3 A<br />
Sortie <strong>de</strong> consommateur<br />
optionnelle<br />
max. 3 A commutés<br />
Capacité <strong>de</strong> batterie 30 – 75 Ah<br />
32<br />
Tensions <strong>de</strong> charge<br />
Phase <strong>de</strong> post-charge 14,4 V<br />
Phase <strong>de</strong> charge d'entretien 13,7 V<br />
Phase <strong>de</strong> charge principale<br />
tension <strong>de</strong> commutation<br />
12,5 V<br />
Tension <strong>de</strong> charge maximale 15,6 V<br />
Compensation <strong>de</strong><br />
température<br />
-24 mV / K<br />
Valeurs mécaniques<br />
Type <strong>de</strong> protection IP 32<br />
Montage Montage sur paroi<br />
Poids 160 g<br />
Bornes <strong>de</strong> raccor<strong>de</strong>ment 6 mm² (multibrin)<br />
10 mm² (brin individuel)<br />
Dimensions L x l x H 146 x 90 x 33 mm<br />
Humidité maximale<br />
(pas <strong>de</strong> con<strong>de</strong>nsation)<br />
95 %
Diagramme <strong>de</strong> charge<br />
HL = Phase <strong>de</strong> charge principale<br />
NL = Phase <strong>de</strong> post-charge<br />
EL = Charge d'entretien<br />
U[V]<br />
UNL UEL UHL 0<br />
HL<br />
NL<br />
EL<br />
Figure 2 : Diagramme <strong>de</strong> charge (allure <strong>de</strong> principe)<br />
Sous réserve <strong>de</strong> modifications techniques !<br />
Mise au rebut<br />
t[h]<br />
L'appareil doit être éliminé conformément aux règles administratives<br />
du pays d'utilisation. Les prescriptions et lois<br />
nationales doivent être respectées (en Allemagne, il s'agit par<br />
exemple du décret sur les véhicules hors d'usage).<br />
Déclaration <strong>de</strong> conformité<br />
1. Principales données relatives au fabricant<br />
Nom : <strong>Truma</strong> <strong>Gerätetechnik</strong> GmbH & Co. KG<br />
Adresse : Wernher-von-Braun-Str.12, D-85640 Putzbrunn<br />
2. I<strong>de</strong>ntification <strong>de</strong> l’appareil<br />
Type / modèle :<br />
Chargeur automatique solaire SC 3<br />
3. Répond aux exigences <strong>de</strong>s directives CE suivantes<br />
3.1 Directive CEM 2004/108/CE<br />
3.2 Sécurité électrique (DBT) 2006/95/CE<br />
3.3 Directive relative aux véhicules hors d'usage 2000/53/CE<br />
et porte le symbole CE.<br />
4. Fon<strong>de</strong>ments <strong>de</strong> l'attestation <strong>de</strong> conformité<br />
DIN EN 60730-1, DIN EN 60730-2-11, DIN EN 55014-1, DIN<br />
EN 55022, DIN EN 61000-3-2, -3-3, -4-2, -4-4, -4-5, -4-6, -4-11<br />
5. Indications relatives à la fonction du signataire<br />
Signature : Dirk Brunner Putzbrunn, 07/01/2013<br />
Direction Centre <strong>de</strong> produits Courant électrique<br />
33
Déclaration <strong>de</strong> garantie du fabricant <strong>Truma</strong><br />
1. Cas <strong>de</strong> garantie<br />
Le fabricant concè<strong>de</strong> une garantie pour <strong>de</strong>s carences <strong>de</strong> l'appareil<br />
imputables à <strong>de</strong>s défauts du matériau ou <strong>de</strong> la fabrication. En outre, le<br />
recours légal en garantie auprès du ven<strong>de</strong>ur reste valable.<br />
La garantie ne s'applique pas :<br />
– pour les pièces d'usure et en cas d'usure naturelle,<br />
– suite à l'utilisation <strong>de</strong> pièces autres que <strong>de</strong>s pièces originales <strong>Truma</strong><br />
dans les appareils,<br />
– en cas <strong>de</strong> dommages causés par <strong>de</strong>s corps étrangers (p. ex. les<br />
huiles et plastifiants) dans le gaz <strong>de</strong>s installations <strong>de</strong> détente <strong>de</strong> gaz,<br />
– en cas <strong>de</strong> non-respect <strong>de</strong>s instructions <strong>de</strong> <strong>montage</strong> et du mo<strong>de</strong><br />
<strong>d'emploi</strong> <strong>Truma</strong>,<br />
– en cas d'utilisation non conforme,<br />
– en cas d'emballage <strong>de</strong> transport inapproprié.<br />
2. Prestations <strong>de</strong> garantie<br />
La garantie couvre les carences dans le sens <strong>de</strong> l'article 1, se manifestant<br />
dans les 24 mois suivant la conclusion du contrat d'achat entre le<br />
ven<strong>de</strong>ur et l'utilisateur final. Le fabricant procé<strong>de</strong>ra à la remise en ordre<br />
<strong>de</strong> tels défauts, c'est-à-dire au choix par la livraison d'un appareil <strong>de</strong><br />
rechange ou par une réparation. Si le fabricant réalise une prestation<br />
<strong>de</strong> garantie, le délai <strong>de</strong> garantie concernant les pièces réparées ou<br />
remplacées ne recommence pas du début, l'ancien délai continue à<br />
courir. Des prétentions plus poussées, en particulier <strong>de</strong>s prétentions<br />
à dommages-intérêts <strong>de</strong> l'acheteur ou d'un tiers, sont exclues. Les<br />
dispositions <strong>de</strong> la législation sur la responsabilité sur le produit restent<br />
inchangées.<br />
Les frais <strong>de</strong> mise à contribution du service après-vente usine <strong>Truma</strong><br />
pour remédier à une carence couverte par la garantie, en particulier<br />
les frais <strong>de</strong> transport, <strong>de</strong> manutention, <strong>de</strong> main d'œuvre et <strong>de</strong> matériel,<br />
sont à la charge du fabricant, pour autant que le SAV intervient sur le<br />
34<br />
territoire <strong>de</strong> la République Fédérale d'Allemagne. La garantie ne couvre<br />
pas les interventions <strong>de</strong> service après-vente dans les autres pays.<br />
Des frais supplémentaires dus à <strong>de</strong>s difficultés <strong>de</strong> dépose et <strong>de</strong> repose<br />
<strong>de</strong> l'appareil (par ex. dé<strong>montage</strong> et re<strong>montage</strong> <strong>de</strong> meubles ou <strong>de</strong> parties<br />
<strong>de</strong> la carrosserie) ne sont pas reconnus en tant que prestation <strong>de</strong><br />
garantie.<br />
3. Invocation du cas <strong>de</strong> garantie<br />
Les coordonnées du fabricant sont les suivantes :<br />
<strong>Truma</strong> <strong>Gerätetechnik</strong> GmbH & Co. KG<br />
Wernher-von-Braun-Straße 12,<br />
85640 Putzbrunn, Allemagne<br />
Veuillez vous adresser au centre <strong>de</strong> service clientèle <strong>de</strong> <strong>Truma</strong> ou à<br />
un <strong>de</strong> nos services après-vente agréés en cas <strong>de</strong> dysfonctionnements<br />
(consultez votre livret <strong>de</strong> service <strong>Truma</strong> ou www.truma.com). Veuillez<br />
spécifier vos réclamations avec autant <strong>de</strong> précision que possible et indiquer<br />
le numéro d’usine <strong>de</strong> l'appareil et la date d'achat.<br />
L'utilisateur final doit amener ou expédier l'appareil à ses risques au<br />
fabricant / service après-vente afin que le fabricant puisse vérifier le<br />
bien-fondé du recours à sa garantie. Envoyez également le déten<strong>de</strong>ur<br />
utilisé en cas <strong>de</strong> dommages concernant l'échangeur thermique.<br />
Climatiseurs :<br />
Il est imposé, en prévention <strong>de</strong>s dommages dus au transport, <strong>de</strong> ne<br />
renvoyer l'appareil qu'après consultation du centre <strong>de</strong> service clientèle<br />
<strong>de</strong> <strong>Truma</strong> ou du service après-vente respectif. L'expéditeur <strong>de</strong>vra supporter<br />
le risque éventuellement lié aux dommages dus au transport au<br />
cas contraire.<br />
Veuillez prévoir une expédition en régime ordinaire pour le renvoi à<br />
l'usine. En cas d'application <strong>de</strong> la garantie, l'usine se charge <strong>de</strong>s coûts<br />
d'envoi et <strong>de</strong> retour. Sinon, l'usine en avise le client et lui communique<br />
le montant du coût <strong>de</strong> la réparation qu'il <strong>de</strong>vra supporter; dans ce cas,<br />
les frais d'expédition sont également à la charge du client.
<strong>Instructions</strong> <strong>de</strong> <strong>montage</strong><br />
Informations concernant la sécurité<br />
Cet appareil intègre <strong>de</strong>s composants pouvant générer<br />
<strong>de</strong>s étincelles ou un arc électrique.<br />
Le <strong>montage</strong> et le raccor<strong>de</strong>ment d'appareils électriques doivent<br />
toujours être réalisés par du personnel spécialisé adapté.<br />
Les modules solaires exposés à la lumière génèrent du courant.<br />
Une faible inci<strong>de</strong>nce <strong>de</strong> la lumière suffit pour produire<br />
à pleine tension. La tension à vi<strong>de</strong> peut être <strong>de</strong>ux fois plus<br />
élevée. Ne pas toucher <strong>de</strong> pièces conduisant du courant.<br />
Avant les travaux <strong>de</strong> <strong>montage</strong> et d'installation, recouvrir les<br />
modules solaires par exemple avec un carton.<br />
L'appareil a été développé pour le raccor<strong>de</strong>ment <strong>de</strong> modules<br />
solaires. Utiliser uniquement <strong>de</strong>s modules appropriés, par<br />
exemple <strong>Truma</strong> SM 23. Observer les valeurs maximales <strong>de</strong><br />
tension et <strong>de</strong> consommation.<br />
Utiliser uniquement les sections <strong>de</strong> conduite et les ampérages<br />
<strong>de</strong> fusible prescrits.<br />
Ne pas installer ou exploiter l'appareil dans <strong>de</strong>s locaux humi<strong>de</strong>s<br />
(par exemples <strong>de</strong>s salles <strong>de</strong> bains) ou <strong>de</strong>s locaux dans lesquels<br />
<strong>de</strong>s mélanges gazeux facilement inflammables peuvent<br />
se produire.<br />
Le <strong>montage</strong> <strong>de</strong> l'appareil doit répondre aux dispositions techniques<br />
et administratives du pays d'utilisation (par exemple<br />
EN 1648). Les prescriptions et les réglementations nationales<br />
doivent être respectées.<br />
Volume <strong>de</strong> livraison<br />
– 1 chargeur automatique solaire<br />
– 1 jeu d'instructions <strong>de</strong> <strong>montage</strong> et d'utilisation<br />
Montage<br />
Voir page 3, figures B, C<br />
L'appareil doit être mis en place protégé contre l'humidité et<br />
l'eau. Le lieu <strong>de</strong> mise en place doit être propre, sec et bien<br />
ventilé. L'appareil doit être posé à proximité <strong>de</strong> la batterie.<br />
Lors du fonctionnement, le boîtier peut se réchauffer à environ<br />
80 °C.<br />
Veillez à ce que les fentes <strong>de</strong> ventilation restent libres<br />
! Une ventilation insuffisante peut provoquer une surchauffe<br />
<strong>de</strong> l'appareil !<br />
L'espace <strong>de</strong> <strong>montage</strong> pour l'appareil doit être muni en haut<br />
et sur le côté d'ouvertures <strong>de</strong> ventilation pour une superficie<br />
d'ouverture totale <strong>de</strong> 100 cm².<br />
Si la température intérieure <strong>de</strong> l'appareil augmente suite à un<br />
manque <strong>de</strong> circulation d'air ou à une température ambiante<br />
trop élevée, l'appareil risque d'être endommagé.<br />
Les batteries à électrolyte liqui<strong>de</strong> gélifié doivent être mises en<br />
place dans un boîtier séparé avec une purge d'air vers l'extérieur.<br />
Un boîtier séparé n'est pas nécessaire pour les batteries<br />
gel et AGM. Observer les consignes d'installation du fabricant<br />
<strong>de</strong> batterie.<br />
Fixer sûrement l'appareil avec <strong>de</strong>ux vis (diamètre 4 mm – pas<br />
<strong>de</strong> vis à tête fraisée). La longueur <strong>de</strong> vis et le couple dépen<strong>de</strong>nt<br />
du support.<br />
35
Raccor<strong>de</strong>ment<br />
Longueurs et sections <strong>de</strong> conduite<br />
Exécution selon EN 1648-1 et VDE 0100, partie 721.<br />
Fusibles F1<br />
5 A, à action retardée<br />
Poser les fusibles impérativement à proximité <strong>de</strong> la<br />
source d'énergie (par exemple batterie). Utiliser uniquement<br />
les sections <strong>de</strong> conduite et les ampérages <strong>de</strong> fusible<br />
prescrits.<br />
Raccor<strong>de</strong>ment source d'énergie / consommateur<br />
Raccor<strong>de</strong>z l'appareil aux modules solaires et à la batterie<br />
conformément au plan <strong>de</strong> raccor<strong>de</strong>ment. Veillez à la bonne<br />
polarité <strong>de</strong> raccor<strong>de</strong>ment.<br />
Des modules solaires multiples doivent toujours être branchés<br />
en parallèle. Utilisez à cet effet toujours uniquement <strong>de</strong>s<br />
modules aux valeurs <strong>de</strong> tension typiques i<strong>de</strong>ntiques (environ<br />
18 V). Deman<strong>de</strong>z à votre concessionnaire l'extension <strong>de</strong> jeu<br />
<strong>de</strong> câbles <strong>Truma</strong>.<br />
Respecter l'ordre <strong>de</strong> raccor<strong>de</strong>ment. Raccor<strong>de</strong>z directement<br />
les consommateurs <strong>de</strong> la caravane (fig. A, a) à la batterie.<br />
Utilisez la sortie <strong>de</strong> consommateur optionnelle seulement pour les<br />
petits consommateurs non mis à la terre, par exemple les lampes.<br />
1. Raccor<strong>de</strong>r la batterie au régulateur <strong>de</strong> charge –<br />
plus et moins<br />
2. Raccor<strong>de</strong>r les modules solaires au régulateur <strong>de</strong> charge –<br />
plus et moins<br />
3. Raccor<strong>de</strong>r le consommateur <strong>de</strong> courant continu à la sortie<br />
<strong>de</strong> consommateur optionnelle plus - moins<br />
Suivre l'ordre inverse pour la désinstallation.<br />
36<br />
Fixation du câble<br />
Bloquer toutes les conduites (par exemple vers les sources<br />
d'énergie, consommateurs et accessoires) avec <strong>de</strong>s colliers <strong>de</strong><br />
câbles.<br />
Plan <strong>de</strong> raccor<strong>de</strong>ment<br />
Voir page 2, figure A<br />
Mise en service<br />
L'appareil est en service dès qu'une batterie est raccordée<br />
(respecter l'ordre <strong>de</strong> raccor<strong>de</strong>ment).
Carica-batterie automatico ad energia solare SC 3<br />
Indice<br />
Istruzioni per l'uso<br />
Glossario .............................................................................. 37<br />
Simboli utilizzati ................................................................... 37<br />
Avvertenze di sicurezza ................................................... 38<br />
Scopo d’impiego ............................................................... 39<br />
Uso improprio ...................................................................... 39<br />
Cura <strong>de</strong>lle batterie ........................................................... 39<br />
Elementi <strong>de</strong>ll'apparecchio ............................................... 40<br />
Funzione ............................................................................. 40<br />
Carica ................................................................................. 41<br />
Attivazione <strong>de</strong>ll'uscita utenza opzionale ...................... 42<br />
Indicatori di funzione ....................................................... 42<br />
Manutenzione ................................................................... 42<br />
Specifiche tecniche .......................................................... 43<br />
Diagramma di carica ........................................................... 44<br />
Smaltimento ...................................................................... 44<br />
Dichiarazione di conformità ............................................ 44<br />
Dichiarazione di garanzia <strong>de</strong>l costruttore <strong>Truma</strong> ........ 45<br />
Istruzioni di montaggio<br />
Avvertenze di sicurezza ................................................... 46<br />
È compreso nella fornitura: ............................................ 46<br />
Montaggio ......................................................................... 46<br />
Collegamento .................................................................... 47<br />
Schema di collegamento ..................................................... 47<br />
Messa in funzione ............................................................ 47<br />
Istruzioni per l'uso<br />
Prima di effettuare il collegamento e la messa in funzione<br />
<strong>de</strong>ll'apparecchio, leggere le istruzioni di montaggio e<br />
per l'uso!<br />
Glossario<br />
Batteria AGM Batteria piombo-acido in cui l'elettrolita<br />
è intrappolato in un feltro assorbente<br />
in microfibra di vetro (absorbed<br />
glass mat).<br />
Batteria OPTIMA® YT S corrispon<strong>de</strong> a una batteria AGM.<br />
Simboli utilizzati<br />
Il simbolo indica possibili pericoli.<br />
Nota con informazioni e raccomandazioni.<br />
37
Avvertenze di sicurezza<br />
Durante l'utilizzo di apparecchi elettrici, per proteggersi<br />
da scossa elettrica, lesioni e pericolo di incendio, osservare<br />
le seguenti misure di sicurezza fondamentali. Prima di<br />
utilizzare l'apparecchio, leggere e rispettare queste indicazioni.<br />
Installazione<br />
Fare attenzione a collocare gli apparecchi in posizione sicura,<br />
per evitare cadute o ribaltamenti. Disporre i cavi sempre in<br />
modo che non vi si possa inciampare. Non esporre gli apparecchi<br />
elettrici alla pioggia. Non utilizzare gli apparecchi elettrici<br />
in ambienti umidi o bagnati. Non mettere in funzione gli<br />
apparecchi elettrici in prossimità di liquidi o gas infiammabili.<br />
Protezione da scossa elettrica<br />
Mettere in funzione solo apparecchi con alloggiamento e cavi<br />
non danneggiati. Fare attenzione a una posa sicura <strong>de</strong>i cavi.<br />
Non tirare i cavi.<br />
In presenza di illuminazione naturale, i moduli fotovoltaici<br />
generano corrente. Anche se la luce è <strong>de</strong>bole, è presente la<br />
piena tensione. La tensione a vuoto può raggiungere il valore<br />
doppio. Non toccare componenti che conducono corrente.<br />
Prima <strong>de</strong>i lavori di montaggio e installazione coprire i moduli<br />
fotovoltaici ad es. con un cartone.<br />
Uso<br />
Questo apparecchio non è <strong>de</strong>stinato ad essere utilizzato da<br />
persone (inclusi bambini) con capacità fisiche, sensoriali o<br />
psichiche limitate o senza esperienza e/o conoscenze, a meno<br />
che non vengano sorvegliate da una persona responsabile per<br />
la loro sicurezza o abbiano ricevuto da questa persona istruzioni<br />
sull'utilizzo <strong>de</strong>ll'apparecchio.<br />
I bambini dovrebbero essere sorvegliati per assicurarsi che<br />
non giochino con l'apparecchio.<br />
38<br />
Non utilizzare gli apparecchi elettrici per uno scopo d'impiego<br />
diverso da quello indicato dal costruttore. Le fessure di ventilazione<br />
sull'alloggiamento <strong>de</strong>vono essere libere e non <strong>de</strong>vono<br />
essere ostruite da bagagli, asciugamani o abiti ecc.<br />
Attenzione<br />
Durante il caricamento e il funzionamento le batterie possono<br />
generare gas esplosivi. Tenere lontane fiamme e fonti di accensione.<br />
Garantire la sufficiente aerazione <strong>de</strong>l vano batterie.<br />
Riparazione<br />
Non effettuare lavori di riparazione o apportare modifiche<br />
all'apparecchio. Rivolgersi al proprio rivenditore o al servizio di<br />
assistenza <strong>Truma</strong> (ve<strong>de</strong>re il libretto di assistenza o il sito<br />
www.truma.com).<br />
Accessori<br />
Utilizzare solo accessori e apparecchi ausiliari forniti o consigliati<br />
dal costruttore.
Scopo d’impiego<br />
Il carica-batterie automatico ad energia solare serve per caricare<br />
accumulatori al piombo da 12 V, costituiti da 6 celle<br />
singole (ad es. batteria per auto), con capacità di 30 – 75 Ah.<br />
L'apparecchio è stato sviluppato per il collegamento di moduli<br />
fotovoltaici. Utilizzare solo moduli adatti, ad es. <strong>Truma</strong> SM 23.<br />
Rispettare i valori massimi di corrente assorbita e tensione. Il<br />
campo d'impiego preferito <strong>de</strong>l carica-batterie automatico sono<br />
le batterie con elettrolita liquido, AGM o gel.<br />
L'apparecchio è <strong>de</strong>stinato all'uso in ambiente chiuso.<br />
In caso di collegamento all'alimentazione elettrica tramite fasci<br />
di cablaggio di un veicolo a motore, ad es. veicolo trattore,<br />
assicurarsi che questo avvenga esclusivamente per mezzo di<br />
un'interfaccia omologata.<br />
Uso improprio<br />
L'apparecchio non è adatto per caricare ad es.:<br />
– batterie da 6 V o accumulatori al piombo da 6 V,<br />
– batterie non ricaricabili,<br />
– batterie al nichel-cadmio.<br />
Se si utilizza l'apparecchio per caricare batterie con tensione<br />
nominale di 6 V, ha subito inizio la gassificazione.<br />
Può formarsi ossidrogeno esplosivo.<br />
L'apparecchio è adatto solo per la regolazione di moduli fotovoltaici.<br />
Non collegare altre sorgenti di tensione (ad es. tensione<br />
di rete 230 V) all'apparecchio. Questo può provocare la distruzione<br />
<strong>de</strong>ll'apparecchio e/o <strong>de</strong>lle sorgenti. Qualora <strong>de</strong>bbano<br />
essere utilizzate altre sorgenti di tensione con l'apparecchio,<br />
contattare il rivenditore.<br />
Cura <strong>de</strong>lle batterie<br />
(anche batterie esenti da manutenzione)<br />
Per raggiungere una lunga durata <strong>de</strong>lle batterie, osservare i<br />
seguenti punti:<br />
– Le batterie dovrebbero essere completamente ricaricate prima<br />
e dopo un consumo di corrente.<br />
– In caso di inattività prolungata (senza radiazione solare), la<br />
batteria <strong>de</strong>ve essere scollegata e ricaricata massimo ogni<br />
12 settimane per 24 ore.<br />
D'inverno stoccare le batterie completamente cariche in<br />
un luogo fresco e al riparo dal gelo e ricaricarle<br />
regolarmente (ogni 12 settimane).<br />
39
Elementi <strong>de</strong>ll'apparecchio<br />
40<br />
MADE IN IN GERMANY<br />
H1 H2 H3 T<br />
X1 X2 X3<br />
Figura 1: Elementi <strong>de</strong>ll'apparecchio<br />
H1 Indicatore di carica solare LED<br />
H2 Indicatore di carica batteria LED<br />
H3 Indicatore di carica batteria LED<br />
T Tasto uscita utenza opzionale<br />
X1 Collegamento modulo fotovoltaico<br />
X2 Collegamento batteria<br />
X3 Collegamento uscita utenza opzionale per utenza di corrente<br />
continua (ad es. lampadina)<br />
Funzione<br />
L'apparecchio è dotato di mo<strong>de</strong>rna tecnologia di carica trifase<br />
a modulazione di larghezza <strong>de</strong>ll'impulso. Questa tecnologia<br />
consente una potenza elevata con peso ridotto e dimensioni<br />
limitate. Grazie all'utilizzo di componenti elettronici di alta<br />
qualità, si ottiene un alto grado di efficienza. La ricarica automatica<br />
protegge le batterie ed evita un sovraccarico dannoso.<br />
Si prolunga così notevolmente la durata <strong>de</strong>lle batterie. Questa<br />
tecnologia è adatta per batterie con elettrolita liquido, gel o<br />
AGM. La carica viene adattata automaticamente per mezzo di<br />
un sensore temperatura interno.<br />
L'apparecchio è pensato per un funzionamento continuo e<br />
in parallelo. Le utenze possono rimanere sempre collegate,<br />
essere collegate o scollegate. Le utenze vengono alimentate<br />
e le batterie caricate contemporaneamente. La corrente <strong>de</strong>lle<br />
utenze <strong>de</strong>ve essere minore <strong>de</strong>lla corrente di carica solare, in<br />
quanto altrimenti non avviene la ricarica <strong>de</strong>lle batterie.<br />
Con il relativo tasto è possibile attivare l'uscita utenza opzionale.<br />
Questa serve solo a collegare piccole utenze, da attivare<br />
con il carica-batterie automatico, come ad es. una lampadina.<br />
Rispettare i valori massimi di corrente assorbita e tensione.
Carica<br />
L'apparecchio dispone di una protezione elettronica da cortocircuito<br />
solare, inversione di corrente e inversione di polarità.<br />
Solo se la batteria è collegata correttamente ed è disponibile<br />
sufficiente potenza generata dalla luce solare, viene attivata la<br />
corrente di carica (ve<strong>de</strong>re il «Diagramma di carica»).<br />
Fase di carica principale<br />
Carica con la massima corrente di carica solare disponibile<br />
fino al raggiungimento <strong>de</strong>lla tensione finale di carica.<br />
Fase di post-carica<br />
La fase di post-carica viene controllata in funzione <strong>de</strong>lla profondità<br />
di scarica.<br />
Fase di carica di mantenimento<br />
La tensione di carica è impostata su 13,7 V. La corrente di carica<br />
diminuisce fino al valore necessario per la compensazione<br />
<strong>de</strong>lla scarica spontanea <strong>de</strong>lla batteria. Le utenze continuano<br />
ad essere alimentate. Se la corrente consumata supera la<br />
corrente di carica solare disponibile, non è più possibile continuare<br />
la carica.<br />
Qualora la tensione <strong>de</strong>lla batteria scenda sotto 12,5 V, l'apparecchio<br />
passa automaticamente alla fase di carica principale,<br />
purché sia disponibile sufficiente corrente di carica solare.<br />
Controllo <strong>de</strong>lla gassificazione<br />
La tensione finale di carica viene modificata in funzione <strong>de</strong>lla<br />
profondità di scarica. Se una batteria viene azionata per lungo<br />
tempo senza sviluppo di gas, esiste il pericolo che si formi<br />
una stratificazione dannosa <strong>de</strong>ll'acido. Questa stratificazione<br />
<strong>de</strong>ll'acido può essere eliminata mediante una gassificazione<br />
limitata e controllata. Questa funzione è assolta dal controllo<br />
<strong>de</strong>lla gassificazione. Quando la batteria si è scaricata maggiormente<br />
e si è scesi sotto il valore <strong>de</strong>lla tensione di «attivazione<br />
<strong>de</strong>lla gassificazione», il controllo <strong>de</strong>lla gassificazione disattiva<br />
la protezione da sovraccarico finché non viene raggiunta la<br />
cosid<strong>de</strong>tta tensione finale di gassificazione. Inoltre, in caso di<br />
numero elevato di cicli, il regolatore di gassificazione assicura<br />
l'aumento <strong>de</strong>lla tensione di carica; in questo modo la capacità<br />
<strong>de</strong>lla batteria viene sfruttata meglio. Anche questo regolatore<br />
è controllato dalla temperatura e adatto per batterie a gel.<br />
Funzionamento in parallelo<br />
Se durante la carica <strong>de</strong>lle batterie viene prelevata corrente per<br />
le utenze, questa viene fornita dalla corrente di carica solare<br />
disponibile. Se la corrente consumata supera la corrente di<br />
carica solare disponibile, l'apparecchio non può caricare la<br />
batteria. L'apparecchio inizia la carica in modo automatico,<br />
quando è nuovamente disponibile una corrente di carica solare<br />
sufficiente.<br />
41
Attivazione <strong>de</strong>ll'uscita utenza opzionale<br />
Premendo il tasto (T) si attiva l'uscita utenza. Premendo nuovamente<br />
il tasto (T) si disattiva l'uscita utenza.<br />
Indicatori di funzione<br />
Il LED ver<strong>de</strong> (H3) e il LED rosso (H2) all'interno <strong>de</strong>l simbolo<br />
<strong>de</strong>lla batteria indicano l'attuale stato di carica (SOC) <strong>de</strong>lla<br />
batteria.<br />
Indicatore SOC Causa<br />
Il LED rosso (H2) e<br />
il LED ver<strong>de</strong> (H3) non si<br />
accendono<br />
42<br />
Nessuna batteria collegata.<br />
Controllare i collegamenti e<br />
la batteria.<br />
Fare attenzione alla corretta<br />
polarità.<br />
LED rosso (H2) acceso La batteria è scarica. Uscita<br />
utenza opzionale disattivata<br />
(protezione da scarica<br />
profonda)<br />
LED rosso (H2) e<br />
LED ver<strong>de</strong> (H3) accesi<br />
La carica <strong>de</strong>lla batteria viene<br />
indicata dal rapporto di illuminazione<br />
<strong>de</strong>i LED.<br />
LED ver<strong>de</strong> (H3) acceso La batteria è completamente<br />
carica > 13,7 V<br />
Il LED giallo (H1) all'interno <strong>de</strong>l simbolo <strong>de</strong>l sole indica la carica<br />
<strong>de</strong>lla batteria.<br />
Indicatore di carica Causa<br />
LED giallo (H1) spento Energia solare insufficiente.<br />
La batteria non viene caricata.<br />
LED giallo (H1) acceso La batteria viene caricata.<br />
LED giallo (H1) lampeggiante La tensione finale di carica<br />
e di conseguenza la fase di<br />
post-carica/carica di mantenimento<br />
sono state raggiunte.<br />
Quanto più breve è<br />
il lampeggiamento <strong>de</strong>l LED,<br />
tanto minore è la carica.<br />
H1<br />
H3<br />
H2<br />
13,7 V<br />
≈11 V<br />
Display<br />
Manutenzione<br />
Prima di eseguire qualsiasi lavoro di manutenzione, interrompere<br />
l'alimentazione di corrente all'apparecchio.<br />
Coprire i moduli fotovoltaici, ad es. con un cartone.<br />
Pulire l'apparecchio con un panno asciutto, privo di lanugine.
Specifiche tecniche<br />
Le indicazioni valgono per una temperatura ambiente di 25 °C<br />
Valori elettrici<br />
Tensione di esercizio 12 V<br />
Tensione d'ingresso max. 47 V<br />
Campo di tensione 8 – 15 V<br />
Soglia di disattivazione 11 – 11,5 V<br />
uscita utenza opzionale<br />
(protezione da scarica<br />
profonda)<br />
Riattivazione<br />
12,5 V<br />
Campo di temperatura am- -25 °C – +50 °C<br />
biente amm.<br />
Campo di temperatura di -35 °C – +80 °C<br />
stoccaggio amm.<br />
Consumo proprio 3 mA<br />
Correnti<br />
Corrente modulo max. 3 A (circa 45 Wp)<br />
Corrente d'uscita max. 3 A<br />
Uscita utenza opzionale Collegamento max. 3 A<br />
Capacità <strong>de</strong>lla batteria 30 – 75 Ah<br />
Tensioni di carica<br />
Fase di post-carica 14,4 V<br />
Fase di carica di<br />
13,7 V<br />
mantenimento<br />
Fase di carica principale 12,5 V<br />
tensione di commutazione<br />
Tensione di carica max. 15,6 V<br />
Compensazione di<br />
-24 mV / K<br />
temperatura<br />
Valori meccanici<br />
Tipo di protezione IP 32<br />
Montaggio Montaggio a parete<br />
Peso 160 g<br />
Morsetti 6 mm² (a filo sottile)<br />
10 mm² (a filo unico)<br />
Dimensioni L x P x H 146 x 90 x 33 mm<br />
Umidità max.<br />
(senza con<strong>de</strong>nsa)<br />
95 %<br />
43
Diagramma di carica<br />
HL = fase di carica principale<br />
NL = fase di post-carica<br />
EL = carica di mantenimento<br />
44<br />
U[V]<br />
UNL UEL UHL 0<br />
HL<br />
NL<br />
Figura 2: Diagramma di carica (andamento di principio)<br />
Salvo modifiche tecniche!<br />
Smaltimento<br />
EL<br />
t[h]<br />
L'apparecchio <strong>de</strong>ve essere smaltito in conformità alle disposizioni<br />
amministrative in vigore nel rispettivo paese d'utilizzo.<br />
Rispettare le leggi e le normative nazionali (in Germania, ad<br />
esempio, la legge sulla rottamazione di veicoli usati).<br />
Dichiarazione di conformità<br />
1. Ragione sociale <strong>de</strong>l costruttore<br />
Nome: <strong>Truma</strong> <strong>Gerätetechnik</strong> GmbH & Co. KG<br />
Indirizzo: Wernher-von-Braun-Str. 12, D-85640 Putzbrunn<br />
2. I<strong>de</strong>ntificazione <strong>de</strong>ll’apparecchio<br />
Mo<strong>de</strong>llo / versione:<br />
Carica-batterie automatico ad energia solare SC 3<br />
3. Soddisfa i requisiti <strong>de</strong>lle seguenti direttive CE<br />
3.1 Direttiva EMC 2004/108/CE<br />
3.2 Sicurezza elettrica (LVD) 2006/95/CE<br />
3.3 Direttiva veicoli fuori uso 2000/53/CE<br />
e dispone <strong>de</strong>l marchio CE.<br />
4. Fondamento <strong>de</strong>l certificato di conformità<br />
DIN EN 60730-1, DIN EN 60730-2-11, DIN EN 55014-1, DIN<br />
EN 55022, DIN EN 61000-3-2, -3-3, -4-2, -4-4, -4-5, -4-6, -4-11<br />
5. Dati sulla funzione <strong>de</strong>l firmatario<br />
Firma: Dirk Brunner Putzbrunn, 07.01.2013<br />
Responsabile Centro prodotti Corrente
Dichiarazione di garanzia <strong>de</strong>l costruttore<br />
<strong>Truma</strong><br />
1. Casi contemplati dalla garanzia<br />
Il costruttore fornisce una garanzia per i vizi <strong>de</strong>ll'apparecchio imputabili<br />
a difetti di materiale o lavorazione. Questa garanzia si aggiunge alla<br />
garanzia legale <strong>de</strong>l venditore.<br />
Non si presta alcuna garanzia:<br />
– per componenti soggetti ad usura e naturale logoramento,<br />
– in seguito all’utilizzo negli apparecchi di parti di ricambio non originali<br />
<strong>Truma</strong>,<br />
– nei sistemi di regolazione <strong>de</strong>lla pressione <strong>de</strong>l gas, per danni causati<br />
da corpi estranei (ad es. oli, plastificanti) nel gas,<br />
– in seguito a mancato rispetto <strong>de</strong>lle istruzioni di montaggio e per l'uso<br />
<strong>Truma</strong>,<br />
– in seguito a utilizzo improprio,<br />
– in seguito a imballaggio per il trasporto non idoneo.<br />
2. Copertura <strong>de</strong>lla garanzia<br />
La garanzia si applica ai vizi di cui al paragrafo 1, che si manifestano<br />
entro 24 mesi dalla conclusione <strong>de</strong>l contratto di acquisto tra il venditore<br />
e il consumatore finale. Il costruttore rimedierà a tali guasti riparandoli,<br />
ma potrà <strong>de</strong>ci<strong>de</strong>re se effettuare una riparazione o una sostituzione.<br />
Nel caso in cui il costruttore <strong>de</strong>cida di prestare garanzia, il periodo di<br />
garanzia, relativamente al pezzo riparato o sostituito, non avrà inizio dal<br />
momento <strong>de</strong>lla riparazione o sostituzione, bensì sarà valido il vecchio<br />
periodo di garanzia. Si escludono ulteriori rivendicazioni, in particolare<br />
richieste di risarcimento danni da parte <strong>de</strong>ll’acquirente o terzi. Restano<br />
salve le disposizioni <strong>de</strong>lla legge sulla responsabilità <strong>de</strong>l produttore.<br />
I costi per il ricorso al servizio di assistenza meccanica <strong>Truma</strong> allo scopo<br />
di eliminare un vizio in garanzia, in particolare i costi di trasporto,<br />
stradali, di lavoro e materiali, sono a carico <strong>de</strong>l costruttore per il servizio<br />
di assistenza in Germania. Gli interventi <strong>de</strong>l servizio di assistenza in altri<br />
paesi non sono coperti dalla garanzia.<br />
Ulteriori costi <strong>de</strong>rivanti da condizioni di smontaggio e montaggio<br />
<strong>de</strong>ll'apparecchio più gravose (ad es. smontaggio di parti di mobili o carrozzeria)<br />
non possono essere riconosciuti in garanzia.<br />
3. Applicazione <strong>de</strong>lla garanzia<br />
L’indirizzo <strong>de</strong>l costruttore è il seguente:<br />
<strong>Truma</strong> <strong>Gerätetechnik</strong> GmbH & Co. KG,<br />
Wernher-von-Braun-Straße 12,<br />
85640 Putzbrunn, Germania<br />
In caso di guasti rivolgersi al centro di assistenza <strong>Truma</strong> o a un nostro<br />
partner di assistenza autorizzato (ve<strong>de</strong>re il libretto di assistenza <strong>Truma</strong><br />
o il sito www.truma.com). Descrivere <strong>de</strong>ttagliatamente i reclami e indicare<br />
il numero di fabbrica <strong>de</strong>ll'apparecchio e la data di acquisto.<br />
Affinché il costruttore possa verificare se sussiste il diritto alla garanzia,<br />
il consumatore finale dovrà farsi carico a proprio rischio <strong>de</strong>l trasporto<br />
o <strong>de</strong>lla spedizione <strong>de</strong>ll’apparecchio presso il costruttore stesso<br />
o un partner di assistenza. In caso di danni allo scambiatore di calore,<br />
<strong>de</strong>ve essere spedito anche il regolatore di pressione <strong>de</strong>l gas utilizzato.<br />
Per i condizionatori:<br />
Per evitare danni conseguenti al trasporto, l'apparecchio potrà essere<br />
spedito solo previo accordo con il centro di assistenza <strong>Truma</strong> in<br />
Germania o con il partner di assistenza autorizzato. In caso contrario,<br />
il mittente sopporta il rischio per gli eventuali danni <strong>de</strong>rivanti dal<br />
trasporto.<br />
In caso di invio in fabbrica, spedire a piccola velocità. Se il caso è contemplato<br />
dalla garanzia, lo stabilimento sosterrà i costi di invio e spedizione<br />
di ritorno. Qualora il caso non sia contemplato dalla garanzia,<br />
il costruttore informa il cliente e indica i costi di riparazione che non<br />
saranno assunti dal costruttore; in questo caso anche i costi di spedizione<br />
sono a carico <strong>de</strong>l cliente.<br />
45
Istruzioni di montaggio<br />
Avvertenze di sicurezza<br />
46<br />
In questo apparecchio sono montati componenti che<br />
possono generare una scintilla o un arco elettrico!<br />
Il montaggio e il collegamento di apparecchi elettrici <strong>de</strong>ve<br />
essere eseguito sostanzialmente da personale qualificato<br />
idoneo!<br />
In presenza di illuminazione naturale, i moduli fotovoltaici<br />
generano corrente. Anche se la luce è <strong>de</strong>bole, è presente la<br />
piena tensione. La tensione a vuoto può raggiungere il valore<br />
doppio. Non toccare componenti che conducono corrente.<br />
Prima <strong>de</strong>i lavori di montaggio e installazione coprire i moduli<br />
fotovoltaici ad es. con un cartone.<br />
L'apparecchio è stato sviluppato per il collegamento di moduli<br />
fotovoltaici. Utilizzare solo moduli adatti, ad es. <strong>Truma</strong> SM 23.<br />
Rispettare i valori massimi di corrente assorbita e tensione.<br />
Utilizzare solo cavi con le sezioni e fusibili con le capacità<br />
prescritte!<br />
Non installare o utilizzare l'apparecchio in ambienti umidi (ad<br />
es. bagno) o in ambienti in cui possono formarsi miscele di<br />
gas facilmente infiammabili.<br />
L'installazione <strong>de</strong>ll'apparecchio <strong>de</strong>ve essere conforme alle<br />
norme tecniche e amministrative <strong>de</strong>l rispettivo paese di utilizzo<br />
(ad es. EN 1648). Rispettare le norme e i regolamenti<br />
nazionali.<br />
È compreso nella fornitura:<br />
– 1 carica-batterie automatico ad energia solare<br />
– 1 manuale di istruzioni di montaggio e per l’uso<br />
Montaggio<br />
Ve<strong>de</strong>re pagina 3, figura B, C<br />
L'apparecchio <strong>de</strong>ve essere installato in un luogo al riparo da<br />
umidità e bagnato. Il luogo di installazione <strong>de</strong>ve essere pulito,<br />
asciutto e ben ventilato. L'apparecchio dovrebbe essere<br />
montato in prossimità <strong>de</strong>lla batteria. Durante il funzionamento<br />
l'alloggiamento può riscaldarsi fino a circa 80 °C.<br />
Assicurarsi che le fessure di ventilazione rimangano<br />
libere! Una ventilazione insufficiente può portare al surriscaldamento<br />
<strong>de</strong>ll'apparecchio!<br />
Il vano di montaggio <strong>de</strong>ll'apparecchio <strong>de</strong>ve essere provvisto in<br />
alto e lateralmente di aperture di ventilazione corrispon<strong>de</strong>nti a<br />
un'apertura complessiva di 100 cm².<br />
Se la temperatura interna <strong>de</strong>ll'apparecchio aumenta per l'insufficiente<br />
ventilazione o per una temperatura ambiente troppo<br />
elevata, l'apparecchio può subire danni.<br />
Le batterie con elettrolita liquido <strong>de</strong>vono essere installate in<br />
un box separato con sfiato verso l'esterno. Un box separato<br />
non è necessario per batterie a gel e AGM. Rispettare le istruzioni<br />
di installazione <strong>de</strong>l costruttore di batterie.<br />
Fissare in modo sicuro l'apparecchio con due viti (diametro<br />
4 mm – nessuna vite a testa svasata). Lunghezza <strong>de</strong>lle viti e<br />
coppia a seconda <strong>de</strong>l fondo.
Collegamento<br />
Lunghezze e sezioni <strong>de</strong>i cavi<br />
Esecuzione conforme a EN 1648-1 e VDE 0100, parte 721.<br />
Fusibili F1<br />
5 A, ritardato<br />
Installare i fusibili vicino alla fonte di energia (ad es. batteria).<br />
Utilizzare solo cavi con le sezioni e fusibili con le<br />
capacità prescritte!<br />
Collegamento fonte di energia/utenza<br />
Collegare l'apparecchio secondo lo schema di collegamento<br />
ai moduli fotovoltaici e alle batterie. Fare attenzione a collegare<br />
correttamente i poli.<br />
Collegare più moduli fotovoltaici sempre in parallelo. A questo<br />
scopo utilizzare solo moduli con gli stessi valori tipici di tensione<br />
(circa 18 V). Contattare il proprio rivenditore per il set di<br />
cavi accessori <strong>Truma</strong>.<br />
Rispettare la sequenza di collegamento. Collegare le<br />
utenze <strong>de</strong>lla roulotte (figura A, a) direttamente alla batteria.<br />
Utilizzare l'uscita utenza opzionale solo per piccole utenze<br />
non messe a terra, ad es. lampadina.<br />
1. Collegare la batteria al regolatore di carica –<br />
più e meno<br />
2. Collegare i moduli fotovoltaici al regolatore di carica –<br />
più e meno<br />
3. Collegare l'utenza di corrente continua all'uscita utenza opzionale<br />
più - meno<br />
Per lo smontaggio rispettare la sequenza inversa.<br />
Fissaggio <strong>de</strong>i cavi<br />
Fissare tutti i cavi (ad es. per fonti di energia, utenze e accessori)<br />
con fascette serracavo.<br />
Schema di collegamento<br />
Ve<strong>de</strong>re pagina 2, figura A<br />
Messa in funzione<br />
L'apparecchio è in funzione non appena viene collegata una<br />
batteria (rispettare la sequenza di collegamento).<br />
47
Bei Störungen wen<strong>de</strong>n Sie sich bitte an das <strong>Truma</strong><br />
Servicezentrum o<strong>de</strong>r an einen unserer autorisierten<br />
Servicepartner (siehe <strong>Truma</strong> Serviceheft o<strong>de</strong>r<br />
www.truma.com).<br />
Für eine rasche Bearbeitung halten Sie bitte Gerätetyp und<br />
Fabriknummer (siehe Typenschild) bereit.<br />
Always notify the <strong>Truma</strong> Service Centre or one of our<br />
authorised service partners if problems are encountered (see<br />
<strong>Truma</strong> Service book or www.truma.com).<br />
Having the equipment mo<strong>de</strong>l and the factory number ready<br />
(see type plate) will speed up processing.<br />
Veuillez vous adresser au centre <strong>de</strong> service clientèle <strong>de</strong><br />
<strong>Truma</strong> ou à un <strong>de</strong> nos services après-vente agréés en cas <strong>de</strong><br />
dysfonctionnements (consultez votre livret <strong>de</strong> service <strong>Truma</strong><br />
ou www.truma.com).<br />
Pour un traitement rapi<strong>de</strong> <strong>de</strong> votre <strong>de</strong>man<strong>de</strong>, veuillez tenir<br />
prêts le type d’appareil et le numéro d'usine (voir plaque<br />
signalétique).<br />
In caso di guasti rivolgersi al centro di assistenza <strong>Truma</strong> o a<br />
un nostro partner di assistenza autorizzato (ve<strong>de</strong>re il libretto di<br />
assistenza <strong>Truma</strong> o il sito www.truma.com).<br />
Affinché la richiesta possa essere elaborata rapidamente,<br />
tenere a portata di mano il mo<strong>de</strong>llo <strong>de</strong>ll’apparecchio e il<br />
numero di fabbrica (v. targa dati).<br />
<strong>Truma</strong> <strong>Gerätetechnik</strong> GmbH & Co. KG<br />
Wernher-von-Braun-Straße 12<br />
85640 Putzbrunn<br />
Deutschland<br />
Service<br />
Telefon +49 (0)89 4617-2142<br />
Telefax +49 (0)89 4617-2159<br />
service@truma.com<br />
www.truma.com<br />
©<br />
76000-33800 · 01 · 01/2013 ·