operating instructions - AJ Madison
operating instructions - AJ Madison
operating instructions - AJ Madison

Create successful ePaper yourself
Turn your PDF publications into a flip-book with our unique Google optimized e-Paper software.
Door Reversal Instructions (cont)<br />
OPERATING INSTRUCTIONS<br />
1. Remove 2 screws (1), then pull door (4) as of arrowhead direction and then the bottom hinge (Right) (2)(Fig.A & Fig.B)<br />
2. Remove 3 screws of right upper Hinge, then remove right upper hinge(See Fig.C)<br />
3. Use the screws which you removed from the right side hinges to fix the left upper hinge (See Fig.D &Fig.E)<br />
4. Rotate the door 180°, then assemble the door on the opposite side.<br />
INSTALLATION<br />
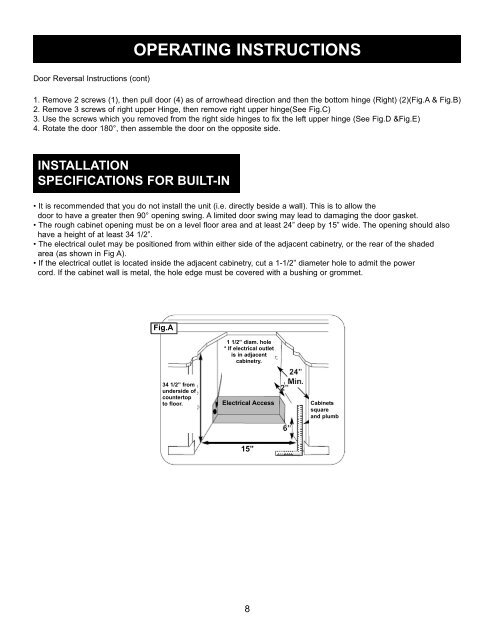
SPECIFICATIONS FOR BUILT-IN<br />
• It is recommended that you do not install the unit (i.e. directly beside a wall). This is to allow the<br />
door to have a greater then 90° opening swing. A limited door swing may lead to damaging the door gasket.<br />
• The rough cabinet opening must be on a level floor area and at least 24” deep by 15” wide. The opening should also<br />
have a height of at least 34 1/2”.<br />
• The electrical oulet may be positioned from within either side of the adjacent cabinetry, or the rear of the shaded<br />
area (as shown in Fig A).<br />
• If the electrical outlet is located inside the adjacent cabinetry, cut a 1-1/2” diameter hole to admit the power<br />
cord. If the cabinet wall is metal, the hole edge must be covered with a bushing or grommet.<br />
Fig.A<br />
Fig A<br />
34 3 34 1/2” /4” from<br />
underside of<br />
countertop of<br />
to floor.<br />
countertop<br />
to floor<br />
1 1 1 1/2” /2”d diam. iam. hole<br />
* *If If electrical outlet outlet<br />
is<br />
is<br />
in<br />
in<br />
adjacent<br />
adjacent<br />
cabinetry.<br />
cabinetry .<br />
Electrical Access<br />
15”<br />
8<br />
Cabinets<br />
square square<br />
and<br />
and<br />
plumb<br />
plumb