operating instructions - AJ Madison
operating instructions - AJ Madison
operating instructions - AJ Madison

Create successful ePaper yourself
Turn your PDF publications into a flip-book with our unique Google optimized e-Paper software.
CONNECTING ICE MAKER TO<br />
WATER SUPPLY<br />
OPERATING INSTRUCTIONS<br />
WARNING<br />
To avoid electric shock, which can cause death or severe<br />
personal injury, disconnect the Ice Maker from an<br />
electrical power outlet before connecting a water supply<br />
line to the Ice Maker.<br />
CAUTION<br />
Copper tubing is recommended for the water supply line.<br />
Water supply tubing made of 1/4” plsstic is not recommended<br />
since it greatly increases the potential for water<br />
leaks. Manufacturer will not be responsible for any<br />
damange if plastic tubing is used for the supply line.<br />
DO NOT install water supply tubing in areas where<br />
temperatures fall below freezing.<br />
- Connect the ice maker to a drinkable water source<br />
that is not tied into a water softening system.<br />
Chemicals from the softener may damage the ice<br />
maker, causing it to malfunction.<br />
IMPORTANT<br />
Ensure that your water supply line connections comply<br />
with all local plumbing codes.<br />
Before installing The Water Supply Line, You<br />
Will Need<br />
1. Basic tools: adjustable wrench and standard, falt blade<br />
screwdriver.<br />
2. Access to a household cold water line with water<br />
pressure between 20 and 120 psi.<br />
3. A water supply line made of 1/4 inch(6.4mm)OD,copper<br />
tubing, To determine the length of copper tubing needed,<br />
you will need to measure the distance form the ice<br />
maker inlet valve at the back of the Ice Maker to your<br />
cold water pipe.Then add approximadtely 7 feet(2.1<br />
meters),so the Ice Maker can be moved out for cleaning.<br />
See Figure 1.<br />
4. A shutoff valve to connect the water supply line to your<br />
household water sytem. (DO NOT use a self-piercing<br />
type shutoff valve.)<br />
5. A compression nut and ferrule(sleeve) for connecting the<br />
water supply line to the ice maker inlet valve.<br />
10<br />
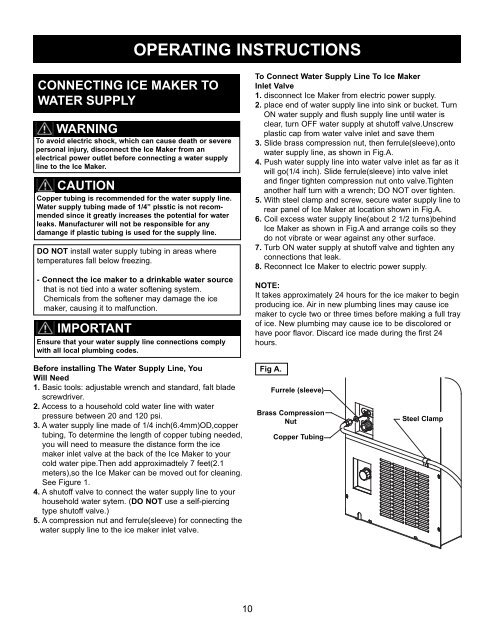
To Connect Water Supply Line To lce Maker<br />
Inlet Valve<br />
1. disconnect Ice Maker from electric power supply.<br />
2. place end of water supply line into sink or bucket. Turn<br />
ON water supply and flush supply line until water is<br />
clear, turn OFF water supply at shutoff valve.Unscrew<br />
plastic cap from water valve inlet and save them<br />
3. Slide brass compression nut, then ferrule(sleeve),onto<br />
water supply line, as shown in Fig.A.<br />
4. Push water supply line into water valve inlet as far as it<br />
will go(1/4 inch). Slide ferrule(sleeve) into valve inlet<br />
and finger tighten compression nut onto valve.Tighten<br />
another half turn with a wrench; DO NOT over tighten.<br />
5. With steel clamp and screw, secure water supply line to<br />
rear panel of Ice Maker at location shown in Fig.A.<br />
6. Coil excess water supply line(about 2 1/2 turns)behind<br />
Ice Maker as shown in Fig.A and arrange coils so they<br />
do not vibrate or wear against any other surface.<br />
7. Turb ON water supply at shutoff valve and tighten any<br />
connections that leak.<br />
8. Reconnect Ice Maker to electric power supply.<br />
NOTE:<br />
It takes approximately 24 hours for the ice maker to begin<br />
producing ice. Air in new plumbing lines may cause ice<br />
maker to cycle two or three times before making a full tray<br />
of ice. New plumbing may cause ice to be discolored or<br />
have poor flavor. Discard ice made during the first 24<br />
hours.<br />
Fig A.<br />
Furrele (sleeve)<br />
Brass Compression<br />
Nut<br />
Copper Tubing<br />
Steel Clamp