

Washer Lavadora Laveuse - Sears
Washer Lavadora Laveuse - Sears
Washer Lavadora Laveuse - Sears

Create successful ePaper yourself
Turn your PDF publications into a flip-book with our unique Google optimized e-Paper software.
8=<br />
9=<br />
[] In wash water temperatures colder than 60°F (15.6°C),<br />
detergents do not dissolve well. Soils can be difficult to<br />
remove. Some fabrics can retain wear wrinkles and have<br />
increased pilling (the formation of small lint-like balls on<br />
the surface of garments).<br />
(Optional Step) OPTIONS selector (on some models). For an<br />
additional rinse and spin at the end of a wash cycle, set the<br />
Options selector to 2nd Rinse. On some models, the 2rid<br />
Rinse feature is part of the cycle.<br />
(Optional Step) SOIL LEVEL selector (on some models). Each<br />
soil level setting is designed for different types of fabric and<br />
soil levels.<br />
Use a soft, damp cloth or sponge to wipe up any spills such as<br />
detergent or bleach from the outside of your washer.<br />
Clean your washer interior by mixing 1 cup (250 mL) of chlorine<br />
bleach and enough detergent to equal twice the manufacturer's<br />
recommended amount for a normal wash load. Pour this mixture<br />
into your washer and run it through a complete cycle using hot<br />
water. Repeat this process if necessary.<br />
NOTE: If your washer has the Auto Load Sensing feature, use<br />
the Bulky cycle.<br />
Remove any hard water deposits using only cleaners labeled as<br />
washer safe.<br />
Cleaning the liquid fabric softener dispenser (on some models):<br />
Style 1: To remove dispenser, grasp the top of the dispenser<br />
with both hands. Squeeze and push upward with both thumbs<br />
to remove. Flush the dispenser with warm water.<br />
Style 2:<br />
1. Hold the top agitator section with one hand. Using the<br />
other hand, rotate the dispenser clockwise until it stops<br />
(approximately 1" [2.54 cm]). To remove, lift the dispenser<br />
straight up. Using a rocking motion, separate the top and base<br />
of the dispenser. Wash three parts (the base, the cone-shaped<br />
cup, and the top) with a mild detergent and warm water.<br />
2. Making sure the pointed end of the cone-shaped cup is<br />
pointed toward the base, assemble the three parts by<br />
pressing the top and bottom sections together. For ease of<br />
assembly, reassemble the dispenser with the parts upside<br />
down. If the seal came off while removing the dispenser<br />
from the agitator, install the seal as shown below.<br />
D<br />
WASHER CARE<br />
A. Top<br />
B. Cone-shaped<br />
cup<br />
C. Base<br />
D. Seal<br />
10. Push in the Cycle Control knob and turn it clockwise to the<br />
wash cycle you want. Reduce the wash time when using a<br />
small water level setting. Pull out the Cycle Control knob to<br />
start the washer.<br />
To stop or restart your washer:<br />
[] To stop the washer at any time, push in the Cycle<br />
Control knob.<br />
[] To restart the washer, close the lid (if open) and pull out<br />
the Cycle Control knob.<br />
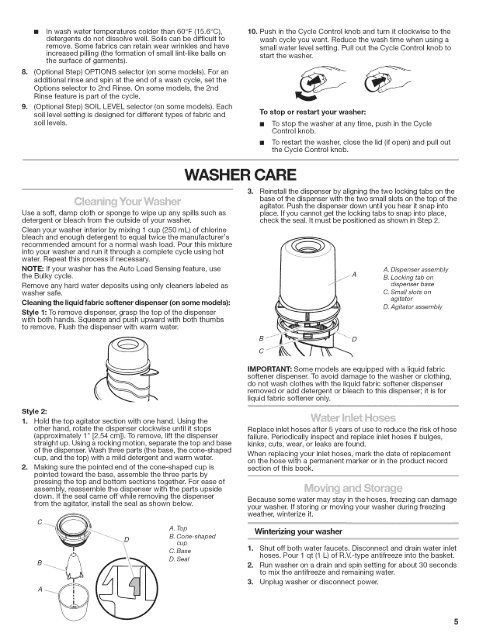
3= Reinstall the dispenser by aligning the two locking tabs on the<br />
base of the dispenser with the two small slots on the top of the<br />
agitator. Push the dispenser down until you hear it snap into<br />
place. If you cannot get the locking tabs to snap into place,<br />
check the seal. It must be positioned as shown in Step 2.<br />
A. Dispenser assembly<br />
B. Locking tab on<br />
dispenser base<br />
C. Smafl slots on<br />
agitator<br />
D. Agitator assembly<br />
IMPORTANT: Some models are equipped with a liquid fabric<br />
softener dispenser. To avoid damage to the washer or clothing,<br />
do not wash clothes with the liquid fabric softener dispenser<br />
removed or add detergent or bleach to this dispenser; it is for<br />
liquid fabric softener only.<br />
Replace inlet hoses after 5 years of use to reduce the risk of hose<br />
failure. Periodically inspect and replace inlet hoses if bulges,<br />
kinks, cuts, wear, or leaks are found.<br />
When replacing your inlet hoses, mark the date of replacement<br />
on the hose with a permanent marker or in the product record<br />
section of this book.<br />
Because some water may stay in the hoses, freezing can damage<br />
your washer. If storing or moving your washer during freezing<br />
weather, winterize it.<br />
Winterizing your washer<br />
1. Shut off both water faucets. Disconnect and drain water inlet<br />
hoses. Pour 1 qt (1 L) of R.V.-type antifreeze into the basket.<br />
2. Run washer on a drain and spin setting for about 30 seconds<br />
to mix the antifreeze and remaining water.<br />
3. Unplug washer or disconnect power.


