GUIDE DE DÉMARRAGE RAPIDE
GUIDE DE DÉMARRAGE RAPIDE
GUIDE DE DÉMARRAGE RAPIDE

Create successful ePaper yourself
Turn your PDF publications into a flip-book with our unique Google optimized e-Paper software.
EN.2<br />
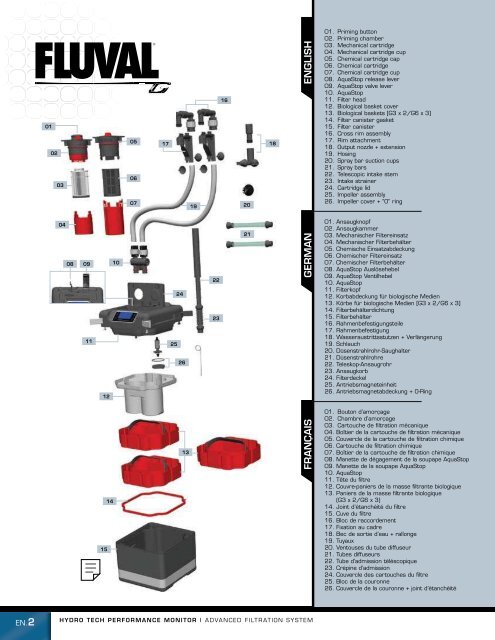
01<br />
02<br />
03<br />
04<br />
08 09<br />
11<br />
12<br />
15<br />
14<br />
10<br />
05<br />
06<br />
07<br />
17<br />
25<br />
24<br />
26<br />
13<br />
ENGLISH<br />
FRANÇAIS GERMAN<br />
HYDRO TECH PERFORMANCE MONITOR | ADVANCED FILTRATION SYSTEM<br />
19<br />
22<br />
23<br />
16<br />
20<br />
21<br />
18<br />
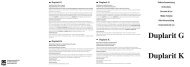
01. Priming button<br />
02. Priming chamber<br />
03. Mechanical cartridge<br />
04. Mechanical cartridge cup<br />
05. Chemical cartridge cap<br />
06. Chemical cartridge<br />
07. Chemical cartridge cup<br />
08. AquaStop release lever<br />
09. AquaStop valve lever<br />
10. AquaStop<br />
11. Filter head<br />
12. Biological basket cover<br />
13. Biological baskets [G3 x 2/G6 x 3]<br />
14. Filter canister gasket<br />
15. Filter canister<br />
16. Cross rim assembly<br />
17. Rim attachment<br />
18. Output nozzle + extension<br />
19. Hosing<br />
20. Spray bar suction cups<br />
21. Spray bars<br />
22. Telescopic intake stem<br />
23. Intake strainer<br />
24. Cartridge lid<br />
25. Impeller assembly<br />
26. Impeller cover + “O” ring<br />
01. Ansaugknopf<br />
02. Ansaugkammer<br />
03. Mechanischer Filtereinsatz<br />
04. Mechanischer Filterbehälter<br />
05. Chemische Einsatzabdeckung<br />
06. Chemischer Filtereinsatz<br />
07. Chemischer Filterbehälter<br />
08. AquaStop Auslösehebel<br />
09. AquaStop Ventilhebel<br />
10. AquaStop<br />
11. Filterkopf<br />
12. Korbabdeckung für biologische Medien<br />
13. Körbe für biologische Medien [G3 x 2/G6 x 3]<br />
14. Filterbehälterdichtung<br />
15. Filterbehälter<br />
16. Rahmenbefestigungsteile<br />
17. Rahmenbefestigung<br />
18. Wasseraustrittsstutzen + Verlängerung<br />
19. Schlauch<br />
20. Düsenstrahlrohr-Saughalter<br />
21. Düsenstrahlrohre<br />
22. Teleskop-Ansaugrohr<br />
23. Ansaugkorb<br />
24. Filterdeckel<br />
25. Antriebsmagneteinheit<br />
26. Antriebsmagnetabdeckung + O-Ring<br />
01. Bouton d’amorçage<br />
02. Chambre d’amorçage<br />
03. Cartouche de filtration mécanique<br />
04. Boîtier de la cartouche de filtration mécanique<br />
05. Couvercle de la cartouche de filtration chimique<br />
06. Cartouche de filtration chimique<br />
07. Boîtier de la cartouche de filtration chimique<br />
08. Manette de dégagement de la soupape AquaStop<br />
09. Manette de la soupape AquaStop<br />
10. AquaStop<br />
11. Tête du filtre<br />
12. Couvre-paniers de la masse filtrante biologique<br />
13. Paniers de la masse filtrante biologique<br />
(G3 x 2/G6 x 3)<br />
14. Joint d’étanchéité du filtre<br />
15. Cuve du filtre<br />
16. Bloc de raccordement<br />
17. Fixation au cadre<br />
18. Bec de sortie d’eau + rallonge<br />
19. Tuyaux<br />
20. Ventouses du tube diffuseur<br />
21. Tubes diffuseurs<br />
22. Tube d’admission téléscopique<br />
23. Crépine d’admission<br />
24. Couvercle des cartouches du filtre<br />
25. Bloc de la couronne<br />
26. Couvercle de la couronne + joint d’étanchéité<br />
IMPORTANT SAFETY INSTRUCTIONS<br />
WARNING - To guard against injury, basic safety precautions should be observed.<br />
READ AND FOLLOW ALL SAFETY INSTRUCTIONS<br />
To guard against injury, basic safety precautions should be<br />
observed when handling the Fluval Canister Filter, including<br />
the following:<br />
1. READ AND FOLLOW ALL<br />
SAFETY INSTRUCTIONS and all<br />
the important notices on the appliance before using.<br />
Failure to do so may result in damage to the unit.<br />
2. DANGER – To avoid possible electric shock, special<br />
care should be taken since water is employed in the<br />
use of aquarium equipment. For each of the following<br />
situations, do not attempt repairs yourself; return the<br />
appliance to an authorized service facility for service or<br />
discard the appliance.<br />
A. If the appliance falls into the water, DON’T reach for it!<br />
First unplug it and retrieve it. If electrical components<br />
of the appliance get wet, unplug the appliance<br />
immediately.<br />
B. If the appliance shows any sign of abnormal water<br />
leakage or if RCD (or GFCI- Ground Fault Current<br />
Interrupter) switches off disconnect the power supply<br />
cord from mains and remove pump from water.<br />
C. Carefully examine the appliance after installation.<br />
It should not be plugged if there is water on parts not<br />
intended to be wet.<br />
D. Do not operate any appliance if it has a damaged cord<br />
or plug, or if it is malfunctioning or it is dropped or<br />
damaged in any manner. The power cord of this<br />
appliance cannot be replaced; if the cord is damaged,<br />
the appliance should be discarded. Never cut the cord.<br />
The display label of this appliance cannot be replaced; if<br />
the display label is damaged or not fully adherent, the<br />
appliance should be discarded.<br />
E. To avoid the possibility of the appliance plug or<br />
receptacle getting wet, position the appliance to one side<br />
of a wall mounted receptacle to prevent water from<br />
dripping onto the receptacle or plug.<br />
A “drip loop” (see photo) should be arranged by the user for<br />
the cord connecting appliance to a<br />
receptacle. The “drip loop” is that<br />
part of the cord below the level of the<br />
receptacle or the connector if an<br />
extension cord is used, to prevent<br />
water traveling along the cord and<br />
coming in contact with the receptacle.<br />
If the plug or receptacle does get wet, DON’T unplug the<br />
cord. Disconnect the fuse or circuit breaker that supplies<br />
power to the appliance. Then unplug and examine for<br />
presence of water in receptacle.<br />
ENGLISH<br />
3. WARNING - Close supervision is necessary when any<br />
appliance is used by or near children. This appliance<br />
is not intended for use by persons (including children)<br />
with reduced physical, sensory or mental capabilities,<br />
or lack of experience and knowledge, unless they have<br />
been given supervision or instruction concerning use<br />
of the appliance by a person responsible for their safety.<br />
Children should be supervised to ensure that they do not<br />
play with the appliance.<br />
4. To avoid injury, do not touch moving parts or hot<br />
parts.<br />
5. CAUTION – Always unplug or disconnect all appliances<br />
in the aquarium from electricity supply before<br />
placing hands in water, before putting on or taking off<br />
parts and while the equipment is being installed,<br />
maintained or handled. Grasp the plug and pull to<br />
disconnect. Never yank cord to pull plug from outlet.<br />
Always unplug an appliance from an outlet when not<br />
in use.<br />
6. This is an aquarium filter-pump. Do not use this filter<br />
pump for other than intended use (i.e.: do not use in<br />
swimming pools, bathrooms, etc.). The use of<br />
attachments not recommended or sold by the appliance<br />
manufacturer may cause an unsafe condition. This<br />
filter-pump is not submersible. Never put the filter head<br />
in water or under water jets.<br />
<br />
situations where people are immersed.<br />
<br />
up to 35 °C.<br />
<br />
liquids.<br />
7. This filter pump is suitable for INDOOR use only. Do not<br />
install or store the appliance where it will be exposed to<br />
the weather or to temperatures below freezing.<br />
8. Make sure that the filter-pump is securely installed<br />
before operating it. Do not allow pump to run dry.<br />
9. If an extension cord is necessary, a cord with proper<br />
rating should be used. A cord rated for less amperes or<br />
watts than the appliance rating may overheat. Care<br />
should be taken to arrange the cord so that it will not be<br />
tripped over or pulled. The connection should be carried<br />
out by a qualified electrical installer.<br />
10. SAVE THESE INSTRUCTIONS<br />
For the complete use and understanding of this product<br />
it is recommended that you read this manual thoroughly<br />
and understand all the steps involved. Failure to do so<br />
may result in damage to this product.<br />
QUICK START <strong>GUI<strong>DE</strong></strong><br />
EN.3