GB - ASCO Numatics
GB - ASCO Numatics
GB - ASCO Numatics

You also want an ePaper? Increase the reach of your titles
YUMPU automatically turns print PDFs into web optimized ePapers that Google loves.
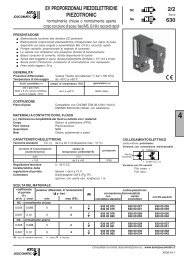
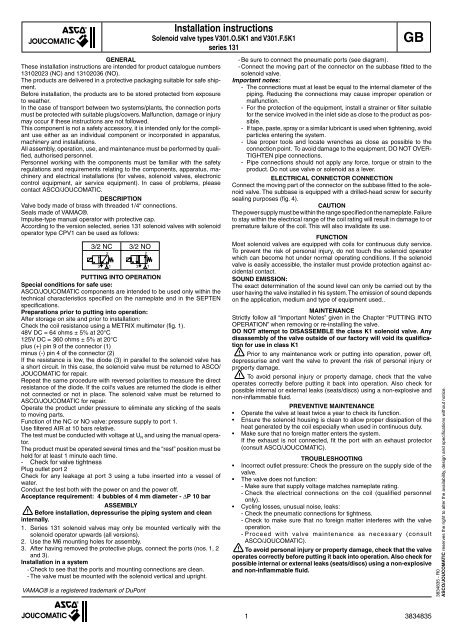
GENERAL<br />
These installation instructions are intended for product catalogue numbers<br />
13102023 (NC) and 13102036 (NO).<br />
The products are delivered in a protective packaging suitable for safe shipment.<br />
Before installation, the products are to be stored protected from exposure<br />
to weather.<br />
In the case of transport between two systems/plants, the connection ports<br />
must be protected with suitable plugs/covers. Malfunction, damage or injury<br />
may occur if these instructions are not followed.<br />
This component is not a safety accessory, it is intended only for the compliant<br />
use either as an individual component or incorporated in apparatus,<br />
machinery and installations.<br />
All assembly, operation, use, and maintenance must be performed by qualifi<br />
ed, authorised personnel.<br />
Personnel working with the components must be familiar with the safety<br />
regulations and requirements relating to the components, apparatus, machinery<br />
and electrical installations (for valves, solenoid valves, electronic<br />
control equipment, air service equipment). In case of problems, please<br />
contact <strong>ASCO</strong>/JOUCOMATIC.<br />
DESCRIPTION<br />
Valve body made of brass with threaded 1/4“ connections.<br />
Seals made of VAMAC®.<br />
Impulse-type manual operator with protective cap.<br />
According to the version selected, series 131 solenoid valves with solenoid<br />
operator type CPV1 can be used as follows:<br />
3/2 NC 3/2 NO<br />
3<br />
2<br />
1<br />
PUTTING INTO OPERATION<br />
Special conditions for safe use:<br />
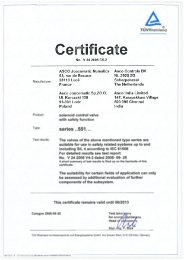
<strong>ASCO</strong>/JOUCOMATIC components are intended to be used only within the<br />
technical characteristics specifi ed on the nameplate and in the SEPTEN<br />
specifi cations.<br />
Preparations prior to putting into operation:<br />
After storage on site and prior to installation:<br />
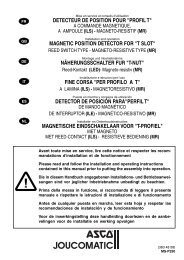
Check the coil resistance using a METRIX multimeter (fi g. 1).<br />
48V DC = 64 ohms ± 5% at 20°C<br />
125V DC = 360 ohms ± 5% at 20°C<br />
plus (+) pin 9 of the connector (1)<br />
minus (-) pin 4 of the connector (2)<br />
If the resistance is low, the diode (3) in parallel to the solenoid valve has<br />
a short circuit. In this case, the solenoid valve must be returned to <strong>ASCO</strong>/<br />
JOUCOMATIC for repair.<br />
Repeat the same procedure with reversed polarities to measure the direct<br />
resistance of the diode. If the coil‘s values are returned the diode is either<br />
not connected or not in place. The solenoid valve must be returned to<br />
<strong>ASCO</strong>/JOUCOMATIC for repair.<br />
Operate the product under pressure to eliminate any sticking of the seals<br />
to moving parts.<br />
Function of the NC or NO valve: pressure supply to port 1.<br />
Use fi ltered AIR at 10 bars relative.<br />
The test must be conducted with voltage at UN and using the manual operator.<br />
The product must be operated several times and the “rest” position must be<br />
held for at least 1 minute each time.<br />
- Check for valve tightness<br />
Plug outlet port 2<br />
Check for any leakage at port 3 using a tube inserted into a vessel of<br />
water.<br />
Conduct the test both with the power on and the power off.<br />
Acceptance requirement: 4 bubbles of 4 mm diameter - ΔP 10 bar<br />
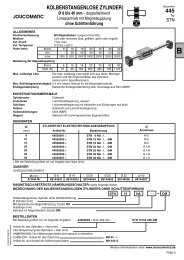
ASSEMBLY<br />
d Before installation, depressurise the piping system and clean<br />
internally.<br />
1. Series 131 solenoid valves may only be mounted vertically with the<br />
solenoid operator upwards (all versions).<br />
2. Use the M6 mounting holes for assembly.<br />
3. After having removed the protective plugs, connect the ports (nos. 1, 2<br />
and 3).<br />
Installation in a system<br />
- Check to see that the ports and mounting connections are clean.<br />
- The valve must be mounted with the solenoid vertical and upright.<br />
VAMAC® is a registered trademark of DuPont<br />
3<br />
2<br />
1<br />
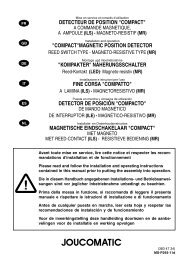
Installation instructions<br />
Solenoid valve types V301.O.5K1 and V301.F.5K1<br />
series 131<br />
1<br />
<strong>GB</strong><br />
- Be sure to connect the pneumatic ports (see diagram).<br />
- Connect the moving part of the connector on the subbase fi tted to the<br />
solenoid valve.<br />
Important notes:<br />
- The connections must at least be equal to the internal diameter of the<br />
piping. Reducing the connections may cause improper operation or<br />
malfunction.<br />
- For the protection of the equipment, install a strainer or fi lter suitable<br />
for the service involved in the inlet side as close to the product as possible.<br />
- If tape, paste, spray or a similar lubricant is used when tightening, avoid<br />
particles entering the system.<br />
- Use proper tools and locate wrenches as close as possible to the<br />
connection point. To avoid damage to the equipment, DO NOT OVER-<br />
TIGHTEN pipe connections.<br />
- Pipe connections should not apply any force, torque or strain to the<br />
product. Do not use valve or solenoid as a lever.<br />
ELECTRICAL CONNECTOR CONNECTION<br />
Connect the moving part of the connector on the subbase fi tted to the solenoid<br />
valve. The subbase is equipped with a drilled-head screw for security<br />
sealing purposes (fi g. 4).<br />
CAUTION<br />
The power supply must be within the range specifi ed on the nameplate. Failure<br />
to stay within the electrical range of the coil rating will result in damage to or<br />
premature failure of the coil. This will also invalidate its use.<br />
FUNCTION<br />
Most solenoid valves are equipped with coils for continuous duty service.<br />
To prevent the risk of personal injury, do not touch the solenoid operator<br />
which can become hot under normal operating conditions. If the solenoid<br />
valve is easily accessible, the installer must provide protection against accidental<br />
contact.<br />
SOUND EMISSION:<br />
The exact determination of the sound level can only be carried out by the<br />
user having the valve installed in his system. The emission of sound depends<br />
on the application, medium and type of equipment used..<br />
MAINTENANCE<br />
Strictly follow all “Important Notes” given in the Chapter “PUTTING INTO<br />
OPERATION” when removing or re-installing the valve.<br />
DO NOT attempt to DISASSEMBLE the class K1 solenoid valve. Any<br />
disassembly of the valve outside of our factory will void its qualifi cation<br />
for use in class K1<br />
d Prior to any maintenance work or putting into operation, power off,<br />
depressurise and vent the valve to prevent the risk of personal injury or<br />
property damage.<br />
d To avoid personal injury or property damage, check that the valve<br />
operates correctly before putting it back into operation. Also check for<br />
possible internal or external leaks (seats/discs) using a non-explosive and<br />
non-infl ammable fl uid.<br />
PREVENTIVE MAINTENANCE<br />
• Operate the valve at least twice a year to check its function.<br />
• Ensure the solenoid housing is clean to allow proper dissipation of the<br />
heat generated by the coil especially when used in continuous duty.<br />
• Make sure that no foreign matter enters the system.<br />
If the exhaust is not connected, fi t the port with an exhaust protector<br />
(consult <strong>ASCO</strong>/JOUCOMATIC).<br />
TROUBLESHOOTING<br />
• Incorrect outlet pressure: Check the pressure on the supply side of the<br />
valve.<br />
• The valve does not function:<br />
- Make sure that supply voltage matches nameplate rating.<br />
- Check the electrical connections on the coil (qualifi ed personnel<br />
only).<br />
• Cycling losses, unusual noise, leaks:<br />
- Check the pneumatic connections for tightness.<br />
- Check to make sure that no foreign matter interferes with the valve<br />
operation.<br />
- Proceed with valve maintenance as necessary (consult<br />
<strong>ASCO</strong>/JOUCOMATIC).<br />
d To avoid personal injury or property damage, check that the valve<br />
operates correctly before putting it back into operation. Also check for<br />
possible internal or external leaks (seats/discs) using a non-explosive<br />
and non-infl ammable fl uid.<br />
3834835<br />
3834835 - R0<br />
<strong>ASCO</strong>/JOUCOMATIC reserves the right to alter the availability, design and specifi cations without notice.
GENERALITES<br />
Cette fi che d’instructions d’installation porte sur le matériel codifi é :<br />
13102023 (NF) et 13102036 (NO).<br />
Le matériel est livré dans un emballage de protection durant le transport.<br />
Avant son installation, le matériel sera stocké à l'abri des intempéries.<br />
Lors d'un transport éventuel entre deux installations les orifi ces seront protégés<br />
par des obturateurs appropriés. Le non respect des points mentionnés<br />
ci-dessous peut être à l'origine de dysfonctionnements, de dommages ou<br />
de blessures.<br />
Le présent composant n'est pas un accessoire de sécurité, il est destiné<br />
uniquement à une utilisation conforme, individuelle ou intégré dans des<br />
appareils, des machines et des installations.<br />
Les opérations de montage, mise en service, utilisation et maintenance<br />
doivent être réalisées par un personnel qualifi é et autorisé.<br />
Le personnel intervenant sur ces composants doit être familiarisé avec les<br />
règles de sécurité et exigences en vigueur concernant les composants,<br />
appareils, machines et installations électriques (pour vannes, électrovannes,<br />
commandes électroniques, traitement de l’air). En cas de problème veuillez<br />
contacter <strong>ASCO</strong>/JOUCOMATIC.<br />
DESCRIPTION<br />
Corps de vanne en laiton taraudé 1/4.<br />
Garnitures en VAMAC® .<br />
Commande manuelle à impulsion, avec capuchon de protection.<br />
L’électrovanne série 131 à tête magnétique CPV1 peut être utilisée, suivant<br />
la version choisie,dans les fonctions suivantes :<br />
3/2 NF 3/2 NO<br />
3<br />
2<br />
1<br />
MISE EN SERVICE<br />
Conditions spéciales pour une utilisation sûre :<br />
Les composants <strong>ASCO</strong>/JOUCOMATIC sont prévus pour être utilisés uniquement<br />
suivant leurs caractéristiques techniques, comme il est indiqué sur<br />
la plaque signalétique et sur les fi ches Septen.<br />
Opérations préliminaires<br />
Après stockage sur site et avant installation<br />
- Contrôle de la résistance de la bobine à l’aide d’un contrôleur multimètre<br />
type «METRIX» (fi g. 1)<br />
48V CC = 64 Ohms ±5% à 20°C<br />
125V CC = 360 Ohms ±5% à 20°C<br />
+ borne 9 du connecteur (1)<br />
- borne 4 du connecteur (2)<br />
Si la résistance est faible, la diode (3) en parallèle avec l’électrovanne<br />
est en court-circuit ; dans ce cas l’électrovanne doit être retournée à<br />
<strong>ASCO</strong>/JOUCOMATIC pour réparation.<br />
En faisant la même mesure en inversant les polarités on mesure la résistance<br />
directe de la diode ; si on trouve les valeurs de la bobine, la diode est<br />
coupée ou absente l’électrovanne doit être retournée à <strong>ASCO</strong>/JOUCOMATIC<br />
pour réparation.<br />
- Faire fonctionner sous pression le produit afi n de supprimer un phénomène<br />
éventuel de gommage des joints sur les parties mobiles.<br />
Fonction de l’appareil NF, ou NO, pression en 1<br />
AIR fi ltré de 10 bars relatifs.<br />
L’essai doit se faire sous tension à UN puis à l’aide de la commande<br />
manuelle.<br />
Il faut effectuer plusieurs manœuvres, la position «repos» doit être maintenue<br />
chaque fois au moins une minute.<br />
- Vérifi er l’étanchéité<br />
Obturer la voie utilisation numéro 2<br />
Contrôle de la fuite en voie 3 à l’aide d’un tube plongé dans un récipient d’eau<br />
Contrôle sous tension et hors tension<br />
- Critères d’acceptation : 4 bulles Ø 4 mm - ΔP 10 bar<br />
MONTAGE<br />
d Avant de procéder au montage, dépressuriser les canalisations<br />
et effectuer un nettoyage interne des dites canalisations.<br />
1. Montage des électrovannes série 131 uniquement corps vertical, tête<br />
magnétique vers le haut (toutes versions).<br />
2. Fixation par les trous M6.<br />
3. Après avoir ôté les bouchons de protection, procéder au raccordement<br />
des orifi ces (repères 1, 2, 3).<br />
Installation sur circuit<br />
- Vérifi er la propreté des orifi ces et des raccords à monter.<br />
- Position de montage impérative verticale tête en haut.<br />
- Respecter les orifi ces de branchement pneumatique (voir schéma).<br />
VAMAC® est une marque déposée de DuPont<br />
3<br />
2<br />
1<br />
Instructions de mise en service<br />
Electrovanne, types V301.O.5K1 et V301.F.5K1<br />
série 131<br />
2<br />
FR<br />
- Raccorder la partie mobile du connecteur sur l’embase fi xée à l’électrovanne.<br />
Consignes importantes :<br />
- La dimension des tuyauteries doit être au minimum égale au<br />
Ø interne. Une restriction des Ø de tuyauteries peut entraîner<br />
des dysfonctionnements.<br />
- Afi n de protéger le matériel, installer une crépine ou un fi ltre adéquat<br />
en amont, aussi près que possible du produit.<br />
- En cas d’utilisation de ruban, pâte, aérosol ou autre lubrifi ant lors<br />
du serrage, veiller à ce qu’aucun corps étranger ne pénètre dans le<br />
circuit.<br />
- Utiliser un outillage approprié et placer les clés aussi près que possible<br />
du point de raccordement. Afi n d’éviter toute détérioration, NE PAS<br />
TROP SERRER les raccords des tuyauteries.<br />
- Les tubes de raccordement ne devront exercer aucun effort, couple<br />
ou contrainte sur le produit. Ne pas se servir de la vanne ou de la tête<br />
magnétique comme d’un levier.<br />
RACCORDEMENT ELECTRIQUE PAR CONNECTEUR<br />
Raccorder la partie mobile du connecteur sur l’embase fi xée à l’électrovanne.<br />
L’embase est munie d’une tête de vis percée pour le plombage de<br />
la liaison (4).<br />
ATTENTION<br />
L'alimentation électrique doit être dans la plage indiquée sur la plaque signalétique.<br />
Le fait de ne pas respecter les limites des caractéristiques électriques<br />
de la bobine, a comme conséquence des dommages ou une défaillance<br />
prématurée de cette dernière. Cela invalidera également son utilisation.<br />
FONCTIONNEMENT<br />
La plupart des électrovannes comportent des bobinages prévus pour mise<br />
sous tension permanente. Pour éviter toute brûlure, ne pas toucher la tête<br />
magnétique qui, en fonctionnement normal et en permanence sous tension,<br />
peut atteindre une température élevée. Si l'électrovanne est facilement<br />
accessible, l'installateur doit prévoir une protection empêchant tout contact<br />
accidentel.<br />
BRUIT DE FONCTIONNEMENT : L’utilisateur ne pourra déterminer avec<br />
précision le niveau sonore émis qu’après avoir monté le composant sur<br />
l’installation. Le bruit de fonctionnement varie selon l’utilisation, le fl uide et<br />
le type de matériel employé.<br />
ENTRETIEN<br />
Pour la dépose ou repose de l'électrovanne, respecter scrupuleusement les<br />
"consignes importantes" du chapitre "MISE EN SERVICE".<br />
Aucun démontage de l’électrovanne K1 n’est autorisée, tout appareil<br />
démonté hors usine n’est plus qualifi é K1.<br />
d Avant toute opération d’entretien ou de remise en marche, couper l’alimentation<br />
de l’électrovanne, dépressuriser le corps de vanne et le purger,<br />
pour prévenir tout risque d’accident corporel ou matériel.<br />
d Pour prévenir tout risque d’accident corporel ou matériel, vérifi er que<br />
l’électrovanne fonctionne correctement avant de la remettre en service.<br />
Vérifi er aussi l’absence d’éventuelles fuites internes (sièges/clapets) ou<br />
externes avec un fl uide non-explosible et ininfl ammable.<br />
ENTRETIEN PREVENTIF<br />
• Faire fonctionner l’électrovanne au moins deux fois par an pour vérifi er<br />
son ouverture et sa fermeture.<br />
• Assurer la propreté du boîtier électromagnétique pour permettre une<br />
bonne dissipation des calories dégagées par le bobinage, notamment<br />
en cas d’utilisation avec mise sous tension permanente.<br />
• Veiller à ce qu'aucun corps étranger ne pénètre dans l'électrovanne.<br />
Si l'échappement n'est pas connecté, vérifi er la présence d’ un protecteur<br />
de purge (consulter <strong>ASCO</strong>/JOUCOMATIC).<br />
CONSEILS DE DÉPANNAGE<br />
• Pression de sortie incorrecte : vérifi er la pression à l’entrée de la vanne.<br />
• L’électrovanne ne fonctionne pas :<br />
- Vérifi er que la tension d’alimentation est conforme à celle indiquée sur<br />
la plaque signalétique.<br />
- Vérifi er les connexions électriques sur la bobine (personnel qualifi é<br />
uniquement).<br />
• Baisse de cadence, bruit anormal, fuite :<br />
- Vérifi er l'étanchéité des connexions pneumatiques.<br />
- Vérifi er l'absence de corps étranger pouvant nuire au fonctionnement.<br />
- Procéder à une maintenance de la vanne si nécessaire (consulter<br />
<strong>ASCO</strong>/JOUCOMATIC).<br />
d Pour prévenir tout risque d’accident corporel ou matériel, vérifi er<br />
que l’électrovanne fonctionne correctement avant de la remettre en<br />
service. Vérifi er aussi l’absence d’éventuelles fuites internes (sièges/<br />
clapets) ou externes avec un fl uide non-explosible et ininfl ammable.<br />
3834835
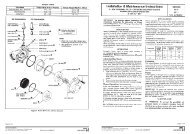
Commande manuelle avec<br />
capuchon de protection<br />
3<br />
1<br />
Echappement<br />
Exhaust<br />
Manual operator with protective cap<br />
Pression<br />
3<br />
Pressure supply<br />
1<br />
2<br />
3<br />
DRAWINGS <strong>GB</strong> DESSINS FR<br />
331<br />
143,5<br />
3<br />
42<br />
95<br />
Vis pour plombage de la liaison<br />
connecteur/embase<br />
3 orifices G 1/4<br />
NO NF/NC<br />
2<br />
1<br />
2 Utilisation<br />
Outlet<br />
3 G1/4 orifi ces<br />
Screw for security sealing of connector/subbase.<br />
Echappement<br />
Exhaust<br />
Pression<br />
3<br />
Pressure supply<br />
Fig. 1 - Schéma de cablage du<br />
connecteur<br />
Connector wiring diagram<br />
3<br />
1<br />
3<br />
2<br />
1<br />
9<br />
2<br />
4<br />
4<br />
2<br />
1<br />
Utilisation<br />
Outlet<br />
METRIX<br />
3834835
4<br />
3834835