freestanding outdoor grill asador autónomo para exteriores gril d ...
freestanding outdoor grill asador autónomo para exteriores gril d ...
freestanding outdoor grill asador autónomo para exteriores gril d ...

Create successful ePaper yourself
Turn your PDF publications into a flip-book with our unique Google optimized e-Paper software.
Make Gas Connection<br />
NOTE: If <strong><strong>gril</strong>l</strong> is to be converted to Natural gas, follow instructions in the<br />
“Gas Conversions” section.<br />
20 lb LP Gas Fuel Tank<br />
LP Gas:<br />
IMPORTANT: A 20 lb LP gas fuel tank must be purchased se<strong>para</strong>tely.<br />
IMPORTANT: The gas pressure regulator/hose assembly supplied with<br />
the <strong><strong>gril</strong>l</strong> must be used. Replacement gas pressure regulator/hose<br />
assembly specific to your model, is available from your <strong>outdoor</strong> <strong><strong>gril</strong>l</strong><br />
dealer.<br />
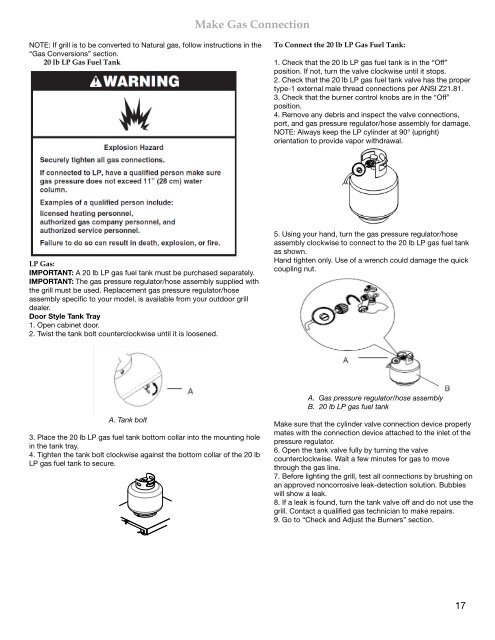
Door Style Tank Tray<br />
1. Open cabinet door.<br />
2. Twist the tank bolt counterclockwise until it is loosened.<br />
A. Tank bolt<br />
3. Place the 20 lb LP gas fuel tank bottom collar into the mounting hole<br />
in the tank tray.<br />
4. Tighten the tank bolt clockwise against the bottom collar of the 20 lb<br />
LP gas fuel tank to secure.<br />
To Connect the 20 lb LP Gas Fuel Tank:<br />
1. Check that the 20 lb LP gas fuel tank is in the “Off”<br />
position. If not, turn the valve clockwise until it stops.<br />
2. Check that the 20 lb LP gas fuel tank valve has the proper<br />
type-1 external male thread connections per ANSI Z21.81.<br />
3. Check that the burner control knobs are in the “Off”<br />
position.<br />
4. Remove any debris and inspect the valve connections,<br />
port, and gas pressure regulator/hose assembly for damage.<br />
NOTE: Always keep the LP cylinder at 90° (upright)<br />
orientation to provide vapor withdrawal.<br />
5. Using your hand, turn the gas pressure regulator/hose<br />
assembly clockwise to connect to the 20 lb LP gas fuel tank<br />
as shown.<br />
Hand tighten only. Use of a wrench could damage the quick<br />
coupling nut.<br />
A. Gas pressure regulator/hose assembly<br />
B. 20 lb LP gas fuel tank<br />
Make sure that the cylinder valve connection device properly<br />
mates with the connection device attached to the inlet of the<br />
pressure regulator.<br />
6. Open the tank valve fully by turning the valve<br />
counterclockwise. Wait a few minutes for gas to move<br />
through the gas line.<br />
7. Before lighting the <strong><strong>gril</strong>l</strong>, test all connections by brushing on<br />
an approved noncorrosive leak-detection solution. Bubbles<br />
will show a leak.<br />
8. If a leak is found, turn the tank valve off and do not use the<br />
<strong><strong>gril</strong>l</strong>. Contact a qualified gas technician to make repairs.<br />
9. Go to “Check and Adjust the Burners” section.<br />
17