freestanding outdoor grill asador autónomo para exteriores gril d ...
freestanding outdoor grill asador autónomo para exteriores gril d ...
freestanding outdoor grill asador autónomo para exteriores gril d ...

You also want an ePaper? Increase the reach of your titles
YUMPU automatically turns print PDFs into web optimized ePapers that Google loves.
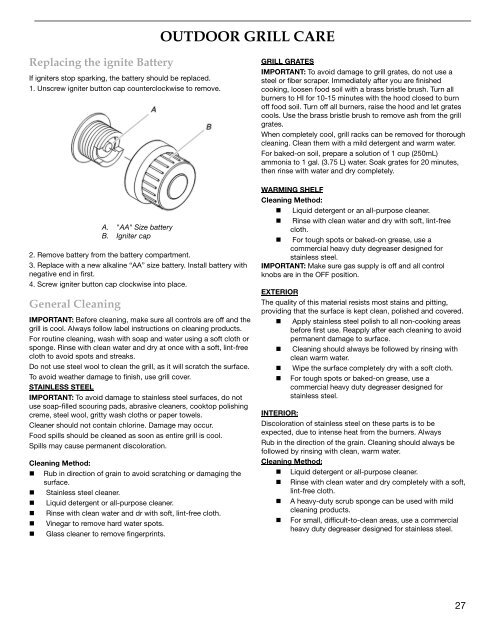
Replacing the ignite Battery<br />
If igniters stop sparking, the battery should be replaced.<br />
1. Unscrew igniter button cap counterclockwise to remove.<br />
A. "AA" Size battery<br />
B. Igniter cap<br />
OUTDOOR GRILL CARE<br />
2. Remove battery from the battery compartment.<br />
3. Replace with a new alkaline “AA” size battery. Install battery with<br />
negative end in first.<br />
4. Screw igniter button cap clockwise into place.<br />
General Cleaning<br />
IMPORTANT: Before cleaning, make sure all controls are off and the<br />
<strong><strong>gril</strong>l</strong> is cool. Always follow label instructions on cleaning products.<br />
For routine cleaning, wash with soap and water using a soft cloth or<br />
sponge. Rinse with clean water and dry at once with a soft, lint-free<br />
cloth to avoid spots and streaks.<br />
Do not use steel wool to clean the <strong><strong>gril</strong>l</strong>, as it will scratch the surface.<br />
To avoid weather damage to finish, use <strong><strong>gril</strong>l</strong> cover.<br />
STAINLESS STEEL<br />
IMPORTANT: To avoid damage to stainless steel surfaces, do not<br />
use soap-filled scouring pads, abrasive cleaners, cooktop polishing<br />
creme, steel wool, gritty wash cloths or paper towels.<br />
Cleaner should not contain chlorine. Damage may occur.<br />
Food spills should be cleaned as soon as entire <strong><strong>gril</strong>l</strong> is cool.<br />
Spills may cause permanent discoloration.<br />
Cleaning Method:<br />
Rub in direction of grain to avoid scratching or damaging the<br />
surface.<br />
Stainless steel cleaner.<br />
Liquid detergent or all-purpose cleaner.<br />
Rinse with clean water and dr with soft, lint-free cloth.<br />
Vinegar to remove hard water spots.<br />
Glass cleaner to remove fingerprints.<br />
GRILL GRATES<br />
IMPORTANT: To avoid damage to <strong><strong>gril</strong>l</strong> grates, do not use a<br />
steel or fiber scraper. Immediately after you are finished<br />
cooking, loosen food soil with a brass bristle brush. Turn all<br />
burners to HI for 10-15 minutes with the hood closed to burn<br />
off food soil. Turn off all burners, raise the hood and let grates<br />
cools. Use the brass bristle brush to remove ash from the <strong><strong>gril</strong>l</strong><br />
grates.<br />
When completely cool, <strong><strong>gril</strong>l</strong> racks can be removed for thorough<br />
cleaning. Clean them with a mild detergent and warm water.<br />
For baked-on soil, prepare a solution of 1 cup (250mL)<br />
ammonia to 1 gal. (3.75 L) water. Soak grates for 20 minutes,<br />
then rinse with water and dry completely.<br />
WARMING SHELF<br />
Cleaning Method:<br />
Liquid detergent or an all-purpose cleaner.<br />
Rinse with clean water and dry with soft, lint-free<br />
cloth.<br />
For tough spots or baked-on grease, use a<br />
commercial heavy duty degreaser designed for<br />
stainless steel.<br />
IMPORTANT: Make sure gas supply is off and all control<br />
knobs are in the OFF position.<br />
EXTERIOR<br />
The quality of this material resists most stains and pitting,<br />
providing that the surface is kept clean, polished and covered.<br />
Apply stainless steel polish to all non-cooking areas<br />
before first use. Reapply after each cleaning to avoid<br />
permanent damage to surface.<br />
Cleaning should always be followed by rinsing with<br />
clean warm water.<br />
Wipe the surface completely dry with a soft cloth.<br />
For tough spots or baked-on grease, use a<br />
commercial heavy duty degreaser designed for<br />
stainless steel.<br />
INTERIOR:<br />
Discoloration of stainless steel on these parts is to be<br />
expected, due to intense heat from the burners. Always<br />
Rub in the direction of the grain. Cleaning should always be<br />
followed by rinsing with clean, warm water.<br />
Cleaning Method:<br />
Liquid detergent or all-purpose cleaner.<br />
Rinse with clean water and dry completely with a soft,<br />
lint-free cloth.<br />
A heavy-duty scrub sponge can be used with mild<br />
cleaning products.<br />
For small, difficult-to-clean areas, use a commercial<br />
heavy duty degreaser designed for stainless steel.<br />
27