Instruction Manual ..............2 Manuel d ... - Wolf Laboratories
Instruction Manual ..............2 Manuel d ... - Wolf Laboratories
Instruction Manual ..............2 Manuel d ... - Wolf Laboratories

Create successful ePaper yourself
Turn your PDF publications into a flip-book with our unique Google optimized e-Paper software.
Wipe the outer surface of the pipette tip to remove residual liquid.<br />
Place the tip of the pipette against the side wall of the container.<br />
Slowly press the dispensing button (lower pipetting button) until the<br />
meniscus is exactly level with the desired volume.<br />
10<br />
Caution!<br />
Take care to avoid aspirating the liquid into the Rota-Filler 3000 ®<br />
which can impair performance. If liquid is aspirated into the unit,<br />
clean the pipette adapter and nose cone per instructions under<br />
“Maintenance” (next page). If necessary, replace the filter.<br />
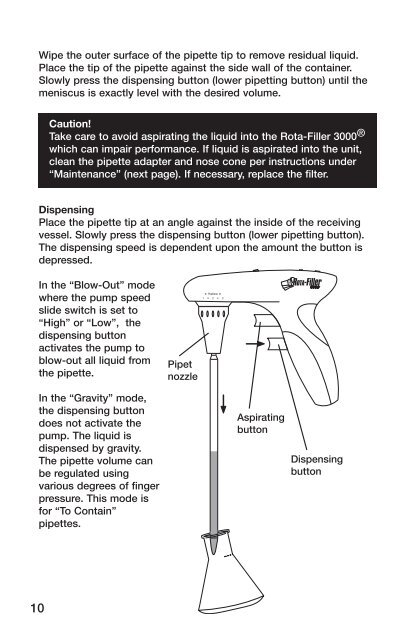
Dispensing<br />
Place the pipette tip at an angle against the inside of the receiving<br />
vessel. Slowly press the dispensing button (lower pipetting button).<br />
The dispensing speed is dependent upon the amount the button is<br />
depressed.<br />
In the “Blow-Out” mode<br />
where the pump speed<br />
slide switch is set to<br />
“High” or “Low”, the<br />
dispensing button<br />
activates the pump to<br />
blow-out all liquid from<br />
the pipette.<br />
In the “Gravity” mode,<br />
the dispensing button<br />
does not activate the<br />
pump. The liquid is<br />
dispensed by gravity.<br />
The pipette volume can<br />
be regulated using<br />
various degrees of finger<br />
pressure. This mode is<br />
for “To Contain”<br />
pipettes.<br />
Pipet<br />
nozzle<br />
Aspirating<br />
button<br />
Dispensing<br />
button<br />
Maintenance<br />
The Rota-Filler 3000 ® is normally maintenance-free. When<br />
necessary, the housing can be wiped occasionally using a damp<br />
cloth.<br />
Cleaning the Pipette Adapter and Replacing the Filter<br />
Caution!<br />
When cleaning and exchanging the filter, wear protective gloves<br />
and safety goggles to avoid the risk of splashes and<br />
contamination.<br />
If liquid has entered the nose cone or if the aspirating efficiency has<br />
decreased, observe the following instructions:<br />
1. Hold the pipette over a container and remove the pipette.<br />
2. Gently unscrew the nose cone.<br />
3. Remove the filter.<br />
4. Remove the pipette adapter from the nose cone by pushing it<br />
upwards.<br />
5. Rinse the pipette adapter with demineralized water and allow to<br />
dry at room temperature.<br />
6. With the Whatman ® name and filter size facing down, push a new<br />
filter into the pipette adapter. The filter’s smooth sided connector<br />
must be facing the pipette adapter. The filter’s stepped, larger<br />
diameter connector should be facing the filter adapter. Push the<br />
filter adapter onto the filter.<br />
7. Reassemble the Rota-Filler 3000 ® by reversing the steps above.<br />
8. Test Rota-Filler 3000 ® for leaks, see “Checking for Leaks” (below).<br />
Notes<br />
— Not all membrane filters are suitable for use with the Rota-Filler<br />
3000 ® . For proper performance, only use the manufacturer’s<br />
recommended replacement filters.<br />
— The pipette adapter, filter, and filter adapter may be steam<br />
sterilized at 121°C for 20 minutes.<br />
—It is the user’s responsibility to ensure proper sterilization.<br />
Checking for Leaks<br />
When the pipette has been filled, liquid should not drip from the<br />
pipette unless appropriate buttons are depressed. Should the pipette<br />
drip, disassemble the pipette adapter, filter, and filter adapter.<br />
Carefully reassemble. If necessary, replace worn parts. See “Ordering<br />
Information” (page 14).<br />
11