BA ROLLER'S Pulsar 2008-04 - Albert Roller
BA ROLLER'S Pulsar 2008-04 - Albert Roller
BA ROLLER'S Pulsar 2008-04 - Albert Roller

Create successful ePaper yourself
Turn your PDF publications into a flip-book with our unique Google optimized e-Paper software.
deu<br />
eng<br />
fra<br />
Elektro-Lötgerät<br />
Betriebsanleitung<br />
Vor lnbetriebnahme lesen!<br />
Electric Soldering Unit<br />
Operating Instructions<br />
Please read before commissioning!<br />
Appareil à souder électrique<br />
Instructions d’emploi<br />
A lire avant que de mettre l’appareil en service!<br />
Made in Germany<br />
<strong>Albert</strong> <strong>Roller</strong> GmbH & Co KG · Werkzeug- und Maschinenfabrik<br />
Neue Rommelshauser Str. 4 · D-71332 Waiblingen · Postfach 1651 · D-71306 Waiblingen<br />
Telefon +49 7151 17 27-0 · Telefax +49 7151 17 27-87<br />
www.albert-roller.de · email: info@albert-roller.de<br />
RW <strong>04</strong>/08 164255A
1<br />
5<br />
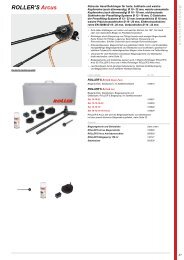
Fig.1<br />
6 3 4 2<br />
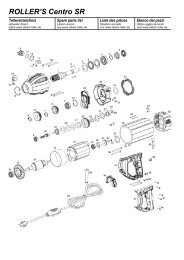
Fig. 1<br />
deu<br />
eng<br />
fra<br />
1 Prismenelektrode<br />
2 Stabelektrode<br />
3 Schalter<br />
4 Zange<br />
5 Schraube<br />
6 Halter<br />
mit Prismenelektrode<br />
1 Prism electrode<br />
2 Rod electrode<br />
3 Switch<br />
4 Tongs<br />
5 Screws<br />
6 Holder<br />
with prism electrode<br />
1 Electrode prismatique<br />
2 Electrodes en baguettes<br />
3 Contacteur<br />
4 Pince<br />
5 Boulons de fixation<br />
6 Support avec<br />
électrode prismatique
deu<br />
Allgemeine Sicherheitshinweise<br />
ACHTUNG! Sämtliche Anweisungen sind zu lesen. Fehler bei der Einhaltung<br />
der nachstehend aufgeführten Anweisungen können elektrischen Schlag,<br />
Brand und/oder schwere Verletzungen verursachen. Der nachfolgend verwendete<br />
Begriff „elektrisches Gerät“ bezieht sich auf netzbetriebene Elektrowerkzeuge<br />
(mit Netzkabel), auf akkubetriebene Elektrowerkzeuge (ohne<br />
Netzkabel), auf Maschinen und auf elektrische Geräte. Verwenden Sie das<br />
elektrische Gerät nur bestimmungsgemäß und unter Beachtung der allgemeinen<br />
Sicherheits- und Unfallverhütungsvorschriften.<br />
BEWAHREN SIE DIESE ANWEISUNGEN GUT AUF.<br />
A) Arbeitsplatz<br />
a) Halten Sie Ihren Arbeitsbereich sauber und aufgeräumt. Unordnung<br />
und unbeleuchtete Arbeitsbereiche können zu Unfällen führen.<br />
b) Arbeiten Sie mit dem elektrischen Gerät nicht in explosionsgefährdeter<br />
Umgebung, in der sich brennbare Flüssigkeiten, Gase oder<br />
Stäube befinden. Elektrische Geräte erzeugen Funken, die den Staub<br />
oder die Dämpfe entzünden können.<br />
c) Halten Sie Kinder und andere Personen während der Benutzung des<br />
elektrischen Gerätes fern. Bei Ablenkung können Sie die Kontrolle über<br />
das Gerät verlieren.<br />
B) Elektrische Sicherheit<br />
a) Der Anschlussstecker des elektrischen Gerätes muss in die Steckdose<br />
passen. Der Stecker darf in keiner Weise verändert werden.<br />
Verwenden Sie keine Adapterstecker gemeinsam mit schutzgeerdeten<br />
elektrischen Geräten. Unveränderte Stecker und passende Steckdosen<br />
verringern das Risiko eines elektrischen Schlages. Ist das elektrische<br />
Gerät mit Schutzleiter ausgerüstet, darf es nur an Steckdosen mit<br />
Schutzkontakt angeschlossen werden. Betreiben Sie das elektrische Gerät<br />
auf Baustellen, in feuchter Umgebung, im Freien oder bei vergleichbaren<br />
Aufstellarten nur über einen 30mA-Fehlerstrom-Schutzschalter (FI-Schalter)<br />
am Netz.<br />
b) Vermeiden Sie Körperkontakt mit geerdeten Oberflächen, wie von<br />
Rohren, Heizungen, Herden und Kühlschränken. Es besteht ein erhöhtes<br />
Risiko durch elektrischen Schlag, wenn Ihr Körper geerdet ist.<br />
c) Halten Sie das Gerät von Regen oder Nässe fern. Das Eindringen von<br />
Wasser in ein Elektrogerät erhöht das Risiko eines elektrischen Schlages.<br />
d) Zweckentfremden Sie das Kabel nicht, um das Gerät zu tragen, aufzuhängen<br />
oder um den Stecker aus der Steckdose zu ziehen. Halten<br />
Sie das Kabel fern von Hitze, Öl, scharfen Kanten oder sich bewegenden<br />
Geräteteilen. Beschädigte oder verwickelte Kabel erhöhen<br />
das Risiko eines elektrischen Schlages.<br />
e) Wenn Sie mit einem elektrischen Gerät im Freien arbeiten, verwenden<br />
Sie nur Verlängerungskabel, die auch für den Außenbereich zugelassen<br />
sind. Die Anwendung eines für den Außenbereich geeigneten<br />
Verlängerungskabels verringert das Risiko eines elektrischen Schlages.<br />
C) Sicherheit von Personen<br />
a) Seien Sie aufmerksam, achten Sie darauf, was Sie tun, und gehen<br />
Sie mit Vernunft an die Arbeit mit einem elektrischen Gerät. Benutzen<br />
Sie das elektrische Gerät nicht, wenn Sie müde sind oder unter<br />
dem Einfluss von Drogen, Alkohol oder Medikamenten stehen. Ein<br />
Moment der Unachtsamkeit beim Gebrauch des Gerätes kann zu ernsthaften<br />
Verletzungen führen.<br />
b) Tragen Sie persönliche Schutzausrüstung und immer eine Schutz -<br />
brille. Das Tragen persönlicher Schutzausrüstung, wie Staubmaske,<br />
rutschfeste Sicherheitsschuhe, Schutzhelm oder Gehörschutz, je nach<br />
Art und Einsatz des elektrischen Gerätes, verringert das Risiko von Verletzungen.<br />
c) Vermeiden Sie eine unbeabsichtigte Inbetriebnahme. Vergewissern<br />
Sie sich, dass der Schalter in der Position „AUS“ ist, bevor Sie den<br />
Stecker in die Steckdose stecken. Wenn Sie beim Tragen des elektrischen<br />
Ge rätes den Finger am Schalter haben oder das Gerät eingeschaltet<br />
an die Stromversorgung anschließen, kann dies zu Unfällen<br />
führen. Überbrücken Sie niemals den Tippschalter.<br />
d) Entfernen Sie Einstellwerkzeuge oder Schraubenschlüssel, bevor<br />
Sie das elektrische Gerät einschalten. Ein Werkzeug oder Schlüssel,<br />
der sich in einem drehenden Geräteteil befindet, kann zu Verletzungen<br />
führen. Greifen Sie niemals in sich bewegende (umlaufende) Teile.<br />
e) Überschätzen Sie sich nicht. Sorgen Sie für einen sicheren Stand<br />
und halten Sie jederzeit das Gleichgewicht. Dadurch können Sie das<br />
Gerät in unerwarteten Situationen besser kontrollieren.<br />
deu<br />
f) Tragen Sie geeignete Kleidung. Tragen Sie keine weite Kleidung oder<br />
Schmuck. Halten Sie Haare, Kleidung und Handschuhe fern von sich<br />
bewegenden Teilen. Lockere Kleidung, Schmuck oder lange Haare können<br />
von sich bewegenden Teilen erfasst werden.<br />
g) Wenn Staubabsaug- und -auffangeinrichtungen montiert werden<br />
können, vergewissern Sie sich, dass diese angeschlossen sind und<br />
richtig verwendet werden. Das Verwenden dieser Einrichtungen verringert<br />
Gefährdungen durch Staub.<br />
h) Überlassen Sie das elektrische Gerät nur unterwiesenen Personen.<br />
Jugendliche dürfen das elektrische Gerät nur betreiben, wenn sie über<br />
16 Jahre alt sind, dies zur Erreichung ihres Ausbildungszieles erforderlich<br />
ist und sie unter Aufsicht eines Fachkundigen gestellt sind.<br />
D) Sorgfältiger Umgang und Gebrauch von elektrischen Geräten<br />
a) Überlasten Sie das elektrische Gerät nicht. Verwenden Sie für Ihre<br />
Arbeit das dafür bestimmte elektrische Gerät. Mit dem passenden<br />
elektrischen Gerät arbeiten Sie besser und sicherer im angegebenen Leistungsbereich.<br />
b) Benutzen Sie kein elektrisches Gerät, dessen Schalter defekt ist. Ein<br />
elektrisches Gerät, das sich nicht mehr ein- oder ausschalten lässt, ist<br />
gefährlich und muss repariert werden.<br />
c) Ziehen Sie den Stecker aus der Steckdose, bevor Sie Geräteeinstellungen<br />
vornehmen, Zubehörteile wechseln oder das Gerät weglegen.<br />
Diese Vorsichtsmaßnahme verhindert den unbeabsichtigten Start<br />
des Geräts.<br />
d) Bewahren Sie unbenutzte elektrische Geräte außerhalb der Reichweite<br />
von Kindern auf. Lassen Sie Personen das elektrische Gerät<br />
nicht benutzen, die mit diesem nicht vertraut sind oder diese Anweisungen<br />
nicht gelesen haben. Elektrische Geräte sind gefährlich,<br />
wenn Sie von unerfahrenen Personen benutzt werden.<br />
e) Pflegen Sie das elektrische Gerät mit Sorgfalt. Kontrollieren Sie, ob<br />
bewegliche Geräteteile einwandfrei funktionieren und nicht klemmen,<br />
ob Teile gebrochen oder so beschädigt sind, dass die Funk -<br />
tion des elektrischen Gerätes beeinträchtigt ist. Lassen Sie beschädigte<br />
Teile vor dem Einsatz des elektrischen Gerätes von qualifiziertem<br />
Fachpersonal oder von einer autorisierten ROLLER<br />
Vertrags-Kundendienstwerkstatt reparieren. Viele Unfälle haben ihre<br />
Ursache in schlecht gewarteten elektrischen Geräten.<br />
f) Halten Sie Schneidwerkzeuge scharf und sauber. Sorgfältig gepflegte<br />
Schneidwerkzeuge mit scharfen Schneidkanten verklemmen sich<br />
weniger und sind leichter zu führen.<br />
g) Sichern Sie das Werkstück. Benutzen Sie Spannvorrichtungen oder einen<br />
Schraubstock, um das Werkstück festzuhalten. Es ist damit sicherer<br />
gehalten als mit Ihrer Hand, und Sie haben außerdem beide Hände zur<br />
Bedienung des elektrischen Gerätes frei.<br />
h) Verwenden Sie elektrische Geräte, Zubehör, Einsatzwerkzeuge usw.<br />
entsprechend diesen Anweisungen und so, wie es für diesen speziellen<br />
Gerätetyp vorgeschrieben ist. Berücksichtigen Sie dabei die<br />
Arbeitsbedingungen und die auszuführende Tätigkeit. Der Gebrauch<br />
von elektrischen Geräten für andere als die vorgesehenen Anwendungen<br />
kann zu gefährlichen Situationen führen. Jegliche eingenmächtige<br />
Veränderung am elektrischen Gerät ist aus Sicherheitsgründen nicht gestattet.<br />
E) Sorgfältiger Umgang und Gebrauch von Akkugeräten<br />
a) Stellen Sie sicher, dass das elektrische Gerät ausgeschaltet ist, bevor<br />
Sie den Akku einsetzen. Das Einsetzen eines Akkus in ein elektrisches<br />
Gerät, das eingeschaltet ist, kann zu Unfällen führen.<br />
b) Laden Sie die Akkus nur in Ladegeräten auf, die vom Hersteller empfohlen<br />
werden. Für ein Ladegerät, das für eine bestimmte Art von Akkus<br />
geeignet ist, besteht Brandgefahr, wenn es mit anderen Akkus verwendet<br />
wird.<br />
c) Verwenden Sie nur die dafür vorgesehenen Akkus in den elektrischen<br />
Geräten. Der Gebrauch von anderen Akkus kann zu Verletzungen<br />
und Brandgefahr führen.<br />
d) Halten Sie den nicht benutzten Akku fern von Büroklammern, Münzen,<br />
Schlüsseln, Nägeln, Schrauben oder anderen kleinen Metallgegenständen,<br />
die eine Überbrückung der Kontakte verursachen<br />
könnten. Ein Kurzschluss zwischen den Akkukontakten kann Verbrennungen<br />
oder Feuer zur Folge haben.<br />
e) Bei falscher Anwendung kann Flüssigkeit aus dem Akku austreten.<br />
Vermeiden Sie den Kontakt damit. Bei zufälligem Kontakt mit Wasser<br />
abspülen. Wenn die Flüssigkeit in die Augen kommt, nehmen
deu<br />
Sie zusätzlich ärztliche Hilfe in Anspruch. Austretende Akkuflüssigkeit<br />
kann zu Hautreizungen oder Verbrennungen führen.<br />
f) Bei Temperaturen des Akku/Ladegerätes oder Umgebungstemperaturen<br />
5°C/40°F oder 40°C/105°F darf der Akku/das Ladegerät<br />
nicht benutzt werden.<br />
g) Entsorgen Sie schadhafte Akkus nicht im normalen Hausmüll, sondern<br />
übergeben Sie sie einer autorisierten ROLLER Vertrags-Kundendienstwerkstatt<br />
oder einem anerkannten Entsorgungsunternehmen.<br />
F) Service<br />
a) Lassen Sie das elektrische Gerät nur von qualifiziertem Fachpersonal<br />
und nur mit Original Ersatzteilen reparieren. Damit wird sichergestellt,<br />
dass die Sicherheit des elektrischen Gerätes erhalten bleibt.<br />
b) Befolgen Sie Wartungsvorschriften und die Hinweise über den Werkzeugwechsel.<br />
c) Kontrollieren Sie regelmäßig die Anschlussleitung des elektrischen<br />
Gerätes und lassen Sie sie bei Beschädigung von qualifiziertem<br />
Fachpersonal oder von einer autorisierten ROLLER Vertrags-Kundendienstwerkstatt<br />
erneuern. Kontrollieren Sie Verlängerungskabel<br />
regelmäßig und ersetzen Sie sie, wenn sie beschädigt sind.<br />
Spezielle Sicherheitshinweise<br />
• Die Elektroden erreichen eine Arbeitstemperatur von ca. 900°C. Des halb<br />
weder Elektroden, noch den Vorderteil der Zange, noch das Werk stück<br />
beim und nach dem Löten berühren!<br />
• Beim Ablegen der Zange nach dem Löten darauf achten, daß der noch<br />
heiße vordere Zangenbereich nicht mit brennbarem Material in Berüh -<br />
rung kommt.<br />
• Verschlissene Elektroden und -halter auswechseln.<br />
1. Technische Daten<br />
1.1. Artikelnummern:<br />
Elektro-Lötgerät ROLLER’S <strong>Pulsar</strong> 164011<br />
Halter mit Prismenelektrode (Paar) 164110<br />
Prismenelektrode (Paar) 164111<br />
Stabelektrode (Paar) 164115<br />
ROLLER’S Lot Cu 3 160200<br />
ROLLER’S Paste Cu 3 160210<br />
1.2. Arbeitsbereich:<br />
Weichlöten von harten und weichen Cu-Rohren<br />
6 – 54 mm<br />
1.3. Elektrische Daten:<br />
Nennleistung, aufgenommen<br />
2000 VA<br />
Nennspannung (Netzspannung)<br />
230 V<br />
Nennfrequenz<br />
50-60 Hz<br />
Nennstrom<br />
8,7 A<br />
Netzsicherung<br />
10 A<br />
Steuerspannung<br />
24 V AC<br />
Sekundär-Leerlaufspannung<br />
7 V AC<br />
Sekundär-Nennspannung<br />
7 V AC<br />
Sekundär-Nennstrom<br />
250 A AC<br />
Aussetzbetrieb AB<br />
0,5 / 3 min<br />
Überlastschutz sekundärseitig durch Temperaturschalter<br />
1.4. Abmessungen:<br />
L × B × H<br />
210 × 150 × 140 mm<br />
1.5. Gewicht:<br />
Gerät<br />
12,9 kg<br />
1.6. Lärminformation:<br />
Arbeitsplatzbezogener Emissionswert<br />
70 dB (A)<br />
1.7. Vibrationen:<br />
Gewichteter Effektivwert der Beschleunigung 2,5 m/s 2<br />
2. Inbetriebnahme<br />
2.1. Elektrischer Anschluß:<br />
Das Lötgerät muß an einer Steckdose mit Schutzerdung (Schutzlei ter)<br />
angeschlossen werden. Netzspannung beachten! Vor Anschluß des<br />
Lötgerätes prüfen, ob die auf dem Leistungsschild angegebene Spannung<br />
der Netzspannung entspricht.<br />
deu<br />
2.2. Auswahl der Elektroden:<br />
Im Regelfall werden die Prismenelektroden (Fig. 1 [1]) verwendet, da<br />
diese aufgrund der größeren Berührungsfläche mit dem Rohr dieses<br />
schneller aufheizen als die Stabelektroden (2). Die Stabelektroden<br />
sind für enge Stellen vorgesehen, an denen mit den Prismenelektro -<br />
den nicht gear beitet werden kann.<br />
3. Betrieb<br />
3.1. Funktionsweise:<br />
Beim Anlegen der Elektroden des Lötgerätes an einen metallischen Leiter,<br />
z. B. Kupferrohr, wird durch Betätigen des Schalters (3) ein Stromkreis<br />
mit niedriger Spannung und hoher Stromstärke geschlos sen. Die<br />
Elektroden haben im Stromkreis Transformator/Kabel/Elek troden/<br />
Werkstück einen relativ hohen elektrischen Widerstand und heizen sich<br />
deshalb auf. Sie können bei größeren Rohrgrößen zum Glühen kommen.<br />
Die hierbei auftretende Wärme wird durch Wärmelei tung an das<br />
Werkstück übertragen, welches nach wenigen Sekunden auf Löttemperatur<br />
erwärmt wird.<br />
3.2. Arbeitsablauf:<br />
Lötstelle fachgerecht vorbereiten (siehe auch 3.3.). Lötgerät an schutzgeerdete<br />
Steckdose anschließen. Zange (Fig. 1 [4]) mit Pris menelektroden<br />
(1) oder – an engen Stellen – mit Stabelektroden (2) am Werkstück anlegen.<br />
Schalter (3) betätigen. Schalter (3) während des Löt vorganges<br />
gedrückt halten. Nach wenigen Sekunden ist die Löttem peratur erreicht.<br />
Lot zuführen bis Lötspalt gefüllt ist. Schalter (3) los lassen, Zange vom<br />
Werkstück lösen. Bei nicht exakt fixiertem Werk stück kann bei geöffnetem<br />
Schalter (3) das Werkstück in der Zange solange gehalten werden,<br />
bis das Lot erstarrt ist.<br />
3.3. Lötmaterial:<br />
Zum Weichlöten ROLLER’S Lot Cu 3 verwenden. Kupferrohre und -fittings<br />
müssen metallisch blank sein. Zur Vorbereitung der Lötstelle ROL-<br />
LER’S Paste Cu 3 auf das Rohrstück auftragen. Diese Paste enthält<br />
Lötpul ver und Flußmittel. Der Vorteil der Paste liegt darin, daß die zur<br />
Lötung erforderliche Temperatur durch Farbumschlag der erwärmten<br />
Paste zu erkennen ist und daß eine bessere Füllung des Lötspaltes erreicht<br />
wird. Auf jeden Fall muß jedoch ROLLER’S Lot Cu 3 nachgeschoben<br />
wer den. ROLLER’S Lot Cu 3 und ROLLER’S Paste Cu 3 sind<br />
speziell für Trinkwas serleitungen entwickelt worden und entsprechen<br />
den DVGW- Arbeitsblättern GW 2 und GW 7, sowie den entsprechenden<br />
DIN- Normen. ROLLER’S Paste Cu 3 ist DVGW-geprüft und zu -<br />
gelassen (Prüf zeichen DVGW Fl 038).<br />
4. Instandhaltung<br />
Vor Instandsetzungs- und Reparaturarbeiten Netzstecker ziehen! Diese Arbeiten<br />
dürfen nur von Fachkräften und unterwiesenen Perso nen durchgeführt<br />
werden.<br />
4.1. Wartung:<br />
ROLLER’S <strong>Pulsar</strong> ist wartungsfrei.<br />
4.2. Inspektion/Instandhaltung:<br />
Elektroden von Lot und Flußmittel freihalten. Diese beeinträchtigen die<br />
Wärmeübertragung. Von Zeit zu Zeit Elektroden (Fig.1 [1], [2]) und Halter<br />
(Fig. 1 [6]) auf Beschädigungen und Abbrand überprüfen. Elek troden<br />
gegebenenfalls auswechseln. Zum Wechseln der Prismen elektroden<br />
die beiden Schrauben (Fig.1 [5]) lösen, abgenützte Elektroden entfernen,<br />
Kontaktflächen des Halters mit Drahtbürste säubern, neue Prismenelektroden<br />
einsetzen und Schrauben wieder anziehen. Deformierte<br />
oder verbrannte Halter ersetzen.<br />
5. Verhalten bei Störungen<br />
5.1. Störung: Lötstelle wird nicht warm.<br />
Ursache: • Netzzuleitung nicht eingesteckt oder defekt.<br />
• Netzsteckdose defekt (Netzsicherung).<br />
• Temperaturschalter in der Transformatorwicklung<br />
hat ausgelöst. Nach Abkühlung der Wicklung<br />
schaltet der Temperaturschalter automatisch wieder ein.<br />
• Gerät defekt.<br />
5.2. Störung: Erwärmung der Lötstelle dauert länger.<br />
Ursache: • Elektroden stark abgebrannt.
deu<br />
6. Hersteller-Garantie<br />
Die Garantiezeit beträgt 12 Monate nach Übergabe des Neuproduktes<br />
an den Erstverwender, höchstens jedoch 24 Monate nach Auslieferung<br />
an den Händler. Der Zeitpunkt der Übergabe ist durch die Einsendung<br />
der Original-Kaufunterlagen nachzuweisen, welche die Angaben des<br />
Kaufdatums und der Produktbezeichnung enthalten müssen. Alle innerhalb<br />
der Garantiezeit auftretenden Funktionsfehler, die nachweisbar<br />
auf Fertigungs- oder Materialfehler zurückzuführen sind, werden kostenlos<br />
beseitigt. Durch die Mängelbeseitigung wird die Garantiezeit für<br />
das Produkt weder verlängert noch erneuert. Schäden, die auf natürliche<br />
Abnutzung, unsachgemäße Behandlung oder Missbrauch, Miss -<br />
achtung von Betriebsvorschriften, ungeeignete Betriebsmittel, übermäßige<br />
Beanspruchung, zweckfremde Verwendung, eigene oder fremde<br />
Eingriffe oder andere Gründe, die ROLLER nicht zu vertreten hat,<br />
zurückzuführen sind, sind von der Garantie ausgeschlossen.<br />
Garantieleistungen dürfen nur von einer autorisierten ROLLER Vertrags-<br />
Kundendienstwerkstatt erbracht werden. Beanstandungen werden nur<br />
anerkannt, wenn das Produkt ohne vorherige Eingriffe in unzerlegtem<br />
Zustand einer autorisierten ROLLER Vertrags-Kundendienstwerkstatt<br />
eingereicht wird. Ersetzte Produkte und Teile gehen in das Eigentum<br />
von ROLLER über.<br />
Die Kosten für die Hin- und Rückfracht trägt der Verwender.<br />
Die gesetzlichen Rechte des Verwenders, insbesondere seine Mängel -<br />
ansprüche gegenüber dem Händler, bleiben unberührt. Diese Hersteller-Garantie<br />
gilt nur für Neuprodukte, welche in der Europäischen Union,<br />
in Norwegen oder in der Schweiz gekauft werden.<br />
7. ROLLER Vertrags-Kundendienstwerkstätten<br />
Firmeneigene Fachwerkstatt für Reparaturen:<br />
SERVICE-CENTER<br />
Neue Rommelshauser Straße 4<br />
D-71332 Waiblingen<br />
Telefon (0 7151) 5 68 08 - 60<br />
Telefax (0 7151) 5 68 08 - 64<br />
Wir holen Ihre Maschinen und Werkzeuge bei Ihnen ab!<br />
Nutzen Sie in der Bundesrepublik Deutschland unseren Abholservice.<br />
Einfach anrufen unter Telefon (0 7151) 5 68 08 - 60.<br />
Oder wenden Sie sich an eine andere autorisierte ROLLER Vertrags-Kundendienstwerkstatt<br />
in Ihrer Nähe.<br />
8. EG-Konformitätserklärung<br />
ROLLER erklärt hiermit, dass die in dieser Betriebsanleitung beschrie -<br />
benen Maschinen mit den Bestimmungen der Richtlinien 98/37/EG,<br />
89/336/EWG und 73/23/EWG konform sind. Folgende Normen werden<br />
entsprechend angewandt: DIN EN ISO 12100-1, DIN EN 12348, DIN EN<br />
50144-1, DIN EN 55014-1, DIN EN 55014-2, DIN EN 602<strong>04</strong>-1, DIN EN<br />
60335-1, DIN EN 60335-2-45, DIN EN 60745-1, DIN EN 60745-2-9, DIN<br />
EN 60745-2-11, DIN EN 61000-3-2, DIN EN 61000-3-3, DIN EN 61029-1,<br />
DIN EN 61029-2-9.<br />
Waiblingen, 01.<strong>04</strong>.<strong>2008</strong><br />
<strong>Albert</strong> ROLLER GmbH & Co KG<br />
Werkzeug- und Maschinenfabrik<br />
D-71332 Waiblingen<br />
Rainer Hech<br />
eng<br />
General Safety Rules<br />
To reduce the risk of injury, user must read and understand instruction<br />
manual.<br />
WARNING! Read all instructions. Failure to follow all instructions listed below<br />
may result in electric shock, fire and/or serious injury. The term „power<br />
tool“ in all of the warnings listed below refers to your mains operated (corded)<br />
power tool or battery operated (cordless) power tool, also machines<br />
and electric units. Only use the power tool for the purpose for which it was<br />
intended, with the due attention to the general safety and accident prevention<br />
regulations.<br />
SAVE THESE INSTRUCTIONS.<br />
A) Work area<br />
a) Keep work area clean and well lit. Cluttered and dark areas invite<br />
accidents.<br />
b) Do not operate power tools in explosive atmospheres, such as in<br />
the presence of flammable liquids, gases or dust. Power tools create<br />
sparks which may ignite the dust or fumes.<br />
c) Keep children and bystanders away while operating a power tool.<br />
Dis tractions can cause you to lose control.<br />
B) Electrical safety<br />
a) Power tool plugs must match the outlet. Never modify the plug in any<br />
way. Do not use any adapter plugs with earthed (grounded) power<br />
tools. Unmodified plugs and matching outlets will reduce risk of electric<br />
shock. If the power tool comes with an earthed wire, the plug may only be<br />
connected to an earthed receptacle. At work sites, in damp surroundings,<br />
in the open or in the case of comparable types of use, only operate the<br />
power tool off the mains using a 30 mA fault current protected switch (FI<br />
breaker).<br />
b) Avoid body contact with earthed or grounded surfaces such as pipes,<br />
radiators, ranges and refrigerators. There is an increased risk of<br />
electric shock if your body is earthed or grounded.<br />
c) Do not expose power tools to rain or wet conditions. Water entering<br />
a power tool will increase the risk of electric shock.<br />
d) Do not abuse the cord. Never use the cord for carrying, pulling or<br />
un plugging the power tool. Keep cord away from heat, oil, sharp edges<br />
or moving parts. Damaged or entangled cords increase the risk of<br />
electric shock.<br />
e) When operating a power tool outdoors, use an extension cord suitable<br />
for outdoor use. Use of a cord suitable for outdoor use reduces the risk<br />
of electric shock.<br />
C) Personal safety<br />
a) Stay alert, watch what you are doing and use common sense when<br />
operating a power tool. Do not use a power tool while you are tired or<br />
under the influence of drugs, alcohol or medication. A moment of in -<br />
attention while operating power tools may result in serious personal injury.<br />
b) Use safety equipment. Always wear eye protection. Safety equipment<br />
such as dust mask, non skid safety shoes, hard hat, or hearing protection<br />
used for appropriate conditions will reduce personal injuries.<br />
c) Avoid accidental starting. Ensure the switch is in the off position before<br />
plugging in. Carrying power tools with your finger on the switch or<br />
plugging in power tools that have the switch on invites accidents.<br />
d) Remove any adjusting key or wrench before turning the power tool<br />
on. A wrench or a key left attached to a rotating part of the power tool may<br />
result in personal injury.<br />
e) Do not overreach. Keep proper footing and balance at all times. This<br />
enables better control of the power tool in unexpected situations.<br />
f) Dress properly. Do not wear loose clothing or jewellery. Keep your<br />
hair, clothing and gloves away from moving parts. Loose clothes, jewellery<br />
or long hair can be caught in moving parts.<br />
g) If devices are provided for the connection of dust extraction and<br />
collection facilities, ensure these are connected and properly used.<br />
Use of these devices can reduce dust related hazards.<br />
h) Only allow trained personnel to use the power tool. Apprentices may<br />
only operate the power tool when they are over 16, when this is necessary<br />
for their training and when they are supervised by a trained operative.<br />
D) Power tool use and care<br />
a) Do not force the power tool. Use the correct power tool for your application.<br />
The correct power tool will do the job better and safer at the rate<br />
for which it was designed.<br />
b) Do not use the power tool if the switch does not turn it on and off.<br />
Any power tool that cannot be controlled with the switch is dangerous and<br />
must be repaired.
eng<br />
c) Disconnect the plug from the power source before making any adjust -<br />
ments, changing accessories, or storing power tools. Such preventive<br />
safety measures reduce the risk of starting the power tool accidentally.<br />
d) Store idle power tools out of the reach of children and do not allow<br />
persons unfamiliar with the power tool or these instructions to operate<br />
the power tool. Power tools are dangerous in the hands of untrained<br />
users.<br />
e) Maintain power tools. Check for misalignment or binding of moving<br />
parts, breakage of parts and any other condition that may affect the<br />
power tools operation. If damaged, have the power tool repaired by<br />
a qualified expert or by an authorised ROLLER after-sales service<br />
facility before use. Many accidents are caused by poorly maintained power<br />
tools.<br />
f) Keep cutting tools sharp and clean. Properly maintained cutting tools<br />
with sharp cutting edges are less likely to bind and are easier to control.<br />
g) Secure the workpiece. Use clamps or a vice to hold the workpiece. This<br />
is safer than holding it with your hand, and also it frees both hands to operate<br />
the equipment.<br />
h) Use the power tool, accessories and tool bits etc., in accordance<br />
with these instructions and in the manner intended for the particular<br />
type of power tool, taking into account the working conditions<br />
and the work to be performed. Use of the power tool for operations diffe -<br />
rent from those intended could result in a hazardous situation. All unauthorised<br />
modifica tions to the power tool are prohibited for safety reasons.<br />
E) Battery tool use and care<br />
a) Ensure the switch is in the off position before inserting battery pack.<br />
Inserting the battery pack into power tools that have the switch on invites<br />
accidents.<br />
b) Recharge only with the charger specified by the manufacturer. A<br />
charger that is suitable for one type of battery may create a risk of fire<br />
when used with another battery pack.<br />
c) Use battery tools only with specifically designated battery packs.<br />
Use of any other battery packs may create a risk of injury and fire.<br />
d) When battery pack is not in use, keep it away from other metal objects<br />
like paper clips, coins, keys, nails, screws, or other small metal<br />
objects that can make a connection from one terminal to another.<br />
Shorting the battery terminals may cause bums or a fire.<br />
e) Under abusive conditions, liquid may be ejected from the battery,<br />
avoid contact. If contact accidentally occurs, flush with water. If liquid<br />
contacts eyes, additionally seek medical help. Liquid ejected<br />
from the battery may cause irritation or bums.<br />
f) Do not use the battery/charger at battery/charger temperatures or<br />
ambient temperatures of 5°C/40°F or 40°C/105°F.<br />
g) Do not dispose defective batteries in the normal domestic waste.<br />
Take them to an authorised ROLLER after-sales service facility or to<br />
a reputed waste disposal company.<br />
F) Service<br />
a) Have your power tool serviced by a qualified repair person using only<br />
identical replacement parts. This will ensure that the safety of the power<br />
tool is maintained.<br />
b) Comply with maintenance instructions and instructions on tool re -<br />
place ments.<br />
c) Check mains lead of power tool regularly and have it replaced by a<br />
qualified expert or an authorised ROLLER after-sales service facility<br />
in case of damage. Check extension cable regularly and replace<br />
it when damaged.<br />
Specific Safety Instructions<br />
• The electrodes reach a working temperature of around 900°C – so never<br />
touch either the electrodes or the front of the tongs or the work piece,<br />
whether during or alter soldering!<br />
• When putting down the tongs after soldering, ensure that the front part of<br />
the tongs, which is still hot, is kept away from inflammable materials.<br />
• Change worn electrodes and electrode holders.<br />
1. Specifications<br />
1.1. Article numbers:<br />
Electric soldering unit ROLLER’S <strong>Pulsar</strong> 164011<br />
Prisma electrodes with holder (pair) 164110<br />
Prisma electrodes (pair) 164111<br />
Rod electrodes (pair) 164115<br />
ROLLER’S Lot Cu 3 160200<br />
ROLLER’S Paste Cu 3 160210<br />
eng<br />
1.2. Working range:<br />
Soft soldering of hard and soft copper piping<br />
6 – 54 mm<br />
1.3. Electrical data:<br />
Rated power input<br />
2000 VA<br />
Rated voltage (mains voltage)<br />
230 V<br />
Rated frequency<br />
50-60 Hz<br />
Rated current<br />
8.7 A<br />
Mains fuse<br />
10 A<br />
Control voltage<br />
24 V AC<br />
Secondary no-load voltage<br />
7 V AC<br />
Secondary rated voltage<br />
7 V AC<br />
Secondary rated current<br />
250 A AC<br />
Intermittent service AB<br />
0.5 / 3 min<br />
Secondary overload protection by temperature switch<br />
1.4. Dimensions:<br />
Length × width × height<br />
210 × 150 × 140 mm<br />
1.5. Weights:<br />
Unit<br />
12.9 kg<br />
1.6. Noise Information:<br />
Emission at workplace<br />
70 dB (A)<br />
1.7. Vibrations:<br />
Weighted effective value of acceleration 2,5 m/s 2<br />
2. Preparations for Use<br />
2.1. Electrical connection:<br />
The soldering unit must be connected to a socket with a protective earth<br />
(earthed wire). Ensure that the mains voltage is correct! Before connecting<br />
the unit, check that the mains voltage is the same as that specified<br />
on the rating plate.<br />
2.2. Selecting the electrodes:<br />
As a rule, the prisma electrodes (Fig. 1 [1]), are used, since they have<br />
a larger area of contact with the pipe and hence heat up the latter faster<br />
than the rod electrodes (2). The rod electrodes are intended for cramped<br />
spots where operation with the prisma electrodes is not possible.<br />
3. Operation<br />
3.1. Mode of operation:<br />
Once the electrodes of the soldering unit are applied to a metallic con -<br />
ductor, e. g. a copper pipe, a circuit with low voltage and high current<br />
intensity is closed by pressing the switch (3). The electrodes have a relatively<br />
high resistance in the transformer/cable/electrodes/work piece<br />
circuit, and therefore heat up. They may become red hot with larger pipe<br />
sizes. The resultant heat is transmitted to the workpiece by heat conduction,<br />
and the workpiece is heated to soldering tempera ture in a matter<br />
of seconds.<br />
3.2. Operating sequence:<br />
Prepare the soldering joint properly (see also 3.3). Connect the unit to<br />
a protectively earthed socket. Attach the tongs (Fig. 1 [4]) with the prisma<br />
electrodes (1) or – in narrow spots – with the rod electrodes (2) to<br />
the workpiece. Operate the switch (3). Keep the switch (3) pressed during<br />
the soldering operation. The soldering temperature is reached within<br />
seconds. Feed in the solder until the soldering gap is filled. Release the<br />
switch (3). Remove the tongs from the workpiece. lf the workpiece is not<br />
precisely fixed, it can be held in the tongs while the switch (3) is open<br />
until the solder has soli dified.<br />
3.3. Soldering material:<br />
Use ROLLER’S Lot Cu 3 for soft-soldering. Copper pipes and fittings<br />
must have a bright metal surface. To prepare the soldering joint, spread<br />
ROLLER’S Paste Cu 3 over the pipe. This paste contains soldering pow -<br />
der and flux. The advantage of the paste is that its change in colour indicates<br />
that the temperature needed for soldering has been reached,<br />
and that a better filling of the soldering gap is achieved. In any event,<br />
however, ROLLER’S Lot Cu 3 must be added too. ROLLER’S Lot Cu 3<br />
and ROLLER’S Paste Cu 3 have been designed specially for drinking<br />
water pipes, and they comply both with German regulations as set forth<br />
in DVGW work sheets GW2 and GW7, and with DIN standards. ROL-<br />
LER’S Paste Cu 3 has been tested and approved by DVGW (DVGW Fl<br />
038 test symbol).
eng<br />
4. Servicing<br />
Pull out the mains plug before starting any servicing or repair work. Such<br />
wirk may only be performed by experts and trained personnel.<br />
4.1. Maintenance:<br />
The ROLLER’S <strong>Pulsar</strong> is maintenance-free.<br />
4.2. lnspection/servicing:<br />
Keep the electrodes free of solder and flux, as these impair heat trans -<br />
mission. Check the electrodes (Fig. 1 [1], [2]) and holders (Fig. 1 [6]) for<br />
damage and con sumption from time to time. Change the electrodes if<br />
necessary. To change the prisma electrodes, undo the two screws (Fig.<br />
1 [5]), take out the worn electrodes, clean the contact surfaces of the<br />
holder with a wire brush, insert new prisma electrodes, and retighten<br />
the screws. Re place deformed or burnt holders.<br />
5. Action in the Event of Problems<br />
5.1. Fault: Solder point does not heat up.<br />
Cause: • Mains lead is not plugged in or is defective.<br />
• Mains socket is defective (mains fuse).<br />
• Temperature switch in the transformer winding has been<br />
operated. The temperature switch comes back on<br />
automatically once the winding has cooled down.<br />
• Unit is defective.<br />
5.2. Fault: Solder point takes longer to heat up.<br />
Cause: • Heavy wear on electrodes.<br />
6. Manufacturer’s Warranty<br />
The warranty period shall be 12 months from delivery of the new product<br />
to the first user but shall be a maximum of 24 months after delivery<br />
to the Dealer. The date of delivery shall be documented by the submission<br />
of the original purchase documents, which must include the date<br />
of purchase and the designation of the product. All functional defects<br />
occurring within the warranty period, which clearly the consequence of<br />
defects in production or materials, will be remedied free of charge. The<br />
remedy of defects shall not extend or renew the guarantee period for<br />
the product. Damage attributable to natural wear and tear, incorrect treatment<br />
or misuse, failure to observe the operational instructions, unsuitable<br />
operating materials, excessive demand, use for unauthorized<br />
purposes, interventions by the Customer or a third party or other reasons,<br />
for which ROLLER is not responsible, shall be excluded from the<br />
warranty.<br />
Services under the warranty may only be provided by customer service<br />
stations authorized for this purpose by ROLLER. Complaints will only<br />
be accepted if the product is returned to a customer service station<br />
autho rized by ROLLER without prior interference in an unassembled<br />
condition. Replaced products and parts shall become the property of<br />
ROLLER.<br />
The user shall be responsible for the cost of shipping and returning the<br />
product.<br />
The legal rights of users, in particular the right to claim damages from<br />
the Dealer, shall not be affected. This manufacturer’s warranty shall apply<br />
only to new products purchased in the European Union, in Norway<br />
or Switzerland.<br />
7. EC declaration of conformity<br />
ROLLER declares that the products decribed in this user manual comply<br />
with corresponding directives 98/37/EG, 89/336/EWG and 73/23/EWG.<br />
Correspondingly this applies to the following norms: DIN EN ISO 12100-1,<br />
DIN EN 12348, DIN EN 50144-1, DIN EN 55014-1, DIN EN 55014-2,<br />
DIN EN 602<strong>04</strong>-1, DIN EN 60335-1, DIN EN 60335-2-45, DIN EN 60745-1,<br />
DIN EN 60745-2-9, DIN EN 60745-2-11, DIN EN 61000-3-2, DIN EN<br />
61000-3-3, DIN EN 61029-1, DIN EN 61029-2-9.<br />
Waiblingen, 01.<strong>04</strong>.<strong>2008</strong><br />
<strong>Albert</strong> ROLLER GmbH & Co KG<br />
Manufacturer of Tools and Machines<br />
D-71332 Waiblingen<br />
Rainer Hech<br />
Remarques générales pour la sécurité<br />
fra<br />
ATTENTION! Toutes les directives doivent être lues. Le non-respect des<br />
directives enumérées ci-après peuvent entraîner une décharge électrique,<br />
des brûlures, et/ou des graves blessures. Le terme utilisé ci-après „appareil<br />
électrique“ se réfère aux outils électriques sur secteur (avec câble<br />
de réseau), aux outils électriques sur accu (sans câble de réseau), aux<br />
machines et aux outils électriques. N'utiliser l'appareil que pour accomplir<br />
les tâches pour les quelles il a été spécialement conçu et conformément<br />
aux prescriptions relatives à la sécurité du travail et à la prévention des accidents.<br />
CONSERVER PRECIEUSEMENT CES DIRECTIVES.<br />
A) Poste de travail<br />
a) Maintenir le poste de travail propre et rangé. Le désordre et un poste<br />
de travail non éclairé peut être source d'accident.<br />
b) Ne pas travailler avec l'appareil électrique dans un milieu où il existe<br />
un risque d'explosion, notamment en présence de liquides, de<br />
gaz ou de poussières inflammables. Les appareils électriques produisent<br />
des étincelles, qui peuvent mettre le feu à la poussière ou aux<br />
vapeurs.<br />
c) Tenir les enfants et des tierces personnes à l'écart pendant l'utilisation<br />
de l'appareil électrique. Il y a un risque de perte de contrôle de<br />
la machine en cas de distraction.<br />
B) Sécurité électrique<br />
a) La fiche mâle de l'appareil électrique doit être appropriée à la prise<br />
de courant. La fiche mâle ne doit en aucun cas être modifée. Ne<br />
pas utiliser d'adaptateur de fiche mâle avec un appareil électrique<br />
avec mise à la terre. Des fiches mâles non modifiées et des prises de<br />
courant appropriées réduisent le risque d'une décharge électrique. Si<br />
l'appareil est doté d'un conducteur de protection, ne brancher la fiche<br />
mâle que sur une prise de courant avec mise à la terre. Sur chantier,<br />
en plein air ou sur un autre mode d'installation, n'utiliser l'appareil électrique<br />
qu'avec un dispositif de protection à courant de défaut de 30 mA<br />
(déclencheur par courant de défaut) sur réseau.<br />
b) Eviter le contact avec des surfaces avec mise à la terre, comme<br />
les tubes, radiateurs, cuisinières et réfrigérateurs. Il y a un risque<br />
élevé de décharge électrique lorsque le corps est en contact avec la<br />
terre.<br />
c) Tenir l'appareil électrique à l'écart de la pluie ou de milieux humides.<br />
La pénétration d'eau dans un appareil électrique augmente le risque de<br />
décharge électrique.<br />
d) Ne pas utiliser le câble pour des fins auxquelles il n'a pas été prévu,<br />
notamment pour porter l'appareil, l'accrocher ou pour débrancher<br />
l'appareil en tirant sur la fiche mâle. Tenir le câble éloigné de la<br />
chaleur, de l'huile, des angles vifs et des pièces de l'appareil en<br />
mouvement. Des câbles endommagés ou emmêlés augmentent le<br />
risque d'une décharge électrique.<br />
e) Si vous travaillez avec l'appareil électrique à l'extérieur, n'utiliser<br />
que des rallonges autorisées pour les travaux à l'extérieur. L'utilisation<br />
d'une rallonge appropriée pour l'extérieur réduit le risque d'une<br />
décharge électrique.<br />
C) Sécurité des personnes<br />
a) Etre attentif, veiller à ce que l'on fait et se mettre au travail avec<br />
bon sens si l'on utilise un appareil électrique. Ne pas utiliser l'appareil<br />
électrique en étant fatigué ou en étant sous l'influence de<br />
drogues, d'alcools ou de médicaments. Un moment d'inattention lors<br />
de l'utilisation de l'appareil peut entraîner de sérieuses blessures.<br />
b) Porter des équipements de protection personnels et toujours des<br />
lunettes de protection. Le port d'équipements de protection personnels,<br />
comme un masque respiratoire, des chaussures de sécurité antidérapantes,<br />
un casque de protection ou une protection acoustique selon<br />
le type de l'utilisation de l'appareil électrique, réduit le risque de blessures.<br />
c) Eviter toute utilisation involontaire ou incontrôlée. Veiller à ce que<br />
l'interrupteur soit en position „O“ avant l'enfichage sur la prise de<br />
courant. Porter un appareil électrique avec le doigt sur l'interrupteur ou<br />
brancher un appareil allumé au secteur peut entraîner des accidents.<br />
Ne jamais ponter un interrupteur.<br />
d) Retirer les outils de réglage ou tournevis, avant la mise en service<br />
de l'appareil électrique. Un outil ou une clé se trouvant dans une
fra<br />
pièce de l'appareil en mouvement peut entraîner des blessures. Ne jamais<br />
porter de main dans des pièces en mouvement (tournantes).<br />
e) Ne pas se sur-estimer. Veiller à une position sûre et garder l'équi -<br />
libre à tout moment. De ce fait, l'appareil peut être mieux contrôlé dans<br />
des situations inattendues.<br />
f) Porter des vêtements appropriés. Ne pas porter de vêtements<br />
amples, ni de bijoux. Ecarter les cheveux, les vêtements et les gants<br />
des pièces en mouvement. Des vêtements amples, des bijoux ou des<br />
cheveux longs pourraient être happés par des pièces en mouvement.<br />
g) Si des dispositifs d'aspiration et de réception de poussière peuvent<br />
être montés, veiller à ce qu'ils soient branchés et utilisés correctement.<br />
L'utilisation de ces dispositions réduit les dangers liés à la<br />
poussière.<br />
h) Ne céder l'appareil électrique qu'à du personnel spécialement formé.<br />
Utilisation interdite aux jeunes gens de moins de 16 ans, sauf en cas de<br />
formation professionnelle et sous surveillance d'une personne qualifiée.<br />
D) Manipulation et utilisation méticuleuse d'appareils électriques<br />
a) Ne pas surcharger l'appareil électrique. Utiliser l'appareil électrique<br />
approprié à votre travail. Avec les appareils électriques adéquats,<br />
le travail est meilleur et plus sûr dans la marge de puissance indiquée.<br />
b) Ne pas utiliser d'appareils électriques dont l'interrupteur est défectueux.<br />
Un appareil électrique qui ne s'allume ou ne s'éteint plus est<br />
dangereux et doit être réparé.<br />
c) Retirer la fiche mâle de la prise de courant avant d'effectuer des<br />
réglages sur l'appareil, de changer des pièces ou de ranger l'appa -<br />
reil. Cette mesure de sécurité empêche une mise en marche involontaire<br />
de l'appareil.<br />
d) Tenir des appareils électriques inutilisés hors de portée des enfants.<br />
Ne pas céder l'appareil électrique à des personnes dont son<br />
utilisation ne leur est pas familière ou qui n'ont pas lu ces directives.<br />
Les appareils électriques sont dangereux s'ils sont utilisés par<br />
des personnes non expérimentés.<br />
e) Prendre scrupuleusement soin de l'appareil électrique. Contrôler<br />
si les pièces de l'appareil en mouvement fonctionnement impeccablement<br />
et si elles ne coincent pas, si des pièces sont cassées<br />
ou endommagées, si le fonctionnement de l'appareil électrique est<br />
préjudiciable. Avant l'utilisation de l'appareil électrique, faire réparer<br />
les pièces endommagées par des professionnels qualifiés ou<br />
par une station S.A.V. agrée sous contrat avec ROLLER. De nombreux<br />
accidents sont dûs à la mauvaise maintenance des outils électriques.<br />
f) Tenir les outils de coupe aiguisés et propres. Des outils de coupe<br />
avec des arêtes aiguisées scrupuleusement soignés coincent moins et<br />
sont plus faciles à utiliser.<br />
g) Consolider la pièces à usiner. Utiliser des dispositifs de serrage ou<br />
un étau pour immobiliser la pièce à usinier. Ainsi, elle est mieux retenue<br />
qu'à la main et en plus les deux mains sont libres pour le maniement<br />
de l'appareil.<br />
h) Utiliser les appareils électriques, les accessoires, les outils etc.<br />
conformément à ces directives et comme cela est prescrit pour ce<br />
type spécifique d'appareil. Tenir compte des conditions de travail<br />
et de la tâche à réaliser. Utiliser les appareils électriques pour accomplir<br />
des tâches différentes de celles pour lesquelles ils ont été conçus, peut<br />
en traîner des situations dangereuses. Pour des raisons de sécurité,<br />
toute modification injustifiée sur l'appareil électrique est formellement<br />
interdite.<br />
E) Manipulation et utilisation méticuleuse d'appareils sur accu<br />
a) S'assurer que l'appareil électrique est éteint, avant de brancher<br />
l'accu. Le branchement d'un accu sur un appareil électrique en marche<br />
peut en traîner des accidents.<br />
b) Charger les accus uniquement avec les chargeurs recommandés<br />
par le fabricant. Il y a un risque d'incendie si un chargeur, approprié<br />
pour un type précis d'accus, est utilisé avec d'autres accus.<br />
c) N'utiliser que les accus prévus à cet effet avec les appareils électriques.<br />
L'utilisation d'autres accus peut entraîner des blessures et des<br />
risques d'accident.<br />
d) Tenir l'accu non utilisé éloigné de trombones de bureau, pièces de<br />
monnaie, clés, clous, vis ou autres petits objets métalliques pouvant<br />
provoquer un court-circuit entre les bornes de l'accu. Un courtcircuit<br />
entre les bornes de l'accu peut provoquer des blessures et un<br />
risque d'incendie.<br />
fra<br />
e) En cas de mauvaise utilisation, il peut y avoir des fuites de liquide.<br />
Eviter le contact avec ce liquide. En cas de contact, rincer à<br />
l'eau. Si le liquide pénètre dans les yeux, rincer à l'eau et consulter<br />
immédiatement un médecin. Des fuites de liquide provenant de<br />
l'accu peuvent entraîner des irritations de la peau ou des brûlures.<br />
f) Ne pas utiliser le chargeur si les températures du chargeur ou les<br />
températures ambiantes sont inférieures à 5°C/40°F ou 40°C/105°F.<br />
g) Ne pas jeter les accus défectueux dans les ordures ménagères,<br />
mais les remettre à une station S.A.V. agrée, sous contrat avec<br />
ROLLER ou à une société reconnue pour le traitement des déchets.<br />
F) Service après vente<br />
a) Faire réparer son appareil uniquement par des professionnels qualifés<br />
en utilisant des pièces d'origines. Cela garantit le maintien de<br />
la sécurité de l'appareil.<br />
b) Suivre les prescriptions de maintenance et les recommandations<br />
pour le changement des outils.<br />
c) Contrôler régulièrement le câble de raccordement de l'appareil électrique<br />
et le faire remplacer s'il est endommagé par un professionnel<br />
qualifié ou par une station S.A.V. agrée, sous contrat avec ROL-<br />
LER. Contrôler régulièrement les rallonges et les remplacer si elles<br />
sont endommagées.<br />
Mesures spéciales de sécurité<br />
• Les électrodes atteignent une température de service ~ 900°C. De ce<br />
fait ne pas toucher les électrodes, la partie avant, ni la pièce, pendant<br />
et après le soudage de la pièce.<br />
• Après le soudage, veiller à ne pas mettre en contact la pince avec des<br />
maté riaux inflammables.<br />
• Remplacer les électrodes et les supports usés.<br />
1. Caractéristiques techniques<br />
1.1. Références<br />
Poste de soudure électrique ROLLER’S <strong>Pulsar</strong> 164011<br />
Support avec électrodes prismatiques (paire) 164110<br />
Electrodes prismatiques (paire) 164111<br />
Electrodes en baguette (paire) 164115<br />
ROLLER’S Lot Cu 3 160200<br />
ROLLER’S Paste Cu 3 160210<br />
1.2. Capacité<br />
Soudage de tubes en cuivre, écroui et recuit, diamètre de 6 à 54 mm<br />
1.3. Caractéristiques électriques<br />
Puissance nominale absorbée<br />
2000 VA<br />
Tension nominale (tension du secteur)<br />
230 V<br />
Fréquence nominale<br />
50-60 Hz<br />
Courant nominal<br />
8,7 A<br />
Fusible<br />
10 A<br />
Tension de commande<br />
24 V<br />
Tension secondaire à vide<br />
7 V<br />
Tension secondaire nominale<br />
7 V<br />
Courant secondaire nominal<br />
250 V<br />
Service intermittent AB<br />
0,5 / 3 min<br />
lnterrupteur de surcharge côté secondaire par automate thermostatique.<br />
1.4. Dimensions:<br />
L × I × H<br />
210 × 150 × 140 mm<br />
1.5. Poids<br />
Appareil<br />
12,9 kg<br />
1.6. Information concernant le bruit:<br />
Données d’émission au poste de travail<br />
70 dB (A)<br />
1.7. Vibrations:<br />
Valeur effective pondérée de l’accélération 2,5 m/s 2<br />
2. Mise en service<br />
2.1. Raccordement électrique<br />
Ne brancher l’appareil que sur une prise de courant pourvue d’une<br />
protection par terre (ligne de terre). S’assurer que la tension du sec -<br />
teur corres ponde à celle indiquée sur la plaquette signalétique.
fra<br />
2.2. Choix des électrodes<br />
En règle générale, on se servira des électrodes prismatiques (Fig. 1<br />
[1]), puisque celles-ci présentant une plus grande de contact sur le<br />
tube. Celui-ci est donc plus rapidement chauffé qu’avec les électro -<br />
des en baguette (2). Ces dernières sont plus particulièrement prévues<br />
pour des interventions dans des endroits étroits ou difficilement<br />
accessibles avec les électrodes prismatiques.<br />
3. Mode d’emploi<br />
3.1. Principe de fonctionnement<br />
En appliquant les électrodes de l’appareil sur un conducteur métal -<br />
lique, un tube en cuivre, par exemple, et en actionnant le contacteur<br />
(3), il est établi un circuit électrique fermé à basse tension et forte in -<br />
tensité du courant. Dans le circuit ainsi établi: transformateur/câble/<br />
électrodes/pièce, les électrodes établissent une résistance relative -<br />
ment élevée qui les échauffe rapidement. Il se peut que les électrodes<br />
rougissent en cas de grandes dimensions. La chaleur ainsi dégagée<br />
est transmise à la pièce, Iaquelle est portée en quelques secondes à<br />
la température nécessaire de soudage.<br />
3.2. Déroulement des opérations<br />
Procéder aux préparatifs nécessaires à un soudage correct (voir éga -<br />
lement paragraphe 3.3.). Brancher l’appareil sur une prise de courant<br />
du secteur. Appliquer la pince (Fig. 1 [4]) munie des électrodes prisma -<br />
tiques (1) ou, pour les endroits étroits, des électrodes en baguette (2)<br />
sur la pièce. Action ner le contacteur (3). Maintenir durant l’opération<br />
de sou dage le contacteur (3) pressé. La température de soudage est<br />
atteinte au bout de quelques secondes. Ajouter un peu de métal d’apport<br />
jus qu’à ce que la fissure soit remplie, puis relâcher le contacteur<br />
(3). En lever la pince de la pièce. Sur les pièces pas correctement<br />
fixées, on pourra maintenir celles-ci quelques instants dans la pince,<br />
après avoir reâché le contacteur (3), jusqu’à ce que la soudure se soit<br />
solidifiée.<br />
3.3. Matériau d’apport<br />
Pour la soudure utiliser ROLLER’S Lot Cu 3. Les tubes et raccords en<br />
cuivre doivent d’abord être nettoyés. Pour préparer l’endroit à souder,<br />
appliquer le décapant ROLLER’S Paste Cu 3. Le décapant se compose<br />
de poudre à souder et de flux. L’avantage du décapant réside<br />
d’une part dans le fait que sa couleur change lorsque la bonne température<br />
de soudage est atteinte et quelle permet d’autre part un meilleur<br />
rem plissage de la fissure. Le soudage lui-même devra quand même<br />
être complété avec ROLLER’S Lot Cu 3. Les deux produits, ROL-<br />
LER’S Lot Cu 3 et ROLLER’S Paste Cu 3, ont été spécialement développés<br />
pour des applica tions sur des conduites d’eau potable et répondent<br />
aux prescriptions DVGW notices GW2 et GW7, ainsi qu’aux<br />
normes DIN afférentes ROLLER’S Paste Cu 3 est en outre homologuée<br />
et agréé DVGW (No de contrôle: DVGW Fl 038).<br />
4. Entretien et maintenance<br />
Avant tout travail d’entretien ou de réparation, débrancher l’appareil. Ces<br />
travaux ne doivent être entrepris que par du personnel qualifié et spécialement<br />
formé.<br />
4.1. Entretien<br />
ROLLER’S <strong>Pulsar</strong> est exempt de tout entretien.<br />
4.2. lnspection/Maintenance<br />
Eviter la salissure des électrodes par du matériau d’apport et du flux.<br />
Celle -ci gêne la transmission thermique. De temps à autre, vérifier<br />
I’état des électrodes (Fig. 1 [1], [2]) et des portes-électrodes (Fig. 1<br />
[6]). En pré sence d’endom magements quelconques ou de brûlages,<br />
remplacer les électrodes. Pour remplacer les électrodes prismatiques,<br />
desserrer les deux vis (Fig. 1 [5]), enlever les électrodes usées, nettoyer<br />
à la brosse métal lique les surfaces de contact des portes-électrodes,<br />
puis mettre en place les nouvelles électrodes, et serrer les vis.<br />
Echanger également des portes-électrodes déformés ou brûlés.<br />
fra<br />
• Prise de courant défectueuse (fusible secteur).<br />
• Le thermo-contact de la bobine du<br />
transfor mateur a réagi à la suite d’une<br />
surcharge quelconque.<br />
• Laisser refroidir, puis procéder à une nouvelle<br />
tentative (le thermocontact se réenclenche<br />
automatiquement).<br />
• Appareil en panne.<br />
5.2. Dérangement: L’échauffement du point à souder dure plus<br />
long temps que d’habitude.<br />
Cause probable: • Électrodes usées.<br />
6. Garantie du fabricant<br />
Le délai de garantie est de 12 mois à compter de la date de prise en<br />
charge du nouveau produit par le premier utilisateur, au plus 24 mois à<br />
compter de la date de livraison chez le revendeur. La date de la déliv -<br />
rance est à justifier par l’envoi des documents d’achat originaux, qui<br />
doivent contenir les renseignements sur la date d’achat et la désignation<br />
du produit. Tous les défauts de fonctionnement qui se présentent<br />
pendant le délai de garantie et qui sont dus à des vices de fabrication<br />
ou de matériel, seront remis en état gratuitement. Le délai de garantie<br />
pour le produit n’est ni prolongé ni renouvelé par la remise en état. Sont<br />
exclus de la garantie tous les dommages consécutifs à l’usure naturelle,<br />
à l’emploi et traitement non appropriés, au non respect des instructions<br />
d’emploi, à des moyens d’exploitation non-adéquats, à un emploi forcé,<br />
à une utilisation inadéquate, à des interventions par l’utilisateur ou des<br />
personnes non compétentes ou d’autres causes n’incombant pas à la<br />
responsabilité de ROLLER.<br />
Les prestations sous garantie ne doivent être effectuées que par des<br />
ateliers de service après-vente ROLLER autorisés. Les appels en garantie<br />
ne seront reconnus que si le produit est renvoyé à l’atelier ROL-<br />
LER en état non démonté et sans interventions préalables. Les produits<br />
et les pièces remplacés redeviennent la propriété de ROLLER.<br />
Les frais d’envoi et de retour seront à la charge de l’utilisateur.<br />
Les droits juridiques de l’utilisateur, en particulier pour ses réclamations<br />
vis à vis du revendeur, restent inchangés. Cette garantie du fabricant<br />
n’est valable que pour les nouveaux produits, achetés au sein de l’Union<br />
Européenne, en Norvège ou en Suisse.<br />
7. Déclaration de conformité CEE<br />
ROLLER déclare par la présente, que les machines citées dans cette<br />
notice d’utilisation sont conformes aux Directives 98/37/EG,<br />
89/336/EWG et 73/23/EWG. Les normes suivantes ont été appliquées:<br />
DIN EN ISO 12100-1, DIN EN 12348, DIN EN 50144-1, DIN EN 55014-1,<br />
DIN EN 55014-2, DIN EN 602<strong>04</strong>-1, DIN EN 60335-1, DIN EN 60335-2-45,<br />
DIN EN 60745-1, DIN EN 60745-2-9, DIN EN 60745-2-11, DIN EN<br />
61000-3-2, DIN EN 61000-3-3, DIN EN 61029-1, DIN EN 61029-2-9.<br />
Waiblingen, 01.<strong>04</strong>.<strong>2008</strong><br />
<strong>Albert</strong> ROLLER GmbH & Co KG<br />
Usine de fabrication d'outils et de machines<br />
D-71332 Waiblingen<br />
Rainer Hech<br />
5. Comportement en cas de dérangement<br />
5.1. Dérangement: L’endroit à souder ne s’échauffe pas.<br />
Causes probables: • Cordon d’alimentation pas branché ou<br />
éfectueux.
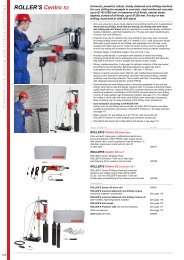
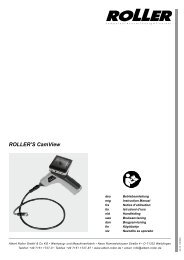
ROLLER’S <strong>Pulsar</strong><br />
Teileverzeichnis Spare parts list Liste des pièces Elenco dei pezzi
deu eng fra ita<br />
1 Zylinderschraube Fillister head screw Vis à tête cylindrique Vite a testa cilindrica 083086<br />
2 Prismenelektrode (Paar) Prismatic electrode (pair) Electrode prismatique (paire) Elettrodo prismatico (coppia) 164111A<br />
3 Sechskantmutter Hexagon nut Ecrou hexagonal Dado esagonale 085<strong>04</strong>2<br />
4 Halter Holder Porte outil Porta utensili 164106<br />
5 Stabelektrode (Paar) Stick electrode (pair) Electrode en baguette (paire) Elettrodo cilindrico (coppia) 164115A<br />
6 Aufnahme Set taper shaft Porte Porta 164124<br />
7 Zylinderschraube Fillister head screw Vis à tête cylindrique Vite a testa cilindrica 083005<br />
8 Isolierstück Insulating piece Pièce d’isolation Pezzo d’isolamento 164108<br />
9 Kerbschraube Sheet metal screw Vis à tôle Vite autofilettante 083111<br />
10 Druckstift Thrust piece Goupille d’ouverture Spina di compressione 164107<br />
11 Schalterdeckel Switch cover Couvercle d’interrupteur Coperchio dell’interruttore 164103<br />
12 Microschalter Micro switch Micro interrupteur Micro interruttore 023145<br />
13 Zylinderschraube Fillister head screw Vis à tête cylindrique Vite a testa cilindrica 081058<br />
14 Druckfeder Pressure spring Ressort de compression Molla di compressione 164105<br />
15 Griffschale Handle shell Coquille poignée Calotta impugnatura 164102<br />
16 Griffschale Handle shell Coquille poignée Calotta impugnatura 164101<br />
17 Achse Axle Axe Asse 163308<br />
18 Aderendhülse Final sleeve Manchon final Boccola finale 034120<br />
20 Tragegriff Carrying handle Poignée de transport Impugnatura di trasporto 164206<br />
21 Erdungskabel kompl. Earth conducting cable compl. Câble de mise à la terre compl. Cavo per messa a terra compl. 164228<br />
22 Flachsteckhülse (isol.) Flat receptacle for taps (isol.) Alvéole platé (isol.) Bussola a spina piatta (isol.) 034112<br />
24 Zahnscheibe Chopper disk Rondelle élastique à dents Ranella zigrinata 087034<br />
25 Sechskantmutter Hexagon nut Ecrou hexagonal Dado esagonale 085037<br />
26 Transformator Transformer Transformateur Transformatore 164222R 220<br />
28 Sechskantmutter Hexagon nut Ecrou hexagonal Dado esagonale 085035<br />
29 Scheibe Washer Rondelle Ranella 086<strong>04</strong>0<br />
30 Relais Relay Relais Relé 025024<br />
31 Blindniet Rivet Rivet Rivetto 089073<br />
32 Zahnscheibe Chopper disk Rondelle élastique à dents Ranella zigrinata 087035<br />
33 Blindniet Rivet Rivet Rivetto 089072<br />
34 Steuertransformator Controlling transformer Transformateur de commande Transformatore di comando 164207R 220<br />
35 Halteplatte Fixing plate Plaque étanchéité Piastra di sostegno 164229<br />
36 Ringkabelschuh Ring cable terminal Cosse Morsetto anulare 034119<br />
38 Blindniet Rivet Rivet Rivetto 089074<br />
39 Gegenmutter Lock nut Contre-écrou Dado 032122<br />
40 Sechskantschraube Hexagon screw Vis à tête hexagonale Vite a testa esagonale 080021<br />
41 Sekundärleitung Secondary cable Câble secondaire Cavo ausiliario 164227<br />
44 Gegenmutter Lock nut Contre-écrou Dado 032121<br />
45 Kabelverschraubung Cable screw connection Raccord de câbles Pressacavo 032113<br />
46 Kabelverschraubung Cable screw connection Raccord de câbles Pressacavo 032111<br />
47 Steuerkabel Controlling cable Câble de commande Cavo di comando 164226<br />
48 Anschlußleitung kpl. 230 V Connecting cable 230 V compl. Raccordement 230 V compl. Cavo d’allacciamento 230 V compl.164215R 220<br />
Anschlußleitung kpl. CH Connecting cable SEV compl. Raccordement SEV compl. Cavo d’allacciamento SEV compl. 164215R SEV<br />
49 Gummipuffer Rubber buffer Tampon en caoutchouc Paracolpi di gomma 032089<br />
50 Pop-Niet Rivet Rivet Rivetto 089029<br />
51 Schutzschlauch Protective tube Tuyau de protection Tubo di protezione <strong>04</strong>4036<br />
–– Leitung kompl. Wire compl. Fil compl. Cavo compl.<br />
Pos. 52, 53 und 54 Pos. 52, 53 and 54 Pos. 52, 53 et 54 Pos. 52, 53 et 54 031<strong>04</strong>1-0130<br />
54 Flachsteckhülse Flat receptacle for taps Alvéole platé Bussola a spina piatta 034014<br />
55 Isolierhülse Insulating sleeve Gaine isolante Guaina isolante 034118<br />
–– Leitung kompl. Wire compl. Fil compl. Cavo compl.<br />
Pos. 54 und 56 Pos. 54 and 56 Pos. 54 et 56 Pos. 54 et 56 031<strong>04</strong>1-0150<br />
–– Halter m. Prismenelektrode Holder with prismatic Support avec électrode Supporto con elettrodo<br />
(Paar) electrode (pair) prismatique (paire) prismatico (coppia)<br />
Pos. 1, 2, 3 und 4 Pos. 1, 2, 3 and 4 Pos. 1, 2, 3 et 4 Pos. 1, 2, 3 e 4 164110A<br />
–– Lötzange Soldering clamp Pince à souder Pinza saldante<br />
Pos. 1 bis 18 ohne 5 Pos. 1 to 18, without 5 Pos. 1 à 18, sans 5 Pos. 1 fino a 18, senza 5 164100<br />
–– Gehäuse kompl. Housing compl. Carcasse compl. Carcassa compl.<br />
Pos. 20, 23, 27, 49 und 50 Pos. 20, 23, 27, 49 and 50 Pos. 20, 23, 27, 49 et 50 Pos. 20, 23, 27, 49 e 50 164225A