Mobiler 8-Kanal-Babyruf MBF 8080 - Hartig + Helling GmbH & Co. KG
Mobiler 8-Kanal-Babyruf MBF 8080 - Hartig + Helling GmbH & Co. KG
Mobiler 8-Kanal-Babyruf MBF 8080 - Hartig + Helling GmbH & Co. KG

Create successful ePaper yourself
Turn your PDF publications into a flip-book with our unique Google optimized e-Paper software.
CE-Konformitätserklärung<br />
Wir,<br />
HARTIG+HELLING GMBH+CO. <strong>KG</strong><br />
HAFENSTRASSE 280, 45356 ESSEN, GERMANY<br />
erklären, dass das Produkt<br />
<strong>MBF</strong> <strong>8080</strong>, <strong>Babyruf</strong><br />
den Schutzanforderungen entspricht, die in der Richtlinie<br />
des Rates zur Angleichung der Rechtsvorschriften der<br />
Mitgliedsstaaten über die elektromagnetische Verträglichkeit<br />
(1999/5/EC) festgelegt sind<br />
R&TTE<br />
Zur Beurteilung wurden folgende Normen herangezogen:<br />
EN301489-5 V1.3.1 (2002-08),<br />
EN301489-1 V1.4.1 (2002-08),<br />
EN300296-2 V1.1.1 (2001-03),<br />
EN60065: 1998 + <strong>Co</strong>rr. 1<br />
Die Prüfung wurde durchgeführt von:<br />
CETECOM ICT Services <strong>GmbH</strong><br />
Notified body ID-No.:<br />
0359<br />
<strong>Mobiler</strong><br />
8-<strong>Kanal</strong>-<strong>Babyruf</strong><br />
<strong>MBF</strong> <strong>8080</strong><br />
Seite/<br />
Page<br />
Bedienungsanleitung 3<br />
Operating instructions 9<br />
01.04.05 Geschäftsführer Markus Wix<br />
Datum<br />
Rechtsgültige Unterschrift<br />
Mode d’emploi 15<br />
Istruzioni per l’uso 21<br />
Wir erklären hiermit, dass unser <strong>Babyruf</strong>gerät <strong>MBF</strong> <strong>8080</strong> den<br />
R&TTE-Direktiven über EMV, Radio und Sicherheit entspricht.<br />
Manual de Instrucciones 29<br />
To use in:<br />
Gebruiksaanwijzing 35
Bedienungsanleitung<br />
Inhalt<br />
1. Lieferumfang ...........................................3<br />
2. Sicherheitshinweise .................................3<br />
3. Bedienelemente ......................................4<br />
4. Einsetzen der Akkus .................................5<br />
5. Akkus laden ............................................5<br />
6. Verbraucherhinweis .................................5<br />
7. Entsorgungshinweis .................................5<br />
8. Display-Beschreibung ..............................6<br />
9. Aufhängevorrichtung ...............................6<br />
10. Ein- und Ausschalten des Gerätes .............6<br />
11. <strong>Babyruf</strong>funktion .......................................6<br />
12. Empfänger ..............................................6<br />
13. Lautstärkeeinstellung ...............................6<br />
14. Senden und Empfangen ...........................6<br />
15. Rufton ....................................................7<br />
16. Displaybeleuchtung .................................7<br />
17. Tastensperre ...........................................7<br />
18. Tasten-Bestätigungston ...........................7<br />
19. Rauschsperre deaktivieren .......................7<br />
20. <strong>Kanal</strong>wahl ...............................................7<br />
21. Automatischer <strong>Kanal</strong>suchlauf ...................7<br />
22. Wechseln des Subcodes ..........................7<br />
23. Reichweite ..............................................7<br />
24. Frequenztabelle .......................................8<br />
25. Subcode-Frequenztabelle ........................8<br />
26. Pflege und Gewährleistung .......................8<br />
27. Technische Daten ....................................8<br />
<strong>MBF</strong> <strong>8080</strong> ist ein Funkgerät im PMR-<br />
Band mit zusätzlichen Funktionen eines<br />
<strong>Babyruf</strong>gerätes. Sender und Empfänger<br />
arbeiten auf 8 Kanälen und 38 verschiedenen<br />
Subcodes. Die Geräte haben eine<br />
Reichweite bis zu 3 km (abhängig von<br />
den örtlichen Gegebenheiten). Dieses<br />
Gerät arbeitet im PMR-Band (Private<br />
Mobile Radio) und ist somit anmeldeund<br />
gebührenfrei zu betreiben. Die Geräte<br />
werden jeweils mit drei speziellen<br />
Microakkus (AAA NiMH) betrieben (im<br />
Lieferumfang enthalten). Die Akkus können<br />
über die integrierte Ladeelektronik<br />
in den Geräten mittels des Netzteils aufgeladen<br />
werden. Sie können aber auch<br />
in die beigefügte Ladehalterung, die mit<br />
dem Netzteil verbunden wird, eingesteckt<br />
und geladen werden.<br />
1. Lieferumfang<br />
1 x <strong>Babyruf</strong> (Sender und Empfänger)<br />
1 x Ladehalterung<br />
1 x Netzteil zu <strong>MBF</strong> <strong>8080</strong><br />
6 x spezielle Microakkus<br />
1 x Bedienungsanleitung<br />
2. Sicherheitshinweise<br />
Bei Schäden, die durch Nichtbeachten der<br />
Anleitung verursacht werden, erlischt der Garantieanspruch!<br />
Für Folgeschäden, die daraus<br />
resultieren, übernehmen wir keine Haftung! Bei<br />
Sach- oder Personenschäden, die durch unsachgemäße<br />
Handhabung oder Nichtbeachtung<br />
der Sicherheitshinweise verursacht werden,<br />
übernehmen wir keine Haftung. In solchen<br />
Fällen erlischt jeder Garantieanspruch.<br />
<strong>Hartig</strong>+<strong>Helling</strong> <strong>GmbH</strong>+<strong>Co</strong>. <strong>KG</strong><br />
Hafenstraße 280, D-45356 Essen, Germany<br />
Telefon +49 201 32066-0, Telefax +49 201 32066-55<br />
www.hartig-helling.de<br />
28HH0405<br />
-3-<br />
• Aus Sicherheits- und Zulassungsgründen (CE)<br />
ist das eigenmächtige Umbauen und/oder<br />
Verändern des Gerätes nicht gestattet.<br />
• Das Gerät darf keinen extremen Temperaturen<br />
(> 50° C/< -5° C), starken Vibrationen, hoher<br />
Feuchtigkeit oder starken mechanischen Beanspruchungen<br />
ausgesetzt werden.<br />
• Betreiben Sie das Gerät nicht unbeaufsichtigt.<br />
Das Gerät und die Verpackung sind kein<br />
Spielzeug und gehören nicht in Kinderhände.<br />
Lassen Sie in Anwesenheit von Kindern besondere<br />
Vorsicht walten.
• Gießen Sie nie Flüssigkeiten über das Gerät.<br />
Sollte dennoch Flüssigkeit in das Geräteinnere<br />
gelangt sein, entfernen Sie die Batterien<br />
und wenden Sie sich an eine Fachkraft.<br />
• Der Betrieb des Gerätes im Kfz und in Flugzeugen<br />
ist nicht erlaubt. Aufgrund der Beeinflussung<br />
der im Fahrzeug/Flugzeug verwendeten<br />
empfindlichen Elektronik sind<br />
Störungen nicht auszuschließen. Zudem<br />
wirken Fahrzeuge wie ein „Faradayscher-Käfig“:<br />
Die vom Funkgerät ausgesendete Funkstrahlung<br />
wird abgeschirmt, die Reichweite<br />
des Gerätes ist dadurch sehr gering. Im Fahrzeuginneren<br />
ist hingegen die Belastung durch<br />
Funkstrahlung erhöht.<br />
• Legen Sie das Gerät nicht in den Auslösebereich<br />
eines Airbags. Beim Auslösen des Airbags<br />
könnte das <strong>Babyruf</strong>gerät weggeschleudert<br />
werden und Verletzungen verursachen.<br />
• Betreiben Sie das Gerät nicht in der Nähe sehr<br />
empfindlicher Geräte, wie sie z. B. in Krankenhäusern<br />
Verwendung finden. Das <strong>Babyruf</strong>gerät<br />
könnte solche Geräte im Betrieb stören.<br />
• Personen mit einem Herzschrittmacher sollten<br />
das Gerät nicht betreiben, da durch die abgegebene<br />
Funkstrahlung eine Beeinflussung<br />
des Herzschrittmachers nicht ausgeschlossen<br />
werden kann.<br />
• Halten Sie das Gerät von explosionsgefährdeten<br />
Bereichen, z. B. Tankstellen, Lagerräumen<br />
für Chemikalien usw. fern. Durch einen<br />
Funken, der z. B. durch einen Batteriewechsel<br />
entstehen kann oder durch die abgestrahlte<br />
Funkenergie, kann in solchen Bereichen eine<br />
Explosion ausgelöst werden.<br />
• Schalten Sie Ihr Funkgerät immer ab, wenn<br />
entsprechende Warnhinweise den Betrieb von<br />
Funktelefonen und Funkgeräten verbieten.<br />
• Mit beschädigter Antenne darf das Gerät nicht<br />
mehr betrieben werden, bei Kontakt der Antenne<br />
mit der Haut könnte dies ansonsten<br />
leichte Verbrennungen verursachen.<br />
• Unachtsamkeit im Straßenverkehr kann zu<br />
schwerwiegenden Unfällen führen. Eine Bedienung<br />
des Gerätes darf deshalb immer nur<br />
dann erfolgen, wenn es die Situation erlaubt<br />
und Sie durch die Bedienung des Gerätes<br />
nicht abgelenkt werden.<br />
• In gewerblichen Einrichtungen sind die Unfallverhütungsvorschriften<br />
des Verbandes<br />
der gewerblichen Berufsgenossenschaften<br />
für elektrische Anlagen und Betriebsmittel zu<br />
beachten.<br />
• Am Gerät dürfen keine baulichen<br />
Veränderungen vorgenommen werden, d. h.<br />
es muss die am Gerät angebrachte Antenne<br />
verwendet werden. Auch Maßnahmen zur<br />
Erhöhung der Sendeleistung dürfen nicht<br />
durchgeführt werden. Das Gerät verliert andernfalls<br />
seine Zulassung und die allgemeine<br />
Betriebserlaubnis. Zudem können technische<br />
Änderungen zur Zerstörung elektronischer<br />
Bauteile führen. Abgleichpositionen innerhalb<br />
des Gerätes dürfen keinesfalls verstellt werden.<br />
Der Abgleich wurde vom Hersteller bereits<br />
optimal durchgeführt.<br />
• Die Geräte sind nicht spritzwassergeschützt<br />
und daher nur entsprechend geschützt im<br />
Freien zu betreiben.<br />
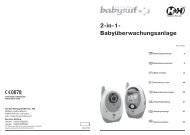
3. Bedienelemente<br />
2<br />
3<br />
5<br />
4<br />
6<br />
7<br />
1<br />
12<br />
13<br />
11<br />
10<br />
1. Antenne<br />
2. Aufhängeöse für ein Band<br />
3. Taste Ein/Aus, Menü, Sperre<br />
4. Ruf/Monitor-Taste<br />
5. Sprechtaste PTT<br />
6. Mikrofon<br />
7. Headset-Buchse (externer Mikrofon-/<br />
Kopfhörer-Anschluss)<br />
8. Aufhängeöse für ein Band<br />
9. Ladebuchse<br />
10. Lautsprecher<br />
11. Display<br />
12. Aufwärtstaste/VOX-Aktivierungstaste<br />
13. Abwärtstaste/Lautstärke<br />
8<br />
9<br />
14<br />
15<br />
14. Ladehalterung<br />
15. Netzbuchse<br />
4. Einsetzen der Akkus<br />
1. Vor der Inbetriebnahme müssen zuerst die<br />
Akkus (im Lieferumfang enthalten) in die Geräte<br />
eingesetzt und aufgeladen werden.<br />
2. Dazu positionieren Sie als erstes die Geräte<br />
so, dass die Geräte-Rückseiten vor Ihnen liegen.<br />
Drücken Sie nun auf die Verriegelungsknöpfe<br />
der Gürtelclips und schieben diese<br />
gleichzeitig zur Seite wie in der Abbildung<br />
dargestellt.<br />
3. Danach öffnen Sie die Batteriefächer, indem<br />
Sie die Deckel nach unten abziehen.<br />
4. Setzen Sie nun Ihre Akkus, wie auf der Markierung<br />
angegeben, ein. Bitte unbedingt auf<br />
die richtige Polung (+/-) achten!<br />
5. Der Zusammenbau erfolgt dann in umgekehrter<br />
Reihenfolge.<br />
5. Akkus laden<br />
1. Zum Laden schalten Sie die Geräte aus.<br />
2. Verbinden Sie das Ladekabel mit der Ladebuchse<br />
PTT/CHG an der Unterseite der Geräte<br />
oder stecken Sie die Geräte in die Ladehalterung.<br />
3. Bei Benutzung der Ladehalterung verbinden<br />
Sie sie mit dem Netzteil.<br />
4. Verbinden Sie danach das Netzteil mit Ihrem<br />
Stromnetz (230 V AC).<br />
5. Der Ladevorgang wird Ihnen durch die im Display<br />
aufblinkenden Akkusymbole angezeigt.<br />
Bei völlig entleerten Akkus beträgt die Ladezeit<br />
ca. 8 bis 10 Stunden.<br />
6. Sobald die Akkusymbole auf „Akku voll“-Anzeige<br />
stehen ohne zu blinken, sind sie geladen.<br />
Neue Akkus sollten beim ersten Mal<br />
14 Stunden geladen werden.<br />
Achtung! Tauschen Sie defekte Akkus nur<br />
gegen Original-Akkus aus. Es können keine<br />
normalen Microakkus AAA in diesen Geräten<br />
geladen werden.<br />
Über die beiliegende Bestellkarte<br />
können Sie zusätzliche Original-<br />
Akkus erwerben.<br />
• Mischen Sie niemals herkömmliche Batterien<br />
mit Akkus!<br />
• Bei Benutzung von Batterien mischen Sie niemals<br />
alte mit neuen Batterien!<br />
• Versuchen Sie niemals herkömmliche Batterien<br />
zu laden. Explosionsgefahr!<br />
• Akkus und Batterien sind kein Kinderspielzeug,<br />
bitte von Kleinkindern fernhalten.<br />
6. Verbraucherhinweis<br />
Bitte beachten Sie, dass alle neuen NiCd- und<br />
NiMH-Akkus erst nach 4 bis 6 Ladevorgängen<br />
die volle Kapazität erreichen.<br />
7. Entsorgungshinweis<br />
Altgeräte, die mit dem abgebildeten Symbol gekennzeichnet<br />
sind, dürfen nicht mit dem Hausmüll<br />
entsorgt werden.<br />
Verbrauchte Batterien und Akkumulatoren<br />
(Akkus), die mit einem der abgebildeten Symbole<br />
gekennzeichnet sind, dürfen nicht mit dem<br />
Hausmüll entsorgt werden.<br />
-4- -5-
Sie müssen sie bei einer Sammelstelle für Altgeräte,<br />
Altbatterien bzw. Sondermüll (informieren<br />
Sie sich bitte bei Ihrer Gemeinde) oder bei<br />
Ihrem Händler, bei dem Sie sie gekauft haben,<br />
abgeben. Diese sorgen für eine umweltfreundliche<br />
Entsorgung.<br />
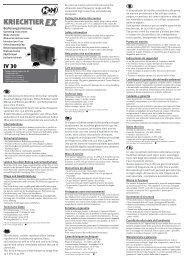
8. Display-Beschreibung<br />
A<br />
G<br />
B<br />
D<br />
C E<br />
F<br />
A. Wird bei aktiver Tastensperre angezeigt.<br />
B. Wird bei aktiver VOX-Funktion (Babyüberwachungsfunktion)<br />
angezeigt.<br />
C. Wird beim Rufton angezeigt<br />
D. Sendeanzeige wird angezeigt, sobald ein<br />
Signal gesendet wird.<br />
E. Empfangsanzeige wird angezeigt, sobald<br />
ein Signal empfangen wird.<br />
F. <strong>Kanal</strong>nummeranzeige<br />
G. Batterieanzeige:<br />
„Batterie voll“-Symbol<br />
„Batterie halbvoll“-Symbol<br />
„Batterie leer“-Symbol“ bedeutet,<br />
dass die Batteriekapazität fast erschöpft<br />
ist. Sobald der akustische Signalton ertönt,<br />
müssen die Akkus umgehend geladen<br />
werden.<br />
9. Aufhängevorrichtung<br />
Sie können ein Band an der Aufhängevorrichtung<br />
(2 und 8) befestigen, um das Gerät z. B.<br />
bei der Überwachung Ihres Babys in die Nähe<br />
des Kinderbettchens zu hängen.<br />
10. Ein- und Ausschalten des Gerätes<br />
Um das Gerät einzuschalten, drücken und halten<br />
Sie die MENU-Taste (3) für 2 bis 3 Sekunden<br />
fest. Dieser Vorgang wird mit einem kurzen<br />
Ton aus dem Lautsprecher bestätigt. Nun befindet<br />
sich das Gerät im Empfangsmodus. Um<br />
das Gerät auszuschalten, wiederholen Sie den<br />
zuvor beschriebenen Schritt. Der Ausschaltvorgang<br />
wird mit einem Signalton bestätigt und<br />
alle in der Anzeige befindlichen Symbole verschwinden.<br />
11. <strong>Babyruf</strong>funktion<br />
(Sender beim Baby)<br />
Mit dieser Funktion wird das <strong>MBF</strong> <strong>8080</strong> auf <strong>Babyruf</strong>gerät<br />
eingestellt. Diese Funktion eignet<br />
sich besonders gut zur Überwachung von Kleinkindern<br />
oder älteren Menschen.<br />
Um die automatische Sprachsteuerung zu aktivieren,<br />
drücken Sie bei eingeschaltetem Gerät<br />
die MENU-Taste (3) und bei gedrückter MENU-<br />
Taste die VOX-Taste (12) solange, bis das Symbol<br />
VOX im Display erscheint. Diese Funktion<br />
kann wie zuvor beschrieben auch wieder deaktiviert<br />
werden. Bei deaktivierter VOX-Funktion<br />
erlischt das Symbol im Display.<br />
Wichtig: Die VOX-Funktion ermöglicht Ihnen<br />
zu senden, ohne dass die Sendetaste PTT (5)<br />
betätigt werden muss. Der Sender wird in diesem<br />
Modus durch Sprache oder Geräusche,<br />
die auf das interne oder externe Mikrofon (nicht<br />
im Lieferumfang enthalten) gegeben werden,<br />
aktiviert.<br />
Aus Sicherheitsgründen und zur optimalen Geräuschübertragung<br />
empfehlen wir Ihnen, einen<br />
Abstand von einem Meter zwischen dem sendenden<br />
Gerät und Baby nicht zu unterschreiten.<br />
12. Empfänger<br />
(Elterneinheit)<br />
Das Gerät, das sich bei den Eltern befindet,<br />
muss nur auf den gleichen <strong>Kanal</strong> und Subcode<br />
eingestellt werden, ohne die VOX-Funktion zu<br />
aktivieren. Zusätzlich müssen Sie nur noch die<br />
gewünschte Lautstärke einstellen.<br />
13. Lautstärkeeinstellung<br />
Um die Lautstärke zu verändern, drücken Sie<br />
die MENU-Taste (3) und bei gedrückter MENU-<br />
Taste die Abwärtstaste (13). Es gibt vier verschiedene<br />
Lautstärkestufen, die Sie bei der Einstellung<br />
im Display ablesen können.<br />
14. Senden und Empfangen<br />
(Walkie Talkie Funktion)<br />
Wichtigste Voraussetzung, dass Sie sich mit Ihrem<br />
Gesprächspartner verständigen können,<br />
ist, dass die Geräte immer auf die gleichen Kanäle<br />
eingestellt sind.<br />
Um eine Nachricht zu senden, drücken Sie<br />
die Sprechtaste (5) und sprechen mit normaler<br />
Stimmlage in einem Sprechabstand von ca.<br />
10 cm in das Mikrofon. Das Senden wird durch<br />
die Sendeanzeige (D) angezeigt. Während Sie<br />
senden, leuchtet die Hintergrundbeleuchtung<br />
des Displays auf. Wenn Sie Ihre Nachricht beendet<br />
haben, lassen Sie die Sprechtaste (5) wieder<br />
los, damit Sie Ihren Gesprächspartner empfangen<br />
können.<br />
15. Rufton<br />
Die Ruftontaste (4) dient zur Aussendung eines<br />
Ruftons, der von allen Gegenstationen gehört<br />
wird, die sich auf dem gleichen <strong>Kanal</strong> befinden.<br />
Nach einmaligem Drücken der Ruftontaste (4)<br />
wird der Rufton für ca. 3 Sekunden gesendet.<br />
16. Displaybeleuchtung<br />
Sowohl beim Einschalten des Gerätes als auch<br />
beim Betätigen der Tasten wird die Hintergrundbeleuchtung<br />
aktiviert. Die Hintergrundbeleuchtung<br />
schaltet sich automatisch nach ca. 4 Sekunden<br />
wieder ab.<br />
17. Tastensperre<br />
Mit der Tastensperre wird gewährleistet, dass<br />
Ihre Einstellungen nicht versehentlich geändert<br />
werden. Die Tastensperre wird aktiviert, indem<br />
Sie die MENU-Taste (3) drücken und bei gedrückter<br />
MENU-Taste die PTT-Taste (5) kurz<br />
drücken. Die aktive Tastensperre wird Ihnen im<br />
Display durch das Schlüssel-Symbol (A) angezeigt.<br />
Gesperrt werden die MENU- und die<br />
Auf/Abwärtstasten. Die Tastatursperre wird wie<br />
zuvor beschrieben wieder deaktiviert. Bei der<br />
deaktivierten Tastensperre erlischt das Schlüssel-Symbol<br />
(A) im Display.<br />
18. Tasten-Bestätigungston<br />
Mit dem Tasten-Bestätigungston wird jeder Tastendruck<br />
und jede Eingabe akustisch bestätigt.<br />
19. Rauschsperre deaktivieren<br />
Da das Gerät immer empfangsbereit ist, würde<br />
es, wenn kein Empfangssignal anliegt, sehr<br />
stark rauschen. Aus diesem Grunde ist das Gerät<br />
mit einer Rauschsperre ausgestattet, die den<br />
Lautsprecher in Empfangsbereitschaft stumm<br />
schaltet. Sobald ein genügend starkes Signal<br />
empfangen wird, wird die Stummschaltung aufgehoben,<br />
so dass das zu empfangende Signal<br />
hörbar wird. Um nun auch schwach zu empfangende<br />
Signale hören zu können, kann man die<br />
Rauschsperre auch deaktivieren. Dazu drücken<br />
Sie einmal auf die MENU-Taste (3) und bei gedrückter<br />
MENU-Taste drücken Sie auf die Monitortaste<br />
(4). Nun ist die Rauschsperre deaktiviert<br />
und im Display erscheint das Symbol RX.<br />
Die Rauschsperre aktivieren Sie dann wieder<br />
wie zuvor beschrieben.<br />
20. <strong>Kanal</strong>wahl<br />
Durch Betätigen der Aufwärts- bzw. Abwärtstaste<br />
(12 bzw. 13) können Sie den von Ihnen gewünschten<br />
<strong>Kanal</strong> eingeben. Es stehen Ihnen 8<br />
verschiedene Kanäle zur Auswahl.<br />
21. Automatischer <strong>Kanal</strong>suchlauf<br />
Die Geräte verfügen über eine automatische<br />
<strong>Kanal</strong>suchlauffunktion. Diese Funktion ist nützlich,<br />
wenn Sie erfahren möchten, ob sich noch<br />
andere Funkteilnehmer in Ihrem Übertragungsbereich<br />
befinden. Um diese Funktion zu aktivieren,<br />
drücken Sie bitte die Aufwärts- oder Abwärtstaste<br />
(12/13) ca. 3 Sekunden. Das Gerät<br />
sucht nun automatisch einen aktiven <strong>Kanal</strong>. Das<br />
wird Ihnen im Display dadurch angezeigt, dass<br />
die <strong>Kanal</strong>anzeige von <strong>Kanal</strong> 1 bis <strong>Kanal</strong> 8 durchgehend<br />
weiter läuft und zwar solange, bis das<br />
Gerät ein aktives Signal empfängt. Sobald ein<br />
aktives Signal empfangen wird, bleibt das Gerät<br />
auf diesem <strong>Kanal</strong> stehen.<br />
22. Wechseln des Subcodes<br />
Um einen anderen Subcode einzustellen, drücken<br />
Sie zweimal hintereinander auf die MENU-<br />
Taste (3), bis im Display der Begriff SC und<br />
danach kurz der momentan eingestellte Subcode<br />
eingeblendet wird. Nun können Sie mit der<br />
Aufwärts- oder Abwärtstaste (12/13) einen von<br />
38 Subcodes wählen und den gewählten <strong>Co</strong>de<br />
mit einem erneuten Druck auf der MENU-Taste<br />
bestätigen. Wenn Sie die Einstellung 00 wählen<br />
sollten, haben Sie die Subcode-Einstellung<br />
deaktiviert und somit keinen Schutz mehr vor<br />
Fremdsendern.<br />
23. Reichweite<br />
Aufgrund der physikalischen Ausbreitungsbedingungen<br />
von Funkwellen müssen Sie die<br />
Reichweite Ihres <strong>Babyruf</strong>gerätes in Ihrer Umge-<br />
-6- -7-
ung durch Ausprobieren ermitteln. Bei optimalen<br />
Bedingungen erzielen Sie eine Reichweite<br />
bis zu 3 km. Die tatsächliche Reichweite hängt<br />
aber im Wesentlichen von den örtlichen Verhältnissen<br />
ab. Da sind z. B. der Standort des<br />
Senders, die Art der Bebauung oder die atmosphärischen<br />
Bedingungen zu berücksichtigen.<br />
Zusätzlich kann die Reichweite eingeschränkt<br />
sein, wenn Sie den Empfänger in Ihren Händen<br />
halten und ihn verschließen.<br />
24. Frequenztabelle<br />
<strong>Kanal</strong>-<br />
Nummer<br />
Frequenz<br />
(MHz)<br />
<strong>Kanal</strong>-<br />
Nummer<br />
Frequenz<br />
(MHz)<br />
1 446,00625 2 446,01875<br />
3 446,03125 4 446,04375<br />
5 446,05625 6 446,06875<br />
7 446,08125 8 446,09375<br />
25. Subcode-Frequenztabelle<br />
<strong>Co</strong>de<br />
Frequenz<br />
(MHz)<br />
<strong>Co</strong>de<br />
Frequenz<br />
(MHz)<br />
1 67,0 2 71,9<br />
3 74,4 4 77,0<br />
5 79,7 6 82,5<br />
7 85,4 8 88,5<br />
9 91,5 10 94,8<br />
11 97,4 12 100,0<br />
13 103,5 14 107,2<br />
15 110,9 16 114,8<br />
17 118,8 18 123,0<br />
19 127,3 20 131,8<br />
21 136,5 22 141,3<br />
23 146,2 24 151,4<br />
25 156,7 26 162,2<br />
27 167,9 28 173,8<br />
29 179,9 30 186,2<br />
31 192,8 32 203,5<br />
33 210,7 34 218,1<br />
35 225,7 36 233,6<br />
37 241,8 38 250,3<br />
26. Pflege und Gewährleistung<br />
Trennen Sie das Gerät vor dem Reinigen gegebenenfalls<br />
von anderen Komponenten und verwenden<br />
Sie bitte keine aggressiven Reiniger.<br />
Das Gerät wurde einer sorgfältigen Endkontrolle<br />
unterzogen. Sollten Sie trotzdem Grund zu einer<br />
Beanstandung haben, senden Sie uns das Gerät<br />
mit der Kaufquittung ein. Wir bieten eine Gewährleistung<br />
von 3 Jahren ab Kaufdatum.<br />
Für Schäden, die durch falsche Handhabung,<br />
unsachgemäße Nutzung oder Verschleiß verursacht<br />
wurden, übernehmen wir keine Haftung.<br />
Technische Änderungen sind vorbehalten.<br />
27. Technische Daten<br />
Kanäle: 8<br />
Frequenzbereich:446,00625-446,09375 MHz<br />
Betriebsspannung: 3,6-4,5 Volt DC über<br />
3 Micro-Alkaline-Batterien oder 3 NiMH-Microakkus<br />
600 mAH (im Lieferumfang enthalten)<br />
Sendeleistung: < 500 mW<br />
Betriebszeit: max. 10 Std. (bei voll geladenen<br />
Akkus); max. 15 Std. (bei Batteriebetrieb 3 x Alkaline<br />
AAA)<br />
Reichweite: max. 3 km (unter optimalen Bedingungen)<br />
Aktuelle Produktinformationen finden Sie auf unserer<br />
Internet-Seite http://www.hartig-helling.de<br />
Operating instructions<br />
<strong>Co</strong>ntent<br />
1. <strong>Co</strong>ntents .................................................9<br />
2. Safety Notes ...........................................9<br />
3. Parts in Use ...........................................10<br />
4. Insertion of Batteries .............................. 11<br />
5. Charging Batteries ................................. 11<br />
6. Customer Information ............................ 11<br />
7. Notes on Disposal .................................. 11<br />
8. Description of Display ............................ 11<br />
9. Hang-up Fittings ....................................12<br />
10. Switching the Unit On and Off .................12<br />
11. Baby Call Function .................................12<br />
12. Receiver ...............................................12<br />
13. Volume Setting ......................................12<br />
14. Transmitting and Receiving .....................12<br />
15. Call Alert ...............................................12<br />
16. Illuminated Display .................................12<br />
17. Keypad Lock .........................................12<br />
18. Button <strong>Co</strong>nfirmation Tone .......................13<br />
19. Deactivating the Noise Limiter .................13<br />
20. Channel Selection ..................................13<br />
21. Automatic Channel Search .....................13<br />
22. Changing the Subcode ...........................13<br />
23. Range ...................................................13<br />
24. Frequency Table ....................................13<br />
25. Subcode Frequency Table ......................13<br />
26. Care and warranty .................................. 14<br />
27. Technical Data ....................................... 14<br />
<strong>MBF</strong> <strong>8080</strong> is a walkie-talkie in the PMR<br />
band with additional baby call monitor<br />
function. The transmitter and receiver<br />
work on 8 channels and 38 different<br />
subcodes. The monitors have a range<br />
of up to 3 km (depending on local conditions).<br />
This device works in the PMR<br />
band (Private Mobile Radio) and its use<br />
is therefore exempt from registration<br />
and charges. Each device is powered<br />
by three special Micro batteries (AAA<br />
NiMH) (included). The batteries can<br />
be charged via the integrated charging<br />
electronics in the units themselves using<br />
the mains adapter. They can however<br />
also be inserted into the charging unit<br />
supplied, this being connected up to the<br />
mains adapter, and then charged.<br />
1. <strong>Co</strong>ntents<br />
1 x Baby monitor (transmitter and receiver)<br />
1 x Charging unit<br />
1 x Mains adapter for <strong>MBF</strong> <strong>8080</strong><br />
6 x Special Micro batteries<br />
1 x User guide<br />
2. Safety Notes<br />
All warranty claims are null and void if any damage<br />
results from failure to follow this user guide.<br />
We accept no liability for any consequential<br />
damage that may result. We accept no liability<br />
for material or personal damages resulting<br />
from improper use or from failure to follow the<br />
safety notes. In such cases all warranty claims<br />
are null and void.<br />
• Unauthorised modifications and/or alterations<br />
to the unit are not permitted for legal and<br />
safety reasons (CE).<br />
• The units may not be exposed to extreme temperatures<br />
(> 50° C/< -5° C), strong vibrations,<br />
very humid conditions, or strong mechanical<br />
loads.<br />
• Do not allow unsupervised use of the unit. Neither<br />
the unit nor its packaging are a plaything<br />
– they should not be allowed to fall into the<br />
hands of children. When children are around,<br />
particular care should be exercised.<br />
• Never pour liquids over the unit. If in spite of<br />
this, liquid should get in side the unit, take out<br />
the batteries and seek specialist help.<br />
-8- -9-
• Operation of the unit in motor vehicles and<br />
aeroplanes is not permitted. Given the effects<br />
of the sensitive electronics used in motor vehicles/aeroplanes,<br />
there is always the possibility<br />
of damage. In addition, motor vehicles have a<br />
Faraday cage effect. This means that the RF<br />
radiation from the walkie-talkie is shielded,<br />
with the result that the range of the unit is very<br />
limited. Inside vehicles, on the other hand, exposure<br />
to RF radiation is increased.<br />
• Do not place the unit in the deployment area<br />
of an airbag. If the airbag deploys, the baby<br />
monitor could be catapulted off and cause<br />
injury.<br />
• Do not use the unit in the vicinity of other very<br />
sensitive equipment, such as is used for instance<br />
in hospitals. The baby monitor could<br />
also interfere with the operation of such<br />
equipment.<br />
• Anybody with a pacemaker should not use the<br />
unit, since there is a possibility that the RF radiation<br />
emitted can affect the pacemaker.<br />
• Keep the unit away from areas where there is<br />
an explosion hazard, such as service stations,<br />
chemicals storage areas etc. In such areas an<br />
explosion can be triggered by a spark escaping<br />
during battery changeover or by the energy<br />
in RF radiation.<br />
• Always switch off your walkie-talkie if there are<br />
warning signs prohibiting the use of cellular<br />
phones and radio equipment.<br />
• The unit may no longer be used if the aerial<br />
is damaged, otherwise contact between the<br />
aerial and the skin could cause slight burns.<br />
• Carelessness in traffic can lead to serious accidents.<br />
The unit may therefore only be used if<br />
the situation allows and your attention in traffic<br />
for example is not distracted.<br />
• If used commercially, the accident protection<br />
provisions of the federation of trade associations<br />
pertaining to electrical plant and systems<br />
must be followed.<br />
• No modifications may be made to the unit,<br />
in other words the aerial attached to the unit<br />
must be used. Neither may any measures for<br />
increasing transmitter performance be carried<br />
out. Unless there is compliance in this,<br />
the unit becomes unlicensed and is no longer<br />
authorised for general use. Moreover, technical<br />
changes can lead to serious damage of<br />
electronic components. Calibration settings<br />
within the unit may on no account be altered.<br />
Optimum calibration has already been carried<br />
out by the manufacturer.<br />
• The units are not protected against spray and<br />
are therefore only to be used outside if suitably<br />
protected.<br />
3. Parts in Use<br />
2<br />
3<br />
5<br />
4<br />
6<br />
7<br />
1<br />
12<br />
13<br />
11<br />
10<br />
1. Aerial<br />
2. Insertion eye for strap<br />
3. On/off button, menu, lock<br />
4. Call/monitor button<br />
5. PTT button<br />
6. Microphone<br />
7. Headset jack (<strong>Co</strong>nnection for external microphone/headphones)<br />
8. Insertion eye for strap<br />
9. Charging jack<br />
10. Loudspeaker<br />
11. Display<br />
12. Forward button/VOX button<br />
13. Back button/volume<br />
14<br />
15<br />
14. Charging unit<br />
15. Mains jack<br />
8<br />
9<br />
4. Insertion of Batteries<br />
1. Before first using the units, the batteries (included)<br />
must be inserted and charged.<br />
2. To do this, first position the units rear side up.<br />
Now press the lock buttons of the belt clip, at<br />
the same time pushing it to the side as shown<br />
in the illustration.<br />
3. Then open the battery compartments by pulling<br />
the covers downwards.<br />
4. Now insert your batteries, following the symbols.<br />
Make sure you get the right polarity<br />
(+/-).<br />
5. Reassembly is then the reverse of the above.<br />
5. Charging Batteries<br />
1. When charging, switch off the units.<br />
2. <strong>Co</strong>nnect the charging cable up to the PTT/<br />
CHG charging jack on the underside of the<br />
units or else insert the units into the charging<br />
unit.<br />
3. To use the charging unit you need to connect<br />
it up to the mains adaptor.<br />
4. Once you have done this, connect the mains<br />
adapter to your mains supply (230 V AC).<br />
5. The charging operation will be displayed to<br />
you via a flashing battery symbol on the display.<br />
For fully discharged batteries the charging<br />
time is about 8 to 10 hours.<br />
6. As soon as the battery symbols display “Battery<br />
full” and no longer flash, then the batteries<br />
are charged up. New batteries should be<br />
charged for 14 hours when they are charged<br />
for the first time.<br />
NB: Only replace faulty batteries with original<br />
ones. Normal AAA Micro batteries cannot be<br />
charged in these units.<br />
You can get additional original batteries<br />
using the enclosed order card.<br />
• Never mix traditional batteries with rechargeable<br />
ones.<br />
• When using non-chargeable batteries, never<br />
mix old and new together.<br />
• Never try to charge traditional batteries, as<br />
there is a risk of explosion.<br />
• Chargeable and non-chargeable batteries<br />
are not playthings – please keep them away<br />
from children.<br />
6. Customer Information<br />
Please note that all new NiCd and NiMH rechargeable<br />
batteries only reach their full capacity<br />
after approx. 4 to 6 charging operations.<br />
7. Notes on Disposal<br />
Old units, marked with the symbol as illustrated,<br />
may not be disposed of in the household<br />
rubbish.<br />
Used rechargeable and non-rechargeable batteries<br />
which are marked with one of the symbols<br />
illustrated may not be disposed of in the household<br />
rubbish.<br />
You must take them to a collection point for old<br />
units, old batteries or special waste (enquire at<br />
your local authority) or the dealer from whom<br />
you bought them. These agencies will ensure<br />
environmentally friendly disposal.<br />
8. Description of Display<br />
A<br />
G<br />
B<br />
D<br />
C E<br />
F<br />
-10- -11-
A. Displayed when keypad is locked.<br />
B. Displayed when VOX function (baby monitoring<br />
function) is on.<br />
C. Displayed during call alert<br />
D. The transmission indicator is displayed on<br />
signal transmission.<br />
E. The reception indicator is displayed on signal<br />
reception.<br />
F. Channel number display<br />
G. Battery display:<br />
“Battery full” symbol<br />
“Battery half full” symbol<br />
“Battery empty” symbol indicates<br />
that battery capacity is almost exhausted.<br />
The batteries must be charged immediately<br />
once the acoustic signal is heard.<br />
9. Hang-up Fittings<br />
You can attach a strap to the hang-up fittings<br />
(2 and 8), so that you can hang up the unit for<br />
monitoring your baby near the cot, for example.<br />
10. Switching the Unit On and Off<br />
To switch on the unit, press and hold down the<br />
MENU button (3) for 2 to 3 seconds. This operation<br />
is confirmed by a short signal emitted from<br />
the loudspeaker. Now the unit is in receiving<br />
mode. To switch off the unit repeat the above<br />
step. Switch-off is confirmed by an audible signal<br />
and all symbols on the display go out.<br />
11. Baby Call Function<br />
(Transmitter with the Baby)<br />
This function switches the <strong>MBF</strong> <strong>8080</strong> to a baby<br />
monitor. This function is particularly suited for<br />
monitoring small children or elderly people.<br />
To activate automatic voice control, with the<br />
unit on, press the MENU button (3) and holding<br />
the MENU button, press the VOX button<br />
(12) until the VOX symbol appears on the display.<br />
This function can be switched off again,<br />
as described above. When the VOX function is<br />
switched off, the symbol on the display goes<br />
out.<br />
NB: The VOX function allows you to transmit<br />
without the need to operate the PTT transmission<br />
button (5). In this mode, the transmitter is<br />
activated via speech or sounds directed at the<br />
internal or external microphone (not included).<br />
For reasons of safety and for optimum sound<br />
transmission, we recommend you always to<br />
maintain a distance of no less than one meter<br />
between the transmitting unit and the baby.<br />
12. Receiver<br />
(Parent Unit)<br />
The unit that the parents have only needs to be<br />
switched to the same channel and subcode; the<br />
Vox function does not need to be activated. In<br />
addition, all you need to do apart from that is set<br />
the volume to the desired level.<br />
13. Volume Setting<br />
To change the volume level, press the MENU<br />
button (3) and holding down the MENU button,<br />
press the back button (13). There are four different<br />
volume levels that you can read off the display<br />
as you are carrying out the setting.<br />
14. Transmitting and Receiving<br />
(Walkie-talkie function)<br />
The main requirement for you to be able to communicate<br />
with the person at the other end is that<br />
the units always be set to the same channels.<br />
To send a message, press the talk button (5)<br />
and speak into the microphone at normal volume<br />
at a distance of about 10 cm. Transmission<br />
is displayed via the transmission indicator (D).<br />
As you are transmitting, the display is backlit.<br />
Once you have finished your message, release<br />
the talk button (5) again so that you can receive<br />
from the person at the other end.<br />
15. Call Alert<br />
The call alert button (4) is for transmitting a call<br />
alert audible to all remote stations on the same<br />
channel. After pressing the call alert button (4)<br />
once, the call alert is transmitted for about 3<br />
seconds.<br />
16. Illuminated Display<br />
The backlit display is activated both as the unit<br />
is switched on and when buttons are pressed.<br />
The backlit display switches off automatically<br />
again after about 4 seconds.<br />
17. Keypad Lock<br />
The keypad lock ensures that your settings cannot<br />
be changed by mistake. The keypad lock<br />
is activated by pressing and holding down the<br />
MENU button (3), and pressing the PTT button<br />
(5) for a short time. If the keypad lock is on,<br />
this will be displayed to you via the key symbol<br />
(A) on the display. The MENU and forward/back<br />
buttons are locked. The keypad lock is switched<br />
off as previously described. Once the keypad<br />
lock is off the key symbol (A) goes out on the<br />
display.<br />
18. Button <strong>Co</strong>nfirmation Tone<br />
The button confirmation tone gives acoustic<br />
confirmation each time a button is pressed or<br />
an entry made.<br />
19. Deactivating the Noise Limiter<br />
Because the unit is always ready for transmitting,<br />
it would emit a loud noise at those times<br />
when no reception signal is present. For this<br />
reason the unit is equipped with a noise limiter<br />
that silences the loudspeaker in reception<br />
readiness mode. A soon as a signal of sufficient<br />
strength if received, the silencer is switched off<br />
thus making the signal received audible. Now,<br />
so as to be also able to hear weak signals, the<br />
noise limiter can also be switched off. To do<br />
this press the MENU button (3) once and hold it<br />
down and press the monitor button (4). Now the<br />
noise limiter is switched off and the RX symbol<br />
appears on the display. You then activate the<br />
noise limiter again as described previously.<br />
20. Channel Selection<br />
By using the forward or back button (12 or 13)<br />
you can enter your desired channel. You have 8<br />
different channel options.<br />
21. Automatic Channel Search<br />
The units have automatic channel search. This<br />
function is useful if you want to know whether<br />
there are other radio users in your transmission<br />
range. To activate this function, press the<br />
forward or back button (12/13) for about 3 seconds.<br />
The unit will now search automatically for<br />
an active channel. This will be displayed to you<br />
on the display in that the channel indicator will<br />
continuously run from channel 1 to channel 8<br />
until the unit receives an active signal. As soon<br />
as an active signal is received the unit stays on<br />
the channel in question.<br />
22. Changing the Subcode<br />
To set another subcode, press the MENU button<br />
(3) twice in succession, until the abbreviation<br />
SC appears on the display and shortly after this,<br />
the subcode just set is inserted. Now you can<br />
select one of 38 subcodes using the forward or<br />
back button (12/13) and confirm the selected<br />
code by pressing the MENU button again. Were<br />
you to select the setting 00 then you would deactivate<br />
the subcode setting and would have no<br />
more protection against interfering transmitters.<br />
23. Range<br />
Given the physical dissemination properties of<br />
RF waves, you must determine the range of your<br />
baby monitor by trying it out in your location.<br />
Under optimum conditions you will get a range<br />
of up to 3 km. The actual range does however<br />
generally depend on local conditions. Here the<br />
location of the transmitter, for example, the type<br />
of buildings and the atmospheric conditions all<br />
come into play. In addition the range can be limited<br />
if you hold the receiver in your hands and<br />
cover it up.<br />
24. Frequency Table<br />
Channel<br />
number<br />
Frequency<br />
(MHz)<br />
Channel<br />
number<br />
Frequency<br />
(MHz)<br />
1 446.00625 2 446.01875<br />
3 446.03125 4 446.04375<br />
5 446.05625 6 446.06875<br />
7 446.08125 8 446.09375<br />
25. Subcode Frequency Table<br />
<strong>Co</strong>de<br />
Frequency<br />
(MHz)<br />
<strong>Co</strong>de<br />
Frequency<br />
(MHz)<br />
1 67.0 2 71.9<br />
3 74.4 4 77.0<br />
5 79.7 6 82.5<br />
7 85.4 8 88.5<br />
9 91.5 10 94.8<br />
11 97.4 12 100.0<br />
13 103.5 14 107.2<br />
15 110.9 16 114.8<br />
-12- -13-
<strong>Co</strong>de<br />
Frequency<br />
(MHz)<br />
<strong>Co</strong>de<br />
Frequency<br />
(MHz)<br />
17 118.8 18 123.0<br />
19 127.3 20 131.8<br />
21 136.5 22 141.3<br />
23 146.2 24 151.4<br />
25 156.7 26 162.2<br />
27 167.9 28 173.8<br />
29 179.9 30 186.2<br />
31 192.8 32 203.5<br />
33 210.7 34 218.1<br />
35 225.7 36 233.6<br />
37 241.8 38 250.3<br />
26. Care and warranty<br />
Before cleaning the unit, disconnect it if necessary<br />
from other components; do not use aggressive<br />
cleaning agents.<br />
The unit has been carefully checked for defects.<br />
If nevertheless you do have cause for complaint,<br />
please send us the unit with your proof of purchase.<br />
We offer a 3 year warranty from date of<br />
purchase.<br />
We are not liable for damage arising from incorrect<br />
handling, improper use or wear and tear.<br />
We reserve the right to make technical modifications.<br />
27. Technical Data<br />
Channels: 8<br />
Frequency range: 446.00625-446.09375 MHz<br />
Operating voltage: 3.6-4.5 volts DC via 3 Micro<br />
alkaline batteries or 3 NiMH Micro batteries<br />
600 mAH (included)<br />
Transmitting power: < 500 mW<br />
Operating time: Maximum of 10 hours (with fully<br />
charged batteries); maximum of 15 hours (with<br />
non-chargeable batteries - 3 x alkaline AAA)<br />
Range: Maximum of 3km (under optimum conditions)<br />
You can find up-to-date product information on our<br />
website http://www.hartig-helling.de<br />
Mode d’emploi<br />
<strong>Co</strong>ntenu<br />
1. Fourniture .............................................15<br />
2. <strong>Co</strong>nsignes de sécurité ...........................15<br />
3. Eléments d’utilisation .............................16<br />
4. Insertion des accus ................................ 17<br />
5. Chargement des accus .......................... 17<br />
6. Informations pour le consommateur ........ 17<br />
7. <strong>Co</strong>nseils pour l’élimination ...................... 17<br />
8. Description de l’affichage .......................18<br />
9. Dispositif de suspension .........................18<br />
10. Mise en marche et arrêt de l’appareil .......18<br />
11. Fonction appel du bébé ..........................18<br />
12. Récepteur (unité parents) .......................18<br />
13. Réglage du volume ................................18<br />
14. Émettre et recevoir ................................19<br />
15. Tonalité d’appel .....................................19<br />
16. Rétroéclairage de l’affichage ..................19<br />
17. Verrouillage des touches ........................19<br />
18. Tonalité de confirmation des touches ......19<br />
19. Désactivat. de la suppression du souffle ..19<br />
20. Choix du canal .......................................19<br />
21. Balayage automatique des canaux ..........19<br />
22. Changement de code .............................19<br />
23. Portée ................................................. 20<br />
24. Table des fréquences ............................ 20<br />
25. Table des fréquences des codes ............ 20<br />
26. Entretien et garantie .............................. 20<br />
27. Caractéristiques techniques .................. 20<br />
7. Avvertenze per lo smaltimento ................24<br />
Le <strong>MBF</strong> <strong>8080</strong> est un émetteur-récepteur<br />
dans la bande PMR avec en supplément<br />
les fonctions d’un interphone bébé.<br />
L’émetteur et le récepteur fonctionnent<br />
sur huit canaux et 38 codes différents<br />
par canal. Les appareils ont une portée<br />
pouvant atteindre 3 km (selon les conditions<br />
locales). Cet appareil fonctionne<br />
dans la bande PMR (Private Mobile Radio)<br />
et il est donc libre d’utilisation, sans<br />
licence ni abonnement. Chacun des appareils<br />
fonctionne sur trois accus spéciaux<br />
« Micro » (NiMH AAA - fournis). Ces<br />
accus peuvent être rechargés à l’aide<br />
de l’adaptateur secteur grâce au circuit<br />
électronique de recharge intégré aux<br />
appareils. Ils peuvent également être<br />
insérés et chargés dans la base de recharge<br />
fournie, à brancher sur l’adaptateur<br />
secteur.<br />
1. Fourniture<br />
1 x interphone bébé (émetteur et récepteur)<br />
1 x base de recharge<br />
1 x adaptateur secteur pour le <strong>MBF</strong> <strong>8080</strong><br />
6 x accus spéciaux de forme « Micro » (AAA)<br />
1 x Mode d’emploi<br />
2. <strong>Co</strong>nsignes de sécurité<br />
En cas de dégâts causés par le non-respect du<br />
mode d’emploi la garantie est annulée. Nous<br />
déclinons toute responsabilité pour les dommages<br />
et leurs suites ainsi causés. Nous déclinons<br />
toute responsabilité pour des dommages matériels<br />
ou corporels causés par une utilisation<br />
inappropriée ou par le non-respect des consignes<br />
de sécurité. Dans ces cas, la garantie<br />
est annulée.<br />
• Pour des raisons liées à la sécurité et à l’homologation<br />
(CE) de l’appareil, la transformation<br />
ou la modification de l’appareil par l’utilisateur<br />
sont interdites.<br />
• L’appareil ne doit pas être exposé à des températures<br />
extrêmes (> 50° C/< -5° C) ni à de<br />
fortes vibrations, une humidité élevée ou de<br />
fortes sollicitations mécaniques.<br />
• L’appareil ne doit pas être utilisé sans surveillance.<br />
L’appareil et son emballage ne sont<br />
pas des jouets et ne doivent pas se trouver<br />
-14- -15-
entre les mains d’enfants. En présence d’enfants,<br />
soyez particulièrement prudent.<br />
• Ne renversez jamais de liquide sur l’appareil.<br />
Au cas ou du liquide aurait néanmoins pénétré<br />
dans l’appareil, retirez les piles et faites appel<br />
à un spécialiste.<br />
• L’utilisation de l’appareil dans des véhicules<br />
à moteur et dans des avions est interdit. En<br />
raison des matériels électroniques très sensibles<br />
utilisés dans les véhicules et les avions,<br />
le risque d’interférences n’est pas exclu. En<br />
outre, les véhicules font fonction de « cages<br />
de Faraday » : le rayonnement radio émis par<br />
l’appareil est arrêté par les parois métalliques,<br />
la portée de l’appareil est donc fortement réduite.<br />
D’autre part, l’interférence radio est<br />
plus forte à l’intérieur du véhicule.<br />
• Ne posez pas l’appareil à proximité d’un des<br />
logements pour airbags. En cas de déclenchement<br />
de l’airbag, l’interphone bébé pourrait<br />
se transformer en projectile et provoquer<br />
des blessures.<br />
• N’utilisez pas l’appareil à proximité d’appareils<br />
très sensibles tels qu’on les trouve par<br />
exemple dans les hôpitaux. L’interphone bébé<br />
pourrait perturber le fonctionnement de ces<br />
appareils.<br />
• L’utilisation de l’appareil est déconseillé aux<br />
personnes portant un stimulateur cardiaque<br />
(« pacemaker ») étant donné qu’une perturbation<br />
du stimulateur cardiaque par le rayonnement<br />
électromagnétique émis par l’appareil<br />
ne peut pas être exclu.<br />
• Gardez l’appareil à bonne distance de zones<br />
où il existe un danger d’explosion telles que<br />
les stations-service, les entrepôts de produits<br />
chimiques etc. Un remplacement de piles ou<br />
même l’énergie du rayonnement électromagnétique<br />
émis peuvent donner naissance à<br />
une étincelle susceptible de déclencher une<br />
explosion dans ces environnements.<br />
• Éteignez toujours votre appareil lorsque l’utilisation<br />
d’appareils radio ou de téléphones mobiles<br />
est interdite.<br />
• L’appareil ne doit plus être utilisé si son antenne<br />
est endommagée car le contact de<br />
l’antenne avec la peau pourrait causer des<br />
brûlures légères.<br />
• L’inattention dans la circulation routière peut<br />
être à l’origine d’accidents aux conséquences<br />
graves. Pour cette raison, il n’est permis<br />
d’utiliser l’appareil que lorsque la situation le<br />
permet et que cette utilisation ne risque pas,<br />
par exemple, de vous distraire au volant d’un<br />
véhicule.<br />
• Dans les installations à caractère professionnel,<br />
il y a lieu d’observer les prescriptions de<br />
l’organisme professionnel compétent en matière<br />
de prévention des accidents lors de l’utilisation<br />
d’installations électriques.<br />
• Toute modification de l’appareil est interdite,<br />
en particulier, seule l’antenne d’origine peut<br />
être utilisée. De même, aucune modification<br />
de l’appareil destinée à augmenter la puissance<br />
émise n’est autorisée. En cas de nonrespect<br />
de cette clause, l’appareil perd son<br />
homologation et son autorisation d’utilisation.<br />
De plus, des modifications techniques peuvent<br />
entraîner la destruction de certains composants<br />
électroniques. Les ajustages internes<br />
de l’appareil ne doivent en aucun cas être<br />
modifiés. Les ajustages ont été effectués de<br />
manière optimale en usine.<br />
• Les appareils ne sont pas protégés contre<br />
les projections d’eau et ne doivent donc être<br />
utilisés à l’extérieur que si leur protection est<br />
assurée.<br />
3. Eléments d’utilisation<br />
2<br />
3<br />
5<br />
4<br />
6<br />
7<br />
8<br />
1<br />
12<br />
13<br />
11<br />
10<br />
1. Antenne<br />
2. Oeillet de suspension pour ruban<br />
3. Touche marche/arrêt, menu, verrouillage<br />
4. Touche appel/surveillance<br />
5. Touche Émission PTT<br />
6. Microphone<br />
9<br />
7. Prise pour casque « headset » (connexion<br />
pour micro et casque externe)<br />
8. Oeillet de suspension pour ruban<br />
9. Prise de recharge<br />
10. Haut-parleur<br />
11. Affichage<br />
12. Touche vers le haut/activation VOX<br />
13. Touche vers le bas/volume<br />
14<br />
15<br />
14. Base de recharge<br />
15. Prise secteur<br />
4. Insertion des accus<br />
1. Avant la mise en service, vous devez insérer<br />
les accus (fournis) dans les appareils et les<br />
charger.<br />
2. Pour cela, retournez les appareils pour accéder<br />
à leur face arrière. Appuyez sur les boutons<br />
de verrouillage des pinces pour ceinture<br />
et repoussez-les comme le montre la figure.<br />
3. Ensuite, ouvrez les compartiments à piles en<br />
faisant glisser les couvercles vers le bas<br />
4. A présent, insérez vos piles rechargeables<br />
comme le montre le marquage. Veillez absolument<br />
à la polarité correcte (+/-) !<br />
5. Le remontage se fait ensuite dans l’ordre inverse.<br />
5. Chargement des accus<br />
1. Pour le chargement, éteignez les appareils.<br />
2. Branchez le câble de recharge dans la prise<br />
PTT/CHG au bas des appareils ou insérez les<br />
appareils dans la base de recharge.<br />
3. Si vous utilisez la base de recharge, branchez-la<br />
sur l’adaptateur secteur.<br />
4. Branchez l’adaptateur sur le secteur<br />
(230 V AC).<br />
5. Le processus du chargement vous est signalisé<br />
par le symbole de batterie clignotant. Pour<br />
des piles complètement vides, le temps de<br />
charge est de 8 à 10 heures.<br />
6. Lorsque les symboles de batterie indiquent «<br />
piles chargées » sans clignoter, les piles sont<br />
chargées. Pour un premier chargement de<br />
piles neuves, une durée de chargement de<br />
14 heures est recommandée.<br />
Attention ! Ne remplacez des accus défectueux<br />
que par des accus d’origine. Ces appareils ne<br />
permettent pas de recharger des piles rechargeables<br />
« Micro » AAA standard.<br />
Le bulletin de commande ci-joint<br />
vous permet de commander des piles<br />
rechargeables supplémentaires.<br />
• Ne mélangez jamais des piles conventionnelles<br />
avec des piles rechargeables.<br />
• Si vous utilisez des piles, ne mélangez jamais<br />
des piles usagées avec des piles neuves.<br />
• N’essayez jamais de recharger des piles conventionnelles.<br />
Danger d’explosion !<br />
• Les accus et les piles ne sont pas des jouets<br />
pour enfants, gardez-les hors de portée des<br />
petits enfants.<br />
6. Informations pour le consommateur<br />
Veuillez tenir compte du fait que les accumulateurs<br />
NiCd et NiMH n’atteignent leur pleine capacité<br />
qu’après 4 à 6 recharges.<br />
7. <strong>Co</strong>nseils pour l’élimination<br />
Les vieux appareils marqués du symbole représenté<br />
sur la figure ne doivent pas être éliminés<br />
avec les ordures ménagères.<br />
-16- -17-
Les piles et accumulateurs usés qui sont marqués<br />
de l’un des symboles représentés ne<br />
doivent pas être éliminés avec les ordures ménagères.<br />
Vous devez les apporter à un point de collecte<br />
pour vieux appareils, piles usées ou déchets<br />
spéciaux (renseignez-vous auprès de votre<br />
mairie) ou les rapporter chez le commerçant où<br />
vous les avez achetés. De cette manière, ils seront<br />
éliminés en respectant l’environnement.<br />
8. Description de l’affichage<br />
A<br />
G<br />
B<br />
D<br />
C E<br />
F<br />
A. S’affiche si les touches sont verrouillées.<br />
B. S’affiche lorsque la fonction VOX (fonction<br />
de surveillance du bébé) est activée.<br />
C. S’affiche en cas de tonalité d’appel<br />
D. L’indicateur d’émission, s’affiche lors de<br />
l’émission d’un signal.<br />
D. L’indicateur de réception, s’affiche lorsqu’un<br />
signal est reçu.<br />
F. Indicateur de numéro de canal<br />
G. Indicateur du niveau de charge des piles ou<br />
accus :<br />
Symbole « accu plein »<br />
Symbole « accu à moitié plein »<br />
Symbole « accu vide » signifie que<br />
les piles ou accus sont presque épuisés.<br />
Lorsque que le signal sonore retentit, les<br />
accus doivent être rechargés sans délai.<br />
9. Dispositif de suspension<br />
Vous pouvez fixer un ruban au dispositif de suspension<br />
(2 et 8) pour pouvoir, par exemple, suspendre<br />
l’appareil à proximité du lit du bébé pendant<br />
la surveillance.<br />
10. Mise en marche et arrêt de l’appareil<br />
Pour mettre l’appareil en marche, appuyez sur<br />
la touche MENU (3) et maintenez-la enfoncée<br />
pendant 2 à 3 secondes. L’allumage vous est<br />
confirmé par un bref signal sonore du hautparleur.<br />
À présent, l’appareil se trouve en mode<br />
réception. Pour éteindre l’appareil, répétez la<br />
manœuvre décrite ci-dessus. L’extinction de<br />
l’appareil est confirmée par un signal sonore<br />
de l’appareil et tous les symboles de l’affichage<br />
disparaissent.<br />
11. Fonction appel du bébé<br />
(émission côté bébé)<br />
Cette fonction met le <strong>MBF</strong> <strong>8080</strong> dans le mode<br />
appel du bébé. Elle convient particulièrement<br />
bien pour la surveillance des petits enfants ou<br />
des personnes âgées.<br />
Pour activer la commande automatique par la<br />
voix, mettez l’appareil en marche, puis appuyez<br />
sur la touche MENU (3) et, sans relâcher la<br />
touche MENU, appuyez sur la touche VOX (12)<br />
jusqu’à ce que le symbole VOX apparaisse sur<br />
l’affichage. Cette fonction peut à nouveau être<br />
désactivée de la même manière que ci-dessus.<br />
Lorsque la fonction VOX est désactivée, son<br />
symbole s’éteint sur l’affichage.<br />
Important ! La fonction VOX permet d’émettre<br />
sans actionner la touche d’émission PTT (5).<br />
Dans ce mode, l’émetteur est activé par la voix<br />
ou par des bruits perçus par le micro interne ou<br />
par un micro externe (non fourni).<br />
Pour des raisons de sécurité et pour une transmission<br />
optimale du son, nous vous recommandons<br />
de garder une distance d‘au moins un mètre<br />
entre l‘émetteur et le bébé.<br />
12. Récepteur (unité parents)<br />
L’appareil qui est utilisé par les parents doit<br />
simplement être réglé sur le même canal et le<br />
même code, mais sans activer la fonction VOX.<br />
Vous n’avez plus qu’à régler le volume souhaité.<br />
13. Réglage du volume<br />
Pour modifier le réglage du volume, appuyez sur<br />
la touche MENU (3) et, sans relâcher la touche<br />
MENU, appuyez sur la touche Vers le bas (13).<br />
Il y a quatre niveaux de volume différents que<br />
vous pouvez observer sur l’affichage pendant<br />
le réglage.<br />
14. Émettre et recevoir<br />
(Fonction talkie walkie)<br />
La condition primordiale pour pouvoir communiquer<br />
avec votre partenaire est que les deux appareils<br />
soient toujours réglés sur le même canal.<br />
Pour émettre un message vocal, appuyez sur<br />
la touche Émission (5) et parlez d’une voix normale<br />
à une distance d’environ 10 cm du micro.<br />
L’émission en cours est signalisée par le témoin<br />
d’émission (D). Pendant l’émission, le rétroéclairage<br />
de l’affichage s’illumine. Lorsque vous<br />
avez fini votre message, relâchez la touche<br />
Émission (5) pour pouvoir recevoir la réponse<br />
de votre interlocuteur.<br />
15. Tonalité d’appel<br />
La touche de tonalité d’appel (4) sert à émettre<br />
un signal acoustique d’appel qui sera entendu<br />
par toutes les stations qui sont réglées sur le<br />
même canal. Une brève pression sur la touche<br />
de la tonalité d’appel (4) produit l’émission de la<br />
tonalité d’appel pendant env. 3 secondes.<br />
16. Rétroéclairage de l’affichage<br />
Le rétroéclairage est activé lors de la mise en<br />
marche de l’appareil et chaque fois que l’on actionne<br />
les touches. Le rétroéclairage s’éteint<br />
automatiquement après env. 4 secondes.<br />
17. Verrouillage des touches<br />
Le verrouillage des touches évite que vos réglages<br />
ne soient modifiés par inadvertance. Vous<br />
activez le verrouillage des touches en appuyant<br />
sur la touche MENU (3) puis, sans relâcher la<br />
touche MENU, brièvement sur la touche PTT<br />
(5). L’activation du verrouillage des touches<br />
vous est signalisé sur l’affichage par le symbole<br />
de la clef (A). Les touches verrouillées sont la<br />
touche MENU et les touches Vers le haut/vers<br />
le bas. Pour désactiver le verrouillage des touches,<br />
procédez de la même manière que cidessus.<br />
Lorsque le verrouillage des touches<br />
est activé, le symbole de la clef (A) s’éteint sur<br />
l’affichage.<br />
18. Tonalité de confirmation des touches<br />
La tonalité de confirmation confirme de manière<br />
audible chaque appui sur une touche et chaque<br />
saisie.<br />
19. Désactivat. de la suppression du souffle<br />
Etant donné que l’appareil est toujours prêt à<br />
recevoir, il produirait un bruit de souffle très intense<br />
tant qu’aucun signal n’est reçu. C’est<br />
pourquoi l’appareil est équipé d’un système<br />
de suppression du souffle qui coupe le hautparleur<br />
lorsque l’appareil est prêt à recevoir.<br />
Dès qu’un signal suffisamment fort est reçu, le<br />
haut-parleur est réactivé de sorte que le signal à<br />
recevoir devient audible. Cependant, si on veut<br />
entendre des signaux très faibles à la réception,<br />
on peut désactiver la suppression du souffle.<br />
Pour cela, appuyez une seule fois sur la touche<br />
MENU (3) et, sans relâcher la touche MENU,<br />
appuyez sur la touche Monitor (4). Maintenant,<br />
la suppression du souffle est désactivée et le<br />
symbole RX apparaît sur l’affichage. Pour réactiver<br />
la suppression du souffle, procédez encore<br />
une fois de la manière décrite ci-dessus.<br />
20. Choix du canal<br />
Vous pouvez sélectionner le canal souhaité en<br />
actionnant la touche Vers le haut (12) ou la touche<br />
Vers le bas (13). Vous disposez d’un choix<br />
de 8 canaux différents.<br />
21. Balayage automatique des canaux<br />
Les appareils sont dotés d’une fonction de balayage<br />
automatique des canaux. Cette fonction<br />
est utile si vous voulez savoir s’il y a d’autres utilisateurs<br />
de systèmes de communication radio<br />
dans votre zone de réception. Pour activer cette<br />
fonction, appuyez sur la touche Vers le haut ou<br />
sur la touche Vers le bas (12/13) pendant environ<br />
3 secondes. Maintenant, l’appareil recherche<br />
automatiquement un canal actif. L’affichage<br />
rend compte de cette activité en faisant défiler<br />
en continu les numéros de canaux de 1 à 8, jusqu’à<br />
ce que l’appareil reçoive un signal actif.<br />
Dès qu’un signal actif est reçu, l’appareil s’immobilise<br />
sur le canal concerné.<br />
22. Changement de code<br />
Pour choisir un autre code, appuyez deux fois<br />
sur la touche MENU (3) jusqu’à ce que l’affichage<br />
présente le symbole SC suivi brièvement<br />
du numéro du code utilisé. A présent, vous pouvez<br />
sélectionner l’un des 38 codes disponibles à<br />
l’aide de la touche Vers le Haut ou de la touche<br />
Vers le bas (12/13) et confirmer votre choix en<br />
appuyant à nouveau brièvement sur la touche<br />
-18- -19-
MENU. Si vous choisissez le numéro de code<br />
00, vous désactivez le système de codes et<br />
vous n’êtes donc plus protégé contre les interférences<br />
par des émetteurs tiers.<br />
23. Portée<br />
En raison des facteurs physiques susceptibles<br />
d’influencer la propagation des ondes électromagnétiques,<br />
il vous incombe de déterminer<br />
vous-même la portée de votre interphone bébé<br />
par des essais dans votre environnement. Dans<br />
les conditions optimales, vous pouvez atteindre<br />
une portée de 3 km. Cependant, la portée<br />
effective dépendra essentiellement des conditions<br />
locales. A cet effet, il convient de tenir<br />
compte de l’implantation de l’émetteur, des bâtiments<br />
environnants ainsi que des conditions<br />
atmosphériques. En outre, vous réduisez la<br />
portée si vous maintenez le récepteur enfermé<br />
dans votre main.<br />
24. Table des fréquences<br />
Numéro<br />
de canal<br />
Fréquence<br />
(MHz)<br />
Numéro<br />
de canal<br />
Fréquence<br />
(MHz)<br />
1 446,00625 2 446,01875<br />
3 446,03125 4 446,04375<br />
5 446,05625 6 446,06875<br />
7 446,08125 8 446,09375<br />
25. Table des fréquences des codes<br />
<strong>Co</strong>de<br />
Fréquence<br />
(MHz)<br />
<strong>Co</strong>de<br />
Fréquence<br />
(MHz)<br />
1 67,0 2 71,9<br />
3 74,4 4 77,0<br />
5 79,7 6 82,5<br />
7 85,4 8 88,5<br />
9 91,5 10 94,8<br />
11 97,4 12 100,0<br />
13 103,5 14 107,2<br />
15 110,9 16 114,8<br />
17 118,8 18 123,0<br />
19 127,3 20 131,8<br />
21 136,5 22 141,3<br />
<strong>Co</strong>de<br />
Fréquence<br />
(MHz)<br />
<strong>Co</strong>de<br />
Fréquence<br />
(MHz)<br />
23 146,2 24 151,4<br />
25 156,7 26 162,2<br />
27 167,9 28 173,8<br />
29 179,9 30 186,2<br />
31 192,8 32 203,5<br />
33 210,7 34 218,1<br />
35 225,7 36 233,6<br />
37 241,8 38 250,3<br />
26. Entretien et garantie<br />
Avant de nettoyer l’appareil, séparez-le des<br />
autres composants éventuels et n’utilisez pas<br />
de détergent agressif.<br />
L’appareil a été soumis à un contrôle rigoureux<br />
en fin de fabrication. Si vous avez néanmoins<br />
un motif de réclamation, renvoyez-nous l’appareil<br />
accompagné de la quittance d’achat. Nous<br />
offrons une garantie de 3 ans compter de la<br />
date d’achat.<br />
Nous n’acceptons aucune responsabilité pour<br />
des dégâts occasionnés par des erreurs de maniement,<br />
une utilisation impropre de l’appareil<br />
ou pour son usure.<br />
Nous nous réservons le droit de procéder à des<br />
modifications techniques.<br />
27. Caractéristiques techniques<br />
Canaux : 8<br />
Gamme de fréquences :<br />
446,00625-446,09375 MHz<br />
Tension d’alimentation : 3,6-4,5 volts DC par<br />
3 piles alcalines « Micro » ou 3 accumulateurs<br />
NiMH type « Micro » AAA de 600 mAH (fournis)<br />
Puissance rayonnée : < 500 mW<br />
Autonomie : max. 10 heures (pour des accumulateurs<br />
complètement chargés), max. 15 heures<br />
(pour des piles alcalines neuves, type AAA)<br />
Portée : max. 3 km (dans les conditions optimales)<br />
Vous pouvez trouver les informations produits<br />
les plus récentes sur notre site Internet<br />
http://www.hartig-helling.de<br />
Istruzioni per l’uso<br />
<strong>Co</strong>ntenuto<br />
1. <strong>Co</strong>nfezione ............................................21<br />
2. Istruzioni per la sicurezza ........................21<br />
3. <strong>Co</strong>mandi .............................................. 22<br />
4. Inserimento delle pile ............................ 23<br />
5. Ricarica delle pile ................................. 23<br />
6. Avvertenze per gli utenti .........................24<br />
7. Avvertenze per lo smaltimento ................24<br />
8. Descrizione del display ...........................24<br />
9. Gancio ..................................................24<br />
10. Accensione e spegnimento ....................24<br />
11. Funzione Baby phone .............................24<br />
12. Ricevitore ............................................. 25<br />
13. Impostazione del volume ....................... 25<br />
14. Trasmissione e ricezione ....................... 25<br />
15. Segnale acustico di linea libera .............. 25<br />
16. Illuminazione del display ........................ 25<br />
17. Blocco dei tasti ..................................... 25<br />
18. Tasto suono di conferma ....................... 25<br />
19. Disattivazione del dispositivo ................. 25<br />
20. Scelta del canale .................................. 25<br />
21. Ricerca automatica dei canali ................ 25<br />
22. Cambio di sottocodice .......................... 26<br />
23. Portata ................................................ 26<br />
24. Tabella della frequenza .......................... 26<br />
25. Sottocodice – Tabella della frequenza .... 26<br />
26. Manutenzione e garanzia ....................... 26<br />
27. Dati tecnici .......................................... 26<br />
L‘apparecchio <strong>MBF</strong> <strong>8080</strong> è un apparecchio<br />
radiotrasmittente che funziona in<br />
banda PMR (Private Mobile Radio) con<br />
le funzioni supplementari di un Baby<br />
phone. Il trasmettitore e il ricevitore lavorano<br />
su 8 canali e 38 sottocodici diversi.<br />
Gli apparecchi hanno una portata<br />
massima di 3 km (in base alle condizioni<br />
ambientali). Questo apparecchio funziona<br />
in banda PMR (Private Mobile Radio)<br />
e senza alcun obbligo di denuncia<br />
ed è esente dal pagamento di imposte.<br />
Ogni volta gli apparecchi sono messi in<br />
funzione da tre speciali pile mini stilo<br />
ricaricabili (AAA NiMH) (comprese nella<br />
confezione). Le pile possono essere<br />
ricaricate attraverso i dispositivi elettronici<br />
caricabatterie integrati presenti<br />
negli apparecchi tramite l‘alimentatore.<br />
Ma si possono anche inserire e caricare<br />
nel supporto caricabatterie compreso<br />
nella confezione, che è collegato all‘alimentatore.<br />
1. <strong>Co</strong>nfezione<br />
1 x Baby phone (trasmettitore e ricevitore)<br />
1 x supporto caricabatterie<br />
1 x alimentatore per l‘apparecchio <strong>MBF</strong> <strong>8080</strong><br />
6 x speciali pile mini stilo ricaricabili<br />
1 x manuale di istruzioni per l‘uso<br />
2. Istruzioni per la sicurezza<br />
In caso di danni dovuti all‘inosservanza delle<br />
istruzioni viene meno il diritto alla garanzia!<br />
Non ci assumiamo alcuna responsabilità per i<br />
danni indiretti che ne dovessero derivare! Non<br />
ci assumiamo alcuna responsabilità per danni<br />
a cose o a persone dovuti a un uso improprio o<br />
all‘inosservanza delle istruzioni per la sicurezza.<br />
In questi casi viene meno qualsiasi diritto<br />
alla garanzia.<br />
• Per ragioni di sicurezza e di omologazione<br />
(EC) non è consentita alcuna modifica arbitraria<br />
e/o trasformazione dell‘apparecchio.<br />
• L‘apparecchio non deve essere esposto a<br />
temperature estreme (> 50° C/< -5° C), a forti<br />
vibrazioni, ad una forte umidità o ad intense<br />
sollecitazioni meccaniche.<br />
• L‘apparecchio non deve essere utilizzato senza<br />
sorveglianza. L‘apparecchio e l‘imballaggio<br />
-20- -21-
non sono giocattoli e non vanno lasciati in mano<br />
ai bambini. Quando i bambini sono presenti,<br />
occorre essere particolarmente prudenti.<br />
• Non devono essere versati liquidi sull‘apparecchio.<br />
Se tuttavia dei liquidi dovessero raggiungere<br />
l‘interno dell‘apparecchio, si devono<br />
togliere le batterie e ci si deve rivolgere ad<br />
un tecnico.<br />
• L‘uso di questo apparecchio non è consentito<br />
in automobile ed in aereo. Dato che sui<br />
veicoli e sugli aerei vengono impiegati dispositivi<br />
elettronici molto sensibili, non sono da<br />
escludere eventuali interferenze. Inoltre i veicoli<br />
agiscono come una „Gabbia di Faraday“:<br />
la radiazione radio emessa dall‘apparecchio<br />
radiotrasmittente viene schermata, in questo<br />
modo la portata dell‘apparecchio è molto ridotta.<br />
Invece all‘interno del veicolo la carica è<br />
incrementata dalla radiazione radio.<br />
• L‘apparecchio non deve essere posto nella<br />
zona di apertura di un Airbag. Quando l‘Airbag<br />
si dovesse aprire, il Baby phone potrebbe<br />
essere catapultato via e potrebbe ferire<br />
qualcuno.<br />
• L‘apparecchio non deve essere utilizzato in<br />
prossimità di apparecchiature molto sensibili,<br />
quali quelle impiegate negli ospedali. Il Baby<br />
phone potrebbe disturbarne il funzionamento.<br />
• Le persone a cui è stato installato un pacemaker,<br />
non dovrebbero utilizzare questo apparecchio,<br />
in quanto non si può escludere che<br />
l‘emissione radio interferisca col funzionamento<br />
del pace maker.<br />
• L‘apparecchio deve essere tenuto lontano da<br />
zone a rischio d‘esplosione, quali stazioni di<br />
servizio, depositi di sostanze chimiche, ecc.<br />
In queste zone una scintilla, che si forma p.es.<br />
quando si cambia una batteria o l‘energia radio<br />
irradiata può provocare un‘esplosione.<br />
• Questo apparecchio radiotrasmittente deve<br />
essere sempre spento, quando le relative<br />
indicazioni di pericolo non consentono l‘impiego<br />
di radiotelefoni e di apparecchi radiotrasmittenti.<br />
• Quando l‘antenna è danneggiata, l‘apparecchio<br />
non può più essere utilizzato, altrimenti<br />
se l‘antenna entrasse in contatto con la pelle,<br />
potrebbe causare lievi bruciature<br />
• Una distrazione in mezzo al traffico può causare<br />
gravi incidenti. Perciò questo apparecchio<br />
deve essere impiegato soltanto quando<br />
le condizioni lo permettono e non quando per<br />
esempio si corre il rischio di essere distratti in<br />
mezzo al traffico.<br />
• Negli impianti professionali si devono osservare<br />
le disposizioni per la prevenzione degli<br />
infortuni delle associazioni professionali delle<br />
categorie produttive per quel che riguarda gli<br />
impianti elettrici e i mezzi di produzione.<br />
• Non si devono apportare modifiche strutturali<br />
all‘apparecchio, quindi si deve utilizzare l‘antenna<br />
applicata all‘apparecchio. Non si devono<br />
neanche prendere provvedimenti per aumentare<br />
la potenza di trasmissione. Altrimenti<br />
l‘apparecchio perde la sua omologazione e<br />
l‘omologazione del tipo. Inoltre le modifiche<br />
tecniche possono provocare la distruzione di<br />
componenti elettronici. Le posizioni di bilanciamento<br />
all‘interno dell‘apparecchio non devono<br />
mai essere modificate. Il bilanciamento è<br />
già stato eseguito in modo ottimale dalla casa<br />
produttrice.<br />
• Gli apparecchi non sono protetti contro gli<br />
spruzzi d‘acqua e quindi all‘aperto si deve<br />
provvedere ad un‘adeguata protezione degli<br />
stessi.<br />
3. <strong>Co</strong>mandi<br />
2<br />
3<br />
5<br />
4<br />
6<br />
7<br />
8<br />
1<br />
12<br />
13<br />
11<br />
10<br />
1. Antenna<br />
2. Gancio per appendere l‘apparecchio con<br />
un nastro<br />
3. Tasto Accensione/Spegnimento, menu,<br />
blocco<br />
4. Tasto chiamata/tasto monitor<br />
5. Pulsante-microfono PTT (Push-To-Talk)<br />
6. Microfono<br />
9<br />
7. Presa per auricolari (collegamento a microfono<br />
esterno / collegamento a auricolari)<br />
8. Gancio per appendere l‘apparecchio con<br />
un nastro<br />
9. Presa per ricarica<br />
10. Altoparlante<br />
11. Display<br />
12. Tasto Up/tasto di attivazione VOX<br />
13. Tasto Down/volume<br />
14<br />
15<br />
14. Supporto caricabatterie<br />
15. Presa<br />
4. Inserimento delle pile<br />
1. Prima della messa in funzione per prima cosa<br />
le pile (comprese nella confezione) devono<br />
essere inserite negli apparecchi e devono essere<br />
caricate.<br />
2. Inoltre si devono posizionare gli apparecchi in<br />
modo tale da trovarsi di fronte alla loro parte<br />
posteriore. A questo punto si devono premere<br />
i pulsanti di bloccaggio delle clip per la cintura<br />
e al tempo stesso si devono far scivolare<br />
lateralmente le clip stesse, come illustrato<br />
nella figura.<br />
3. Quindi si devono aprire i vani portabatterie, tirando<br />
il coperchio verso il basso.<br />
4. A questo punto si devono inserire le pile come<br />
è indicato sulla marcatura. Occorre fare attenzione<br />
alla corretta polarizzazione (+/-)!<br />
5. A questo punto il montaggio avviene nella sequenza<br />
contraria.<br />
5. Ricarica delle pile<br />
1. Per ricaricare le pile gli apparecchi devono<br />
essere spenti.<br />
2. Il cavo per la ricarica deve essere collegato<br />
alla presa per la ricarica PTT/CHG che si trova<br />
nella parte inferiore degli apparecchi oppure<br />
gli apparecchi devono essere inseriti nel supporto<br />
caricabatterie.<br />
3. Se si utilizza il supporto caricabatterie, questo<br />
deve essere collegato all‘alimentatore.<br />
4. A questo punto l‘alimentatore deve essere<br />
collegato alla rete elettrica (230 V CA).<br />
5. Il processo di ricarica è indicato sul display<br />
dai simboli lampeggianti delle pile. Il periodo<br />
di ricarica per pile completamente scariche<br />
va dalle 8 alle 10 ore.<br />
6. Non appena compare sul display l‘indicazione<br />
non lampeggiante „pile cariche“, le pile sono<br />
cariche. Quando le pile nuove vengono ricaricate<br />
per la prima volta, il processo di ricarica<br />
dovrebbe durare 14 ore.<br />
Attenzione! Sostituire le pile difettose soltanto<br />
con pile originali. In questi apparecchi non si<br />
possono caricare normali pile mini stilo AAA.<br />
Tramite la cartolina allegata si possono<br />
ordinare pile originali supplementari.<br />
• Le batterie convenzionali non devono mai essere<br />
mescolate alle pile!<br />
• Quando si usano le batterie, non si devono<br />
mai mescolare quelle vecchie con quelle<br />
nuove!<br />
• Non si deve mai provare a caricare le batterie<br />
convenzionali. Rischio si esplosione!<br />
-22- -23-
• Le pile e le batterie non sono giocattoli e devono<br />
essere tenute lontano dalla portata dei<br />
bambini.<br />
6. Avvertenze per gli utenti<br />
Si tenga conto del fatto che tutte le nuove pile<br />
ricaricabili NiCd e NiMH raggiungono la loro<br />
completa capacità soltanto dopo 4-6 ricariche.<br />
7. Avvertenze per lo smaltimento<br />
Le apparecchiature usate, contrassegnate dal<br />
simbolo illustrato, non devono essere smaltite<br />
tra i rifiuti domestici.<br />
Le batterie usate e le pile ricaricabili contrassegnate<br />
da uno dei simboli illustrati non devono<br />
essere smaltite tra i rifiuti domestici.<br />
Devono essere portate presso un centro di raccolta<br />
per apparecchiature usate, batterie usate<br />
o rifiuti speciali (informarsi presso il proprio<br />
comune) oppure presso il rivenditore dal quale<br />
sono state acquistate. Presso questi centri è<br />
possibile lo smaltimento ecologico.<br />
8. Descrizione del display<br />
A<br />
G<br />
B<br />
D<br />
C E<br />
F<br />
A. Viene visualizzato quando il blocco dei tasti<br />
è attivo.<br />
B. Viene visualizzato quando la funzione VOX<br />
(funzione di controllo del bambino) è attiva.<br />
C. Viene visualizzato quando si ha un segnale<br />
acustico di linea libera.<br />
D. L‘indicatore di trasmissione viene visualizzato<br />
non appena viene trasmesso un segnale.<br />
E. L‘indicatore di ricezione viene visualizzato<br />
non appena viene ricevuto un segnale.<br />
F. Indicazione del numero del canale<br />
G. Indicazione della batteria:<br />
simbolo „batteria carica“<br />
simbolo „batteria mezza carica“<br />
simbolo „batteria scarica“ che indica<br />
che la capacità della batteria è quasi<br />
esaurita. Non appena si sente il segnale<br />
acustico, si devono caricare immediatamente<br />
le pile.<br />
9. Gancio<br />
Per appendere l‘apparecchio di controllo per<br />
esempio vicino al lettino del bambino, si può fissare<br />
un nastro al gancio (2 e 8).<br />
10. Accensione e spegnimento<br />
Per accendere l‘apparecchio, si deve premere il<br />
tasto MENU (3) e mantenerlo in posizione per 2<br />
- 3 secondi. Questa procedura è confermata da<br />
un breve suono provenient dall‘altoparlante. Ora<br />
l‘apparecchio è in modalità ricezione. Per spegnere<br />
l‘apparecchio si deve ripetere la procedura<br />
descritta sopra. La procedura di spegnimento<br />
è confermata da un segnale e tutti i simboli sul<br />
display spariscono.<br />
11. Funzione Baby phone<br />
(trasmettitore vicino al bambino)<br />
<strong>Co</strong>n questa funzione l‘apparecchio <strong>MBF</strong> <strong>8080</strong> è<br />
impostato come Baby phone. Questa funzione<br />
si presta particolarmente al controllo dei bambini<br />
piccoli o delle persone anziane.<br />
Per attivare il comando vocale quando l‘apparecchio<br />
è acceso, si deve premere il tasto MENU<br />
(3) e, mantenendo premuto il tasto MENU, si<br />
deve premere il tasto VOX (12) finchè il simbolo<br />
VOX appare sul display. <strong>Co</strong>me descritto precedentemente,<br />
questa funzione può anche essere<br />
nuovamente disattivata. Quando la funzione<br />
VOX è disattivata, il simbolo sparisce dal display.<br />
Nota bene: la funzione VOX rende possibile<br />
la trasmissione senza dover attivare il tasto di<br />
trasmissione PTT (5). In questa modalità il trasmettitore<br />
è attivato dalla voce o dai rumori che<br />
sono inviati al microfono interno o esterno (non<br />
compreso nella confezione).<br />
Per motivi di sicurezza e per una trasmissione<br />
ottimale dei rumori si consiglia di mantenere<br />
una distanza di almeno un metro tra il trasmettitore<br />
ed il bambino.<br />
12. Ricevitore<br />
(apparecchio usato dai genitori)<br />
L‘apparecchio usato dai genitori deve essere<br />
sintonizzato sullo stesso canale e sottocodice,<br />
senza attivare la funzione VOX. Inoltre si deve<br />
anche impostare il volume a proprio piacimento.<br />
13. Impostazione del volume<br />
Per modificare il volume, si deve premere il tasto<br />
MENU (3) e, mantenendo premuto il tasto<br />
MENU, si deve premere il tasto Down (13). Si<br />
può scegliere tra quattro diverse intensità di volume,<br />
che possono essere rilevate sul display<br />
durante l‘impostazione.<br />
14. Trasmissione e ricezione<br />
(Funzione Walky-Talky)<br />
La condizione fondamentale perché si possa<br />
comunicare con il proprio interlocutore è che<br />
gli apparecchi siano sintonizzati sullo stesso<br />
canale.<br />
Per trasmettere un messaggio si deve premere il<br />
pulsante microfono (5) e parlare con un normale<br />
registro della voce rivolti verso il microfono mantenendosi<br />
ad una distanza di ca.10 cm dallo<br />
stesso. La trasmissione viene segnalata dall‘indicatore<br />
di trasmissione (D). Durante la trasmissione<br />
si attiva la retroilluminazione del display.<br />
Quando la comunicazione è finita, si deve rilasciare<br />
nuovamente il pulsante microfono (5), in<br />
modo da poter sentire il proprio interlocutore.<br />
15. Segnale acustico di linea libera<br />
Il tasto del segnale acustico di linea libera (4)<br />
serve a trasmettere un segnale acustico di linea<br />
libera che viene raccolto da tutte le stazioni<br />
remote sintonizzate sullo stesso canale. Premendo<br />
una volta il tasto del segnale acustico<br />
di linea libera (4), questo viene trasmesso per<br />
ca. 3 secondi..<br />
16. Illuminazione del display<br />
La retroilluminazione si attiva sia accendendo<br />
l‘apparecchio che premendo i tasti. La retroilluminazione<br />
si disattiva di nuovo automaticamente<br />
dopo ca. 4 secondi.<br />
17. Blocco dei tasti<br />
Grazie al blocco dei tasti ci si assicura che le<br />
impostazioni non vengano inavvertitamente<br />
modificate. Il blocco dei tasti si attiva premendo<br />
il tasto MENU (3) e premendo brevemente<br />
il tasto PTT (5) sempre mantenendo premuto<br />
il tasto MENU. Il blocco dei tasti attivo è indicato<br />
sul display dal simbolo-chiave (A). I tasti<br />
MENU e i tasti Up e Down vengono bloccati. Il<br />
blocco dei tasti viene nuovamente disattivato,<br />
come descritto sopra. Quando il blocco dei tasti<br />
viene disattivato sparisce dal display il simbolo-chiave<br />
(A).<br />
18. Tasto suono di conferma<br />
<strong>Co</strong>n il tasto suono di conferma si confermano<br />
con un suono tutte le battute (dei tasti) e tutti<br />
gli input.<br />
19. Disattivazione del dispositivo<br />
di eliminazione del rumore<br />
Poiché l‘apparecchio è sempre pronto a ricevere,<br />
in assenza di un segnale di ricezione esso<br />
produrrebbe rumori forti. Per questa ragione<br />
l‘apparecchio è dotato di un dispositivo di eliminazione<br />
del rumore, che esegue il silenziamento<br />
dell‘altoparlante in standby. Non appena viene<br />
ricevuto un segnale abbastanza forte, viene tolto<br />
il circuito di muting in modo tale da poter sentire<br />
il segnale in arrivo.<br />
Per poter sentire anche i segnali deboli in arrivo,<br />
si può anche disattivare il dispositivo di eliminazione<br />
del rumore. A questo scopo si deve<br />
premere soltanto una volta il tasto MENU (3) e,<br />
tenendo sempre premuto il tasto MENU, si deve<br />
premere il tasto Monitor (4). Il dispositivo di eliminazione<br />
del rumore è disattivato e sul display<br />
appare il simbolo RX. Il dispositivo di eliminazione<br />
del rumore può essere poi attivato nuovamente<br />
come è descritto sopra.<br />
20. Scelta del canale<br />
Premendo il tasto Up e il tasto Down (12 e 13)<br />
si può selezionare il canale desiderato. Si può<br />
scegliere tra 8 diversi canali.<br />
21. Ricerca automatica dei canali<br />
Gli apparecchi dispongono di una funzione di<br />
ricerca automatica dei canali. Questa funzione<br />
è utile per scoprire se nel proprio campo di<br />
trasmissione si trovano anche altri utenti del<br />
-24- -25-
sistema radio. Per attivare questa funzione si<br />
deve premere il tasto Up o il tasto Down (12/13)<br />
per ca. 3 secondi. A questo punto l‘apparecchio<br />
ricerca automaticamente un canale attivo<br />
e questa ricerca è segnalata sul display dal fatto<br />
che l‘indicazione dei canali che va dall‘ 1 all‘<br />
8 continua a scorrere ininterrottamente finchè<br />
l‘apparecchio non riceve un segnale attivo. Non<br />
appena riceve un segnale attivo, l‘apparecchio<br />
si ferma su questo canale.<br />
22. Cambio di sottocodice<br />
Per impostare un altro sottocodice, si deve premere<br />
due volte di seguito il tasto MENU (3), finchè<br />
non si inserisce gradualmente sul display la<br />
sigla SC seguita dal sottocodice momentaneamente<br />
impostato. A questo punto premendo il<br />
Up o il tasto Down (12/13) si può scegliere uno<br />
dei 38 sottocodici e confermare il codice selezionato<br />
premendo nuovamente il tasto MENU.<br />
Scegliendo l‘impostazione 00, si disattiva l‘impostazione<br />
del sottocodice e quindi non si ha<br />
più alcuna protezione da trasmettitori esterni.<br />
23. Portata<br />
Si deve calcolare la portata del proprio Baby<br />
phone nel proprio ambiente eseguendo prove<br />
sulla base delle condizioni fisiche di propagazione<br />
delle onde radio. In condizioni ottimali la portata<br />
massima è di 3 km. Ma la portata effettiva<br />
dipende essenzialmente dalle condizioni locali;<br />
occorre infatti tener conto per esempio dell‘ubicazione<br />
del trasmettitore, del tipo di costruzione<br />
o delle condizioni atmosferiche. Inoltre la portata<br />
può essere ridotta se si tiene in mano il ricevitore<br />
e se, così facendo, lo si chiude.<br />
24. Tabella della frequenza<br />
Numero<br />
del<br />
canale<br />
Frequenza<br />
(MHz)<br />
Numero<br />
del<br />
canale<br />
Frequenza<br />
(MHz)<br />
1 446,00625 2 446,01875<br />
3 446,03125 4 446,04375<br />
5 446,05625 6 446,06875<br />
7 446,08125 8 446,09375<br />
25. Sottocodice – Tabella della frequenza<br />
<strong>Co</strong>dice<br />
Frequenza<br />
(MHz)<br />
<strong>Co</strong>dice<br />
Frequenza<br />
(MHz)<br />
1 67,0 2 71,9<br />
3 74,4 4 77,0<br />
5 79,7 6 82,5<br />
7 85,4 8 88,5<br />
9 91,5 10 94,8<br />
11 97,4 12 100,0<br />
13 103,5 14 107,2<br />
15 110,9 16 114,8<br />
17 118,8 18 123,0<br />
19 127,3 20 131,8<br />
21 136,5 22 141,3<br />
23 146,2 24 151,4<br />
25 156,7 26 162,2<br />
27 167,9 28 173,8<br />
29 179,9 30 186,2<br />
31 192,8 32 203,5<br />
33 210,7 34 218,1<br />
35 225,7 36 233,6<br />
37 241,8 38 250,3<br />
26. Manutenzione e garanzia<br />
Prima della pulizia scollegare l‘apparecchio da<br />
eventuali altri componenti e non utilizzare detergenti<br />
aggressivi.<br />
L‘apparecchio è stato sottoposto ad un accurato<br />
controllo finale. Se dovesse tuttavia sussistere<br />
motivo di contestazione, inviarci l‘apparecchio<br />
con la ricevuta di acquisto. Offriamo una<br />
garanzia di 3 anni dalla data di acquisto.<br />
Non ci assumiamo alcuna responsabilità per<br />
danni causati da utilizzo scorretto o non appropriato<br />
o dall‘usura.<br />
<strong>Co</strong>n riserva di modifiche tecniche.<br />
27. Dati tecnici<br />
Canali: 8<br />
Intervallo di frequenza:<br />
446,00625-446,09375 MHz<br />
Tensione di alimentazione: 3,6-4,5 Volt DC<br />
con 3 microbatterie alcaline o 3 pile ricaricabili<br />
mini stilo (NiMH) 600 mAH (comprese nella<br />
confezione)<br />
Potenza di trasmissione: < 500 mW<br />
Tempo di funzionamento: massimo 10 ore (con<br />
pile completamente cariche); massimo 15 ore<br />
(con funzionamento con 3 batterie alcaline AAA)<br />
Portata massima: 3 km (in condizioni ottimali)<br />
Informazioni aggiornate sul prodotto<br />
sono disponibili sul nostro sito Internet<br />
http://www.hartig-helling.de<br />
-26- -27-
Manual de Instrucciones<br />
<strong>Co</strong>ntiene<br />
1. El suministro incluye: ............................ 29<br />
2. Instrucciones de seguridad ................... 29<br />
3. <strong>Co</strong>mponentes: ..................................... 30<br />
4. Sustitución de las pilas ...........................31<br />
5. Carga de las pilas ..................................31<br />
6. Instrucciones al consumidor ...................31<br />
7. Instrucciones de eliminación ..................31<br />
8. Descripción de la pantalla ..................... 32<br />
9. Dispositivo de suspensión ..................... 32<br />
10. Encendido y apagado del aparato .......... 32<br />
11. Función de vigilancia del bebé ............... 32<br />
12. Receptor (unidad de los padres) ............ 32<br />
13. Ajuste del volumen ................................ 33<br />
14. Emisión y recepción .............................. 33<br />
15. Señal acústica ...................................... 33<br />
16. Iluminación de la pantalla ...................... 33<br />
17. Bloqueo del teclado .............................. 33<br />
18. Señal acústica de confirmación ............. 33<br />
19. Desactivar el bloqueo de ruidos ............. 33<br />
20. Selección de canal ................................ 33<br />
21. Búsqueda automática de canal .............. 33<br />
22. Cambio de subcódigos ......................... 33<br />
23. Alcance ............................................... 34<br />
24. Tabla de frecuencias ............................. 34<br />
25. Tabla de frecuencias de subcódigos ....... 34<br />
26. Cuidado y garantía ................................ 34<br />
27. Datos técnicos ..................................... 34<br />
El <strong>MBF</strong> <strong>8080</strong> es un sistema de radio con<br />
banda PMR con las funciones adicionales<br />
de vigilancia para bebés. Tanto<br />
emisor como receptor funcionan a 8 canales<br />
y 38 subcódigos diferentes. Estos<br />
aparatos tienen un alcance de hasta<br />
3 km (dependiendo de las condiciones<br />
del entorno). Este sistema funciona con<br />
banda PMR (Private Mobile Radio) y por<br />
lo tanto, puede utilizarse sin necesidad<br />
de registrarse ni abonar tasas adicionales.<br />
Los aparatos funcionan en cada<br />
caso mediante tres micropilas especiales<br />
(AAA NiMH) incluidas en el suministro<br />
del aparato. Es posible cargar las<br />
pilas conectando el sistema electrónico<br />
de carga integrado en los aparatos a la<br />
fuente de alimentación. También puede<br />
conectar a la fuente de alimentación<br />
el cargador que viene con el aparato y<br />
cargarlo.<br />
1. El suministro incluye:<br />
1 sistema de vigilancia para bebés (emisor y<br />
receptor)<br />
1 soporte de carga<br />
1 fuente de alimentación para el <strong>MBF</strong> <strong>8080</strong><br />
6 micropilas especiales<br />
1 manual de instrucciones<br />
2. Instrucciones de seguridad<br />
En caso de daños debidos a la desobediencia<br />
de alguno de los puntos de este manual de instrucciones,<br />
perderá todo derecho de reclamación<br />
de garantía. El fabricante no se hace responsable<br />
de los daños resultantes de lo arriba<br />
mencionado. En caso de lesiones a personas<br />
o daños materiales debidos a la manipulación<br />
indebida o desobediencia de las instrucciones<br />
de seguridad, el fabricante no se hace responsable<br />
de los mismos. En estos casos la garantía<br />
quedará invalidada.<br />
• Por razones de seguridad y autorización (marcado<br />
CE) está prohibido reequipar o modificar<br />
el aparato por cuenta propia.<br />
• No someta el aparato a temperaturas extremas<br />
(> 50° C/< -5° C), vibraciones fuertes,<br />
elevado grado de humedad o altos esfuerzos<br />
mecánicos.<br />
-28- -29-
• Nunca deje el aparato funcionando sin vigilancia.<br />
Ni el aparato ni su embalaje son juguetes<br />
y por ello deben mantenerse fuera del alcance<br />
de los niños. Tome precauciones especiales<br />
cuando los niños estén presentes.<br />
• Nunca vierta líquidos sobre el aparato. Si, a<br />
pesar de ello, algún líquido entra en el interior<br />
del aparato, quite las baterías y acuda a un<br />
servicio técnico especializado.<br />
• Está prohibido poner en funcionamiento el<br />
aparato en el interior de vehículos y aviones.<br />
Debido a posibles interferencias en el equipo<br />
electrónico del avión/vehículo, no es posible<br />
excluir daños. Además, los vehículos podrían<br />
actúar como una „jaula de Faraday“. <strong>Co</strong>mo el<br />
aparato tiene una protección para las ondas<br />
de radiofrecuencia emitidas por él mismo, su<br />
alcance es reducido. En el interior del vehículo,<br />
por el contrario, la carga por emisiones de<br />
radiofrecuencia es mayor.<br />
• No deje el aparato en la zona del airbag. Si el<br />
airbag se abre, el aparato de vigilancia para<br />
bebés podría salir despedido y causar lesiones<br />
a personas.<br />
• No ponga el aparato cerca de otros aparatos<br />
sensibles como, p.ej., los aparatos que se<br />
utilizan en los hospitales. El aparato de vigilancia<br />
para bebés podría dañar este tipo de<br />
aparatos.<br />
• Las personas con marcapasos no deben usar<br />
este aparato, ya que debido a las ondas de radiofrecuencia<br />
no es posible excluir la posibilidad<br />
de que el aparato afecte al marcapasos.<br />
• Mantenga el aparato alejado de lugares con<br />
riesgo de explosiones, p.ej. gasolineras, almacenes<br />
de sustancias químicas, etc. Si se<br />
producen chispas, p.ej. al sustituir las pilas,<br />
o simplemente debido a la energía de las ondas<br />
de radiofrecuencia emitidas por el aparato,<br />
puede producirse una explosión en estos<br />
lugares.<br />
• Apague siempre el aparato de radio siempre<br />
que alguna placa de advertencia prohíba el<br />
uso de teléfonos móviles y aparatos de radio.<br />
• Nunca utilice el aparato si la antena está dañada,<br />
ya que en caso de contacto de la antena<br />
con la piel podría causar quemaduras<br />
leves.<br />
• Si no presta atención al tráfico puede provocar<br />
accidentes graves. Por ello, utilice el aparato<br />
sólo cuando la situación se lo permita y<br />
p.ej. no le haga distraerse de la situación del<br />
tráfico en caso de estar conduciendo.<br />
• En instalaciones comerciales deberá tener<br />
presente la normativa de prevención de accidentes<br />
de la asociación de instalaciones y<br />
aparatos eléctricos.<br />
• Nunca modifique la estructura del aparato, es<br />
decir, utilice siempre la antena suministrada<br />
con el aparato. Tampoco tome medidas para<br />
elevar la potencia de emisión del aparato. De<br />
lo contrario, el aparato perderá toda autorización<br />
y estará prohibido utilizarlo. Además, si<br />
realiza modificaciones técnicas podrá destruir<br />
sus piezas electrónicas. Las posiciones de<br />
compensación del interior del aparato no deben<br />
cambiarse en ningún caso. Esta compensación<br />
ya ha sido optimizada por el fabricante.<br />
• Estos aparatos no están protegidos frente a<br />
salpicaduras de agua y por lo tanto, no pueden<br />
utilizarse en exteriores.<br />
3. <strong>Co</strong>mponentes:<br />
2<br />
3<br />
5<br />
4<br />
6<br />
7<br />
8<br />
1<br />
12<br />
13<br />
11<br />
10<br />
1. Antena<br />
2. Asa para colgar una cinta<br />
3. Botón ON/OFF, menú, dispositivo de bloqueo<br />
4. Botón llamada/monitor<br />
5. Botón para hablar PTT<br />
6. Micrófono<br />
7. Salida para auriculares (conexión externa<br />
para micrófono/auriculares)<br />
8. Asa para colgar una cinta<br />
9. Salida para cargador<br />
10. Altavoces<br />
11. Pantalla<br />
9<br />
12. Botón de activación/botón VOX de detección<br />
de voz<br />
13. Botón de reducción/volumen<br />
14<br />
15<br />
14. Soporte de carga<br />
15. Salida de alimentación eléctrica<br />
4. Sustitución de las pilas<br />
1. Antes de utilizar el aparato, primero deberá<br />
colocar las pilas (incluidas en el suministro<br />
del aparato) en los aparatos y cargarlas.<br />
2. Para ello, coloque los aparatos de forma que<br />
sus paneles traseros queden mirando hacia<br />
usted. Luego pulse los botones de bloqueo<br />
del clip de cierre y desplácelos a la vez hacia<br />
un lado, como se muestra en la ilustración.<br />
3. Después abra el compartimento de las pilas<br />
empujando la tapa hacia abajo.<br />
4. Ahora coloque las pilas de acuerdo con las<br />
marcas. Preste atención a la correcta polarida<br />
(+/-).<br />
5. Realice el montaje en modo inverso al desmontaje.<br />
5. Carga de las pilas<br />
1. Antes de cargar las pilas apague los aparatos.<br />
2. <strong>Co</strong>necte el cable de carga a la toma de carga<br />
PTT/CHG del panel inferior de los aparatos o<br />
conecte los aparatos en el soporte de carga.<br />
3. Cuando utilice el soporte de carga conéctelo<br />
mediante la fuente de alimentación.<br />
4. Luego conecte la fuente de alimentación a la<br />
red de alimentación eléctrica doméstica (230<br />
V CA).<br />
5. El proceso de carga se indica mediante los<br />
símbolos de las pilas parpadeantes en la pantalla.<br />
<strong>Co</strong>n las pilas totalmente descargadas,<br />
el tiempo de carga durará de 8 a 10 horas.<br />
6. Cuando los símbolos de las pilas cambien a la<br />
indicación de “Pilas cargadas” sin parpadeo,<br />
las pilas ya están cargadas. La primera vez<br />
que cargue pilas nuevas deberá dejarlas cargando<br />
durante 14 horas.<br />
¡Atención! Sustituya las pilas gastadas o defectuosas<br />
sólo por pilas originales. Estos aparatos<br />
no admiten pilas micro AAA normales.<br />
Utilice la tarjeta de pedido que viene<br />
con el aparato para adquirir las pilas<br />
originales accesorias.<br />
• Nunca mezcle pilas normales con las pilas especiales<br />
del aparato<br />
• Nunca mezcle pilas gastadas con pilas nuevas<br />
• Nunca intente cambiar pilas normales. Peligro<br />
de explosión<br />
• Las pilas no son juguetes, manténgalas fuera<br />
del alcance de los niños.<br />
6. Instrucciones al consumidor<br />
Procure que todas las pilas INCD y NiMH alcancen<br />
su total capacidad después de 4 a 6 ciclos<br />
de carga.<br />
7. Instrucciones de eliminación<br />
Los aparatos usados y marcados por el símbolo<br />
que muestra la ilustración no deberán eliminarse<br />
junto con la basura doméstica.<br />
-30- -31-
Las pilas y acumuladores usados marcados con<br />
el símbolo que muestra la ilustaración no deberán<br />
eliminarse junto con la basura doméstica.<br />
Deberá entregarlos en un centro de reciclaje<br />
adecuado para aparatos usados, pilas o baterías<br />
usadas o residuos especiales (infórmese<br />
en su comunidad) o diríjase a su distribuidor o<br />
al punto de venta donde adquirió el aparato, en<br />
pro de una eliminación del aparato respetuosa<br />
con el medio ambiente.<br />
8. Descripción de la pantalla<br />
A<br />
G<br />
B<br />
D<br />
C E<br />
F<br />
A. Aparece cuando el bloqueo del teclado está<br />
activado.<br />
B. Aparece cuando la función de detección de<br />
voz VOX (función de vigilancia de bebés)<br />
está activada.<br />
C. Aparece durante la señal acústica<br />
D. El símbolo de emisión aparece cuando se<br />
emite una señal.<br />
E. El símbolo de recepción aparece cuando se<br />
recibe una señal.<br />
F. Indicador del número de canal<br />
G. Indicador del estado de carga de las baterías:<br />
Símbolo „Pilas cargadas“<br />
Símbolo „Pilas a media carga“<br />
Símbolo „Pilas descargadas“. Significa<br />
que las pilas están casi descargadas.<br />
En cuanto suene la señal acústica deberá<br />
cargar las pilas de inmediato.<br />
9. Dispositivo de suspensión<br />
Puede fijar una cinta al dispositivo de suspensión<br />
(2 y 8), por ejemplo, para colgar el sistema<br />
de vigilancia del bebé cerca de la cuna del niño.<br />
10. Encendido y apagado del aparato<br />
Para encender el aparato, mantenga pulsado el<br />
botón MENU (3) durante 2 a 3 segundos. Este<br />
proceso se confirmará mediante una breve señal<br />
acústica emitida desde el altavoz. En ese<br />
momento, el aparato quedará ajustado en modo<br />
de recepción. Para apagar el aparato, repita el<br />
paso arriba descrito. El proceso de apagado<br />
quedará confirmado mediante una señal acústica<br />
y todos los símbolos de la pantalla desaparecerán.<br />
11. Función de vigilancia del bebé<br />
(emisor del bebé)<br />
Mediante esta función, el <strong>MBF</strong> <strong>8080</strong> quedará<br />
ajustado en el modo de vigilancia del bebé. Esta<br />
función es ideal para vigilar bebés o personas<br />
ancianas.<br />
Para activar el dispositivo automático de detección<br />
de voz pulse con el aparato encendido el<br />
botón MENU (3) y con el botón MENU pulsado<br />
pulse el botón VOX (12) hasta que el símbolo<br />
VOX desaparezca de la pantalla. Esta función<br />
puede desactivarse repitiendo el paso arriba<br />
descrito. Cuando la función VOX está desactivada<br />
también desaparece el símbolo de la<br />
pantalla.<br />
Importante: La función VOX permite emitir sin<br />
tener que pulsar el botón de emisión PTT (5).<br />
El emisor se activa mediante la voz o mediante<br />
ruidos que llegan al micrófono interno o externo<br />
(no incluido en el suministro del aparato).<br />
Por razones de seguridad, y para lograr una retransmisión<br />
óptima de los ruidos, le recomendamos<br />
que respete la distancia de un metro entre<br />
el aparato de emisión y el bebé.<br />
12. Receptor (unidad de los padres)<br />
El aparato que se encuentra en la habitación de<br />
los padres ha de ajustarse al mismo canal y subcódigo<br />
que el aparato de la habitación del niño,<br />
sin activar la función VOX. Sólo deberá ajustar<br />
adicionalmente el volumen deseado.<br />
13. Ajuste del volumen<br />
Para modificar el volumen pulse el botón MENU<br />
(3) y con el botón MENU pulsado pulse el botón<br />
de reducción de volumen (13). El aparato<br />
cuenta con cuatro niveles de regulación de volumen,<br />
los cuales aparecen en pantalla durante<br />
el ajuste.<br />
14. Emisión y recepción<br />
(Función Walkie Talkie)<br />
Un requisito indispensable es lograr una total<br />
claridad para la comprensión óptima del interlocutor.<br />
Esto se consigue ajustando ambos aparatos<br />
en el mismo canal.<br />
Para enviar un mensaje pulse el botón de habla<br />
(5) y hable con un tono de voz normal a una<br />
distancia de aprox. 10 cm con el micrófono.<br />
La emisión se indica mediante la indicación de<br />
emisión (D). Durante la emisión se iluminará la<br />
retroiluminación de la pantalla. Cuando haya<br />
terminado el mensaje suelte el botón de emisión<br />
(5) para poder recibir el mensaje de su interlocutor.<br />
15. Señal acústica<br />
El botón de señal acústica (4) sirve para emitir<br />
una señal acústica que se recibirá en todas las<br />
estaciones conectadas al mismo canal. Pulsando<br />
una vez el botón de señal acústica (4), ésta<br />
se emitirá durante aprox. 3 segundos.<br />
16. Iluminación de la pantalla<br />
La retroiluminación se activará tanto al encender<br />
el aparato como al pulsar los botones. La<br />
retroiluminación se apagará automáticamente<br />
después de 4 segundos.<br />
17. Bloqueo del teclado<br />
El bloqueo del teclado impide la modificación<br />
accidental de los ajustes del aparato. El bloqueo<br />
del teclado se activa pulsando el botón MENU<br />
(3) y pulsando brevemente el botón PTT (5) con<br />
el botón MENU pulsado. El bloqueo de teclado<br />
activado se mostrará en la pantalla mediante el<br />
símbolo de la llave (A). Los botones de aumento/reducción<br />
y el botón MENÚ quedarán deshabilitados.<br />
El bloqueo del teclado se puede desactivar<br />
realizando el paso arriba descrito. <strong>Co</strong>n el<br />
bloqueo del teclado desactivado desaparecerá<br />
el símbolo de la llave (A) en la pantalla.<br />
18. Señal acústica de confirmación<br />
de los botones<br />
Mediante la señal acústica de los botones, cada<br />
una de las veces que pulse un botón y al realizar<br />
una acción se emitirá una señal acústica de<br />
confirmación.<br />
19. Desactivar el bloqueo de ruidos<br />
<strong>Co</strong>mo el aparato siempre está listo para recibir<br />
sonidos, en caso de no recibir una señal emitirá<br />
un fuerte ruido. Por esta razón, el aparato<br />
está equipado con un bloqueo de ruidos que<br />
enmudecerá los altavoces mientras los aparatos<br />
estén funcionando normalmente. En cuanto<br />
se reciba una señal suficientemente potente,<br />
la función de atenuación quedará deshabilitada<br />
para permitir oir la señal que se recibe. Para<br />
poder escuchar también las señales débiles es<br />
posible desactivar el bloqueo de ruidos. Para<br />
ello pulse una vez el botón MENU (3) y con el<br />
botón MENU pulsado pulse el botón del monitor<br />
(4). Ahora el bloqueo de ruidos quedará desactivado<br />
y en la pantalla aparecerá el símbolo RX.<br />
Para volver a activar el bloqueo de ruidos repita<br />
el paso arriba descrito.<br />
20. Selección de canal<br />
Pulsando el botón de aumento/reducción (12 ó<br />
13) puede ajustar el canal deseado. Hay 8 canales<br />
distintos a disposición.<br />
21. Búsqueda automática de canal<br />
Los aparatos disponen de una función de búsqueda<br />
automática de canal. Esta función sirve<br />
para saber si hay otros usuarios de radio en su<br />
misma área de retransmisión. Para activar esta<br />
función pulse el botón de aumento/reducción<br />
(12/13) durante 3 segundos.<br />
El aparato buscará automáticamente un canal<br />
activo.<br />
Este hecho aparece indicado en la pantalla,<br />
que la indicación del canal 1 al 8 sigue funcionando<br />
de forma continua y funcionará hasta que<br />
el aparato reciba una señal activa. En cuanto el<br />
aparato reciba una señal activa, éste permanecerá<br />
ajustado en ese canal.<br />
22. Cambio de subcódigos<br />
Para ajustar un subcódigo distinto al actual, pulse<br />
dos veces seguidas el botón MENU (3) hasta<br />
que en la pantalla aparezca SC y luego aparece-<br />
-32- -33-
á temporalmente el subcódigo que está ajustado.<br />
Ya puede seleccionar mediante los botones<br />
aumento/reducción (12/13) uno de los 38<br />
subcódigos y el código seleccionado pulsando<br />
nuevamente el botón MENU. Si seleccionara el<br />
ajuste 00, desactivaría el ajuste del subcódigo<br />
y no estará protegido de otras emisiones de radio<br />
extrañas.<br />
23. Alcance<br />
Debido a las condiciones físicas de alcance de<br />
las ondas de radiofrecuencia, deberá probar el<br />
alcance de su equipo de vigilancia para bebés<br />
realizando una prueba de funcionamiento en su<br />
hogar. En condiciones óptimas logrará un alcance<br />
de hasta 3 km. El alcance real dependerá, no<br />
obstante, de las características locales.<br />
Es decir, por ejemplo, deberá tener en cuenta<br />
el lugar de posicionamiento del emisor, del<br />
tipo de construcción o de las condiciones atmosféricas.<br />
Asimismo, el alcance puede verse limitado si<br />
el receptor sostiene el aparato en sus manos<br />
y lo tapa.<br />
24. Tabla de frecuencias<br />
Número<br />
de canal<br />
Frequencia<br />
(MHz)<br />
Número<br />
de canal<br />
Frequencia<br />
(MHz)<br />
1 446,00625 2 446,01875<br />
3 446,03125 4 446,04375<br />
5 446,05625 6 446,06875<br />
7 446,08125 8 446,09375<br />
25. Tabla de frecuencias de subcódigos<br />
Código<br />
Frecuencia<br />
(MHz)<br />
Código<br />
Frecuencia<br />
(MHz)<br />
1 67,0 2 71,9<br />
3 74,4 4 77,0<br />
5 79,7 6 82,5<br />
7 85,4 8 88,5<br />
9 91,5 10 94,8<br />
11 97,4 12 100,0<br />
13 103,5 14 107,2<br />
15 110,9 16 114,8<br />
Código<br />
Frecuencia<br />
(MHz)<br />
Código<br />
Frecuencia<br />
(MHz)<br />
17 118,8 18 123,0<br />
19 127,3 20 131,8<br />
21 136,5 22 141,3<br />
23 146,2 24 151,4<br />
25 156,7 26 162,2<br />
27 167,9 28 173,8<br />
29 179,9 30 186,2<br />
31 192,8 32 203,5<br />
33 210,7 34 218,1<br />
35 225,7 36 233,6<br />
37 241,8 38 250,3<br />
26. Cuidado y garantía<br />
Antes de limpiar el aparato desconéctelo, si<br />
procede, de otros componentes y no utilice detergentes<br />
agresivos.<br />
El aparato fue sometido a un cuidadoso control<br />
final. Si hubiera cualquier motivo de reclamación,<br />
envíenos el aparato junto con el recibo de<br />
compra. Ofrecemos una garantía de 3 años a<br />
partir de la fecha de adquisición.<br />
En caso de averías debidas a manipulación o<br />
uso indebido o desgaste, no adoptamos ninguna<br />
responsabilidad.<br />
Nos reservamos todas las modificaciones técnicas.<br />
27. Datos técnicos<br />
Canales: 8<br />
Rango de frecuencia:<br />
446,00625-446,09375 MHz<br />
Tensión de funcionamiento: 3,6-4,5 V CC mediante<br />
3 pilas micro alcalinas o 3 pilas micro<br />
NiMH 600 mAH (incluidas en el suministro del<br />
aparato)<br />
Potencia de emisión: < 500 mW<br />
Tiempo de funcionamiento: máx. 10 horas (con<br />
las pilas totalmente cargadas); máx. 15 horas<br />
(con 3 pilas alcalinas AAA)<br />
Alcance: máx. 3 km (en condiciones óptimas)<br />
Encontrará informaciones de producto<br />
actualizadas en nuestra página web<br />
http://www.hartig-helling.de<br />
Gebruiksaanwijzing<br />
Inhoud<br />
1. Leveringsomvang ................................. 35<br />
2. Veiligheidsinstructies ............................ 35<br />
3. Bedieningselementen ........................... 36<br />
4. Plaatsen van de batterijen ......................37<br />
5. Batterijen opladen .................................37<br />
6. <strong>Co</strong>nsumentaanwijzing ............................37<br />
7. Afvoeraanwijzing ....................................37<br />
8. Displaybeschrijving ............................... 38<br />
9. Ophangvoorziening ............................... 38<br />
10. In- en uitschakelen van het toestel ......... 38<br />
11. Babyroepfunctie ................................... 38<br />
12. Ontvanger ............................................ 38<br />
13. Instelling van de geluidssterkte .............. 38<br />
14. Zenden en ontvangen ........................... 39<br />
15. Oproeptoon ......................................... 39<br />
16. Displayverlichting ................................. 39<br />
17. Toetsvergrendeling ............................... 39<br />
18. Toets-bevestigingstoon ......................... 39<br />
19. Ruisblokkering deactiveren ................... 39<br />
20. Kanaalkeuze ......................................... 39<br />
21. Automatische kanaalzoekfunctie ............ 39<br />
22. Wisselen van de subcode ...................... 39<br />
23. Reikwijdte ............................................ 40<br />
24. Frequentietabel .................................... 40<br />
25. Subcode-frequentietabel ...................... 40<br />
26. Onderhoud en garantie ......................... 40<br />
27. Technische gegevens ............................ 40<br />
<strong>MBF</strong> <strong>8080</strong> is een radiozendtoestel dat<br />
functioneert in de PMR-band met extra<br />
functies van een babyfoon. Zender en<br />
ontvanger functioneren op 8 kanalen en<br />
38 verschillende subcodes. De toestellen<br />
hebben een reikwijdte tot 3 km (afhankelijk<br />
van de plaatselijke omstandigheden).<br />
Dit toestel functioneert in<br />
de PMR-band (Private Mobile Radio) en<br />
kan bijgevolg zonder registratie of bijkomende<br />
taksen worden gebruikt. Voor de<br />
toestellen zijn telkens drie speciale micro-batterijen<br />
(AAA NiMH) nodig (in de<br />
levering inbegrepen). De batterijen kunnen<br />
via de geïntegreerde laadelektronica<br />
in de toestellen door middel van de<br />
elektrische voeding worden opgeladen.<br />
Ze kunnen echter eveneens in de bijgevoegde<br />
lader worden geplaatst die met<br />
de elektrische voeding wordt verbonden<br />
en daarna worden opgeladen.<br />
1. Leveringsomvang<br />
1 x babyfoon (zender en ontvanger)<br />
1 x lader<br />
1 x elektrische voeding voor <strong>MBF</strong> <strong>8080</strong><br />
6 x speciale micro-batterijen<br />
1 x gebruikshandleiding<br />
2. Veiligheidsinstructies<br />
Bij schade die door het niet in acht nemen van<br />
de handleiding wordt veroorzaakt, vervalt de<br />
aanspraak op garantie! Voor indirecte schade<br />
die daaruit resulteert, aanvaarden wij geen<br />
enkele aansprakelijkheid! Voor materiële of<br />
persoonlijke schade die door onoordeelkundige<br />
herstelling of het niet in acht nemen van<br />
de veiligheidsinstructies wordt veroorzaakt,<br />
aanvaarden wij geen enkele aansprakelijkheid.<br />
In dergelijke gevallen vervalt de aanspraak op<br />
garantie.<br />
• Omwille van veiligheids- en vergunningsredenen<br />
(CE) is het eigenmachtig verbouwen en/<br />
of wijzigen van het toestel niet toegelaten.<br />
• Het toestel mag niet worden blootgesteld aan<br />
extreme temperaturen (> 50° C/< -5° C), sterke<br />
vibraties, hoge vochtigheid of sterke mechanische<br />
belastingen.<br />
• Gebruik het toestel niet zonder toezicht. Het<br />
toestel en de verpakking zijn geen speelgoed<br />
-34- -35-
en horen niet thuis in kinderhandjes. Houd bijzonder<br />
toezicht in aanwezigheid van kinderen.<br />
• Giet nooit vloeistoffen over het toestel uit.<br />
Mocht er toch vloeistof in het toestel terechtkomen,<br />
verwijder dan de batterijen en neem<br />
contact op met een vakman.<br />
• Het gebruik van het toestel is niet toegelaten<br />
in de wagen en in vliegtuigen. Omwille<br />
van de beïnvloeding van de elektronica die<br />
in het voertuig/vliegtuig aanwezig is, kunnen<br />
eventuele storingen niet worden uitgesloten.<br />
Bovendien werken voertuigen als een “kooi<br />
van Faraday“: de door het radiozendtoestel<br />
verzonden radiogolven worden niet afgeschermd,<br />
de reikwijdte van het toestel is daardoor<br />
zeer klein. Binnen in het voertuig wordt<br />
daarentegen de belasting door radiogolven<br />
verhoogd.<br />
• Leg het toestel niet in het ontplooiingsbereik<br />
van een airbag. Bij het ontplooien van<br />
de airbag zou de babyfoon kunnen worden<br />
weggeslingerd en verwondingen kunnen veroorzaken.<br />
• Gebruik het toestel niet in de buurt van zeer<br />
gevoelige apparaten, zoals bijv. in ziekenhuizen<br />
worden geëxploiteerd. De babyfoon zou<br />
de goede werking van dergelijke apparaten<br />
kunnen storen.<br />
• Personen met een pacemaker mogen het toestel<br />
niet gebruiken, omdat door de afgegeven<br />
radiostraling een nadelige beïnvloeding van<br />
de pacemaker niet kan worden uitgesloten.<br />
• Houd het toestel uit de buurt van explosiegevaarlijke<br />
gebieden, bijv. tankstations, opslagruimten<br />
voor chemische producten enz. Door<br />
vonken die bijv. door een batterijwissel kunnen<br />
ontstaan of door de uitgestraalde energie<br />
van de radiogolven, kan in dergelijke gebieden<br />
een explosie worden veroorzaakt.<br />
• Schakel het radiozendtoestel altijd uit, wanneer<br />
het gebruik van GSM’s en radiozendtoestellen<br />
wordt verboden door eventuele waarschuwingsborden.<br />
• Met beschadigde antenne mag het toestel<br />
niet verder worden gebruikt, omdat contact<br />
van de antenne met de huid anders lichte<br />
brandwonden zou kunnen veroorzaken.<br />
• Onoplettendheid in het wegverkeer kan tot<br />
ernstige ongevallen leiden. Het toestel mag<br />
daarom enkel worden bediend, wanneer de<br />
omstandigheden dit toelaten en uw aandacht<br />
door de bediening ervan, bijvoorbeeld in het<br />
wegverkeer, niet wordt afgeleid.<br />
• In industriële inrichtingen dienen de voorschriften<br />
ter voorkoming van ongevallen van<br />
het verbond van de industriële officiële ongevallenverzekeringen<br />
voor elektrische installaties<br />
en bedrijfsmiddelen in acht genomen<br />
te worden.<br />
• Aan het toestel mogen geen constructiewijzigingen<br />
worden uitgevoerd, d.w.z. dat de<br />
antenne die aan het toestel vastzit, moet worden<br />
gebruikt. Evenmin mogen er maatregelen<br />
worden getroffen om het zendvermogen te<br />
verhogen. Het toestel verliest anders zijn vergunning<br />
en de algemene gebruikstoelating.<br />
Bovendien kunnen technische wijzigingen tot<br />
verstoring van elektronische componenten<br />
leiden. Regelstanden in het toestel mogen<br />
in geen geval worden gewijzigd. De regeling<br />
werd door de fabrikant reeds optimaal<br />
uitgevoerd.<br />
• De toestellen zijn niet beschermd tegen<br />
sproeiwater en mogen daarom enkel met de<br />
nodige bescherming in de vrije lucht worden<br />
gebruikt.<br />
3. Bedieningselementen<br />
2<br />
3<br />
5<br />
4<br />
6<br />
7<br />
8<br />
1<br />
12<br />
13<br />
11<br />
10<br />
1. Antenne<br />
2. Ophangoogje voor een riem<br />
3. Toets Aan/Uit, Menu, Blokkeren<br />
4. Oproep/monitor-toets<br />
5. Spreektoets PTT<br />
6. Microfoon<br />
7. Aansluitbus voor headset (externe microfoon-/<br />
hoofdtelefoonaansluiting)<br />
9<br />
8. Ophangoogje voor een riem<br />
9. Laadcontact<br />
10. Luidspreker<br />
11. Display<br />
12. Toets “omhoog” / VOX-activeringstoets<br />
13. Toets “omlaag”/geluidssterkte<br />
14<br />
15<br />
14. Laadhouder<br />
15. Netbus<br />
4. Plaatsen van de batterijen<br />
1. Vóór de ingebruikname moeten eerst de batterijen<br />
(bij de levering inbegrepen) in de toestellen<br />
worden geplaatst en worden opgeladen.<br />
2. Daartoe plaatst u de toestellen om te beginnen<br />
zo, dat de rugzijde ervan voor u ligt. Druk<br />
nu op de vergrendelknop van de gordelclips<br />
en schuif deze gelijktijdig opzij zoals in de afbeelding<br />
wordt getoond.<br />
3. Daarna opent u de batterijvakjes door het<br />
deksel naar beneden weg te trekken.<br />
4. Plaats nu de batterijen, zoals wordt aangeduid<br />
op de markering. Absoluut letten op de<br />
juiste polarisatie (+/-) a.u.b.!<br />
5. Het terug in elkaar zetten gebeurt dan in omgekeerde<br />
volgorde.<br />
5. Batterijen opladen<br />
1. Voor het opladen, schakelt u de toestellen uit.<br />
2. Verbind de laadkabel met de laadbus PTT/<br />
CHG aan de onderzijde van de toestellen of<br />
plaats de toestellen in de laadhouder.<br />
3. Bij gebruik van de laadhouder verbindt u deze<br />
met de elektrische voeding.<br />
4. Verbind daarna de elektrische voeding met<br />
het stroomnet (230 V AC).<br />
5. Het laadproces wordt u getoond door het batterijsymbool<br />
dat op de display knippert. Bij<br />
volledig lege batterijen bedraagt de laadtijd<br />
ong. 8 tot 10 uren.<br />
6. Zodra de batterijsymbolen op “batterij vol“-<br />
aanduiding staan zonder te knipperen, zijn de<br />
batterijen opgeladen. Nieuwe batterijen moeten<br />
de eerste keer 14 uren worden geladen.<br />
Opgepast! Vervang defecte batterijen enkel<br />
door originele batterijen. In dit toestel kunnen<br />
geen gewone micro-batterijen AAA worden<br />
gebruikt.<br />
U kan extra originele batterijen bestellen<br />
met de ingesloten bestelkaart.<br />
• Meng nooit gewone batterijen met accu’s!<br />
• Bij gebruik van batterijen mag u nooit oude<br />
met nieuwe batterijen mengen!<br />
• Probeer nooit gewone batterijen op te laden.<br />
Gevaar voor explosie!<br />
• Accu’s en batterijen zijn geen speelgoed voor<br />
kinderen, uit de buurt houden van kleine kinderen<br />
a.u.b.<br />
6. <strong>Co</strong>nsumentaanwijzing<br />
Let er a.u.b. op, dat alle nieuwe NiCd- en NiMHbatterijen<br />
pas na 4 tot 6 keer opladen hun volledige<br />
capaciteit bereiken.<br />
7. Afvoeraanwijzing<br />
Oude toestellen voorzien van het afgebeeld<br />
symbool, mogen niet samen met het gewone<br />
huisvuil worden afgevoerd.<br />
Lege batterijen en accumulatoren (accu’s) die<br />
voorzien zijn van één van de afgebeelde symbolen,<br />
mogen niet samen met het gewone huisvuil<br />
-36- -37-
worden afgevoerd.<br />
U moet ze afgeven in een centraal ophaalpunt<br />
voor oude toestellen, oude batterijen of speciaal<br />
afval (gelieve u te informeren bij uw gemeente)<br />
of bij uw handelaar waar u ze gekocht hebt.<br />
Deze zorgen voor een milieuvriendelijke afvoer.<br />
8. Displaybeschrijving<br />
A<br />
G<br />
B<br />
D<br />
C E<br />
F<br />
A. Wordt getoond bij actieve toetsvergrendeling.<br />
B. Wordt getoond bij actieve VOX-functie (babybewakingsfunctie).<br />
C. Wordt getoond bij de oproeptoon<br />
D. Zendindicatie wordt getoond, zodra een<br />
signaal wordt verzonden.<br />
E. Ontvangstindicatie wordt getoond, zodra<br />
een signaal wordt ontvangen.<br />
F. Kanaalnummerweergave<br />
G. Batterij-indicatie:<br />
“Batterij vol“-symbool<br />
“Batterij halfvol“-symbool<br />
“Batterij leeg“-symbool betekent,<br />
dat de batterijcapaciteit bijna is uitgeput.<br />
Zodra het akoestische signaal weerklinkt,<br />
moeten de batterijen onmiddellijk worden<br />
opgeladen.<br />
9. Ophangvoorziening<br />
U kan een riem aan de ophangvoorziening (2<br />
en 8) bevestigen, om het toestel bijv. bij de bewaking<br />
van uw baby in de buurt van het kinderbedje<br />
te hangen.<br />
10. In- en uitschakelen van het toestel<br />
Om het toestel in te schakelen, drukt u op de<br />
MENU-toets (3) en houdt u deze ingedrukt<br />
gedurende 2 tot 3 seconden. Deze handeling<br />
wordt bevestigd met een korte toon uit de luidspreker.<br />
Nu bevindt het toestel zich in de ontvangstmodus.<br />
Om het toestel uit te schakelen,<br />
herhaalt u hoger beschreven stap. De uitschakelprocedure<br />
wordt met een signaaltoon bevestigd<br />
en alle symbolen op de display verdwijnen.<br />
11. Babyroepfunctie<br />
(zender bij de baby)<br />
Met deze functie wordt de <strong>MBF</strong> <strong>8080</strong> op het<br />
babyroeptoestel ingesteld. Deze functie is bijzonder<br />
goed geschikt voor bewaking van kleine<br />
kinderen of oudere mensen.<br />
Om de automatische spraaksturing te activeren,<br />
drukt u bij ingeschakeld toestel op de MENUtoets<br />
(3) en met ingedrukte MENU-toets zolang<br />
op de VOX-toets (12), tot het symbool VOX op<br />
de display verschijnt. Deze functie kan zoals<br />
hoger beschreven, ook weer worden gedeactiveerd.<br />
Bij gedeactiveerde VOX-functie dooft het<br />
symbool op de display.<br />
Belangrijk: Met de VOX-functie kan u zenden,<br />
zonder dat de zendtoets PTT (5) moet worden<br />
bediend. De zender wordt in deze modus door<br />
spraak of geluiden op de interne of externe microfoon<br />
(niet bij de levering inbegrepen) geactiveerd.<br />
Om veiligheidsredenen en voor optimale geluidstransmissie,<br />
raden wij u aan een afstand<br />
van één meter tussen het zendapparaat en de<br />
baby niet te overschrijden.<br />
12. Ontvanger<br />
(Eenheid voor de ouders)<br />
Het toestel dat zich bij de ouders bevindt, hoeft<br />
enkel op hetzelfde kanaal en subcode te worden<br />
ingesteld, zonder de VOX-functie te activeren.<br />
Bijkomend moet u nog de gewenste geluidssterkte<br />
instellen.<br />
13. Instelling van de geluidssterkte<br />
Om de geluidssterkte te veranderen, drukt u op<br />
de MENU-toets (E) en met ingedrukte MENUtoets<br />
op de toets “omlaag“ (13). Er zijn vier verschillende<br />
graden van geluidssterkte, die u bij<br />
de instelling van de display kan aflezen.<br />
14. Zenden en ontvangen<br />
(Walkie Talkie functie)<br />
Belangrijkste voorwaarde om met uw gesprekspartner<br />
contact te kunnen maken, is dat de toestellen<br />
altijd op hetzelfde kanaal zijn ingesteld.<br />
Om een bericht te verzenden, drukt u op de<br />
spreektoets (5) en spreekt u met normaal stemvermogen<br />
vanop een spreekafstand van ong. 10<br />
cm in de microfoon. Het verzenden wordt aangeduid<br />
door de zendindicatie (D). Tijdens het<br />
verzenden, brandt de achtergrondverlichting<br />
van de display. Wanneer u het bericht hebt beeindigd,<br />
laat u de spreektoets (5) terug los, zodat<br />
u uw gesprekspartner kan ontvangen.<br />
15. Oproeptoon<br />
De oproeptoontoets (4) dient voor het uitzenden<br />
van een oproeptoon die door alle andere stations<br />
wordt gehoord, die zich op hetzelfde kanaal<br />
bevinden. Na één keer drukken op de oproeptoontoets<br />
(4) wordt de oproeptoon gedurende<br />
ong. 3 seconden verzonden.<br />
16. Displayverlichting<br />
Zowel bij het inschakelen van het toestel als<br />
ook bij het bedienen van de toetsen, wordt de<br />
achtergrondverlichting geactiveerd. De achtergrondverlichting<br />
wordt na ong. 4 seconden automatisch<br />
weer uitgeschakeld.<br />
17. Toetsvergrendeling<br />
Met de toetsvergrendeling wordt er voor gezorgd<br />
dat uw instellingen niet per ongeluk worden<br />
gewijzigd. De toetsvergrendeling wordt geactiveerd<br />
door de MENU-toets (3) in te drukken<br />
en met ingedrukte MENU-toets de PTT-toets<br />
(5) kort in te drukken. De actieve toetsvergrendeling<br />
wordt u getoond op de display door het<br />
sleutel-symbool (A). De MENU- toetsen en de<br />
toetsen “omhoog” en “omlaag” worden vergrendeld.<br />
De toetsvergrendeling wordt zoals hoger<br />
beschreven weer gedeactiveerd. Bij gedeactiveerde<br />
toetsvergrendeling dooft het sleutelsymbool<br />
(A) op de display.<br />
18. Toets-bevestigingstoon<br />
Met de toets-bevestigingstoon wordt iedere<br />
toetsdruk en iedere invoer akoestisch bevestigd.<br />
19. Ruisblokkering deactiveren<br />
Omdat het toestel altijd klaar is voor ontvangst,<br />
zou het zeer erg ruisen wanneer het geen ontvangstsignaal<br />
verkrijgt. Om deze reden is het<br />
toestel met een ruisblokkering uitgerust, die<br />
de luidspreker in het ontvangstbereik uitschakelt<br />
(mute). Zodra een voldoende sterk signaal<br />
wordt ontvangen, wordt de uitschakeling (mute)<br />
gedeactiveerd, zodat het te ontvangen signaal<br />
hoorbaar wordt. Om nu ook zwak te ontvangen<br />
signalen te kunnen horen, kan de ruisblokkering<br />
ook gedeactiveerd worden. Daartoe drukt u<br />
gewoon eenmaal op de MENU-toets (3) en met<br />
ingedrukte MENU-toets drukt u op de monitortoets<br />
(4). Nu is de ruisblokkering gedeactiveerd<br />
en op de display verschijnt het symbool RX. De<br />
ruisblokkering activeert u dan weer opnieuw zoals<br />
hoger beschreven.<br />
20. Kanaalkeuze<br />
Door bediening van de toetsen “omhoog” of<br />
“omlaag” (12 of 13) kan u de gewenste kanalen<br />
invoeren. U kan kiezen uit 8 verschillende<br />
kanalen.<br />
21. Automatische kanaalzoekfunctie<br />
De toestellen beschikken over een automatische<br />
kanaalzoekfunctie. Deze functie is nuttig,<br />
wanneer u zou willen weten, of er zich nog andere<br />
mobiele gebruikers in uw transmissiebereik<br />
bevinden. Om deze functie te activeren, drukt u<br />
a.u.b. ongeveer 3 seconden op de toetsen “omhoog“<br />
of “omlaag“ (12/13) Het toestel zoekt nu<br />
automatisch een actief kanaal. Dat wordt u op<br />
de display getoond, doordat de kanaalindicatie<br />
continu verder loopt van kanaal 1 tot kanaal 8 en<br />
wel zolang tot het toestel een actief signaal ontvangt.<br />
Zodra een actief signaal wordt ontvangen,<br />
blijft het toestel op dat kanaal staan.<br />
22. Wisselen van de subcode<br />
Om een andere subcode in te stellen, drukt u<br />
tweemaal achter elkaar op de MENU-toets (3),<br />
totdat in de display het begrip SC en daarna<br />
even de huidige ingestelde subcode wordt<br />
weergegeven. Nu kan u met de toetsen “omhoog“<br />
of “omlaag“ (12/13) één van de 38 subcodes<br />
selecteren en de geselecteerde code<br />
bevestigen door opnieuw op de MENU-toets te<br />
drukken. Wanneer u de instelling 00 zou selecteren,<br />
hebt u de subcode-instelling gedeacti-<br />
-38- -39-
veerd en daardoor geen bescherming meer tegen<br />
vreemde zenders.<br />
<strong>Co</strong>de<br />
Frequentie<br />
(MHz)<br />
<strong>Co</strong>de<br />
Frequentie<br />
(MHz)<br />
23. Reikwijdte<br />
Omwille van de natuurkundige spreidingsvoorwaarden<br />
van radiogolven, moet u de reikwijdte<br />
van uw babyfoon in uw omgeving ontdekken<br />
door uitproberen. In optimale omstandigheden<br />
haalt u een reikwijdte van maximum 3 km.<br />
De werkelijke reikwijdte hangt echter in hoofdzaak<br />
af van de plaatselijke omstandigheden.<br />
Daarbij dient bijv. rekening te worden gehouden<br />
met de standplaats van de zender, het type van<br />
bebouwing of de atmosferische omstandigheden.<br />
Bovendien kan de reikwijdte beperkt zijn,<br />
wanneer u de ontvanger in uw handen houdt en<br />
hem afsluit.<br />
24. Frequentietabel<br />
Frequentie<br />
(MHz)<br />
Kanaalnummer<br />
Kanaalnummer<br />
Frequentie<br />
(MHz)<br />
1 446,00625 2 446,01875<br />
3 446,03125 4 446,04375<br />
5 446,05625 6 446,06875<br />
7 446,08125 8 446,09375<br />
25. Subcode-frequentietabel<br />
<strong>Co</strong>de<br />
Frequentie<br />
(MHz)<br />
<strong>Co</strong>de<br />
Frequentie<br />
(MHz)<br />
1 67,0 2 71,9<br />
3 74,4 4 77,0<br />
5 79,7 6 82,5<br />
7 85,4 8 88,5<br />
9 91,5 10 94,8<br />
11 97,4 12 100,0<br />
13 103,5 14 107,2<br />
15 110,9 16 114,8<br />
17 118,8 18 123,0<br />
19 127,3 20 131,8<br />
21 136,5 22 141,3<br />
23 146,2 24 151,4<br />
25 156,7 26 162,2<br />
27 167,9 28 173,8<br />
29 179,9 30 186,2<br />
31 192,8 32 203,5<br />
33 210,7 34 218,1<br />
35 225,7 36 233,6<br />
37 241,8 38 250,3<br />
26. Onderhoud en garantie<br />
Scheidt het apparaat voor het reinigen eventueel<br />
van andere onderdelen en gebruikt u alstublieft<br />
geen agressieve reinigingsmiddelen.<br />
Het apparaat is aan een zorgvuldige eindcontrole<br />
onderworpen. Mocht u desondanks toch<br />
reden hebben om het apparaat terug te sturen,<br />
stuurt u ons het apparaat dan, samen met de<br />
kwitantie, op. Wij bieden een garantie van 3 jaar<br />
vanaf de aanschafdatum.<br />
Voor schade die veroorzaakt is door verkeerd<br />
of onjuist gebruik of door verslijting, zijn wij niet<br />
verantwoordelijk.<br />
Technische wijzigingen voorbehouden.<br />
27. Technische gegevens<br />
<strong>Kanal</strong>en: 8<br />
Frequentiebereik: 446,00625-446,09375 MHz<br />
Bedrijfsspanning: 3,6-4,5 Volt DC via 3 Micro-<br />
Alkaline-batterijen of 3 NiMH-Micro-accu’s<br />
600 mAH (in de levering inbegrepen)<br />
Zendvermogen: < 500 mW<br />
Functioneringsduur: max. 10 uren (met volledig<br />
opgeladen accu‘s); max. 15 uren (bij gebruik<br />
van batterijen 3 x Alkaline AAA)<br />
Reikwijdte: max. 3 km (onder optimale omstandigheden)<br />
Actuele productinformatie vindt u op onze<br />
internetsite http://www.hartig-helling.de<br />
-40-