Stinson Reliant SR-10 BNF/PNP - HobbyTown USA
Stinson Reliant SR-10 BNF/PNP - HobbyTown USA
Stinson Reliant SR-10 BNF/PNP - HobbyTown USA

You also want an ePaper? Increase the reach of your titles
YUMPU automatically turns print PDFs into web optimized ePapers that Google loves.
EN<br />
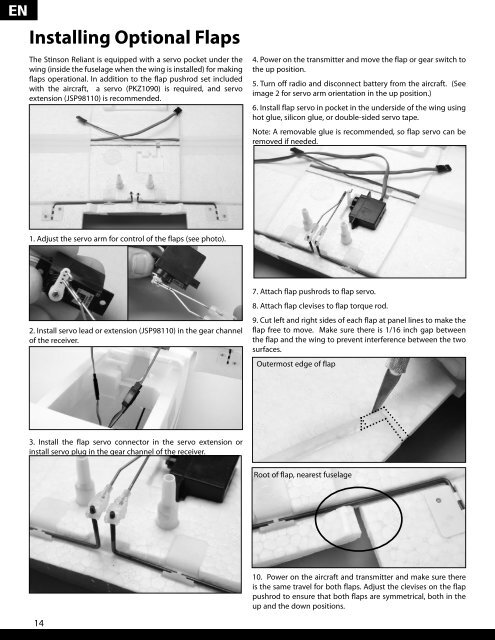
Installing Optional Flaps<br />
The <strong>Stinson</strong> <strong>Reliant</strong> is equipped with a servo pocket under the<br />
wing (inside the fuselage when the wing is installed) for making<br />
flaps operational. In addition to the flap pushrod set included<br />
with the aircraft, a servo (PKZ<strong>10</strong>90) is required, and servo<br />
extension (JSP981<strong>10</strong>) is recommended.<br />
4. Power on the transmitter and move the flap or gear switch to<br />
the up position.<br />
5. Turn off radio and disconnect battery from the aircraft. (See<br />
image 2 for servo arm orientation in the up position.)<br />
6. Install flap servo in pocket in the underside of the wing using<br />
hot glue, silicon glue, or double-sided servo tape.<br />
Note: A removable glue is recommended, so flap servo can be<br />
removed if needed.<br />
1. Adjust the servo arm for control of the flaps (see photo).<br />
2. Install servo lead or extension (JSP981<strong>10</strong>) in the gear channel<br />
of the receiver.<br />
7. Attach flap pushrods to flap servo.<br />
8. Attach flap clevises to flap torque rod.<br />
9. Cut left and right sides of each flap at panel lines to make the<br />
flap free to move. Make sure there is 1/16 inch gap between<br />
the flap and the wing to prevent interference between the two<br />
surfaces.<br />
Outermost edge of flap<br />
3. Install the flap servo connector in the servo extension or<br />
install servo plug in the gear channel of the receiver.<br />
Root of flap, nearest fuselage<br />
<strong>10</strong>. Power on the aircraft and transmitter and make sure there<br />
is the same travel for both flaps. Adjust the clevises on the flap<br />
pushrod to ensure that both flaps are symmetrical, both in the<br />
up and the down positions.<br />
14