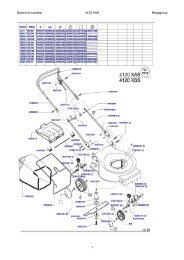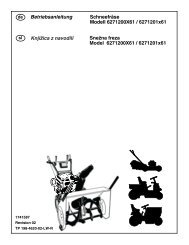
Instruction Book Snow Thrower Model 6291570X61 ... - Technik.sk
Instruction Book Snow Thrower Model 6291570X61 ... - Technik.sk
Instruction Book Snow Thrower Model 6291570X61 ... - Technik.sk

Create successful ePaper yourself
Turn your PDF publications into a flip-book with our unique Google optimized e-Paper software.
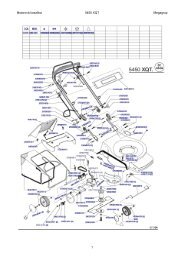
OPERATION<br />
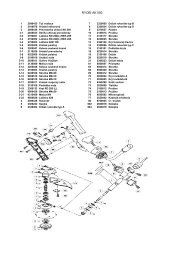
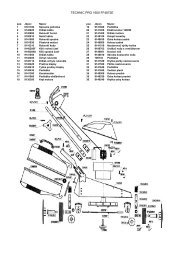
NOTE: Illustrations are located on page 2<br />
and on pages 173 through 178.<br />
CAUTION: Use only attachments and<br />
accessories approved by the manufacturer<br />
of the snow thrower (such as tire chains,<br />
electric start kits, etc.).<br />
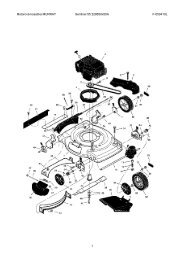
Know Your <strong>Snow</strong> <strong>Thrower</strong> (Figure 1)<br />
Read this <strong>Instruction</strong> <strong>Book</strong> and safety rules<br />
before operation the snow thrower. Compare the<br />
illustration with your snow thrower to familiarize<br />
yourself with the location of various controls and<br />
adjustments.<br />
How To Control The Discharge Of The<br />
<strong>Snow</strong><br />
1740876<br />
WARNING: Never direct the<br />
discharge of snow toward<br />
bystanders.<br />
WARNING: Always stop the engine<br />
before unclogging the discharge<br />
chute or the auger housing and<br />
before leaving the snow thrower.<br />
1. (Figure 1) Turn the crank assembly (2) to<br />
change the discharge direction of the<br />
snow.Turn the crank assembly (2) to<br />
change the discharge direction of the snow.<br />
2. Pull the remote chute lever (20) back to<br />
discharge the snow high and far. Push the<br />
remote chute lever (20) forward to<br />
discharge the snow down.<br />
How To Stop The <strong>Snow</strong> <strong>Thrower</strong><br />
(Figure 1)<br />
1. To stop discharging snow, release the auger<br />
drive lever (5).<br />
2. To stop the wheels, release the traction<br />
drive lever (1).<br />
3. Stop the engine.<br />
a. To stop the engine on models with a<br />
throttle control (13), first move the<br />
throttle control (13) to the SLOW<br />
position and then move it to the STOP<br />
position.<br />
b. To stop the engine on models with an<br />
ignition switch (13), move the ignition<br />
switch (13) to the OFF position.<br />
c. Pull out and remove the safety key (8).<br />
CAUTION: To stop the engine, do not move<br />
the choke control to CHOKE position.<br />
Backfire or engine damage can occur.<br />
How To Go Forward or Backward<br />
(Figure 1)<br />
1. To change the ground speed, first release the<br />
traction drive lever (1) and then move the<br />
speed shift lever (6) to the desired speed.<br />
2. Ground speed is determined by snow<br />
conditions. Select the speed by moving the<br />
speed shift lever (6) into the appropriate<br />
notch on the shift lever plate.<br />
Speed 1, 2 Wet, Heavy<br />
Speed 3 Light<br />
Speed 4 Very Light<br />
Speed 5, 6 Transport only<br />
3. To go forward, engage the traction drive<br />
lever (1). Maintain a firm hold on the handle<br />
as the snow thrower starts to move forward.<br />
Guide the snow thrower by moving the<br />
handle either left or right. Do not attempt to<br />
push the snow thrower.<br />
4. To go backward, release the tractor drive<br />
lever (1).<br />
5. Move the speed shift lever (6) into either<br />
first or second reverse.<br />
6. Engage the traction drive lever (1).<br />
IMPORTANT: Do not move the speed shift<br />
lever (6) while the traction drive lever (1) is<br />
engaged.<br />
How To Throw <strong>Snow</strong> (Figure 1)<br />
1. Engage the auger drive lever (5).<br />
2. To stop throwing snow, release the auger<br />
drive lever (5).<br />
WARNING: The operation of any<br />
snow thrower can result in foreign<br />
objects being thrown into the eyes,<br />
which can result in severe eye damage.<br />
Always wear safety glasses or eye shields<br />
while operating the snow thrower. We<br />
recommend standard safety glasses or use<br />
a wide vision safety ma<strong>sk</strong> over your<br />
glasses.<br />
Before Starting The Engine<br />
1. Before you service or start the engine,<br />
familiarize yourself with the snow thrower. Be<br />
sure you understand the function and<br />
location of all controls.<br />
2. Check the tension of the clutch cable before<br />
starting the engine. See “How To Adjust The<br />
Clutch Cable” in the Maintenance section of<br />
this manual.<br />
3. Make sure that all fasteners are tight.<br />
4. Make sure the height adjust <strong>sk</strong>ids are<br />
properly adjusted. See “How To Adjust The<br />
Height Of The Skids” in the Maintenance<br />
section of this manual.<br />
5. Check the air pressure in the tires. The<br />
correct air pressure is 1 BAR (14 PSI) to 1,25<br />
BAR (17 PSI). Do not exceed the maximum<br />
amount of air pressure shown on the side of<br />
the tire.<br />
How To Stop The Engine (Figure 1)<br />
1. To stop the engine on models with a throttle<br />
control (13), first move the throttle control<br />
(13) to the SLOW position and then move it<br />
to the STOP position.<br />
2. To stop the engine on models with an<br />
ignition switch (13), move the ignition<br />
switch (13) to the OFF position.<br />
3. Pull out and remove the safety key (8).<br />
CAUTION: To stop the engine, do not move<br />
the choke control to CHOKE position.<br />
Backfire or engine damage can occur.<br />
How To Start The Engine (Figure 1)<br />
<strong>Model</strong>s equipped with an Electric Starter<br />
NOTE: An electric starter kit can be added to<br />
recoil start engines. Electric starter kits are<br />
available from your nearest authorized<br />
service center.<br />
10<br />
en<br />
WARNING: The starter is equipped<br />
with a three−wire power cord and<br />
plug and is designed to operate on<br />
220 volt A.C. household current. The power<br />
cord must be properly grounded at all times<br />
to avoid the possibility of electrical shock<br />
which can injure the operator. Carefully<br />
follow all instructions in the “How To Start<br />
The Engine” section. Make sure that your<br />
house wiring is a three−wire grounded<br />
system. If you are not sure, a<strong>sk</strong> a licensed<br />
electrician. If your house wire system is not<br />
a three−wire grounded system, do not use<br />
this electric starter under any conditions. If<br />
your system is grounded but a three−hole<br />
grounded receptacle is not available to start<br />
the engine, have a three−hole grounded<br />
receptacle installed by a licensed<br />
electrician. To connect a 220 volt A.C. power<br />
cord, always connect the power cord to the<br />
switch box (11) on the engine first. Then,<br />
plug the other end into the three−hole<br />
grounded receptacle. When disconnecting<br />
the power cord, always unplug the end from<br />
the three−hole grounded receptacle first.<br />
How To Start A Cold Engine (Figure 1)<br />
1. Check the engine oil.<br />
2. Fill the fuel tank with regular unleaded petrol.<br />
See “How To Prepare The Engine”.<br />
3. Make sure the traction drive lever (1) and<br />
the auger drive lever (5) are in the<br />
disengaged (released) position.<br />
4. To start the engine on models with a throttle<br />
control (13), move the throttle control (13)<br />
to the FAST position. Operate the engine<br />
with the throttle control (13) in the FAST<br />
position.<br />
5. To start the engine on models with an<br />
ignition switch (13), move the ignition<br />
switch (13) to the ON position.<br />
6. Insert the safety key (8) into the ignition slot.<br />
Make sure the safety key (8) snaps into<br />
place. Do not turn the safety key (8).<br />
Remove the extra safety key and keep in a<br />
safe place.<br />
7. Move the choke control (14) to the full<br />
choke position.<br />
8. (Electric Start) Connect the power cord to<br />
the switch box (11) located on the engine.<br />
9. (Electric Start) Plug the other end of the<br />
power cord into a three−hole, grounded 220<br />
VOLT, A.C. receptacle. (See the WARNING<br />
in this section).<br />
10.Push the primer button (9). Every time you<br />
push the primer button (9), wait two<br />
seconds. For the number of times required to<br />
push the primer button (9), see the engine<br />
manufacturer’s instructions.<br />
11. (Electric Start) Push on the electric start<br />
button (10) until the engine starts. Do not<br />
crank for more than 5 seconds at a time.<br />
Wait one minute between starts to allow the<br />
starter to cool.<br />
12.(Recoil Start) Slowly pull the recoil starter<br />
handle (12) until resistance is felt and then<br />
pull rapidly to start the engine. Do not allow<br />
the recoil starter handle (12) to snap back.<br />
Slowly return the recoil starter handle (12).<br />
13.If the engine does not start in 5 or 6 tries,<br />
See the “Trouble Shooting Chart”<br />
<strong>Instruction</strong>s.<br />
14.Allow the engine to warm up for several<br />
minutes. As the engine warms up, adjust the<br />
choke control (14) toward the RUN position.<br />
Wait until the engine runs smoothly before<br />
each choke adjustment.