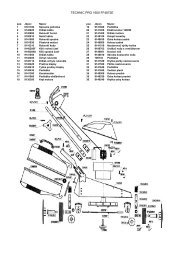
Instruction Book Snow Thrower Model 6291570X61 ... - Technik.sk
Instruction Book Snow Thrower Model 6291570X61 ... - Technik.sk
Instruction Book Snow Thrower Model 6291570X61 ... - Technik.sk

Create successful ePaper yourself
Turn your PDF publications into a flip-book with our unique Google optimized e-Paper software.
14.Tighten the bolts (3) on each side of the<br />
bottom panel (2).<br />
15.(Figure 17) Install the belt cover (1). Tighten<br />
screw (2).<br />
16.Check the adjustment of the cables. See<br />
“How To Check And Adjust The Cables” in<br />
the Maintenance section.<br />
17.Connect the spark plug wire.<br />
How To Adjust The Belt Guide<br />
1. Disconnect spark plug wire.<br />
2. (Figure 17) Remove screw (2). Remove the<br />
belt cover (1).<br />
3. (Figure 1) Engage the auger drive lever (5).<br />
4. (Figure 22) Measure the distance between<br />
the belt guide (2) and auger drive belt (3).<br />
The correct distance (4) is 3 mm (1/8 inch).<br />
5. If an adjustment is necessary, loosen the<br />
mounting bolt for the belt guide (2). Move<br />
the belt guide (2) to the correct position<br />
(4). Tighten the mounting bolt for the belt<br />
guide (2).<br />
6. (Figure 17) Install the belt cover (1). Tighten<br />
screw (2).<br />
7. Connect the spark plug wire.<br />
How To Adjust Or Replace The Friction<br />
Wheel<br />
How To Check The Friction Wheel<br />
If the snow thrower will not move forward, check<br />
the traction drive belt, the traction drive cable or<br />
the friction wheel. If the friction wheel is worn or<br />
damaged, it must be replaced. See “How To<br />
Replace the Friction Wheel” in this section. If the<br />
friction wheel is not worn or damaged, check as<br />
follows.<br />
1. (Figure 1) Remove the gas from the gas<br />
tank. Stand the snow thrower up on the front<br />
end of the auger housing (4).<br />
WARNING: Drain the gasoline<br />
outdoors, away from fire or flame.<br />
2. Disconnect the spark plug wire.<br />
3. (Figure 21) Remove the bolts (1) on each<br />
side of the bottom panel (2).<br />
4. Loosen the bolts (3) on each side of the<br />
bottom panel (2).<br />
5. Remove the bottom panel (2).<br />
6. (Figure 1) Position the shift speed lever (6)<br />
in the lowest forward speed.<br />
7. (Figure 23) Note the position of the friction<br />
wheel (4). The correct distance “A” from the<br />
right side of the friction wheel (4) to the<br />
outside of the motorbox is as follows:<br />
Tire Size Distance “A”<br />
12 and 13 inch 4-1/8” (10.5 cm)<br />
16 inch 4-5/16” (10.95 cm)<br />
If the friction wheel (4) is not in the correct<br />
position, adjust as follows.<br />
How To Adjust The Friction Wheel<br />
1. (Figure 1) Position the shift speed lever (6)<br />
in the lowest forward speed.<br />
2. (Figure 9) Loosen hex jam nut (9) on speed<br />
select rod (2). Remove ball joint (6) from<br />
shifter rod (7).<br />
1740876<br />
3. (Figure 23) Move the friction wheel (4) to<br />
the correct position.<br />
4. (Figure 9) Turn the adaptor (10) until the<br />
ball joint (6) is aligned with the mounting<br />
hole in the shifter rod (7). When aligned,<br />
attach the ball joint (6) to the shifter rod (7).<br />
5. (Figure 21) Install the bottom panel (2).<br />
6. Install the bolts (1) on each side of the<br />
bottom panel (2).<br />
7. Tighten the bolts (1) and bolts (3) on each<br />
side of the bottom panel (2).<br />
How To Replace The Friction Wheel<br />
If the friction wheel is worn or damaged, the<br />
snow thrower will not move forward. The friction<br />
wheel must be replaced as follows.<br />
WARNING: Do not lubricate the<br />
disc drive plate or the friction<br />
wheel.<br />
1. (Figure 1) Remove the gas from the gas<br />
tank. Stand the snow thrower up on the front<br />
end of the auger housing (4).<br />
WARNING: Drain the gasoline<br />
outdoors, away from fire or flame.<br />
2. Disconnect the spark plug wire.<br />
3. (Figure 27) Remove the bolts (1) on each<br />
side of the bottom panel (2).<br />
4. Loosen the bolts (3) on each side of the<br />
bottom panel (2).<br />
5. Remove the bottom panel (2).<br />
6. (Figure 28) Remove the rear support brace<br />
(18).<br />
7. (Figure 29) Use a 3/16” allen wrench and<br />
remove the fastener that secures the right<br />
axle clamp (30) to the axle (34).<br />
8. Remove the right wheel (35), axle (34), axle<br />
clamp (30), and washer (31).<br />
9. (Figure 27) Remove the left wheel (10) from<br />
the axle (11).<br />
10.(Figure 30) Remove the fasterners that<br />
secure the axle suport (32) to the motorbox.<br />
Remove the axle suport (32) and bushing<br />
(33).<br />
11. Loosen (do not remove) the bolts that secure<br />
the axle bearings (19) to the motor box.<br />
12.Remove the clutch/drive sprocket<br />
assembly (20) from the axle (11).<br />
13.(Figure 31) Remove the four bolts (16) that<br />
hold the bearings (7) on each side of the<br />
hex shaft (8).<br />
14.(Figure 32) Remove the hex shaft (8) and<br />
bearings (7).<br />
NOTE: Take special note of the position of<br />
the washers (13).<br />
15.(Figure 25) Remove the three fasteners (4)<br />
that hold the friction wheel (5) to the hub<br />
(6).<br />
16.(Figure 25) Remove the friction wheel (5)<br />
from the hub (6). Slip the friction wheel (5)<br />
off the hex shaft (8).<br />
17.Assemble the new friction wheel (5) onto<br />
hub (6) with the fasteners removed earlier.<br />
18.(Figure 32) Install the hex shaft (8) and<br />
bearings (7) with the four bolts removed<br />
earlier.<br />
Make sure the washers (17) are properly<br />
installed in the original position. Also,<br />
make sure the two washers (13) are<br />
properly aligned with the actuator arms<br />
(14).<br />
14<br />
en<br />
19.Make sure the hex shaft (8) turns freely.<br />
20.To install the remaining parts, reverse the<br />
above steps.<br />
21.Check the adjustment of the friction wheel.<br />
See “How To Adjust The Friction Wheel” in<br />
this section.<br />
22.Make sure the friction wheel and the disc<br />
drive plate are free from grease or oil.<br />
23.(Figure 27) Install the bottom panel (2).<br />
24.Install the bolts (1) on each side of the<br />
bottom panel (2).<br />
25.Tighten the bolts (1) and bolts (3) on each<br />
side of the bottom panel (2).<br />
26.Connect the spark plug wire.<br />
How To Replace the Auger Shear Bolt<br />
The augers are secured to the auger shaft with<br />
special shear bolts. These shear bolts are<br />
designed to break and protect the machine if an<br />
object becomes lodged in the auger housing. Do<br />
not use a harder bolt as the protection provided<br />
by the shear bolt will be lost.<br />
WARNING: For safety and to<br />
protect the machine, use only<br />
original equipment shear bolts.<br />
To replace a broken shear bolt, proceed as<br />
follows. Extra shear bolts were provided in the<br />
assembly parts bag.<br />
1. Stop the engine.<br />
2. Disconnect the spark plug wire. Make sure<br />
all moving parts have stopped.<br />
3. (Figure 13) Lubricate the auger shaft Zerk<br />
fitting (1), if equipped, with a grease gun.<br />
4. (Figure 24) Align the hole in the auger with<br />
the hole in the auger shaft. Install the new<br />
shear bolt (2), spacer (3), and locknut (4).<br />
NOTE: If the model has a 33” (84 cm)<br />
Auger Housing, the spacer (3) is not<br />
required.<br />
5. Connect the spark plug wire.<br />
How To Prepare The <strong>Snow</strong> <strong>Thrower</strong> For<br />
Storage<br />
WARNING: Do not remove gasoline<br />
while inside a building, near a fire,<br />
or while you smoke. Gasoline<br />
fumes can cause an explosion or a fire.<br />
If the snow thrower is to be stored for an<br />
extended period, refer to the engine<br />
manufacturer’s operating manual (included with<br />
some models) for important maintenance or<br />
storage details.<br />
1. Drain the fuel tank.<br />
2. Let the engine run until it is out of gasoline.<br />
3. Never store the snow thrower with fuel in the<br />
tank inside a building where ignition sources<br />
are present such as hot water and space<br />
heaters, clothes dryers, and the like. Allow the<br />
engine (motor) to cool before storing in any<br />
enclosure.<br />
4. Drain the oil from the warm engine. Fill the<br />
engine crankcase with new oil.<br />
5. Remove the spark plug from the cylinder.<br />
Pour one ounce of oil into the cylinder.<br />
Slowly pull the recoil−start grip so that the oil<br />
will protect the cylinder. Install a new spark<br />
plug in the cylinder.<br />
6. Thoroughly clean the snow thrower.<br />
7. Lubricate all lubrication points. See the<br />
Maintenance section.