Notice de montage et d'entretien Logano G125 BE US/CA - Buderus
Notice de montage et d'entretien Logano G125 BE US/CA - Buderus
Notice de montage et d'entretien Logano G125 BE US/CA - Buderus
Create successful ePaper yourself
Turn your PDF publications into a flip-book with our unique Google optimized e-Paper software.
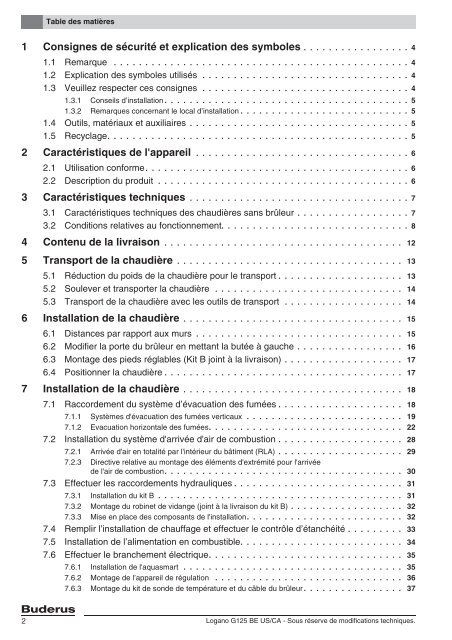
Table <strong>de</strong>s matières<br />
1 Consignes <strong>de</strong> sécurité <strong>et</strong> explication <strong>de</strong>s symboles . . . . . . . . . . . . . . . . . 4<br />
1.1 Remarque . . . . . . . . . . . . . . . . . . . . . . . . . . . . . . . . . . . . . . . . . . . . . . . 4<br />
1.2 Explication <strong>de</strong>s symboles utilisés . . . . . . . . . . . . . . . . . . . . . . . . . . . . . . . . . 4<br />
1.3 Veuillez respecter ces consignes . . . . . . . . . . . . . . . . . . . . . . . . . . . . . . . . . 4<br />
1.3.1 Conseils d’installation . . . . . . . . . . . . . . . . . . . . . . . . . . . . . . . . . . . . . . . 5<br />
1.3.2 Remarques concernant le local d’installation . . . . . . . . . . . . . . . . . . . . . . . . . . . 5<br />
1.4 Outils, matériaux <strong>et</strong> auxiliaires . . . . . . . . . . . . . . . . . . . . . . . . . . . . . . . . . . . 5<br />
1.5 Recyclage. . . . . . . . . . . . . . . . . . . . . . . . . . . . . . . . . . . . . . . . . . . . . . . . 5<br />
2 Caractéristiques <strong>de</strong> l'appareil . . . . . . . . . . . . . . . . . . . . . . . . . . . . . . . . . . 6<br />
2.1 Utilisation conforme . . . . . . . . . . . . . . . . . . . . . . . . . . . . . . . . . . . . . . . . . . 6<br />
2.2 Description du produit . . . . . . . . . . . . . . . . . . . . . . . . . . . . . . . . . . . . . . . . 6<br />
3 Caractéristiques techniques . . . . . . . . . . . . . . . . . . . . . . . . . . . . . . . . . . . 7<br />
3.1 Caractéristiques techniques <strong>de</strong>s chaudières sans brûleur . . . . . . . . . . . . . . . . . . 7<br />
3.2 Conditions relatives au fonctionnement. . . . . . . . . . . . . . . . . . . . . . . . . . . . . . 8<br />
4 Contenu <strong>de</strong> la livraison . . . . . . . . . . . . . . . . . . . . . . . . . . . . . . . . . . . . . . 12<br />
5 Transport <strong>de</strong> la chaudière . . . . . . . . . . . . . . . . . . . . . . . . . . . . . . . . . . . . 13<br />
5.1 Réduction du poids <strong>de</strong> la chaudière pour le transport . . . . . . . . . . . . . . . . . . . . 13<br />
5.2 Soulever <strong>et</strong> transporter la chaudière . . . . . . . . . . . . . . . . . . . . . . . . . . . . . . 14<br />
5.3 Transport <strong>de</strong> la chaudière avec les outils <strong>de</strong> transport . . . . . . . . . . . . . . . . . . . 14<br />
6 Installation <strong>de</strong> la chaudière . . . . . . . . . . . . . . . . . . . . . . . . . . . . . . . . . . . 15<br />
6.1 Distances par rapport aux murs . . . . . . . . . . . . . . . . . . . . . . . . . . . . . . . . . 15<br />
6.2 Modifier la porte du brûleur en m<strong>et</strong>tant la butée à gauche . . . . . . . . . . . . . . . . . 16<br />
6.3 Montage <strong>de</strong>s pieds réglables (Kit B joint à la livraison) . . . . . . . . . . . . . . . . . . . 17<br />
6.4 Positionner la chaudière . . . . . . . . . . . . . . . . . . . . . . . . . . . . . . . . . . . . . . 17<br />
7 Installation <strong>de</strong> la chaudière . . . . . . . . . . . . . . . . . . . . . . . . . . . . . . . . . . . 18<br />
7.1 Raccor<strong>de</strong>ment du système d’évacuation <strong>de</strong>s fumées . . . . . . . . . . . . . . . . . . . . 18<br />
7.1.1 Systèmes d'évacuation <strong>de</strong>s fumées verticaux . . . . . . . . . . . . . . . . . . . . . . . . . 19<br />
7.1.2 Evacuation horizontale <strong>de</strong>s fumées. . . . . . . . . . . . . . . . . . . . . . . . . . . . . . . 22<br />
7.2 Installation du système d'arrivée d'air <strong>de</strong> combustion . . . . . . . . . . . . . . . . . . . . 28<br />
7.2.1 Arrivée d'air en totalité par l'intérieur du bâtiment (RLA) . . . . . . . . . . . . . . . . . . . . 29<br />
7.2.3 Directive relative au <strong>montage</strong> <strong>de</strong>s éléments d'extrémité pour l'arrivée<br />
<strong>de</strong> l'air <strong>de</strong> combustion. . . . . . . . . . . . . . . . . . . . . . . . . . . . . . . . . . . . . . 30<br />
7.3 Effectuer les raccor<strong>de</strong>ments hydrauliques . . . . . . . . . . . . . . . . . . . . . . . . . . . 31<br />
7.3.1 Installation du kit B . . . . . . . . . . . . . . . . . . . . . . . . . . . . . . . . . . . . . . . 31<br />
7.3.2 Montage du robin<strong>et</strong> <strong>de</strong> vidange (joint à la livraison du kit B) . . . . . . . . . . . . . . . . . . 32<br />
7.3.3 Mise en place <strong>de</strong>s composants <strong>de</strong> l'installation. . . . . . . . . . . . . . . . . . . . . . . . . 32<br />
7.4 Remplir l’installation <strong>de</strong> chauffage <strong>et</strong> effectuer le contrôle d’étanchéité . . . . . . . . . 33<br />
7.5 Installation <strong>de</strong> l’alimentation en combustible. . . . . . . . . . . . . . . . . . . . . . . . . . 34<br />
7.6 Effectuer le branchement électrique. . . . . . . . . . . . . . . . . . . . . . . . . . . . . . . 35<br />
7.6.1 Installation <strong>de</strong> l'aquasmart . . . . . . . . . . . . . . . . . . . . . . . . . . . . . . . . . . . 35<br />
7.6.2 Montage <strong>de</strong> l’appareil <strong>de</strong> régulation . . . . . . . . . . . . . . . . . . . . . . . . . . . . . . 36<br />
7.6.3 Montage du kit <strong>de</strong> son<strong>de</strong> <strong>de</strong> température <strong>et</strong> du câble du brûleur . . . . . . . . . . . . . . . . 37<br />
2<br />
<strong>Logano</strong> <strong>G125</strong> <strong>BE</strong> <strong>US</strong>/<strong>CA</strong> - Sous réserve <strong>de</strong> modifications techniques.


