Create successful ePaper yourself
Turn your PDF publications into a flip-book with our unique Google optimized e-Paper software.
6. Undo the screw securing the microswitch bracket to the valve body.<br />
The sensor may now be dismantled to examine the diaphragm.<br />
7. To examine the diaphragm hold the assembly securely and carefully<br />
remove the four screws. The diaphragm spring will force the two halves<br />
of the valve apart.<br />
8. Carefully examine the diaphragm and replace it if there is any damage.<br />
9. Reassemble in reverse order.<br />
6. Dévisser la vis de fixation du support du microrupteur sur le corps de<br />
la vanne. Le capteur peut maintenant être démonté pour permettre l’inspection<br />
du diaphragme.<br />
7. Pour inspecter le diaphragme, soutenir solidement l’ensemble et enlever<br />
avec précaution les quatre vis. Le ressort du diaphragme écartera les<br />
deux moitiés de la vanne.<br />
8.Examiner attentivement le diaphragme et le remplacer s’il est endommagé.<br />
9.Remonter en procédant dans le sens inverse du démontage.<br />
Microswitch / Bracket<br />
Micro-interrupteur /support<br />
Central Heating Pressure Differential Valve<br />
Pressostat différentiel du chauffage central<br />
Sensing Pipe<br />
Tube sensible<br />
Diaphragm<br />
Diaphragme<br />
By-pass Pipe<br />
By-pass<br />
Spring Clip<br />
Collier à ressort<br />
Heating Flow Pipe<br />
Conduite de chauffage<br />
Diverter Manifold<br />
Collecteur de dérivation<br />
<strong>Fi</strong>g. 35<br />
Pressure Gauge Capillary<br />
Capillaire manomètre<br />
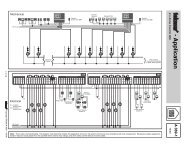
8.11 Flow Regulator (<strong>Fi</strong>gs. 36)<br />
1. Undo the filter cartridge from the inlet/return manifold.<br />
2. Unscrew the venturi and remove the flow regulator.<br />
3. Check the cleanliness of the filter gauze, rinsing thoroughly in clean<br />
water as necessary. <strong>Fi</strong>t the new flow regulator and reassemble in reverse<br />
order.<br />
8.11 Limitateur de débit (<strong>Fi</strong>g. 36)<br />
1. Dévisser la cartouche de fi ltre du collecteur d’admission/retour.<br />
2. Dévisser le venturi et déposer le régulateur de débit.<br />
3. Contrôler la gaze du filtre. Si elle est encrassée, la rincer soigneusement<br />
à l’eau propre.<br />
Monter le nouveau régulateur de débit et remonter l’ensemble en<br />
procédant dans le sens inverse du démontage.<br />
Cartridge Body<br />
Cartouche de filtre<br />
<strong>Fi</strong>lter Gauze<br />
Gaze du filtre<br />
Flow Regulator<br />
Limitateur de débit<br />
<strong>Fi</strong>g. 36<br />
Venturi<br />
Venturi<br />
Inlet/Return Manifold<br />
Collecteur d’admission/retour<br />
32