- Page 1: BSW1400
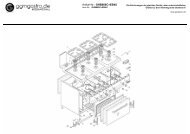
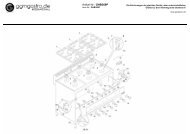
- Page 5 and 6: 33A 3B 3C 3D 5A 6A61A1BE1C24513 456
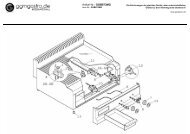
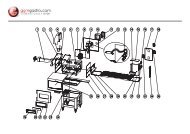
- Page 7 and 8: 1L223M41567
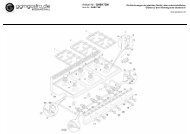
- Page 9 and 10: 1P239
- Page 11 and 12: 2. INFORMAZIONI GENERALI2.1 SCOPO D
- Page 13 and 14: sempre pulite ed asciutte al fine d
- Page 15 and 16: gas nocivi) e quindi sono molto con
- Page 17 and 18: ( ! ) PER SALVARE LE IMPOSTAZIONI E
- Page 19 and 20: FOTO F1 INTERRUTTORE GENERALE A CHI
- Page 21 and 22: abrasivi si riduca al di sotto di 1
- Page 23 and 24: zione ( Foto F - 2 ).Azionare l’i
- Page 25 and 26: Se le batterie utilizzate sono al P
- Page 27 and 28: 1. CONTENTS2. GENERAL INFORMATION2.
- Page 29 and 30: lustrations presented in this bookl
- Page 31 and 32: Take the same precautions and follo
- Page 33 and 34: Battery discharge indicator and fun
- Page 35 and 36: Mount the brushes or scraper disks
- Page 37 and 38: of the squeegee blades from the squ
- Page 39 and 40: Model “BSW1400”- Verify that th
- Page 41 and 42: 7.8 PERIODIC MAINTENANCEFor all the
- Page 43 and 44: 1. SOMMAIRE2. GENERALITES2.1 BUT DU
- Page 45 and 46: prévues par les normes européenne
- Page 47 and 48: 4.3 DEBALLAGE( ! ) Endossez l'équi
- Page 49 and 50: ( ! ) LES REGLAGES DI CONFIGURATION
- Page 51 and 52: geur ( Photo M - 3 ).Pour accéder
- Page 53 and 54:
Débrancher le chargeur du réseau
- Page 55 and 56:
parfaitement fermé, sans faire pas
- Page 57 and 58:
7.1 RESERVOIRSVidangez les deux ré
- Page 59 and 60:
gorgé.☺ Dégagez le conduit en
- Page 61 and 62:
2. ALLGEMEINE INFORMATIONEN2.1 ZIEL
- Page 63 and 64:
Schutzbrille und Gehörschutz, Stau
- Page 65 and 66:
zu achten, dass die Maschine und al
- Page 67 and 68:
Betrieb des Batterie-Abladungsanzei
- Page 69 and 70:
zunehmen. Für eine detaillierte Be
- Page 71 and 72:
Die Batterien sollten nicht unvolls
- Page 73 and 74:
ung an der Maschinenrückseite befe
- Page 75 and 76:
Fachpersonal durchführen lassen, d
- Page 77 and 78:
Gegenstände behindern die Bewegung
- Page 79 and 80:
2. INFORMACIONES GENERALES2.1 FINAL
- Page 81 and 82:
y en caso de ingestión llame inmed
- Page 83 and 84:
ien 5h). Los ciclos de descarga/car
- Page 85 and 86:
1) Los primeros dos diodos LED ( Fo
- Page 87 and 88:
CADO5 DISYUNTOR TÉRMICO DEL MOTOR
- Page 89 and 90:
Los dos pómulos rojos de los lados
- Page 91 and 92:
trás de la máquina ( Foto B - 2 )
- Page 93 and 94:
todas las indicaciones proporcionad
- Page 95 and 96:
tos.☹ El electrolito se ha evapor
- Page 97:
elektrycznego i elektronicznego ora