Manuale UNIFICATO Free EB-BT - Copertina (A5) - 10.2008.FH10
Manuale UNIFICATO Free EB-BT - Copertina (A5) - 10.2008.FH10
Manuale UNIFICATO Free EB-BT - Copertina (A5) - 10.2008.FH10

Create successful ePaper yourself
Turn your PDF publications into a flip-book with our unique Google optimized e-Paper software.
BSW1400
PAG. 3IITALIANO PAG. 10GBENGLISH PAG. 27FFRANÇAIS PAG. 43DDEUTSCH PAG. 60EESPAÑOL PAG. 78SLOSLOVENŠČINA PAG. 962
12 3A3 456B213
11A22AC3A3B3C3D23 4561874
33A 3B 3C 3D 5A 6A61A1BE1C24513 45627F1985
GH12I2136
1L223M41567
12321N45676451O32458
1P239
1. INDICE2. INFORMAZIONI GENE-RALI2.1 SCOPO DEL MA-NUALE2.2 TERMINOLOGIA E LEGENDA SIMBOLI2.3 IDENTIFICAZIONE DEL PRODOTTO2.4 UTILIZZO PROPRIO2.5 MODIFICHE TECNICHE3. INFORMAZIONI SULLA SICUREZZA3.1 RACCOMANDAZIONI FONDAMENTALI3.2 RUMOROSITÀ E VIBRAZIONI4. INFORMAZIONI SULLA MOVIMENTA-ZIONE4.1 SOLLEVAMENTO E TRASPORTODELL’IMBALLO4.2 CONTROLLO ALLA CONSEGNA4.3 SBALLAGGIO4.4 SOLLEVAMENTO E TRASPORTO:MACCHINA, BATTERIA E CARICABATTERI<strong>A5</strong>. INFORMAZIONI INSTALLAZIONE5.1 BATTERIE5.1.2 PREPARAZIONE BATTERI<strong>A5</strong>.1.3 INSTALLAZIONE BATTERIE5.1.4 COLLEGAMENTO BATTERIE5.1.5 CONFIGURAZIONE INDICATORE DI SCA-RICA BATTERIE5.2 CONFIGURAZIONE CARICABATTERIA6. INFORMAZIONI UTILIZZO6.1 PREPARAZIONE MACCHINA6.2 STRUTTURA E FUNZIONI MACCHINA6.3 RICARICA DELLE BATTERIE6.4 MONTAGGIO TERGIPAVIMENTO6.5 SMONTAGGIO TERGIPAVIMENTO6.6 SOSTITUZIONE DELLE LAME IN GOMMADEL TERGIPAVIMENTO6.7 REGOLAZIONE TERGIPAVIMENTO6.8 MONTAGGIO E SMONTAGGIO DELPARASPRUZZI6.9 MONTAGGIO E SMONTAGGIODELLA SPAZZOLA6.10 RIEMPIMENTO E SCARICO DEL SERBA-TOIO SOLUZIONE6.11 SCARICO DEL SERBATOIO DI RECUPERO6.12 NORME SPECIFICHE D’USO DEL MO-DELLO E6.13 GUIDA DELLA MACCHINA6.14 METODO DI LAVORO106.14.1 PREPARAZIONE ED AVVERTENZE6.14.2 CONTROLLO STATO DI CARICA DELLABATTERIA6.14.3 LAVAGGIO DIRETTO O PER SUPERFICILEGGERMENTE SPORCHE6.14.4 LAVAGGIO INDIRETTO O PER SUPER-FICI MOLTO SPORCHE6.14.5 OPERAZIONI POST LAVAGGIO7. INFORMAZIONI MANUTENZIONE7.1 SERBATOI7.2 TUBO DI ASPIRAZIONE7.3 TERGIPAVIMENTO7.4 ACCESSORI7.5 CORPO MACCHINA7.6 BATTERIE7.7 DISGIUNTORE TERMICO7.8 PERIODICITÀ7.8.1 OPERAZIONI GIORNALIERE7.8.2 OPERAZIONI SETTIMANALI7.8.3 OPERAZIONI AD INTERVALLI ESTESI7.9 RICAMBI CONSIGLIATI8. INFORMAZIONI SUL CONTROLLO DIESERCIZIO8.1 LA MACCHINA NON FUNZIONA8.2 LA MACCHINA NON AVANZA8.3 NON GIRANO LE SPAZZOLE8.4 NON SCENDE O SCENDE TROPPOPOCA SOLUZIONE DETERGENTE8.5 MANCA ASPIRAZIONE8.6 POCA ASPIRAZIONE8.7 IL MOTORE SPAZZOLE O IL MOTOREASPIRAZIONE NON SI FERMANO8.8 IL TERGIPAVIMENTO NON PULISCE ONON ASCIUGA BENE8.9 IL CARICABATTERIA NON FUNZIONA8.10 LE BATTERIE NON SI CARICANO ONON MANTENGONO LA CARICA
2. INFORMAZIONI GENERALI2.1 SCOPO DEL MANUALEPer facilitare la consultazione e la rilettura degli argomentid’interesse, fare riferimento all’indice postoall’inizio della sezione della propria lingua.Il presente manuale è stato redatto dal costruttoree costituisce parte integrante del prodotto; inquanto tale deve essere conservato con cura pertutta la vita della macchina fino alla demolizione.Il cliente deve accertarsi che gli operatori abbianoletto o conoscano il contenuto del presente manualeal fine di attenersi scrupolosamente alle istruzioniqui descritte.Solamente la costante osservanza delle indicazionifornite in questo manuale permette di ottenere i miglioririsultati in termini di sicurezza, prestazioni, efficaciae durata nel tempo del prodotto ora in vostropossesso. Il non attenersi correttamente a questeregole, potrà potenzialmente provocare danni all’uomo,alla macchina, alla superficie lavata ed all’ambienteche in nessun caso potranno essereimputati al costruttore.Il presente manuale si riferisce dettagliatamentealla macchina e fornisce indicazioni e descrizioni relativeesclusivamente a batterie e caricabatteria(opzionali) di cui disponiamo.Le batterie ed il caricabatterie sono componentifondamentali per completare la macchina e ne condizionanoil funzionamento in termini di autonomiae prestazioni. Solamente la corretta combinazionefra i due accessori (batterie e caricabatterie) permettedi ottenere il massimo delle prestazioni edevita grosse perdite di denaro. Per informazioni dettagliatea riguardo, è essenziale far riferimento aimanuali specifici di batterie e caricabatterie.I caricabatterie e le batterie che suggeriamo (opzionali)assicurano la migliore combinazione con lamacchina ed offrono, oltre ad un’eccezionale versatilità(caricabatterie), standard qualitativi e prestazionaliai vertici della categoria.2.2 TERMINOLOGIA E LEGENDA SIMBOLIPer una maggior chiarezza e per evidenziare inmodo adeguato i vari aspetti delle istruzioni descritte,sono stati utilizzati termini e simboli che quidi seguito definiti ed illustrati:- Macchina. Questa definizione sostituisce la denominazionecommerciale a cui fa riferimento questomanuale.- Operatore. Lo sono le persone che normalmenteutilizzano la macchina, ne conoscono gli aspetti difunzionamento, ma non hanno competenza tecnichespecifiche per poter eseguire interventi che larichiedano.- Tecnico. Lo sono le persone che possiedonoquell’esperienza, preparazione tecnica, conoscenzalegislativa e normativa che permettono di eseguireogni tipo di intervento necessario, con la facoltà diriconoscere ed evitare possibili pericoli durante l’installazione,l’uso, la movimentazione e la manutenzionedella macchina.- SIMBOLO INDICAZIONE ( ☞) Sono informazionidi particolare importanza al fine di evitare guastialla macchina.- SIMBOLO ATTENZIONE ( ! ) Sono informazioniestremamente importanti al fine di evitare seridanni alla macchina e all’ambiente in cui si opera.- SIMBOLO PERICOLO () Sono informazioni vitalial fine di evitare gravi (o estreme) conseguenzealla salute delle persone e all’integrità del prodottoe dell’ambiente in cui opera.2.3 IDENTIFICAZIONE DEL PRODOTTOLa targa identificativa situata sotto il cruscotto contienele seguenti informazioni:• identificazione del costruttore• marchio CE• codice del modello• modello• potenza nominale complessiva• numero di serie (n° di matricola)• anno di fabbricazione• peso a massimo carico2.4 UTILIZZO PROPRIOLa macchina in questione è una lavasciuga pavimenti:deve essere utilizzata per il lavaggio ed aspirazionedi liquidi di pavimenti piani, rigidi,orizzontali, lisci o moderatamente rugosi, uniformie liberi da ingombri in ambienti sia civili che industriali.Ogni altro utilizzo è vietato, Vi preghiamo difare riferimento attentamente alle informazioni sullasicurezza riportate nel presente manuale.La lavasciuga distribuisce sulla superficie da trattareuna quantità di soluzione (regolabile opportunamente)d’acqua e detergente mentre le spazzoleeffettuano la rimozione dello sporco a terra. L’impiantodi aspirazione di cui la macchina è dotata,attraverso un tergipavimento a terra, permette diasciugare perfettamente in un solo passaggio i liquidie lo sporco appena rimosso dalle spazzolefrontali.Associando opportunamente un detergente per lapulizia con i vari tipi di spazzole (o dischi abrasivi)disponibili, la macchina è in grado di adattarsi atutte le combinazioni di tipi di pavimento e sporco.2.5 MODIFICHE TECNICHEQuesta macchina è stata concepita e costruita inaccordo con i fondamentali requisiti per la sicurezzae la salute dell’utilizzatore previsti dalle direttive europee,per questo è stato apposto il marchio CE sull’etichettaidentificativa. Le direttive europee per lequali l’apparecchio risulta conforme sono citate nelCertificato di conformità, allegato al presentemanuale. Questo certificato risulterà invalido qualoral’apparecchio subisca qualsiasi tipo di modifica11
non precedentemente accordata con il costruttore.Il costruttore si riserva il diritto di apportare, senzaalcun preavviso, modifiche tecniche al prodotto attead aggiornarlo o migliorarlo tecnicamente. Per questomotivo qualche dettaglio della macchina in Vostropossesso potrà risultare diverso dalleinformazioni sui cataloghi commerciali o dallestesse raffigurazioni contenute in questo libretto,senza che, per questo, vengano compromesse la sicurezzae le informazioni fornite a riguardo.3. INFORMAZIONI SULLA SICUREZZA3.1 RACCOMANDAZIONI FONDAMENTALI(☞) Leggere attentamente il “manuale istruzioniper l’uso” prima di procedere alle operazionidi avviamento, impiego,manutenzione, manutenzione ordinaria, oqualsiasi altro intervento sulla macchina.( ! ) Rispettare rigorosamente tutte le prescrizionicontenute nel presente manuale edin quelli relativi a batterie e caricabatterie(con particolare attenzione per quelle di attenzionee pericolo).Il costruttore declina ogni responsabilità perdanni a persone o cose conseguenti all’inadempienzadelle suddette prescrizioni.(☞) Prima dell’utilizzo della macchina, assicurarsiche ogni componente sia correttamente posizionato.( ! ) La macchina deve essere utilizzata solo da personaleche sia stato addestrato all’impiego, cheabbia dimostrato la propria capacità e che sia statoespressamente incaricato all’uso. Per evitare l’usonon autorizzato, custodire la macchina a riposo inun luogo non accessibile ad estranei ed estrarre lachiave dal quadro dei comandi.( ! ) L’impiego della macchina è vietato ai minori.( ! ) Non destinare questa macchina ad usi diversida quelli espressamente previsti. Valutare il tipo diedificio nel quale si opera e rispettare scrupolosamentele norme e le condizioni di sicurezza lì vigenti.() Non utilizzare la macchina in luoghi non adeguatamenteilluminati, in ambienti esplosivi, in presenzadi sporco nocivo alla salute (polveri, gas,ecc.), su strade o passaggi pubblici ed in ambientiesterni in genere.( ! ) Il campo di temperatura previsto per l’utilizzodella macchina è tra +4°C e + 35°C; depositare lamacchina a riposo in un ambiente asciutto e noncorrosivo dove la temperatura sia compresa tra +10°C e + 50°C.Il campo di umidità previsto per la macchina inqualsiasi condizione si trovi è tra 30% e 95%.() Non usare o aspirare mai liquidi, gas, polverisecche, acidi e solventi (es. diluenti per vernici, acetone,ecc.), anche se diluiti, infiammabili o esplosivi(es. benzina, olio combustibile, ecc.); non aspiraremai oggetti in fiamme od incandescenti.( ! ) Non impiegare la macchina su pendenzao rampe superiori al 2% .In caso di piccole pendenze non utilizzare la macchinain modo trasversale, manovrandola semprecon cautela e non facendo inversioni. Nel trasportosu rampe o pendenze più elevate, usare la massimaattenzione per evitare ribaltamenti e/o accelerazioniincontrollate. Utilizzare solamente la velocità piùbassa! Affrontare rampe e/o gradini esclusivamentecon testata spazzole e tergipavimento sollevati.( ! ) Non parcheggiare mai la macchina inpendenza.(☞) La macchina non deve essere mai lasciata incustoditacon chiave inserita e collegata; abbandonarlasolo dopo aver scollegato e disinserita lachiave, averla assicurata contro movimenti accidentalie scollegata dall’eventuale alimentazioneelettrica.() Nell’uso prestare attenzione a terze persone,in particolare a bambini presenti nell’ambiente incui si opera.( ! ) Non utilizzare la macchina per il trasporto dipersone/cose o il traino di cose. Non trainare lamacchina.(☞) Non utilizzare la macchina come banco d’appoggioper nessun peso e per nessun motivo. Nonostruire le aperture di ventilazione e di smaltimentocalore.( ! ) Non rimuovere, modificare ed eludere i dispositividi sicurezza.( ! ) Utilizzare sempre le protezioni individuali perla sicurezza dell’operatore: grembiule o tuta protettiva,scarpe antiscivolo ed impermeabili, guanti digomma, occhiali e cuffie di protezione, mascherineper la protezione delle via respiratorie. Prima di iniziarea lavorare, togliersi monili, orologi, cravatteed altro potenzialmente in grado di provocare graviinfortuni.( ! ) Non mettere le mani tra le parti in movimento.(☞) Non impiegare detergenti diversi da quelli previstie attenersi alle prescrizioni indicate nelle relativeschede di sicurezza. Raccomandiamo diconservare i detergenti in luogo inaccessibile aibambini e inoltre, in caso di contatto con gli occhi,di lavare immediatamente e abbondantemente conacqua e, in caso d’ingestione, di consultare immediatamenteun medico.Accertarsi che le prese di corrente per l’alimentazionedel caricabatterie siano collegate ad idonearete di terra e che siano protette da interruttori magnetotermicie differenziali.() Se si equipaggia la macchina con batterie algel è essenziale assicurarsi della corretta regolazionedell’indicatore di scarica posizionato sul cruscotto.Rivolgersi al proprio rivenditore o farriferimento al paragrafo specifico.( ! ) E’ indispensabile osservare le istruzioni dellacasa produttrice delle batterie ed osservare le disposizionidel Legislatore. Mantenere le batterie12
sempre pulite ed asciutte al fine di evitare correntidi dispersione superficiale. Proteggere le batterieda impurità, per esempio da polvere metallica.() Non appoggiare utensili sulle batterie: pericolodi cortocircuito e di esplosione.() Nell’uso dell’acido per batterie, osservare scrupolosamentele istruzioni di sicurezza relative.In presenza di campi magnetici particolarmente elevati,valutare l’eventuale effetto sull’elettronica dicontrollo.Non lavare mai la macchina con getti d’acqua.(☞) I fluidi recuperati contengono detergenti, disinfettanti,acqua, materiale organico ed inorganicorecuperato durante le fasi di lavoro: essi vannosmaltiti seguendo la vigente legge in materia.( ! ) In caso di guasto e/o cattivo funzionamentodella macchina, spegnerla immediatamente (scollegandoladalla rete di alimentazione elettrica odalle batterie) e non manometterla.Rivolgersi ad un centro di assistenza tecnica del costruttore.() Tutte le operazioni di manutenzione o sostituzionedegli accessori devono essere eseguite in ambientiadeguatamente illuminati e solamente dopoaver scollegato la macchina dall’alimentazione elettricastaccando il connettore batteria.(☞) Far effettuare qualsiasi genere di interventosull’impianto elettrico e tutte le operazioni di manutenzionee riparazione (particolarmente quellenon esplicitamente descritte in questo manuale)solo da personale specializzato esperto nel settoree nelle rilevanti norme di sicurezza.(☞) E’ consentito solo l‘uso di accessori e ricambioriginali forniti unicamente dal Costruttorein quanto solo questi offrono lacertezza che l’apparecchio possa funzionarein modo sicuro e senza inconvenienti. Nonusare parti smontate da altre macchine oaltri kit come ricambi.Qualora si decida di non utilizzare più la macchina,si raccomanda di asportare le batterie e di smaltirlein modo eco compatibile secondo quanto previstodalla norma europea 91/157/EEC o depositarle inun centro di raccolta autorizzato.Per lo smaltimento della macchina agire secondo lalegislazione vigente nel luogo di utilizzo:- la macchina va scollegata dalla rete, svuotata daliquidi e pulita;- la macchina va quindi scomposta in gruppi di materialiomogenei (plastiche in accordo a quanto indicatodal simbolo di riciclabilità, metalli, gomma,imballi). In caso di componenti contenenti materialidiversi, rivolgersi a enti competenti; ciascun gruppoomogeneo va smaltito in accordo alla legge in materiadi riciclo.Si raccomanda inoltre di rendere innocue quelleparti della macchina suscettibili di pericolo, specialmenteper i bambini.(☞) Prima di ogni utilizzo, controllare la macchina,in particolare, controllare che il cavo di ricarica dellabatteria ed il connettore siano in buone condizionie sicuri per operare. Se non sono in perfette condizioni,non utilizzare la macchina per nessun motivoprima della riparazione da parte di uno specialistaautorizzato.(☞) Spegnere immediatamente il motore di aspirazionese si notano fuoriuscite di schiuma o liquido.(☞) Non utilizzare la macchina su pavimenti tessiliquali tappeti, moquette, ecc.L’utilizzo di cere, detergenti schiumosi o dispersionilungo i tubi, possono provocare alla macchina problemiseri od ostruire gli stessi tubi.3.2 RUMOROSITÀ E VIBRAZIONILa macchina è per utilizzo interno e per questo nonè soggetta alle direttive di riferimento.4. INFORMAZIONI SULLA MOVIMENTA-ZIONE4.1 SOLLEVAMENTO E TRASPORTO DELL’IM-BALLO( ! ) Durante tutte le operazioni di sollevamento otrasporto, assicurarsi di aver saldamente ancoratola macchina imballata, al fine di evitare ribaltamentio cadute accidentali.Le operazioni di carico e scarico dagli automezzi,devono essere effettuate con illuminazione adeguata.La macchina imballata deve essere movimentatacon mezzi adeguati, prestando attenzione a nondanneggiare/urtare l’imballo in nessuna parte, noncapovolgerlo, ed utilizzare la necessaria cura nell’appoggiarloa terra.(☞) Tutte queste indicazioni valgono anche per lebatterie ed il caricabatterie.4.2 CONTROLLO ALLA CONSEGNA(☞) Al momento della consegna della merce (macchina,batteria o caricabatteria) da parte del trasportatore,verificare con attenzione l’integritàdell’imballo e del suo contenuto. Nel caso quest’ultimoavesse subito danni, farlo notare al trasportatore,e riservarsi, per iscritto (selezionare suldocumento la dicitura “riserva”), di presentare la richiestadi risarcimento, prima di accettare la merce.4.3 SBALLAGGIO( ! ) Indossare gli indumenti protettivi ed utilizzaregli strumenti adeguati per limitare i rischi d’infortunio.Per la macchina, procedere secondo la seguente sequenza:Se la macchina è confezionata con involucro in cartone:- tagliare ed eliminare le regge plastiche con forbiceo tronchese.- Togliere, sfilando dall’alto, l’involucro in cartone.- Togliere le buste all’interno e verificarne il conte-13
nuto (manuale di uso e manutenzione, connettoreper caricabatterie)- Togliere le staffe metalliche o regge plastiche chefissano la macchina al pallet.- Liberare dall’imballo la spazzola ed il tergipavimento.- Far scendere la macchina (spingendola all’indietro)dal pallet utilizzando un piano inclinato bensaldo al pavimento ed al pallet.Se la macchina è confezionata con gabbia di legno:- staccare tutte le pareti di legno dal pallet, partendoda quella superiore.- Togliere il film protettivo dalla macchina.- Togliere le staffe metalliche o regge plastiche chefissano la macchina al pallet.- Liberare dall’imballo la spazzola ed il tergipavimento- Far scendere la macchina (spingendola all’indietro)dal pallet utilizzando un piano inclinato bensaldo al pavimento ed al pallet.Procedere con le stesse precauzioni ed indicazioniper togliere dall’imballo il caricabatterie opzionale(estraendolo dall’alto dell’imballo per le maniglieapposite) e la batteria opzionale.Allontanata la macchina da tutti gli imballi, si puòprocedere al montaggio degli accessori e delle batteriesecondo il paragrafo specifico.Si suggerisce di conservare tutti gli elementi dell’imballo,poiché potrebbero tornare utili per proteggerela macchina e gli accessori in un successivotrasporto in altro luogo o presso centri assistenzaautorizzati. Contrariamente, gli imballi devono esseresmaltiti secondo quanto previsto dalle leggi vigentiin materia.4.4 SOLLEVAMENTO E TRASPORTO: MAC-CHINA, BATTERIA E CARICABATTERIA( ! ) Non sollevare mai la macchina con un carrelloelevatore, in nessuna zona del telaio esistono lecondizioni per poter effettuare un sollevamento diretto.Prima della preparazione dell’imballo e del trasporto,occorre:- Svuotare il serbatoio recupero ed il serbatoio soluzione.- Smontare il tergipavimento e le spazzole o trascinatori.- Scollegare e togliere le batterie.Sistemare la macchina sul pallet originale (o su unoequivalente che ne regga il peso e che ne contengagli ingombri) con un piano inclinato.Ancorare saldamente al pallet la macchina e il tergipavimentocon staffe metalliche o altro comunqueadeguato al peso degli elementi.Sollevare il pallet con la macchina per caricarlo sulmezzo di trasporto.Ancorare saldamente la macchina ed il pallet confuni collegate al mezzo di trasporto.Alternativamente, se si dispone di mezzi di trasportoprivati, con rampe inclinate, si può procederea spingere direttamente la macchina senzapallet, assicurandosi comunque di proteggere tuttii componenti e la macchina stessa da urti violenti,umidità, vibrazioni, movimenti accidentali, duranteil trasporto.(☞) Per il sollevamento o l’inserimento (nel vanomacchina) della batteria, servirsi esclusivamente dipersonale e mezzi adeguati (cavi, golfari, ecc.) all’operazionee a supportare il peso dei carichi inquestione. Utilizzare per il trasporto, le stesse precauzionied indicazioni suggerite per la macchinaunite alle indicazioni dello specifico manuale del costruttore.Il caricabatterie può essere trasportato sui supportidi cui dispone, sia verticalmente che orizzontalmente,utilizzare le stesse precauzioni ed indicazionipreviste per la macchina unite a quelle previstenello specifico manuale.5. INFORMAZIONI INSTALLAZIONE5.1 BATTERIEIndipendentemente dalla tipologia di costruzione,le prestazioni di una batteria si indicano con unacapacità sempre riferita ad un periodo di scarica.Un altro valore importante sono il numero di scarichepossibili. La capacità è espressa in ampere perora (Ah), mentre il periodo di scarica si indica generalmentein 20 ore (C20 oppure 20h, oppure nonespressamente indicato) o 5 ore (C5 oppure 5h). Icicli di scarica/carica sono l’indicazione del numerodi volte che la batteria supporta la carica nelle miglioricondizioni e in pratica indicano la vita utiledella batteria rispettando tutti gli accorgimenti previsti.Quindi la capacità di una stessa batteria, varia a secondadi quanto velocemente ne utilizzo l’energia(la corrente), per questo i valori della capacitàespressi in C5 o C20 variano così sensibilmente. E’fondamentale considerare questi fattori al fine difare un corretto raffronto fra i prodotti disponibilisul mercato e quanto noi offriamo.Su questa macchina possono essere montate duetipi di batterie diversi per costruzione e caratteristiche.- Batteria a moduli corazzati tubolari al Pb-Acido:richiedono il controllo periodico del livello dell’elettrolitoin ogni elemento!( ! ) Se un elemento rimane scoperto dallasoluzione acida, si ossida in 24 ore e le prestazionidi quell’elemento vengono permanentementecompromesse.() Fare riferimento al manuale delle batterie perevitare rischi fisici ed economici.- Batteria a moduli al gel: questo tipo di batterienon richiede manutenzione, non richiede particolariambienti per la ricarica (in quanto non emettono14
gas nocivi) e quindi sono molto consigliate.( ! ) Non è assolutamente scontato che batteriee caricabatterie con le stesse caratteristichetecniche di quelli che offriamo dianorisultati analoghi, solamente una perfettacompatibilità fra questi elementi (batterie alPb-Acido, batterie al gel e caricabatterie) tutelanole prestazioni, la vita utile, la sicurezzaed il valore economico investito.5.1.2 PREPARAZIONE BATTERIA( ! ) Le caratteristiche tecniche delle batterie utilizzatedevono corrispondere a quelle indicate nel paragrafodelle informazioni tecniche. L’utilizzo dibatterie diverse può provocare seri danni alla macchinao può richiedere ricariche più frequenti.( ) Durante l’installazione o qualsiasi tipo di manutenzionedelle batterie, l’operatore deve esseremunito degli accessori protettivi adeguati per evitareinfortuni. Operare lontano da fiamme libere,non cortocircuitare i poli delle batterie, non causarescintille e non fumare.Le batterie sono normalmente fornite cariche consoluzione acida (per quelle al Pb-Acido) e pronteper l’impiego; seguire in ogni caso il manuale allegatoalla batteria ed attenersi attentamente alle indicazionisulla sicurezza e sulle modalità d’impiegocontenute.5.1.3 INSTALLAZIONE BATTERIEPer inserire le batterie nel vano ( Foto I - 2) occorretenere il piatto spazzola abbassato;per aprire il vano batterie, tirare la leva di apertura( Foto H - 1) e sollevare il serbatoio soluzione ( FotoO - 3 );sganciare il fermaglio a clip ( Foto I - 1) posto sulcavo di sollevamento del piatto spazzola.Inserire le batterie nell’apposita sede ( Foto I - 2)controllando attentamente che esse siano in perfettostato.5.1.4 COLLEGAMENTO BATTERIE( ! ) Queste operazioni devono essere eseguite dapersonale specializzato.Eseguire l’installazione e la carica delle batterie inun luogo ventilato e secco, lontano da sorgenti dicalore e da sostanze corrosive. Assicurarsi della corrispondenzadelle tensioni tra batterie e caricabatterie.Proteggere la rete con un interruttore di tiporitardato o un fusibile di carico superiore all’assorbimentomassimo del caricabatterie. Rispettare lepolarità della presa batteria.- Staccare il connettore Anderson del cablaggio batteriedal connettore Anderson del cablaggio macchina( Foto D - 7 )( Foto F - 8 ). Prendere semprein mano i connettori, non tirare mai i cavi.Nella Foto G è riportato lo schema di connessionedelle batterie per i modelli BSW1400 - <strong>BT</strong>.( ) Fissare il cablaggio batteria alla batteriacollegando i morsetti esattamente e solo suipoli contraddistinti dallo stesso simbolo (cablaggiorosso “+”, cablaggio nero “-“)! Uneventuale cortocircuito della batteria puòprovocare esplosioni!Verificato che tutti i comandi sul pannello siano inposizione “0” o comunque di riposo, collegare ilconnettore della batteria a quello della macchina.( ! ) Chiudere il vano batteria facendo attenzione anon schiacciare alcun cablaggio.Nella Foto I - 3 è visibile come deve esser eseguitoil corretto collegamento delle batterie per i modelliBSW1400 - <strong>BT</strong>.5.1.5 CONFIGURAZIONE INDICATORE DI SCARICA BATTERIEAl momento dell’acquisto della lavasciuga la scheda elettronica è configurata per il funzionamento conbatterie al GEL. Qualora si intenda equipaggiare la lavasciuga con batterie al Pb-Acido occorre agire comesegue:Modello “ BSW1400”( ! ) PER ENTRARE NELLA MODALITA’ DI CONFIGURAZIONE DELLE SOGLIE DELLA BATTERIA:1) Premere contemporaneamente i tasti “ACCENSIONE SPAZZOLA” ( Foto C - 1) e “ACCENSIONE ASPI-RATORE” ( Foto C - 2) entro 2 secondi dall’accensione della scheda tramite l’interruttore a chiave ( FotoD - 1): i 3 LED della batteria verranno accesi ( Foto C - 3A, 3B, 3C).2) Premere il tasto “ACCENSIONE ASPIRATORE” ( Foto C - 2) entro 5 secondi dall’azione precedente. Unavolta premuto il tasto si entra nella modalità di configurazione prevista: si accendono i LED giallo e verdedella batteria ( Foto C - 3A, 3B).( ! ) LE IMPOSTAZIONI DI CONFIGURAZIONE SONO VISIBILI SUL LED SPAZZOLE ( Foto C - 2A):1) Spento: Pb-Acido.2) Acceso: Gel.( ! ) PER MODIFICARE LE IMPOSTAZIONI DI CONFIGURAZIONE:Premere il tasto “ACCENSIONE SPAZZOLA” ( Foto C - 1) .15
( ! ) PER SALVARE LE IMPOSTAZIONI E USCIRE DALLA MODALITA’:Premere il tasto “ACCENSIONE ASPIRATORE” ( Foto C - 2).Ad impostazione effettuata si avranno differenti livelli di scarica della batteria, con interventi differenziatisulle funzioni della macchina come specificato nella tabella seguente:Funzionamento indicatore di scarica batterie - MODELLO “BSW1400”Tensione VoltsTipo di batterieLED indicatoredi stato di caricabatteriaLED indicatoredi funzionamentospazzolaPb-Acido GEL Segnalazione Segnalazione AZIONE24,0 24,0 Verde acceso Acceso Tutto funzionante21,5 22,5 Giallo acceso Acceso Tutto funzionante20,5 21,5 Rosso acceso Lampeggiante Il motore spazzolanon funziona20,0 21,0 RossolampeggianteLampeggiantel motori spazzola easpirazionenon funzionanoModello “ <strong>BT</strong>”( ! ) PER ENTRARE NELLA MODALITA’ DI CONFIGURAZIONE DELLE SOGLIE DELLA BATTERIA:1) Premere contemporaneamente i tasti “RIDUZIONE VELOCITA’ “ ( Foto E - 3) e “ACCENSIONE ASPI-RATORE” ( Foto E - 6) entro 2 secondi dall’accensione della macchina tramite l’interruttore a chiave ( FotoF - 1). Il secondo LED di indicazione della velocità risulterà acceso ( Foto E - 3B).2) Premere il tasto “AUMENTO VELOCITA’ ” ( Foto E - 4) entro 5 secondi dall’azione precedente. Una voltapremuto il tasto si entra nella modalità di configurazione prevista.( ! ) LE IMPOSTAZIONI DI CONFIGURAZIONE SONO VISIBILI SUI LED DI INDICAZIONE DELLA VELO-CITA:1) I primi due LED ( Foto E - 3A, 3B) indicano il tipo di impostazione delle soglie di intervento dell’indicatoree devono essere entrambi accesi;2) Il terzo e il quarto LED ( Foto E - 3C, 3D) indicano il tipo di batteria; per il tipo Pb-Acido deve essereacceso solo il terzo LED ( Foto E - 3C) mentre per il tipo GEL devono essere accesi entrambi ( Foto E -3C, 3D);( ! ) PER MODIFICARE LE IMPOSTAZIONI DI CONFIGURAZIONE:1) I tasti “AUMENTO VELOCITA’ “ ( Foto E - 4) e “RIDUZIONE VELOCITA’ “ ( Foto E - 3) servono per impostarela soglia di intervento dell’indicatore in modo tale da far accendere i primi due LED dell’indicazionedella velocità2) Il tasto “ACCENSIONE SPAZZOLA” ( Foto E - 5) serve per selezionare le batterie di tipo Pb-Acido mentreil tasto “ACCENSIONE ASPIRATORE ” ( Foto E - 6) serve per selezionare le batterie di tipo GEL.16
( ! ) PER SALVARE LE IMPOSTAZIONI E USCIRE DALLA MODALITA’:Premere contemporaneamente i tasti “RIDUZIONE VELOCITA’ “ ( Foto E - 3) e “ACCENSIONE ASPIRA-TORE” ( Foto E - 6) .Ad impostazione effettuata si avranno differenti livelli di scarica della batteria, con interventi differenziatisulle funzioni della macchina come specificato nella tabella seguente:Funzionamento indicatore di scarica batterie - MODELLO “<strong>BT</strong>”Tensione VoltsTipo di batterieLED indicatoredi stato di caricabatteriaLED indicatoredi funzionamentospazzolaPb-Acido GEL Segnalazione Segnalazione AZIONE24,0 24,0 Verde acceso Acceso Tutto funzionante21,5 22,5 Giallo acceso Acceso Tutto funzionante20,5 21,5 Rosso acceso Lampeggiante Non funziona ilmotore spazzola20,0 21,0 RossolampeggianteLampeggianteNon funziona piùnessun motoreNel caso non si completi il ciclo di configurazione leimpostazioni rimangono invariate come all’origine.( ! ) Si raccomanda l’intervento dell’assistenza o diun tecnico in caso di problemi con le impostazioniriportate. Non aprire né manomettere il circuitoelettrico.5.2 CONFIGURAZIONE CARICABATTERIAFar eseguire solo da Tecnici specializzati. Al momentodell’acquisto della lavasciuga il caricabatterieintegrato è configurato per il funzionamento conbatterie al GEL. Qualora si intenda equipaggiare lalavasciuga con batterie al Pb-Acido occorre agirecome segue:( ! ) VISUALIZZAZIONE DELLE IMPOSTAZIONI DELCARICABATTERIALe impostazioni di carica del caricabatteria sono indicatedal lampeggio dei LED luminosi all’accensionedel carica batteria stesso.- LED luminoso ROSSO ( Foto M - 2 ) lampeggia2 volte = caricabatteria configurato per batteriePB-AcidoLED luminoso VERDE ( Foto M - 3 ) lampeggia2 volte = caricabatteria configurato per batterieGELE’ possibile eseguire questo tipo di verifica senzache le batterie siano collegate.( ! ) CONFIGURAZIONE DIP-SWITCH PER CARICA-BATTERIA CBHD1Per impostare la curva di carica per batterie al Pb-Acido o batterie al GEL è necessario agire sull’interruttore( dip-switch ) posto all’interno delcaricabatteria (Foto M - 4).Per accedere al dip-switch occorre smontare il coperchioinferiore del caricabatteria (Foto M - 1) oppureil tappo di plastica (Foto M - 5) .A partire da sinistra verso destra, l’unico dip-switchche ha effetto è il primo, vale a dire quello indicatodal numero 1 del dip-switch SW1 (Foto M - 6 ).Posizione Dip-Switch 1ONOFFTipo di caricaCurva di carica perbatterie Pb-AcidoCurva di carica perbatterie GELNOTA BENE: tutti gli altri dip-switch NON DE-VONO essere spostati in quanto non si produrrebbealcun tipo effetto sul funzionamento delcaricabatteria.17
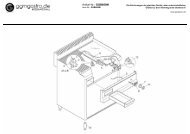
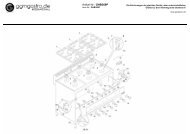
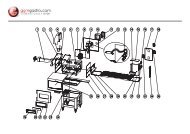
6. INFORMAZIONI UTILIZZO6.1 PREPARAZIONE MACCHINA( ! ) Prima di iniziare a lavorare, indossare scarpeantiscivolo, guanti ed ogni altro dispositivo di protezionepersonale indicato dal fornitore del detergenteimpiegato o richiesto dall’ambiente in cui siopera.(☞) Eseguire le seguenti operazioni prima di iniziarea lavorare, fare riferimento ai relativi paragrafiper una dettagliata descrizione di queste fasi:Controllare il livello di carica della batteria e procederealla ricarica, se necessario.Montare le spazzole o i dischi trascinatori (con i dischiabrasivi) del tipo opportuno per la superficieed il lavoro da svolgere.Montare il tergipavimento, verificare che sia ben fissato,collegato al tubo di aspirazione e con le lamedi asciugatura non eccessivamente usurate.Verificare che il serbatoio di recupero sia vuoto, secosì non fosse svuotarlo completamente.Controllare e chiudere completamente il comandodi rilascio della soluzione detergente.Riempire il serbatoio soluzione attraverso il foro anteriorecon acqua pulita e detergente non schiumogenoin concentrazione adeguata. Lasciare undislivello di 2 cm fra la bocca del tappo ed il livellodel liquido.(☞) Per evitare pericoli, si consiglia di prendere dimestichezzacon i movimenti della macchina, facendodelle prove su una superficie ampia e senzaostacoli.Per ottenere i migliori risultati in termini di pulizia edurata dell’apparecchiatura suggeriamo alcunesemplici, ma importanti procedure:- Individuare l’area di lavoro, allontanando i possibiliostacoli d’intralcio; se la superficie è moltoampia, operare per aree rettangolari contigue e parallelefra loro.- Scegliere una traiettoria di lavoro rettilinea ed iniziarea lavorare dalla zona più remota per evitare diripassare su aree già pulite.6.2 STRUTTURA E FUNZIONI MACCHINAFOTO A1 INTERRUTTORE GENERALE2 INTERRUTTORE MOTORE SPAZZOLA3 INTERRUTTORE MOTORE ASPIRAZIONEFOTO B1 CAVO DI ALIMENTAZIONE2 LEVA DOSAGGIO SOLUZIONE DETER-GENTE3 LEVA DI SOLLEVAMENTO DEL PIATTOSPAZZOLA4 LEVA DI SOLLEVAMENTO DEL TERGIPA-VIMENTO5 LEVA DI COMANDO6 TUBO SVUOTAMENTO SERBATOIO RE-CUPERO18FOTO C1 INTERRUTTORE MOTORE SPAZZOLA1A INDICATORE LUMINOSO “LED” FUN-ZIONAMENTO MOTORE SPAZZOLA2 INTERRUTTORE MOTORE ASPIRAZIONE2A INDICATORE LUMINOSO “LED” FUN-ZIONAMENTO MOTORE ASPIRAZIONE3 INDICATORE LUMINOSO STATO DI CA-RICA BATTERIE3A INDICATORE LUMINOSO “LED” VERD<strong>EB</strong>ATTERIA CARICA3B INDICATORE LUMINOSO “LED” GIALLOBATTERIA CARICA 50%3C INDICATORE LUMINOSO “LED” ROSSOBATTERIA SCARICAFOTO D1 INTERRUTTORE GENERALE A CHIAVE2 LEVA DI COMANDO3 LEVA DI SOLLEVAMENTO DEL PIATTOSPAZZOLA4 LEVA DI SOLLEVAMENTO DEL TERGIPA-VIMENTO5 DISGIUNTORE TERMICO MOTORE SPAZ-ZOLA6 TUBO SVUOTAMENTO SERBATOIO REC-UPERO7 CONNETTORE BATTERIE8 LEVA DOSAGGIO SOLUZIONE DETER-GENTEFOTO E1 INDICATORE LUMINOSO STATO DI CA-RICA BATTERIE1A INDICATORE LUMINOSO “LED” VERD<strong>EB</strong>ATTERIA CARICA1B INDICATORE LUMINOSO “LED” GIALLO1CBATTERIA CARICA 50%INDICATORE LUMINOSO “LED” ROSSOBATTERIA SCARICA2 INDICATORE DI MARCIA AVANTI/INDIE-TRO3 TASTO SELETTORE PER LA RIDUZIONEDELLA VELOCITA’ DI AVANZAMENTO3A VELOCITA’ DI AVANZAMENTO 13B VELOCITA’ DI AVANZAMENTO 23C VELOCITA’ DI AVANZAMENTO 33D VELOCITA’ DI AVANZAMENTO 44 TASTO SELETTORE PER AUMENTODELLA VELOCITA’ DI AVANZAMENTO5 INTERRUTTORE MOTORE SPAZZOL<strong>A5</strong>A INDICATORE LUMINOSO “LED” FUN-ZIONAMENTO MOTORE SPAZZOLA6 INTERRUTTORE MOTORE ASPIRAZIONE6AINDICATORE LUMINOSO “LED” FUN-ZIONAMENTO MOTORE ASPIRAZIONE
FOTO F1 INTERRUTTORE GENERALE A CHIAVE2 LEVA DI COMANDO TRAZIONE MARCIAAVANTI / RETROMARCIA3 LEVA DI SOLLEVAMENTO DEL PIATTOSPAZZOLA4 LEVA DI SOLLEVAMENTO DEL TERGIPA-VIMENTO5 DISGIUNTORE TERMICO MOTORE SPAZ-ZOLA6 DISGIUNTORE TERMICO MOTORE TRA-ZIONE7 TUBO SVUOTAMENTO SERBATOIO RE-CUPERO8 CONNETTORE BATTERIE9 LEVA DOSAGGIO SOLUZIONE DETER-GENTEFOTO GSCHEMA DI CONNESSIONE DELLE BAT-TERIEFOTO H1 LEVA APERTURA VANO BATTERIE2 APERTURA PER RIEMPIMENTO SERBA-TOIO SOLUZIONE CON TAPPO IN SPU-GNAFOTO I1 FERMAGLIO DI SGANCIO DEL CAVOSOLLEVAMENTO DEL PIATTOSPAZZOLA2 VANO ALLOGGIAMENTO BATTERIE CONBATTERIE 12V3 CONNESSIONE DELLE BATTERIEFOTO L1 CARICABATTERIE INCORPORATO2 CAVO DI ALIMENTAZIONE PER RICA-RICA BATTERIEFOTO M1 COPERCHIO DEL CARICABATTERIA2 INDICATORE LUMINOSO “LED” ROSSOBATTERIA SCARICA3 INDICATORE LUMINOSO “LED” VERD<strong>EB</strong>ATTERIA CARICA4 INTERRUTTORI DIP-SWITCH5 TAPPO PER ACCESSO AI DIP-SWITCH6 DIP-SWITCH NR. 1 PER SETTAGGIOCURVA DI CARICA PB-ACIDO / GEL5 RUOTA DEL TERGIPAVIMENTO6 POMELLO DI SGANCIO DEL TERGIPAVI-MENTO7 POMELLO DI REGOLAZIONE DELL’INCLI-NAZIONE DEL TERGIPAVIMENTOFOTO O1 COPERCHIO DEL VANO FILTRO MOTOREASPIRAZIONE2 APERTURA PER RIEMPIMENTO SERBA-TOIO SOLUZIONE3 SERBATOIO RECUPERO4 SERBATOIO SOLUZIONE5 PARASPRUZZIFOTO P1 GALLEGGIANTE2 FILTRO DELL’ASPIRAZIONE3 OBLO’ ISPEZIONE SERBATOIO RECU-PERO6.3 RICARICA DELLE BATTERIECollegare il cavo di prolunga al cavo di alimentazionedel caricabatteria ( Foto L - 2 ) e connetterload una presa di rete.All’accensione il caricabatterie esegue un test sullatensione della batteria per decidere se iniziare omeno il processo di ricarica. Se la batteria non èconnessa al caricabatteria lampeggerà il LED rosso( Foto M - 2 ). Se il test ha dato esito positivo trascorso1 secondo avrà inizio la carica delle batterie,con il LED rosso acceso.Durante il processo di carica l’avanzamento dellacarica è segnalato tramite tre indicatori luminosiLED: rosso, giallo e verde.Il LED verde ( Foto M - 3 ) segnala che il processodi carica è terminato.Scollegare il caricabatteria dalla rete.LED RossoLED GialloLED Verde( ! ) Per ulteriori informazioni consultare il manualedi utilizzo e sicurezza del costruttore del caricabatterie.FOTO N1 RUOTA PARACOLPI2 POMELLO DI REGOLAZIONE DELLAPRESSIONE DEL TERGIPAVIMENTO3 TUBO DI ASPIRAZIONE4 POMELLO SMONTAGGIO DELLE LAMEDEL TERGIPAVIMENTOSe la macchina è equipaggiata con batterie Pb-Acido, ricaricare solo in un luogo ben ventilato, sollevareil coperchio superiore ed aprire i tappi dellebatterie.( ) Seguire il manuale di utilizzo e sicurezza delcostruttore delle batterie (vedi paragrafo manutenzionebatterie).19
Se la macchina è equipaggiata con batterie al gel(senza manutenzione), seguire le sottostanti istruzioni.Se la macchina è utilizzata regolarmente:Lasciare sempre collegate le batterie al caricabatteriequando non si sta utilizzando la macchina.Se la macchina non viene utilizzata per lunghi periodi:Caricare la batteria durante la notte dopo l’ultimoutilizzo, poi sconnettere la batteria dalcaricabatteria.Ricaricare la batteria durante la notte prima diusare di nuovo la macchina.Evitare di effettuare ricariche intermedie o incompletein fase di lavoro.Se la macchina è dotata di batterie al Pb-Acido,controllare regolarmente l’intensità del liquido deglielementi con il densimetro: se uno o più elementirisultassero scarichi e gli altri completamente carichi,la batteria è danneggiata e va quindi sostituitao riparata (fare riferimento al manuale di serviziodella batteria.Chiudere i tappi degli elementi ed abbassare il coperchiosuperiore.6.4 MONTAGGIO TERGIPAVIMENTOAvvitare leggermente i due pomelli ( Foto N - 6 ) sulcorpo del tergipavimento.Infilare il tergipavimento nelle apposite sedi situatesul supporto del tergipavimento, assicurandone ilfissaggio avvitando i due pomelli ( Foto N - 6 ).Inserire saldamente il tubo di aspirazione ( Foto N- 3 ) proveniente dalla macchina nel tubo di attaccoposto sul corpo del tergipavimento.6.5 SMONTAGGIO TERGIPAVIMENTOScollegare il tubo di aspirazione dal corpo del tergipavimento.Svitare leggermente i due pomelli ( Foto N - 6 ) etirare verso di sé il tergipavimento per liberarlo dallapropria sede.6.6 SOSTITUZIONE DELLE LAME IN GOMMADEL TERGIPAVIMENTOSmontare il tergipavimento dal suo supporto ( vedi6.5).Svitare completamente i pomelli ( Foto N - 4, N - 6) ed effettuare una pressione sulle teste delle vitisulle quali erano avvitati fino a far uscire dal corpodel tergipavimento il supporto di plastica interno.Sfilare le lame in gomma dal supporto di plastica tirandoleda un’estremità.Inserire sul supporto di plastica la nuova lama ingomma, incastrando i perni di plastica nelle corrispondentiaperture sulla lama.Reintrodurre il supporto di plastica dentro il corpodel tergipavimento e fissarlo saldamente avvitandoi pomelli di ancoraggio ( Foto N - 4, N - 6 ).Rimontare il tergipavimento sul suo supporto ( vedi6.4 ).206.7 REGOLAZIONE TERGIPAVIMENTOIl pomello a vite posto sul supporto del tergipavimento( Foto N - 7 ) regola l’inclinazione del tergipavimentorispetto al suolo. Le due manopole rosseai lati ( Foto N - 2 ), collegate alle ruote posterioridel tergipavimento, servono per regolare la pressionedel tergipavimento sul suolo.La perfetta regolazione prevede che lama ingomma posteriore, strisciando in movimento, flettain ogni suo punto, formando con il pavimento unangolo di 45° circa.Durante il lavoro della macchina (avanzamento) sipuò intervenire sui pomelli ( Foto N - 2, N - 7 ) perregolare l’inclinazione e la pressione del tergipavimentoin modo che l’asciugatura sia uniforme lungotutta la lunghezza del tergipavimento.Tratti umidi indicano un’asciugatura insufficiente;agire sui pomelli di regolazione per ottimizzarne l’efficacia.6.8 MONTAGGIO E SMONTAGGIO DEL PARA-SPRUZZIIl paraspruzzi è fissato al piatto spazzola tramite unfermaglio a molla agganciato al piatto stesso.Per rimuovere il paraspruzzi è sufficiente sganciareil fermaglio a molla e tirare il paraspruzzi verso dise.Per rimontare il paraspruzzi, incastrarlo saldamentesul piatto spazzola, agganciare l’estremità fissa delcavo di acciaio sul piatto spazzola e poi agganciareil fermaglio a molla sull’altra estremità del piattospazzola.6.9 MONTAGGIO E SMONTAGGIO DELLASPAZZOLA( ! ) Non lavorare mai senza spazzole o trascinatorie dischi abrasivi perfettamente installati sulla macchina.Per il montaggio:Assicurarsi che il piatto spazzola sia in posizione sollevata,altrimenti sollevarlo seguendo l’indicazionenel paragrafo specifico.Assicurarsi che la chiave d’accensione sul pannellocomandi sia in posizione di macchina spenta.Posizionare la spazzola sotto il piatto lavante, facendoattenzione che la flangia di aggancio dellaspazzola si trovi sotto l’innesto metallico della macchina.Abbassare il piatto lavante ed avviare la rotazionedella spazzola tramite l’apposito interruttore: inquesto modo la spazzola si aggancia automaticamente.Per il montaggio del disco trascinatore seguire lastessa procedura.( ! ) Non permettere che la lunghezza dei fili dellespazzole si riduca al di sotto di 1 cm.( ! ) Non permettere che lo spessore dei dischi
abrasivi si riduca al di sotto di 1 cm.Lavorare con spazzole troppo consumate o dischiabrasivi troppo sottili, può provocare danni allamacchina ed al pavimento.Controllare regolarmente lo stato di usura di questicomponenti prima di iniziare il lavoro.Per lo smontaggio o la sostituzione:Assicurarsi che il piatto spazzole sia in posizione sollevata,altrimenti sollevarlo seguendo l’indicazionenel paragrafo specifico.Assicurarsi che la chiave di accensione sul pannellocomandi sia in posizione di macchina spenta.Tenendo fra le mani la spazzola sotto il piatto, ruotarlenel senso di rotazione ed abbassarle per liberarledall’innesto metallico.Per lo smontaggio del disco trascinatore seguire lastessa procedura.6.10 RIEMPIMENTO E SCARICO DEL SERBA-TOIO SOLUZIONE(☞) La temperatura dell’acqua o del detergenteimmesso non deve essere superiore ai50°C(☞) Ad ogni riempimento del serbatoio soluzione( Foto O - 4 ), provvedere sempre a svuotare il serbatoiorecupero ( Foto O - 3 ).Per il carico:- Versare nel serbatoio la quantità richiesta del prodottochimico, considerando la quantità percentuale(%) del fornitore, riferita alla capacità del serbatoiopieno indicata nella scheda del prodotto.( ! ) Utilizzare esclusivamente prodotti idonei al pavimentoed allo sporco da rimuovere.- Versare l’acqua nell’apertura di carico posta nellaparte anteriore della macchina ( Foto H - 2, O - 2 ).Lasciare un dislivello di 2 cm fra la bocca del tappoed il livello del liquido. Non riempire oltre questamisura!() La macchina è stata progettata per essereimpiegata con detergenti non schiumogenie biodegradabili, specifici perlavapavimenti. L’utilizzo di altri prodotti chimici,(come ad esempio ipoclorito di sodio,ossidanti, solventi od idrocarburi) può danneggiareo distruggere la macchina.- Seguire le norme di sicurezza specificate nel relativoparagrafo e sul contenitore del detergente.- Per una lista completa dei detergenti adeguati disponibili,contattare il costruttore della macchina.(☞) Utilizzare sempre detergenti non schiumogeni- Non lasciare incustodita la gomma dell’acqua peril riempimento ed inserirla completamente nel serbatoio,potrebbe spostarsi e bagnare parti delicatedella macchina.- Chiudere il serbatoio con il relativo tappo.Per lo scarico:- Svitare il tappo di scarico del serbatoio soluzioneposto nella zona inferiore del serbatoio ed attendereil completo svuotamento.- Richiudere saldamente il tappo di scarico.6.11 SCARICO DEL SERBATOIO DI RECU-PEROLo scarico delle acque sporche deve essere effettuatoin linea con le normative nazionali. L’utilizzatoreha la completa responsabilità di assicurare ilrispetto di queste regole.Quando è terminata la soluzione detergente, primadi procedere ad un nuovo riempimento del serbatoiosoluzione occorre sempre svuotare il serbatoiodi recupero ( Foto O - 3 ).In generale, si può svuotare il serbatoio di recuperotutte le volte che lo si desidera, anche in fasi intermediedel ciclo di lavoro.Il volume del serbatoio di recupero è superiore aquello per la soluzione, perciò non si dovrebbe maiverificare una situazione di potenziale pericolo peril motore di aspirazione; ad ogni buon conto, c’è ungalleggiante di sicurezza ( Foto P - 1 ) che intervienechiudendo il condotto di aspirazione qualorail livello di liquido sporco sia eccessivo.() Se per qualche motivo si nota una perdita diacqua o schiuma da sotto i serbatoi, spegnere immediatamenteil motore di aspirazione e procedereallo svuotamento del serbatoio di recupero.Per scaricare il serbatoio:Guidare la macchina nel luogo adatto per lo scaricodell’acqua sporca, preferibilmente in prossimità diun WC o di uno scolo fognario (osservare le regolenazionali per lo smaltimento delle acque reflue).Spegnere la macchina e togliere la chiave dal pannello.Staccare dal gancio il tubo di scarico ( Foto B - 6, D- 6, F - 7) e tenendolo in alto, togliere il tappo dichiusura.Abbassare il tubo di scarico verso il punto selezionato.L’operazione di svuotamento può essere interrottarapidamente e per ogni esigenza, semplicementetenendo in alto il tubo di scarico.Verificare la quantità di sporco residuo nel serbatoioe, se necessario, lavarlo internamente attraversoil foro di ispezione ( Foto P - 3 ).Terminato lo svuotamento del serbatoio, tappare iltubo di scarico e fissarlo al sostegno dietro la macchina.(☞) Il tappo del tubo di scarico deve essere chiusoperfettamente, senza far passare aria, altrimenti siavrà una perdita di depressione che causerà un’imperfettaasciugatura.21
6.12 NORME SPECIFICHE D’USO DEL MO-DELLO “E “Il modello “E” può essere messo in funzione solamentese la tensione (voltaggio) indicata sulla targhettacorrisponde a quella a disposizione nellostabile e se la presa di corrente è fornita di messaa terra.Non danneggiare il cavo di alimentazione, nonschiacciarlo e non strapparlo.Non passare sopra il cavo di alimentazione con lamacchina. Il cavo potrebbe avvolgersi negli organiin movimento causando un corto circuito.( ) ATTENZIONE!!! - Il modello “E” ha partiin tensione o percorse da corrente, il contattocon le quali può provocare gravi lesioni e persinola morte.- Prima di qualunque operazione sulla macchina ènecessario scollegare la stessa dalla rete elettrica.- Non toccare mai cavi elettrici difettosi o che presentinosegni d’usura.- Prima di accedere all’impianto elettrico occorre disinserirela macchina e staccarla dalla presa di corrente.- Qualora si riscontrassero nei cavi elettrici difetti,danni o screpolature, sostituirli immediatamentecon ricambi originali.- I collegamenti a rete devono essere protetti almenocontro gli spruzzi d’acqua.- Per il collegamento a rete della macchina utilizzaresolo prolunghe conformi alle normative di sicurezzain vigore.- La presa di rete a cui la macchina è collegata deveesser provvista di interruttore salvavita.- E’ assolutamente vietato l’uso della macchina inprossimità di piscine o specchi d’acqua.( ) SITUAZIONI D’EMERGENZAIn casi d’emergenza:- Scollegare immediatamente la macchinadalla rete elettrica.- Applicare immediatamente le misure dipronto soccorso.In caso di incidente, la macchina non deve essererimessa in funzione prima di essere stata esaminatada un tecnico autorizzato dal costruttore.6.13 GUIDA DELLA MACCHINAModello “E”Collegare alle rete il cavo di alimentazione ( Foto B- 1 ) tramite una prolunga.Azionare l’interruttore generale ( Foto A - 1 ) sullaposizione ON.Azionare l’interruttore di accensione della spazzola( Foto A - 2 )( ! ) la spazzola inizierà a girare solo azionandola leva di comando ( Foto B - 5 ).Azionare l’interruttore di accensione dell’aspirazione( Foto A - 3 ).Aprire il rubinetto soluzione abbassando la leva dosaggiodetergente posta dietro la macchina ( FotoB - 2 ), abbassare il gruppo aspirante tramite la levadi sollevamento del tergipavimento ( Foto B - 4 ),abbassare la testata lavante tramite la leva di sollevamento( Foto B - 3 ).Eseguire il lavaggio del pavimento, procedendo lentamentein avanti tirando la leva di comando ( FotoB - 5 ) per azionare la spazzola; al rilascio della levadi comando la rotazione della spazzola si interromperàdopo alcuni secondi.Ricordarsi di sollevare il tergipavimento prima di retrocedereper evitare guasti al tergipavimento.Modello “BSW1400”Verificare la connessione del connettore batterie,posto sul retro della macchina sotto il pannello comandi( Foto D - 7 ).Inserire e girare la chiave di accensione ( Foto D -1 ).Dal pannello comandi, controllare lo stato di caricadelle batterie ( Foto C - 3 );Azionare l’interruttore di accensione della spazzola( Foto C - 1 )( ! ) la spazzola inizierà a girare solo dopoaver azionando la leva di comando ( Foto D -2 ).Azionare l’interruttore di accensione dell’aspirazione( Foto C - 2 ).Aprire il rubinetto soluzione abbassando la leva dosaggiodetergente posta dietro la macchina ( FotoD - 8 ), abbassare il gruppo aspirante tramite la levadi sollevamento del tergipavimento ( Foto D - 4 ),abbassare la testata lavante tramite la leva di sollevamento( Foto D - 3 ).Eseguire il lavaggio del pavimento, procedendo lentamentein avanti tirando la leva di comando ( FotoD - 2 ) per azionare la spazzola; al rilascio della levadi comando la rotazione della spazzola si interromperàdopo alcuni secondi.Ricordarsi di sollevare il tergipavimento prima di retrocedereper evitare guasti al tergipavimento.Modello “<strong>BT</strong>”Verificare la connessione del connettore batterie,posto sul retro della macchina sotto il pannello comandi( Foto F - 8 ).Inserire e girare la chiave di accensione ( Foto F -1 ).Dal pannello comandi, controllare lo stato di caricadelle batterie ( Foto E - 1 ) e, se sufficiente, selezionarela velocità di marcia desiderata ( Foto E - 3,E - 4 ).Azionare l’interruttore di accensione della spazzola( Foto E - 5 )( ! ) la spazzola inizierà a girare solo dopoaver azionando la leva di comando della tra-22
zione ( Foto F - 2 ).Azionare l’interruttore di accensione dell’aspirazione( Foto E - 6 ).Aprire il rubinetto soluzione abbassando la leva dosaggiodetergente posta dietro la macchina ( FotoF - 9 ), abbassare il gruppo aspirante tramite la levadi comando del tergipavimento ( Foto F - 4 ), abbassarela testata lavante tramite la leva di comando( Foto F - 3 ).Eseguire il lavaggio del pavimento procedendo inavanti tirando la leva di comando della trazione (Foto F - 2 ) verso l’alto o spingere tale leva verso ilbasso per retrocedere; al rilascio della leva di comandosi interromperà la trazione e la rotazionedella spazzola si interromperà dopo alcuni secondi.Ricordarsi di sollevare il tergipavimento prima di retrocedereper evitare guasti al tergipavimento.6.14 METODO DI LAVORO6.14.1 PREPARAZIONE ED AVVERTENZELiberare la superficie da trattare (con strumenti idoneiquali aspiratori, spazzatrici, ecc.) da ogni residuosolido libero. Se non si procede con questaoperazione preliminare, lo sporco solido potrebbeimpedire il corretto funzionamento del tergipavimento,compromettendo la perfetta asciugatura.Questa macchina deve essere guidata esclusivamenteda personale addestrato.6.14.2 CONTROLLO STATO DI CARICA DELLABATTERIALa sequenza di luci dell’indicatore di stato di carica( Foto C - 3, E - 1 ) si spegne progressivamente finoall’esaurimento della carica della batteria. Quandosi accende la luce rossa ( Foto C - 3C, E - 1C ), spegnereil motore spazzole, chiudere l’erogazione soluzione,terminare eventualmente di asciugare ilpiccolo residuo umido e portarsi presso il luogo delcaricabatterie per procedere alla ricarica della batteria.( ! ) Le batterie si possono danneggiare irrimediabilmentese il livello di carica residua siriduce troppo (vedere il manuale di uso dellabatteria), non forzare la scarica della batteriaoltre i limiti fissati dalle sicurezze, spegnendoe riaccendendo la chiave od in nessun altromodo.6.14.3 LAVAGGIO DIRETTO O PER SUPER-FICI LEGGERMENTE SPORCHELavaggio ed asciugatura in un unico passaggio.Preparare la macchina come descritto precedentementee utilizzarla come descritto nel paragrafo6.13 .(☞) Mai utilizzare la macchina senza soluzione detergente,si potrebbe danneggiare il pavimento.6.14.4 LAVAGGIO INDIRETTO O PER SUPER-FICI MOLTO SPORCHELavaggio ed asciugatura in diversi passaggi.Preparare la macchina come descritto precedentemente.Prima operazione:Eseguire il lavaggio come descritto nel paragrafo6.13 senza però procedere all’asciugatura del pavimento.Lasciare che la soluzione detergente facciaeffetto sullo sporco, secondo quanto indicatonelle informazioni relative al detergente utilizzato.Seconda operazione:Procedere come spiegato nel paragrafo precedentedel “Lavaggio Diretto” (6.14.3) per procedere anchecon l’asciugatura del pavimento.(☞) Mai utilizzare la macchina senza soluzione detergente,si potrebbe danneggiare il pavimento.6.14.5 OPERAZIONI POST LAVAGGIOChiudere l’erogazione del detergente.Sollevare il piatto spazzola e spegnere il motoredella spazzola.Dopo aver asciugato completamente la superficieda eventuali leggere tracce d’acqua, attenderequalche secondo, poi sollevare il tergipavimento espegnere il motore d’aspirazione.Dirigersi verso un punto adatto di scarico dei serbatoi;svuotare e pulire i serbatoi (vedere il paragrafo6.11).Spegnere la macchina con la chiave e toglierla dalquadro.Procedere, se necessario, alla ricarica della batteria(vedere il paragrafo relativo).7. INFORMAZIONI MANUTENZIONE() Girare la chiave, toglierla dal quadro comandie scollegare il connettore batteria dal cablaggiodella macchina.(☞) Far eseguire gli interventi sull’impianto elettricoe tutte le operazioni di manutenzione e riparazione(particolarmente quelle non esplicitamentedescritte in questo manuale) solo a centri assistenzaautorizzati o a personale tecnico specializzatoesperto nel settore e nelle rilevanti norme disicurezza.La regolarità della manutenzione sulla macchina,seguendo attentamente le indicazioni del costruttore,garantisce un migliore rendimento ed unamaggiore durata della macchina.7.1 SERBATOIScaricare i due serbatoi come descritto nei relativiparagrafi.Rimuovere lo sporco solido riempiendo e scaricandoi serbatoi fino all’effettiva eliminazione di tutto losporco: utilizzare per l’operazione un tubo di lavaggioo simili.23
( ! ) Acqua calda oltre i 50°, idropulitrice adalta pressione o spruzzi troppo violenti possonodanneggiare i serbatoi e la macchina.Lasciare i tappi dei serbatoi aperti (solo con macchinaa riposo), in modo che possano asciugarsi edevitare così il formarsi di cattivi odori.7.2 TUBO DI ASPIRAZIONEStaccare il tubo d’aspirazione dal tergipavimento (Foto N - 3 )Ora è possibile lavare e liberare il tubo da ostruzioni.Infilare saldamente il tubo sul corpo del tergipavimento.7.3 TERGIPAVIMENTO( ! ) Non maneggiare il tergipavimento a maninude, indossare guanti ed ogni indumento protettivoadatto per l’operazione.Staccare il tergipavimento dalla macchina e pulirlosotto acqua corrente con una spugna o una spazzola.Controllare l’efficacia ed il consumo delle lame acontatto con il pavimento. Queste hanno il compitodi raschiare la pellicola di detergente ed acqua sulpavimento ed isolare la porzione di superficie perottenere la massima depressione del motore diaspirazione: in questo modo l’asciugatura dellamacchina è perfetta. Lavorando continuamente inquesto modo, lo spigolo vivo della lamina tende adarrotondarsi o deteriorarsi, compromettendo la perfettaasciugatura, per questo occorre sostituire lelame del tergipavimento.Per sostituire le lame consumate, seguire il paragraforelativo, girare le lame per consumare gli altrispigoli vivi o montarne altre nuove.7.4 ACCESSORIRimuovere e pulire le spazzole o i dischi trascinatori.( ! ) Controllare attentamente che non ci siano incastraticorpi estranei come parti metalliche, viti,trucioli o corde e simili, per evitare di danneggiareil pavimento e la macchina.Verificare la planarità di lavoro delle spazzole (controllarese si è verificato un consumo irregolare sullespazzole o sui dischi abrasivi)Utilizzare solamente accessori suggeriti dal costruttore,altri prodotti possono compromettere la sicurezza.7.5 CORPO MACCHINAPer pulire il corpo esterno della macchina, utilizzareuna spugna od un panno, aiutandosi, se necessariocon una spazzola morbida per vincere lo sporcoostinato. La superficie antiurto della macchina è rugosaper evitare di evidenziare graffi procurati durantel’utilizzo, tuttavia questa soluzione non facilital’asportazione di macchie persistenti sulla superficie.È vietato l’utilizzo di macchine a vapore, ditubi con acqua corrente o idropulitrice.7.6 BATTERI<strong>EB</strong>atterie PB-ACIDOEseguire le operazioni di manutenzione in accordocon le istruzioni del costruttore e con tutte le indicazioniqui espresse.Lasciare scoperte (non completamente immersenella soluzione acida) le piastre degli elementi procurauna rapida ossidazione e compromette irrimediabilmentela funzionalità dell’elemento.La tracimazione di soluzione acida può corrodere lamacchina.Utilizzare caricabatteria suggeriti dal costruttore ecomunque adatti al tipo di batteria da caricare.Ricaricare le batterie sempre in stanze ben ventilate,esiste il rischio di esplosione!L’utilizzo di batterie al Gel o senza manutenzione èmolto consigliato.Batterie GELEseguire le operazioni di manutenzione in accordocon le istruzioni del costruttore e con tutte le indicazioniqui espresse.Utilizzare solamente caricabatterie suggeriti dal costruttore.7.7 DISGIUNTORI TERMICILa macchina è dotata di protezioni elettriche deiprincipali organi di funzionamento per evitare costosiguasti.Sono ovvero presenti disgiuntori termici per la salvaguardiadel motore trazione ove previsto, e per ilmotore spazzola.Quando uno di questi interruttori interviene automaticamente,per riattivare la funzionalità disabilitataè sufficiente premere a fondo l’interruttorescattato.L’intervento dei disgiuntori termici, specie nelleprime settimane di vita della macchina, potrebbenon avere effettive origini da malfunzionamentodella macchina, tuttavia occorre far controllare daun tecnico specializzato il corretto funzionamentodel dispositivo in oggetto qualora il relativo disgiuntorecontinui ad intervenire.7.8 PERIODICITÀPer tutte le operazioni qui descritte fare riferimentoalle istruzioni ed avvertenze dettagliate nei relativiparagrafi.7.8.1 OPERAZIONI GIORNALIERESmontare e controllare la spazzola o il disco trascinatore(con il disco abrasivo montato). Verificareche non ci siano elementi estranei che impedisconoil movimento o l’efficacia di tutti gli organi di pulizia.Controllare il tergipavimento: pulire le lame e verificarnel’integrità/usura;24
Se le batterie utilizzate sono al Pb-Acido, eseguireattentamente le operazioni segnalate dal costruttoredi batterie.Procedere alla ricarica delle batterie.7.8.2 OPERAZIONI SETTIMANALIControllare ed eventualmente sostituire il paraspruzzi.Controllare attentamente il profilo delle lame deltergipavimento, sostituirle se necessario.Controllare che tubi ed i condotti di aspirazione nonsiano intasati.Pulire a fondo i serbatoi soluzione e di recupero.Per i modelli con batteria al Pb-Acido: controllare illivello dell’elettrolito in tutti gli elementi e rabboccarecon acqua distillata, se necessario. Fare riferimentoalle dettagliate indicazioni del costruttoredelle batterie.Sollevando il coperchio del vano del filtro di aspirazione,verificare la presenza di liquidi ed, eventualmente,farla defluire nel serbatoio recupero.7.8.3 OPERAZIONI AD INTERVALLI ESTESINonostante la macchina sia stata costruita con rigoree sia conforme ai più severi test qualitativi, icomponenti elettrici e meccanici sono inevitabilmentesoggetti all’usura ed all’invecchiamento dopolunghi periodi di utilizzo.Per operare in sicurezza e senza inconvenienti, suggeriamodi far controllare attentamente la Vostramacchina da un nostro centro assistenza tecnicaautorizzato (o da uno specialista del settore familiarecon tutte le rilevanti norme di sicurezza contenutein questo manuale), ogni anno.Interventi di questo tipo potranno risultare necessaricon più frequenza, qualora la macchina lavori inparticolari/difficili situazioni e/o non sia stata correttamentemantenuta.7.9 RICAMBI CONSIGLIATISarete in grado di ottenere sempre il massimo dellaredditività dalla Vostra macchina tenendo sempre adisposizione il materiale di consumo più comune eprogrammando manutenzioni ordinarie e straordinarie.Per l’elenco di questi ricambi fare riferimentoal proprio rivenditore.8. CONTROLLO DI ESERCIZIOQueste indicazioni servono per capire le cause dialcuni problemi a fronte di determinati tipi di inconvenienti;per il tipo di azione da eseguire siprega comunque di far riferimento alle sezioni specifichesottostanti.8.1 LA MACCHINA NON FUNZIONA☹ La chiave non è inserita o correttamente girata.☺Inserire e girare la chiave in posizione “1” o dimacchina accesa.☹Il connettore della batteria è staccato o mal collegatoal connettore del cablaggio principale.☺ Collegare saldamente i due connettori.☹ La macchina si sta ricaricando.☺Terminare la ricarica.☹ Le batterie sono scariche.☺ Ricaricare le batterie.8.2 LA MACCHINA NON AVANZA☹ La leva di comando della trazione è in posizioneneutra☺Selezionare una direzione di marcia tirando la levaverso l’alto o verso il basso☹ L’inclinazione del pavimento è troppo elevata☺ Spingere manualmente la macchina al nuovo livello.☹ E’ intervenuta la protezione termica (generale)del/i motore/i di trazione☺ Fermare la macchina, lasciarla riposare per 5 minuti.☹ Le batterie sono scariche.☺ Ricaricare le batterie.8.3 NON GIRA LA SPAZZOLA☹ Non è selezionato l’interruttore del motore spazzola.☺ Premere il pulsante per attivare la spazzola.☹ E’ intervenuta la protezione termica del motoredella spazzola, il motore si è surriscaldato.☺ Verificare il motivo (corde o simili che impedisconoil movimento, superfici eccessivamente sconnesse,ecc.) e premere il disgiuntore di ripristino.☹ Il relè del motore od il motore delle spazzole èguasto☺ Farlo sostituire.8.4 NON SCENDE O SCENDE TROPPO POCASOLUZIONE DETERGENTE☹ Il serbatoio soluzione è vuoto.☺ Riempire il serbatoio soluzione, dopo aver svuotatoil serbatoio di recupero.☹ La leva di regolazione di flusso è chiusa o quasichiusa.☺ Regolare / aumentare il flusso di uscita soluzionecome desiderato.☹ Il filtro della soluzione detergente è ostruito inqualche punto.☺ Liberare il condotto rimuovendo lo sporco.8.5 MANCA ASPIRAZIONE☹ Il tubo di aspirazione non è collegato al tergipavimento.☺ Collegarlo correttamente☹ Il tubo di aspirazione, il condotto del tergipavimentosono intasati.☺ Liberare e pulire i condotti da ogni ostruzione.☹ Il motore di aspirazione è spento.☺ Attivarlo.☹ Il serbatoio di recupero è pieno.☺ Svuotarlo.25
☹ Il motore di aspirazione non riceve l’alimentazioneelettrica o è bruciato.☺ Verificare i collegamenti e, nel secondo caso, faresostituire il motore.Il costruttore NON potrà essere d’aiuto a problemicausati dall’utilizzo di batterie e caricabatterienon forniti direttamente.8.6 POCA ASPIRAZIONE☹ Il coperchio del serbatoio di recupero non è statoserrato saldamente.☺ Serrarlo saldamente.☹ Il tappo del tubo di scarico del serbatoio di recuperonon è chiuso perfettamente.☺ Chiuderlo correttamente.☹ Il tubo di aspirazione, il condotto del tergipavimentood il vano di ispezione sono intasati.☺ Liberare e pulire i condotti da ogni ostruzione.8.7 IL MOTORE SPAZZOLA O IL MOTOREASPIRAZIONE NON SI FERMANO☺ Fermare la macchina interrompendo l’alimentazionegenerale staccando il connettore principaledella batteria e contattare il servizio tecnico.8.8 IL TERGIPAVIMENTO NON PULISCE ONON ASCIUGA BENE☹ Le lame del tergipavimento sono usurate o trascinanosporco solido.☺ Sostituirle o pulirle.☹ La regolazione del tergipavimento non è corretta,l’avanzamento deve essere esattamente perpendicolarealla direzione di marcia.☺ Procedere alla regolazione del tergipavimento.☹ Il tubo di aspirazione, il condotto del tergipavimentosono intasati.☺ Liberare e pulire i condotti da ogni ostruzione.8.9 IL CARICABATTERIE NON FUNZIONA☹ Non parte la ricarica della batteria.☺ Controllare che il caricabatteria sia effettivamentecollegato alla batteria. Consultare il manualedel caricabatteria.8.10 LE BATTERIE NON SI CARICANO O NONMANTENGONO LA CARICA.☹ Le batterie sono nuove e non danno il 100%delle prestazioni attese.☺ L’accumulatore raggiunge il massimo delle prestazionidopo 20-30 cicli di ricarica completi.☹ L’elettrolito è evaporato e non copre completamentele piastre.☺ Controllare il manuale uso e manutenzione delcostruttore delle batterie.☹ Vi sono vistose differenze di densità fra i vari elementi☺ Sostituire la batteria danneggiata.Consultare sempre il manuale di uso e manutenzionedelle batterie e del caricabatterie, se non si risolveil problema, contattare il servizio tecnicoautorizzato.26
1. CONTENTS2. GENERAL INFORMATION2.1 SCOPE OF THE MA-NUAL2.2 TERMINOLOGY AND SYMBOL LEGEND2.3 PRODUCT IDENTIFICATION2.4 SPECIFIC USE2.5 TECHNICAL MODIFICATIONS3. SAFETY INFORMATION3.1 BASIC RECOMMENDATIONS3.2 NOISE AND VIBRATIONS4. HANDLING INFORMATION4.1 PACKING LIFTING AND TRANSPORT4.2 CHECKS UPON DELIVERY4.3 UNPACKING4.4 LIFTING AND TRANSPORT: MACHINE,BATTERY AND BATTERY CHARGER5. INSTALLATION INFORMATION5.1. BATTERY5.1.2 BATTERY PREPARATION5.1.3 BATTERY INSTALLATION5.1.4 BATTERY CONNECTION5.1.5 CIRCUIT BOARD SETTINGS CONFIGU-RATION5.2 BATTERY CHARGER CONFIGURATION6. OPERATING INFORMATION6.1 MACHINE PREPARATION6.2 STRUCTURE AND FUNCTIONS6.3 BATTERY CHARGING6.4 SQUEEGEE ASSEMBLY6.5 SQUEEGEE DISASSEMBLY6.6 SQUEEGEE BLADES DISASSEMBLY / AS-SEMBLY6.7 SQUEEGEE ADJUSTMENT6.8 SPLASH GUARD ASSEMBLY/ DISASSEM-BLY6.9 BRUSH ASSEMBLY / DISASSEMBLY6.10 FILLING AND DRAINING THE SOLUTIONTANK6.11 DRAINING THE RECOVERY TANK6.12 SPECIFIC INSTRUCTIONS FOR THEUSE OF MODEL “E”6.13 DRIVING THE MACHINE6.14 WORK METHOD6.14. PREPARATION AND WARNINGS6.14.2 BATTERY CHARGE LEVEL CONTROLS6.14.3 DIRECT SCRUBBING OR FOR SLIGHTLYDIRTY SURFACES276.14.4 INDIRECT SCRUBBING OR FOR VERYDIRTY SURFACES6.14.5 POST-SCRUBBING OPERATIONS7. MAINTENANCE INFORMATION7.1 TANKS7.2 SUCTION HOSE7.3 SQUEEGEE7.4 ACCESSORIES7.5 MACHINE BODY7.6 BATTERIES7.7 THERMAL BREAKERS7.8 PERIODIC MAINTENANCE7.8.1 DAILY OPERATIONS7.8.2 WEEKLY OPERATIONS7.8.3 OPERATIONS AT EXTENDED INTERVALS7.9 RECOMMENDED SPARE PARTS8. OPERATING CHECKS8.1 THE MACHINE DOESN’T WORK8.2 THE MACHINE DOESN’T MOVE8.3 THE BRUSH DON’T ROTATE8.4 NOT ENOUGH OR TOO MUCH DETER-GENT85 NO SUCTION8.6 INSUFFICIENT SUCTION8.7 THE BRUSH MOTOR OR THE SUCTIONMOTOR DOESN’T STOP8.8 THE SQUEEGEE DOESN’T CLEAN ORDRY EFFICIENTLY8.9 THE BATTERY CHARGER DOESN’TWORK8.10 THE BATTERIES DO NOT CHARGE ORDO NOT HOLD A CHARGE
2. GENERAL INFORMATION2.1 SCOPE OF THE MANUALTo make it easier to read about and look up varioussubjects, refer to the table of contents at the beginningof the section in your language.This manual has been prepared by the manufacturerand is an integral part of the product. As such,it must be kept in a safe place for the machine’s entireservice life until demolition.The customer must ensure that machine operatorshave read or are familiar with the contents of thismanual so that they strictly follow the instructionsdescribed herein.Constant compliance with the instructions providedin this manual is the only way to guarantee the bestresults in terms of safety, performance, efficiencyand service life of the product you now own. Noncompliancewith these rules may cause injuries topeople and damage to the machine, the scrubbedsurface and the environment: in no case can suchinjuries or damage be attributed to the manufacturer.This manual refers in detail to the machine and providesinstructions and descriptions only about ourbatteries and battery chargers (optional).The batteries and the battery charger are basiccomplementary machine parts and will affect its operationin terms of running time and performances.Only the correct combination of the two accessories(batteries and battery charger) will ensure the highestpossible performances and avoid wasting lotsof money. For more detailed information refer tothe special battery and battery charger manuals.Our recommended battery chargers and batteries(optional) ensure the best combination with themachine and offer outstanding versatility (batterycharger) as well as the category’s highest qualityand performance standards.2.2 TERMINOLOGY AND SYMBOL LEGENDFor the sake of clarity and to efficiently highlightthe various aspects of the instructions provided,terms and symbols were used that are defined andillustrated here below:- Machine. This definition replaces the commercialname to which this manual refers.- Operator. An operator is considered the personwho normally uses the machine and is familiar withits operating features but does not have the specifictechnical skills to work on that machine.- Technician. A technician is considered a personwho has the experience, technical education, legislativeand regulatory knowledge that allows himto carry out any type of required work, and the abilityto recognize and to avoid possible risks duringmachine installation, operation, handling and maintenance.- INDICATION SYMBOL (). Particularly importantinformation to avoid machine malfunctions.- ATTENTION SYMBOL (!). Very important informationto avoid serious damage to the machine andto the environment in which it operates.- DANGER SYMBOL (). Vital information toavoid serious (or extreme) consequences affectingthe health of persons and causing damage to theproduct and the environment in which it operates.2.3 PRODUCT IDENTIFICATIONThe nameplate located under the dashboard containsthe following information:• Manufacturer ID• CE mark• Model code• Model• Overall power rating• Serial number• Year built• Weight with maximum load2.4 SPECIFIC USEThis machine is a floor scrubber-drier: it must beused to scrub and to vacuum liquids of flat, rigid,horizontal, smooth or moderately rough and uniformfloors that are free from obstacles in both civicand industrial environments. Any other use is prohibited.Please refer very carefully to the safety informationreported in this manual.The scrubber-drier distributes a quantity of a waterand detergent solution (adjustable) on the surfaceto be cleaned, while the brushes remove any dirt onthe ground. The machine’s suction system, using aground squeegee, perfectly dries the liquids andthe dirt just removed from the front brushes in asingle pass.By efficiently combining a cleaning detergent withvarious types of brushes (or abrasive disks), themachine can adapt to all the various combinationsof floors and dirt.2.5 TECHNICAL MODIFICATIONSThis machine was designed and built in accordancewith the fundamental requirements for user safetyand health as set forth in European directives. Forthis reason the CE mark was placed on the ID label.The European directives to which the equipmentconforms are referenced in the Certificate of conformityannexed to this manual. This certificatewill no longer be valid if the equipment is modifiedin any way without the manufacturer’s prior authorization.The manufacturer reserves the right to make technicalmodifications to the product, without prior notice,in order to make the necessary technicalupgrades or improvements. For this reason, somedetails of your machine may be different from theinformation in the sales catalogues or from the il-28
lustrations presented in this booklet. However, thiswill not reduce safety or invalidate the informationsupplied to this regard.3. SAFETY INFORMATION3.1 BASIC RECOMMENDATIONS(☞) Carefully read the “instruction manual”before starting, using, performing unscheduledor routine maintenance or any otherwork on the machine.( ! ) Rigorously comply with all the instructionsprovided in this manual and in those forthe batteries and battery chargers (with particularattention to warnings and danger notices).The manufacturer will not be held responsible forinjuries to persons or damage to property due tonon-compliance with the aforementioned instructions.(☞) Before using the machine, make sure thateach part is in the correct position.( ! ) The machine can only be used by personnelwho have received appropriate training, who haveproven their skills and who have been expressly assignedto use it. To avoid unauthorized use, keepthe machine in a place that denies access to unauthorizedpersonnel when not being used and removethe key from the control panel.( ! ) Minors are prohibited from using the machine.( ! ) Do not operate this machine for any other purposeexcept for the use for which it was specificallydesigned. Evaluate the type of building where it willbe utilized and rigorously comply with the currentsafety regulations and conditions.() Do not use the machine in places without adequatelighting, in explosive environments, whenharmful dirt is present (dust, gas, etc.), on roads orpublic passageways and in outdoor environmentsin general.( ! ) The machine operating temperature range is+4°C to + 35°C; when not being used, store themachine in a dry and non-corrosive environmentwithin a temperature range of between + 10°C and+ 50°C.When using the machine under any condition thehumidity must range between 30% and 95%.() Never use or vacuum liquids, gases, dry dust,acids and solvents (e.g. paint thinners, acetone,etc.), even if diluted, inflammables or explosives(e.g. petrol, fuel oil, etc.); never vacuum flaming orincandescent objects.( ! ) Do not use the machine on slopes orramps steeper than 2%.For small slopes, do not use the machine sideways,always handle it with caution and never move backwards.When transporting the machine on steeperramps or slopes, be very careful to avoid tippingand/or uncontrolled accelerations.The machine can be handled on ramps and/orsteps only with the brush head and squeegee liftedoff the ground.( ! ) Never park the machine on a slope.(☞) Never leave the machine unattended with thekey in and connected; it may be left only after havingdisconnected it and taken the key out and guaranteeingagainst accidental movements and, ifnecessary, disconnecting it from the electricalpower supply.() Make sure there are no other persons, andchildren in particular, in the area where the machineis being used.( ! ) Do not use the machine to transport persons/thingsor to tow objects. Do not tow the machine.(☞) Do not use the machine as a support surfacefor any weight for any reason.Do not block the ventilation and heat dispersionopenings.( ! ) Do not remove, modify or by-pass the safetydevices.( ! ) Always use individual safety devices to ensureoperator safety: aprons or safety overalls, non-slipand waterproof shoes, rubber gloves, goggles andearphones, and masks to protect the respiratorytract. Before starting to work, remove necklaces,watches, ties and other objects that may cause seriousinjuries.( ! ) Do not insert hands between moving parts.(☞) Do not use detergents that differ from thoserequired and follow the instructions indicated onthe relative safety sheets. Detergents should bestored in a place that is inaccessible to children. Incase of contact with the eyes, rinse immediatelywith copious amounts of water and, if swallowed,immediately consult a physician.Make sure that the battery charger power socketsare connected to an efficient earthing system andthat they are protected by magneto thermal anddifferential circuit breakers.( ! ) Follow the battery manufacturer’s instructionsand comply with legal provisions. The batteriesshould always be clean and dry to avoid surfaceleakage currents. Protect the batteries against impurities,such as metallic dust.() If the machine is equipped with gel batteries itis essential to make sure the run-down indicator(located on the panel) is adjusted correctly. Contactyour dealer or refer to the specific paragraph.() Do not place tools on top of the batteries: theymay cause a short-circuit or an explosion.() When using battery acid, rigorously respect therelative safety instructions. In the presence of particularlystrong magnetic fields, evaluate the possibleeffect on electronic control devices.Never spray water on the machine to clean it.(☞) Recovered fluids contain detergents, disinfectants,water, as well as organic and inorganic materialcollected during work operations: dispose of29
them in accordance with current legal provisions.( ! ) If the machine malfunctions and/or operatesinefficiently, turn it off immediately (disconnectingit from the electric power supply or from the batteries)and do not tamper with it.Contact one of the manufacturer’s technical servicecentres.() All maintenance or accessory replacement operationsmust be carried out in environments withadequate lighting and only after having disconnectedthe machine from the electric power supplyby detaching the battery connector.(☞) All work on the electrical system and all maintenanceand repair operations (especially those notexplicitly described in this manual) should be carriedout only by authorized service centers or byspecialized technical personnel who are experts inthe sector and in the pertinent safety regulations.(☞) The machine owner can only use originalaccessories and spare parts supplied exclusivelyby the manufacturer since suchparts are the only ones that guarantee thatthe equipment will operate safely withoutany problems. Do not use parts disassembledfrom other machines or other kits as spareparts.If the machine will no longer be used, remove thebatteries and dispose of them in accordance withthe eco-compatibility regulations as set forth in Europeanstandard 91/157/EEC or deposit them in anauthorized collection centre.To dispose of the machine, comply with the currentlaws where it is used:- disconnect the machine from the mains and cleanit after emptying any liquids;- separate the machine into groups of homogeneousmaterials (plastics in accordance with the recyclingsymbol, metals, rubber, packing). For partscontaining different materials, contact the competentauthorities;Each homogeneous group must be disposed of inaccordance with recycling laws.In addition, it is recommended to eliminate thoseparts of the machine that may be dangerous, especiallyfor children.(☞) Before each use, check the machine and, inparticular, check that the battery charging cable andthe connector are in good condition and safe foruse. If they are not in perfect condition, do not usethe machine for any reason until an authorized specialistrepairs the defective parts.(☞) If foam or liquid is noted, immediately turn offthe suction motor.(☞) Do not use the machine on textile flooring,such as rugs, carpeting, etc.Wax, foaming detergents or dispersions along thehoses may cause serious problems for the machineor clog the hoses.3.2 NOISE AND VIBRATIONSThe machine is designed for indoor use and thereforeis not subject to the reference directives.4. HANDLING INFORMATION4.1 PACKING LIFTING AND TRANSPORTDuring all lifting or transport operations, make surethat the packed machine is securely anchored toprevent it from tipping over or falling accidentally.Transport vehicle loading and unloading operationsmust be carried out with adequate lighting.The packed machine must be handled using adequatedevices, making sure not to damage/strikeany part of the packing, not to tip it over and to bevery careful when placing it on the ground.(☞) All these instructions also apply to the batteriesand the battery charger.4.2 CHECKS UPON DELIVERY(☞) When the goods are delivered (machine, batteryor battery charger) by the transporter, carefullycheck the condition of the packing and its contents.If the contents have been damaged, notify thetransporter and reserve the right, in writing (selectthe word “reserve” on the document), to submit aclaim for compensation before accepting the goods.4.3 UNPACKING( ! ) Wear safety clothing and use adequate toolsto limit the risks of accidents.Carry out the following steps if the machine ispacked with a cardboard housing:- Use scissors or clippers to cut and eliminate theplastic straps.- Slip off the cardboard housing from the top of thepacked machine.- Remove the envelops inside and check their contents(use and maintenance manual, batterycharger connector)- Remove the metallic brackets or plastic straps thatsecure the machine to the pallet.- Release the brushes and the squeegee from thepacking.- Take the machine off the pallet (pushing it backward)by using an inclined surface that is solidly attachedto the floor and to the pallet.If the machine is packed in a wooden crate:- Detach all the wooden sides from the pallet, startingfrom the top one.- Remove the protective film wrapped around themachine.- Remove the metallic brackets or plastic straps thatsecure the machine to the pallet.- Release the brushes and the squeegee from thepacking.- Take the machine off the pallet (pushing it backward)by using an inclined surface that is solidly attachedto the floor and to the pallet.30
Take the same precautions and follow the same instructionsto remove the optional battery chargerfrom the packing (holding the special handles to extractit from the top of the packing) and the optionalbattery.After moving the machine away from all the packing,start mounting the accessories and the batteriesas per the instructions provided in the specificsection.Keep all the pieces of the packing since they mightbe useful in the future to protect the machine andthe accessories during transport to another locationor to authorized service centers. If not, the packingcan be disposed in accordance with current disposallaws.4.4 LIFTING AND TRANSPORT: MACHINE,BATTERY AND BATTERY CHARGER( ! ) Never use a forklift truck to lift the machine.There are no places on the frame that can be usedto lift the machine directly.Before preparing the packing and transporting themachine:- Empty the recovery tank and the detergent solutiontank.- Disassemble the squeegee and the brushes orscrapers.- Disconnect and remove the batteries.Place the machine on the original pallet (or anequivalent one that can bear the weight and is bigenough for the machine’s overall dimensions) usingan inclined surface.Solidly anchor the machine and the squeegee tothe pallet using metallic brackets or other elementsthat can bear the weight of the parts.Lift the pallet with the machine and load it on thetransport vehicle.Secure the machine and the pallet using ropes connectedto the transport vehicle.As an alternative, when using private transport vehicles,use inclined ramps to push the machinewithout the pallet, making sure to protect all partsand the machine itself against violent impacts, humidity,vibrations and accidental movements duringtransport.The battery boxes have holes where tools can behooked for handling.(☞) To lift or insert the battery (into the machinecompartment), use only suitable personnel andequipment (cables, eyehooks, etc.) for the operationand to bear the weight of the loads involved.When transporting, take the same precautions andfollow the same instructions provided for the machinetogether with those in the special manufacturer’smanual.The battery charger can be transported on its supports,both vertically and horizontally. Take thesame precautions and follow the same instructionsprovided for the machine together with those in thespecial manufacturer’s manual.5. INSTALLATION INFORMATION5.1. BATTERYRegardless of the type of construction, battery performancesare indicated with the term capacity,which always refers to a discharge period. Anotherimportant value is the number of possible discharges.The capacity is expressed in amps perhour (Ah), while the discharge period is generallyindicated as 20 hours (C20 or 20h, or not expresslyindicated) or 5 hours (C5 or 5h). Thedischarge/charge cycles indicate the number oftimes that the battery can hold a charge under thebest conditions, i.e. they indicate the useful batteryservice life complying with all the necessary measures.Therefore, the capacity of a battery varies dependingon how fast it uses energy (current). That’s whythere’s such a variation in the capacity values expressedas C5 or C20. These factors must be takeninto account when comparing products available onthe market with our own.This machine can be equipped with two types ofbatteries that differ in terms of their constructionand features.- Pb-Acid battery with tubular armored modules:the electrolyte level in each element must be periodicallychecked!( ! ) If one element is no longer covered bythe acid solution it will oxidize in 24 hours,thus permanently affecting that element’sperformance.() Refer to the battery manual to avoid physicaldamage and economic loss.- Gel module battery: this type of battery is maintenancefree and does not require special environmentsfor recharging (since it does not emit anyharmful gases); therefore, it is highly recommended.( ! ) It should not be taken for granted thatbatteries and battery chargers with the sametechnical features as those we offer will producethe same results. Only perfect compatibilitybetween these elements (Pb-Acidbatteries, gel batteries and battery chargers)will safeguard the performances, the servicelife, the safety and the economic value invested.5.1.2 BATTERY PREPARATION( ! ) The technical features of the batteries usedmust match those indicated in the technical featuressection. Using different batteries may causeserious damage to the machine or may requirethem to be charged more frequently.() During installation or when performing anytype of battery maintenance, the operator must beequipped with adequate safety accessories to preventaccidents. Work far from open flames, do notshort-circuit the battery poles, do not generate31
sparks and do not smoke.The batteries are normally supplied full of acid solution(for the Pb-Acid type) and ready for use. Inany case, follow the steps indicated in the manualsupplied with the battery and carefully follow theinstructions regarding safety and operating procedures.5.1.3 BATTERY INSTALLATIONTo insert batteries in the battery compartment(Photo I - 2) it is necessary to lower the brush plateto the floor.To access to the battery compartment, pull theopening lever (Photo H - 1) and lift the recoverytank (Photo O - 3).Detach the spring clip (Photo I - 1) placed on thelifting cable of the brush plate.Place the batteries in the battery compartment(Photo I - 2) checking that they are in perfect conditions.5.1.4 BATTERY CONNECTION( ! ) These operations must be carried out by specializedpersonnel.Install and charge the batteries in a dry ventilatedplace, far from sources of heat and corrosive substances.Make sure that the voltage between thebatteries and the battery charger corresponds. Protectthe circuit with a delay switch or a fuse with ahigher charge than the maximum absorption of thebattery charger. Comply with the polarity of the batteryplug.Disconnect the Anderson connector of the batterywiring from the Anderson connector of the machinewiring (Photo D - 7) (Photo F - 8) . Always hold theconnectors with the hands and never pull on thecables.Photo G show connection diagram of the batteriesfor BSW1400 - <strong>BT</strong> machines.( ) Attach the battery wiring to the battery,connecting the terminals only on the polesmarked with the same symbol (red wiring“+”, black wiring “-“)!A battery short-circuit may cause an explosion!After checking that all the controls on the panel arein position “0” or at rest, connect the battery connectorto the machine connector.( ! ) Close the battery compartment making surenot to crush any wires.Photo I - 3 show the correct connection of the batteriesfor BSW1400 - <strong>BT</strong> machines.5.1.5 CIRCUIT BOARD SETTINGS CONFIGURATIONThe machine is equipped to GEL battery circuit board configured. If the operator whish to use e Pb-Acidbattery, it is necessary to set the electronic circuit board as follows:Model “BSW1400”( ! ) TO ENTER THE BATTERY THRESHOLD CONFIGURATION MODE:1) Press simultaneously the push buttons “BRUSH MOTOR SWITCH” (Photo C - 1) and “SUCTION MOTORSWITCH” (Photo C - 2) within 2 seconds after switching on the machine with the key switch (Photo D -1). The three LED of the battery power test (Photo C - 3A, 3B, 3C ) will be ON.2) Press “SUCTION MOTOR SWITCH” key within 5 seconds from the previous action; you have now enteredin the configuration mode: the green and yellow LED of the battery power test (Photo C - 3A, 3B) will be ON.( ! ) THE CONFIGURATION SETTINGS ARE VISIBLE ON THE BRUSH MOTOR SWITCH SIGNAL LED (PhotoC - 2A ):1) OFF: Pb-Acid.2) ON: Gel.( ! ) TO MODIFY CONFIGURATION SETTINGS:Press the “BRUSH MOTOR SWITCH” (Photo C - 1)( ! ) TO SAVE THE SETTINGS AND EXIT THE MODE:Press the “SUCTION MOTOR SWITCH” (Photo C - 2)Once the settings have been set, we have different battery discharge levels with differentiated interventionon the machine functions as specified in the following table:32
Battery discharge indicator and functions - MODEL “BSW1400”VoltsBattery TypeBattery powertest indicatorLEDBrush operationindicator LEDPb-Acid GEL Signaling Signaling ACTION24,0 24,0 Green LED ON LED ON All working21,5 22,5 Yellow LED ON LED ON All working20,5 21,5 Red LED ON LED FLASHING Brush motor is not working20,0 21,0 Red LEDFLASHINGLED FLASHINGBrush and suction motorsare not workingModel “<strong>BT</strong>”( ! ) TO ENTER THE BATTERY THRESHOLD CONFIGURATION MODE:1) Press simultaneously the push buttons “REDUCE SPEED” (Photo E - 3) and “SUCTION MOTORSWITCH” (Photo E - 6) within 2 seconds after switching on the machine with the key switch (Photo F -1). The second LED of the speed indicator (Photo E - 3B ) will be ON.2) Press “INCREASE SPEED” (Photo E - 4)” key within 5 seconds from the previous action; you have nowentered in the configuration mode.( ! ) THE CONFIGURATION SETTINGS ARE VISIBLE ON THE SPEED INDICATOR LED:1) The first two LEDs (Photo E - 3A, 3B) indicate the type of setting of the indicator intervention thresholdan both must be ON;2) The third and fourth LEDs (Photo E - 3C, 3D) indicate the battery type: for the PB-Acid battery onlythe third LED (Photo E - 3C ) should be ON, while for the GEL battery both should be ON (Photo E - 3C,3D)( ! ) TO MODIFY CONFIGURATION SETTINGS:1) The “INCREASE SPEED” (Photo E - 4)” and “REDUCE SPEED” (Photo E - 3) keys are used to set theindicator’s intervention threshold in such a way that the first two speed indicators LEDs (Photo E - 3A,3B) turn ON;2) The “BRUSH MOTOR SWITCH” (Photo E - 5) is used to set the PB-Acid battery type while the “SUC-TION MOTOR SWITCH” (Photo E - 6) is used to set the GEL battery type( ! ) TO SAVE THE SETTINGS AND EXIT THE MODE:Press the “REDUCE SPEED” (Photo E - 3) switch and the “SUCTION MOTOR SWITCH” (Photo E - 6) simultaneously.Once the settings have been set, we have different battery discharge levels with differentiated interventionon the machine functions as specified in the following table:33
Battery discharge indicator and functions - MODEL “<strong>BT</strong>”VoltsBattery TypeBattery powertest indicatorLEDBrush operationindicator LEDPb-Acid GEL Signaling Signaling ACTION24,0 24,0 Green LED ON LED ON All working21,5 22,5 Yellow LED ON LED ON All working20,5 21,5 Red LED ON LED FLASHING Brush motor isnot working20,0 21,0 Red LEDFLASHINGLED FLASHINGAll motors arenot workingIf you do not complete the configuration procedure,the settings remain as they were originally.( ! ) We recommend to call the assistance centre ora technician if you have problems with the settingsgiven.Do not open or tamper the electronic board.5.2 BATTERY CHARGER CONFIGURATION( ! ) We recommend to call the assistance centre ora technician if you have problems with the settinggiven.The machine is equipped with a battery chargerconfigurated for GEL batteriesIf the operator whish to use Pb-Acid battery, it isnecessary change the battery charger settings asfollows:( ! ) DISPLAY OF THE BATTERY CHARGER SET-TINGSThe battery charger settings are shown by theblinking of the LED indicator when the batterycharger is switching on:- the RED LED indicator ( Photo M - 2 )flashes 2 times = the battery charger is set forPB-Acid batteries- the GREEN LED indicator ( Photo M - 3 )flashes 2 times = the battery charger is set forGEL batteriesThe battery charger settings will be displayed evenif batteries are not connected.( ! ) DIP-SWITCH CONFIGURATION FOR PC-ACID/GEL BATTERY CHARGING CURVETo set the charging curve type for Pb-Acid or GELbatteries it is necessary to operate on a dipswitchplaced inside the battery charger (Photo M -4 ).The dip-switch available for the setting of thecharging curve is on the control card ( Photo M - 4) that is placed behind the lower panel of the batterycharger ( Photo M - 1 ). It is also possible toreach the dip-switch by removing the plastic cap (Photo M - 5 ).Starting from left to right, the dip-switch availablefor the setting of the charging curve is the first one,that is indicated by number 1 in dip-switch SW1( Photo M - 6 ).Position of Dip-switchSW1 - number 1ONOFFCharging curveCharging curve forPB-Acid batteriesCharging curve forGEL batteriesNOTE: the position of all the remaining dip-switchesmust NOT be changed.6. OPERATING INFORMATION6.1 MACHINE PREPARATION( ! ) Before starting to work, wear non-slip shoes,gloves and any other personal protection device indicatedby the supplier of the detergent used orconsidered necessary based on the operating environment.(☞) Do the following before starting to work. Referto the relative sections for a detailed description ofthese steps:Heck the battery charge level and charge, if necessary.34
Mount the brushes or scraper disks (with the abrasivedisks) that are suitable for the surface andwork involved.Mount the squeegee, check that it is solidly attachedand connected to the suction hose and thatthe drying blades are not too worn.Make sure that the recovery tank is empty. If not,empty it completely.Check and completely close the detergent solutionrelease control.Fill the detergent solution tank with a mix of cleanwater and non-foaming detergent in an adequateconcentration through the anterior hole. Leave 2cm between the mouth of the plug and the level ofthe liquid.(☞) To avoid risks, become familiar with the machinemovements, carrying out test runs on a largesurface without obstacles.To obtain the best results in terms of cleaning andequipment service life, you should do the followingsimple but important operations:- Identify the work area, moving all possible obstaclesout of the way; if the surface is very extensive,work in contiguous and parallel rectangular areas.- Choose a straight work trajectory and begin workingfrom the farthest area to avoid passing overareas that have already been cleaned.6.2 STRUCTURE AND FUNCTIONSPHOTO A1 GENERAL ON/OFF SWITCH2 BRUSH MOTOR SWITCH3 SUCTION MOTOR SWITCHPHOTO B1 POWER SUPPLY CABLE2 WATER OUTLET ADJUSTING LEVER3 BRUSH PLATE LIFT/LOWER LEVER4 SQUEEGEE LIFT/LOWER LEVER5 BRUSH OPERATION LEVER6 RECOVERY TANK DRAIN HOSEPHOTO C1 BRUSH MOTOR SWITCH1A BRUSH MOTOR OPERATION LED2 SUCTION MOTOR SWITCH2A SUCTION MOTOR OPERATION LED3 BATTERY POWER TEST3A GREEN LED - FULL BATTERY CHARGE3B YELLOW LED - 50% BATTERY CHARGE3C RED LED - BATTERY DISCHARGEDPHOTO D1 GENERAL ON / OFF KEY SWITCH2 BRUSH OPERATION LEVER3 BRUSH PLATE LIFT/LOWER LEVER4 SQUEEGEE LIFT/LOWER LEVER5 BRUSH MOTOR THERMAL BREAKER6 RECOVERY TANK DRAIN HOSE7 BATTERY CONNECTOR8 WATER OUTLET ADJUSTING LEVERPHOTO E1 BATTERY POWER TEST1A GREEN LED - FULL BATTERY CHARGE1B YELLOW LED - 50% BATTERY CHARGE1C RED LED - BATTERY DISCHARGED2 FORWARD/REVERSE INDICATOR3 REDUCE SPEED SWITCH3A TRACTION SPEED 13B TRACTION SPEED 23C TRACTION SPEED33D TRACTION SPEED 44 INCREASE SPEED SWITCH5 BRUSH MOTOR SWITCH5A BRUSH MOTOR OPERATION LED6 SUCTION MOTOR SWITCH6A SUCTION MOTOR OPERATION LEDPHOTO F1 GENERAL ON / OFF KEY SWITCH2 FORWARD/REVERSE TRACTION OPERA-TION LEVER3 BRUSH PLATE LIFT/LOWER LEVER4 SQUEEGEE LIFT/LOWER LEVER5 BRUSH MOTOR THERMAL BREAKER6 TRACTION MOTOR THERMAL BREAKER7 RECOVERY TANK DRAIN HOSE8 BATTERY CONNECTOR9 WATER OUTLET ADJUSTING LEVERPHOTO GBATTERY CONNECTION DIAGRAMPHOTO H1 BATTERY COMPARTMENT OPENINGLEVER2 SOLUTION TANK FILLING OPENINGPHOTO I1 OPENING CLIP SPRING2 BATTERY COMPARTMENT WITH 12VBATTERIES3 BATTERY CONNECTION WIRINGPHOTO L1 BUILT-ON BATTERY CHARGER2 BATTERY CHARGER POWER SUPPLYCABLEPHOTO M1 BATTERY CHARGER COVER35
2 RED LED - BATTERY DISCHARGED3 GREEN LED - FULL BATTERY CHARGE4 DIP-SWITCHES5 PLASTIC CAP6 DIP-SWITCH NR. 1 FOR PB-ACID/GELBATTERY SETTINGPHOTO N1 SQUEEGEE BUMPER WHEEL2 SQUEEGEE PRESSION ADJUSTING KNOB3 SUCTION HOSE4 SQUEEGEE BLADES REPLACEMENTKNOB5 SQUEEGEE WHEEL6 SQUEEGEE FIXING KNOB7 SQUEEGEE INCLINATION ADJUSTINGKNOBPHOTO O1 HOOD OF SUCTION FILTER COMPAR-TMENT2 SOLUTION TANK FILLING OPENING3 RECOVERY TANK4 SOLUTION TANK5 SPLAH GUARDPHOTO P1 FLOATING DEVICE2 SUCTION FILTER3 RECOVERY TANK INSPECTION6.3 BATTERY CHARGINGConnect the patch cord to the power cable of thebattery charger ( Photo L - 2 ) and to the mainspower.On switching on a new battery charger of theCBHD1 series, the charger will check the batteryvoltage and decide whether to start the chargingprocess. If the battery is not connected to the batterycharger, the red LED will flash ( Photo M - 2 ).If the result of the test is positive after 1 secondthe charging of the battery can start, with the redLED on.The progress of the charging process is shown bythree LED’s: red, yellow and green, as in the wholerange of the battery chargers.The green LED ( Photo M - 3 ) shows the end of thecharging or the last phase in case of deep chargingprocess; in the former case, the relay is opened todisconnect galvanically the battery from the batterycharger.( ! ) For further information refer to the use andsafety manual of the battery charger provided bythe manufacturer.If the machine is equipped with Pb-Acid batteries,charge only in a well-ventilated area, lift thesuperior cover and open the battery plugs.( ) Follow the steps indicated in the battery manufacturer’soperating and safety manual (see thebattery maintenance section).If the machine is equipped with GEL batteries(maintenance free), follow the instructions indicatedhere below.If the machine is used regularly:Always keep the batteries connected to the batterycharger when the machine is not being used.If the machine is not used for extended time periods:Charge the battery during the night after the lastwork period, and then disconnect the battery fromthe battery charger.Charge the battery during the night before usingthe machine again.Intermediate or incomplete charging while workingshould be avoided.If the machine is equipped with Pb-Acid batteries,use a hydrometer to check the element liquidintensity on a regular basis: if one or more elementsare discharged and the others fully charged,the battery has been damaged and should be replacedor repaired (refer to the battery servicemanual).Close the element plugs and lower the superiorcover.6.4 SQUEEGEE ASSEMBLYSlightly screw the two knobs ( Photo N - 6 ) intothe squeegee body and insert the squeegee intothe slots situated on the squeegee support.Screw the two knobs ( Photo N - 6 ) in order to securethe squeegee to the support.Firmly insert the suction hose ( Photo N - 3 ) intothe pipe in the squeegee body.6.5 SQUEEGEE DISASSEMBLYDisconnect the suction hose from the squeegeebody.Unscrew the two knobs ( Photo N - 6 ) that securethe squeegee to its support and pull the squeegeeto free it.Red LEDYellow LEDGreen LED6.6 SQUEEGEE BLADES DISASSEMBLY / AS-SEMBLYDisassemble the squeegee from its support (see6.5)Unscrew the knobs ( Photo N - 4, N - 6 ) placed onthe squeegee body and apply some pressure ontheir bolts in order to push out the plastic support36
of the squeegee blades from the squeegee body.Tear off the rubber blades from the plastic support.Assemble the new blades on the plastic support bythe means of the plastic pins that have to be fixedin the holes placed the blades.Push the plastic support of the squeegee bladesinto the squeegee body and screw the knobs (Photo N - 4, N - 6 ) to secure it to the squeegeebody.Reassemble the squeegee to its support (see 6.4).6.7 SQUEEGEE ADJUSTMENTThe knob screw on the squeegee support ( Photo N- 7) adjusts the squeegee’s inclination with respectto the floor. The two red knobs on the sides, connectedto the rear wheels of the squeegee ( PhotoN - 2 ) are to adjust the pressure of the squeegeeto the floor.When the squeegee is perfectly adjusted, the rearsqueegee blade, sliding as it moves, bends in allpoints forming an angle of 45° with the floor.As the machine operates (advances), the knobs (Photo N - 2, N - 7 ) can be used to adjust the inclinationand pressure of the squeegee blades on thefloor.Squeegee drying must be uniform along the entiredrying line: damp patches mean that drying is insufficient;turn the adjustment knobs to optimizedrying.6.8 SPLASH GUARD ASSEMBLY/ DISASSEM-BLYThe splash guard is assembled to the brush platewith a spring holder linked to the brush plate itself.To disassemble the splash guard simply detach thespring holder and pull the splash guard.To reassemble, fix the splash guard in the brushplate, and then hook the steel cable to one side ofthe plate and the spring holder to the other side ofthe brush plate.6.9 BRUSH ASSEMBLY / DISASSEMBLY( ! ) Never use the machine if the brush or the padholder with abrasive pad is not perfectly installed.Assembly:Make sure that the brush plate is raised; otherwiselift it by following the instructions provided in thespecific section.Make sure that the ignition key on the control panelis in OFF position.Place the brush under the plate, taking care thatthe coupling flange on the brush is under the metalcoupling of the machine.Lower the brush plate and start the brush rotationoperating the brush motor switch and the brush operationlever; the brush will couple automatically.To assemble the pad holder follow the same procedure.( ! ) Do not allow the length of the rows of brushesto become lower than 1 cm.( ! ) Do not allow the thickness of the abrasivedisks to become less than 1 cm.Working with excessively worn brushes or excessivelythin abrasive disks may damage the machineand the floor.Regularly check the wear on these parts beforestarting to work.Disassembly or replacement:Make sure that the brush plate is raised; otherwiselift it by following the instructions provided in thespecific section.Make sure that the ignition key on the control panelis in position OFF position.While holding the brush with the hands under theplate, turn it in the rotation direction while loweringto release it from the metal coupling on the machine.To disassemble the pad holder follow the same procedure.6.10 FILLING AND DRAINING THE SOLU-TION TANK(☞) The temperature of the water or the detergentshould never exceed 50°C.(☞)Always empty the recovery tank ( Photo O - 4)before filling the solution tank ( Photo O - 3).To fill the tank:- Pour into the tank the required quantity of thechemical product, considering the percentage indicatedby the supplier, with reference to the full tankcapacity listed on the product sheet.( ! ) Use only those products suitable for the floorand the dirt to be removed.- Pour water in the filling opening placed in thefront of the machine ( Photo H - 2, O - 2 ).Leave 2 cm between the filling opening and the liquidlevel. Do not fill beyond this point!() The machine was designed to be usedwith non-foaming and biodegradable detergentsmade specifically for scrubber-driers.The use of other chemical products (such assodium hypochlorite, oxidizers, solvents orhydrocarbons) may damage or destroy themachine.- Follow the safety regulations specified in the relativesection and indicated on the detergent container.- Contact the machine manufacturer to obtain acomplete list of available and suitable detergents.- Do not leave the water hose unattended and insertit completely into the tank: the hose mightmove and get sensitive parts of the machine wet.Close the tank with its foam plug.37
To drain:• Unscrew the cock.• Close the drainage plug firmly.6.11 DRAINING THE RECOVERY TANKThe dirty water must be drained in accordance withnational regulations.The user is completely responsible for ensuringcompliance with such rules.After the detergent solution is finished, alwaysempty the recovery tank ( Photo O - 3) before fillingit again.In general, the recovery tank can be emptied wheneverrequired, and even during intermediate phasesof the work cycle.The recovery tank volume is higher than the detergentsolution volume, therefore a potentially dangeroussituation for the suction motor should neveroccur. In any case, a safety float ( Photo P - 1) willstop the suction if the dirty liquid level is too high.() If water or foam starts leaking from under thetanks for any reason, immediately turn off the suctionmotor and empty the recovery tank.To drain the tank:Drive the machine to a suitable location to drain thedirty water and preferably near a toilet or a sewerdrain (comply with the national regulations forwaste water disposal).Turn off the machine and remove the key from thepanel.Detach the drain hose from the holder ( Photo B -6, D - 6, F - 7 ) and, keeping it high, unscrew theplug.Lower the drain hose toward the selected drainagepoint.The emptying operation can be interrupted quicklyand whenever required just by raising the drainhose.Check how much dirt is still in the tank and, if necessary,wash it inside through the inspection hole (Photo P - 3).Fully tighten the drain hose with the screw plug andhang it on the support behind the machine. Thedrain hose plug must be airtight, otherwise the subsequentpressure loss will reduce drying efficiency.6.12 SPECIFIC INSTRUCTIONS FOR THE USEOF MODEL “E”The “E” model machine may be turned on only ifthe voltage indicated on the tag corresponds withthe available voltage and that the electrical outlet isgrounded (earthed).Do not damage the feed cable; do not crush or pullon it.Do not run over the feed cable with the machine.The cable could wind up in moving parts causing ashort circuit.() ATTENTION !!! - The model “E” machinehas parts, which are connected to the current;contact with these could cause graveinjuries or even death.- Before executing any type of operation on the machinealways disconnect it from the electricalsource.- Never touch electric cables that are defective orworn.- Before gaining access to the electrical system it isalways necessary to disconnect the machine fromthe electrical source.- In the case of defective, damaged, or crackedelectric cables, replace immediately with authenticreplacement parts.- The network of connections must be protectedfrom water spray.- The patch cord for the connection of the machineto the mains power must conforms to current safetyrules.- The electrical system to which the machine is connectedmust be equipped with a cutout box.- It is absolutely forbidden to use the machine inproximity to swimming pools or stretches of water.() EMERGENCY SITUATIONSIn case of emergency:- Immediately disconnect the machine fromthe power mains.- Immediately apply proper first-aid.If an accident should occur the machine must notbe put into operation until a technician authorizedby the manufacturer has examined it.6.13 DRIVING THE MACHINEModel “E”- Connect the power cable of the machine ( PhotoB - 1) to the power mains using a patch cord.- Switch ON the general ON-OFF switch ( Photo A -1).- Switch ON the brush motor switch ( Photo A - 2).( ! ) The brush will start the rotation onlywhen the machine operator will operate thebrush operation lever ( Photo B - 5).- Switch ON the suction motor switch ( Photo A - 3).- Open the water outlet lowering the control lever( Photo B - 2)- Lower the squeegee unit by using the lift/lowerlever ( Photo B - 4)- Lower the brush plate unit by using the lift/lowerlever ( Photo B - 3)- Wash the floor moving forward slowly, pulling thebrush operation lever ( Photo B - 5); releasing thelever the brush rotation will stop after few seconds.( ! ) Remember to lift the squeegee before drivingreverse to avoid damaging it.38
Model “BSW1400”- Verify that the battery connector placed in theback of the machine ( Photo D - 7) is connected.- Put the ignition key ( Photo D - 1) in and turn ONthe machine.- In the control panel, check the battery charge status( Photo C - 3 )- Switch ON the brush motor switch ( Photo C - 1).( ! ) The brush will start the rotation onlywhen the machine operator will operate thebrush operation lever ( Photo D - 2).- Switch ON the suction motor switch ( Photo C - 2).- Open the water outlet lowering the control lever( Photo D - 8)- Lower the squeegee unit by using the lift/lowerlever ( Photo D - 4)- Lower the brush plate unit by using the lift/lowerlever ( Photo D - 3)- Wash the floor moving forward slowly, pulling thebrush operation lever ( Photo D - 2); releasing thelever the brush rotation will stop after few seconds.( ! ) Remember to lift the squeegee before drivingreverse to avoid damaging it.Model “<strong>BT</strong>”- Verify that the battery connector placed in theback of the machine ( Photo F - 8) is connected.- Put the ignition key ( Photo F - 1) in and turn ONthe machine.- In the control panel, check the battery charge status( Photo E - 1 ) and, if sufficient, select the runningspeed wished ( Photo E - 3, E - 4 ).- Switch ON the brush motor switch ( Photo E - 5).( ! ) The brush will start the rotation onlywhen the machine operator will operate thebrush operation lever ( Photo F - 2).- Switch ON the suction motor switch ( Photo E - 6).- Open the water outlet lowering the control lever( Photo F - 9)- Lower the squeegee unit by using the lift/lowerlever ( Photo F - 4)- Lower the brush plate unit by using the lift/lowerlever ( Photo F - 3)- Wash the floor moving forward by pulling the tractionlever ( Photo F - 2) up or push the tractionlever down to reverse traction; releasing the leverthe traction will stop immediately and brush rotationwill stop after few seconds.( ! ) Remember to lift the squeegee before drivingreverse to avoid damaging it.6.14 WORK METHOD6.14.1 PREPARATION AND WARNINGSRemove any loose solid residue from the surface tobe treated (using suitable tools, such as vacuumcleaners, sweepers, etc.). It this is not done, thesolid dirt might prevent the squeegee from operatingcorrectly, reducing drying efficiency.Only trained personnel can drive this machine.6.14.2 BATTERY CHARGE LEVEL CONTROLSThe sequence of lights of the battery charge control( Photo C - 3, E - 1 ) progressively turns off until thebattery is discharged . When the red light turns on( Photo C - 3C, E - 1C ), turn off the brush motor,close the detergent solution outlet, finish drying thesmall residual moisture and go to the battery chargingarea to charge the battery.( ! ) The batteries may be irreparably damagedif the residual charge level drops toolow (see the battery operating manual). Donot force the battery discharge beyond thesafety limits, turning the key off and on or inany other manner.6.14.3 DIRECT SCRUBBING OR FORSLIGHTLY DIRTY SURFACESScrubbing and drying in a single pass.Prepare the machine as previously described anduse it as described in paragraph 6.13.(☞) Never use the machine without the detergentsolution: the floor might be damaged.6.14.4 INDIRECT SCRUBBING OR FOR VERYDIRTY SURFACESScrubbing and drying in various passes.Prepare the machine as previously described.First set of operations:Wash the floor as described in paragraph 6.13,without drying the floorAllow the detergent solution to work on thedirty floor according to what is indicated inthe information relative to the detergentused.Second set of operations:Proceed as explained in the previous “Direct Washing”paragraph (6.14.3) to also proceed with dryingthe floor.(☞) Never use the machine without the detergentsolution: the floor might be damaged.6.14.5 POST-SCRUBBING OPERATIONSClose the detergent solution outlet.Lift the brush unit and turn off the brush motor.After having completely dried any traces of wateron the surface, wait a few seconds and then lift thesqueegee and turn off the suction motor.Move to a suitable location to drain the tanks;empty and clean the tanks (as described in 6.11).Turn off the machine using the key and remove itfrom the control panel.If necessary, charge the battery (see the relativesection).7. MAINTENANCE INFORMATION( ) Turn the key, remove it from the control paneland disconnect the battery from the machinewiring.39
(☞) All work on the electrical system as well as allmaintenance and repair operations (especiallythose not explicitly described in this manual) shouldbe carried out only by authorized service centers orby specialized technical personnel who are expertsin the sector and in the pertinent safety regulations.Performing regular maintenance on the machine,and carefully following the manufacturer’s instructions,is the best guarantee for obtaining the bestperformances and extended machine service life.7.1 TANKSDrain the two tanks as described in the relative sections.Remove any solid dirt by filling and draining thetanks until all dirt has been eliminated: use a washinghose or similar tool to do this.( ! ) Water hotter than 50°, a high-pressurecleaner or excessively powerful sprays maydamage the tanks and the machine.Leave the plugs of the tanks open (only while themachine is not being used) so that they can dry andthus prevent the formation of foul odors.7.2 SUCTION HOSEDetach the suction hose from the squeegee ( PhotoN - 3).Now you can wash the hose and remove any obstructions.Firmly insert the hose on the squeegee body.7.3 SQUEEGEE( ! ) Do not handle the squeegee with bare hands:wear gloves and any safety clothing needed tocarry out the operation.Detach the squeegee from the machine and cleanit under running water using a sponge or a brush.Check the efficiency and the wear on the strips incontact with the floor. They are designed to scrapethe film of detergent and water on the floor and toisolate that portion of the surface to enhance thevacuum of the suction motor: this ensures that themachine will dry very efficiently. Working constantlyin this manner tends to round or to deteriorate thesharp edge of the strip, thus reducing drying efficiently.This is why the squeegee strips must be replaced.To replace the worn blades, follow the instructionsin the relative section. Turn the blades around towear down the other sharp corners or to install newones.7.4 ACCESSORIESRemove and clean the brushes or the scraper disks.( ! ) To avoid damaging the floor and the machine,carefully check if foreign matter, such as metallicparts, screws, chips, cords or similar items, has becomejammed.Check that the brushes are flat as they work on thesurface (check for any irregular wear on thebrushes or on the abrasive disks). If necessary, adjustthe slant of the action on the floor.Use only the accessories recommended by themanufacturer: other products may reduce operatingsafety.7.5 MACHINE BODYUse a sponge or a soft cloth to clean the exterior ofthe machine and, if necessary, a soft brush to eliminatetough dirt. The machine’s shockproof surfaceis rough to make it harder to see scratches causedduring use. However, this does not make it easier toremove tough stains on the surface. It is prohibitedto use steam machines, hoses with running waterand high-pressure cleaners.7.6 BATTERIESPB-Acid batteriesCarry out maintenance operations in accordancewith the manufacturer’s instructions and with all theother instructions provided in this manual.Exposing the element plates (not completely immersedin the acid solution) will lead to rapid oxidationand irreparably reduce the element’soperating capacities.An overflowing acid solution may corrode the machine.Use battery chargers recommended by the manufacturerand, in any case, those that are suitablefor the type of battery to be charged.Always charge batteries in well-ventilated rooms:there is an explosion risk!The use of gel or maintenance-free batteries ishighly recommended.GEL batteriesCarry out maintenance operations in accordancewith the manufacturer’s instructions and with all theother instructions provided in this manual.Use only those battery chargers recommended bythe manufacturer.7.7 THERMAL BREAKERSThe machine is equipped with electric protectiondevices on the main operating components to avoidcostly malfunctions.Thermal breakers are installed to protect the drivemotor wherever foreseen and the brush motor.When one of these breakers trips automatically, thedisabled function can be reactivated by fully depressingthe button of the breaker.When the thermal breakers trip, especially whenthe machine is used during the first few weeks, itmight not be caused by actual machine malfunctions.However, a specialized technician shouldcheck the device if the relative breaker continuesto trip.40
7.8 PERIODIC MAINTENANCEFor all the operations described herein, refer to theinstructions and detailed warnings in the relativesections.7.8.1 DAILY OPERATIONSDisassemble and check the brush or the pad driverdisk (with the abrasive disks mounted).Check that there are no foreign bodies that may impedethe movement or efficiency of all cleaningparts.Check the squeegee: clean the blades and checktheir condition/wear.If Pb-Acid batteries are used, carefully carry out theoperations described by the battery manufacturer.Charge the batteries.7.8.2 WEEKLY OPERATIONSCheck and, if necessary, replace the splash guard.Carefully check the profile of the squeegee bladesand replace them, if necessary.Check that the suction hoses and conduits are notclogged;Thoroughly clean the solution and recovery tanks.For other models with the Pb-Acid battery: checkthe level of the electrolyte in all elements and, ifnecessary, top up with distilled water. Refer to thebattery manufacturer’s detailed instructions.Lift the filter compartment cover and check underthe impermeable sponge filter for any signs of liquid;if there is any, drain it off into the dirty watertank.7.8.3 OPERATIONS AT EXTENDED INTER-VALSEven though the machine was built with great precisionand conforms to the most severe qualitytests, the electrical and mechanical parts will inevitablybe subjected to wear and aging after extendedperiods of use.For safe and problem-free operation, your machineshould be carefully checked every year by our authorizedtechnical service centre (or by a specialistin the sector familiar with all the pertinent safetyregulations contained in this manual).This type of work may have to be carried out morefrequently if the machine operates in particular/difficultsituations and/or if required maintenance wasnot performed.7.9 RECOMMENDED SPARE PARTSYou’ll always be able to use your machine as efficientlyas possible by maintaining a stock of themost common consumable materials and by schedulingroutine and extraordinary maintenance. Contactyour dealer for a list of these spare parts.8. OPERATING CHECKS8.1 THE MACHINE DOESN’T WORK☹ The key isn’t inserted or correctly turned.☺ Insert and turn the key to position ON.☹ The battery connector is disconnected or poorlyattached to the main wiring connector.☺ Firmly connect the two connectors.☹The machine is charging.☺ Complete the charging operation.☹ The batteries are discharged.☺ Charge the batteries.8.2 THE MACHINE DOESN’T MOVE☹ The traction lever is in neutral position.☺ Select a traction direction by pulling or pushingthe traction lever.☹ The floor slope is too high.☺ Push manually the machine to the upper floorlevel.☹ The thermal protection of the traction motor istripped.☺ Stop the machine and rest it for 5 minutes, thepush the thermal breaker button.☹ The batteries are discharged.☺ Charge the batteries.8.3 THE BRUSH DON’T ROTATE☹ The brush motor switch is not selected.☺ Press the button to activate the brushes.☹ The brush motor thermal breaker tripped; themotor overheated.☺ Troubleshoot the cause (cords or similar itemsthat impede movement, surface too rough, etc.)and press the reset breaker (the first from the top).☹ The transmission belt is broken.☺ Replace it.☹ The motor relay or the brush motor is broken.☺ Replace it.8.4 NOT ENOUGH OR TOO MUCH DETERGENT☹ The detergent solution tank is empty.☺ Fill the detergent solution tank after having emptiedthe recovery tank.☹ The flow adjustment lever is closed or almostclosed.☺ Adjust/increase the detergent solution outletflow as required.☹ The detergent feed conduit is clogged in somepoint.☺ Clean out the conduit by removing the dirt.8.5 NO SUCTION☹ The suction hose is not connected to thesqueegee.☺ Connect it correctly.☹ The suction hose or the squeegee conduit areclogged.☺ Clean out and remove any obstructions from theconduits.41
☹ The suction motor is turned off.☺ Activate it.☹ The recovery tank is full.☺ Empty it.☹ The suction motor is not receiving electric poweror is burned.☺ Check the connections and, for the latter case,replace the motor.8.6 INSUFFICIENT SUCTION☹ The recovery tank drain hose plug is not perfectlyclosed.☺ Close it correctly.☹ The suction hose, the squeegee conduit or theinspection compartment is clogged.☺ Clean out and remove any obstructions from theconduits.☹ There are significant differences in densityamong the various elements.☺ Replace the damaged battery.Always consult the battery and battery charger useand maintenance manual. If this does not solve theproblem, contact the authorised technical servicecentre.The manufacturer CANNOT solve problemscaused by using batteries and battery chargersthat were not directly supplied.8.7 THE BRUSH MOTOR OR THE SUCTIONMOTOR DOESN’T STOP☺ Stop the machine, cutting off the main powersupply and disconnecting the main battery connector,and contact the technical service centre.8.8 THE SQUEEGEE DOESN’T CLEAN OR DRYEFFICIENTLY☹ The squeegee blades are worn or are draggingsolid dirt.☺ Replace or clean them.☹ The squeegee adjustment is not correct; theadvancement must be exactly perpendicular to therunning direction.☺ Adjust the squeegee.☹ The suction hose or the squeegee conduit areclogged.☺ Clean out and remove any obstructions from theconduits.8.9 THE BATTERY CHARGER DOESN’T WORK☹ The battery charge doesn’t start .☺ Check that the battery charger is connected tothe battery. Consult the battery charger manual.8.10 THE BATTERIES DO NOT CHARGE OR DONOT HOLD A CHARGE☹ At the end of the charging process, the batteryis not correctly charged (see the battery manufacturer’sinstruction-maintenance manual)☺ Check the battery charger error message andcheck the data indicated on the display (see thebattery charger’s instruction manual).☹ The batteries are new and do not generate100% of the rated performances.☺ The accumulator reaches the maximum performanceafter 20-30 complete charge cycles.☹ The electrolyte has evaporated and does notcompletely cover the plates.☺ Check the battery manufacturer’s use and maintenancemanual.42
1. SOMMAIRE2. GENERALITES2.1 BUT DU MANUEL2.2 TERMINOLOGIE ETLEGENDE DES SYMBOLES2.3 IDENTIFICATION DE LA MACHINE2.4 USAGE PREVU2.5 MODIFICATIONS TECHNIQUES3. INFORMATIONS SUR LA SECURITE3.1 REGLES IMPORTANTES3.2 EMISSION SONORE ET VIBRATIONS4. INFORMATIONS SUR LA MANUTENTION4.1 MANUTENTION DE L'EMBALLAGE4.2 CONTROLE A LA RECEPTION4.3 D<strong>EB</strong>ALLAGE4.4 MANUTENTION DE LA MACHINE, DESBATTERIES ET DU CHARGEUR D<strong>EB</strong>ATTERIES5. INFORMATIONS TECHNIQUES5.1 BATTERIES5.1.2 PREPARATION DES BATTERIES5.1.3 INSTALLATION DES BATTERIES5.1.4 BRANCHEMENT DES BATTERIES5.1.5 CONFIGURATION DE L’INDICATEUR DELA DÉCHARGE DES BATTERIES5.2 CONFIGURATION DU CHARGEUR D<strong>EB</strong>ATTERIES6. INFORMATIONS SUR L’UTILISATION6.1 PREPARATION DE LA MACHINE6.2 STRUCTURE ET FONCTIONS DE LAMACHINE6.3 RECHARGE DES BATTERIES6.4 MONTAGE DU SUCEUR6.5 DEMONTAGE DU SUCEUR6.6 REMPLACEMENT DES BAVETTES DUSUCEUR6.7 REGLAGE DU SUCEUR6.8 MONTAGE ET DEMONTAGE DE LABAVETTE ANTI-ECLABOUSSURES6.9 MONTAGE ET DEMONTAGE DE LABROSSE6.10 REMPLISSAGE ET VIDANGE DU RESER-VOIR D’EAU PROPRE6.11 VIDANGE DU RESERVOIR D’EAU SALE6.12 NORMES PARTICULIERES D’UTILISA-TION DU MODELE “ E”6.13 CONDUITE DE LA MACHINE6.14 METHODE DE TRAVAIL6.14.1 PREPARATION ET CONSEILS6.14.2 CONTRÔL DE L’ETAT DE CHARGE DESBATTERIES6.14.3 LAVAGE DIRECT OU POUR SURFACESLEGEREMENT SALES6.14.5 OPERATIONS APRES-LAVAGE7. INFORMATIONS SUR L’ENTRETIEN7.1 RESERVOIRS7.2 TUYAU D’ASPIRATION7.3 SUCEUR7.4 ACCESSOIRES7.5 CORPS DE LA MACHINE7.6 BATTERIES7.7 DISJONCTEURS THERMIQUES7.8 CADENCES7.8.1 OPERATIONS QUOTIDIENNES7.8.2 OPERATIONS H<strong>EB</strong>DOMADAIRES7.8.3 OPERATIONS A INTERVALLES REGU-LIERS7.9 PIECES DE RECHANGE CONSEILLEES8. PETIT GUIDE DE DEPANNAGE8.1 LA MACHINE NE FONCTIONNE PAS8.2 LA MACHINE N’AVANCE PAS8.3 LA BROSSE NE TOURNE PAS8.4 LA DISTRIBUTION DE SOLUTIONDETERGENTE EST INSUFFISANTEOU INEXISTANTE8.5 ABSENCE D’ASPIRATION8.6 L’ASPIRATION N’EST PAS EFFICACE8.7 LE MOTEUR DES BROSSES OU LE MO-TEUR ASPIRATION NE S’ARRETENT PAS8.8 LE SUCEUR NE NETTOIE PAS OUNE SECHE PAS BIEN8.9 LE CHARGEUR DE BATTERIES NE FON-TIONNE PAS8.10 LES BATTERIES NE SE CHARGENT PASOU NE MAINTIENNENT PAS LA CHARGE43
2. GENERALITES2.1 BUT DU MANUELAfin de faciliter la consultation et la lecture des argumentsqui vous intéressent, reportez-vous ausommaire au début de la section correspondant àvotre langue.Ce manuel a été rédigé par le fabricant et fait partieintégrale de l'équipement de la machine. Il doitêtre conservé en tant que tel pendant toute la viede la machine jusqu'à sa mise au rebut.Le client doit vérifier si le personnel préposé à laconduite de la machine a bien lu et assimilé le contenude ce manuel afin de respecter scrupuleusementles instructions qu'il reporte.Seule l'observation constante des prescriptionsfournies dans ce manuel permettra d'obtenir lesmeilleurs résultats du point de vue de la sécurité,des performances, de l'efficacité et de la longévitéde la machine en votre possession. Le non-respectde ces règles peut provoquer des dommages à l'-homme, à la machine, à la surface lavée et à l'environnementqui ne pourront en aucun cas êtreimputés au fabricant.Ce manuel décrit de façon détaillée la machine etfournit des indications et des descriptions concernantexclusivement les batteries et le chargeur debatteries (optionnels) mis à la disposition par le fabricant.Les batteries et le chargeur de batteries sont descomposants essentiels pour compléter la machine.Ils en conditionnent le fonctionnement en termesd'autonomie et de performances. Seule la justecombinaison entre les deux accessoires (batterieset chargeur de batteries) permet d'obtenir le maximumdes performances et d'éviter de grosses pertesd'argent. Pour plus de détails à ce sujet, veuillezvous reporter aux manuels spécifiques des batterieset du chargeur de batteries.Le chargeur de batteries et les batteries que nouspréconisons (optionnels) assurent la meilleure compatibilitéavec la machine et garantissent, en plusd'une exceptionnelle polyvalence (chargeur de batteries)des standards de qualité et des performancesqui placent cette autolaveuse au sommet de sacatégorie.2.2 TERMINOLOGIE ET LEGENDE DES SYM-BOLES REDACTIONNELSPour une plus grande clarté et souligner de façonadéquate les différents aspects des instructions décrites,on a eu recours à des termes et à des symbolesrédactionnels définis et illustrés ci-dessous:- Machine. Cette définition remplace la désignationcommerciale à laquelle se réfère ce manuel.- Opérateur. Ce sont les personnes qui conduisentla machine et qui sont instruites sur son fonctionnement,mais qui n'ont pas la compétence techniquespécifique pour pouvoir exécuter lesinterventions qu'elle requiert.- Technicien. Ce sont les personnes qui possèdentl'expérience, la préparation technique, la connaissancelégislative et normative permettant d'effectuertoutes les interventions nécessaires avec lafaculté de reconnaître et de prévenir les risques potentielspendant l’installation, la conduite, la manutentionet l'entretien de la machine.- SYMBOLE INDICATION ( ☞) Ce sont des informationsparticulièrement importantes pour nepas endommager la machine.- SYMBOLE ATTENTION ( ! ) Ce sont des informationsextrêmement importantes afin de prévenirde sérieux dommages à la machine et au milieudans lequel elle opère.- SYMBOLE DE DANGER () Ce sont des informationsvitales afin d'éviter de graves (ou extrêmes)conséquences à la santé des personnes et desérieux dommages à la machine et au milieu danslequel on opère.2.3 IDENTIFICATION DE LA MACHINELa plaquette d'identification appliquée sous le tableaude bord, reporte les informations suivantes:• identification du fabricant• marque CE• référence du modèle• modèle• puissance nominale totale• numéro de série (numéro de matricule)• année de fabrication• poids total prêt à l'emploi2.4 USAGE PREVULa machine en question est une autolaveuse poursols: elle a été conçue pour le lavage et l'aspirationde liquides de sols plats, rigides, aplanis, lisses oumodérément rugueux, uniformes et libres d'obstaclesdans des environnements civils et industriels.Tout autre usage est interdit. Vous êtes priés d'observerattentivement les informations sur la sécuritéreportées dans ce manuel.L'autolaveuse distribue sur la surface à traiter unequantité de solution (réglable opportunément)d'eau et de détergent tandis que les brosses éliminentla saleté du sol. Grâce à l'unité d'aspirationdont elle est équipée, elle peut sécher parfaitementen un seul passage les liquides et la saleté à peineéliminés par les brosses frontales à travers le suceur.En associant opportunément un détergent pour lenettoyage avec les différents types de brosses (oudisques abrasifs) disponibles, la machine est en mesurede s'adapter à tous les types de sols et de saletés.2.5 MODIFICATIONS TECHNIQUESCette machine a été conçue et fabriquée conformémentaux prescriptions de sécurité et de santé44
prévues par les normes européennes comme leprouve la marque CE reportée sur la plaquetted'identification. Les directives européennes auxquellesla machine fait référence sont citées dans leCertificat de conformité joint à ce manuel. Cecertificat deviendra automatiquement caduc en casde modification de la machine non autorisée préalablementpar le fabricant.Dans un souci d'amélioration constante, le fabricantse réserve le droit d'apporter, sans aucun préavis,des modifications techniques sur la machine. Pourcette raison, certains détails de la machine en votrepossession pourraient être différents des indicationset ddes illustrations reportées dans ce manuel, sansque pour autant, les informations et la sécurité ensoient compromises.3. INFORMATIONS SUR LA SECURITE3.1 REGLES IMPORTANTES( ☞) Lisez attentivement ce manuel avant deprocéder aux opérations de mise en route,utilisation, entretien ou n'importe quelleautre intervention sur la machine.( ! ) Observez rigoureusement toutes les prescriptionscontenues dans ce manuel et dansceux relatifs aux batteries et au chargeur debatteries (avec une attention particulière auxprescriptions reportant le symbole d'attentionet de danger.Le fabricant décline toute responsabilité encas de dégâts à des personnes ou à des biensprovoqués par le non-respect desdites prescriptions.( ☞) Avant d'utiliser la machine, vérifiez l'emplacementde chaque composant.( ! ) La conduite de la machine doit être exclusivementconfiée à un personnel spécialement formé,ayant fait preuve de son aptitude et qui aura étéexpressément chargé de sa conduite. Pour prévenirtoute utilisation intempestive, la machine doit êtreremisée dans un endroit inaccessible à des tiercespersonnes et après d’avoir retiré la clé de contact.( ! ) La conduite de la machine est interdite auxmineurs.( ! ) Cette machine est uniquement destinée àl'usage pour lequel elle a été conçue. Evaluez letype d'édifice dans lequel vous opérez et observezscrupuleusement les règles et les conditions de sécuritéqui y sont en vigueur.() Il est interdit d'utiliser la machine dans deslieux insuffisamment éclairés, dans des environnementsà risque de déflagrations, en présence de saleténuisible à la santé (poussières nocives, gaz,etc.), sur des routes ou des passages publics ni àl'extérieur en général.( ! ) La plage de température d'exercice prévue estcomprise entre +4°C et + 35°C. La machine doitêtre remisée dans un endroit sec et non corrosif oùla température doit être comprise entre + 10°C et+ 50°C.Le taux d'humidité prévu pour la machine dansn'importe quelle condition d'exercice doit être comprisentre 30% et 95%.() Il est interdit d'aspirer des liquides, des gaz,des poudres sèches, acides et solvants (ex. diluantspour vernis, acétones, etc.) même s'ils sont dilués.Il est aussi interdit d'aspirer des liquides inflammablesou explosifs (ex. essence, huile combustible,etc.) de même que des objets en flammes ou incandescents.( ! ) Il est interdit d'utiliser l'autolaveuse surdes déclivités ou des rampes dépassant 2%.En cas de déclivités légères, manœuvrez toujoursavec prudence, sans faire demi-tour ni de manœuvrestransversales. Sur des déclivités plus élevées,manœuvrez toujours avec prudence en évitant lesaccélérations incontrôlées et prévenir le capotage.Conduisez à petite vitesse. Les rampes et/ou lesmarches doivent être affrontées avec les brosses etle suceur soulevées.( ! ) La machine ne doit jamais être garée surun sol en pente.( ☞) La machine ne doit jamais être laissée sanssurveillance avec la clé de contact connectée. Avantde quitter la machine, il faut toujours dèconnecteret retirer la clé de contact, couper l’arrivée de courantet prendre les mesures pour la protéger contretoute manoeuvre accidentelle.() Faites très attention aux tierces personnes eten particulier aux enfants présents dans l'environnementde travail.( ! ) Il est interdit d'utiliser la machine pour le transportde personnes ou d'objets ou la traction decharges. Il est interdit de tracter la machine.( ☞) Il est interdit d'utiliser la machine pour yposer des charges sous aucun motif. Il est aussi interditd'obstruer les ouvertures de ventilation etd'évacuation de la chaleur.( ! ) Il est interdit de démonter ou de modifier lesdispositifs de sécurité.( ! ) Le port de l'équipement de protection individuelleest obligatoire: tablier ou combinaison,chaussures antidérapantes et imperméables, gantsen caoutchouc, lunettes et oreillettes de protection,masque pour la protection des voies respiratoires.Enlevez les bijoux, la montre, la cravate ou toutautre accessoire qui pourrait être happé pendantl'utilisation de la machine et provoquer de gravesaccidents.( ! ) Il est interdit de mettre les mains dans les piècesen mouvement.( ☞) N'utilisez pas de détergents différents de ceuxpréconisés et suivez le mode d'emploi reporté surles fiches de sécurité. Le détergent doit être rangédans un endroit inaccessible aux enfants. En cas decontact avec les yeux, rincez immédiatement etabondamment avec de l'eau. En cas d'ingestion,consultez immédiatement un médecin.45
Vérifiez si les prises de courant pour l'alimentationdu chargeur de batteries sont branchées à une miseà la terre et si elles sont protégées par des disjoncteursthermiques et différentiels.() Si la machine est équipée de batteries au gel,le réglage de l'indicateur de charge situé sur le tableaude commande est fondamental. Pour ce réglage,adressez-vous à votre revendeur oureportez-vous au paragraphe correspondant dansle manuel de mode d'emploi de la machine.( ! ) Le mode d'emploi du fabricant des batteriesdoit être suivi rigoureusement ainsi que la législationen la matière. Les batteries doivent toujoursêtre propres et sèches dans le but de prévenir lescourants de dispersion superficielle. Protégez lesbatteries contre les impuretés, comme la poudremétallique.() Ne posez pas d'outils sur les batteries : dangerde court-circuit et d'explosion.() Suivez scrupuleusement les instructions de sécuritéen manipulant l'acide pour batteries.En cas de champs magnétiques particulièrementélevés, évaluez l'effet éventuel sur l'électronique decontrôle.Ne lavez jamais la machine en dirigeant des jetsd'eau dessus.( ☞) Les eaux résiduelles contiennent du détergent,du désinfectant, de l'eau, de la matière organiqueet inorganique récupérés pendant les phasesde travail: elles doivent être traitées selon la législationlocale en la matière.( ! ) Débranchez immédiatement la machine en casde panne ou de dysfonctionnement. N'y touchezpas et faites appel à un centre de service aprèsventeagréé.() Toutes les opérations d'entretien ou de changementdes accessoires doivent être effectuéesdans un endroit bien éclairé et seulement aprèsavoir débranché la machine de l'alimentation électriqueen ayant débranché le connecteur des batteries.( ☞) Les interventions sur le circuit électrique ettoutes les opérations d'entretien (en particulier cellesqui ne sont pas décrites dans ce manuel) doiventêtre effectuées auprès de centres de serviceaprès-vente agréés ou par des techniciens spécialisésinformés sur la législation en vigueur en matièrede sécurité.( ☞) En cas de réparation, utilisez seulementdes pièces de rechange d'origine car elles offrentla certitude que l'appareil puisse fonctionneren toute sécurité et sansinconvénient. N'utilisez jamais de pièces récupéréessur d'autres machines.A la fin de la vie de la machine, il est conseillé d'enleverles batteries et de les traiter dans le respectde l'environnement conformément à la norme européenne91/157/EEC ou de les remettre à un centrede traitement spécialisé.La mise au rebut de la machine doit s'effectuerdans le respect de la législation locale en vigueur enla matière:- débranchez la machine et vidangez-la de tous sesliquides,- démontez la machine et triez ses pièces en fonctionde leur composition (plastique pour les piècesreportant le symbole de recyclage, métal, caoutchouc,etc.). En cas de pièces à composition hétérogène,adressez-vous à des centres spécialisés.Chaque matériau doit être traité conformément àla législation en matière de traitement des déchets.Il faudra aussi rendre sans danger les pièces dangereusesde la machine, spécialement pour les enfants.( ☞) Avant toute utilisation, vérifiez la machine, enparticulier l'état du câble de recharge des batterieset du connecteur. En cas de mauvaises conditions,n'utilisez la machine sous aucun motif et faitesappel à un centre de service après-vente pour laréparation.( ☞) Eteignez immédiatement le moteur d'aspirationen cas de débordement de mousse ou de liquide.( ☞) La machine n'a pas été conçue pour le lavagede sols en tissu comme la moquette, les tapis, etc.L'utilisation de cires, shampooings moussants oudes dispersions le long des tuyaux peut endommagersérieusement la machine ou obstruer lesditstuyaux.3.2 EMISSION SONORE ET VIBRATIONSLa machine est destinée à un usage interne et n'estdonc pas soumises aux directives de référence.4. INFORMATIONS SUR LA MANUTEN-TION4.1 MANUTENTION DE L'EMBALLAGE( ! ) Assurez-vous d'avoir solidement ancré la machineemballée avant de procéder à sa manutentionafin de prévenir tout capotage ou chuteséventuelles.Le chargement/déchargement des camions doits'effectuer sous un éclairage adéquat.La machine emballée doit être manutentionnéeavec des engins adaptés en veillant à ne pas endommager/heurterl'emballage. Ne le renversez paset posez-le à terre en procédant avec douceur etprudence.( ☞) Ces indications sont aussi valables pour lesbatteries et le chargeur de batteries.4.2 CONTROLE A LA RECEPTION( ☞) Au moment de la réception de la marchandise(machine, batteries ou chargeur de batteries), vérifiezavec attention l'état de l'emballage et de soncontenu. En cas de dégâts apparents, réceptionnezla marchandise "sous réserves" en les mentionnantsur le bulletin de livraison.46
4.3 D<strong>EB</strong>ALLAGE( ! ) Endossez l'équipement de protection individuelleet utilisez les outils adéquats pour limiter lesrisques d'accident.Procédez de la façon suivante s'il s'agit d'un emballageen carton:- coupez les feuillards en plastique avec des ciseauxou autre instrument tranchant,- enlevez le carton en tirant par le haut,- enlevez les sachets et vérifiez le contenu (manuelde mode d'emploi et d'entretien, connecteur pourchargeur de batteries),- enlevez les éléments de fixation qui fixent la machineà la palette,- déballez les brosses et le suceur,- déchargez la machine (en la faisant reculer) de lapalette en interposant une rampe d'accès entre lesol et la palette.Procédez de la façon suivante s'il s'agit d'une caisseen bois :- démontez toutes les cloisons en bois en commençantpar la supérieure,- enlevez la housse de protection de la machine,- enlevez les éléments de fixation qui fixent la machineà la palette,- déballez les brosses et le suceur,- déchargez la machine (en la faisant reculer) de lapalette en interposant une rampe d'accès entre lesol et la palette.Procédez de la même façon pour déballer le chargeurde batteries optionnel (en le tirant par le hautavec les poignées prévues à cet effet) et les batteriesoptionnelles.Eloignez tous les éléments d'emballage, puis montezles accessoires et les batteries selon le paragraphespécifique.Il est conseillé de garder tous les éléments d'emballagecar ils peuvent être réutilisés pour transporterla machine à un autre endroit ou auprèsd'un centre de service après-vente agréé. Sinon ilsdevront être éliminés conformément à la législationen vigueur en la matière.4.4 MANUTENTION DE LA MACHINE, DESBATTERIES ET DU CHARGEUR DE BATTERIES( ! ) Ne manutentionnez jamais la machine avec unchariot élévateur car son châssis n'a pas été conçupour supporter un levage direct.Avant de manutentionner la machine il faut:- vider le réservoir de l'eau sale et le réservoir de lasolution détergente,- démonter le suceur et les brosses ou les entraîneurs,- débrancher et enlever les batteries.Placez la machine sur la palette d'origine ou sur uneautre de portée et dimensions suffisantes en vousaidant d'une rampe d'accès.Fixez solidement la machine et le suceur à la paletteavec des fixations métalliques ou autres adaptésau poids des éléments.Levez la palette avec la machine pour la chargersur le camion.Fixez solidement la machine et la palette avec descordes à la caisse du camion.Si vous disposez d'engins de transport privés avecrampes d'accès, vous pouvez pousser directementla machine dessus sans palette. Il faudra cependantprotéger la machine et ses composants contre lesheurts violents, l'humidité, les vibrations et les manœuvresbrusques pendant le transport.Les caissons des batteries sont dotés d'ouverturespour assurer la prise d'outils de manutention.( ☞) La manutention ou l'introduction (dans le logementde la machine) des batteries doit être effectuéepar des manutentionnaires spécialisés etdes engins adéquats (câbles, pitons, etc.) ayantune portée suffisante. Manutentionnez les batteriesen suivant les mêmes instructions que pour la machineainsi que les indications reportées dans lemanuel spécifique du fabricant.Le chargeur de batteries peut être manutentionnéverticalement ou horizontalement sur les supportsdont il est équipé en suivant les mêmes instructionsque pour la machine ainsi que les indications reportéesdans le manuel spécifique du fabricant.5. INFORMATIONS TECHNIQUES5.1 BATTERIESIndépendamment du type de fabrication, les performancesd’une batterie sont indiquées avec unecapacité se référant toujours à une durée de décharge.Un autre paramètre important est le nombrede décharges possibles. La capacité estexprimée en Ampère/heure (Ah), tandis que ladurée de décharge est généralement de 20 heures(C20 ou 20h ou n’est pas expressément indiqué) ou5 heures (C5 ou 5h) Les cycles de décharge/rechargeindiquent le nombre de fois que la batteriesupporte la recharge dans les meilleures conditions,c’est à dire la vie utile de la batterie en respectanttoutes les mesures prévues. Par conséquent, la capacitéd’une même batterie varie en fonction del’utilisation plus ou moins rapide du courant. C’estpour cette raison que les valeurs de la capacité expriméesen C5 ou C20 varient aussi sensiblement.Il est essentiel de tenir compte de ces facteurs aumoment de faire la comparaison entre les batteriesque nous offrons et les autres disponibles sur lemarché.Cette machine peut être équipée de deux types debatteries différents:- Batteries à modules blindés tubulaire au Pb-Acide:elles requièrent le contrôle périodique du niveau del’électrolyte dans chaque élément!( ! ) Un élément non recouvert par la solutionacide s’oxyde en 24 heures et les perfor-47
mances dudit élément sont compromises defaçon permanente.( ) Reportez-vous au manuel des batteries afin deprévenir tout risque physique et économique.- Batteries à modules au gel: elles ne requièrentpas d’entretien ni d’environnement particulier pourla recharge (car elles n’émettent pas de gaz nocifs),elles sont donc fortement conseillées.( ! ) Il n’est absolument pas dit que les batterieset le chargeur de batteries ayant lesmêmes caractéristiques techniques que ceuxque nous proposons donnent des résultatsanalogues, seule une parfaite compatibilitéentre ces éléments (batteries au Pb-Acide,batteries au gel et chargeur de batteries) garantitles performances, la vie utile, la sécuritéet la valeur de l’investissement.5.1.2 PREPARATION DES BATTERIES( ! ) Les caractéristiques techniques des batteriesutilisées doivent correspondre à celles indiquéesdans le paragraphe des informations techniques.L’utilisation de batteries différentes peut endommagersérieusement la machine ou requérir des rechargesplus fréquentes.( ) Pendant l’installation ou toute autre manipulationdes batteries, l’opérateur doit endosser l’équipementde protection individuelle afin de prévenirles accidents. Il devra opérer loin de flammes nues,sans court-circuiter les pôles des batteries, ni provoquerd’étincelles. Il est interdit de fumer.Les batteries sont livrées remplies de solution acide(pour les batteries au Pb-Acide) et prêtes à l’emploi.Suivez les instructions contenues dans le manueldes batteries, en particulier les consignes desécurité et le mode d’emploi.5.1.3 INSTALLATION DES BATTERIESPour insérer les batteries dans le logement ( PhotoI - 2) il faut abaiser le plateau de brosse;pour accéder au logement des batteries il faut tirerle levier d’ouverture ( Photo H - 1) et soulever leréservoir d’eau sale ( Photo O - 3)- détacher la clip (Photo I - 1);Insérer les batteries dans ses logements ( Photo I- 2) en contrôlant attentivement que celles ciétaient en parfait état.5.1.4 BRANCHEMENT DES BATTERIES( ! ) Ces opérations doivent être effectuées par unpersonnel spécialisé.Effectuer l’installation et le chargement des batteriesdans un lieu aéré et sec, loin de sources dechaleur et de substances corrosives. S’assurer dela correspondance des tensions entre batteries etchargeur. Protéger le réseau avec un interrupteurdu type retardé ou un fusible de charge supérieureà l’absorption maximum du chargeur. Respecter lapolarité de la prise batterie.- Débrancher le connecteur Anderson du câblagedes batteries du connecteur Anderson du câblagede la machine ( Photo D - 7) ( Photo F - 8). Tirertoujours sur le connecteur même, jamais sur le fil.La photo G montre le schema de conexion du branchementdes batteries pour les modèles BSW1400 - <strong>BT</strong>.( ) Branchez le câblage de la batterie à labatterie en branchant les bornes et en respectantexactement la polarité (câblagerouge “+”, câblage noir “-“) ! Un court-circuitéventuel de la batterie peut provoquer desexplosions!Après avoir vérifié si toutes les commandes sur letableau de commande sont sur “0” ou au repos,brancher le connecteur des batteries à celui de lamachine.( ! ) Fermer le logement batteries en veillant àn’écraser aucun fil.La photo I - 3 montre comment doit être effectuéle branchement correct des batteries pour les modèlesBSW1400 - <strong>BT</strong>.5.1.5 CONFIGURATION DE L’INDICATEUR DE LA DÉCHARGE DES BATTERIESLa machine est configurée pour le fonctionnement avec batteries GEL.Dans le cas l’opérateur désire utiliser batteries Pb-Acide, il faut configurer le circuit électronique selon laprocédure suivante:MODELE “BSW1400”( ! ) POUR ENTRER EN MODALITE DE CONFIGURATION DES SEUILS DE LA BATTERIE PROCEDEZ DELA FACON SUIVANTE:1) Appuyez simultanément sur les interrupteurs “ALLUMAGE DE LA BROSSE” ( Photo C - 1) et “ALLU-MAGE DE L’ASPIRATION” ( Photo C - 2) dans les deux secondes suivant l’activation de la machine avecl’interrupteur à clé: les 3 LED de la batterie doit être allumées ( Photo C - 3A, 3B, 3C).2) Appuyez sur l’interrupteur “ALLUMAGE DE L’ASPIRATION” ( Photo C - 2) dans les 5 secondes qui suiventl’action précédente; on entre dans la modalité de configuration prévue. Les LED jeune et vert doiventêtre allumées ( Photo C - 3A, 3B).48
( ! ) LES REGLAGES DI CONFIGURATION SONT VISIBLES A TRAVERS LA LED D’INDICATION DE LABROSSE ( Photo C - 1A):1) OFF: Pb-Acide2) ON: GEL( ! ) POUR MODIFIER LES REGLAGES DE CONFIGURATION :Appuyez l’interrupteur “ALLUMAGE DE LA BROSSE” ( Photo C - 1).( ! ) POUR ENREGISTRER LES REGLAGES ET SORTIR DE LA MODALITE:Appuyez l’interrupteur “ALLUMAGE DE L’ASPIRATION” ( Photo C - 2).Après avoir terminé la configuration, on aura différents niveaux de décharge batterie avec des interventionsdifférenciées sur les functions de la machine comme spécifié ci dessus:Fontionnement de l’indicateur de la décharge des batteries - MODELE “BSW1400”Tension VoltsType de batteriesLED d’indicationd’etat de chargedes batteriesLED d’indicationfonctionnementde la brossePb-Acide GEL Signalisation Signalisation ACTION24,0 24,0 Vert allumé Allumé Tout fonctionne21,5 22,5 Jeune allumé Allumé Tout fonctionne20,5 21,5 Rouge allumé Clignotant Le moteur de la brossene fonctionne pas20,0 21,0 RougeclignotantClignotantLe moteurs de la brosseet d’aspiration ne fonctionnentpasMODELE “<strong>BT</strong>”( ! ) POUR ENTRER EN MODALITE DE CONFIGURATION DES SEUILS DE LA BATTERIE PROCEDEZ DELA FACON SUIVANTE:1) Appuyez simultanément sur les interrupteurs “REDUCTION DE LA VITESSE” ( Photo E - 3) et “ALLU-MAGE DE L’ASPIRATION” ( Photo E - 6) dans les deux secondes suivant l’activation de la machine avecl’interrupteur à clé ( Photo F - 1): la deuxième LED d’indication de la vitesse doit être allumée ( Photo E- 3B).2) Appuyez sur l’interrupteur “AUGMENTATION DE LA VITESSE” ( Photo E - 4) dans les 5 secondes quisuivent l’action précédente; on entre aussi dans la modalité de configuration prévue.( ! ) LES REGLAGES DE CONFIGURATION SONT VISIBLES A TRAVERS LES LED D’INDICATION DE LA VI-TESSE:1) Les deux premières LED indiquent le type de mise au point des seuils d’intervention de l’indicateur etdoivent être allumées toutes les deux.2) La troisième et quatrième LED indiquent le type de batterie. La troisième LED allumée indique le typePB-Acide, tandis que l’allumage simultané de la troisième et quatrième LED indique type de batterie GEL.49
( ! ) POUR MODIFIER LES REGLAGES DE CONFIGURATION :1) Les interrupteurs “AUGMENTATION DE LA VITESSE” ( Photo E - 4) et “REDUCTION DE LA VITESSE”( Photo E - 3) servent à régler le seuil de déclenchement de l’indicateur en allumant les deux premièresLED de l’indication de vitesse.2) L’interrupteur “ALLUMAGE DE LA BROSSE” ( Photo E - 5) sert à sélectionner le type de batterie PB-Acide et l’interrupteur “ALLUMAGE DE L’ASPIRATION” ( Photo E - 6) sert à sélectionner le type de batterieGEL.( ! ) POUR ENREGISTRER LES REGLAGES ET SORTIR DE LA MODALITE:Appuyez simultanément sur les interrupteurs “REDUCTION DE LA VITESSE” ( Photo E - 3) et “ALLUMAGEDE L’ASPIRATION” ( Photo E - 6).Après avoir terminé la configuration, on aura différents niveaux de décharge batterie avec des interventionsdifférenciées sur les functions de la machine comme spécifié ci dessus:Fontionnement de l’indicateur de la décharge des batteries - MODELE “<strong>BT</strong>”Tension VoltsType de batteriesLED d’indicationd’etat de chargedes batteriesLED d’indicationfonctionnementde la brossePb-Acide GEL Signalisation Signalisation ACTION24,0 24,0 Vert allumé Allumé Tout fonctionne21,5 22,5 Jeune allumé Allumé Tout fonctionne20,5 21,5 Rouge allumé Clignotant Le moteur de la brossene fonctionne pas20,0 21,0 RougeclignotantClignotantAucun moteur ne fonctionnepas5.2 CONFIGURATION DU CHARGEUR D<strong>EB</strong>ATTERIEEn cas de problèmes avec les réglages faites appelà un technicien. La machine est configurée pour lefonctionnement avec batteries GEL. Dans le casl’opérateur désire utiliser batteries Pb-Acide, il fautconfigurer le charge-batterie selon la procédure suivante:( ! ) VISUALISATION DES REGLAGES DE CHARGEDU CHARGEURLes réglages de charge du chargeur sont indiquéspar le clignotement des LED à l’allumage du chargeur:- LED ROUGE ( Photo M - 2 ) clignote 2 fois= chargeur réglé pour la charge des batteries PB-Acide- LED VERTE ( Photo M - 3 ) clignote 2 fois =chargeur réglé pour la charge des batteries GELOn peut effectuer cette vérification aussi même queles batteries ne sont pas branchées.( ! ) CONFIGURATION DU DIP-SWITCH POUR LECHARGEUR CBHD1Pour configurer la courbe de charge pour batteriesPB-Acide ou pour batteries GEL il faut agir sur l’interrupteur(Dip-Switch) placé à l’intérieur du char-50
geur ( Photo M - 3 ).Pour accéder au Dip-Switch il faut démonter le couvercledu chargeur ( Photo M - 1 ) ou le bouchon enplastique ( Photo M - 5 ).Le Dip-Switch qui a effet pour la configuration de lacourbe de charge est le premier du côté gauche,c’est à dire lequel indiqué par le numéro 1 du Dip-Switch SW1 ( Photo M - 6 ).Position du Dip-switchSW1 - numbero 1ONOFFCourbe de chargeCourbe de chargepour batteriesPB-AcidCourbe de chargepour batteriesGEL( ! ) ATENTION: Ne touché pas les outres Dip-Switch car ils n’ont aucun effet sur le réglage de lacourbe de charge.6. INFORMATIONS SUR L’UTILISATION6.1 PREPARATION DE LA MACHINE( ! ) L’utilisation de la machine requiert le port del’équipement de protection individuelle (chaussuresà semelles antidérapantes, gants, etc.) et tout autredispositif de protection personnelle indiqué par lefabricant du détergent ou requis par l’environnementdans lequel on opère.(☞) Effectuez les opérations préliminaires suivantes.Reportez-vous aux paragraphes correspondantspour une description plus détaillée de cesopérations.Contrôlez le niveau de charge des batteries et rechargez-lesen cas de besoin.Montez les brosses ou les disques entraîneurs (avecles disques abrasifs) correspondant à la surface àtraiter et au type d’opération à effectuer.Montez le suceur, vérifiez sa fixation, son raccordementau tuyau d’aspiration et l’usure des bavettes.Vérifiez si le réservoir de l’eau sale est vide, videzlecomplètement en cas de besoin.Contrôlez et fermez complètement le distributeurde solution détergente.Remplissez le réservoir de solution détergente àtravers de l’orifice antérieur avec de l’eau propre etdu détergent non moussant en respectant le dosagepréconisé. Laissez un espace de 2 cm entre legoulot du bouchon et le niveau de la solution.(☞) S’il s’agit d’une première utilisation, il estconseillé de se familiariser avec la machine en faisantdes essais sur une grande surface libre de toutobstacle.Pour obtenir les meilleurs résultats en termes denettoyage et de longévité de la machine, nous suggéronsquelques simples mais importantes procédures:- Repérez l’aire de travail en enlevant les obstacleséventuels. Si la surface est très étendue, opérez parzones rectangulaires contiguës et parallèles.- Choisissez une trajectoire rectiligne et commencezpar la zone plus éloignée pour éviter de passer surdes zones déjà nettoyées.6.2 STRUCTURE ET FONCTIONS DE LA MA-CHINEPHOTO A1 INTERRUPTEUR GENERAL2 INTERRUPTEUR MOTEUR BROSSE3 INTERRUPTEUR MOTEUR D’ASPIRATIONPHOTO B1 CABLE D’ALIMENTATION2 LEVIER DOSAGE SOLUTION3 LEVIER LEVÉE/ DESCENTE PLATEAUBROSSE4 LEVIER LEVÉE/ DESCENTE SUCEUR5 LEVIER DE COMANDE6 TUYAU VIDANGE RÉSERVOIR DE L’EAUSALEPHOTO C1 INTERRUPTEUR MOTEUR BROSSE1A LED TEMOIN DE FONCTIONEMENTMOTEUR BROSSE2 INTERRUPTEUR MOTEUR D’ASPIRATION2A LED TEMOIN DE FONCTIONEMENTMOTEUR D’ASPIRATION3 INDICATEUR DU NIVEAU DE CHARGEDES BATTERIES3A LED VERTE TEMOIN BATTERIE CHARGE3B LED JAUNE TEMOIN BATTERIE 50%CHARGE3C LED ROUGE TEMOIN BATTERIEDESCHARGEPHOTO D1 INTERRUPTEUR GENERAL A CLE2 LEVIER DE COMANDE3 LEVIER LEVÉE/ DESCENTE PLATEAUBROSSE4 LEVIER LEVÉE/ DESCENTE SUCEUR5 DISJONCTEUR THERMIQUE MOTEURBROSSE6 TUYAU VIDANGE RÉSERVOIR DE L’EAUSALE7 CONNECTEUR BATTERIES8 LEVIER DOSAGE SOLUTIONPHOTO E1 INDICATEUR DU NIVEAU DE CHARGEDES BATTERIES1A LED VERTE TEMOIN BATTERIE CHARGE1B LED JAUNE TEMOIN BATTERIE 50%51
CHARGE1C LED ROUGE TEMOIN BATTERIEDESCHARGE2 TÉMOIN LUMINEUX MARCHE AVANT/ARRIÈRE3 INTERRUPTEUR DE REDUCTIONVITESSE3A VITESSE D’AVANCEMENT 13B VITESSE D’AVANCEMENT 23C VITESSE D’AVANCEMENT 33D VITESSE D’AVANCEMENT 44 INTERRUPTEUR D’AUGMENTATIONVITESSE5 INTERRUPTEUR MOTEUR BROSSE5A LED TEMOIN DE FONCTIONEMENTMOTEUR BROSSE6 INTERRUPTEUR MOTEUR D’ASPIRATION6A LED TEMOIN DE FONCTIONEMENTMOTEUR D’ASPIRATIONPHOTO F1 INTERRUPTEUR GENERAL A CLE2 LEVIER DE COMANDE TRACTIONAVANT/ARRIÈRE3 LEVIER LEVÉE/ DESCENTE PLATEAUBROSSE4 LEVIER LEVÉE/ DESCENTE SUCEUR5 DISJONCTEUR THERMIQUE MOTEURBROSSE6 DISJONCTEUR THERMIQUE MOTEURD’ASPIRATION7 TUYAU VIDANGE RÉSERVOIR DE L’EAUSALE8 CONNECTEUR BATTERIES9 LEVIER DOSAGE SOLUTIONPHOTO GSCHEMA DE BRANCHEMENT BATTERIESPHOTO H1 LEVIER D’AUVERTURE DU LOGEMENTDES BATTERIES2 ORIFICE DE REMPLISSAGE RESEVOIREAU PROPRE AVEC FILTRE EN MOUSSEPHOTO I1 CLIP DE DECLENCHEMENT2 LOGEMENT AVEC BATTERIES 12V3 BRANCHEMENT DE BATTERIESPHOTO L1 CHARGEUR DE BATTERIE2 CABLE D’ALIMENTATION POUR CHAR-GEUR DE BATTERIEPHOTO M1 COUVERCLE DU CHARGEUR DE2 LED ROUGE TEMOIN BATTERIEDESCHARGE3 LED VERTE TEMOIN BATTERIE CHARGE4 INTERRUPTEURS DIP-SWITCH5 BOUCHON POUR L’ACCES AU DIP-SWITCH6 DIP-SWITCH NR. 1 POUR LA CONFIGURATION DE LA COURBE DE CHARGE PB-ACIDE / GELPHOTO N1 ROUE PARE-CHOCS DU SUCEUR2 POMMEAU DE REGLAGE DE PRESSIONDU SUCEUR3 TUYAU D’ASPIRATION4 POMMEAU DE DEPOSE BAVETTESSUCEUR5 ROUE DU SUCEUR6 POMMEAU DEMONTAGE SUCEUR7 POMMEAU REGLAGE INCLINATIONSUCEURPHOTO O1 COFFRE DU LOGEMENT DU FILTRE DEL’ASPIRATION2 ORIFICE DE REMPLISSAGE RESERVOIREAU PROPRE3 RÉSERVOIR D’EAU SALE4 RÉSERVOIR D’EAU PROPRE (SOLUTION)5 BAVETTE ANTI-ECLABOUSSUREPHOTO P1 FLOTTEUR2 FILTRE DE L’ASPIRATION3 AUVERTURE D’INSPECTION RÉSERVOIRD’EAU SALE6.3 RECHARGE DES BATTERIESBrancher la rallonge au câble d’alimentation duchargeur ( Photo L - 2 ) et le connecter au réseauélectrique.Lorsqu’il est allumé, le chargeur de batteries CBHD1effectue un test de la tension de la batterie pourdécider s’il faut démarrer le processus de chargement.Si la batterie n’est pas connectée au chargeur debatteries, la LED témoin de couleur rouge ( PhotoM - 2 ) commencera à clignoter. Si le test a donnéun résultat positif, après 1 second le processus dechargement de la batterie peut commencer avec letémoin LED rouge allumé.Si pendant le processus de chargement l’utilisateurdéconnecte la batterie de chargeur de la batterie,après quelques secondes, ce dernier se réinitialiseet se prépare à commencer un nouveau processusde chargement.La progression de la charge est indiquée par lestrois témoins lumineux à LED: rouge, jaune etverte.La LED verte ( Photo M - 3 ) signale la fin du processusde chargement.52
Débrancher le chargeur du réseau électrique.LED RougeLED JauneLED Verte( ! ) Suivez les instructions contenues dans le manueldu constructeur, en particulier les consignesde sécurité et le mode d’emploi.Si la machine est équipée de batteries au Pb-Acide, elles doivent être rechargées dans un lieubien ventilé. Soulevez le couvercle supérieur et dévissezles bouchons des batteries.() Suivez les instructions du manuel de moded’emploi du fabricant des batteries (cf. paragrapheentretien batteries).Si la machine est équipée de batteries au gel(sans entretien), suivez les instructions ci-dessous.Si la machine est utilisée régulièrement:Laissez toujours les batteries branchées au chargeurde batteries.Si la machine est inutilisée pendant de longues périodes:Chargez les batteries pendant la nuit après la dernièreutilisation puis débranchez les batteries duchargeur.Evitez les recharges intermédiaires ou incomplètesen phase de travail.Si la machine est équipée de batteries au Pb-Acide,contrôlez régulièrement l’intensité du liquide deséléments avec le densimètre: si un ou plusieurs élémentsétaient déchargés et les autres complètementchargés, les batteries devront êtreremplacées ou réparées (veuillez vous reporter aumode d’emploi spécifique des batteries).Revissez les bouchons des éléments et abaissez lecouvercle supérieur.6.4 MONTAGE DU SUCEURDévisser légèrement les deux pommeaux (Photo N- 6) et enfiler le suceur dans les oeillets de guidagesitués sur le support suceur; resserrer les deuxpommeaux (Photo N - 6).Introduisez solidement le tuyau d’aspiration de lamachine dans le tuyau du corps du suceur.6.5 DEMONTAGE DU SUCEURDébranchez le tuyau d’aspiration du corps du suceur.Dévisser légèrement les deux pommeaux (Photo N- 6) et tirez vers vous le suceur.6.6 REMPLACEMENT DES BAVETTES DU SU-CEURDémonter le suceur de son support (voir 6.5); dévissercomplètement les pommeaux (Photo N - 4, N- 6) et effectuer une pression sur les têtes des vissur lequelles étaient vissés les pommeaux, jusqu’ace que le corps intérieur en plastique ne sort complètement.Défiler les bavettes en tirant sur une extrémité versl’autre.Pour le remontage effectuer l’opération inverse, faisantattention de bien encastrer les ergots de plastiquedans les trous des bavettes.6.7 REGLAGE DU SUCEURLe pommeau placé sur le support du suceur (PhotoN - 7) sert pour régler l’inclination du suceur.Les deux pommeaux rouges (Photo N - 2) liés auxroues du suceur servent pour régler la pression dusuceur sur le sol.Le parfait réglage du suceur prévoit que la bavettearrière soit inclinée sur toute sa longueur en formantun angle de 45° avec le sol.Pendant l’avancement de la machine, on peut intervenirsur les pommeaux de pression et d’inclinaison(Photo N - 2, N - 7) de façon que le séchagedu sol soit uniforme sur toute la longueur du suceur.Des zones humides sur le sol indiquent un séchageinsuffisant; agir sur les pommeaux de réglage pouroptimiser le séchage.6.8 MONTAGE ET DEMONTAGE DE LA BA-VETTE ANTI-ECLABOUSSURESLa bavette anti-éclaboussures est accroché au plateaubrosse avec un anneau à ressort.Pour démonter la bavette il est suffisant de décrocherl’anneau à ressort et tirer la bavette anti-éclaboussuresvers vous.Pour le remontage, encastrer la bavette anti-éclaboussuressur le plateau brosse, accrocher l’extrémitéfixe du câble en acier sur le plateau brosse etfixer l’anneau à ressort sur l’autre extrémité du plateaubrosse.6.9 MONTAGE ET DEMONTAGE DE LABROSSE( ! ) Ne travaillez jamais sans que la brosse soitparfaitement montée sur la machine.Pour le montage:Vérifiez si le plateau brosse est levé, sinon levez-leen suivant les indications reportées dans le paragraphecorrespondant.Vérifiez si la clé d’allumage sur le tableau de commandeest sur “0”.Positionner la brosse sous le plateau, avec laflasque d’accouplement près du branchement mé-53
tallique.Abaisser le plateau et activer la rotation de labrosse: de cette façon la brosse s’accroche automatiquement.Pour le montage du plateau porte-pad suivre lamême procédure.( ! ) La longueur des soies des brosses ne doit jamaisêtre inférieure à 1 cm.( ! ) L’épaisseur des disques abrasifs ne doit jamaisêtre inférieure à 1 cm.Travailler avec des brosses trop usées ou desdisques abrasifs trop minces peut endommager lamachine et la surface à traiter.Contrôlez régulièrement l’usure de ces composantsavant de commencer le travail.Pour le démontage ou le changement:Vérifiez si le plateau des brosses est levé, sinonlevez-le en suivant les indications reportées dans leparagraphe correspondant.Vérifiez si la clé d’allumage sur le tableau de commandeest sur OFF.Tenez la brosse entre les mains sous le plateau,tournez-la dans le sens de rotation et abaissez-lapour libérer le plateau de guidage.Pour le démontage du plateau porte-pad suivre lamême procédure.6.10 REMPLISSAGE ET VIDANGE DU RESER-VOIR D’EAU PROPRE(☞) La température de l’eau ou du détergentne doit jamais dépasser les 50°C.(☞) Videz toujours le réservoir d’eau sale (Photo O- 4) avant de remplir le réservoir d’eau propre(Photo O - 3).Pour le remplissage:- Verser dans le réservoir la quantité de détergentpréconisée par le fabricant selon la capacité du réservoirindiquée sur le mode d’emploi sur l’emballagedu produit.( ! ) Utiliser exclusivement des produits adaptés àla surface et à la saleté à éliminer.- Verser l’eau dans l’orifice de remplissage (Photo H- 2, O - 2 )Laisser toujours un espace de 2 cm entre le goulotde l’orifice et le niveau du liquide. Ne remplissezpas au-delà de cette mesure !() La machine a été conçue pour être utiliséeavec des détergents non moussants etbiodégradables adaptés aux autolaveuses.L’utilisation d’autres produits chimiquescomme l’hypochlorite de sodium, les oxydants,les solvants ou les hydrocarbures peutendommager ou détruire la machine.- Suivez les règles de sécurité indiquées dans le paragraphecorrespondant ainsi que celle reportéessur l’emballage du détergent.- Pour une liste complète des détergents adéquatsdisponibles, contactez le fabricant de la machine.(☞) Utiliser toujours un détergent à moussefreinée ou un additif anti-mousse afin d’éviterdes dommages au moteur d’aspiration.- Ne laissez jamais le tuyau de remplissage d’eausans surveillance et introduisez-le complètementdans le réservoir car sinon il pourrait se déplacer etmouiller des composants délicats de la machine.- Fermez le réservoir avec son bouchon/filtre enéponge.Pour la vidange:- Dévisser le bouchon de vidange situé dans la partieinférieure du réservoir et attendre la vidangecomplète du réservoir.- Fermer solidement le bouchon de vidange.6.11 VIDANGE DU RESERVOIR D’EAU SALELa vidange de l’eau sale doit s’effectuer conformémentà la législation locale en vigueur. L’entière responsabilitédu respect de cette législation revientau conducteur de la machine.Lorsque la solution détergente est épuisée, il fauttoujours vider le réservoir de l’eau sale avant deprocéder au remplissage (Photo O - 3).Le réservoir de l’eau sale peut être vidé à chaquefois qu’on le souhaite même en phase intermédiairedu cycle de travail.La capacité du réservoir de l’eau sale est supérieureà celui de la solution détergente. Le moteur d’aspirationest protégé par un flotteur de sécurité qui sedéclenche en l’éteignant lorsque le niveau de l’eausale dépasse un certain niveau.() Si vous constatez une fuite d’eau ou de moussede sous les réservoirs, éteignez immédiatement lemoteur d’aspiration et videz le réservoir de l’eausale.Pour vider le réservoir de l’eau sale :Conduisez la machine dans un lieu adapté à la vidangede l’eau sale, de préférence près d’un WC oud’un trou à l’égout (observez la législation locale envigueur en matière de traitement des eaux usées).Eteignez la machine et retirez la clé de contact dutableau.Détachez le tuyau de vidange (Photo B - 6, D - 6, F- 7 ) et tenez-le vers le haut, dévissez le bouchon.Abaissez le tuyau de vidange vers le point sélectionné.La vidange peut être interrompue à toutmoment et rapidement en relevant simplement letuyau de vidange.Vérifiez la quantité de saleté résiduelle dans le réservoir.Lavez-le si nécessaire à travers l’ouvertured’inspection (Photo P - 3 ).Serrez solidement le tuyau de vidange avec le bouchonà vis et accrochez-le au soutien derrière lamachine.(☞) Le bouchon du tuyau de vidange doive être54
parfaitement fermé, sans faire passer de l’air, sinonon aura une dépression qui provoquera un séchageimparfait.6.12 NORMES PARTICULIERES D’UTILISA-TION DU MODELE “E”La machine “E” peut être mise en marche seulementsi le voltage indiqué sur la plaque correspondà celui disponible dans le bâtiment et si la prise decourant dispose de la prise de terre.Ne pas endommager le câble d’alimentation, ne pasl’écraser ni l’arracher.Ne pas rouler sur le câble d’alimentation avec lamachine. Le câble pourrait s’enrouler sur les partiesmécaniques en mouvement et causer un courtcircuit.( ) ATTENTION !! Le modèle “E” a des partiessous tension ou traversées par le courantélectrique qui, en cas de contact, peuventprovoquer des lésions graves et même lamort.- Avant toute opération d’entretien sur la machine,il est nécessaire de la débrancher du réseau électrique.- Ne jamais toucher des câbles électriques défectueuxou qui présentent des signes d’usure.- Avant d’accéder au circuit électrique de la machine,il faut l’éteindre et débrancher la prise decourant.- Si on s’aperçoit que les câbles électriques présententun défaut ou sont endommagés, il faut lesremplacer immédiatement avec des pièces de rechanged’origine.- Les branchements au réseau électrique doiventêtre au moins protégés contre les éclaboussuresd’eau.- Pour brancher la machine au réseau électrique utiliserseulement des rallonges conformes au normatifsde sécurité en vigueur.- La prise de courant sur laquelle la machine estbranchée doit être fournie d’un disjoncteur.- Il est absolument interdit d’utiliser la machine auxabords d’une piscine ou de plans d’eau.( ) SITUATIONS CRITIQUESEn cas d’accident:- Débrancher immédiatement la machine.- Prendre immédiatement des mesures desecours d’urgence.En cas d’accident, la machine ne doit pas être remiseen marche avant d’avoir été révisée par le fabricant.6.13 CONDUITE DE LA MACHINEModéle “E”Brancher le câble d’alimentation (Photo B - 1) auréseau électrique avec une rallonge.Positionner l’interrupteur général (Photo A - 1) surON.Appuyer sur l’interrupteur d’actionnement de labrosse (Photo A - 2)( ! ) La rotation de la brosse va commencerseulement avec l’actionnement du levier decommande (Photo B - 5);Appuyer sur l’interrupteur d’actionnement de l’aspiration(Photo A - 3)Ouvrir ensuite le robinet de sortie de la solution détergenteen abaissant le levier de dosage (Photo B- 2)Abaisser le suceur avec le levier de commande(Photo B - 4)Abaisser le plateau brosse avec le levier de commande(Photo B - 3)Avancer lentement en agissent sur le levier de commandde la brosse (Photo B - 4) pour effectuer lelavage du sol.N’oubliez pas de soulever le suceur avant d’actionnerla marche arrière pour ne pas abîmer le suceur.Modéle “BSW1400”Vérifier la connexion du connecteur des batteriessitué sous le tableau de commandes (Photo D - 7).Introduire et tourner la clé de contact (Photo D -1).Sur le du tableau de commandes, vérifier la chargedes batteries (Photo C - 3).Si la charge des batteries est suffisante, appuyersur l’interrupteur d’actionnement de la brosse(Photo C - 1)( ! ) La rotation de la brosse va commencerseulement avec l’actionnement du levier decommande (Photo D - 2);Appuyer sur l’interrupteur d’actionnement de l’aspiration(Photo C - 2)Ouvrir ensuite le robinet de sortie de la solution détergenteen abaissant le levier de dosage (Photo D- 8)abaisser le suceur avec le levier de commande(Photo D - 4)abaisser le plateau brosse avec le levier de commande(Photo D - 3)Avancer lentement en agissent sur le levier de commandde la brosse (Photo D - 2) pour effectuer lelavage du sol.N’oubliez pas de soulever le suceur avant d’actionnerla marche arrière pour ne pas abîmer le suceur.Modéle “<strong>BT</strong>”Vérifier la connexion du connecteur des batteriessitué sous le tableau de commandes (Photo F - 8).Introduire et tourner la clé de contact (Photo F -1).Sur le du tableau de commandes, vérifier la chargedes batteries (Photo E - 1).55
Si la charge des batteries est suffisante, sélectionnezla vitesse de marche souhaitée (Photo E - 3, E- 4).Appuyer sur l’interrupteur d’actionnement de labrosse (Photo E - 5)( ! ) La rotation de la brosse va commencerseulement avec l’actionnement du levier decommande (Photo F - 2);Appuyer sur l’interrupteur d’actionnement de l’aspiration(Photo E - 6)Ouvrir ensuite le robinet de sortie de la solution détergenteen abaissant le levier de dosage (Photo F- 9)Abaisser le suceur avec le levier de commande(Photo F - 4)Abaisser le plateau brosse avec le levier de commande(Photo F - 3)Avancer lentement en agissent sur le levier de commandede la traction (Photo F - 2) pour effectuer lelavage du sol.Levez le levier pour avancer ou baissez le levierpour la marche arrière.En relâchent le levier de commande, la traction vas’arrêter ainsi que la rotation de la brosse aprèsquelques seconds.N’oubliez pas de soulever le suceur avant d’actionnerla marche arrière pour ne pas abîmer le suceur.6.14 METHODE DE TRAVAIL6.14.1 PREPARATION ET CONSEILSDégagez la surface à traiter (avec des appareilsadaptés comme aspirateurs, balayeuses, etc.) detout résidu solide. Cette opération préliminaire estnécessaire car sinon la saleté solide pourrait empêcherle bon fonctionnement du suceur et nuirait auséchage.La conduite de la machine doit exclusivement êtreconfiée à un personnel formé.6.14.2 CONTRÔL DE L’ETAT DE CHARGE DESBATTERIESLes témoins lumineux LED de l’état de charge(Photo C - 3, E - 1) s’éteignent progressivement aufur et à mesure de l’épuisement de la charge.Lorsque le témoin LED rouge s’allume (Photo C -3C, E - 1C), éteignez le moteur de brosse, fermezla distribution de solution détergente, terminezéventuellement de sécher le petit résidu humide etrendez-vous auprès du chargeur de batteries pourrecharger les batteries.( ! ) Les batteries peuvent s’endommager irrémédiablementsi le niveau de charge résiduellese réduit trop (cf. le manuel de moded’emploi des batteries). Ne forcez pas la déchargedes batteries au-delà des limitesfixées par les dispositifs de sécurité en éteignantou en rallumant la clé de contact ni enaucune autre façon.6.14.3 LAVAGE DIRECT OU POUR SURFACESLEGEREMENT SALESLavage et séchage en un seul passage.Préparer la machine comme décrit précédemmentet l’user comme décrit ou paragraphe 6.13 .(☞) Il est interdit d’utiliser la machine sans solutiondétergente, car cela abîmerait la surface.6.14.4 LAVAGE INDIRECT OU POUR SUR-FACES TRES SALESLavage et séchage en différents passages.Préparez la machine comme décrit précédemment.Première opération:Effectuer le lavage comme décrit ou paragraph 6.13mais sans procéder au séchage du sol.Laisser agir quelque temps la solution détergenteen suivant les indications reportées surle mode d’emploi du produit.Deuxième opération :Procéder comme indiqué dans le paragraphe précédent“Lavage direct” (6.14.3) pour effectuer leséchage du sol.(☞) Il est interdit d’utiliser la machine sans solutiondétergente, car cela abîmerait la surface.6.14.5 OPERATIONS APRES-LAVAGEArrêter la distribution de la solution détergente.Lever le plateau brosse et éteindre le moteur de labrosse.Après avoir éliminé complètement les traînéesd’eau éventuelles, attendre quelques secondes,puis lever le suceur et arrêter le moteur d’aspiration.Dirigez-vous vers un endroit adapté pour effectuerla vidange des réservoirs; vider et nettoyer les réservoirs(cf. paragraphe 6.11).Arrêter la machine en tournant la clé et retirez-ladu tableau.En cas de besoin, effectuez la recharge des batteries(cf. le paragraphe correspondant).7. INFORMATIONS SUR L’ENTRETIEN() Tournez la clé de contact, retirez-la du tableaude bord et déconnectez le connecteur des batteriesdu câblage de la machine.(☞) Les interventions sur le circuit électrique et lesopérations d’entretien et de réparation (particulièrementcelles qui ne sont pas explicitement décritesdans ce manuel) doivent être effectuées par uncentre de service après-vente agréé ou par un technicienspécialisé informé de la législation en vigueur.Le respect des cadences d’entretien et des prescriptionsdu fabricant est la garantie d’un meilleurrendement et d’une plus grande longévité de la machine.56
7.1 RESERVOIRSVidangez les deux réservoirs comme décrit dans lesparagraphes correspondants.Eliminez la salissure solide en remplissant et en vidantplusieurs fois les réservoirs jusqu’à l’éliminationeffective de toute la saleté: utilisez un tuyaude lavage ou autre pour l’opération.( ! ) De l’eau à plus de 50°, des nettoyeurs àhaute pression ou des jets d’eau trop violentspeuvent endommager les réservoirs et la machine.Laissez les bouchons des réservoirs ouverts (seulementavec la machine au repos) de façon à fairesécher les réservoirs et prévenir ainsi la formationdes mauvaises odeurs.7.2 TUYAU D’ASPIRATIONDémontez le tuyau d’aspiration de la raclette.Vous pouvez à présent laver le tuyau et éliminez lesobstructions.Enfilez solidement le tuyau sur le corps du suceur.7.3 SUCEUR( !) Ne manipulez pas le suceur à mains nues, endossezdes gants et tout autre équipement de protectionadapté à l’opération.Démontez le suceur de la machine et nettoyez-lasous de l’eau courante avec une éponge ou unebrosse.Contrôlez l’efficacité et l’usure des bavettes encontact avec le sol. Elles ont la fonction de racler lapellicule de détergent et d’eau sur le sol et d’isolerla portion de surface afin d’obtenir la dépressionmaximum du moteur d’aspiration : de cette façon leséchage de la machine sera parfait. Au fur et à mesurede son utilisation, l’arête vive de la lame tendà s’arrondir et à s’user en nuisant ainsi au parfaitséchage. Les bavettes du suceur doivent donc êtrechangées. Pour ce faire, suivez les indications duparagraphe correspondant. Tournez les bavettespour user les autres arêtes vives ou montez des bavettesneuves.7.4 ACCESSOIRESDémontez et nettoyez les brosses ou les disquesentraîneurs.( ! ) Contrôlez soigneusement si des corps étrangersne se sont pas encastrés (pièces métalliques,vis, copeaux ou cordes et autres) ce qui endommageraitle sol et la machine.Vérifiez le niveau des soies des brosses (contrôlezsi une usure irrégulière s’est vérifiée sur les brossesou les disques abrasifs), en cas de besoin, réglezl’inclinaison de l’action sur le sol.Montez seulement les accessoires préconisés par lefabricant, d’autres pièces pourraient compromettrela sécurité.7.5 CORPS DE LA MACHINEPour nettoyer l’extérieur de la machine, utilisez uneéponge ou un chiffon en vous aidant d’une brosseaux soies douces pour éliminer les taches plus difficiles.La rugosité de la superficie de la machine,voulue pour ne pas rendre apparentes les érafluresdues à l’utilisation, ne facilite par l’élimination destaches persistantes. N’utiliser pas des machines àvapeur, ni des tuyaux d’arrosage ni des nettoyeursà haute pression.7.6 BATTERIESBatteries PB-ACIDELes opérations d’entretien doivent se conformer auxindications du fabriquant ainsi qu’à celles décritesci-dessous.Si les plaques des éléments ne sont pas complètementimmergées dans l’acide, cela provoque uneoxydation rapide et un dysfonctionnement irrémédiablede l’élément concerné.Le débordement de l’acide provoque l’oxydation dela machine.Utilisez un chargeur de batteries préconisé par lefabricant et adapté au type de batteries à charger.Les batteries doivent toujours être rechargées dansun endroit bien ventilé, car il existe un risque d’explosion.L’utilisation de batteries au gel ou sans entretienest fortement conseillée.Batteries GELLes opérations d’entretien doivent se conformer auxindications du fabricant ainsi qu’à celles décrites cidessous.Utilisez un chargeur de batteries préconisé par lefabricant.7.7 DISJONCTEURS THERMIQUESLa machine est équipée de protections électriquesqui protègent les principaux organes de fonctionnement.Des disjoncteurs thermiques ont été prévus pourprotéger le moteur traction et le moteur de labrosse.En cas de déclenchement automatique d’un de cesdisjoncteurs, il suffit d’appuyer à fond sur le disjoncteurconcerné pour rétablir le fonctionnement.Le déclenchement des disjoncteurs, spécialementpendant les premières semaines d’utilisation, ne signifiepas obligatoirement un dysfonctionnementde la machine. Il est cependant conseillé de fairecontrôler le dispositif par un électricien spécialisé sile disjoncteur continue à se déclencher.7.8 CADENCESPour toutes les opérations décrites dans ce paragraphe,reportez-vous aux instructions détailléesdans les paragraphes correspondants.57
7.8.1 OPERATIONS QUOTIDIENNESDémonter et contrôler la brosse ou les disques entraîneurs(avec les disques abrasifs montés). Vérifiers’il n’y a pas de corps étrangers qui empêchentle mouvement ou l’efficacité de tous les organes denettoyage.Contrôler le suceur : nettoyer les bavettes et vérifiez-enl’usure.Si les batteries utilisées sont au Pb-Acide, suivez attentivementles prescriptions du fabricant des batteries.Effectuer la recharge des batteries.7.8.2 OPERATIONS H<strong>EB</strong>DOMADAIRESContrôler et changer en cas de besoin la bavetteanti-éclaboussures.Contrôler attentivement le profil des bavettes dusuceur et changez-les en cas de besoin.Contrôler si les tuyaux et les conduits d’aspirationne sont pas engorgés.Nettoyer à fond les réservoirs de la solution détergenteet de l’eau sale.Pour les modèles équipés de batteries au Pb-Acide: contrôler le niveau de l’électrolyte sur tous les élémentset faites l’appoint avec de l’eau distillée encas de besoin. Reportez-vous aux indications détailléesfournies par le fabricant des batteries.Soulever le couvercle du logement du filtre d’aspiration,vérifiez la présence de liquide et, éventuellementfaites-le évacuer dans le réservoir de l’eausale.7.8.3 OPERATIONS A INTERVALLES REGU-LIERSMême si la machine a été fabriquée avec rigueur etest conforme aux tests de qualité plus sévères, lescomposants électriques et mécaniques sont inévitablementsoumis à l’usure et au vieillissementaprès de longues périodes d’utilisation.Pour opérer en toute sécurité et sans inconvénients,il est conseillé de faire réviser votre machinechaque année auprès d’un centre de service aprèsventeagréé ou par un technicien spécialisé informéde toutes les règles de sécurité contenues dans cemanuel. Si la machine travaille dans des conditionsparticulièrement difficiles ou en cas de négligenced’entretien, il est conseillé de faire réviser la machineplus souvent.7.9 PIECES DE RECHANGE CONSEILLEESIl est conseillé de tenir toujours à disposition lespièces de rechange plus fréquentes et de ne jamaisnégliger les opérations d’entretien ordinaire et extraordinaire,ceci afin d’avoir toujours le maximumde productivité de la machine.La liste de ces pièces de rechange est disponibleauprès de votre revendeur.8. PETIT GUIDE DE DEPANNAGECes indications servent à comprendre les causes decertains problèmes par rapport à des inconvénientsprécis. Pour le type d’action à effectuer, reportezvousaux paragraphes correspondants ci-dessous.8.1 LA MACHINE NE FONCTIONNE PAS☹ La clé n’est pas introduite ni tournée correctement.☺ Introduisez et tournez la clé sur ON☹ Le connecteur des batteries est débranché oumal branché au connecteur du câblage principal.☺ Branchez solidement les deux connecteurs.☹ La machine est en train de recharger ses batteries.☺Attendez la fin de la recharge.☹ Les batteries sont déchargées.☺ Rechargez les batteries.8.2 LA MACHINE N’AVANCE PAS☹ Le levier de commande de la traction est au pointmort.☺ Sélectionnez une direction de marche; levez lelevier pour avancer ou baissez le levier pour lamarche arrière.☹ La déclivité du sol est trop importante.☺ Poussez manuellement la machine jusqu’au niveausouhaité.☹ Déclenchement du disjoncteur du ou des moteursde traction.☺ Arrêtez la machine, laissez-la reposer pendant 5minutes.☹ Les batteries sont déchargées.☺ Rechargez les batteries.8.3 LA BROSSE NE TOURNE PAS☹ L’interrupteur du moteur de la brosse n’est passélectionné.☺ Appuyez sur l’interrupteur pour activer la brosse.☹ Déclenchement du disjoncteur du moteur de labrosse en raison d’une surchauffe.☺ Vérifiez et éliminez la raison ayant provoqué lasurchauffe (présence de bouts de ficelle ou autrescorps étrangers empêchant le mouvement, surfacestrop accidentées, etc.) et réenclenchez le disjoncteuren appuyant dessus.☹ Le relais du moteur ou le moteur de la brosse estdéfectueux.☺ Changez le relais du moteur ou le moteur de labrosse.8.4 LA DISTRIBUTION DE SOLUTION DETER-GENTE EST INSUFFISANTE OU INEXISTANTE☹ Le réservoir de solution détergente est vide.☺ Remplissez le réservoir de solution détergente,après avoir vidé le réservoir de l’eau sale.☹ Le levier de réglage du flux est fermé ou presquefermé.☺ Régulez / augmentez le flux de distribution de lasolution détergente comme souhaité.☹ Le conduit de distribution du détergent est en-58
gorgé.☺ Dégagez le conduit en éliminant la saleté.8.5 ABSENCE D’ASPIRATION☹ Le tuyau d’aspiration n’est pas raccordé au suceur.☺ Raccordez correctement le tuyau d’aspiration.☹ Le tuyau d’aspiration, le conduit du suceur ou lelogement d’inspection sont engorgés.☺ Désengorgez et nettoyez tous les conduits.☹ Le moteur d’aspiration est éteint.☺ Activez le moteur d’aspiration.☹ Le réservoir de l’eau sale est plein.☺ Videz le réservoir.☹ Le courant n’arrive pas au moteur d’aspirationou le moteur est grillé.☺ Vérifiez les branchements et dans changez lemoteur dans le deuxième cas.8.6 L’ASPIRATION N’EST PAS EFFICACE☹ Le couvercle du réservoir de l’eau sale n’a pasété serré solidement.☺ Serrez-le solidement.☹ Le bouchon du tuyau de vidange du réservoir del’eau sale n’est pas parfaitement fermé.☺ Fermez-le correctement.☹ Le tuyau d’aspiration, le conduit du suceur ou lelogement d’inspection sont engorgés.☺ Désengorgez et nettoyez tous les conduits.☹Les batteries sont neuves mais elles ne fournissentpas 100% des performances attendues☺ L’accumulateur atteint le maximum de ses performancesaprès 20-30 cycles de recharge complets.☹ L’électrolyte s’est évaporé et ne couvre pas complètementles plaques.☺ Consultez le manuel spécifique du fabricant desbatteries.☹ Il y a des différences évidentes entre les différentséléments.☺ Changez l’élément défectueux.Consultez toujours manuel d’instructions spécifiquedes batteries et du chargeur de batteries, si le problèmepersiste, contactez le centre de serviceaprès-vente agréé le plus proche.Le fabricant NE PEUT ETRE d’aucune aide encas de problèmes dus à des batteries et à unchargeur de batteries qu’il n’a pas fourni.8.7 LE MOTEUR DES BROSSES OU LE MO-TEUR ASPIRATION NE S’ARRETENT PAS☺ Arrêtez la machine en coupant l’alimentation généraleen débranchant le connecteur principal desbatteries et contactez le centre de service aprèsventeagréé le plus proche.8.8 LE SUCEUR NE NETTOIE PAS OU NESECHE PAS BIEN☹ Les bavettes du suceur sont usées ou ont butécontre de la salissure solide.☺ Changez les bavettes ou nettoyez-les.☹ Le suceur n’est pas bien réglée, l’avancementdoit être exactement perpendiculaire au sens de lamarche.☺ Procédez au réglage du suceur.☹ Le tuyau d’aspiration ou le conduit du suceursont engorgés.☺ Désengorgez et nettoyez tous les conduits.8.9 LE CHARGEUR DE BATTERIES NE FONC-TIONNE PAS☹ La recharge des batteries ne démarre pas☺ Contrôlez si le chargeur des batteries est effectivementbranché aux batteries. Consultez le manuelspécifique du chargeur de batteries.8.10 LES BATTERIES NE SE CHARGENT PASOU NE MAINTIENNENT PAS LA CHARGE59
1. INHALTSVERZEICHNIS2. ALLGEMEINE INFORMA-TIONEN2.1 ZIELSETZUNG DESHANDBUCHS2.2 TERMINOLOGIE UND BEDEUTUNGDER SYMBOLE2.3 IDENTIFIZIERUNG DES PRODUKTES2.4 SACHGEMÄSSER G<strong>EB</strong>RAUCH2.5 TECHNISCHE ABÄNDERUNGEN3. SICHERHEITSINFORMATIONEN3.1 WICHTIGE HINWEISE3.2 LÄRM UND ERSCHÜTTERUNGEN4. HANDLING-INFORMATIONEN4.1 H<strong>EB</strong>EN UND TRANSPORT DERVERPACKUNG4.2 KONTROLLE BEI DER LIEFERUNG4.3 AUSPACKEN4.4 H<strong>EB</strong>EN UND TRANSPORT: MASCHINE,BATTERIE UND BATTERIELADEGERÄT5. INFORMATIONEN FÜR DIE INSTALLATION5.1 BATTERIEN5.1.2 VORBEREITUNG DER BATTERIE5.1.3 INSTALLATION DER BATTERIEN5.1.4 ANSCHLUSS DER BATTERIEN5.1.5 KONFIGURATION DES ANZEIGERS DESBATTERIELADEZUSTANDS5.2 KONFIGURATION DES LADEGERÄTS6. INFORMATIONEN FÜR DEN G<strong>EB</strong>RAUCH6.1 VORBEREITUNG DER MASCHINE6.2 STRUKTUR UND FUNKTIONEN DERMASCHINE6.3 LADEN DER BATTERIEN6.4 EINBAU DES SQUEEGEES6.5 AUSBAU DES SQUEEGEES6.6 WECHSELN DER SQUEEGEE-WISCH-BLÄTTER AUS GUMMI6.7 EINSTELLUNG DES SQUEEGEES6.8 EINBAU UND AUSBAU DERSPRITZSCHUTZVORRICHTUNG6.9 EINBAU UND AUSBAU DER BÜRSTE6.10 BEFÜLLEN UND ENTLEEREN DESLÖSUNGSBEHÄLTERS6.11 ENTLEEREN DES SCHMUTZWASSERBE-HÄLTERS6.12 SPEZIFISCHE G<strong>EB</strong>RAUCHSANWEISUN-GEN FÜR DAS MODELL “E”6.13 FAHREN DER MASCHINE6.14 ARBEITSWEISE606.14.1 VORBEREITUNG UND WARNHINWEISE6.14.2 PRÜFUNG DES BATTERIELADEZU-STANDS6.14.3 DIREKTES WASCHEN ODER WASCHENVON LEICHT VERSCHMUTZTENFLÄCHEN6.14.4 INDIREKTES WASCHEN ODER WASCHENVON STARK VERSCHMUTZTEN FLÄCHEN6.14.5 VORGÄNGE NACH DEM WASCHEN7. WARTUNGSINFORMATIONEN7.1 BEHÄLTER7.2 SAUGROHR7.3 SQUEEGEE7.4 ZUBEHÖRE7.5 MASCHINENKÖRPER7.6 BATTERIEN7.7 THERMISCHE SICHERUNGSAUTOMATEN7.8 HÄUFIGKEIT7.8.1 TÄGLICHE EINGRIFFE7.8.2 WÖCHENTLICHE EINGRIFFE7.8.3 IN EINEM LÄNGEREN ABSTANDVORZUNEHMENDE EINGRIFFE7.9 EMPFOHLENE ERSATZTEILE8. BETRI<strong>EB</strong>SKONTROLLE8.1 DIE MASCHINE FUNKTIONIERT NICHT8.2 DIE MASCHINE FÄHRT NICHT VOR8.3 DIE BÜRSTE DREHT SICH NICHT8.4 ES TRITT KEINE ODER NUR WENIGREINIGUNGSLÖSUNG AUS8.5 KEIN SAUGBETRI<strong>EB</strong>8.6 ZU GERINGE SAUGKRAFT8.7 DER BÜRSTENMOTOR ODER DERSAUGMOTOR HALTEN NICHT AN8.8 DER SQUEEGEE REINIGT ODERTROCKNET NICHT GUT8.9 DAS BATTERIELADEGERÄTFUNKTIONIERT NICHT8.10 DIE BATTERIEN WERDEN NICHTGELADEN ODER ENTLADEN SICH ZUSCHNELL
2. ALLGEMEINE INFORMATIONEN2.1 ZIELSETZUNG DES HANDBUCHSZum leichteren Nachschlagen und Lesen der gewünschtenInformationen ist Bezug auf das Inhaltsverzeichnisam Anfang des Abschnittes in dergewünschten Sprache zu nehmen.Das vorliegende Handbuch wurde vom Herstellerder Maschine zusammengestellt und stellt ein ergänzendesTeil des Produktes dar. Daher muss dasHandbuch über die gesamte Lebensdauer der Maschinebis zur Verschrottung sorgfältig aufbewahrtwerden.Der Kunde hat sich zu vergewissern, dass das Personaldas Handbuch gelesen und den Inhalt desselbenverstanden hat, damit es die hierbeschriebenen Anleitungen genau befolgen kann.Nur das genaue Befolgen der in diesem Handbuchenthaltenen Anleitungen und Anweisungen gewährleistetbeste Resultate hinsichtlich Sicherheit, Leistungen,Wirksamkeit und Lebensdauer des sichjetzt in Ihrem Besitz befindenden Produkts. Das Nichtbefolgendieser Vorschriften kann eine potentielleGefahr für den Anwender, die Maschine, diegereinigte Oberfläche und die Umgebung darstellen;für die daraus entstehenden Schäden kann derHersteller auf keinen Fall verantwortlich gemachtwerden.Das vorliegende Handbuch bezieht sich detailliertauf die Maschine und enthält ausschließlich Anleitungenund Beschreibungen für die Batterien undBatterieladegeräte (Optional), über die wir verfügen.Batterien und Batterieladegeräte sind Komponentenvon grundlegender Bedeutung für die Maschine,denn von ihnen hängen Autonomie undLeistungen derselben ab.Nur die korrekte Kombination dieser beiden Zubehörteile(Batterie und Batterieladegerät) gewährleistetoptimale Leistungen und verhindertkostspielige Schäden . Für detaillierte Informationenist Bezug auf die spezifischen Handbücher derBatterien und Batterieladegeräte zu nehmen.Die von uns empfohlenen Batterieladegeräte (Optional)gewährleisten die beste Kombination mit derMaschine und zeichnen sich nicht nur durch eineaußerordentliche Vielseitigkeit (Batterieladegeräte),einen hohen Qualitätsstandard und erstklassige Leistungenaus.2.2 TERMINOLOGIE UND BEDEUTUNG DERSYMBOLEFür ein besseres Verständnis und zum Hervorhebender verschiedenen Aspekte der Anleitungen wurdenBegriffe und Symbole verwendet, die nachstehenddefiniert und abgebildet werden:- Maschine. Dieser Begriff ersetzt die Handelsbezeichnung,auf die sich dieses Handbuch bezieht.- Bediener. Person oder Personen, die die Maschinenormalerweise bedienen und mit deren Betriebvertraut sind, aber nicht über die spezifischetechnische Kompetenz verfügen, die für die Durchführungbesonderer Eingriffe erforderlich ist.- Techniker. Person oder Personen, die über dieErfahrung, technische Ausbildung, Kenntnis der Gesetzeund Vorschriften verfügen, die für die Durchführungbesonderer Eingriffe erforderlich ist.Diese Personen sind in der Lage, Gefahren zu erkennenund zu vermeiden, die bei der Installation,dem Gebrauch, dem Handling und der Wartung derMaschine auftreten können.- HINWEISSYMBOL ( ☞) Diese Informationensind besonders wichtig, um Maschinenstörungen zuvermeiden.- ACHTUNGSSYMBOL ( ! ) Diese Informationensind besonders wichtig, um schwere MaschinenundUmweltschäden zu vermeiden.- GEFAHRSYMBOL () Diese Informationen sindbesonders wichtig, um schwere (oder schwerste)Personen-, Maschinen- und Umweltschäden zu vermeiden.2.3 IDENTIFIZIERUNG DES PRODUKTSDas unter dem Armaturenbrett über dem Batterieverbinderangebrachte Maschinenschild enthält folgendeInformationen:• Angabe des Herstellers• CE-Zeichen• Modellnummer• Modell• Gesamt-Nennleistung• Seriennummer (Kennnummer)• Baujahr• Gewicht bei max. Beladung2.4 SACHGEMÄSSER G<strong>EB</strong>RAUCHDie Maschine, auf die sich dieses Handbuch bezieht,ist eine Scheuersaugmaschine: Die Maschinekann zum Waschen und Absaugen von Flüssigkeitenvon ebenen, starren, waagerechten, glattenoder mäßig rauen gleichmäßigen und hindernislosenBöden in Zivilgebäuden und Industriegebäudeneingesetzt werden. Jeder andere Einsatz ist verboten.Wir bitten Sie, die in diesem Handbuch enthaltenenSicherheitshinweise strikt zu befolgen.Die Scheuersaugmaschine verteilt eine einstellbareMenge Reinigungslösung aus Wasser und Reinigungsmittelauf dem zu behandelnden Boden, währenddie Bürsten den Schmutz vom Bodenentfernen. Mittels eines auf dem Boden aufliegendenSqueegee erlaubt die Sauganlage der Maschinedas perfekte Trocknen der Oberflächen und des vonden Frontbürsten aufgenommenen Schmutzes ineinem einzigen Durchgang.Durch eine korrekte Kombination der verschiedenenReinigungsmittel mit den verschiedenen verfügbarenBürstentypen (oder Schleifscheiben) kanndie Maschine an alle Boden- und Schmutztypen angepasstwerden.61
2.5 TECHNISCHE ABÄNDERUNGENDiese Maschine wurde unter Berücksichtigung derin den EWG-Richtlinien enthaltenen Vorschriften zurGewährleistung der Sicherheit und der Gesundheitdes Anwenders entwickelt und gebaut und istdaher mit dem CE-Zeichen auf dem Maschinenschildversehen. Die EWG-Richtlinien, denen dieMaschine entspricht, sind in der dem vorliegendenHandbuch beiliegenden Konformitätsbescheinigungaufgeführt. Diese Bescheinigung verliertihre Gültigkeit, wenn nicht zuvor mit dem Herstellervereinbarte Abänderungen an der Maschine durchgeführtwerden.Der Hersteller behält sich das Recht vor, jederzeitund ohne Vorankündigung technische Abänderungenam Produkt vorzunehmen, um das Produkt zuaktualisieren oder technisch zu verbessern. Daherkann die von Ihnen gekaufte Maschine in kleinerenDetails leicht von den in unseren Katalogen oder imvorliegenden Handbuch enthaltenen Informationenund Abbildungen abweichen, ohne dass dadurchdie Sicherheit und die entsprechenden Informationenbeeinträchtigt werden.3. SICHERHEITSINFORMATIONEN3.1 WICHTIGE HINWEISE(☞) Das “Bedienungsanleitungshandbuch”ist vor dem Einschalten, dem Gebrauch, derWartung, der ordentlichen Wartung und jeglichenEingriffen an der Maschine aufmerksamzu lesen.( ! ) Alle im vorliegenden Handbuch und denHandbüchern der Batterie und des Batterieladegerätsenthaltenen Anweisungen sindstrikt zu befolgen (insbesondere dieAchtungs- und Gefahrhinweise).Der Hersteller haftet nicht für Personenund/oderSachschäden, die auf das Nichtbeachtender o.g. Vorschriften zurückzuführensind.(☞) Vor dem Gebrauch der Maschine ist sicherzustellen,dass alle Bauteile korrekt positioniert sind.( ! ) Die Maschine darf nur von Personen verwendetwerden, die bezüglich des Gebrauchs derselbenausgebildet wurden, die zum Bedienen der Maschinefähig sind, und die ausdrücklich mit dem Gebrauchder Maschine beauftragt wurden. ZumVerhindern eines nicht autorisierten Gebrauchs derMaschine ist dieselbe mit gezogenem Zündschlüsselan einem Ort abzustellen, der Unbefugten nicht zugänglichist.( ! ) Der Gebrauch der Maschine ist nur volljährigenPersonen gestattet.( ! ) Die Maschine darf nicht für einen anderen alsden ausdrücklich vorgesehenen Zweck eingesetztwerden. Bei dem Gebrauch der Maschine ist der jeweiligeGebäudetyp zu berücksichtigen und es sinddie dort geltenden Sicherheitsbedingungen strikt zubeachten.() Die Maschine nicht an schlecht beleuchtetenOrten, in explosionsgefährdeter Umgebung, in Anwesenheitvon gesundheitsschädlichem Schmutz(Staub, Gas, usw.), auf Straßen oder öffentlichenWegen sowie im Freien im Allgemeinen verwenden.( ! ) Die Maschine wurde für den Einsatz bei einerUmgebungstemperatur zwischen +4°C und + 35°Centwickelt; bei Nichtgebrauch ist die Maschine ineiner trockenen, nicht korrosiven Umgebung beieiner Temperatur zwischen + 10°C und + 50°C abzustellen.Die für den Betrieb und die Lagerung der Maschinezulässige Feuchtigkeit liegt zwischen 30% und95%.() Keine brennbaren oder explosiven Flüssigkeiten,Gase, Trockenpulver, Säuren und Lösemittel(z.B. Lösemittel zum Verdünnen von Lack, Azeton,usw.) oder Benzin, Öl, Treibstoff, usw. ansaugen,auch wenn diese verdünnt sind; keine brennendenoder glühenden Gegenstände ansaugen.( ! ) Die Maschine nicht auf einem Gefälleüber 2% oder auf Rampen mit einem Gefälleüber 2% einsetzen;bei kleineren Gefällen darf die Maschine nicht querzum Gefälle eingesetzt werden, ist immer vorsichtigzu manövrieren und nicht zu wenden. Beim Transportauf Rampen oder stärkeren Gefällen ist höchsteAufmerksamkeit erforderlich, um einUmkippen sowie eine unkontrollierte Beschleunigungzu vermeiden. Immer die niedrigste Geschwindigkeiteinstellen! Rampen und Gefälleausschließlich mit hochgefahrenen Bürsten undSqueegees befahren.( ! ) Die Maschine niemals an Gefällen parken.(☞) Die Maschine darf auf keinen Fall bei steckendemSchlüssel und an das Stromnetz angeschlossenemNetzstecker unbeaufsichtigt gelassenwerden. Vor dem Verlassen der Maschine ist derNetzstecker und der Schlüssel zu ziehen und es sindgeeignete Maßnahmen zu treffen, um zu vermeiden,dass die Maschine sich in Bewegung setzt.() Beim Gebrauch der Maschine ist auf in der Einsatzumgebunganwesende Drittpersonen, insbesondereKinder, zu achten.( ! ) Die Maschine nicht zum Transportieren vonPersonen und/oder Gegenständen oder zumSchleppen von Gegenständen verwenden. Die Maschinenicht schleppen.(☞) Die Maschine nicht als Ablage für Gegenständeverwenden.Die Belüftungs- und Kühlöffnungen nicht bedeckenoder verstopfen.( ! ) Die Sicherheitsvorrichtungen nicht entfernen,abändern oder umgehen.( ! ) Immer die für die Sicherheit des Bedieners erforderlichepersönliche Schutzausrüstung verwenden:Schürze oder Schutzanzug, rutschfesteswasserdichtes Schuhwerk, Gummihandschuhe,62
Schutzbrille und Gehörschutz, Staubschutzmaske.Vor Arbeitsbeginn sind Armbänder, Ketten, Uhren,Krawatten und andere Gegenstände abzulegen, dieeine potentielle Gefährdung darstellen und zuschweren Unfällen führen können.( ! ) Nicht mit den Händen zwischen die sich bewegendenMaschinenteile greifen.(☞) Keine anderen als die vorgesehenen Reinigungsmittelverwenden und die in den jeweiligenSicherheitsblättern enthaltenen Vorsichtsmassnahmenund Vorschriften beachten. Wir empfehlen, dieReinigungsmittel an einem Kindern unzugänglichenOrt aufzubewahren. Bei Kontakt mit den Augen sinddie Augen sofort gründlich mit Wasser zu spülen.Bei Verschlucken der Reinigungslösung ist sofort einArzt aufzusuchen.Sicherstellen, dass die Steckdosen für die Stromversorgungdes Batterieladegeräts an eine geeigneteErdungsanlage angeschlossen sind und durchThermoschutzschalter und Differentialschalter abgesichertsind.() Wenn die Maschine mit Batterien ausgerüstetwird, ist darauf zu achten, dass die an der Instrumententafelangebrachte Entladungsanzeige korrekteingestellt ist. Den zuständigenVertragshändler kontaktieren oder den spezifischenAbschnitt des Handbuchs nachschlagen.( ! ) Die Anleitungen des Batterieherstellers sindstrikt zu befolgen und die anwendbaren Gesetzesind zu befolgen. Die Batterien immer sauber undtrocken halten, um Kriechstrom zu vermeiden. DieBatterien vor Verschmutzungen, wie zum BeispielMetallstaub, schützen.() Keine Werkzeuge auf die Batterien legen: Kurzschluss-und Explosionsgefahr.() Bei der Verwendung von Batteriesäure sind dieentsprechenden Sicherheitsvorschriften strikt zubefolgen.In Anwesenheit von Magnetfeldern sind die Auswirkungenauf die Kontrollelektronik zu überprüfen.Die Maschine auf keinen Fall mit Wasserstrahl reinigen.(☞) Die aufgenommenen Flüssigkeiten enthaltenReinigungsmittel, Desinfektionsmittel, Wassersowie organisches und anorganisches Material, daswährend der Arbeitsphasen gelöst wurde: Dahermüssen diese Flüssigkeiten gemäß den anwendbarenGesetzen entsorgt werden.( ! ) Bei Defekten und/oder Betriebsstörungen istdie Maschine sofort abzustellen (von dem Stromnetzoder den Batterien trennen). Nicht versuchen,die Maschine selbst zu reparieren, sondern ein technischesKundendienstcenter des Herstellers kontaktieren.() Alle Zubehörwartungs- und Ersetzungsarbeitenmüssen in gut beleuchteter Umgebung durchgeführtwerden, nachdem die Maschine durchTrennen des Batterieverbinders von der Stromversorgunggetrennt wird.(☞) Alle Eingriffe an der elektrischen Anlage sowiealle Wartungs- und Reparatureingriffe (insbesonderedie nicht ausdrücklich im vorliegenden Handbuchbeschriebenen Eingriffe) müssen inautorisierten Kundendienstcentern oder durch technischesPersonal mit Erfahrung auf dem Sektorunter Beachtung der anwendbaren Sicherheitsvorschriftendurchgeführt werden.(☞) Es ist ausschließlich der Einsatz von Originalersatzteilenzugelassen, das einzig undallein vom Hersteller zu beziehen ist, dennnur Originalersatzteile gewährleisten eineneinwandfreien und sicheren Betrieb der Maschine.Keine aus anderen Maschinen ausgebautenTeile oder andere Ersatzteilkitsverwenden.Wenn die Maschine nicht mehr verwendet werdensoll, sind die Batterien auszubauen und gemäß denVorschriften der EU-Norm 91/157/EWG zu entsorgenoder einem autorisierten Batteriesammelcenterzu übergeben.Bei der Entsorgung der Maschine sind die im jeweiligenAnwendungsland geltenden Gesetze zubefolgen:- Die Maschine vom Netz trennen, die Flüssigkeitenablassen und die Maschine reinigen;- Dann wird die Maschine zerlegt und auf der Basisder auf den einzelnen Teilen vorhandenen Wiederverwertungszeichen(Kunststoff, Metall, Gummi,Verpackungsmaterial) werden die verschiedenenWerkstoffe gesammelt. Bei andere Werkstoffe enthaltendenBauteilen ist die zuständige Stelle zukontaktieren.Jede Werkstoffgruppe wird gemäß den Wiederverwertungsgesetzenentsorgt.Es wird empfohlen, die Bauteile der Maschine, vondenen eine Gefahr ausgehen kann, unschädlich zumachen, damit insbesondere Kinder nicht gefährdetwerden.(☞) Vor jedem Gebrauch ist die Maschine zu überprüfenund insbesondere ist zu kontrollieren, dassdas Batterieladekabel und der Steckverbinder ineinwandfreiem Zustand sind, damit eine sichere Arbeitgewährleistet werden kann. Wenn diese Teilenicht in einwandfreiem Zustand sein sollten, darfdie Maschine auf keinen Fall vor der Reparatur desdefekten Teiles durch einen zugelassenen Fachmannin Betrieb gesetzt werden.(☞) Beim Austreten von Schaum oder Flüssigkeitenist der Saugmotor sofort abzustellen(☞) Die Maschine nicht auf Textilböden, wie Teppichen,Teppichboden, usw. verwenden.Der Gebrauch von Wachs oder Schaum bildendenReinigungsmitteln sowie Leckagen an den Schläuchenund Rohren kann zu schweren Betriebsstörungender Maschine sowie zum Verstopfen derLeitungen führen.63
3.2 LÄRM UND ERSCHÜTTERUNGENDie Maschine ist für den Gebrauch in Innenräumenvorgesehen und untersteht daher nicht den Bezugsrichtlinien.4. HANDLINGS-INFORMATIONEN4.1 H<strong>EB</strong>EN UND TRANSPORT DER VERPAC-KUNG( ! ) Während des Hebens und des Transports ist sicherzustellen,dass die verpackte Maschine sicherverankert wurde, damit sie nicht umkippen oder abstürzenkann.Beim Laden/Abladen der Maschine auf/von Fahrzeugenist für eine geeignete Beleuchtung zu sorgen.Beim Handling der verpackten Maschine sind geeigneteMittel einzusetzen; dabei ist darauf zuachten, dass die Verpackung keinen Stößen ausgesetztund nicht beschädigt wird. Die verpackte Maschinenicht auf den Kopf stellen und sie sanft aufden Boden absetzen.(☞) Diese Anweisungen gelten auch für die Batterienund das Batterieladegerät.4.2 KONTROLLE BEI DER LIEFERUNG(☞) Bei der Lieferung der Ware (Maschine, Batterien,Batterieladegerät) durch den Spediteur ist zukontrollieren, dass die Verpackung und deren Inhaltkeine Beschädigungen aufweisen. Falls der Verpackungsinhaltbeschädigt sein sollte, ist derSpediteur diesbezüglich zu unterrichten und es istschriftliche eine Schadensersatzforderung niederzulegen,bevor die Ware angenommen wird (aufdem Lieferschein “unter Vorbehalt” ankreuzen).4.3 AUSPACKEN( ! ) Es ist Schutzkleidung anzuziehen und es sindgeeignete Werkzeuge zu verwenden, um die Unfallgefahrauf ein Minimum zu reduzieren.Beim Auspacken der Maschine ist folgendermaßenvorzugehen:In Karton verpackte Maschine:- Die Kunststoffumreifungen mit einer Schere oderSchlagzange durchtrennen.- Den Karton hochziehen und entfernen.- Die Beutel aus dem Innenraum nehmen undderen Inhalt überprüfen (Gebrauchs- und Wartungshandbuch,Steckverbinder für Anschluss an dasBatterieladegerät).- Die Metallbügel oder Kunststoffumreifungsbänderentfernen, die die Maschine an der Palette befestigen.- Die Bürsten und Squeegees aus der Verpackungnehmen.- Die Maschine nach hinten von der Palette schieben,wozu eine gut an der Palette und am Bodenbefestigte geneigte Ebene zu verwenden ist.In Holzverschlag verpackte Maschine:- Alle Holzwände von der Palette lösen, wobei mitdem oberen Teil begonnen wird.- Die Schutzfolie von der Maschine entfernen.- Die Metallbügel und Kunststoffumreifungen entfernen,die die Maschine an der Palette befestigen.- Die Bürsten und Squeegees aus der Verpackungnehmen.- Die Maschine nach hinten von der Palette schieben,wozu eine gut an der Palette und am Bodenbefestigte geneigte Ebene zu verwenden ist.Unter Anwendung der gleichen Vorsichtsmaßnahmenwird das als Optional gelieferte Batterieladegerät(an den speziellen Griffen von oben aus derVerpackung herausziehen) und die Optional-Batterieaus der jeweiligen Verpackung genommen.Nachdem das gesamte Verpackungsmaterial entferntwurde, können die Zubehörteile und Batteriengemäß den im spezifischen Abschnittenthaltenen Anleitungen montiert werden.Es wird empfohlen, alle Verpackungselemente aufzubewahren,da sie zum Schützen der Maschineund des Zubehörs bei einem weiteren Transport aneinen anderen Ort oder zu einem autorisierten Kundendienstcenterverwendet werden können. Andernfallssind beim Entsorgen desVerpackungsmaterials die anwendbaren Gesetze zubefolgen.4.4 H<strong>EB</strong>EN UND TRANSPORT: MASCHINE,BATTERIE UND BATTERIELADEGERÄT( ! ) Die Maschine nicht mit einem Hubwagenheben, da der Rahmen nicht mit Hubpunkten ausgerüstetist, an die die Gabeln angelegt werdenkönnten, und folglich kein direktes Heben möglichist.Vor der Vorbereitung der Verpackung und des Transportsist es erforderlich:- Den Flüssigkeitssammelbehälter und den Reinigungslösungsbehälterentleeren.- Die Squeegees und die Bürsten oder Haltescheibenabbauen.- Die Batterien trennen und entfernen.Die Maschine mittels einer geneigten Ebene auf dieOriginalpalette (oder eine andere, dem Maschinengewichtund den Maschinenabmessungen entsprechendenUnterlage) schieben.Die Maschine und den Squeegee mit Metallbügelnoder anderen dem Gewicht der Elemente entsprechendenVorrichtungen fest an der Palette verankern.Die Palette mit der Maschine heben und auf dasTransportmittel laden.Die Maschine und die Palette mit Seilen sicher imTransportmittel befestigen.Wenn man über private Transportmittel mit Laderampenverfügt, kann man die Maschine auch direktohne Palette auf die Ladefläche desTransportmittels schieben. Dabei ist jedoch darauf64
zu achten, dass die Maschine und alle Komponentenwährend des Transports vor Stößen, Feuchtigkeit,Erschütterungen und plötzliche Bewegungengeschützt sind.Die Batteriekästen sind mit Bohrungen versehen,an denen die für das Handling erforderlichen Werkzeugeangebracht werden können.(☞) Zum Heben oder Einsetzen der Batterie (indas entsprechende Fach der Maschine) sind ausschließlichFachpersonal und für den jeweiligen Eingriffgeeignete Mittel einzusetzen (Seile,Transportösen, usw.), die für das Gewicht der zuhebenden Teile geeignet sind. Beim Transport sinddie gleichen Vorsichtsmaßnahmen zu treffen unddie gleichen Anleitungen zu befolgen, die für denTransport der Maschine beschrieben wurden. Zusätzlichsind die Anleitungen im spezifischen Handbuchdes Herstellers zu beachten.Das Batterieladegerät kann sowohl vertikal als horizontalauf den Unterlagen transportiert werden,mit denen es ausgestattet ist. Dabei sind die gleichenAnleitungen zu befolgen, die für den Transportder Maschine beschrieben wurden. Zusätzlich sinddie Anleitungen im spezifischen Handbuch des Herstellerszu beachten.5. INFORMATIONEN FÜR DIE INSTAL-LATION5.1 BATTERIENUnabhängig von dem Bautyp wird die Leistungeiner Batterie mit einer immer auf die Entladezeitbezogenen Kapazität angegeben. Ein weiterer wichtigerWert ist die Anzahl der möglichen Entladungen.Die Kapazität wird im Ampere pro Stunde (Ah)ausgedrückt, während der Entladezeitraum im Allgemeinenin 20 Stunden (C20 oder 20h oder nichtspezifisch ausgedrückt) oder 5 Stunden (C5 oder5h) ausgedrückt wird. Die Entlade-/Ladezyklen zeigenan, wie oft die Batterie dem Laden unter denbesten Umständen standhält, und stellen dahereinen Anhaltspunkt für die Nutzdauer einer Batteriebei Einhalten aller entsprechenden Vorschriftendar.Folglich variiert die Kapazität einer Batterie auf derBasis des mehr oder weniger schnellen Verbrauchsder in ihr enthaltenen Energie (Strom). Daher variierendie in C5 oder C20 ausgedrückten Kapazitätswertederart stark. Es ist von grundlegenderBedeutung diese Faktoren zu berücksichtigen, umeinen korrekten Vergleich zwischen den auf demMarkt verfügbaren Produkten und unserem Angebotanzustellen.Diese Maschine kann mit zwei unterschiedlichenBatterietypen ausgerüstet werden, die sich bezüglichder Bauweise und Eigenschaften unterscheiden.- Pb-Säure-Batterie mit gepanzerten Rohrmodulen:Erfordern eine regelmäßige Kontrolle des Elektrolytenstandsjeden Elements!( ! ) Wenn ein Element nicht durch die Säurelösungbedeckt ist, oxydiert es in 24 Stundenund die Leistung dieses Elements wirddefinitiv kompromittiert.() Es ist Bezug auf das Batteriehandbuch zu nehmen,um Sachschäden und wirtschaftliche Schädenzu vermeiden.- Gel-Modulbatterie: Dieser Batterietyp ist wartungsfrei,benötigt keine besonderen Räumlichkeitenzum Aufladen (denn es werden keineschädlichen Gase abgegeben) und wird daher vonuns empfohlen.( ! ) Es kann auf keinen Fall davon ausgegangenwerden, dass Batterien und Batterieladegeräte mitden gleichen Eigenschaften der von uns angebotenenBatterien und Batterieladegeräte gleiche Resultategewährleisten. Nur eine perfekteKompatibilität zwischen diesen Elementen (Pb-Säure-Batterien, Gel-Batterien und Batterieladegerät)gewährleistet erstklassige Leistungen, langeLebensdauer, Sicherheit und Wirtschaftlichkeit.5.1.2 VORBEREITUNG DER BATTERIE( ! ) Die technischen Eigenschaften der verwendetenBatterien müssen mit den im Abschnitt “TechnischeInformationen” angegebenen Eigenschaftenübereinstimmen. Der Einsatz von nicht den Vorschriftenentsprechenden Batterien kann zu schwerenMaschinenschäden führen und ein häufigeresAufladen erforderlich machen.() Während der Installation oder der Wartung derBatterien hat der Bediener geeignete Schutzausrüstungenzu verwenden, um Unfälle zu vermeiden.Nicht in der Nähe von offenem Feuer arbeiten, dieBatteriepole nicht kurzschließen, keinen Funkenschlagerzeugen und nicht rauchen.Die Batterien werden normalerweise mit Säure befülltgeliefert (Pb-Säure-Batterien) und sind einsatzbereit.Es sind jedoch auf jeden Fall die in demder Batterie beigestellten Handbuch enthaltenenAnweisungen und Vorschriften bezüglich der Sicherheitund des Gebrauchs zu befolgen.5.1.3 INSTALLATION DER BATTERIENZum Einsetzen der Batterie in das Batteriefach(Foto I - 2) muss die Bürstenplatte abgesenkt werden;zum Öffnen des Batteriefachs den Öffnungshebelziehen (Foto H - 1) und den Lösungsbehälter anheben(Foto O - 3);die Spannklammer am Hebekabel der Bürstenplattelösen (Foto I - 1).Die Batterien in das Batteriefach einsetzen (Foto I– 2) und sicherstellen, dass sie in einwandfreiemZustand sind.5.1.4 ANSCHLUSS DER BATTERIEN( ! Diese Eingriffe müssen von Fachmännern durchgeführtwerden.65
Installation und Laden der Batterien sollen aneinem gut belüfteten, trockenen Ort und nicht inder Nähe von Wärmequellen und korrosiven Stoffenerfolgen. Sicherstellen, dass die Spannung der Batterienund des Batterieladegeräts übereinstimmen.Das Stromnetz durch einen verzögerten Schalteroder eine Sicherung mit einer über der Höchstaufnahmedes Batterieladegeräts liegender Last absichern.Die Polarität der Batteriebuchse einhalten.- Den Anderson-Verbinder des Batteriekabels vomAnderson-Verbinder des Maschinenkabels trennen( Foto D - 7 )( Foto F - 8 ). Die Kabel immer in dieHand nehmen und niemals an ihnen ziehen.Auf Foto G ist der Batterieanschlussplan für die ModelleBSW1400 – <strong>BT</strong> abgebildet.( ) Das Batteriekabel an der Batterie befestigen,indem die Klemmen an die mit demgleichen Symbol gekennzeichneten Pole angeschlossenwerden (rotes Kabel “+”,schwarzes Kabel “-”)! Ein eventueller Kurzschlussder Batterie kann zu Explosionenführen !Sicherstellen, dass alle Bedienelemente auf “0”oder auf “Aus” stehen, und den Batterieverbinderdann mit dem Maschinenverbinder verbinden( ! ) Das Batteriefach schließen und dabei aufpassen,dass kein Kabel gequetscht wird.Auf Foto I – 3 ist dargestellt, wie die Batterien derModelle BSW1400 – <strong>BT</strong> korrekt angeschlossen werden.5.1.5 KONFIGURATION DES ANZEIGERS DES BATTERIELADEZUSTANDSBeim Kauf der Scheuersaugmaschine ist die elektronische Karte für den Betrieb mit GEL-Batterien konfiguriert.Wenn die Scheuersaugmaschine mit PB-Säure-Batterien ausgestattet werden soll, ist folgendermaßenvorzugehen:Modell “BSW1400”( ! ) FÜR DEN ZUGRIFF AUF DEN KONFIGURATIONSMODUS DER BATTERIESCHWELLEN:1) Gleichzeitig die Tasten „BÜRSTE EINSCHALTEN“ (Foto C – 2) und „SAUGER EINSCHALTEN“ (Foto C –3) innerhalb von 2 Sekunden nach dem Einschalten der Karte mittels des Schlüsselschalters drücken: Die3 Batterie-Led werden eingeschaltet (Foto C - 3A, 3B, 3C).2) Die Taste „SAUGER EINSCHALTEN“ (Foto C – 3) innerhalb von 5 Sekunden nach dem vorhergehendenEingriff drücken. Nach dem Drücken der Taste befindet man sich in dem gewünschten Konfigurationsmodus:Die gelbe und grüne LED der Batterie schalten sich ein (Foto C - 3A, 3B).( ! ) DIE KONFIGURATIONSEINSTELLUNGEN SIND AUF DER LED DER BÜRSTEN SICHTBAR ( Foto C -2A):1) Ausgeschaltet: Pb-Säure.2) Eingeschaltet: Gel.( ! ) ZUM ÄNDERN DER KONFIGURATIONSEINSTELLUNGEN:- Die Taste „BÜRSTE EINSCHALTEN“ drücken ( Foto C - 1) .( ! ) ZUM SPEICHERN DER KONFIGURATIONSEINSTELLUNGEN UND ZUM VERLASSEN DES MODUS:Die Taste „SAUGER EINSCHALTEN“ drücken ( Foto C - 2) .Nach erfolgter Einstellung hat man verschiedene Entladungslevel der Batterie und mit differenziertenEingriffen auf die Maschinenfunktionen, wie aus der nachfolgenden Tabelle hervorgeht:66
Betrieb des Batterie-Abladungsanzeiger - MODELL “BSW1400”VoltsBatterieLED AnzeigeBatterieladezustLED AnzeigeBurstenbetriebPb-Saure GEL Anzeige Anzeige BEDEUTUNG24,0 24,0 GrünEingeschaltet21,5 22,5 GelbEingeschaltet20,5 21,5 RotEingeschaltet20,0 21,0 RotBlinkendEingeschaltetEingeschaltetBlinkendBlinkendAlles funktioniertAlles funktioniertDie Bürstenmotorfunktioniert nichtDie Bürstenmotor undSaugmotorfunktionieren nichtModell “<strong>BT</strong>”( ! ) FÜR DEN ZUGRIFF AUF DEN KONFIGURATIONSMODUS DER BATTERIESCHWELLEN:1) Gleichzeitig die Tasten „NIEDRIGERE GESCHWINDIGKEIT“ (Foto E – 3) und „SAUGER EINSCHALTEN“(Foto E – 6) innerhalb von 2 Sekunden nach dem Einschalten der Maschine mittels des Schlüsselschalters(Foto F – 1) drücken: Die zweite Geschwindigkeitsanzeige- LED schaltet sich ein (Foto E – 3B).2) Die Taste „HÖHERE GESCHWINDIGKEIT“ (Foto E – 4) innerhalb von 5 Sekunden nach dem vorhergehendenEingriff drücken. Nach dem Drücken der Taste befindet man sich in dem gewünschten Konfigurationsmodus.( ! ) DIE KONFIGURATIONSEINSTELLUNGEN SIND AUF DER LED DER GESCHWINDIGKEITSANZEIGESICHTBAR:1) Die ersten beiden LED ( Foto E - 3A, 3B) zeigen den Einstellungstyp der Ansprechschwellen des Anzeigersan und müssen beide eingeschaltet sein;2) Die dritte und vierte LED ( Foto E - 3C, 3D) zeigen den Batterietyp an; beim Pb-Säure Typ darf nurdie dritte LED eingeschaltet sein ( Foto E - 3C), während beim GEL-Typ beide LED eingeschaltet seinmüssen ( Foto E - 3C, 3D);( ! ) ZUM ÄNDERN DER KONFIGURATIONSEINSTELLUNGEN:1) Die Tasten “HÖHERE GESCHWINDIGKEIT’ “ ( Foto E - 4) und “NIEDRIGERE GESCHWINDIGKEIT’ “ (Foto E - 3) dienen zum derartigen Einstellen der Ansprechschwelle des Anzeigers, dass sich die erstenbeiden LED der Geschwindigkeitsanzeige einschalten.2) Die Taste “BÜRSTE EINSCHALTEN” ( Foto E - 5) dient zum Anwählen der Pb-Säure-Batterien, währenddie Taste “SAUGER EINSCHALTEN” zum Anwählen der GEL-Batterien dient ( Foto E - 6).( ! ) ZUM SPEICHERN DER KONFIGURATIONSEINSTELLUNGEN UND ZUM VERLASSEN DES MODUS:Gleichzeitig die Tasten „NIEDRIGERE GESCHWINDIGKEIT“ ( Foto E - 3) und “HÖHERE GESCHWINDIG-KEIT” ( Foto E - 6) drücken.Nach erfolgter Einstellung hat man verschiedene Entladungslevel der Batterie und mit differenziertenEingriffen auf die Maschinenfunktionen, wie aus der nachfolgenden Tabelle hervorgeht:67
Betrieb des Batterie-Abladungsanzeiger - MODELL “<strong>BT</strong>”VoltsBatterieLED AnzeigeBatterieladezustLED AnzeigeBurstenbetriebPb-Saure GEL Anzeige Anzeige BEDEUTUNG24,0 24,0 GrünEingeschaltet21,5 22,5 GelbEingeschaltet20,5 21,5 RotEingeschaltet20,0 21,0 RotBlinkendEingeschaltetEingeschaltetBlinkendBlinkendAlles funktioniertAlles funktioniertDie Bürstenmotorfunktioniert nichtNicht funktioniert mehrWenn der Konfigurationszyklus nicht zu Ende geführtwird, wird die ursprüngliche Konfiguration beibehalten.( ! ) Bei Problemen mit den angegebenen Einstellungensollte unser Kundendienst oder ein Technikerin Anspruch genommen werden. DenSchaltkreis nicht öffnen und nicht abändern.5.2 KONFIGURATION DES LADEGERÄTSDieser Vorgang muss von Fachtechnikern durchgeführtwerden. Beim Kauf der Scheuersaugmaschineist das eingebaute Batterieladegerät für den Betriebmit GEL-Batterien konfiguriert. Wenn die Scheuersaugmaschinemit PB-Säure-Batterien ausgestattetwerden soll, ist folgendermaßen vorzugehen:( ! ) ANZEIGEN DER LADEGERÄTEINSTELLUNGENDie Ladeeinstellungen des Batterieladegeräts werdendurch das Blinken der LED bei Einschalten desBatterieladegeräts angezeigt.- ROTE LED ( Foto M - 2 ) blinkt 2 Mal = Batterieladegerätfür Pb-Säure-Batterien konfiguriert- GRÜNE LED ( Foto M -3 ) blinkt 2 Mal = Batterieladegerätfür GEL-Batterien konfiguriertDiese Kontrolle kann auch bei nicht angeschlossenenBatterien durchgeführt werden.( ! ) DIP-SWITCH-KONFIGURATION FÜR LADEGE-RÄT CBHD1Zum Einstellen der Ladekurve für Pb-Säure-Batterien oder GEL-Batterien ist auf den im Batterieladegerätangebrachten Schalter ( dipswitch) einzuwirken (Foto M - 4).Für den Zugang zum dip-switch muss die untereAbdeckung des Batterieladegeräts (Foto M - 1) oderder Kunststoffdeckel (Foto M - 5) abgebaut werden.Von links nach rechts hat allein der erste dip-switcheine Wirkung, d.h. derjenige mit der Nummer 1des dip-switch SW1 ( Foto M - 6 ).Position Dip-Switch 1ONOFFLadekurveLadekurve fürPb-Säure BatterienLadekurve fürGEL BatterienHinweis: Alle anderen dip-switches DÜRFENNICHT verstellt werden, da sie keine Wirkung aufden Betrieb des Batterieladegeräts haben.6. INFORMATIONEN FÜR DEN GE-BRAUCH6.1 VORBEREITUNG DER MASCHINE( ! ) Bevor mit der Arbeit begonnen wird sindrutschfeste Schuhe, Handschuhe und alle anderenvom Hersteller der verwendeten Reinigungslösungangegebenen oder von der Arbeitsumgebung gefordertenpersönlichen Schutzausrüstungen anzuwenden.(☞) Vor Arbeitsbeginn sind folgende Eingriffe vor-68
zunehmen. Für eine detaillierte Beschreibung dieserPhasen ist Bezug auf die entsprechenden Abschnittezu nehmen:Den Ladestand der Batterie überprüfen und die Batteriefalls erforderlich laden.Die Bürsten oder Haltescheiben (mit Schleifscheiben)des für die zu bearbeitende Oberfläche unddie durchzuführende Arbeit geeigneten Typs installieren.Den Squeegee montieren und überprüfen, dass ergut befestigt und an das Saugrohr angeschlossenist und dass die Trocknungsblätter nicht zu starkabgenutzt sind.Kontrollieren, dass der Sammelbehälter leer ist undgegebenenfalls vollständig entleeren.Den Ladestand der Batterie überprüfen und die Batteriefalls erforderlich ladenDen Lösungsbehälter über die vordere Öffnung mitreinem Wasser und angemessen konzentriertemnicht schaumbildendem Reinigungsmittel befüllen.Zwischen Stopfen und Flüssigkeitspegel sollte einAbstand von 2 cm liegen.(☞) Zum Vermeiden von Gefahren sollte man sichmit den Bewegungen der Maschine vertraut machen,indem Proben auf einer großen hindernisfreienFläche durchgeführt werden.Für beste Resultate hinsichtlich Reinigung und Lebensdauerdes Geräts empfehlen wir einige einfache,doch wichtige Verfahren:- Den Arbeitsbereich begutachten und eventuelleHindernisse entfernen. Wenn die zu reinigende Flächesehr groß ist, ist sie in aneinanderliegende, parallelzueinander verlaufende rechteckige Flächen zuunterteilen.- Eine geradlinige Arbeitsspur wählen und die Arbeitin dem am entferntesten gelegenen Bereichbeginnen, damit man nicht über bereits gereinigteBereiche fahren muss.6.2 STRUKTUR UND FUNKTIONEN DER MA-SCHINEFOTO A1 HAUPTSCHALTER2 BÜRSTENMOTORSCHALTER3 SAUGMOTORSCHALTERFOTO B1 STROMKABEL2 REINIGUNGSLÖSUNGSDOSIERH<strong>EB</strong>EL3 H<strong>EB</strong>EL ZUM H<strong>EB</strong>EN DER BÜRSTEN-PLATTE4 H<strong>EB</strong>EL ZUM H<strong>EB</strong>EN DES SQUEEGEES5 STEUERH<strong>EB</strong>EL6 ABLASSSCHLAUCH SCHWARZWASSER-BEHÄLTERFOTO C1 BÜRSTENMOTORSCHALTER1ALEUCHTANZEIGE „LED“ BÜRSTENMO-TOR IN BETRI<strong>EB</strong>2 SAUGMOTORSCHALTER2ALEUCHTANZEIGE „LED“ SAUGMOTOR INBETRI<strong>EB</strong>3 LEUCHTANZEIGE BATTERIELADEZU-3A3B3CSTANDLEUCHTANZEIGE GRÜNE „LED“BATTERIE GELADENLEUCHTANZEIGE GELBE „LED“BATTERIE GELADEN 50%LEUCHTANZEIGE ROTE „LED“ BATTE-RIE ENTLADENFOTO D1 HAUPTSCHLÜSSELSCHALTER2 STEUERH<strong>EB</strong>EL3 H<strong>EB</strong>EL ZUM H<strong>EB</strong>EN DER BÜRSTEN-PLATTE4 H<strong>EB</strong>EL ZUM H<strong>EB</strong>EN DES SQUEEGEES5 THERMISCHER SICHERUNGSAUTOMATBÜRSTENMOTOR6 ABLASSSCHLAUCH SCHWARZWASSER-BEHÄLTER7 BATTERIEVERBINDER8 REINIGUNGSLÖSUNGSDOSIERH<strong>EB</strong>ELFOTO E1 BATTERIELADEZUSTANDANZEIGER1A LEUCHTANZEIGE GRÜNE „LED“BATTERIE GELADEN1B LEUCHTANZEIGE GELBE „LED“BATTERIE GELADEN 50%1C LEUCHTANZEIGE ROTE „LED“BATTERIE ENTLADEN2 FAHRANZEIGER VORWÄRTS/RÜCK-WÄRTS3 SCHALTER ZUM REDUZIEREN DER VOR-LAUFGESCHWINDIGKEIT3A VORLAUFGESCHWINDIGKEIT 13B VORLAUFGESCHWINDIGKEIT 23C VORLAUFGESCHWINDIGKEIT 33D VORLAUFGESCHWINDIGKEIT 44 SCHALTER ZUM ERHÖHEN DER VOR-LAUFGESCHWINDIGKEIT5 BÜRSTENMOTORSCHALTER5A LEUCHTANZEIGE „LED“BÜRSTENMOTOR IN BETRI<strong>EB</strong>6 SAUGMOTORSCHALTER6ALEUCHTANZEIGE „LED“ SAUGMOTORIN BETRI<strong>EB</strong>FOTO F1 HAUPTSCHLÜSSELSCHALTER2 STEUERH<strong>EB</strong>EL FAHRANTRI<strong>EB</strong>VORWÄRTS / RÜCKWÄRTS3 H<strong>EB</strong>EL ZUM H<strong>EB</strong>EN DER BÜRSTEN-PLATTE4 H<strong>EB</strong>EL ZUM H<strong>EB</strong>EN DES SQUEEGEES69
5 THERMISCHER SICHERUNGSAUTOMATBÜRSTENMOTOR6 THERMISCHER SICHERUNGSAUTOMATANTRI<strong>EB</strong>SMOTOR7 ABLASSSCHLAUCH SCHWARZWASSER-BEHÄLTER8 BATTERIEVERBINDER9 REINIGUNGSLÖSUNGSDOSIERH<strong>EB</strong>ELFOTO GBATTERIEANSCHLUSSPLANFOTO H1 BATTERIEFACHÖFFNUNGSH<strong>EB</strong>EL2 BEFÜLLÖFFNUNG DES LÖSUNGSBEHÄL-TERS MIT SCHAUMSTOFFSTOPFENFOTO I1 BEFESTIGUNGSKLEMME DES BÜRSTEN-PLATTENH<strong>EB</strong>EKABELS2 BATTERIEFACH MIT 12V-BATTERIEN3 BATTERIEANSCHLUSSFOTO L1 EING<strong>EB</strong>AUTES LADEGERÄT2 STROMKABEL FÜR LADEGERÄTFOTO M1 LADEGERÄTDECKEL2 LEUCHTANZEIGE ROTE „LED“BATTERIE ENTLADEN3 LEUCHTANZEIGE GRÜNE „LED“BATTERIE GELADEN4 DIP-SWITCH SCHALTER5 STOPFEN FÜR ZUGANG ZU DENDIP-SWITCHES6 DIP-SWITCH NR. 1 ZUM EINSTELLENDER LADEKURVE PB-SÄURE / GELFOTO N1 ABWEISROLLE2 DREHKNOPF ZUM EINSTELLEN DESSQUEEGEEDRUCKS3 SAUGROHR4 DREHKNOPF ZUM AUSBAUEN DERSQUEEGEE-BLÄTTER5 SQUEEGEE-RAD6 SQUEEGEE-AUSLÖSEDREHKNOPF7 EINSTELLKNOPF FÜR DIESQUEEGEENEIGUNGFOTO O1 ABDECKUNG DES FILTERFACHS AMSAUGMOTOR2 BEFÜLLÖFFNUNG DES LÖSUNGSBEHÄL-TERS3 SCHWARZWASSERBEHÄLTER4 LÖSUNGSBEHÄLTER5 SPRITZSCHUTZVORRICHTUNGEN70FOTO P1 SCHWIMMER2 FILTER ANSAUGUNG3 INSPEKTIONSBULLAUGE SCHWARZ-WASSERBEHÄLTER6.3 LADEN DER BATTERIENDas Verlängerungskabel mit dem Batterieladegerätkabelverbinden ( Foto L - 2 ) und es an eineNetzsteckdose anschließen.Beim Einschalten des Batterieladegeräts einen Batteriespannungstestdurchführen, um zu entscheiden,ob ein Ladevorgang notwendig ist. Wenn dieBatterie nicht an das Batterieladegerät angeschlossenist, blinkt die rote LED ( Foto M - 2 ). Wenn derTest positiv verlaufen ist, setzt der Batterieladevorgangnach einer Sekunde ein und die rote LED isteingeschaltet.Während des Ladevorgangs wird der Ladefortschrittdurch drei LED-Leuchtanzeigen angezeigt: rot, gelbund grün.Die grüne LED (Foto M – 3) zeigt an, dass der Ladevorgangabgeschlossen ist.Das Batterieladegerät von Stromnetz trennen.LED RossoLED GialloLED Verde( ! ) Für weitere Informationen das Gebrauchs- undSicherheitshandbuch des Batterieladegerätherstellersnachschlagen.Wenn die Maschine mit Pb-Säure-Batterienausgestattet ist, sind die Batterien an einem gut belüftetenOrt zu laden, wobei der obere Deckel angehobenund die Batteriestopfen geöffnet werdenmüssen.( ) Die im Gebrauchs- und Sicherheitshandbuchdes Batterieherstellers enthaltenen Anleitungen befolgen(siehe Abschnitt “Batteriewartung”).Wenn die Maschine mit Gel-Batterien (wartungsfrei)ausgerüstet ist, sind die untenstehenden Anleitungenzu befolgen.Regelmäßiger Gebrauch der Maschine:Die Batterien immer an das Batterieladegerät angeschlossenlassen, wenn die Maschine nicht verwendetwird.Wenn die Maschine über einen längeren Zeitraumnicht verwendet wird: Die Batterie in der Nachtnach dem letzten Gebrauch der Maschine laden undsie dann vom Batterieladegerät trennen.Die Batterie in der Nacht vor dem erneuten Gebrauchder Maschine laden.
Die Batterien sollten nicht unvollständig oder zwischenverschiedenen Arbeitsphasen geladen werden.Wenn die Maschine mit Pb-Säure-Batterien ausgestattetist, ist die Dichte der die Elemente bedekkendenFlüssigkeit regelmäßig mit demDichtemesser zu überprüfen: Wenn ein oder mehrereElemente entladen und die anderen Elementegeladen sein sollten, ist die Batterie beschädigt undmuss ersetzt oder repariert werden (siehe Anleitungenim Batteriehandbuch).Die Stopfen der Elemente schließen und den oberenDeckel absenken.6.4 EINBAU DES SQUEEGEESDie beiden Drehknöpfe (Foto N - 6) am Squeegee-Körper leicht festziehen.Den Squeegee in seinen Sitz an der Squeegee-Halterungeinsetzen und durch Festziehen der beidenDrehknöpfe befestigen (Foto N – 6).Das Saugrohr der Maschine ( Foto N - 3 ) in die Anschlussöffnungam Squeegee-Körper einsetzen.6.5 AUSBAU DES SQUEEGEESDas Saugrohr vom Squeegee-Körper abtrennen.Die beiden Drehknöpfe (Foto N – 6) etwas lockernund den Squeegee zu sich hin ziehen, um ihn ausseinem Sitz zu lösen.6.6 WECHSELN DER SQUEEGEE-WISCHBLÄT-TER AUS GUMMIDen Squeegee von seiner Halterung lösen (siehe6.5).Die Drehknöpfe ( Foto N - 4, N - 6 ) komplett abschraubenund Druck auf die Köpfe der Schrauben,an denen sie angebracht waren, ausüben, bis dieinnere Kunststoffhalterung aus dem Squeegee-Körperaustritt.Die Gummiblätter aus der Kunststoffhalterung ziehen,indem sie an einem Ende gezogen werden.Das neue Gummiblatt in die Kunststoffhalterungeinsetzen, indem die Kunststoffzapfen in die entsprechendenÖffnungen am Blatt gedrückt werden.Die Kunststoffhalterung wieder in den Squeegee-Körper einsetzen und sie durch Festschrauben derBefestigungsdrehknöpfe ( Foto N - 4, N - 6 ) befestigen.Den Squeegee wieder an seiner Halterung anbringen(siehe Abb. 6.4).6.7 EINSTELLUNG DES SQUEEGEESDer Drehknopf an der Squeegee-Halterung ( Foto N- 7 ) regelt die Neigung des Squeegees bezüglichdes Bodens. Die an die Hinterräder des Squeegeesangeschlossenen beiden roten Drehknöpfe ( FotoN - 2 ) dienen zum Einstellen des Squeegee-Drucksauf den Boden.Die perfekte Einstellung wird erhalten, sobald dashintere Wischblatt während der Bewegung schleiftund sich in jedem Punkt biegt und mit dem Bodeneinen 45°-Winkel bildet.Beim Maschinenbetrieb (Vorschub) kann man aufdie Drehknöpfe ( Foto N - 2, N - 7 ) einwirken, umdie korrekte Neigung und den korrekten Druck desSqueegees einzustellen, um ein gleichmäßigesTrocknen über die gesamte Squeegee-Länge zu erhalten.Feuchte Spuren weisen auf eine unzureichendeTrocknung hin. In diesem Fall ist auf die Drehknöpfeeinzuwirken, um die Wirksamkeit zu optimieren.6.8 EINBAU UND AUSBAU DER SPRITZ-SCHUTZVORRICHTUNGDer Spritzschutz ist mittels einer Federklammer ander Bürstenplatte befestigt.Zum Abbauen des Spritzschutzes reicht es aus, dieFederklammer zu lösen und den Spritzschutz zusich hin zu ziehen.Zum Wiederanbringen des Spritzschutzes wird dieserin seinen Sitz an der Bürstenplatte eingerastetund dann wird das feststehende Ende des Stahlkabelsan der Bürstenplatte befestigt. Nun die Federklammeram anderen Ende der Bürstenplattebefestigen6.9 EINBAU UND AUSBAU DER BÜRSTE( ! ) Niemals ohne perfekt an der Maschine installiertenBürsten oder Haltescheiben oder Schleifscheibenarbeiten.Einbau:Sicherstellen, dass die Bürstenplatte hochgefahrenist; andernfalls ist die Platte unter Beachtung derAnleitungen im spezifischen Abschnitt hochzufahren.Sicherstellen, dass der Zündschlüssel in der Steuertafelauf “0” (Maschine ausgeschaltet) steht.Die Bürste unter der Waschplatte positionieren unddabei aufpassen, dass der Bürstenkopplungsflanschsich unter dem Anschluss aus Metall der Maschinebefindet.Die Waschplatte absenken und die Bürsten mittelsdes entsprechenden Schalters in Drehung versetzen:Die Bürste wird automatisch angekuppelt.Für die Montage der Haltescheibe ist auf die gleicheWeise vorzugehen.( ! ) Die Länge der Bürstenborsten darf nicht unter1 cm sinken.( ! ) Die Schleifscheibenstärke darf nicht unter 1cm sinken.Zu stark abgenutzte Bürsten oder zu dünne Schleifscheibenkönnen die Maschine und den Boden beschädigen.Regelmäßig den Verschleißzustand dieser Teileüberprüfen, bevor die Arbeit aufgenommen wird.71
Ausbau oder Ersetzen:Sicherstellen, dass die Bürstenplatte hochgefahrenist; andernfalls ist die Platte unter Beachtung derAnleitungen im spezifischen Abschnitt hochzufahren.Sicherstellen, dass der Zündschlüssel in der Steuertafelauf “0” (Maschine ausgeschaltet) steht.Die Bürste unter der Platte zwischen den Händenhalten und in Drehrichtung drehen und dann absenken,um sie von dem Metallanschluss zu befreien.Für den Ausbau der Haltescheibe ist auf die gleicheWeise vorzugehen.6.10 BEFÜLLEN UND ENTLEEREN DES LÖ-SUNGSBEHÄLTERS(☞) Die Temperatur des einzufüllendenWassers oder Reinigungsmittels darf nichtüber 50°C liegen.(☞) Bei jedem Befüllen des Lösungsbehälters (Foto O - 4 ) ist der Sammelbehälter ( Foto O - 3 )immer zu entleeren.Befüllen:- Die erforderliche Menge des chemischen Produktsin den Behälter füllen, wobei die vom Hersteller angegebeneKonzentration in Prozent (%) zu beachtenist, die sich auf die in der Produktkarteangegebene Kapazität des vollen Behälters bezieht.( ! ) Ausschließlich für den jeweiligen Bodentypsowie für den zu entfernenden Schmutztyp geeigneteProdukte verwenden.- Wasser in die Befüllöffnung im Vorderteil der Maschinegießen ( Foto H - 2, O - 2 ).Zwischen Stopfen und Flüssigkeitspegel sollte einAbstand von 2 cm liegen. Den Behälter nicht überdieses Maß füllen!() Die Maschine wurde für den Einsatz mitnicht Schaum bildenden und biologisch abbaubarenspezifischen Reinigungsmitteln fürBondereinigungsmaschinen entwickelt. DieVerwendung anderer chemischer Produkte,wie z. B. Ätznatron, Oxydantien, Lösemitteloder Kohlenwasserstoffe kann zu einer Beschädigungoder Zerstörung der Maschineführen.- Die im entsprechenden Abschnitt des Handbuchsund auf dem Reinigungsmittelbehälter angegebenenSicherheitsvorschriften befolgen.- Für ein vollständiges Verzeichnis der verfügbarengeeigneten Reinigungsmittel ist der Hersteller derMaschine zu kontaktieren.(☞) Immer nicht Schaum bildende Reinigungsmittelverwenden- Den Wasserschlauch zum Befüllen des Behältersmit Wasser nicht unbeaufsichtigt lassen und vollständigin den Behälter einführen, damit er nichtherausrutschen und empfindliche Maschinenteilenass machen kann.- Den Behälter mit dem entsprechenden Stopfenverschließen.Entleeren:- Den Ablassstopfen des Lösungsbehälters im unterenBehälterbereich abschrauben und warten, bisder Behälter vollkommen leer ist.- Den Ablassstopfen wieder fest zudrehen.6.11 ENTLEEREN DES SCHMUTZWASSERBE-HÄLTERSBeim Ablassen des Schmutzwassers sind die Vorschriftendes jeweiligen Anwendungslands der Maschinezu befolgen. Der Anwender haftet für dasBeachten dieser Gesetze.Wenn die Reinigungslösung aufgebraucht ist, mussder Schmutzwasserbehälter vor dem Befüllen desReinigungslösungsbehälters immer entleert werden( Foto O - 3 ).Im Allgemeinen kann der Schmutzwasserbehälterso oft wie gewünscht und auch in den Zwischenphasendes Arbeitszyklus entleert werden.Das Fassungsvermögen des Sammelbehälters istgrößer als das Fassungsvermögen des Reinigungslösungsbehälters,weshalb eine potentielle Gefährdungdes Saugmotors ausgeschlossen sein sollte.Trotzdem ist zur Sicherheit ein Schwimmer vorhanden( Foto P - 1 ), der den Saugmotor anhält, sobaldder Schmutzwasserstand zu hoch ist.() Wenn eine Wasser- oder Schaumleckage unterden Behältern festgestellt wird, ist der Saugmotorsofort abzustellen und der Sammelbehälter zu entleeren.Entleeren des Behälters:Die Maschine an einen zum Ablassen des Schmutzwassersgeeigneten Ort fahren, d.h. möglichst indie Nähe eines WC oder eines Abwassergullys (essind die im jeweiligen Anwendungsland der Maschinegeltenden Gesetze zur Entsorgung von Abwasserzu befolgen).Die Maschine ausschalten und den Zündschlüsselziehen.Den Ablassschlauch ( Foto B - 6, D - 6, F - 7) ausseiner Halterung nehmen, den Schlauch hochhaltenund den Verschlussstopfen abschraubenDen Ablassschlauch zum gewählten Punkt hin absenken.Der Entleerungsvorgang kann jederzeit unterbrochenwerden, indem der Schlauch hochgehaltenwird.Die Schmutzrückstandmenge im Behälter überprüfenund den Behälterinnenraum gegebenenfallsdurch die Inspektionsöffnung ( Foto P - 3 ) waschen.Nach dem Entleeren des Behälters den Ablassschlauchverschließen und wieder an seiner Halte-72
ung an der Maschinenrückseite befestigen.(☞) Der Ablassschlauch muss immer perfekt verschlossenwerden, denn es darf keine Luft eintreten,weil es sonst zu einem Unterdruckverlustkommt, was den Trocknungsvorgang beeinträchtigt.6.12 SPEZIFISCHE G<strong>EB</strong>RAUCHSANWEISUN-GEN FÜR DAS MODELL “E”Das Modell “E” kann nur eingeschaltet werden,wenn die auf dem Schild angegebene Spannungmit der im Werk vorhandenen Spannung übereinstimmtund wenn die Netzsteckdose geerdet ist.Das Netzkabel nicht beschädigen, nicht quetschenund nicht an demselben ziehen.Nicht mit der Maschine über das Netzkabel fahren.Das Kabel könnte sich in den sich bewegenden Maschinenteilenaufwickeln und einen Kurzschluss hervorrufen.( ) ACHTUNG!!! - Das Modell “E” besitzt überunter Spannung stehende Teile und Teile,durch die Strom fließt. Das Berühren dieserTeile kann zu schweren Verletzungen undauch zum Tod führen.- Vor jeglichem Eingriff an der Maschine muss dieselbevom Stromnetz getrennt werden.- Beschädigte oder verschlissene Stromkabel niemalsberühren.- Vor dem Einschalten der elektrischen Anlage istdie Maschine auszuschalten und der Netzstecker istzu ziehen.- Wenn beschädigte Kabel, andere Schäden oderRisse festgestellt werden, sind die defekten Teileumgehend durch Originalersatzteile zu ersetzen.- Die Anschlüsse an das Stromnetz müssen zumindestgegen Wasserspritzer geschützt werden.- Für den Anschluss an das Stromnetz sind ausschließlichden geltenden Sicherheitsvorschriftenentsprechende Verlängerungskabel zu verwenden.- Die Netzsteckdose, an die die Maschine angeschlossenist, muss mit einem Fehlerstrom-Schutzschalterausgestattet werden.- Es ist strikt verboten, die Maschine in der Nähevon Schwimmbädern oder Gewässern zu verwenden.( ) NOTSITUATIONENIn Notfällen:- Die Maschine umgehend vom Stromnetztrennen.- Umgehend die Erste-Hilfe-Maßnahmen einleiten.Bei Unfällen darf die Maschine nicht wieder in Betriebgesetzt werden, bevor sie durch einen vomHersteller autorisierten Techniker untersuchtwurde.6.13 FAHREN DER MASCHINEModell “E”Das Stromkabel ( Foto B - 1 ) mittels eines Verlängerungskabelsan das Stromnetz anschließen.Den Hauptschalter ( Foto A - 1 ) auf ON stellen.Den Einschalter der Bürste betätigen ( Foto A - 2 ).( ! ) die Bürste beginnt sich erst nach Betätigendes Steuerhebels zu drehen ( Foto B - 5).Den Einschalter des Saugaggregats betätigen (Foto A -3 ).Den Reinigungslösungshahn öffnen, indem der ander Maschinenrückseite angebrachte Dosierhebel (Foto B - 2 ) nach unten verstellt wird, das Saugaggregatabsenken, indem der Squeegee-Steuerhebel( Foto B - 4 ) nach unten verstellt wird; dasWaschaggregat absenken, indem der Steuerhebel( Foto B - 3 ) betätigt wird.Den Boden waschen und langsam vorfahren, indemder Steuerhebel ( Foto B - 5 ) zum Einschalten derBürste betätigt wird. Bei Loslassen des Steuerhebelswird die Bürstendrehung nach einigen Sekundenangehalten.Daran denken, dass der Squeegee vor dem Rückwärtsfahrenangehoben werden muss, damit ernicht beschädigt wird.Modell “BSW1400”Den Anschluss des an der Maschinenrückseite unterder Steuertafel angebrachten Batterieverbindersüberprüfen ( Foto D - 7 ).Den Zündschlüssel einsetzen und drehen ( Foto D- 1 ).Auf der Steuertafel den Ladezustand der Batterienüberprüfen ( Foto C - 3 );Den Einschalter der Bürste betätigen ( Foto C - 1 ).( ! ) die Bürste beginnt sich erst nach Betätigendes Steuerhebels zu drehen ( Foto D -2 ).Den Einschalter des Saugaggregats betätigen (Foto C - 2 ).Den Reinigungslösungshahn öffnen, indem der ander Maschinenrückseite angebrachte Dosierhebel (Foto D - 8 ) nach unten verstellt wird, das Saugaggregatabsenken, indem der Squeegee-Steuerhebel( Foto D - 4 ) nach unten verstellt wird; dasWaschaggregat absenken, indem der Steuerhebel( Foto D - 3 ) betätigt wird.Den Boden waschen und langsam vorfahren, indemder Steuerhebel ( Foto D -2 ) zum Einschalten derBürste betätigt wird. Bei Loslassen des Steuerhebelswird die Bürstendrehung nach einigen Sekundenangehalten.Daran denken, dass der Squeegee vor dem Rückwärtsfahrenangehoben werden muss, damit ernicht beschädigt wird.Modell “<strong>BT</strong>”Den Anschluss des an der Maschinenrückseite unter73
der Steuertafel angebrachten Batterieverbindersüberprüfen ( Foto F - 8 ).Den Zündschlüssel einsetzen und drehen ( Foto F -1 ).Auf der Bedientafel den Batterieladezustand ( FotoE - 1 ) überprüfen und –falls dieser ausreicht- diegewünschte Betriebsgeschwindigkeit einstellen (Foto E - 3, E - 4 ).Den Einschalter der Bürste betätigen ( Foto E -5 ).( ! ) die Bürste beginnt sich erst nach Betätigendes Fahrhebels zu drehen ( Foto F -2 ).Den Einschalter des Saugaggregats betätigen (Foto E - 6 ).Den Reinigungslösungshahn öffnen, indem der ander Maschinenrückseite angebrachte Dosierhebel (Foto F - 9 ) nach unten verstellt wird, das Saugaggregatabsenken, indem der Squeegee-Steuerhebel( Foto F - 4 ) nach unten verstellt wird; dasWaschaggregat absenken, indem der Steuerhebel( Foto F - 3 ) betätigt wird.Den Boden waschen und vorwärts fahren, indemder Fahrhebel nach vorne gezogen wird ( Foto F -2 ), oder diesen Hebel nach unten drücken, umrückwärts zu fahren.Bei Loslassen des Fahrhebels wird die Maschine angehaltenund die Bürstendrehung wird nach einigenSekunden unterbrochen.Daran denken, dass der Squeegee vor dem Rückwärtsfahrenangehoben werden muss, damit ernicht beschädigt wird.6.14 ARBEITSWEISE6.14.1 VORBEREITUNG UND WARNHIN-WEISEDie zu bearbeitende Fläche mit geeigneten Geräten,wie Staubsaugern, Kehrmaschinen, usw. vonallen festen Rückständen befreien. Wenn diese vorbereitendeReinigung nicht vorgenommen wird,könnte der feste Schmutz den einwandfreien Betriebder Squeegees und somit das perfekte Trocknenbeeinträchtigen.Diese Maschine darf nur durch ausgebildetes Personalgefahren werden.6.14.2 PRÜFUNG DES BATTERIELADEZU-STANDSDie Sequenz der Ladezustandanzeigerleuchten (Foto C - 3, E - 1 ) wird fortschreitend gelöscht, bisdie Batterie leer ist. Sobald sich die rote Lampeeinschaltet ( Foto C - 3C, E - 1C ), ist der Bürstenmotorabzustellen, die Reinigungslösungszufuhr zuunterbrechen, die noch nasse Fläche zu trocknenund die Maschine zum Batterieladegerät zu fahren,wo die Batterie geladen wird.( ! ) Die Batterien können irreparabel beschädigtwerden,, wenn die Restladung zustark absinkt (siehe Batteriehandbuch); dieBatterie nicht durch wiederholtes Ein- undAusschalten des Zündschlüssels oder auf andereArt und Weise über die durch die SicherheitsvorrichtungenvorgegebenenGrenzwerte hinaus entladen.6.14.3 DIREKTES WASCHEN ODER WASCHENVON LEICHT VERSCHMUTZTEN FLÄCHENWaschen und Trocknen in einem einzigen Durchgang.Die Maschine wie zuvor beschrieben vorbereitenund wie in Abschnitt 6.13 verwenden.(☞) Die Maschine nie ohne Reinigungslösung betreiben,da der Boden beschädigt werden könnte.6.14.4 INDIREKTES WASCHEN ODER WA-SCHEN VON STARK VERSCHMUTZTEN FLÄ-CHENWaschen und Trocknen in mehreren DurchgängenDie Maschine wie zuvor beschrieben vorbereiten.Erster Arbeitsgang:Den Waschvorgang wie in Abschnitt 6.13 beschriebendurchführen, ohne den Boden zu trocknen.Die Reinigungslösung gemäß den Informationenbezüglich des verwendeten Reinigungsmittelsauf den Schmutz einwirkenlassen.Zweiter Arbeitsgang:Wie im vorhergehenden Abschnitt “Direktes Waschen”(6.14.3) beschrieben vorgehen, um denBoden auch zu trocknen.(☞) Die Maschine nie ohne Reinigungslösung betreiben,da der Boden beschädigt werden könnte.6.14.5 VORGÄNGE NACH DEM WASCHENDie Reinigungslösungsversorgung unterbrechen.Die Bürstenplatte hochfahren und den Bürstenmotorabschalten.Nachdem eventuelle Wasserspuren auf der Flächevollständig getrocknet wurden einige Sekundenwarten, dann den Squeegee hochfahren und denSaugmotor abstellen.Die Maschine an einem zum Entleeren der Behältergeeigneten Ort fahren und die Behälter entleerenund reinigen (wie in Abschnitt 6.11 beschrieben).Die Maschine mit dem Zündschlüssel ausschaltenund den Zündschlüssel ziehen.Falls erforderlich die Batterie laden (siehe entsprechenderAbschnitt).7. WARTUNGSINFORMATIONEN() Den Schlüssel drehen und aus dem Zündschlossziehen. Den Batterieverbinder vom Maschinenkabeltrennen.(☞) Die Eingriffe an der elektrischen Anlage wieauch alle Wartungs- und Reparaturarbeiten (insbesonderenicht ausdrücklich im vorliegenden Handbuchbeschriebene Arbeiten) nur in autorisiertenKundendienstcentern oder durch kompetentes74
Fachpersonal durchführen lassen, das mit den anwendbarenSicherheitsvorschriften vertraut ist.Die regelmäßige Wartung der Maschine unter Beachtungder Anleitungen des Herstellers trägt dazubei, eine bessere Leistung und eine längere Lebensdauerder Maschine zu gewährleisten.7.1 BEHÄLTERDie beiden Behälter wie in den entsprechenden Abschnittenbeschrieben entleeren.Den festen Schmutz entfernen, indem die Behälterso lange gefüllt und entleert werden, bis keineSchmutzablagerungen mehr vorhanden sind. Dazueinen Waschschlauch oder ähnliches verwenden.( ! ) Über 50°C heißes Wasser, Hochdruckwasserstrahlreinigerund starke Wasserspritzerkönnen die Behälter und dieMaschine beschädigen.Die Behälterdeckel geöffnet lassen (nur bei stillstehenderMaschine, damit die Behälter trocknen könnenund keine unangenehmen Gerüche entstehen.7.2 SAUGROHRDas Saugrohr vom Squeegee trennen ( Foto N - 3).Jetzt kann das Saugrohr gewaschen und von Verstopfungenbefreit werden.Das Rohr korrekt am Squeegee-Körper anbringen.7.3 SQUEEGEE( ! ) Den Squeegee nicht mit bloßen Händen anfassen,sondern Handschuhe und alle anderen fürden jeweiligen Eingriff erforderlichen Schutzausrüstungenanwenden.Den Squeegee von der Maschine abbauen und miteinem Schwamm oder einer Bürste unter fließendemWasser reinigen.Die Wirksamkeit und den Abnutzungsgrad der denBoden berührenden Blätter überprüfen. Die Blätterhaben die Aufgabe, den Reinigungslösungs- undWasserfilm vom Boden zu wischen und den Bereichzu isolieren, um einen maximalen Unterdruck desSaugmotors zu gewährleisten: Auf diese Weise wirdein perfektes Trocknen gewährleistet. Im Laufe derZeit rundet sich die Kante des Blattes ab und verschleißt,was die Wirksamkeit des Trocknungsvorgangsbeeinträchtigt. In diesem Fall sind dieSqueegee-Blätter zu ersetzen.Zum Ersetzen der abgenutzten Wischblätter sinddie im entsprechenden Abschnitt enthaltenen Anleitungenzu befolgen. Die Blätter umdrehen, umdie anderen scharfen Kanten zu nutzen oder neueBlätter einsetzen.7.4 ZUBEHÖREDie Bürsten oder die Haltescheiben abbauen undreinigen.( ! ) Sorgfältig überprüfen, dass keine Fremdkörper,wie Metallteile, Schrauben, Späne, Seile oderähnliches verklemmt sind, damit der Boden und dieMaschine nicht beschädigt werden.Kontrollieren, dass die Bürsten eben sind (Bürstenund Schleifscheiben auf unregelmäßige Abnutzungüberprüfen).Es ist nur vom Hersteller empfohlenes Zubehör zuverwenden; andere Produkte können die Sicherheitbeeinträchtigen.7.5 MASCHINENKÖRPERZur Außenreinigung des Maschinenkörpers ist einSchwamm oder ein Tuch zu verwenden; gegebenenfallskann eine weiche Bürste zum Entfernenvon hartnäckigem Schmutz verwendet werden. Diestoßfeste Oberfläche der Maschine ist rau, damitbei der Arbeit entstandene Kratzer nicht sichtbarsind. Diese Lösung trägt jedoch nicht dazu bei,hartnäckige Flecken von der Maschinenoberflächezu entfernen.Der Einsatz von Dampfreinigern, Wasserschläuchenoder Wasserstrahlreinigern istverboten.7.6 BATTERIENPB-SÄURE-BatterienBei der Durchführung der Wartungseingriffe sinddie Anweisungen des Herstellers und alle im Handbuchenthaltenen Anweisungen zu befolgen.Wenn die Batterieelemente nicht vollständig mit derSäurelösung bedeckt sind, kommt es zu einer Oxydation,was die Funktionstüchtigkeit der Batteriedefinitiv beeinträchtigt.Überlaufende Säure kann zu einer Korrosion derMaschine führen.Vom Hersteller empfohlene Batterieladegeräte verwenden,die für den zu ladenden Batterietyp geeignetsein müssen.Die Batterien immer in gut belüfteten Räumenladen. Es besteht Explosionsgefahr!Der Einsatz von Gel-Batterien oder wartungsfreienBatterien wird empfohlen.GEL-BatterienBei der Durchführung der Wartungseingriffe sinddie Anweisungen des Herstellers und alle im Handbuchenthaltenen Anweisungen zu befolgen.Nur vom Hersteller empfohlene Batterieladegeräteverwenden.7.7 THERMISCHE SICHERUNGSAUTOMATENDie Maschine ist an den wichtigsten Betriebsorganenmit Elektro-Schutzvorrichtungen ausgestattet,um kostspielige Defekte zu verhindern.Wo vorgesehen sind thermische Sicherungsautomatenzum Schutz des Fahrmotors und den Bürstenmotorsinstalliert.Beim automatischen Ansprechen eines dieserSchalter ist es zum Wiederherstellen der unterbrochenenFunktion erforderlich, den angesprochenen75
Schalter bis an den Anschlag zu drücken.Das Ansprechen der thermischen Sicherungsautomatenmuss insbesondere während der ersten Einsatzwochender Maschine nicht unbedingt aufBetriebsstörungen der Maschine beruhen. Trotzdemist es erforderlich den einwandfreien Betrieb der betroffenenVorrichtung durch einen Fachmann überprüfenzu lassen, wenn der thermischeSicherungsautomat wiederholt anspricht.7.8 HÄUFIGKEITFür alle hier beschriebenen Eingriffe ist Bezug aufdie detaillierten Anleitungen und Warnhinweise inden entsprechenden Abschnitten dieses Handbuchszu nehmen.7.8.1 TÄGLICHE EINGRIFFEDie Bürste und/oder Haltescheibe (bei montierterSchleifscheibe) abbauen und kontrollieren.. Sicherstellen,dass keine Fremdkörper die Bewegungoder Wirksamkeit der Reinigungsorgane beeinträchtigen.Den Squeegee kontrollieren: Die Blätter reinigenund kontrollieren, dass sie unbeschädigt und nichtabgenutzt sind.Wenn Pb-Säure-Batterien verwendet werden, istden Anweisungen des Herstellers der BatterieFolge zu leisten.Die Batterien laden.7.8.2 WÖCHENTLICHE EINGRIFFEDie Spritzschutzvorrichtungen kontrollieren und gegebenenfallsaustauschen.Das Profil der Squeegee-Blätter überprüfen unddiese gegebenenfalls ersetzen.Kontrollieren, dass Rohre und Saugrohrleitungennicht verstopft sind.Die Lösungs- und Schmutzwasserbehälter gründlichreinigen.Modelle mit Pb-Säure-Batterie: Den Elektrolytenstandin allen Elementen überprüfen und gegebenenfallsmit destilliertem Wasser auffüllen. Dabei istBezug auf die detaillierten Informationen des Batterieherstellerszu nehmen.Die Saugfilterabdeckung anheben und kontrollieren,ob Flüssigkeiten vorhanden sind. Wenn Flüssigkeitvorhanden ist, ist diese in denSchmutzwassertank zu leiten.7.8.3 IN EINEM LÄNGEREN ABSTAND VOR-ZUNEHMENDE EINGRIFFEObwohl die Maschine sorgfältig gebaut und strengenQualitätsprüfungen unterzogen wurde, sind dieelektrischen und mechanischen Bauteile bei längeremNichtgebrauch der Maschine unvermeidlichVerschleiß und Alterung ausgesetzt.Für einen sicheren und störungsfreien Betrieb empfehlenwir, unsere Maschine durch ein autorisiertesKundendienstcenter (oder einen Fachmann, der mitden im vorliegenden Handbuch enthaltenen Sicherheitsvorschriftenvertraut ist) einmal jährlichüberholen zu lassen.Diese Kontrollen können häufiger erforderlich werden,wenn die Maschine unter besonderen/schwerenEinsatzbedingungen betrieben wird, und/odernicht korrekt gewartet wurde.7.9 EMPFOHLENE ERSATZTEILEEs wird empfohlen, immer ausreichend Verbrauchsmaterialvorrätig zu haben und die ordentlichenund außerordentlichen Wartungseingriffe zuprogrammieren, um immer die maximale Leistungder Maschine zu erhalten. Das Verzeichnis dieserErsatzteile fordern Sie bitte bei Ihrem Händler an.8. BETRI<strong>EB</strong>SKONTROLLEDiese Eingriffe tragen dazu bei, die Ursache einigerProbleme bei bestimmten Störungen zu verstehen.Für die vorzunehmenden Abhilfen ist immer Bezugauf die nachfolgenden spezifischen Abschnitte zunehmen.8.1 DIE MASCHINE FUNKTIONIERT NICHT☹ Der Schlüssel steckt nicht im Zündschloss oderwurde nicht gedreht.☺ Den Schlüssel ins Zündschloss stecken und auf“1” oder Maschinenstart drehen.Der Batterieverbinder ist getrennt oder falsch anden Verbinder des Hauptkabels angeschlossen.☺ Beide Verbinder korrekt anschließen.☹ Die Maschine wird geladen.☺ Ladevorgang beenden.☹ Die Batterien sind entladen.☺ Batterien laden.8.2 DIE MASCHINE FÄHRT NICHT VOR☹ Der Fahrtrichtungshebel befindet sich in neutralerStellung.☺Eine Fahrtrichtung einstellen, indem der Hebelnach oben gezogen oder nach unten gedrückt wird.☹ Die Steigung des Bodens ist zu hoch.☺ Die Maschine von Hand auf die neue Ebeneschieben.☹ Ein allgemeiner Thermo-Schutzschalter des Fahrmotors/derFahrmotoren hat angesprochen.☺ Die Maschine anhalten und 5 Minuten ruhen lassen.☹ Die Batterien sind entladen.☺ Batterien laden.8.3 DIE BÜRSTE DREHT SICH NICHT☹ Der Bürstenmotorschalter wurde nicht eingeschaltet.☺ Den Schalter zum Einschalten der Bürsten drükken.☹ Der Thermoschutzschalter des Bürstenmotorshat angesprochen, der Motor ist überhitzt.☺ Nach der Ursache forschen (Seile oder ähnliche76
Gegenstände behindern die Bewegung, zu unebeneFläche, usw.) und den Rückstellschalter drücken.☹ Das Relais des Motors oder der Bürstenmotor istdefekt.☺ Ersetzen lassen.8.4 ES TRITT KEINE ODER NUR WENIG REI-NIGUNGSLÖSUNG AUS☹ Der Lösungsbehälter ist leer.☺Den Lösungsbehälter füllen, nachdem derSchmutzwasserbehälter entleert wurde.☺ Der Flussregelhebel ist geschlossen oder fast geschlossen.☹ Die austretende Lösungsmenge einstellen/erhöhen.☹ Der Reinigungslösungsfilter ist verstopft..☹ Den Schmutz oder Fremdkörper aus der Leitungentfernen.8.5 KEIN SAUGBETRI<strong>EB</strong>☹ Das Saugrohr ist nicht an den Squeegee angeschlossen.☺ Korrekt anschließen.☹ Das Saugrohr und die Squeegee-Leitung sindverstopft.☺ Die Leitungen von der Verstopfung befreien.☹ Der Saugmotor ist abgestellt.☺ Den Motor einschalten.☹ Der Schmutzwasserbehälter ist voll.☺ Behälter entleeren.☹ Der Saugmotor wird nicht stromversorgt oder istdurchgebrannt.☺ Die Anschlüsse prüfen oder den durchgebranntenMotor ersetzen lassen.8.6 ZU GERINGE SAUGKRAFT☹ Der Schmutzwasserbehälterdeckel wurde nichtkorrekt festgeschraubt.☺ Korrekt festschrauben.☹ Der Ablassschlauchstopfen des Schmutzwasserbehältersist nicht korrekt geschlossen.☺ Korrekt schließen.☹ Das Saugrohr, die Squeegee-Leitung oder das Inspektionsfachsind verstopft.☺ Die Leitungen von der Verstopfung befreien.Vorschub muss exakt senkrecht zur Fahrtrichtungerfolgen.☺ Den Squeegee korrekt einstellen.☹ Das Saugrohr, die Squeegee-Leitung sind verstopft.☺ Die Leitungen von der Verstopfung befreien.8.9 DAS BATTERIELADEGERÄT FUNKTIO-NIERT NICHT☹ Der Batterieladevorgang setzt nicht ein☺ Kontrollieren, dass das Batterieladegerät effektivan die Batterie angeschlossen ist. Das Handbuchdes Batterieladegeräts nachschlagen.8.10 DIE BATTERIEN WERDEN NICHT GELA-DEN ODER ENTLADEN SICH ZU SCHNELL☹ Die Batterien sind neu und erreichen nicht dieerwartete Leistung von 100%.☺ Der Akku erreicht seine maximale Ladekapazitäterst nach 20-30 kompletten Ladezyklen.☹ Die Elektrolytenlösung ist verdampft und bedecktdie Platten nicht vollständig.☺ Das Gebrauchs- und Wartungshandbuch des Batterieherstellersnachschlagen.☹ Es werden starke Dichteunterschiede zwischenden verschiedenen Elementen festgestellt.☺ Die beschädigte Batterie ersetzen.Immer das Gebrauchs- und Wartungshandbuch derBatterien und des Batterieladegeräts nachschlagen.Wenn das Problem nicht gelöst werden kann, ist einautorisierter technischer Kundendienst zu kontaktieren.Der Hersteller kann NICHT bei der Lösungvon Problemen behilflich sein, die auf nichtdirekt gelieferte Batterien oder Batterieladegerätezurückzuführen sind.8.7 DER BÜRSTENMOTOR ODER DER SAUG-MOTOR HALTEN NICHT AN☺ Die Maschine anhalten, indem die Hauptstromversorgungdurch Ziehen des Hauptverbinders derBatterie unterbrochen wird. Den technischen Kundendienstkontaktieren.8.8 DER SQUEEGEE REINIGT ODER TROCK-NET NICHT GUT☹ Die Squeegee-Blätter sind abgenutzt oderschleppen zu viel festen Schmutz mit sich.☺ Die Blätter ersetzen oder reinigen.☹ Der Squeegee ist nicht richtig eingestellt, der77
1. INDICE2. INFORMACIONES GENE-RALES2.1 FINALIDAD DELMANUAL2.2 TERMINOLOGÍA Y LEYENDA DE LOSSÍMBOLOS2.3 IDENTIFICACIÓN DEL PRODUCTO2.4 USO AL QUE ESTÁ DESTINADO LA MÁ-QUINA2.5 MODIFICACIONES TÉCNICAS3. INFORMACIONES SOBRE LA SEGURIDAD3.1 RECOMENDACIONES FUNDAMENTALES3.2 RUIDO Y VIBRACIONES4. INFORMACIONES SOBRE EL DESPLAZA-MIENTO4.1 ELEVACIÓN Y TRANSPORTE DE LA MÁ-QUINA EMBALADA4.2 CONTROL AL RECIBIR LA MERCANCÍA4.3 DESEMBALAJE4.4 ELEVACIÓN Y TRANSPORTE: MÁQUINA,BATERÍA Y CARGADOR DE BATERÍAS5. INFORMACIONES SOBRE LA INSTALA-CIÓN5.1 BATERÍAS5.1.2 PREPARACIÓN DE LAS BATERÍAS5.1.3 INSTALACIÓN DE LAS BATERÍAS5.1.4 CONEXIÓN DE LAS BATERÍAS5.1.5 CONFIGURACIÓN DEL INDICADORDE DESCARGA DEL LAS BATERIAS5.2 CONFIGURACION DEL CARGADORDE BATERÍAS6. INFORMACIONES SOBRE LA UTILIZACIÓN6.1 PREPARACIÓN DE LA MÁQUINA6.2 ESTRUCTURA Y FUNCIONES DE LAMÁQUINA6.3 RECARGA DE LAS BATERÍAS6.4 MONTAJE DE LA BOQUILLA DE SECADO6.5 DESMONTAJE DE LA BOQUILLA DESECADO6.6 SUSTITUCIÓN DE LOS LABIOS DE LABOQUILLA DE SECADO6.7 REGULACIÓN DE LA BOQUILLA DESECADO6.8 MONTAJE Y DESMONTAJE DEL PROTEC-TOR CONTRA SALPICADURAS6.9 MONTAJE Y DESMONTAJE DEL CEPILLO6.10 LLENADO Y DESCARGA DEL DEPÓSITODE LA SOLUCIÓN LIMPIADORA786.11 VACIADO DEL DEPÓSITO DE RECUPE-RACIÓN6.12 NORMAS ESPECÍFICAS DE USO DELMODELO “E”6.13 CONDUCCIÓN DE LA MÁQUINA6.14 MÉTODO DE TRABAJO6.14.1 PREPARACIÓN Y ADVERTENCIAS6.14.2 CONTROL DEL ESTADO DE CARGA DELAS BATERÍAS6.14.3 LAVADO DIRECTO O PARA SUPERFICIESLIGERAMENTE SUCIAS6.14.4 LAVADO INDIRECTO O PARA SUPERFI-CIES MUY SUCIAS6.14.5 OPERACIONES SUCESIVAS AL LAVADO7. INFORMACIONES SOBRE EL MANTENI-MIENTO7.1 DEPÓSITOS7.2 TUBO DE ASPIRACIÓN7.3 BOQUILLA DE SECADO7.4 ACCESORIOS7.5 CUERPO DE LA MÁQUINA7.6 BATERÍAS7.7 DISYUNTORES TÉRMICOS7.8 PERIODICIDAD7.8.1 OPERACIONES DIARIAS7.8.2 OPERACIONES SEMANALES7.8.3 OPERACIONES A LARGOS INTERVALOS7.9 RECAMBIOS ACONSEJADOS8. CONTROL DE FUNCIONAMIENTO8.1 LA MÁQUINA NO FUNCIONA8.2 LA MÁQUINA NO AVANZA8.3 EL CEPILLO NO GIRA8.4 LA SOLUCIÓN LIMPIADORA NO BAJA OBAJA EN POCA CANTIDAD8.5 FALTA ASPIRACIÓN8.6 POCA ASPIRACIÓN8.7 EL MOTOR DE LOS CEPILLOS O ELMOTOR DE ASPIRACIÓN NO SEDETIENEN8.8 LA BOQUILLA DE SECADO NO LIMPIA ONO SECA BIEN8.9 EL CARGADOR DE BATERÍAS NOFUNCIONA8.10 LAS BATERÍAS NO SE CARGAN O NOMANTIENEN LA CARGA
2. INFORMACIONES GENERALES2.1 FINALIDAD DEL MANUALPara facilitar la consulta y lectura de los temas deinterés, consulte el índice que se halla al inicio dela sección escrita en su idioma.El presente manual ha sido redactado por el fabricantey forma parte integrante del producto, ycomo tal debe conservarse con cuidado durantetoda la vida de la máquina hasta su demolición.El cliente debe asegurarse de que los operarioshayan leído y comprendido el contenido del presentemanual, a fin de que puedan atenerse escrupulosamentelas instrucciones descritas en elmismo.Para obtener los mejores resultados en términos deseguridad, prestaciones, eficacia y duración del productoque han adquirido es fundamental respetarsiempre las indicaciones proporcionadas en estemanual. El incumplimiento de estas reglas puedeprovocar daños a las personas, a la máquina, a lasuperficie lavada y al ambiente, que en ningún casopodrán imputarse al fabricante.El presente manual se refiere detalladamente a lamáquina y proporciona indicaciones y descripcionesexclusivamente a las baterías y cargadores debaterías (opcionales) que disponemos.Las baterías y el cargador de baterías son componentesfundamentales para completar la máquina ycondiciones el funcionamiento de la misma en términosde autonomía y prestaciones. Sólo la correctacombinación entre los dos accesorios(baterías y cargador de baterías) permite obtenerlas máximas prestaciones y evita grandes pérdidasde dinero. Para más informaciones al respecto esesencial remitirse a los manuales específicos de lasbaterías y de los cargadores de baterías.Los cargadores de baterías y las baterías que sugerimos(opcionales) aseguran la mejor combinacióncon la máquina y, además de unaextraordinaria versatilidad (cargadores de baterías),ofrecen estándares cualitativos y prestaciones en lacumbre de la categoría.2.2 TERMINOLOGÍA Y LEYENDA DE LOS SÍM-BOLOSPara una mayor claridad y para evidenciar de modoadecuado los diferentes aspectos de las instruccionesdescritas, se han utilizado los términos y símbolosque se definen y presentan a continuación:- Máquina. Esta definición sustituye el nombre comercialal que se refiere este manual.- Operario. Por operario se entienden las personasque normalmente utilizan la máquina y que conocensu funcionamiento, pero que no tienenconocimientos técnicos específicos para poder realizarlas intervenciones que pudieran ser necesarias.- Técnico. Por técnico se entienden las personascon la experiencia, preparación técnica y conocimientoslegislativos y normativos necesarios parapermitir realizar todo tipo de intervención en la máquina,con la capacidad de reconocer y evitar posiblespeligros durante la instalación, el uso, eldesplazamiento y el mantenimiento de la máquina.- SÍMBOLO INDICACIÓN () Son informacionesde especial importancia para evitar averías a lamáquina.- SÍMBOLO ATENCIÓN ( ! ) Son informacionessumamente importantes para evitar serios daños ala máquina y al ambiente en el que se trabaja.- SÍMBOLO PELIGRO () Son informaciones vitalespara evitar graves (o extremas) consecuenciasa la salud de las personas y a la integridad delproducto y del ambiente en el que se trabaja.2.3 IDENTIFICACIÓN DEL PRODUCTOLa placa de datos situada debajo del panel de mandoscontiene las siguientes informaciones:• identificación del fabricante• marca CE• código del modelo• modelo• potencia nominal total• número de serie• año de fabricación• peso con la máxima carga2.4 USO AL QUE ESTÁ DESTINADO LA MÁ-QUINALa máquina descrita en el presente manual es unafregadora-secadora de suelos: debe utilizarse parala limpieza y aspiración de líquidos de suelos planos,rígidos, horizontales, lisos o poco rugosos, uniformesy sin obstáculos, en locales tanto civilescomo industriales. Está prohibido cualquier otro usoque no sea los arriba indicados. Le rogamos lea detenidamentelas informaciones sobre la seguridadproporcionadas en este manual.La fregadora-secadora distribuye sobre la superficieque se ha de limpiar una cantidad de solución (regulableen función de las necesidades) de agua ydetergente mientras los cepillos eliminan la suciedaddel suelo. El equipo de aspiración de la máquina,a través de una boquilla de secado (rasquetade secado), seca perfectamente con una sola pasadalos líquidos y la suciedad eliminada por los cepillosfrontales.Asociando un adecuado detergente para la limpiezacon los diferentes tipos de cepillos (o discos abrasivos)disponibles, la máquina puede adaptarse atodas las combinaciones de tipos de suelos y suciedad.2.5 MODIFICACIONES TÉCNICASEsta máquina ha sido pensada y fabricada deacuerdo con los requisitos fundamentales para laseguridad y la salud del usuario establecidos en las79
directivas europeas, como queda patente por lamarca CE aplicada en la etiqueta de identificación.Las directivas europeas aplicadas a la máquina secitan en el Certificado de conformidad adjuntoal presente manual. Este certificado quedará anuladosi la máquina sufre cualquier tipo de modificaciónque no se haya acordado previamente con elfabricante.El fabricante se reserva el derecho de aportar sinprevio aviso las modificaciones técnicas al productoque considere necesarias para actualizarlo o mejorarlotécnicamente. Por este motivo algunos detallesde la máquina que ha comprado podrían diferircon las informaciones indicadas en los catálogos comercialeso con las figuras del presente manual, sinque por esto se altere la seguridad del mismo y lasinformaciones proporcionadas al respecto.3. INFORMACIONES SOBRE LA SEGURI-DAD3.1 RECOMENDACIONES FUNDAMENTALES() Lea detenidamente el “manual de instruccionespara el uso” antes de realizar lasoperaciones de puesta en marcha, utilización,mantenimiento, mantenimiento ordinario,o cualquier otro tipo de intervención enla máquina.( ! ) Respete escrupulosamente todas las prescripcionescontenidas en el presente manualasí como las prescripciones de los manualesde las baterías y de los cargadores de baterías(prestando especial atención a los párrafosprecedidos por el símbolo de atención opeligro).El fabricante declina toda responsabilidadpor los daños que pudieran producirse a personaso cosas debidos al incumplimiento delas citadas prescripciones.() Antes de utilizar la máquina, asegúrese deque todos los componentes estén bien colocados.( ! ) La máquina debe ser utilizada exclusivamentepor personal que haya sido formado para su uso,que haya demostrado su capacidad y que haya sidoexpresamente encargado de usarla. Para evitar eluso no autorizado, cuando no utilice la máquinaguárdela en un lugar no accesible a personas ajenas,y quite la llave del tablero de mandos.( ! ) Está prohibido el uso de la máquina a menoresde edad.( ! ) No destine esta máquina a otros usos que nosean los expresamente previstos. Valúe el tipo deedificio en el cual debe trabajarse y respete escrupulosamentelas normas y las condiciones de seguridadvigentes en el mismo.() No utilice la máquina en lugares que no dispongande la iluminación adecuada, en ambientesexplosivos, en presencia de suciedad nociva para lasalud (polvos, gases, etc.), en calles o pasajes públicosy en ambientes exteriores en general.( ! ) El campo de temperatura previsto para el usode la máquina es de +4°C a + 35°C; coloque la máquinaen reposo en un lugar seco y no corrosivo,donde la temperatura esté comprendida entre +10°C y + 50°C.El campo de humedad previsto para la máquina, encualquier condición en que la misma se encuentre,es del 30% al 95%.() No use o aspire nunca líquidos, gases, polvossecos, ácidos y disolventes (por ejemplo diluyentespara pinturas, acetona, etc.), aunque estén diluidos,no utilice productos inflamables o explosivos(por ejemplo gasolina, aceite combustible, etc.); noaspire nunca objetos en llamas o incandescentes.( ! ) No utilice la máquina en pendencias orampas superiores al 2 %.Para transportar la máquina en rampas o en pendenciasmás elevadas, presta la máxima atenciónpara evitar vuelcos y/o aceleraciones incontroladas.Desplace la máquina por rampas y/o escalones sólocon el cabezal de los cepillos y la boquilla de secadolevantados.( ! ) Nunca aparque la máquina en pendencia.() La máquina nunca debe dejarse sin vigilanciacon la llave puesta y conectada; sólo puede abandonarsedespués de haber desconectado y quitadola llave, tras haberla asegurado contra movimientosaccidentales y desconectado de la alimentacióneléctrica.() Cuando utilice la máquina preste atención a lapresencia de terceras personas, especialmente a losniños que pudieran estar presentes en el localdonde se trabaja.( ! ) No utilice la máquina para transportar personasu objetos o para arrastrar objetos. No arrastrela máquina.() No utilice la máquina como superficie deapoyo, para ningún peso y por ningún motivo.No obstruya las aperturas de ventilación y de eliminacióndel calor.( ! ) No elimine, modifique o deshabilite los dispositivosde seguridad.( ! ) Utilice siempre las protecciones personalespara la seguridad del operario: delantal o mono detrabajo de seguridad, zapatos antideslizantes e impermeables,guantes de goma, gafas y cascos deprotección, mascarillas para proteger las vías respiratorias.Antes de empezar a trabajar quítese loscollares, relojes, corbatas y todo aquello que potencialmentepudiera provocar graves accidentes.( ! ) No introduzca las manos entre las partes enmovimiento.() No utilice detergentes diferentes a los previstosy aténgase a las prescripciones indicadas enlas diferentes fichas de seguridad. Aconsejamosconservar los detergentes en un lugar inaccesiblea los niños. En caso de contacto accidental con losojos, lave inmediata y abundantemente con agua,80
y en caso de ingestión llame inmediatamente a unmédico.Asegúrese de que las tomas de corriente para la alimentacióndel cargador de baterías estén conectadasa una adecuada red de tierra, y que esténprotegidas por interruptores magnetotérmicos y diferenciales.() Si la máquina está equipada con baterías al geles esencial asegurarse de que el indicador de descargasituado en el salpicadero esté correctamenteregulado. Para ello diríjase a su revendedor o sigalas correspondientes instrucciones del manual.( ! ) Es indispensable respetar las instrucciones delfabricante de las baterías y las disposiciones delLegislador. Mantenga las baterías siempre limpias ysecas, a fin de evitar corrientes de dispersión superficial.Proteja las baterías contra las impurezas,como por ejemplo el polvo metálico.() No apoye herramientas sobre las baterías: peligrode cortocircuito y de explosión.() Cuando use ácido para baterías, siga escrupulosamentelas correspondientes instrucciones deseguridad.En presencia de campos magnéticos especialmentealtos, valúe el efecto que dichos campos podríantener en la electrónica de control.Nunca limpie la máquina con chorros de agua.() Los fluidos recuperados contienen detergentes,desinfectantes, agua, material orgánico e inorgánicorecuperado durante las fases de trabajo:estos fluidos deben eliminarse siguiendo la ley vigenteen materia.( ! ) En caso de avería y/o mal funcionamiento dela máquina, apáguela inmediatamente (desenchufándolade la red de alimentación eléctrica o de lasbaterías) y no manipúlela.Diríjase a un centro de asistencia técnica del fabricante.() Todas las operaciones de mantenimiento o sustituciónde los accesorios deben realizarse en ambientesadecuadamente iluminados, y sólo despuésde haber desenchufado la máquina de la alimentacióneléctrica, desconectando el conector de la batería.() Todas las intervenciones en el sistema eléctricoy todas las operaciones de mantenimiento yde reparación (especialmente las que no se describenexplícitamente en este manual) deben ser realizadasexclusivamente por los centros de asistenciaautorizados o por personal técnico especializado yexperto en el sector y en las normas de seguridad.() Se permite usar sólo accesorios y recambiosoriginales, proporcionados exclusivamentepor el fabricante, puesto que sóloestos recambios garantizan que la máquinafuncione de modo seguro y sin inconvenientes.No use piezas desmontadas de otras máquinasu otros juegos de piezas comorecambios.Cuando decida no utilizar más la máquina, aconsejamosque separe las baterías y las elimine segúnse establece en la norma europea 91/157/EEC, obien deposítelas en un centro de recogida autorizado.Para la eliminar la máquina respete la legislación vigenteen el lugar donde se utilice:- En primer lugar hay que desconectar la máquinade la red, vaciar los líquidos y limpiarla.- Seguidamente la máquina se divide por grupos demateriales homogéneos (plásticos de acuerdo conlo indicado por el símbolo de reciclado, metales,goma, embalajes). En caso de componentes quecontengan diferentes materiales, diríjase a los organismoscompetentes en materia.Cada grupo homogéneo debe eliminarse deacuerdo a la ley en materia de reciclaje.Se aconseja hacer inocuas las partes de la máquinasusceptibles de peligro, especialmente para losniños.() Compruebe la máquina cada vez que deba utilizarla.En especial, compruebe que el cable de recargade la batería y el conector estén en buenascondiciones y que sean seguros para el operario. Sino están en perfectas condiciones, no utilice la máquinapor ningún motivo antes de que un técnicoespecializado y autorizado realice la reparación.() Apague inmediatamente el motor de aspiraciónsi observa pérdidas de espuma o de líquido.() No utilice la máquina sobre superficies textilescomo alfombras, moquetas, etc.El uso de ceras, detergentes espumosos o dispersionesa lo largo de los tubos, puede ocasionar a lamáquina serios problemas y obstruir los tubos.3.2 RUIDO Y VIBRACIONESLa máquina está destinada para uso interno, por loque no está sujeta a las directivas de referencia.4. INFORMACIONES SOBRE EL DESPLA-ZAMIENTO4.1 ELEVACIÓN Y TRANSPORTE DE LA MÁ-QUINA EMBALADA( ! ) Durante todas las operaciones de elevación otransporte, asegúrese de que la máquina embaladaesté bien sujetada, a fin de evitar que se vuelque ocaiga accidentalmente.Las operaciones de carga y descarga con los mediosa tal fin destinados, deben realizarse con laadecuada iluminación.La máquina embalada debe moverse con mediosadecuados, prestando atención a no dañar ni golpearel embalaje en ninguna parte y a no volcarlo,y apoyándolo en el suelo con mucho cuidado.() Todas estas indicaciones también valen paralas baterías y el cargador de baterías.4.2 CONTROL AL RECIBIR LA MERCANCÍA() Cuando reciba la mercancía (máquina, bate-81
ía o cargador de baterías) del transportista, compruebeatentamente la integridad del embalaje yde su contenido. Si éste último hubiera sufridodaños, comuníquelo al transportista, y resérvese,por escrito (seleccione en el documento la voz “reserva”),de presentar la solicitud de resarcimientoantes de aceptar la mercancía.4.3 DESEMBALAJE( ! ) Vista prendas de seguridad y utilice los instrumentosadecuados para limitar los riesgos de accidentes.Para la máquina, proceda del siguiente modo y poreste orden.Si la máquina está embalada en caja de cartón:- Corte y quite los flejes de plástico con tijeras o cizalla.- Quite, sacándola por arriba, la caja de cartón.- Saque las bolsas que están dentro de la caja ycompruebe su contenido (manual de uso y mantenimiento,conector para cargador de baterías)- Quite las abrazaderas metálicas o flejes plásticosque fijan la máquina al pallet.- Saque del embalaje los cepillos y la boquilla desecado.- Saque la máquina (empujándola hacia atrás) delpallet utilizando una plataforma inclinada bien sujetadaal pavimento y al pallet.Si la máquina está embalada en jaula de madera:- Separe del pallet todas las paredes de madera,empezando por la pared superior.- Quite el film protectivo de la máquina.- Quite las abrazaderas metálicas o flejes plásticosque fijan la máquina al pallet.- Saque del embalaje los cepillos y la boquilla desecado.- Saque la máquina (empujándola hacia atrás) delpallet utilizando una plataforma inclinada bien sujetadaal pavimento y al pallet.Proceda con las mismas precauciones e indicacionespara quitar de su embalaje el cargador de bateríasopcional (extrayéndolo desde arriba delembalaje por medio de las específicas manillas) y labatería opcional.Aleje la máquina del resto de los embalajes, ahoraya puede montar los accesorios y las baterías, paraello lea el correspondiente párrafo de este manual.Se sugiere conservar todos los elementos del embalaje,porque podrían ser útiles para proteger lamáquina y los accesorios en caso de transporte aotro lugar o a los centros de asistencia autorizados.Si no desea guardar el embalaje, el mismo deberáeliminarse según lo establecido en las leyes vigentesen materia.4.4 ELEVACIÓN Y TRANSPORTE: MÁQUINA,BATERÍA Y CARGADOR DE BATERÍAS( ! ) Nunca levante la máquina con una carretillaelevadora, el bastidor no tiene los elementos necesariospara efectuar una elevación directa.Antes de preparar el embalaje y de efectuar el transporte,realice las siguientes operaciones:- Vacíe el depósito de recuperación y el depósito dela solución.- Desmonte la boquilla de secado y el cepillo o elplato de arrastre.- Desconecte y quite las baterías.Coloque la máquina en el pallet original (o en unoequivalente que soporte el peso y que sea adecuadoa las dimensiones de la máquina) para elloutilice una plataforma inclinada.Fije fuertemente la máquina y la boquilla de secadoal pallet con abrazaderas metálicas u otros elementosque sean adecuados al peso de los elementos.Levante el pallet con la máquina para cargarlosobre el medio de transporte.Fije fuertemente la máquina y el pallet con cablesconectados al medio de transporte.Si se tienen a disposición medios de transporte privados,con rampas inclinadas, se puede empujardirectamente la máquina sin el pallet, asegurándosede que todos los componentes y la máquinaestén adecuadamente protegidos para que no sufrangolpes violentos, humedad, vibraciones o movimientosaccidentales durante el transporte.Las cajas de las baterías están provistas de orificiospara enganchar las herramientas necesarias parael transporte.() Para la elevación o introducción (en el vanode la máquina) de la batería, utilice exclusivamentepersonal y medios adecuados (cables, armellas,etc.) para la operación y para soportar el peso delas cargas en cuestión. Para el transporte tenga lasmismas precauciones y siga las mismas indicacionessugeridas para la máquina, asimismo siga lasindicaciones del manual del fabricante de la batería.El cargador de baterías puede transportarse sobrelos soportes de los que está provisto, tanto verticalcomo horizontalmente, tome las mismas precaucionesy siga las mismas indicaciones previstas parala máquina, asimismo siga las indicaciones del manualdel cargador de baterías.5. INFORMACIONES SOBRE LA INSTA-LACIÓN5.1 BATERÍASIndependientemente del tipo de construcción, lasprestaciones de una batería se indican con la capacidadreferida a un periodo de descarga. Otrovalor importante es el número de descargas posibles.La capacidad está expresada en amperios porhora (Ah), mientras que el periodo de descarga generalmentese indica en 20 horas (C20 o bien 20h,o bien no se indica expresamente) o 5 horas (C5 o82
ien 5h). Los ciclos de descarga/carga son la indicacióndel número de veces que la batería soportala carga en las mejores condiciones, es decir, indicanla vida útil de la batería respetando todas lasprescripciones previstas.Por lo tanto la capacidad de una batería varía enfunción de la velocidad con la que utilice la energía(la corriente), por este motivo los valores de la capacidadexpresados en C5 o C20 varían tan sensiblemente.Es fundamental considerar estos factoresa fin de efectuar una correcta comparación entrelos productos disponibles en el mercado y los ofrecidospor nosotros.Esta máquina admite dos tipos de baterías diferentespor su construcción y características.- Batería de módulos blindados tubulares al Pb-Ácido: ¡requieren el control periódico del nivel delelectrolito en cada elemento!( ! ) Si un elemento no está cubierto por lasolución ácida, se oxida en 24 horas y lasprestaciones de ese elemento se dañan sinposibilidad de recuperación.• Remítase al manual de las baterías para evitar riesgosfísicos y económicos.- Batería de módulos al gel: este tipo de baterías norequieren mantenimiento ni ambientes especialespara la recarga (puesto que no emiten gases nocivos)y, por lo tanto, se aconsejan vivamente.( ! ) No está absolutamente descontado quebaterías y cargadores de baterías con las mismascaracterísticas técnicas que los ofrecidospor nosotros den resultados análogos,sólo una perfecta compatibilidad entre estoselementos (baterías al Pb-Ácido, baterías algel y cargador de baterías) protegen las prestaciones,la vida útil, la seguridad y el valoreconómico invertido.5.1.2 PREPARACIÓN DE LAS BATERÍAS( ! ) Las características técnicas de las baterías utilizadasdeben corresponder con las indicadas en elpárrafo de las informaciones técnicas. El uso de bateríasdiferentes puede provocar serios daños a lamáquina o requerir recargas más frecuentes.( ) Durante la instalación o cualquier tipo de operaciónde mantenimiento de las baterías, el operariodebe disponer de los accesorios de seguridadadecuados para evitar accidentes. Trabaje lejos dellamas libres, no cortocircuite los polos de las baterías,no provoque chispas y no fume.Las baterías normalmente se proporcionan cargadascon solución ácida (para las baterías al Pb-Ácido) y listas para usar, siga las instrucciones delmanual que se entrega con la batería y aténgaseescrupulosamente a las indicaciones sobre la seguridady sobre los modos de uso descritos en dichomanual.5.1.3 INSTALACIÓN DE LAS BATERÍASPara instalar las baterías en el alojamiento ( Foto I- 2) el grupo ceppillo tiene que ser bajado;para abrir el alojamiento de las baterías, tirar la palancade apertura ( Foto H - 1) y subir el depósitode recuperación ( Foto O - 3 );separar la grapa a clip ( Foto I - 1 ) colocada sulcable de subida del grupo cepillo.Instalar las baterías en el alojamiento correspondiente( Foto I - 2) comprobando detenidamenteque estén en perfectas condiciones.5.1.4 CONEXIÓN DE LAS BATERÍAS( ! ) Estas operaciones deben ser realizadas porpersonal especializado.Desconecte el conector Anderson perteneciente alcableado baterías del conector Anderson pertenecienteal cableado máquina ( Foto D - 7, F - 8 ).Para ello aferre los conectores, no tire nunca de loscables.En la Foto G se puede ver el esquema de conexiónde las baterías para las máquinas BSW1400 - <strong>BT</strong>.( ) Fije el cableado batería a la batería conectandolos bornes exactamente y sólo enlos polos marcados con el mismo símbolo(cableado rojo “+”, cableado negro “-”) ¡Uneventual cortocircuito de la batería puedeocasionar explosiones!Una vez haya comprobado que todos los mandosen el panel estén en posición “0” o en reposo, conecteel conector de la batería al de la máquina.( ! ) Cierre el vano batería y preste atención a noaprisionar ningún cable.En la Foto I - 3 se mostra como se deben conectarlas baterías para las máquinas BSW1400 - <strong>BT</strong>.5.1.5 CONFIGURACIÓN DEL INDICADOR DE DESCARGA DEL LAS BATERIASEl circuito electronico de la maquina esta configurado por el funcionamiento con baterías GEL.Si la maquina esta equipada con baterías Pb-Acido esta necesario configurar el circuito en la manera siguiente:Modelo “BSW1400”( ! ) PARA ENTRAR EN EL MODO DE CONFIGURACIÓN DE LOS UMBRALES DE LA BATERIA:1) Presione simultaneamente los interruptores “ENCENDIDO MOTOR CEPILLO” ( Foto C - 1) y “ ENCEN-DIDO MOTOR ASPIRACION” ( Foto C - 2) en un tempo maximo de dos segundos tras el encendido dela maquina por medio del interruptor de llave ( Foto D - 1): los 3 diodos LED de indicacion de la bateriaesteran encendidos ( Foto C - 3A, 3B, 3C).83
2) Presione l’interruptor “ ENCENDIDO MOTOR ASPIRACION” ( Foto C - 2) antes de que transcurran 5segundos desde la accion precedente. Se entra así en el modo de configuracion previsto. Los diodosLED amarillo y verde esteran encendidos ( Foto C - 3A, 3B ).( ! ) LAS IMPOSTACIONES DE CONFIGURACIÓN PUEDEN VERSE EN LOS DIODOS LED DE INDICACIONDEL MOTOR CEPILLO( Foto C - 2A ):1) OFF: Pb-Acido.2) ON: Gel.( ! ) PARA MODIFICAR LAS IMPOSTACIONES DE CONFIGURACIÓN:Presione el interruptor “ENCENDIDO MOTOR CEPILLO” ( Foto C - 1).( ! ) PARA GUARDAR LAS IMPOSTACIONES DE CONFIGURACIÓN Y SALIR DEL MODO:Presione el interruptor “ ENCENDIDO MOTOR ASPIRACION” ( Foto C - 2).Una vez realizada la programación se tendrán diferentes niveles de descarga de las baterías con intervencionesdiferenciadas en los motores, como detallado en el cuadro siguiente:Funcion de l’indicador de descarga de las baterías - MODELO “BSW1400”Tension VoltsTipo de bateriasLED indicador delestado de cargade las bateríasLED indicador delfuncionamientodel motor cepilloPb-Acido GEL Señalización Señalización Acción24,0 24,0 Verdeencendido21,5 22,5 Amarilloencendido20,5 21,5 Rojoencendido20,0 21,0 RojodestellanteEncendidoEncendidoDestellanteDestellanteTodo en funcionamientoTodo en funcionamientoNo funciona el motordel cepilloNo funcionan losmotores del cepillo yde aspiraciónModelo “<strong>BT</strong>”( ! ) PARA ENTRAR EN EL MODO DE CONFIGURACIÓN DE LOS UMBRALES DE LA BATERIA:1) Presione simultaneamente los interruptores “REDUCCION VELOCIDAD” ( Foto E - 3) y “ ENCENDIDOMOTOR ASPIRACION” ( Foto E - 6) en un tempo maximo de dos segundos tras el encendido de la maquinapor medio del interruptor de llave ( Foto F - 1): el segundo LED de indicacion de la velocidadestera encendido ( Foto E - 3B).2) Presione el interruptor “ AUMENTO VELOCIDAD ” ( Foto E - 4) antes de que transcurran 5 segundosdesde la accion precedente. Se entra así en el modo de configuracion previsto.( ! ) LAS IMPOSTACIONES DE CONFIGURACIÓN PUEDEN VERSE EN LOS DIODOS LED DE INDICACIONDEL LA VELOCIDAD ( Foto C - 2A ):84
1) Los primeros dos diodos LED ( Foto E - 3A, 3B) indican el tipo de configuración de los umbrales deintervención del indicador, y ambos debe estar encendidos2) El tercer y el cuarto diodo LED ( Foto E - 3C, 3D) indican el tipo de batería: para el tipo de Pb-Acidosólo debe estar encendido el tercer diodo LED ( Foto E - 3C ), mientras que para el tipo GEL deben estarencendidos ambos los diodos LED ( Foto E - 3C, 3D).( ! ) PARA MODIFICAR LAS IMPOSTACIONES DE CONFIGURACIÓN:1) Los interruptores “ AUMENTO VELOCIDAD ” ( Foto E - 4) y “REDUCCION VELOCIDAD” ( Foto E - 3)sirven para programar el umbral de intervención del indicador, de modo que se encendian los primerosdos diodos LED de la indicación de la velocidad.2) El interruptor “ENCENDIDO MOTOR CEPILLO” ( Foto E - 5 ) sirve para seleccionar las baterías de tipoPb-Acido mientras el interruptor “ ENCENDIDO MOTOR ASPIRACION” ( Foto E - 6) sirve para seleccionarlas baterías de tipo GEL.Presione el interruptor “ENCENDIDO MOTOR CEPILLO” ( Foto C - 1).( ! ) PARA GUARDAR LAS IMPOSTACIONES DE CONFIGURACIÓN Y SALIR DEL MODO:Presione simultaneamente los interruptores “REDUCCION VELOCIDAD” ( Foto E - 3) y “ ENCENDIDOMOTOR ASPIRACION” ( Foto E - 6).Una vez realizada la programación se tendrán diferentes niveles de descarga de las baterías con intervencionesdiferenciadas en los motores, como detallado en el cuadro siguiente:Funcion de l’indicador de descarga de las baterías - MODELO “<strong>BT</strong>”Tension VoltsTipo de bateriasLED indicador delestado de cargade las bateríasLED indicador delfuncionamientodel motor cepilloPb-Acido GEL Señalización Señalización Acción24,0 24,0 Verdeencendido21,5 22,5 Amarilloencendido20,5 21,5 Rojoencendido20,0 21,0 RojodestellanteEncendidoEncendidoDestellanteDestellanteTodo en funcionamientoTodo en funcionamientoNo funciona el motordel cepilloNo funciona ningunmotorSi no se completa el ciclo de configuración, las impostacionesno se modifican y quedan como en origen.( ! ) Se aconseja intervención de sistema de asistenciao de un técnico en caso de encontrar problemascon las programaciones.No abra ni manipule el circuito eléctrico.5.2 CONFIGURACION DEL CARGADOR D<strong>EB</strong>ATERÍASSe aconseja la intervencion del sistema de asistencia.El cargador de la maquina está configurado porbaterías GEL. Si lse desea equipar la maquina conbaterías Pb-Acido es necesario configurar el cargadoren la manera siguiente:( ! ) VISUALIZACION DE LAS IMPOSTACIONES DELCARGADORLas impostaciones de carga del cargador de bateríasson indicadas dal destallamento de los diodosLED al encendidodel cargador.85
- el diodo LED ROJO ( Foto M - 2 ) destalla 2veces = cargador configurado para baterías PB-Acido- el diodo LED VERDE ( Foto M - 3 ) destalla 2veces = cargador configurado para baterías GELSe puede efectuar este tipo de verificación aunquesi las baterías no son connectadas.( ! ) CONFIGURACION DE LOS DIP-SWITCH DELCARGADOR CBHD1Para hacer la configuración del cargador con tipode carga para baterías PB-Acido o GEL se necesitade obrar l’interruptor (Dip-Switch) situado al’interior del cargador ( Foto M - 2 ).Para acceder al dip-switch se debe desmontar latapa inferior del cargador ( Foto M - 1 ) o el tapónen plastico ( Foto M - 5 ).El unico dip-switch que tiene que ser obrado es elprimer a l’izsquierda, indicado por el numero 1 deldip-switch SW1 ( Foto M - 6 )Posición Dip-Switch 1ONOFFTipo de cargaCurva de carga parabaterías Pb-AcidoCurva de carga parabaterías GELATENCION: los otros dip-switch no se debenobrar en cuanto no tienen ningun efecto sobre eltipo de carga del cargador6. INFORMACIONES SOBRE LA UTILI-ZACIÓN6.1 PREPARACIÓN DE LA MÁQUINA( ! ) Antes de empezar a trabajar, póngase zapatosantideslizantes, guantes y todos los dispositivos deprotección personal indicados por el proveedor deldetergente utilizado o necesario para el ambienteen el que se trabaja.( ) Realice las siguientes operaciones antes deempezar a trabajar, remítase a los párrafos específicospara una detallada descripción de estas fases:Compruebe el nivel de carga de la batería y, si fueranecesario, recárguela.Monte los cepillos o los discos arrastradores (conlos discos abrasivos) del tipo adecuado para la superficiey el trabajo que se ha de realizar.Monte la boquilla de secado, compruebe que estébien fijado y contactado al tubo de aspiración, asimismocompruebe que los labios de secado noestén excesivamente desgastadas.Compruebe que el depósito de recuperación estévacío, si no lo estuviera vacíelo completamente.Compruebe y cierre completamente el mando de liberaciónde la solución limpiadora.Llene el depósito de la solución a través le taponanterior con agua limpia y detergente no espumosoen la adecuada proporción. Deje un desnivel de 2cm entre la boca del tapón y el nivel del líquido.( ) Para evitar peligros, se aconseja familiarizarseantes con los movimientos de la máquina, probándolaen una superficie amplia y sin obstáculos.Para obtener los mejores resultados en términos delimpieza y duración de la máquina, sugerimos algunossimples, pero importantes, procedimientos:- Examine el área de trabajo, alejando los posiblesobstáculos; si la superficie es muy amplia, trabajepor áreas rectangulares contiguas y paralelas entresí.- Escoja una trayectoria de trabajo rectilínea y empiecea trabajar por la zona más lejana, para evitarvolver a pasar sobre las zonas que ya se han limpiado.6.2 ESTRUCTURA Y FUNCIONES DE LA MÁ-QUINAFOTO A1 INTERRUPTOR GENERAL2 INTERRUPTOR MOTOR CEPILLO3 INTERRUPTOR MOTOR ASPIRACIÓNFOTO B1 CABLE DE ALIMENTACIÓN2 PALANCA DE DOSIFICACIÓN DE LASOLUCIÓN DETERGENTE3 PALANCA SUBE/BAJA GRUPO CEPILLO4 PALANCA SUBE/BAJA BOQUILLA DE SE-CADO5 PALANCA DE MANDO6 TUBO DE VACIADO DEL DEPÓSITO DERECUPERACIÓNFOTO C1 INTERRUPTOR MOTOR CEPILLO1A INDICADOR LED DE SIGNALIZACIÓNFUNCIONAMIENTO MOTOR CEPILLO2 INTERRUPTOR MOTOR ASPIRACIÓN2A INDICADOR LED DE SIGNALIZACIÓNFUNCIONAMIENTO MOTOR ASPIRACIÓN3 INDICADOR LUMINOSO ESTADO DECARGA DE LAS BATERÍAS3A INDICADOR LUMINOSO LED VERD<strong>EB</strong>ATERÍAS CARGA3B INDICADOR LUMINOSO LED AMARILLOBATERÍAS CARGA 50%3C INDICADOR LUMINOSO LED ROJOBATERÍAS DESCARGAFOTO D1 INTERRUPTOR GENERAL DE LLAVE2 PALANCA DE MANDO3 PALANCA SUBE/BAJA GRUPO CEPILLO4 PALANCA SUBE/BAJA BOQUILLA DE SE-86
CADO5 DISYUNTOR TÉRMICO DEL MOTOR CE-PILLO6 TUBO DE VACIADO DEL DEPÓSITO DERECUPERACIÓN7 CONECTOR DE BATERÍAS8 PALANCA DE DOSIFICACIÓN DE LASOLUCIÓN DETERGENTEFOTO E1 INDICADOR LUMINOSO ESTADO DECARGA DE LAS BATERÍAS1A INDICADOR LUMINOSO LED VERD<strong>EB</strong>ATERÍAS CARGA1B INDICADOR LUMINOSO LED AMARILLO1CBATERÍAS CARGA 50%INDICADOR LUMINOSO LED ROJOBATERÍAS DESCARGA2 INDICADOR LUMINOSO DE MARCHAADELANTE/ATRÁS3 INTERRUPTOR DE REDUCCIÓN DE LAVELOCIDAD DE AVANCE3A VELOCIDAD DE AVANCE 13B VELOCIDAD DE AVANCE 23C VELOCIDAD DE AVANCE 33D VELOCIDAD DE AVANCE 44 INTERRUPTOR DE AUMENTO DE LAVELOCIDAD DE AVANCE5 INTERRUPTOR MOTOR CEPILLO5A INDICADOR LED DE SIGNALIZACIÓNFUNCIONAMIENTO MOTOR CEPILLO6 INTERRUPTOR MOTOR ASPIRACIÓN6AINDICADOR LED DE SIGNALIZACIÓNFUNCIONAMIENTO MOTOR ASPIRACIÓNFOTO F1 INTERRUPTOR GENERAL DE LLAVE2 PALANCA DE MANDO TRACCIÓNADELANTE/ATRÁS3 PALANCA SUBE/BAJA GRUPO CEPILLO4 PALANCA SUBE/BAJA BOQUILLA DESECADO5 DISYUNTOR TÉRMICO DEL MOTORCEPILLO6 DISYUNTOR TÉRMICO DEL MOTOR DETRACCIÓN7 TUBO DE VACIADO DEL DEPÓSITO DERECUPERACIÓN8 CONECTOR DE BATERÍAS9 PALANCA DE DOSIFICACIÓN DE LASOLUCIÓN DETERGENTEFOTO GDIAGRAMA DE CONEXIÓN DE LASBATERÍASFOTO H1 PALANCA DE ABERTURA DEL ALOJA-MIENTO DE LAS BATERÍAS2 ABERTURA DE LLENADO DEL DEPÓSITODE LA SOLUCIÓN DETERGENTE CONTAPÓN EN ESPONJAFOTO I1 GRAPA A CLIP PARA EL DESGANCHEDEL CABLE DE SUBIDA DEL GRUPOCEPILLO.2 ALOJAMIENTO BATERÍAS CONBATERÍAS 12V3 CONEXIÓN DE LAS BATERÍASFOTO L1 CARGADOR DE BATERÍAS2 CABLE DE ALIMENTACIÓN DELCARGADORFOTO M1 TAPA DEL CARGADOR DE BATERÍAS2 INDICADOR LUMINOSO LED ROJOBATERÍA DESCARGA3 INDICADOR LUMINOSO LED VERD<strong>EB</strong>ATERÍA CARGA4 INTERRUPTORES DIP-SWITCH5 TAPÓN DE ACCESO A LOSINTERRUPTORES DIP-SWITCH6 INTERRUPTOR DIP-SWITCH NR. 1PARA LA CONFIGURACIÓN DE CARGAPB-ACIDO / GELFOTO N1 RUEDA PARAGOLPES2 PÓMULO DE REGULACIÓN DE LAPRESIÓN LA BOQUILLA DE SECADO3 TUBO DE ASPIRACIÓN4 PÓMULO DE FIJACIÓN LÁBIOSDE LA BOQUILLA DE SECADO5 RUEDA DE LA BOQUILLA DE SECADO6 PÓMULO DE FIJACIÓN DE LA BOQUILLADE SECADO7 PÓMULO DE REGULACIÓN DE LAINCLINACIÓN DE LA BOQUILLA DESECADOFOTO O1 TAPA DEL ALOJAMIENTO DEL FILTRO DEASPIRACIÓN2 ABERTURA DE LLENADO DEL DEPÓSITODE LA SOLUCIÓN DETERGENTE3 DEPÓSITO DE RECUPERACIÓN4 DEPÓSITO DE LA SOLUCIÓNDETERGENTE5 PROTECTOR DE SALPICADURASFOTO P1 FLOTADOR2 FILTRO DE ASPIRACIÓN3 ABERTURA DE INSPECCIÓN DEL DEPÓ-SITO DE RECUPERACIÓN87
6.3 RECARGA DE LAS BATERÍASConectar el cable de alargo al cable de alimentacióndel cargador ( Foto L - 2 ) y conectar la maquinaa la red eléctrica.Al encenderse, el cargador de baterías efectúa unaprueba de la tensión de batería para decidir si iniciaro no el proceso de carga. Si la batería no estáconectada al cargador de baterías, se enciende elled rojo de luz intermitente. Si el resultado de laprueba es positivo,después de un segundo iniciaráel proceso de carga de la batería, con el LED rojoencendido ( Foto M - 2 ).Si, durante el proceso de carga de la batería, elusuario desconecta la batería del cargador de baterías,después de pocos segundos el cargador debaterías se pone a cero y se prepara a iniciar unnuevo proceso de carga.El avance del proceso de carga es señalado mediantetres indicadores luminosos de LED: rojo,amarillo y verde.El LED verde ( Foto M - 3 ) señala que el procesode carga es terminado.A la fin del proceso de carga desconectar el cargador.LED RojoLED AmarilloLED VerdeSi la máquina está equipada con baterías al Pb-Ácido, recargue sólo en un lugar bien ventilado, levantela tapa superior y abra los tapones de lasbaterías.() Siga el manual de utilización y seguridad delfabricante de las baterías (véase el párrafo correspondienteal mantenimiento de las baterías).Si la máquina está equipada con baterías al gel(sin mantenimiento), siga las siguientes instrucciones.Si la máquina se utiliza con regularidad:Deje siempre conectadas las baterías al cargadorde baterías cuando no se utilice la máquina.Si la máquina no se utiliza durante largos periodos:Cargue la batería por la noche, después de la últimavez que utilice la máquina. Seguidamente desconectela batería del cargador de baterías.Recargue la batería por la noche antes de usar denuevo la máquina.Evite realizar recargas intermedias o incompletasen fase de trabajo.Después de la recarga, apague el cargador de bateríasy desconecte el conector de las baterías.Si la máquina está equipada con baterías al Pb-Ácido, compruebe con regularidad la intensidad dellíquido de los elementos con el densímetro: si unoo más elementos estuvieran descargados y losdemás completamente cargados, significa que labatería está dañada y por tanto hay que cambiarlao repararla (remítase al manual de servicio de labaterías).Cierre los tapones de los elementos y baje la tapasuperior.Sujete los conectores con las manos, no tire de loscables.Conecte de nuevo los conectores de la máquina.6.4 MONTAJE DE LA BOQUILLA DE SECADOBajar el soporte de la boquilla de secado para simplificarel montaje.Atornillar ligeremente los dos pómulos ( Foto N - 6) sobre el cuerpo de la boquilla de secado.Posicionar la boquilla de secado en los adecuadosespacios sobre el soporte y fijarla atornillando losdos pómulos ( Foto N - 6 ).Introduzca fuertemente el tubo de aspiración ( FotoN - 3 ) en el tubo de soporte sobre el cuerpo de laboquilla de secado.6.5 DESMONTAJE DE LA BOQUILLA DE SE-CADOBajar la boquilla de secado para simplificar el desmontaje.Desconectar el tubo de aspiración del cuerpo de laboquilla de secado.Destornillar los dos pómulos puestos sobre la boquillade secado ( Foto N - 6 ) y tirar la boquilla desecado a sí mismo para liberarla de su alojamiento.6.6 SUSTITUCIÓN DE LOS LABIOS DE LA BO-QUILLA DE SECADODesmontar la boquilla de secado de su soporte (veer 6.5)Destornillar los pómulos ( Foto N - 4, N - 6 ) puestossobre de la boquilla de secado y presionar lostornillos para sacar el soporto plastico de los labiosde su alojamiento.Sacar los labios dal soporte plastico.Montar los labios nuevos sobre el soporte plasticoensablando los pernios en plastico dentro de lasaberturas corispondentes sobre los labios de goma.Introducer el soperte plastico dentro del cuerpo dela boquilla de secado y fijarlo atornillando los pómulos( Foto N - 4, N - 6 ).Montar la boquilla de secado sobre el soporte (ver6.4 ).6.7 REGULACIÓN DE LA BOQUILLA DE SE-CADOEl pómulo situado en el soporte ( Foto N - 7 ) regulala inclinación de la boquilla de secado respectoal suelo, según el eje longitudinal de la máquina.88
Los dos pómulos rojos de los lados, conectados alas ruedas posteriores de la boquilla de secado, sirvenpara regular la presión de los labios en gomasul suelo.Si el labio trasero está bien regulado, cuando se arrastrasobre el pavimento debe flexionar en todossus puntos, formando con el suelo un ángulo de45°. Durante el trabajo de la máquina (avance) sepuede intervenir en los pómulos ( Foto N - 2, N - 7) para regular la correcta inclinación de los labios.La boquilla de secado debe secar de modo uniformea lo largo de todo el frente de secado.Tramos húmedos a los lados indican un secado insuficiente;regule mediante los pomos para optimizarla eficacia.6.8 MONTAJE Y DESMONTAJE DEL PROTEC-TOR CONTRA SALPICADURASEl protector contra salpicaduras es enganchado alplato del grupo cepillo por medio de una grapa a resorte.Para desmontar el protector contra salpicaduras senecesita de desenganchar la grapa a resorte y tirarel protector a sí mismo.Para montar el protector, encastrarlo fuertementesobre el plato del grupo cepillo, enganchar la extremidadfija del cable de acero sobre el plato delgupo cepillo y despues enganchar la grafa a resortesobre la otra extremidad.6.9 MONTAJE Y DESMONTAJE DEL CEPILLO( ! ) Nunca trabaje sin los cepillos, arrastradores ydiscos abrasivos perfectamente montados en lamáquina.Para el montaje:Asegúrese de que el plato del cepillo esté levantado,si no fuera así, levántelo siguiendo las instruccionesdel párrafo específico.Asegúrese de que la llave de encendido en el panelde mandos esté en posición “0”.Coloque el cepillo debajo del plato cepillo, en correspondeciadel acoplamiento metalico de la maquina.Baje el plato del cepillo y ponga en marcha la rotacióndel cepillo con l’interruptor relativo: de estemodo el cepillo se engancha automáticamente.Para el montaje del plato de arrastre seguir elmismo procedimiento.( ! ) No permita que la longitud de los hilos de loscepillos se reduzca a menos de 1 cm.( ! ) No permita que el espesor de los discos abrasivosse reduzca a menos de 1 cm.Trabajar con cepillos demasiado desgastados o condiscos abrasivos demasiado delgados, puede provocardaños a la máquina y al pavimento.Compruebe regularmente el desgaste de estoscomponentes antes de empezar a trabajar.Para el desmontaje o la sustitución:Asegúrese de que el plato del cepillo esté levantado,si no fuera así, levántelo siguiendo las instruccionesdel párrafo específico.Asegúrese de que la llave de encendido en el panelde mandos esté en posición “0”.Aferrando con las manos el cepillo debajo del plato,gírelos en el sentido de rotación, seguidamente bájelospara liberarlos del plato guía.Para el demontaje del plato de arrastre seguir elmismo procedimiento.6.10 LLENADO Y DESCARGA DEL DEPÓSITODE LA SOLUCIÓN LIMPIADORA() La temperatura del agua o del detergenteintroducido no debe ser superior a50°C() Antes de llenar el depósito de la solución limpiadora( Foto O - 4 ) hay que vaciar por completodel depósito de recuperación ( Foto O - 3 ).Para el llenado:• Derramar en el depósito la cantidad requerida delproducto químico, considerando el porcentaje (%)indicado por el proveedor, referido a la capacidaddel depósito lleno indicada en la ficha del producto.• Derramar el agua en el depósito a través del’abertura de llenado posicionada en la parte delanterade la maquina ( Foto H - 2, O - 2 ).• Deje un desnivel de 2 cm entre la boca del tapóny el nivel del líquido. ¡No sobrepase esta medida!• Utilice exclusivamente productos adecuados alsuelo y a la suciedad que se ha de limpiar.() La máquina ha sido proyectada para serutilizada con detergentes no espumosos ybiodegradables, específicos para máquinaslimpiadoras de suelos. La utilización de otrosproductos químicos, (como por ejemplo hipocloritode sodio, oxidantes, disolventes ohidrocarburos) puede dañar o destruir la máquina.• Siga las normas de seguridad especificadas en elcorrespondiente párrafo y en el envase del detergente.• Para tener una lista completa de los detergentesadecuados disponibles, diríjase al fabricante de lamáquina.() Utilizar siempre detergentes no espumosos.• No deje sin vigilancia el tubo del agua para el llenado,introdúzcalo completamente en el depósito,puesto que podría desplazarse y mojar partes delicadasde la máquina.• Cierre la tapa del depósito.Para el vaciado:• Desenrosque el tapon de vaciado del déposito situadoen la zona inferior de la máquina, en la partetrasera, y espere a que el depósito se vacíe com-89
pletamente.• Cierre fuertemente el tapon de descarga.6.11 VACIADO DEL DEPÓSITO DE RECUPE-RACIÓNLa descarga del agua sucia debe realizarse de conformidadcon las normativas nacionales. El usuarioes el único responsable de asegurar que se respetanestas reglas.Cuando se ha acabado la solución limpiadora, antesde llenar de nuevo hay que vaciar siempre el depósitode recuperación ( Foto O - 3 ).Por lo general, se puede vaciar el depósito de recuperacióntodas las veces que se quiera, inclusoen fases intermedias del ciclo de trabajo.El volumen del depósito de recogida es superior aldel depósito de la solución, por lo que no deberíaverificarse nunca una situación de potencia peligropara el motor de aspiración. De todos modos, hayun flotador de seguridad ( Foto P - 1 ) que intervienecerrando el tubo de aspiración, en caso deque el nivel del líquido sucio sea excesivo.() Si por cualquier motivo observara una pérdidade agua o de espuma por debajo de los depósitos,apague inmediatamente el motor de aspiración yvacíe el depósito de recogida.Para vaciar el depósito:Conduzca la máquina a un lugar adecuado para elvaciado del agua sucia, preferiblemente cerca deun WC o de un desagüe (respete las reglas nacionalespara la eliminación de las aguas residuales).Apague la máquina y quite la llave del panel demandos.Desacople el tubo de vaciado del gancho ( Foto B -6, D - 6, F - 7 ), y manteniendo el tubo arriba, abrael tapón de cierre.Baje el tubo de vaciado hacia el punto seleccionado.La operación de vaciado puede interrumpirse rápidamentesi fuera necesario, simplemente levantandoel tubo de vaciado.Compruebe la cantidad de suciedad que ha quedadoen el depósito y, si fuera necesario, lávelo internamentea través del orificio de inspección ( FotoP - 3 ).Cerrar fuertemente el tubo de vaciado con el tapóny cuélguelo en el soporte situado detrás de la máquina.() El tapón del tubo de vaciado debe estar perfectamentecerrado, sin dejar el paso de aire, puestoque de otro modo se tendrá una pérdida dedepresión que causará un mal secado del suelo.6.12 NORMAS ESPECÍFICAS DE USO DEL MO-DELO “E”La máquina “E” se puede poner en servicio sólo sila tensión (voltaje) indicada en la placa de característicasse corresponde con la disponible en el edificioy si la toma de corriente dispone de puesta atierra.No perjudicar el cable de alimentación, no aplastarloni desgarrarlo.No pasar con la máquina por encima del cable dealimentación. El cable podría enrollarse en los órganosen movimiento causando un cortocircuito.() ATENCIÓN! El modelo “E” tiene partesbajo tensión o por las que circula corriente;el contacto con dichas partes puede causargraves lesiones y hasta la muerte.- Antes de efectuar cualquier operación en la máquinaes preciso desconectarla de la red eléctrica.- No tocar nunca los cables eléctricos estropeadoso que presenten signos de desgaste.- Antes de acceder a la instalación eléctrica es precisoapagar la máquina y desconectarla de la tomade corriente.- Si se notan cables eléctricos estropeados, reemplazarlosinmediatamente por repuestos originales.- Las conexiones con la red deben ser protegidaspor lo menos contra las salpicaduras de agua.- Para conectar la máquina con la red eléctrica emplearsolo cables de alargo conformes a las normativasde seguridad en vigor.- La toma de corriente en la cual se enchufa la máquinaha de disponer de interruptor salvavidas.- Se prohibe terminantemente emplear la máquinacerca de piscinas o contenedores de agua.() SITUACIONES DE EMERGENCIAEn casos de emergencia:- Desconectar inmediatamente la máquinade la red eléctrica- Aplicar inmediatamente las medidas de primerosauxilios.En caso de accidente no se puede poner de nuevoen servicio la máquina sin que primero haya sidoexaminada por el personal especialista autorizadopor el constructor.6.13 CONDUCCIÓN DE LA MÁQUINAModelo “E”Conectar el cable de alimentación de la maquina (Foto B - 1 ) con la red eléctrica empleando un cablede alargo.Accionar el interruptor general ( Foto A - 1 ) su laposicion ON.Accionar el interruptor de encendido del motor cepillo( Foto A - 2 ).( ! ) El cepillo empezerá su rotación solo accionandolapalanca de mando ( Foto B - 5 ).Accionar el interruptor de encendido del motor del’aspiración ( Foto A - 3 ).Abrir el grifo de la solución detergente bajando lapalanca de dosificación del detergente situada de-90
trás de la máquina ( Foto B - 2 ).A continuación, bajar el grupo de la boquilla de secadoy el grupo del cepillo por medio de las palancasde subida y bajada ( Foto B - 3, B - 4 ).Efectuar el lavado del suelo, adelantando lentamenteaccionando la palanca de mando ( Foto B -5 ) para la rotación del cepillo; al terminar el accionamientode la palanca de mando la rotación delcepillo se para en algunos segundos.Recuerde que hay que levantar la boquilla de secadoantes de retroceder, a fin de evitar averías ala boquilla de secado.Modelo “BSW1400”Compruebe la conexión del conector baterías, situadodebajo del panel de mandos ( Foto D - 7 ) .Introducer y girar la llave de encendido ( Foto D -1 ).Desde el panel de mandos, compruebe el estadode carga de las baterías ( Foto C - 3 ).Accionar el interruptor de encendido del motor cepillo( Foto C - 1 ).( ! ) El cepillo empezerá su rotación solo accionandolapalanca de mando ( Foto D - 2 ).Accionar el interruptor de encendido del motor del’aspiración ( Foto C - 2 ).Abrir el grifo de la solución detergente bajando lapalanca de dosificación del detergente situada detrásde la máquina ( Foto D - 8 ).A continuación, bajar el grupo de la boquilla de secadoy el grupo del cepillo por medio de las palancasde subida y bajada ( Foto D - 3, D - 4 ).Efectuar el lavado del suelo, adelantando lentamenteaccionando la palanca de mando ( Foto D -2 ) para la rotación del cepillo; al terminar el accionamientode la palanca de mando la rotación delcepillo se para en algunos segundos.Recuerde que hay que levantar la boquilla de secadoantes de retroceder, a fin de evitar averías ala boquilla de secado.Modelo “<strong>BT</strong>”Compruebe la conexión del conector baterías, situadodebajo del panel de mandos ( Foto F - 8 ) .Introducer y girar la llave de encendido ( Foto F -1 ).Desde el panel de mandos, compruebe el estadode carga de las baterías ( Foto E - 1 ) y, si la cargaes suficiente, seleccionar la velocidad de avance pormedio de los interruptores ( Foto E - 3, E - 4 ).Accionar el interruptor de encendido del motor cepillo( Foto E - 5 ).( ! ) El cepillo empezerá su rotación solo accionandolapalanca de mando ( Foto F - 2 ).Accionar el interruptor de encendido del motor del’aspiración ( Foto E - 6 ).Abrir el grifo de la solución detergente bajando lapalanca de dosificación del detergente situada detrásde la máquina ( Foto F - 9 ).A continuación, bajar el grupo de la boquilla de secadoy el grupo del cepillo por medio de las palancasde subida y bajada ( Foto F - 3, F - 4 ).Efectuar el lavado del suelo, tirando en alto la palancade mando de la tracción ( Foto F - 2 ) paraadelantar y bajandola para retroceder; al terminarel accionamiento de la palanca de mando la tracciónse para y la rotación del cepillo se para en algunossegundos.Recuerde que hay que levantar la boquilla de secadoantes de retroceder, a fin de evitar averías ala boquilla de secado.6.14 MÉTODO DE TRABAJO6.14.1 PREPARACIÓN Y ADVERTENCIASLibere la superficie que se ha de tratar (con instrumentosadecuados como aspiradores, barredoras,etc.) de todo residuo sólido libre. Si no se realizaesta operación preliminar, la suciedad sólida podríaimpedir el correcto funcionamiento de la boquillade secado, que podría no secar perfectamente.Esta máquina debe ser conducida por personaladiestrado para ello.6.14.2 CONTROL DEL ESTADO DE CARGA DELAS BATERÍASLa secuencia de luces ( Foto C - 3, E - 1 ) se apagaprogresivamente hasta que se agota la carga de labatería. Cuando se enciende la luz roja ( Foto C -3C, E - 1C ), apague el motor de los cepillos, cierreel suministro de la solución limpiadora, acabe desecar el pequeño resto húmedo y diríjase hasta ellugar donde se encuentra el cargador de bateríaspara recargar las mismas.( ! ) Las baterías se pueden dañar irremediablementesi el nivel de carga residua se reduceexcesivamente (véase el manual de usode la batería), no fuerce la descarga de la bateríamás allá de los límites fijados por los dispositivosde seguridad, apagando yvolviendo a encender la llave o de ningúnotro modo.6.14.3 LAVADO DIRECTO O PARA SUPERFI-CIES LIGERAMENTE SUCIASLavado y secado en una única pasada.Prepare la máquina como anteriormente descrito yutilizar la maquina como descrito en el párrafo 6.13.( ) No utilice nunca la máquina sin la soluciónlimpiadora, puesto que se podría dañar el suelo.6.14.4 LAVADO INDIRECTO O PARA SUPER-FICIES MUY SUCIASLavado y secado en varias pasadas.Prepare la máquina como anteriormente descrito.Primera operación:Efectuar el lavado del suelo como descrito en elpárrafo 6.13, pero sin efectuar el secado del suelo.Deje que la solución limpiadora haga efectosobre la sociedad, según lo indicado en las in-91
formaciones relativas al detergente utilizado.Segunda operación:Proceda como se explica en el párrafo precedente“Lavado Directo” (6.14.3) para secar el pavimento.() No utilice nunca la máquina sin la solución limpiadora,puesto que se podría dañar el suelo.6.14.5 OPERACIONES SUCESIVAS AL LA-VADOCierre el suministro del detergente.Levante el grupo cepillos y apague el motor de loscepillos.Después de haber secado completamente la superficiede posibles rastros de agua, espere algunossegundos, seguidamente levante la boquilla de secadoy apague el motor de aspiración.Diríjase hacia un lugar adecuado para el vaciado delos depósitos; vacíe y limpie los depósitos (véanseel párrafo 6.11).Apague la máquina con la llave de contacto y quíteladel tablero de mandos.Proceda, si fuera necesario, a recargar la batería(véase el correspondiente párrafo).7. INFORMACIONES SOBRE EL MANTE-NIMIENTO() Gire la llave, quítela del tablero de mandos ydesconecte el conector batería del cableado de lamáquina.() Haga que centros de asistencia autorizados opersonal técnico especializado experto en el sectory en las correspondientes normas de seguridad realicetodas las intervenciones en el sistema eléctricoy todas las operaciones de mantenimiento y reparación(especialmente las que no están explícitamentedescritas en este manual).La regularidad del mantenimiento en la máquina,siguiendo atentamente las indicaciones del fabricante,garantiza un mejor rendimiento y una mayorduración de la máquina.7.1 DEPÓSITOSVacíe los dos depósitos como se describe en loscorrespondientes párrafos.Elimine la suciedad sólida llenando y vaciando losdepósitos hasta extraer toda la suciedad: para elloutilice un tubo de lavado o similares.( ! ) Agua caliente a más de 50°, hidrolimpiadoraa alta presión o chorros demasiado violentospueden dañar los depósitos y lamáquina.Deje las tapas de los depósitos abiertas (sólo con lamáquina en reposo), a fin de que puedan secarsey evitar así la formación de malos olores.7.2 TUBO DE ASPIRACIÓNDesacople el tubo de aspiración de la boquilla desecadoAhora ya se puede lavar y liberar el tubo de las posiblesobstrucciones.Introduzca firmemente el tubo en el cuerpo de laboquilla de secado.7.3 BOQUILLA DE SECADO( ! ) No maneje la boquilla de secado a manos descubiertas,póngase guantes y todas las prendasde seguridad adecuadas para la operación.Desacople la boquilla de secado de la máquina ylímpielo colocando debajo de un chorro de aguacorriente con una esponja o un cepillo.Compruebe la eficacia y el desgaste de los labiosen contacto con el pavimento. Los mismos tienen lafunción de rascar la película de detergente y aguasobre el pavimento y aislar la porción de superficiepara obtener la máxima depresión del motor deaspiración: de este modo el secado de la máquinaes perfecto. Trabajando continuamente de estemodo, el canto vivo de la banda tiende a redondearseo deteriorarse, perjudicando el perfecto secado,para esto hay que sustituir los labios de laboquilla de secado.Para cambiar los labios desgastados, siga las instruccionesdel correspondiente párrafo, gire los labiospara desgastar los otros cantos vivos o monteotras nuevas.7.4 ACCESORIOSQuite y limpie los cepillos o los discos arrastradores.( ! ) Compruebe atentamente que no estén encastradoscuerpos extraños como, por ejemplo, partesmetálicas, tornillos, virutas, cuerdas o similares,para evitar dañar el suelo y la máquina.Compruebe la planitud de trabajo de los cepillos(compruebe si se ha verificado un desgaste irregularde los cepillos o de los discos abrasivos). Si fueranecesario regule la inclinación de los cepillos sobreel suelo.Utilice exclusivamente los accesorios indicados porel fabricante, otros productos pueden perjudicar laseguridad.7.5 CUERPO DE LA MÁQUINAPara limpiar el cuerpo externo de la máquina, utiliceuna esponja o un trapo, si fuera necesario utiliceun cepillo blando para eliminar la suciedad másadherida. La superficie antigolpes de la máquina esrugosa para que las rayas ocasionadas durante eluso no queden muy evidenciadas, pero esta soluciónno facilita la limpieza de manchas persistentessobre la superficie. También pueden utilizarse máquinasde limpieza a vapor, pero está prohibido utilizartubos con agua corriente o hidrolimpiadoras.7.6 BATERÍASBaterías PB-ÁCIDORealice las operaciones de mantenimiento deacuerdo con las instrucciones del fabricante y con92
todas las indicaciones proporcionadas en el presentemanual.Dejar descubiertas (no completamente sumergidasen la solución ácida) las placas de los elementosocasiona una rápida oxidación y perjudica irremediablementela funcionalidad del elemento.El desbordamiento de la solución ácida puede corroerla máquina.Utilice cargadores de baterías aconsejados por elfabricante y, en cualquier caso, que sean adecuadosal tipo de batería que se ha de cargar.Recargue las baterías siempre en locales bien ventilados:¡existe el riesgo de explosión!El uso de baterías al Gel o sin mantenimiento estáfuertemente aconsejado.Baterías GELRealice las operaciones de mantenimiento deacuerdo con las instrucciones del fabricante y contodas las indicaciones que se proporcionan en estemanual.Utilice exclusivamente los cargadores de bateríasaconsejados por el fabricante.7.7 DISYUNTORES TÉRMICOSLa máquina está dotada de protecciones eléctricasde los principales órganos de funcionamiento paraevitar costosas averías.Donde previsto, están presentes disyuntores térmicospara proteger el motor de tracción, y para elmotor cepillos.Cuando uno de estos interruptores interviene automáticamente,para reactivar el funcionamientodeshabilitado es suficiente presionar hasta el fondoel interruptor que ha saltado.La intervención de los disyuntores térmicos, especialmenteen las primeras semanas de vida de lamáquina, podría no estar ocasionada por un malfuncionamiento de la máquina. De todos modos untécnico especializado debe comprobar que el dispositivofuncione correctamente, en caso de que eldisyuntor continúe interviniendo.7.8 PERIODICIDADPara todas las operaciones descritas en este párrafo,remítase a las instrucciones y a las advertenciasdetalladas en los correspondientes párrafos.7.8.1 OPERACIONES DIARIASDesmonte y controle los cepillos o los discos arrastradores(con los discos abrasivos montados).Compruebe que no haya elementos extraños queimpidan el movimiento o la eficacia de todos los órganosde limpieza.Compruebe la boquilla de secado: limpie los labiosy compruebe su desgaste.Si las baterías utilizadas son al Pb-Ácido, realiceatentamente las operaciones indicadas por el fabricantede las baterías.Recargue las baterías.7.8.2 OPERACIONES SEMANALESCompruebe y, si fuera necesario, sustituya o regule,la altura de los protectores contra salpicaduras.Compruebe atentamente el perfil de los labios de laboquilla de secado y cámbielas si fuera necesario.Compruebe que los tubos y los conductos de aspiraciónno estén obturados.Compruebe la planitud de trabajo de los cepillos(compruebe si se ha verificado un desgaste irregularde los cepillos o de los discos abrasivos). Si fueranecesario regule la inclinación de los cepillos sobreel suelo.Limpie a fondo el depósito de la solución limpiadoray el de recuperación.Para los modelos con batería al Pb-Ácido: compruebeel nivel del electrolito en todos los elementosy, si fuera necesario, reponga el nivel con aguadestilada. Remítase a las instrucciones detalladasdel fabricante de las baterías.Levante la tapa de las baterías y compruebe si haylíquido debajo de la esponja del filtro impermeable.Si fuera necesario, evacue el agua en el depósitode recuperación destornillando el tapón de cierresituado en el fondo del hueco del filtro.7.8.3 OPERACIONES A LARGOS INTERVALOSNo obstante la máquina esté fabricada con rigor ysea conforme con las más severas pruebas cualitativas,los componentes eléctricos y mecánicos inevitablementeestán sujetos a desgaste y alenvejecimiento tras largos periodos de utilización.Para trabajar en condiciones de seguridad y sin inconvenientes,sugerimos que un centro de asistenciatécnica autorizado (o un especialista del sectorque conozca todas las normas de seguridad contenidasen este manual), revise atentamente la máquinacada año.Intervenciones de este tipo pueden ser necesariascon más frecuencia en caso de que la máquina trabajeen situaciones especiales o difíciles, y/o si nose ha realizado un correcto mantenimiento de lamisma.7.9 RECAMBIOS ACONSEJADOSPara obtener el máximo rendimiento de su máquina,tenga siempre a disposición el material deconsumo más común y programe mantenimientosordinarios y extraordinarios. Para obtener la lista deestos recambios, remítase a su revendedor.8. CONTROL DE FUNCIONAMIENTO8.1 LA MÁQUINA NO FUNCIONA☹ La llave de contacto no está introducida o no seha girado correctamente.☺ Introducer y girar la llave en posición “1” o demaquina encedida.☹ El conector de la batería está desacoplado o mal93
conectado al cableado principal.☺ Conecte fuertemente los dos conectores.☹ La máquina se está recargando.☺Terminar la recarga.☹ Las baterías están agotadas.☺ Recargar las baterías.8.2 LA MÁQUINA NO AVANZA☹ La palanca de selección de la dirección está enposición neutra☺ Seleccionar una dirección de marcha☹ La inclinación del suelo es demasiado elevada☺ Empujar manualmente la máquina al nuevonivel..☹ Ha intervenido la protección térmica (general)del motor/ de los motores de tracción☺ Parar la máquina, dejarla reposar durante 5 minutos,cambiar los fusibles.☹ Las baterías están descargadas.☺ Recargar las baterías.8.3 EL CEPILLO NO GIRA☹ No se ha seleccionado el interruptor del motordel cepillo.☺ Presionar el interruptor para activar el cepillo.☹ Ha intervenido la protección térmica del motordel cepillo, el motor se ha sobrecalentado.☺ Comprobar el motivo (cuerdas o similares queimpiden el movimiento, superficies excesivamentedesconexas, etc.) y presionar el disyuntor de restablecimiento.☹ La correa de transmisión está rota.☺ Cambiar la correa.☹ El relé del motor o el motor del cepillo estáaveriado☺ Cambiar el relé o el motor.8.4 LA SOLUCIÓN LIMPIADORA NO BAJA OBAJA EN POCA CANTIDAD☹ El depósito de la solución está vacío.☺ Llenar el depósito de la solución, después dehaber vaciado el depósito de recuperación.☹ La palanca de regulación del flujo está cerrada ocasi cerrada.☺ Regular / aumentar el flujo de salida de la soluciónsegún se desee.☹ El conducto de suministro del detergente estáobstruido en algún punto☺ Liberar el conducto eliminando la suciedad.8.5 FALTA ASPIRACIÓN☹ El tubo de aspiración no está conectado a la boquillade secado.☺ Conectarlo correctamente☹ El tubo de aspiración o el conducto de la boquillade secado están obstruidos.☺ Liberar y limpiar los conductos.☹ El motor de aspiración está apagado.☺ Activarlo.☹ El depósito de recuperación está lleno.☺ Vaciarlo.☹ El motor de aspiración no recibe la alimentacióneléctrica o está quemado.☺ Comprobar las conexiones y, en el segundo caso,hay que cambiar el motor.8.6 POCA ASPIRACIÓN☹ La tapa del depósito de recuperación no estábien cerrada.☺ Cerrar fuertemente la tapa.☹ El tapón del tubo de vaciado del depósito derecuperación no está perfectamente cerrado.☺ Cerrarlo correctamente.☹ El tubo de aspiración, el conducto de la boquillade secado o el vano de inspección están obstruidos.☺ Liberar y limpiar los conductos.8.7 EL MOTOR DE LOS CEPILLOS O ELMOTOR DE ASPIRACIÓN NO SE DETIENEN☺ Parar la máquina interrumpiendo la alimentacióngeneral y desconectando el conector principal dela batería y llamar al servicio técnico.8.8 LA BOQUILLA DE SECADO NO LIMPIA ONO SECA BIEN☹ Los labios de la boquilla de secado están desgastadaso arrastran suciedad sólida.☺ Cambiarlas o limpiarlas.☹ La regulación de la boquilla de secado no es correcta,el avance debe ser perpendicular a la direcciónde marcha.☺ Regular la boquilla de secado.☹ El tubo de aspiración o el conducto de la boquillade secado están obstruidos.☺ Liberar y limpiar los conductos.8.9 EL CARGADOR DE BATERÍAS NO FUN-CIONA☹ No arranca la recarga de la batería .☺ Controlar que el cargador de baterías esté bienconectado a la batería. Consultar el manual delcargador de baterías.8.10 LAS BATERÍAS NO SE CARGAN O NOMANTIENEN LA CARGA☹ Al final del proceso de recarga, la batería no estácorrectamente cargada (véase el manual de instrucciones-mantenimientodel fabricante de la batería)☺ Comprobar el mensaje de error del cargador debaterías y controlar los datos indicados en el display(Véase el manual de instrucciones del cargador debaterías).☹ Las baterías son nuevas y no dan el 100% de lasprestaciones esperadas.☺ El acumulador alcanza las máximas prestacionestranscurridos unos 20-30 ciclos de recarga comple-94
tos.☹ El electrolito se ha evaporado y no cubre completamentelas placas.☺ Controlar el manual de uso y mantenimiento delfabricante de las baterías.☹ Hay notables diferencias de densidad entre losdiferentes elementos☺ Cambiar la batería dañada.Consulte siempre el manual de uso y mantenimientode las baterías y del cargador de baterías,si no consigue solucionar el problema, llame al serviciotécnico autorizado.El fabricante NO podrá ayudarle a solucionarlos problemas causados por usar baterías ycargadores de baterías no suministrados directamente.95
ItalianoQuale proprietario di un apparecchio elettricoo elettronico, la legge (conformemente alla direttivaUE 2002/96/CE del 27 gennaio 2003sui rifiuti di apparecchiature elettriche ed elettronichee alle legislazioni nazionali degli Statimembri UE che hanno messo in atto tale direttiva)Le vieta di smaltire questo prodotto oi suoi accessori elettrici/elettronici come rifiutodomestico non separato. È tenuto invece a faruso dei previsti punti di raccolta gratuiti.EnglishAs owner of an electrical or electronic product,you are not allowed by law (according toEU-Directive 2002/96/EC of 27 January 2003on waste electrical and electronic equipmentand the particular national laws of the EU-Member States transforming this Directive) todispose of this product or its electrical/electronicaccessories as unsorted domesticwaste. You shall use the designated gratispossibilities for return instead.FrançaisLa législation (directive européenne2002/96/CE du 27 janvier 2003 relative auxdéchets d'équipements électriques et électroniques(DEEE) et législations nationales desétats membres de l’UE reprenant celle-ci) interditau propriétaire d’un appareil électriqueou électronique de jeter celui-ci ou ses composantset accessoires électriques/électroniquesmélangés aux ordures ménagères.Veuillez remettre l’appareil usagé aux pointsde collecte gratuite indiqués.DeutschAls Besitzer eines elektrischen oder elektronischenGerätes ist es Ihnen gesetzlich untersagt(gemäß EU-Richtlinie 2002/96/EG vom27. Januar 2003 über Elektro- und Elektronik-Altgeräte sowie gemäß nationalen Ländergesetzgebungender EU-Mitgliedstaaten, indenen diese Richtlinie umgesetzt wird), diesesProdukt oder seine elektrischen/elektronischenZubehörteile unsortiert in denHaushaltsmüll zu geben. Bitte benutzen Siestattdessen die hierfür ausgewiesenen kostenlosenRückgabe-Stellen.EspañolComo propietario de un aparato eléctrico oelectrónico le está prohibido por ley (a tenorde la Directiva de la UE 2002/96/CE del 27 deenero de 2003 sobre residuos de aparatoseléctricos y electrónicos y la legislación nacionalde los estados miembros de la UE quehaya incorporado esta directiva) eliminar esteproducto o sus componentes eléctricos/electrónicoscomo residuos urbanos no seleccionados.Por favor, utilice en su lugar lospuntos de recogida que sin cargo alguno sehan establecido para este fin.PortugueseComo proprietário de um aparelho eléctrico ouelectrónico, a lei proíbe-lhe (segundo o DirectivaCEE 2002/96/CE de 27 de Janeiro de2003 relativa a equipamentos eléctricos eelectrónicos velhos, bem como segundo as legislaçõesnacionais aplicáveis nos Estadosmembrosda UE em que a referida directiva étransposta) deitar este produto ou os seuscomponentes eléctricos/electrónicos no lixodoméstico sem uma separação anterior. Porfavor, use os pontos de devolução gratuita indicadospara o efeito.PolishZgodnie z regulacją UE 2002/96/EG z dnia 27stycznia 2003 r. o utylizacji zużytego sprzętu
elektrycznego i elektronicznego oraz przepisamiprawnymi obowiązującymi w danympaństwie członkowskim Unii, usuwanie tegoproduktu i jego elektrycznych/elektronicznychakcesoriów wraz odpadami domowymi jestsurowo zabronione. Jako właściciel takiegosprzętu jest Pan/Pani odpowiedzialny/a zaprawidłową utylizację zużytych urządzeń, tzn.należy je zwrócić do odpowiednich bezpłatnychpunktów zbiorczych.HungarianAz elektromos vagy elektronikus készülékektulajdonosainak törvény (az elektromos éselektronikus berendezések hulladékairól szóló,2003. január 27-i 2002/96/EK európai uniósirányelv, valamint az ezt az irányelvet alkalmazóEU-tagállamok nemzeti törvényei) tiltjameg, hogy a szóban forgó termékeket vagyazoknak elektromos/elektronikus alkatrészeitosztályozatlanul a háztartási szemétbe juttassák.Kérjük, hogy ezeket a kijelölt díjmenteshulladékátvevő helyen adják le.SerbianKao vlasniku električnog ili elektronskog proizvoda,zakonom vam nije dozvoljeno (u skladusa EU direktivom 2002/96/EC od 27. januara2003., o otpadu električne i elektronskeopreme i posebnim nacionalnim zakonima zemaljačlanica EU koje su prihvatile tu direktivu)odlagati ovaj proizvod ili njegoveelektrične/elektronske dodatke kao neodeljenkućni otpad. Morate naprotiv da koristite predviđenebesplatne mogućnosti sakupljanja.RussianВам как владельцу электрического илиэлектронного прибора запрещено законом (всоответствии с директивой ЕС 2002/96/EG от 27января 2003 г. о старых электрических иэлектронных приборах, а также в соответствиис национальным законодательством странычленаЕС, в которое трансформируется этадиректива), выбрасывать в бытовой мусор безсортировки этот продукт или егоэлектрические/электронные компоненты.Пожалуйста, сдавайте эти приборы насоответствующие бесплатные пункты сбора.CzechJako majiteli elektrického nebo elektronickéhopřístroje vám zákon (podle směrnice Evropskéunie 2002/96/ES ze dne 27. ledna 2003 oodpadních elektrických a elektronických zařízenícha podle národních právních předpisůčlenských států EU, ve kterých je tato směrniceaplikována) zakazuje, abyste tentovýrobek nebo jeho elektrické resp. elektronickédíly likvidovali jako neroztříděný domácíodpad. Používejte místo toho laskavě k likvidacibezplatné sběrny, které jsou k tomuurčené.RomanianÎn calitate de posesor al unui aparat electricsau electronic vă este interzis prin lege (conformdirectivei EU 2002/96/EG din data de 27ianuarie 2003 privind aparatele electrice şielectronice uzate precum şi în conformitate culegislaţia naţională a statelor membre ale UEîn care directiva este valabilă), să aruncaţiacest produs sau componentele electrice/electroniceale acestuia odată cu deşeurile menajere.Vă rugăm să utilizaţi în schimb punctelegratuite de colectare special destinate acestoraparate.