Manuel d'utilisation - Di Blasi
Manuel d'utilisation - Di Blasi
Manuel d'utilisation - Di Blasi

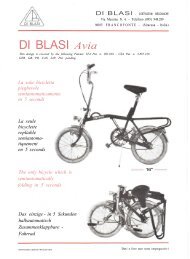
Create successful ePaper yourself
Turn your PDF publications into a flip-book with our unique Google optimized e-Paper software.
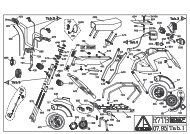
I F GBD4.6.2 Controllo manuale del motoreIl triciclo è equipaggiato con unamanopola girevole posta sul lato destrodel manubrio (Fig. E21).Per condurre il triciclo con l’aiuto delmotore è necessario:• Spostare su RUN il commutatoreposto sul manubrio (A - Fig.E21).• Per partire e regolare la velocità, agiresulla manopola (B fig. 21).Il commutatore (C - Fig. E21) puòstare in qualsiasi delle due posizioni(0 - I)Quando si vuole condurre il triciclosenza l’aiuto del motore, spostare ilcommutatore (A fig. E21) su OFF.4.7 Batteria e caricabatteria4.7.1 Descrizioni• Cassetta batterie (Fig. E30)°(A) Spina per la carica°(B) Tappo della spina della carica• Caricabatteria (fig. E31)°(F) Presa di connessione alla batteria°(G) Spina di collegamento alla retaelettrica°(H) Indicatore luminoso della fasedella carica4.7.2 Per caricare la batteria• Togliere il tappo (B-Fig. 30) dallaspina (A-fig.30) della batteria.• Collegare la spina del caricabatteria(G-fig. E31) alla presa della reteelettrica: l’indicatore luminoso (H)diventa verde.• Collegare la presa (F-fig. E31) delcaricabatteria alla spina (A-fig. E30)della batteria: l’indicatore luminosodel caricabatteria (H-fig. E31) diventarosso.• La carica della batteria è completataquando l’indicatore luminoso (Hfig.E31)diventa di nuovo verde.• Tempo di carica: 3,5 h circa4.6.2 Contrôle manuel du moteurLe tricycle est équipé avec poignéetournante placée sur le coté droit duguidon (Fig. E21).Pour conduire le tricycle avec l’aide dumoteur il faut:• Basculer sur RUN le commutateurplacé sur le guidon (A - Fig. E21).• Pour partir et régler la vitesse, tournerla poignée (B fig. E21).Le commutateur (C - Fig. E21) peutrester dans une quelconque de deuxpositions (0 - I)Quand on veut conduire le tricycle sansl’aide du moteur, basculer lecommutateur (A fig. E21) sur OFF.4.7 Batterie et Chargeur4.7.1 Descriptions• Boite batteries (fig. E30)°(A)Fiche de prise pour la charge°(B)Bouchon de protection de la prise• Chargeur (fig. E31)°(F)Prise de connexion à la batterie°(G)Fiche de prise de courant duréseau°(H)Voyant de la phase de charge4.7.2 Pour charger la batterie• Enlever le bouchon (B-fig.30) de lafiche (A.Fig.30) de la batterie.• Branchez la fiche du chargeur (G-fig.E31) à la prise de courant du réseau:le voyant (H) devient vert• Branchez la prise (F-fig.E31) duchargeur à la fiche(A-fig.E30) de labatterie: le voyant du chargeur (Hfig.E31) devient rouge.• La charge de la batterie est complètequand le voyant (H-fig-E31) devientà nouveau vert.• Temps de charge: 3,5 h environs4.6.2 Control of the motor by twistgripThe tricycle is equipped with a twistgrip placed on the right hand side ofthe handlebar.To ride the tricycle with the help of themotor it is necessary:• To put on RUN the switch placed onthe handlebar (A fig. E21)• To start and ride the tricycle at thedesired speed, just turn the twist grip(B fig. E21)The switch (C fig. E21) can be placedin any of its two position (0 - I).When the help of the motor is notrequired, just put on OFF the switch (Afig. 20).4.7 Battery & Charger4.7.1 Descriptions• Battery box (fig. E30)°(A) Charging plug°(B) Protection cap of the plug• Charger (fig. E31)°(F) Socket for connection to thebattery°(G) Plug to the mains power supply°(H) Lighted indicator showing thecharging status4.7.2 Charging of the battery• Remove the plug (B-fig.30) from theplug (A-fig.30) of the battery.• Connect the charger plug (G-fig.E31)to a mains power socket: the indicator(H-fig.E31) lights up green.• Connect the charger socket (F-fig.E31) to the plug (A-fig.E30) of thebattery: the indicator (H-fig.31) ligthsup red.• The battery is charged when theindicator (H-fig.E31) lights up greenagain.• Charging time: 3,5 h approx4.6.2 Bedienung des Motors vonHandDas Dreirad ist mit einem Drehknopfrechts am Lenker (Abb. E21)ausgerüstet.Für den Motorbetrieb des Dreirads istfolgendes erforderlich:• Des Schalter am Lenker in RUNStellung bringen (A . Abb. E21).• Zum Anfahren und zum Verstellender Geschwindigkeit den Drehknopf(B Abb. 21) verwenden.Der Schalter (C-Abb. E21) kann sichbeliebig in einer der beiden Stellungen(0 - 1) befinden.Wenn das Dreirad ohne Einsatz desMotors gefahren werden soll, denSchalter (A Abb.E21) in OFF Stellungbringen.4.7 Batterie und Batterieladegerät4.7.1 Beschreibungen• Batteriekasten (Abb. E30)°(A) Ladestecker°(B) Deckel für den Ladestecker• Batterieladegerät (Abb. E31)°(F) Steckdose für den Anschluss andie Batterie°(G) Stecker zum Anschluss an dasStromnetz°(H) Leuchtanzeige während desLadevorgangs4.7.2 Aufladen der Batterie• Deckel (B-Abb.30) von der Steckdose(A-Abb.30) der Batterie abnehmen• Den Stecker des Batterieladegeräts(G-Abb. E31) aus der Steckdose desStromnetzes ziehen: dieLeuchtanzeige (H) wird grün.• <strong>Di</strong>e Steckdose (F-Abb. E31) desBatterieladegeräts (A-Abb. E30) anden Batteriestecker anschließen: dieLeuchtanzeige des Batterieladegeräts(H-E31) wird rot.• <strong>Di</strong>e Batterie ist voll aufgeladen wenndie Leuchtanzeige (H-Abb. F31)wieder grün wird.• Ladezeit: etwa 3,5 Stunden