Manuel d'utilisation - Di Blasi
Manuel d'utilisation - Di Blasi
Manuel d'utilisation - Di Blasi

You also want an ePaper? Increase the reach of your titles
YUMPU automatically turns print PDFs into web optimized ePapers that Google loves.
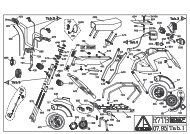
I F GBD5. REGOLAZIONI5.1 Gancio manubrioIl piantone del manubrio è bloccato inposizione verticale da un gancio postosulla testa della forcella.Prima di usare il triciclo:• Verificare che il piantone del manubrioaderisca completamente e senzagioco alla parte interna del gancio,come mostrato in fig. 13.• Verificare che la molla che tira ilgancio agisca efficacemente.Non condurre il triciclo se il ganciomanubrio si trova in una delleposizioni errate mostrate in fig. 14e 15 oppure se la molla tira poco omale il gancio stesso.Se il gancio assume la posizione errataillustrata in fig.14 (cioè se il gancio nonaderisce completamente al piantone)o in fig. 15 (cioè se il gancio ha delgioco rispetto al piantone), ripristinarela posizione corretta mostrara in fig. 13nel seguente modo:• Allentare la vite (A - fig. 16)• Far girare l’anello eccentrico (B - fig.16) in un senso o in un altro per unafrazione di giro finchè il gancio si ponecome mostrato in fig. 13• Serrare la vite (A - fig. 16).• Aprire e chiudere il manubrio percontrollare se la posizione del gancioè corretta.Se la molla tira poco o male il ganciostesso, provvedere alla suasostituzione.5.3 Regolazioni sella5.3.1 Regolazioni dell’altezza dellasellaL’altezza della sella è regolabile:• In 3 posizioni nella versione Standard• In 2 posizioni nella versione Junior• Nella versione Cadet, l’altezza dellasella non è regolabileLa regolazione deve essere effettuataa triciclo aperto e su entrambi i cannottisella (fig. 17/1);• Svitare i dadi (A) ed estrarre le viti(B);• Regolare l’altezza della sella in modoche i fori dei cannotti superioricorrispondano con quelli dei cannottiinferiori e che il sellino sia orizzontale;• Introdurre le viti nei fori, avvitare idadi.5. REGLAGES5.1 Crochet du guidonLa potence du guidon est bloquée enposition verticale par crochet qui laretient contre la fourche.Avant de partir:• Vérifiez que la potence du guidons’est bien engagée au contactcomplet de la courbe intérieure ducrochet,comme montré en fig. 13.• Vérifiez que le ressort pousseefficacement le crochet contre lapotence du guidon.Ne conduisez jamais le tricycle, sile crochet du guidon est dans undes position déréglées montrées enfig. 14 et 15 ou si le ressort poussefaiblement le crochet.Si le crochet est dans la positiondéréglée montrée en fig. 14(c.à.d. lecrochet n’est pas complètementengagé à la potence du guidon) ou enfig. 15 (c.à.d. il y a du jeu entre lecrochet et la potence), rétablissez laposition correcte montrée en fig. 13comme suit:• Desserez la vis (A - fig. 16)• Faites tourner sur elle même larondelle excentrée (B -fig. 16), dansun sens ou dans l’autre, pour unefraction de tour jusqu’à ce que lacrochet de blocage se place commemontré en fig. 13• Bloquez à nouveau la vis (A fig.16)• Contrôlez à nouveau si la position ducrochet de blocage est correcte enrepliant et ouvrant à nouveau leguidon.Si le ressort pousse faiblement lecrochet du guidon, remplacez le.5.3 Réglages de la selle5.3.1 Réglages de la hauteur de laselleLa hauteur de la selle est réglable:• En 3 niveaux dans la versionStandard• En 2 niveaux dans la verision Junior• Dans la version Cadet, l’hateur de laselle n’est pas règlableLe réglage se fait quand le tricycle esten position ouverte et sur les deuxcolonnes de selle (fig. 17/1);• Devissez les écrous (A) et enlevezles vis (B);• Réglez la selle au niveau préféré defaçon que les trous des colonnessupérieures corrispondent à ceux descolonnes inférieures et que la sellesoint en position horizontale;• Montez à nouveau les vis de blocageet serrez leurs écrous.5. ADJUSTMENTS5.1 Handlebar hook adjustmentThe handlebar stem is blocked in thevertical, riding position by the hooklocated on the top of the front fork.Before riding:• Check that the hook is properlypositioned: it should adherecompletely and without slack to thehandlebar stem, as shown in fig. 13;• Check that the spring pulls powerfullythe hook.Never ride the tricycle is handlebarhook is in one of the wrong positionsshown in fig. 14 and 15 or if thespring pulls weakly the hook.If the hook is in the wrong positionshown in fig. 14 (i.e. the hook does notadhere completely to the stem) or infig. 15 (i.e there is a play between thehook and the stem), readjust the hookto the right position shown in fig.13 asfollows:• Loosen the screw (A fig. 16)• Turn the eccentric ring (B fig. 16) fora fraction of turn, until the position ofthe hook is that shown in fig. 13;• Tighten the screw (A- fig. 16)• Check again for the proper positionof the hook by folding and openingthe handlebar.If the spring pulls weakly the hook,replace it.5.3 Seat height adjustments5.3.1 Seat height adjustmentThe seat height adjustable:• In 3 positions in the Standard version• In 2 positions in the Junior version• In the Cadet version, the height of theseat is not adjustableThe adjustment must be carried outwhen the tricycle is in its open positionand on both the seat posts (fig. 17/1);• Unscrew the nuts (A) and removescrews (B).• Adjust the seat at the desired heightso that the holes of the upper postscorrespond with the holes of the lowerposts and so that the seat ishorizontal.• Fit again the screws in the holes,tighten the nuts.5. EINSTELLUNGEN5.1 Lenkstangenhaken<strong>Di</strong>e Steuersäule der Lenkstange wirddurch einen Haken oben an der Gabelin senkrechter Stellung gesperrt.Vor Benutzung des Dreirads:• Prüfen, ob die Steuersäule derLenkstange wie in Abb. 13 dargestelltvollkommen und spielfrei an derInnenseite des Hakens anliegt.• Prüfen, dass die Zugfeder desHakens wirksam eingreift.Das Dreirad nicht lenken, wenn derLenkstangenhaken sich in einer derin Abb. 14 und 15 dargestelltenFehlstellungen befindet oder wenndie Feder den Haken nur leicht oderschlecht zieht.Wenn der Haken die in Abb. 14 (das heit, wenn der Haken nicht vollkommen ander Lenkstange anliegt) oder die in Abb.15 gezeigten Fehlstellungen einnimmt(das hei t, wenn der Haken zurLenkstange Spiel aufweist), die in Abb.13 dargestellte richtige Stellung wie folgtwieder herstellen:• <strong>Di</strong>e Schraube lockern (A - Abb. 16).• Den Exzenterring (B - Abb. 16) umden Bruchteil einer Drehung so langeleicht in die eine oder die andereRichtung drehen bis der Haken diein Abb. 13 gezeigte Stellungeinnimmt.• <strong>Di</strong>e Schraube (A - Abb. 16) anziehen.• <strong>Di</strong>e Lenkstange zur Prüfung derrichtigen Hakenstellung öffnen undschliessen.<strong>Di</strong>e Feder austauschen wenn dieseden Haken nicht stark genun oderschlecht zieht.5.3 Verstellung des Sattels5.3.1 Verstellung der Sattelhöhe<strong>Di</strong>e Sattelhöhe kann wie folgt eingestelltwerden:• In 3 Stellungen in derStandardausführung• In 2 Stellungen in derJuniorausführung• In Cadet Ausführung ist die Sattelhöhenicht verstellbar<strong>Di</strong>e Einstellung beioffenem Dreirad und an beidenSattelrohren vornehmen (Abb. 17/1);• <strong>Di</strong>e Muttern (A) lockern und dieSchrauben (B) abziehen;• <strong>Di</strong>e Sattelhöhe so einstellen, dass dieÖffnungen der obener Sattelrohre mitden Öffnungen der unteren Sattelrohreübereinstimmen und sich der Sattel inwaagrechter Stellung befindet.• <strong>Di</strong>e Schrauben in Öffnungen einsetzen,die Muttern festziehen.