

Samsung DIGIMAX S800 (EC-S800ZBBA/E1 ) - Manuel de l'utilisateur 8.43 MB, pdf, Anglais
Samsung DIGIMAX S800 (EC-S800ZBBA/E1 ) - Manuel de l'utilisateur 8.43 MB, pdf, Anglais
Samsung DIGIMAX S800 (EC-S800ZBBA/E1 ) - Manuel de l'utilisateur 8.43 MB, pdf, Anglais

You also want an ePaper? Increase the reach of your titles
YUMPU automatically turns print PDFs into web optimized ePapers that Google loves.
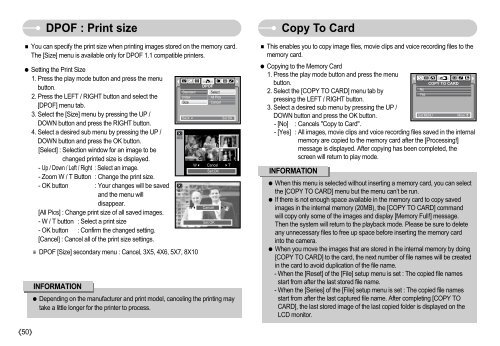
DPOF : Print size<br />
You can specify the print size when printing images stored on the memory card.<br />
The [Size] menu is available only for DPOF 1.1 compatible printers.<br />
Setting the Print Size<br />
1. Press the play mo<strong>de</strong> button and press the menu<br />
button.<br />
2. Press the LEFT / RIGHT button and select the<br />
[DPOF] menu tab.<br />
3. Select the [Size] menu by pressing the UP /<br />
DOWN button and press the RIGHT button.<br />
4. Select a <strong>de</strong>sired sub menu by pressing the UP /<br />
DOWN button and press the OK button.<br />
[Select] : Selection window for an image to be<br />
changed printed size is displayed.<br />
- Up / Down / Left / Right : Select an image.<br />
- Zoom W / T Button : Change the print size.<br />
- OK button : Your changes will be saved<br />
and the menu will<br />
disappear.<br />
[All Pics] : Change print size of all saved images.<br />
- W / T button : Select a print size<br />
- OK button : Confirm the changed setting.<br />
[Cancel] : Cancel all of the print size settings.<br />
Standard<br />
In<strong>de</strong>x<br />
Size<br />
Back:<br />
DPOF [Size] secondary menu : Cancel, 3X5, 4X6, 5X7, 8X10<br />
Set:OK<br />
INFORMATION<br />
Depending on the manufacturer and print mo<strong>de</strong>l, canceling the printing may<br />
take a little longer for the printer to process.<br />
W<br />
W<br />
DPOF<br />
Select<br />
All Pics<br />
Cancel<br />
Set:OK<br />
Cancel T<br />
Cancel T<br />
Set:OK<br />
Copy To Card<br />
This enables you to copy image files, movie clips and voice recording files to the<br />
memory card.<br />
Copying to the Memory Card<br />
1. Press the play mo<strong>de</strong> button and press the menu<br />
button.<br />
COPY TO CARD<br />
No<br />
2. Select the [COPY TO CARD] menu tab by<br />
Yes<br />
pressing the LEFT / RIGHT button.<br />
3. Select a <strong>de</strong>sired sub menu by pressing the UP /<br />
DOWN button and press the OK button.<br />
Exit:MENU<br />
Move: <br />
- [No] : Cancels "Copy to Card".<br />
- [Yes] : All images, movie clips and voice recording files saved in the internal<br />
memory are copied to the memory card after the [Processing!]<br />
message is displayed. After copying has been completed, the<br />
screen will return to play mo<strong>de</strong>.<br />
INFORMATION<br />
When this menu is selected without inserting a memory card, you can select<br />
the [COPY TO CARD] menu but the menu can’t be run.<br />
If there is not enough space available in the memory card to copy saved<br />
images in the internal memory (20<strong>MB</strong>), the [COPY TO CARD] command<br />
will copy only some of the images and display [Memory Full!] message.<br />
Then the system will return to the playback mo<strong>de</strong>. Please be sure to <strong>de</strong>lete<br />
any unnecessary files to free up space before inserting the memory card<br />
into the camera.<br />
When you move the images that are stored in the internal memory by doing<br />
[COPY TO CARD] to the card, the next number of file names will be created<br />
in the card to avoid duplication of the file name.<br />
- When the [Reset] of the [File] setup menu is set : The copied file names<br />
start from after the last stored file name.<br />
- When the [Series] of the [File] setup menu is set : The copied file names<br />
start from after the last captured file name. After completing [COPY TO<br />
CARD], the last stored image of the last copied fol<strong>de</strong>r is displayed on the<br />
LCD monitor.<br />
50


