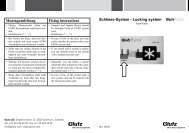
Bohrlehre Eypos - Glutz
Bohrlehre Eypos - Glutz
Bohrlehre Eypos - Glutz

Create successful ePaper yourself
Turn your PDF publications into a flip-book with our unique Google optimized e-Paper software.
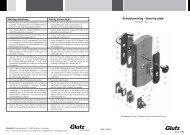
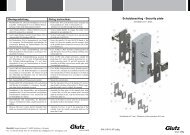
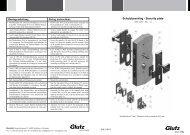
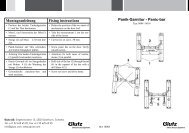
Montageanleitung Fixing instructions<br />
• Alten Beschlag und Zylinder demontieren.<br />
• Remove old hardware and cylinder.<br />
• Positionsstift (4) je nach Vierkant von Schlossnuss • Screw the positioning pin (4) in the fixing template<br />
(8, 8.5, 9 mm) in <strong>Bohrlehre</strong> (3) schrauben.<br />
(3) according to the lock follower (8, 8.5, 9 mm).<br />
• Positionsstift (5) D 10 mm in <strong>Bohrlehre</strong> (3) schrau- • Screw the positioning pin (5) D 10 mm in the fixing<br />
ben. Oberes Gewinde (6) für Entfernung 72-78. Un- template (3). Upper thread (6) for centres 72-78. Loteres<br />
Gewinde (7) für Entfernung 88-94.<br />
wer thread (7) for centres 88-94.<br />
• <strong>Bohrlehre</strong> (3) mit Positionsstift (4) in Schlossnuss<br />
stecken.<br />
• Introduce the fixing template (3) in the lock follower.<br />
• Die 3 Bohrungen (9) mit Bohrer (8) Ø 13 mm 3 bis • Pre-drill 3 holes (9) with Ø 13 mm with drill (8) to a<br />
5 mm anbohren.<br />
depth of 3 to 5 mm.<br />
• ® Für <strong>Eypos</strong> auch Bohrung (10) anbohren. •<br />
® For <strong>Eypos</strong> also drill hole (10).<br />
• Achtung: Nicht bis auf Schlosskasten bohren! • Caution: Do not drill into lock case!<br />
• <strong>Bohrlehre</strong> (3) entfernen und auf anderer Seite der • Take off the fixing template (3) and introduce it in the<br />
Türe in Schlossnuss stecken.<br />
lock follower on the other side.<br />
• Die 3 oder 4 Bohrungen (9/10) Ø 13 mm auch auf • Pre-drill 3/4 holes (9/10) with Ø 13 mm to a depth of<br />
dieser Seite 3 bis 5 mm anbohren.<br />
3 to 5 mm also from this side.<br />
• <strong>Bohrlehre</strong> (3) entfernen und Schloss (2) demontie- • Take off the fixing template (3) and remove the lock<br />
ren!<br />
case!<br />
• Alle Bohrungen durchbohren.<br />
• Drill through all holes.<br />
Achtung: Das Schloss muss dabei ausgebaut sein! Caution: Lock must be removed during this task!<br />
• Schloss (2) und Zylinder einbauen, Beschlag gemäss • Assemble lock (2), cylinder and hardware according<br />
Montageanleitung montieren.<br />
to the fixing instructions.<br />
<strong>Glutz</strong> AG, Segetzstrasse 13, 4502 Solothurn, Schweiz<br />
Tel. +41 32 625 65 20, Fax +41 32 625 65 35, info@glutz.com, www.glutz.com<br />
MA-10024<br />
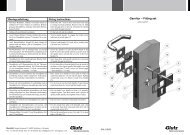
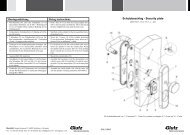
<strong>Bohrlehre</strong> – Site fixing template<br />
Schutzbeschläge <strong>Eypos</strong> ® / Security plates <strong>Eypos</strong> ®
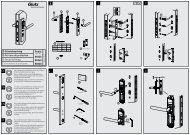
Mode d’emploi Istruzioni di montaggio<br />
• Démonter les anciennes garnitures et le cylindre. • Smontare la vecchia ferramenta e il cilindro.<br />
• Visser la tige de position (4) dans le gabarit de perça- • Avvitare il perno di posizionamento (4) nella dima<br />
ge (3) selon fouillot de la serrure (8, 8.5, 9 mm). di foratura (3) in base al quadro della noce (8, 8.5, 9<br />
mm).<br />
• Visser la tige de position (5) D 10 mm dans le gabarit • Avvitare il perno di posizionamento (5) D 10 mm<br />
(3). Filetage supérieur (6) pour distances 72-78. Fi- nella dima di foratura (3). Filetto superiore (6) per<br />
letage inférieur (7) pour distances 88-94<br />
distanze 72-78. Filetto inferiore (7) per distanze 88-94.<br />
• Introduire le gabarit de perçage (3) dans le fouillot • Inserire la dima di foratura (3) con il perno di posizi-<br />
de la serrure.<br />
onamento (4) nella noce.<br />
• Percer 3 trous (9) Ø 13 mm de 3 à 5 mm à l’aide du • Perforare i 3 fori (9) con il trapano (8) Ø 13 da mm 3<br />
forêt (8).<br />
a 5 mm.<br />
• ® Pour <strong>Eypos</strong> également faire le percement (10). ® • Per <strong>Eypos</strong> eseguire anche il foro (10).<br />
• Attention: ne pas percer jusqu’au boîtier de la serrure!<br />
• Attenzione: non perforare la scatola!<br />
• Enlever le gabarit de perçage (3) et l’introduire dans • Togliere la dima di foratura (3) e inserirla nella noce<br />
le fouillot de l’autre coté de la serrure.<br />
sull‘altro lato.<br />
• Les 3 ou 4 trous (9/10) Ø 13 mm sont également à • Praticare i 3 o 4 fori (9/10) Ø 13 da 3 a 5 mm anche<br />
percer de ce côté.<br />
su questo lato.<br />
• Enlever le gabarit (3) et démonter la serrure! • Togliere la dima di foratura (3) e smontare la serratura<br />
(2)!<br />
• Achever les perçages.<br />
• Praticare tutti i fori.<br />
Attention: veiller à ce que la serrure soit démontée<br />
auparavant!<br />
Attenzione: la serratura deve essere smontata!<br />
• Assembler serrure (2) et cylindre ainsi que ferrements • Montare la serratura (2) e il cilindro, montare la ferra-<br />
selon instruction de montage.<br />
menta seguendo le istruzioni.<br />
<strong>Glutz</strong> AG, Segetzstrasse 13, 4502 Solothurn, Schweiz<br />
Tel. +41 32 625 65 20, Fax +41 32 625 65 35, info@glutz.com, www.glutz.com<br />
MA-10024<br />
Aide du gabarit de perçage - Dima di foratura<br />
Entrée de sécurité <strong>Eypos</strong> ® / Ferramenta di sicurezza <strong>Eypos</strong> ®