

Pexal Pipe - Heating Solutions Ireland
Pexal Pipe - Heating Solutions Ireland
Pexal Pipe - Heating Solutions Ireland

Create successful ePaper yourself
Turn your PDF publications into a flip-book with our unique Google optimized e-Paper software.
POSA IN OPERA Laying<br />
Giunzioni con raccordi a stringere Junctions with compression fittings<br />
Il principio su cui si basa questo sistema è semplice: chiudere un anello tagliato con un dado conico. L’anello comprime<br />
così il tubo sul raccordo e ne realizza sia la tenuta meccanica che idraulica. Una volta tagliato il tubo alla misura desiderata,<br />
si procede alla calibratura ed alla sbavatura con l’apposito utensile: il calibro deve essere inserito nella tubazione<br />
e quindi ruotato alternativamente in senso orario ed antiorario. Si procede infine a calzare sul tubo tutti i componenti del<br />
raccordo: 1. dado stringitubo; 2. anello elastico tagliato; 3. corpo del raccordo.<br />
IMPORTANTE: Il tubo deve arrivare a battuta contro l’anello dielettrico in Ptfe (Teflon). Si procede quindi a stringere il<br />
dado sull’adattatore. Tutta la procedura è illustrata nelle foto qui di fianco. Questo tipo di giunzione è, in genere, quello<br />
più comunemente utilizzato ogni qual volta la giunzione debba essere ispezionabile e quando ci si debba collegare ad un<br />
componente dell’impianto che potrebbe essere oggetto di manutenzione o sostituzione; ad esempio, le valvole e i detentori<br />
posti sui corpi scaldanti, le derivazioni da un collettore, ecc.<br />
The principle, which this system is based on, is easy: close a cut ring with a cone-shaped nut. The ring compresses the pipe<br />
on the fitting and makes it mechanically tight and watertight. When the pipe has been cut at the desired size, it is gauged and<br />
trimmed with the suitable tool: the gauge should be inserted in the pipeline and then alternatively clockwise and anticlockwise<br />
rotated. Then all the fitting components are fit in the pipe: 1. pipe-screwing nut; 2. cut spring ring; 3. fitting body.<br />
IMPORTANT: The pipe should reach the stop against the dielectric ring in Ptfe (Teflon) Then the nut is tightened on the<br />
adapter. The whole procedure is shown in the pictures on the side This kind of junction is usually the most commonly used<br />
whenever the junction should be available for inspection and when it should be connected with a system component subject<br />
to maintenance or replacement: for example, the valves and holders put on the heating bodies, the manifold shunts, etc.<br />
Fig. 1<br />
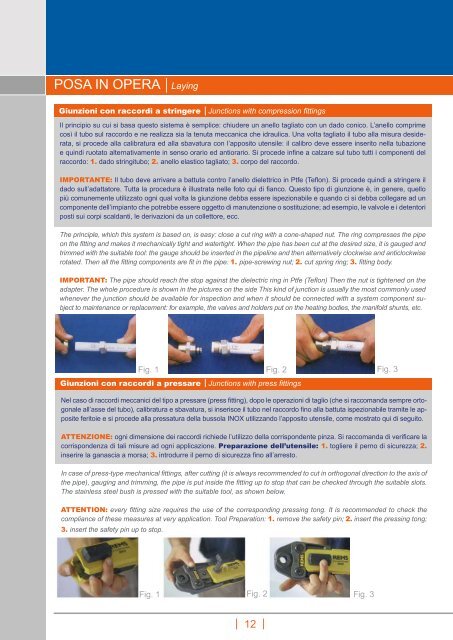
Giunzioni con raccordi a pressare Junctions with press fittings<br />
Nel caso di raccordi meccanici del tipo a pressare (press fitting), dopo le operazioni di taglio (che si raccomanda sempre ortogonale<br />
all’asse del tubo), calibratura e sbavatura, si inserisce il tubo nel raccordo fino alla battuta ispezionabile tramite le apposite<br />
feritoie e si procede alla pressatura della bussola INOX utilizzando l’apposito utensile, come mostrato qui di seguito.<br />
ATTENZIONE: ogni dimensione dei raccordi richiede l’utilizzo della corrispondente pinza. Si raccomanda di verificare la<br />
corrispondenza di tali misure ad ogni applicazione. Preparazione dell’utensile: 1. togliere il perno di sicurezza; 2.<br />
inserire la ganascia a morsa; 3. introdurre il perno di sicurezza fino all’arresto.<br />
In case of press-type mechanical fittings, after cutting (it is always recommended to cut in orthogonal direction to the axis of<br />
the pipe), gauging and trimming, the pipe is put inside the fitting up to stop that can be checked through the suitable slots.<br />
The stainless steel bush is pressed with the suitable tool, as shown below.<br />
ATTENTION: every fitting size requires the use of the corresponding pressing tong. It is recommended to check the<br />
compliance of these measures at very application. Tool Preparation: 1. remove the safety pin; 2. insert the pressing tong;<br />
3. insert the safety pin up to stop.<br />
Fig. 2 Fig. 3<br />
Fig. 1 Fig. 2 Fig. 3<br />
12