TS 100 R Manuel d'utilisation et d'entretien Operator's ... - Husqvarna
TS 100 R Manuel d'utilisation et d'entretien Operator's ... - Husqvarna
TS 100 R Manuel d'utilisation et d'entretien Operator's ... - Husqvarna

Create successful ePaper yourself
Turn your PDF publications into a flip-book with our unique Google optimized e-Paper software.
English<br />
26<br />
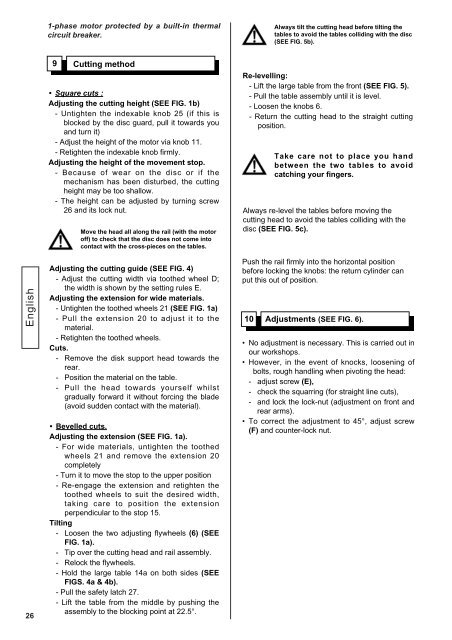
1-phase motor protected by a built-in thermal<br />
circuit breaker.<br />
9 Cutting m<strong>et</strong>hod<br />
• Square cuts :<br />
Adjusting the cutting height (SEE FIG. 1b)<br />
- Untighten the indexable knob 25 (if this is<br />
blocked by the disc guard, pull it towards you<br />
and turn it)<br />
- Adjust the height of the motor via knob 11.<br />
- R<strong>et</strong>ighten the indexable knob firmly.<br />
Adjusting the height of the movement stop.<br />
- Because of wear on the disc or if the<br />
mechanism has been disturbed, the cutting<br />
height may be too shallow.<br />
- The height can be adjusted by turning screw<br />
26 and its lock nut.<br />
Move the head all along the rail (with the motor<br />
off) to check that the disc does not come into<br />
contact with the cross-pieces on the tables.<br />
Adjusting the cutting guide (SEE FIG. 4)<br />
- Adjust the cutting width via toothed wheel D;<br />
the width is shown by the s<strong>et</strong>ting rules E.<br />
Adjusting the extension for wide materials.<br />
- Untighten the toothed wheels 21 (SEE FIG. 1a)<br />
- Pull the extension 20 to adjust it to the<br />
material.<br />
- R<strong>et</strong>ighten the toothed wheels.<br />
Cuts.<br />
- Remove the disk support head towards the<br />
rear.<br />
- Position the material on the table.<br />
- Pull the head towards yourself whilst<br />
gradually forward it without forcing the blade<br />
(avoid sudden contact with the material).<br />
• Bevelled cuts.<br />
Adjusting the extension (SEE FIG. 1a).<br />
- For wide materials, untighten the toothed<br />
wheels 21 and remove the extension 20<br />
compl<strong>et</strong>ely<br />
- Turn it to move the stop to the upper position<br />
- Re-engage the extension and r<strong>et</strong>ighten the<br />
toothed wheels to suit the desired width,<br />
taking care to position the extension<br />
perpendicular to the stop 15.<br />
Tilting<br />
- Loosen the two adjusting flywheels (6) (SEE<br />
FIG. 1a).<br />
- Tip over the cutting head and rail assembly.<br />
- Relock the flywheels.<br />
- Hold the large table 14a on both sides (SEE<br />
FIGS. 4a & 4b).<br />
- Pull the saf<strong>et</strong>y latch 27.<br />
- Lift the table from the middle by pushing the<br />
assembly to the blocking point at 22.5°.<br />
Always tilt the cutting head before tilting the<br />
tables to avoid the tables colliding with the disc<br />
(SEE FIG. 5b).<br />
Re-levelling:<br />
- Lift the large table from the front (SEE FIG. 5).<br />
- Pull the table assembly until it is level.<br />
- Loosen the knobs 6.<br />
- R<strong>et</strong>urn the cutting head to the straight cutting<br />
position.<br />
Take care not to place you hand<br />
b<strong>et</strong>ween the two tables to avoid<br />
catching your fingers.<br />
Always re-level the tables before moving the<br />
cutting head to avoid the tables colliding with the<br />
disc (SEE FIG. 5c).<br />
Push the rail firmly into the horizontal position<br />
before locking the knobs: the r<strong>et</strong>urn cylinder can<br />
put this out of position.<br />
10 Adjustments (SEE FIG. 6).<br />
• No adjustment is necessary. This is carried out in<br />
our workshops.<br />
• However, in the event of knocks, loosening of<br />
bolts, rough handling when pivoting the head:<br />
- adjust screw (E),<br />
- check the squarring (for straight line cuts),<br />
- and lock the lock-nut (adjustment on front and<br />
rear arms).<br />
• To correct the adjustment to 45°, adjust screw<br />
(F) and counter-lock nut.