everStick®Perio everStick®Perio - GC Europe
everStick®Perio everStick®Perio - GC Europe
everStick®Perio everStick®Perio - GC Europe

Create successful ePaper yourself
Turn your PDF publications into a flip-book with our unique Google optimized e-Paper software.
0.5 mm) of composite including the<br />
approximal spaces. Leave enough space<br />
for cleaning the approximal spaces. Do not<br />
cure the composite during this phase.<br />
6. Position and light-cure the fibre<br />
Remove the white protective paper and use<br />
tweezers to pick the fibre up from the<br />
silicone groove. Remove any residual<br />
silicone from the fibre bundle. Position the<br />
fibre bundle on top of the uncured flowable<br />
composite. Aim to place the fibre as<br />
incisally as possible in the anterior area.<br />
Make sure that it will not be in occlusion.<br />
Position one end of the fibre bundle first by<br />
pressing it down with the StickSTEPPER<br />
instrument (sterilize the instrument before<br />
use). Pre-cure the fibre in place, one tooth<br />
at a time, for about five seconds, using a<br />
curing light. The wide-tipped StickSTEP-<br />
PER instrument shields the rest of the fibre<br />
from light. As the fibre is made of lightconducting<br />
material, it is recommended to<br />
direct the light-curer away from the<br />
uncured fibre bundle. Press the fibre into<br />
the approximal spaces as well. Make sure<br />
that the embrasures are not blocked with<br />
fibre and composite.<br />
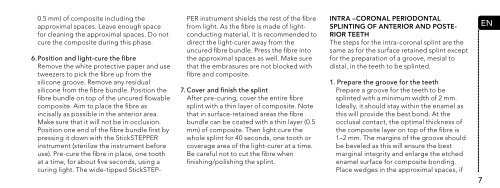
7. Cover and finish the splint<br />
After pre-curing, cover the entire fibre<br />
splint with a thin layer of composite. Note<br />
that in surface-retained areas the fibre<br />
bundle can be coated with a thin layer (0.5<br />
mm) of composite. Then light cure the<br />
whole splint for 40 seconds, one tooth or<br />
coverage area of the light-curer at a time.<br />
Be careful not to cut the fibre when<br />
finishing/polishing the splint.<br />
INTRA –CORONAL PERIODONTAL<br />
SPLINTING OF ANTERIOR AND POSTE-<br />
RIOR TEETH<br />
The steps for the intra-coronal splint are the<br />
same as for the surface retained splint except<br />
for the preparation of a groove, mesial to<br />
distal, in the teeth to be splinted.<br />
1. Prepare the groove for the teeth<br />
Prepare a groove for the teeth to be<br />
splinted with a minimum width of 2 mm.<br />
Ideally, it should stay within the enamel as<br />
this will provide the best bond. At the<br />
occlusal contact, the optimal thickness of<br />
the composite layer on top of the fibre is<br />
1–2 mm. The margins of the groove should<br />
be beveled as this will ensure the best<br />
marginal integrity and enlarge the etched<br />
enamel surface for composite bonding.<br />
Place wedges in the approximal spaces, if<br />
en<br />
7