everStick®Perio everStick®Perio - GC Europe
everStick®Perio everStick®Perio - GC Europe
everStick®Perio everStick®Perio - GC Europe

Create successful ePaper yourself
Turn your PDF publications into a flip-book with our unique Google optimized e-Paper software.
en<br />
8<br />
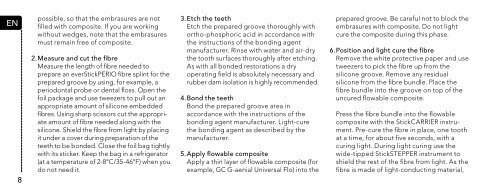
possible, so that the embrasures are not<br />
filled with composite. If you are working<br />
without wedges, note that the embrasures<br />
must remain free of composite.<br />
2. Measure and cut the fibre<br />
Measure the length of fibre needed to<br />
prepare an everStickPERIO fibre splint for the<br />
prepared groove by using, for example, a<br />
periodontal probe or dental floss. Open the<br />
foil package and use tweezers to pull out an<br />
appropriate amount of silicone embedded<br />
fibres. Using sharp scissors cut the appropriate<br />
amount of fibre needed along with the<br />
silicone. Shield the fibre from light by placing<br />
it under a cover during preparation of the<br />
teeth to be bonded. Close the foil bag tightly<br />
with its sticker. Keep the bag in a refrigerator<br />
(at a temperature of 2-8°C/35-46°F) when you<br />
do not need it.<br />
3. Etch the teeth<br />
Etch the prepared groove thoroughly with<br />
ortho-phosphoric acid in accordance with<br />
the instructions of the bonding agent<br />
manufacturer. Rinse with water and air-dry<br />
the tooth surfaces thoroughly after etching.<br />
As with all bonded restorations a dry<br />
operating field is absolutely necessary and<br />
rubber dam isolation is highly recommended.<br />
4. Bond the teeth<br />
Bond the prepared groove area in<br />
accordance with the instructions of the<br />
bonding agent manufacturer. Light-cure<br />
the bonding agent as described by the<br />
manufacturer.<br />
5. Apply flowable composite<br />
Apply a thin layer of flowable composite (for<br />
example, <strong>GC</strong> G-aenial Universal Flo) into the<br />
prepared groove. Be careful not to block the<br />
embrasures with composite. Do not light<br />
cure the composite during this phase.<br />
6. Position and light cure the fibre<br />
Remove the white protective paper and use<br />
tweezers to pick the fibre up from the<br />
silicone groove. Remove any residual<br />
silicone from the fibre bundle. Place the<br />
fibre bundle into the groove on top of the<br />
uncured flowable composite.<br />
Press the fibre bundle into the flowable<br />
composite with the StickCARRIER instrument.<br />
Pre-cure the fibre in place, one tooth<br />
at a time, for about five seconds, with a<br />
curing light. During light curing use the<br />
wide-tipped StickSTEPPER instrument to<br />
shield the rest of the fibre from light. As the<br />
fibre is made of light-conducting material,