1 Line Guard Assembly 2 Furling Drum 3 Cotter Pin 7 ... - Harken
1 Line Guard Assembly 2 Furling Drum 3 Cotter Pin 7 ... - Harken
1 Line Guard Assembly 2 Furling Drum 3 Cotter Pin 7 ... - Harken

Create successful ePaper yourself
Turn your PDF publications into a flip-book with our unique Google optimized e-Paper software.
■ Contrôle du diamètre de perçage de la cadène<br />
Vérifiez que le diamètre de perçage de la cadène du<br />
bateau est compatible avec le diamètre de l'axe commandé.<br />
HARKEN ne recommande pas de repercer la<br />
cadène ni l'enrouleur.<br />
Vérifiez que le bord inférieur de la chape ne vient pas<br />
toucher le pont du bateau quand l'enrouleur est incliné<br />
au bon angle. Si c'est un problème, il faut ajouter un<br />
cardan sous l'enrouleur et raccourcir le profil en<br />
conséquence. Voir page: 14 - 15.<br />
■ Vérifiez la place disponible dans le balcon avant<br />
Vérifiez que l'ensemble tambour n'est pas gêné par<br />
le balcon avant. Si vous avez un arrêt d'ancre utilisez<br />
deux cardans pour réhausser l'enrouleur. Voir page:<br />
14 - 15.<br />
■ Note<br />
L'enrouleur 00AL tourne autour de l'étai équipé d'un<br />
ridoir (non fourni par <strong>Harken</strong>). Les connecteurs sont<br />
prisonniers sur le câble. Que ce soit sur un câble avec<br />
embouts sertis ou un rod, les connecteurs doivent être<br />
enfilés sur l'étai avant sertissage ou repoussage à froid<br />
de l'embout inférieur. Cette opération est très facile à la<br />
fabrication de l'étai. Si vous avez choisi de réutiliser<br />
l'étai existant, il sera raccourci de la longueur de pénétration<br />
du câble dans l'embout à sertir, et un cardan<br />
ou une paire de lattes ridoir seront nécessaires pour<br />
compenser. Dans ce cas on peut aussi bien changer<br />
la terminaison supérieure du câble que l'embout fileté<br />
du bas du câble. <strong>Harken</strong> ne fourni aucun embout à<br />
sertir ou manuel dans ce but. Si un embout Norseman<br />
ou Sta-Lock est utilisé, l'installation peut être<br />
entièrement menée à proximité du bateau<br />
sans avoir recours à un gréeur.<br />
■ Si vous réutilisez votre câble<br />
Votre enrouleur est conçu pour réutiliser votre câble<br />
d'étai existant. Examinez minutieusement votre câble<br />
pour vous assurer qu'il est en bon état avant de le<br />
réutiliser avec l'enrouleur. Veillez aux traces de corrosion,<br />
aux fissures dans les embouts sertis, aux points<br />
d'abrasion et aux torons coupés sur le câble lui même.<br />
L'état du câble varie en fonction du climat et de<br />
l'utilisation, mais en règle générale ne réutilisez pas un<br />
câble qui a séjourné dans l'eau salée pendant plus de<br />
quatre saisons ou dans tous les cas un câble de plus<br />
de six ans.<br />
1<br />
2<br />
■ Prüfen des Toggel-Bolzens<br />
Passt der gelieferte Bolzen genau zum Beschlag am<br />
Bug? <strong>Harken</strong> rät davon ab, irgend welche Anpassungen<br />
vorzunehmen um abweichende Bolzen aufnehmen zu<br />
können.<br />
Berührt der Roller mit seinem tiefsten Punkt nichts,<br />
wenn er im Winkel des Vorstags gehalten wird? Ggf.<br />
muss ein weiterer Toggel unterhalb des Rollers angebracht<br />
und das Vorstag entsprechend gekürzt werden.<br />
Siehe Seite 14 - 15.<br />
■ Prüfen der Platzverhältnisse im Bugkorb<br />
Passt die Trommel in den Bugkorb? Lässt sich das<br />
Ankerschapp noch öffnen? Nötigenfalls mit zusätzlichem<br />
Toggel oder Verlängerung die Trommel höher<br />
setzen. Siehe Seite 14 - 15.<br />
■ Note<br />
Der Typ 00AL reitet auf Vorstag und Spanner (nicht von<br />
<strong>Harken</strong> geliefert). Die Verbinder sind auf dem Draht<br />
'gefangen'. Bei Walz-Terminals und Rod müssen die<br />
Verbinder vor dem Walzen/Stauchen aufgebracht<br />
werden. Das geschieht am einfachsten bei der<br />
Herstellung des Vorstags. Falls ein bestehendes Stag<br />
wieder verwendet werden soll, wird es um die abgeschnittene<br />
Länge gekürzt, und muss entsprechend<br />
durch ein Toggle kompensiert werden.<br />
Bei Nachrüstungen kann Aug- oder Bolzen-Terminal<br />
gewalzt/gestaucht werden. <strong>Harken</strong> liefert dazu keine<br />
Terminals. Bei Verwendung eines Norseman oder Sta-<br />
Lok Auges kann die Installation an Bord erfolgen, ohne<br />
das Stag zu einem Ausrüster zu bringen.<br />
■ Der Zustand des Stag-Materials<br />
Ihr Roll-System macht von Ihrem bestehenden Stag<br />
gebrauch. Versichern Sie sich also gründlich seines<br />
guten Zustands bevor Sie es mit dem Roller einsetzen.<br />
Suchen Sie insbesondere nach Korrosion und<br />
Haarrissen in der Nähe von aufgepressten Teilen sowie<br />
Abnützung und Schäden am Draht.<br />
Der Zustand des Stags hängt ab von Klima und Einsatz,<br />
aber eine Faustregel rät zum Ersatz, wenn das Stag<br />
mehr als vier Saisons im Salzwasser eingesetzt war<br />
oder älter ist als sechs Jahre.<br />
6<br />
3<br />
4<br />
5<br />
■ Controllo del perno della landa<br />
Controllare la landa dello strallo sulla barca assicurandosi<br />
che il perno speciale ordinato sia quello giusto. La<br />
<strong>Harken</strong> sconsiglia di trapanare la landa o modificare<br />
l'avvolgifiocco per adattare perni di altre dimensioni.<br />
Controllare che l'angolo inferiore dell'avvolgifiocco,<br />
nella corretta posizione di lavoro, non urti la parte della<br />
landa che giace sulla coperta. Se si verificano dei problemi<br />
bisogna aggiungere uno snodo sotto<br />
l'avvolgifiocco e accorciare, di conseguenza, lo strallo.<br />
Vedi pag. 14 - 15.<br />
■ Controllo dello spazio intorno al pulpito di prua<br />
Controllare con attenzione che la parte inferiore del<br />
tamburo stia all'interno del pulpito di prua. Se è presente<br />
un sistema di fissaggio per l'ancora, verificare<br />
che non sia d'intralcio e se necessario usare uno snodo<br />
o una prolunga della landa per alzare l'avvolgifiocco.<br />
Vedi pag. 14 - 15.<br />
■ Nota<br />
L'avvolgifiocco 00AL si monta sopra lo strallo e l' arridatoio<br />
(non forniti dalla <strong>Harken</strong>). I connettori<br />
vanno montati sul cavo o tondino, prima di impiombare<br />
o pressare a freddo. Questa operazione risulta più<br />
semplice quando si usa uno strallo nuovo; se si decide<br />
di riusare lo strallo esistente, bisogna accorciarlo della<br />
lunghezza corrispondente al perno filettato e usare<br />
poi una landa per compensare. Sullo strallo possono<br />
essere impiombati sia un perno filettato che un occhio<br />
a seconda delle necessità. La <strong>Harken</strong> non fornisce i<br />
terminali per questo scopo. Se si usa un terminale<br />
a occhio Norseman o Sta-Lok, l'installazione può<br />
essere completata sulla barca senza ricorrere ad<br />
un attrezzatore.<br />
7<br />
8<br />
■ Condizioni del cavo<br />
Il sistema è stato progettato per consentire di riutilizzare<br />
lo strallo esistente.<br />
Esaminare lo strallo attentamente per assicurarsi che sia<br />
in buone condizioni prima di riutilizzarlo. Per gli stralli in<br />
cavo fare attenzione ad eventuali corrosioni e rotture sui<br />
terminali a pressare e che il cavo stesso non sia danneggiato.<br />
Per stralli in tondino fare attenzione ad eventuali<br />
corrosioni o rotture sulle pressature a freddo e sui terminali<br />
o a intaccature nel tondino stesso.<br />
Le condizioni degli stralli possono variare a seconda del<br />
clima e delle condizioni d'uso; è buona regola non riutilizzare<br />
un cavo che sia stato usato in acqua salata per più<br />
di quattro anni o che sia più vecchio di sei anni. Il tondino<br />
ha, di solito, vita più lunga; in ogni caso va analizzato<br />
attentamente prima di riutilizzarlo.<br />
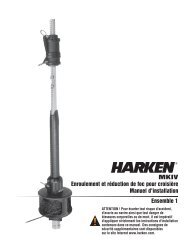
1 <strong>Line</strong> <strong>Guard</strong> <strong>Assembly</strong><br />
Guide antiusure de drosse<br />
Leinen-Führung<br />
Guida per la scotta<br />
2 <strong>Furling</strong> <strong>Drum</strong><br />
Tambour<br />
Trommel<br />
Tamburo<br />
3 <strong>Cotter</strong> <strong>Pin</strong><br />
Goupille Fendue<br />
Sicherungsstift (Splint)<br />
Coppiglia<br />
4. Clevis <strong>Pin</strong><br />
Axe épaulé<br />
Toggelbolzen<br />
Perno<br />
5 Spring Tang<br />
Lame Élastique<br />
Blattfeder<br />
Piastra a Molla<br />
6 Tack Shackle<br />
Manille d’amure<br />
Fuss-Schäkel<br />
Grillo mura<br />
7 Torque Tube/Hub <strong>Assembly</strong><br />
Tube de Torsion<br />
Mitnehmerhülse/Nabe<br />
Tubo di torsione<br />
8 Torque Tube Cap<br />
Capuchon de Tube de Torsion<br />
Kappe auf Mitnehmerhülse<br />
Cappuccio del tubo di torsione<br />
9 Torque Tube Foil Key<br />
Clavette de Tube de Torsion<br />
Verschlusskeil (in Mitnehmer-Hülse)<br />
Chiave per il tubo de torsione dell’estruso<br />
10 Bottom Foil Extrusion<br />
Profil inférieur standard<br />
Unterstes Profil<br />
Estruso inferiore<br />
11 Bottom Foil Connector<br />
Connecteur inférieur<br />
Unterstes Verbinder<br />
Connettore inferiore<br />
12 Feeder<br />
Engageur<br />
Einfädler<br />
Feeder<br />
4 Unit 0 MKII June 1998
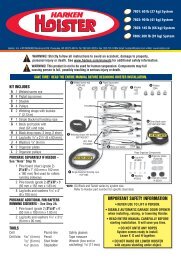
WARNING! <strong>Harken</strong> does not recommend drilling boat's chainplate or toggle as this may result in rig<br />
failure which will cause an accident, damage to your vessel, personal injury or death.<br />
See www.harken.com for additional safety information.<br />
20<br />
WARNING! Headstay condition should be checked by a professional rigger before reusing. Wire<br />
that is old or damaged may break suddenly causing an accident, damage to your vessel,<br />
personal injury or death. See www.harken.com for additional safety information.<br />
19<br />
16<br />
18<br />
15<br />
17<br />
12<br />
13<br />
14<br />
9 11<br />
■ Sizing Check<br />
Unit 00AL is designed to fit boats with the following Specifications:<br />
Part No.<br />
Ref.<br />
Art Nr<br />
Num.<br />
1110<br />
10<br />
■ Check Chainplate Clevis <strong>Pin</strong><br />
Check the chainplate on the boat to make sure the special<br />
pin ordered and shipped will fit correctly. <strong>Harken</strong><br />
does not recommend drilling the chainplate or altering<br />
the furler to fit other pin sizes.<br />
Check to make sure the bottom corner of the furler does<br />
not hit the deck plates of the chainplate when the furler is<br />
at the correct angle. If this is a problem, a toggle must be<br />
added below the furler and the headstay shortened<br />
accordingly. See page 14 - 15.<br />
■ Check Bow Pulpit Clearance<br />
Check to make sure the lower drum assembly will fit<br />
inside the bow pulpit. If there is an anchor locker, check<br />
to see if the drum assembly will clear. If necessary, use a<br />
toggle or link plates to raise the unit. See page 14 - 15.<br />
■ Note<br />
The 00AL unit rides over the headstay and turnbuckle<br />
(not supplied by <strong>Harken</strong>). It requires the connectors to<br />
be captured on the wire. With swage studs or rod stays,<br />
13 Regular Foil Extrusion<br />
Profil standard (2130 mm)<br />
Normales Profil<br />
Estruso Standard<br />
14 Connector<br />
Connecteur<br />
Verbinder<br />
Connettore<br />
Wire Ø<br />
Ø Câble<br />
Stag Ø<br />
Ø Cavo<br />
1<br />
/8", 5 /32", 3 /16"<br />
3, 4, 5 mm<br />
Rod Ø<br />
Ø du Rod<br />
Rod Ø<br />
Ø Tondino<br />
-4, 4.37 mm<br />
Clevis <strong>Pin</strong> Ø<br />
Ø de l’axe<br />
Bolzen Ø<br />
Ø Perno<br />
1<br />
/4", 5 /16", 3 /8", 7 /16"<br />
6.4, 8, 9.5, 11 mm<br />
15 Conector Locking Wedges<br />
Cales plastiques pour connecteurs<br />
Kunststoff Keile<br />
Piastrine di bloccaggio connettori<br />
16 Connector Screws<br />
Vis pour connecteurs<br />
Schrauben für Verbinder<br />
Viti di bloccaggio connettori<br />
Boat Length<br />
Schiff länge<br />
Longueur du Bateau<br />
Lunghezza della Barca<br />
26' Max<br />
7.93 m<br />
Standard Length<br />
Longueur Normale<br />
Länge normal<br />
Lunghezza Normale<br />
31'6"<br />
7.93 m<br />
connectors must be slid on the stay before swaging or<br />
coldheading. This is most easily done when making up<br />
the headstay. If you elect to reuse the existing wire, it will<br />
be shortened the depth that the wire is recessed into the<br />
terminal and a toggle or link plate used to compensate.<br />
On retrofits, either the eye or the stud may be swaged or<br />
coldheaded. <strong>Harken</strong> does not supply terminals for this<br />
purpose. If a Norseman or Stay-Lok terminal is used, the<br />
installation can be completed at the boat without taking<br />
the wire to a rigger.<br />
■ Wire Condition<br />
Your system is designed to allow use of your existing<br />
headstay wire. Examine your headstay carefully to be<br />
sure that is is in good condition before you use it with<br />
the furler. Look for corrosion and cracks at swage fittings<br />
and for abrasion or damage to the wire itself.<br />
Wire condition will vary depending upon climate and use<br />
but as a general rule, do not use wire which has been in<br />
saltwater for more than four seasons or any wire which<br />
is more than six years old.<br />
17 Halyard Swivel<br />
Emérillon de drisse<br />
Fallwirbel<br />
Girella superiore (Drizza)<br />
18 Top Foil Extrusion<br />
Profils plastiques pour connecteurs<br />
Top Profil<br />
Estruso superiore<br />
Maximum Headstay<br />
Longueur Maxi d l'étai<br />
max. länge Vorstag<br />
Max. Lunghezza Strallo<br />
35'<br />
10.67 m<br />
19 Connector<br />
Connecteur<br />
Verbinder<br />
Connettore<br />
20 Top Foil Trim Cap<br />
Capuchon plastique supérieur<br />
Topkappe<br />
Cappuccio per estruso superiore<br />
January 2002 Unit 00AL 5
Pièces Teile Parti<br />
Vous devriez avoir au moins deux boites: une boite<br />
longue contenant les profils et une boite carrée contenant<br />
le tambour et ses divers accessoires. Vous<br />
pourriez aussi avoir une troisième boite contenant<br />
l'étai.<br />
■ La boite de profils contient:<br />
-4 Extrusions de 2.13 m. Un kit standard comporte<br />
quatre profils, mais l'un deux a pu être prédécoupé<br />
pour servir de profil supérieur. Si votre étai est plus<br />
long que 11.68 m vous devez commander un profil<br />
supplémentaire, Ref: # 906 et un connecteur<br />
Ref: # 909.<br />
-1 Extrusion spéciale de 610 mm pour profil inférieur.<br />
■ La boite carrée contient les pièces principales<br />
fixées sur leur carton et une boite plus<br />
petite avec les accessoires.<br />
Sie haben mindestens zwei Kartons: Einen langen<br />
Karton mit den Profilen und einen kleinen Karton mit<br />
der Trommel und dem Zubehör. Sollten Sie ein<br />
neues Vorstag benötigen, haben Sie auch noch<br />
einen dritten Karton mit dem neuen, bzw. abgelängten<br />
Vorstag.<br />
■ Der Karton mit den Profilen enthält:<br />
2.13 m lange Profile; Ein Standardpaket enthält vier<br />
Profile, von denen jedoch ein Profil als Top Profil abgeschnitten<br />
sein kann. Falls Ihr Vorstag länger als 11.68<br />
m ist, müssen Sie ein extra Profil bestellen,<br />
ArtNr HR 906.<br />
1 "Bottom Profil" (610 mm lang), Profilstück zwischen<br />
Mitnehmerhülse und Einfädler. Ein "Top Profil" entfällt<br />
bei bestimmten Vorstaglängen.<br />
■ Der Teile-Karton enthält Teile in Blister<br />
Verpackung sowie eine Schachtel mit kleinen<br />
Teilen.<br />
Nella confezione si trovano almeno due scatole: una<br />
lunga contenente i vari pezzi di estruso, e una rettangolare<br />
contenente il tamburo e gli altri componenti.<br />
Potrebbe esserci anche una terza scatola, se<br />
richiesta, contenente lo strallo di prua.<br />
■ La scatola dell'estruso contiene:<br />
Parti di estruso lunghe 2.13 m. Un kit standard è composto<br />
da quattro pezzi di cui uno può essere stato tagliato<br />
per usarlo come parte superiore. Se lo strallo<br />
è più lungo di 11.68 m, ordinare un pezzo di estruso<br />
in più, (Cod. H 906).<br />
Un estruso inferiore speciale lungo 610 mm.<br />
■ La scatola rettangolare contiene i componenti<br />
mostrati nella figura sottostante e una<br />
scatola con i pezzi più piccoli.<br />
Pièces Principales Haupt-Komponenten Componenti Principali<br />
HFG852 Ensemble tambour comprenant<br />
HCP1222 Lames élastiques (2)<br />
HFS757 Kit vis de 5 mm pour lames (2)<br />
HFG600 Tambour monté<br />
2110 Manille d'amure 6 mm<br />
HFG750 Ensemble panier<br />
914 Bout 6 mm – long 13.72 m (agrafe comprise)<br />
HFG850 Capuchon de tube de torsion<br />
1111 Emerillon drisse comprenant<br />
2110 Manille de tétière 6 mm<br />
2112 Manille de drisse 6 mm<br />
HSB15 Billes Delrin 6.35 mm chemin<br />
inférieur (24)<br />
HSB17 Billes Torlon 6.35 mm chemin<br />
supérieur (24)<br />
HCP1199 Circlips de retenue<br />
HCP191 Circlips de retenue<br />
HFG852 Trommel-Teil, mit<br />
HCP1222 Niro Feder-Flansch (2)<br />
HFS757 5 mm Inbusschrauben (2)<br />
HFG600 Trommel<br />
2110 6 mm Fuss-Schäkel<br />
HFG750 Korb (Leinen-Schutz)<br />
914 6 mm Leine,13.72 m mit HCP237 Krampen<br />
HFG850 Mitnehmer-Hülse<br />
1111 Fallwirbel<br />
2110 6 mm Kopf-Schäkel<br />
2112 6 mm Fall-Schäkel<br />
HSB15 6.35 mm Delrin Kugeln (24)<br />
unterer Käfig<br />
HSB17 6.35 mm Torlon Kugeln (24)<br />
oberer Käfig<br />
HCP1199 Rückhalte-Ring<br />
HCP191 Rückhalte-Ring<br />
HFG852 Il tamburo completo comprende<br />
HCP1222 Molle<br />
HFS757 2 viti da 5 mm<br />
HFG600 Raccoglitore<br />
2110 Grillo della mura<br />
HFG750 Guida completa per la scotta<br />
914 13.72 metri di cima<br />
HCP850 Cappuccio del tubo di torsione<br />
1111 Girella della drizza che comprende<br />
2110 Grillo penna<br />
2112 Grillo drizza<br />
HSB15 Sfere in Delrin da 6.35 mm (24)<br />
cuscinetto inferiore<br />
HSB17 Sfere in Torlon da 6.35 mm (24)<br />
cuscinetto superiore<br />
HCP1199 Anello di tenuta<br />
HCP191 Anello di tenuta<br />
6 Unit 00AL June 1999
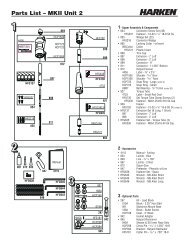
Parts<br />
You should have two boxes: a long box with foils and a rectangular box<br />
containing the drum and miscellaneous components. You may also<br />
have a third box containing the headstay.<br />
■ The foil box contains:<br />
4 7' (2.13 m) Foil Extrusions. A standard kit has four foils, but one may have been pre-cut for use as your top foil.<br />
If your headstay is longer than 31'6" (9.60 m) you should order one extra foil extrusion, Part #906.<br />
1 24" (610 mm) Special Bottom Foil Extrusion.<br />
■ The main components box contains parts packaged on the display card plus a smaller parts box.<br />
Main Components<br />
Halyard Swivel<br />
1111<br />
<strong>Drum</strong> <strong>Assembly</strong><br />
HFG852<br />
Ensemble Panier et<br />
Chape Articulée<br />
Trommeleinheit<br />
Tamburo Completo<br />
Torque Tube Cap<br />
HFG850<br />
Capuchon de tube de torsion<br />
Mitnehmer-Hülse<br />
Cappuccio del tubo di torsione<br />
914 <strong>Line</strong> - 45'1/4"<br />
Bout 6 long 13.75 m<br />
6 mm Leine,13.75 m<br />
13.75 metri di cima<br />
Emérillon de drisse<br />
Fallwirbel<br />
Girella Superiore<br />
Main Parts<br />
Part Description<br />
HFG852 <strong>Drum</strong> <strong>Assembly</strong><br />
HCP1222 SS Spring Tangs (2)<br />
HFS757 5 mm Socket Head Cap Screws (2)<br />
HFG600 Spool <strong>Assembly</strong><br />
2110 1/4" Tack Shackle<br />
HFG750 <strong>Line</strong> <strong>Guard</strong> <strong>Assembly</strong><br />
914 1/4" line 45’ with HCP237 Hog Ring<br />
HFG850 Torque Tube Cap<br />
1111 Halyard Swivel<br />
2110 1/4" Head Shackle<br />
2112 1/4" Halyard Shackle<br />
HSB15 24 - 1/4" Delrin Balls, Lower Race<br />
HSB17 24 - 1/4" Torlon Balls, Upper Race<br />
HCP1199 Large Retaining Snap Ring<br />
HCP191 Small Retaining Snap Ring<br />
June 1999 Unit 00AL 7
Pièces Teile Parti<br />
Pièces Prisonnieres De L'étai<br />
Réf. Désignation<br />
933 Vis de profil<br />
946 Cales plastiques de connecteurs<br />
913 Engageur et vis HFG214<br />
910 Capuchon plastique supérieur<br />
833 Loctite ® bleue<br />
929 Loctite ® rouge<br />
909 Connecteurs standards (152 mm)<br />
908 Connecteur inférieur (194 mm)<br />
HFG858 Profil inférieur de 610 mm<br />
906 Extrusions de 2.13 m. Un kit<br />
standard comporte 4 profils.<br />
1112 Longueur de profil de 1.067 m.<br />
Commander si l’etai dépasse 9.60 m.<br />
Teile für Vor-Montage<br />
ArtNr Beschreibung<br />
933 Schrauben für Profile<br />
946 Verbinder-Keile<br />
913 Einfädler mit Schraube HFG214<br />
910 Capuchon plastique supérieur<br />
833 Loctite ® blau<br />
929 Loctite ® rot<br />
909 Verbinder standard (152 mm)<br />
908 Verbinder, unterster (194 mm)<br />
HFG858 “Bottom Profil” (610 mm lang)<br />
906 2.13 m. lange Profile: Ein<br />
Standardpaket enthält vier Profile<br />
1112 Zusätzliche Verlängerung von 1.07 m.<br />
bestellen, falls Vorstag länger als<br />
9.60 m.<br />
Componenti Dell’attrezzatura<br />
Num. Descrizione<br />
933 Viti per l’estruso<br />
946 Plastrine di Bloccaggio Connettori<br />
913 Feeder con vite HFG214<br />
910 Cappuccio per estruso superiore<br />
833 Loctite blu<br />
929 Loctite rossa<br />
909 Connettore Standard da 152 mm<br />
908 Connettore Inferiore da 194 mm<br />
HFG858 Estruso inferiore lungo 610 mm<br />
906 Estruso da 2.13m (5 nella confezione<br />
standard)<br />
1112 Estruso aggiuntivo 1.07 m. Ordinare se la<br />
lunghezza dello strallo è maggiore<br />
di 9.60 m.<br />
Pièces Diverses Diverse Teile Componenti Vari<br />
Réf.<br />
HFG641<br />
HFG642<br />
HFG889<br />
Désignation<br />
Clef Allen de 4 mm<br />
Clef Allen de 5 mm<br />
Clavette de tube de torsion<br />
ArtNr<br />
HFG641<br />
HFG642<br />
HFG889<br />
Beschreibung<br />
4 mm Inbusschlüssel<br />
5 mm Inbusschlüssel<br />
Verschlusskeil (in Mitnehmer-Hülse)<br />
Num.<br />
HFG641<br />
HFG642<br />
HFG889<br />
Descrizione<br />
Chiave a brugola da 4 mm<br />
Chiave a brugola da 5 mm<br />
Chiave per il tubo di torsione dell'estruso<br />
Astuce: Commandez une clavette de cadène<br />
supplémentaire pour l'avoir en rechange.<br />
947 Préengageur<br />
872 Super Glue<br />
Tip: Bestellen Sie bei Ihrem Händler einen<br />
zusätzlichen Keil als Reserve.<br />
947 Vorfädler<br />
872 Sekundenkleber<br />
Suggerimento: ordinare una chiavee di riserva<br />
dal rivenditore.<br />
947 Prefeeder<br />
872 Colla speciale<br />
Kits d’axes de cadène<br />
Toggel-Bolzen Satz<br />
Serie di perni<br />
Les pièces suivantes devront être commandées en plus<br />
pour s'accorder avec votre diamètre d'axe de cadène.<br />
Folgende Teile sind passend zu Ihrem Toggel-Bolzen<br />
zu bestellen:<br />
I seguenti pezzi vanno ordinati a parte per poter adattarsi<br />
alla dimensione del vostro perno.<br />
Axe de Cadène<br />
Composition<br />
Toggel-Bolzen<br />
Bestandteil<br />
Perni<br />
Componenti<br />
Réf.<br />
HFG767 Axe 6.35 mm<br />
1106<br />
Kit d’axe de<br />
6.35 mm<br />
HFG768 Entretoise<br />
HFS113<br />
Goupille fendue<br />
HFG753 Axe 8 mm<br />
1107<br />
Kit d’axe de<br />
8 mm<br />
HFG758 Entretoise<br />
HFS113<br />
Goupille fendue<br />
1108<br />
1109<br />
Désignation<br />
Kit d’axe de<br />
9.5 mm<br />
Kit d’axe de<br />
11 mm<br />
Réf.<br />
HFG749<br />
HFS113<br />
HFG773<br />
HFS113<br />
Désignation<br />
Axe 9.5 mm<br />
Goupille fendue<br />
Axe 11 mm<br />
Goupille fendue<br />
Astuce: Commandez un axe de cadène supplémentaire<br />
pour l'avoir en rechange.<br />
ArtNr<br />
HFG767<br />
6.35 mm<br />
Satz für<br />
Bolzen<br />
1106 6.35 mm<br />
Bolzen<br />
HFG768 Distanzhülse<br />
HFS113 Splint<br />
HFG753 8 mm Bolzen<br />
1107<br />
Satz für<br />
8 mm<br />
Bolzen<br />
HFG758 Distanzhülse<br />
HFS113 Splint<br />
1108<br />
1109<br />
Beschreibung<br />
Satz für<br />
9.5 mm<br />
Bolzen<br />
Satz für<br />
11 mm<br />
Bolzen<br />
ArtNr<br />
HFG749<br />
HFS113<br />
HFG773<br />
HFS113<br />
Tip: Bestellen Sie einen Satz zusätzlich, als<br />
Reserve<br />
Beschreibung<br />
9.5 mm<br />
Bolzen<br />
Splint<br />
11 mm Bolzen<br />
Splint<br />
Num.<br />
HFG767<br />
Perno da<br />
6.35 mm<br />
1106<br />
Perno da<br />
6.35 mm<br />
HFG768 Distanziale<br />
HFG753<br />
Perno da<br />
8 mm<br />
1107<br />
Perno da<br />
8 mm<br />
HFG758 Distanziale<br />
1108<br />
1109<br />
Descrizione<br />
Perno da<br />
9.5 mm<br />
Perno da<br />
11 mm<br />
Num.<br />
HFS113<br />
HFS113<br />
HFG749<br />
HFS113<br />
HFG773<br />
HFS113<br />
Suggerimento: ordinare una serie di perni di<br />
riserva dal rivenditore.<br />
Descrizione<br />
Coppiglia<br />
Coppiglia<br />
Perno da<br />
9.5 mm<br />
Coppiglia<br />
Perno da<br />
11 mm<br />
Coppiglia<br />
8 Unit 00AL 07/08/09
Parts<br />
HFG889 872<br />
933<br />
910<br />
946<br />
913<br />
HFG641<br />
HFG642<br />
947<br />
833<br />
Miscellaneous Parts<br />
Part<br />
HFG641<br />
HFG642<br />
HFG889<br />
Description<br />
4 mm Allen Wrench<br />
5 mm Allen Wrench<br />
Torque Tube Foil Key<br />
929<br />
909<br />
908<br />
Tip: Order an extra key from your dealer to have as a spare.<br />
947 Prefeeder<br />
872 Super Glue ®<br />
1112<br />
906<br />
Foil and Feeder Parts<br />
HFG858<br />
Part Description<br />
933 Foil screws<br />
946 Connector wedges<br />
913 Feeder with HFG214 Screw<br />
910 Trim cap<br />
833 Loctite ® (blue)<br />
929 Loctite ® (red)<br />
909 6" (152 mm) Connector (4 in standard package)<br />
908 7.625" (194 mm) Long bottom connector<br />
HFG858 2' (610 mm) Bottom foil<br />
906 7' (2.13 m) Foil (4 in standard package)<br />
1112 Optional 3.5' (1.067 m) top foil for lengths<br />
over 31'6" (9.601 m)<br />
1106 1107 1108 1109<br />
Clevis <strong>Pin</strong> Sets<br />
Clevis <strong>Pin</strong><br />
Components<br />
Part No. Description Part No. Description<br />
HFG767<br />
1<br />
/4" (6.35 mm) <strong>Pin</strong><br />
1106 1<br />
/4" <strong>Pin</strong> Set HFG768<br />
Spacer<br />
HFS113 <strong>Cotter</strong> <strong>Pin</strong><br />
HFG753<br />
5<br />
/16" (8 mm) <strong>Pin</strong><br />
1107 5<br />
/16" <strong>Pin</strong> Set HFG758<br />
Spacer<br />
HFS113 <strong>Cotter</strong> <strong>Pin</strong><br />
1108 3<br />
/8" <strong>Pin</strong> Set<br />
HFG749<br />
3<br />
/8" (9.5 mm) <strong>Pin</strong><br />
HFS113 <strong>Cotter</strong> <strong>Pin</strong><br />
1109 7<br />
/16" <strong>Pin</strong> Set<br />
HFG773<br />
7<br />
/16" (11 mm) <strong>Pin</strong><br />
HFS113 <strong>Cotter</strong> <strong>Pin</strong><br />
Tip: Order an extra pin set from your dealer to have as a spare.<br />
June 2002 Unit 00AL 9