You also want an ePaper? Increase the reach of your titles
YUMPU automatically turns print PDFs into web optimized ePapers that Google loves.
99364380_KF610_MN Seite 6 Montag, 21. Juni 2010 10:48 10<br />
English<br />
Our products are engineered to meet the highest<br />
standards of quality, functionality and design.<br />
We hope you thoroughly enjoy your new Braun<br />
coffeemaker.<br />
Caution<br />
• Please read the use instructions carefully and<br />
completely before using the appliance.<br />
• This appliance is not intended for use by children<br />
or persons with reduced physical, sensory<br />
or mental capabilities, u<strong>nl</strong>ess they are given<br />
supervision by a person responsible for their<br />
safety. In general, we recommend that you keep<br />
the appliance out of reach of children. Children<br />
should be supervised to ensure that they do not<br />
play with the appliance.<br />
• Before plugging into a socket, check that your<br />
voltage corresponds with the voltage printed on<br />
the bottom of the appliance.<br />
• Never place the thermal carafe on a hotplate or<br />
other heated surfaces, as this would damage the<br />
carafe base.<br />
• Caution: During and after operation, the metal<br />
surfaces will get hot. Avoid touching hot surfaces,<br />
especially the carafe base, to prevent burns or<br />
scalds. Always use the handle to carry the carafe<br />
and keep it upright.<br />
• Do not use the thermal carafe in a microwave.<br />
• Never submerge the thermal carafe in water, nor<br />
clean it in a dishwasher.<br />
• Before you start preparing a new carafe of coffee,<br />
always allow the coffeemaker to cool down for<br />
approximately five minutes (switch off the appliance),<br />
otherwise steam can develop when filling<br />
the water tank with cold water.<br />
• Braun electric appliances meet applicable<br />
safety standards. Repairs on electric appliances<br />
(including cord replacement) must o<strong>nl</strong>y be carried<br />
out by authorized Braun service centers. Faulty,<br />
unqualified repair work may cause accidents or<br />
injury to the user.<br />
• This appliance was constructed to process normal<br />
household quantities.<br />
• Always use cold water to make coffee.<br />
Maximum cups<br />
10 cups (125 ml each)<br />
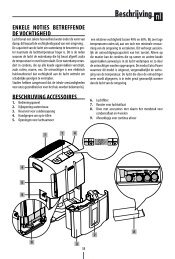
Description<br />
A Cord/cord storage<br />
B Space compensator<br />
C Water level indicator<br />
D Water tank<br />
E Water filter cartridge<br />
F Water filter exchange dial<br />
G Filter basket release button<br />
H Filter basket with drip stop<br />
I Carafe stand<br />
J On/off switch («I/O»)<br />
K Thermal carafe<br />
I<br />
Setting into operation<br />
By means of the cord storage facility (A), you can<br />
adjust the cord length by pulling it out of or pushing<br />
it in.<br />
Water filter<br />
This product includes an exclusive Brita ® water filter<br />
especially designed for Braun coffeemakers. The<br />
water filter improves coffee flavor by significantly<br />
reducing chlorine and also prevents calcification<br />
(scale) buildup. Provided that the cartridge is replaced<br />
regularly (every two months), it not o<strong>nl</strong>y brews<br />
better tasting coffee, but can also extend the life of<br />
your coffeemaker by preventing calcification buildup.<br />
Braun water filter cartridges are available at your local<br />
retailer or Braun service centres.<br />
Installing the water filter cartridge<br />
1. Unpack the water filter cartridge (E) and follow<br />
the instructions given on the pack.<br />
2. Remove the space compensator (B) from the<br />
water tank.<br />
3. Insert the water filter cartridge (E). (Be certain<br />
to keep the space compensator as it must be<br />
installed in the water tank whenever the water filter<br />
cartridge is removed.)<br />
4. The water filter should be exchanged every<br />
two months. To remind you, set the water filter<br />
exchange dial (F) so that the current month is<br />
shown in the left space (start month). The month<br />
you should replace the water filter will then be<br />
shown in the right space (end month).<br />
Note:<br />
Before using the coffeemaker for the first time, after<br />
a long period of not using it, or after installing a new<br />
water filter cartridge, run the coffeemaker through<br />
one brewing cycle using a maximum of 8 cups of<br />
cold, fresh water without any ground coffee.<br />
Thermal carafe<br />
The thermal carafe (K) is made of high-quality, double<br />
walled, vacuum stai<strong>nl</strong>ess steel. Your coffee will be<br />
kept warm even longer if you pre-warm the thermal<br />
carafe by rinsing with hot water before brewing.<br />
• To remove the lid, turn the grip anti-clockwise (a)<br />
and take it off.<br />
• To close it again, place it on the carafe with the<br />
grip located at the right of the carafe handle (b)<br />
and turn it clockwise until it locks into place.<br />
• During brewing, the coffee runs through a special<br />
opening of the closed lid.<br />
• If you want to serve coffee after brewing is<br />
finished, press the raised end of the silver lid grip<br />
6