MOTORI ASINCRONI TRIFASE AUTOFRENANTI SERIE ... - isgev
MOTORI ASINCRONI TRIFASE AUTOFRENANTI SERIE ... - isgev
MOTORI ASINCRONI TRIFASE AUTOFRENANTI SERIE ... - isgev

You also want an ePaper? Increase the reach of your titles
YUMPU automatically turns print PDFs into web optimized ePapers that Google loves.
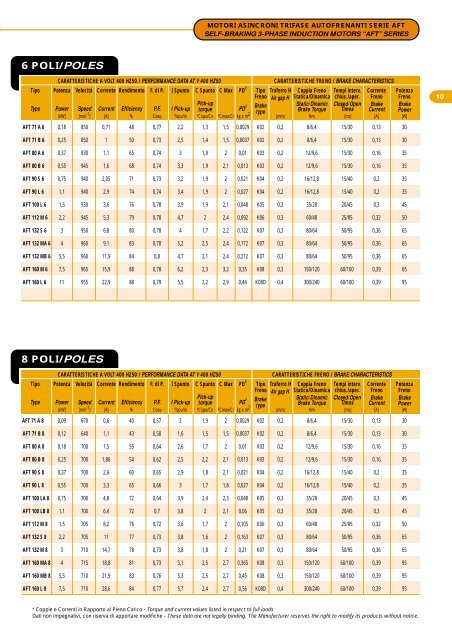
<strong>MOTORI</strong> <strong>ASINCRONI</strong> <strong>TRIFASE</strong> <strong>AUTOFRENANTI</strong> <strong>SERIE</strong> AFT<br />
SELF-BRAKING 3-PHASE INDUCTION MOTORS “AFT” <strong>SERIE</strong>S<br />
Regolazione del freno - Brake adjustment<br />
Prima di eseguire ogni operazione sul freno si raccomanda<br />
di togliere l’alimentazione e, se esso è in funzione da diverse<br />
ore, lasciar trascorrere un certo tempo per far raffreddare<br />
le superfici. La regolazione del traferro avviene mediante i<br />
registri (1) dopo avere allentato le viti di fissaggio (2). Prima<br />
di iniziare ad usare il freno assicurarsi che tali viti siano<br />
saldamente bloccate nella flangia di supporto dello stesso.<br />
È importante prima di utilizzare il freno regolare la coppia<br />
frenante rispettando i dati riportati nelle tabelle<br />
che seguono (CARATTERISTICHE FRENO).Per regolare la<br />
coppia frenante bisogna intervenire sulla ghiera (3), la quale<br />
agisce a sua volta sulle molle di coppia (4). Prima di effettuare<br />
la regolazione del traferro, assicurarsi che l’albero non abbia<br />
alcun momento torcente e che il freno sia elettricamente<br />
escluso.<br />
Before carrying out any operation on the brake, cut off the<br />
power supply and, if the brake has been operating for a few<br />
hours, wait until the surfaces have cooled down. The air<br />
gap is adjusted using the registers (1) after having loosened<br />
the fastening screws (2). Before starting to use the brake,<br />
make sure that the screws are firmly tightened in the support<br />
flange. Before using the brake, it is important to adjust the<br />
braking torque based on the data indicated in the following<br />
tables (BRAKE CHARACTERISTICS). To adjust the braking<br />
torque, use the ring nut (3), which engages the torque<br />
springs (4). Before adjusting the air gap, make sure that the<br />
shaft does not have any bending moment and that the brake<br />
is electrically insulated.<br />
6<br />
Manutenzione e riparazione - Maintenance and repairs<br />
È necessaria una frequente ispezione del freno in tutte le<br />
sue parti. Il consumo dipende da numerosi fattori: l’inerzia,<br />
la velocità del motore, la frequenza degli interventi; per<br />
questo motivo non è possibile dare una indicazione generale<br />
relativa al numero di interventi dopo i quali è necessario<br />
sostituire il disco, pulire e regolare il traferro. Le operazioni<br />
di ispezione del freno devono essere fatte seguendo quanto<br />
riportato nella sezione precedente: regolazione del freno.<br />
Assicurarsi dopo l’ispezione che il traferro sia correttamente<br />
regolato.<br />
All brake parts must be inspected on a regular basis. Wear<br />
depends on many factors: inertia, motor speed and frequency<br />
of operations. For this reason it is not possible to provide<br />
a general indication about the number of operations after<br />
which the disc must be replaced and the air gap cleaned<br />
and adjusted. The brake inspection operations must be<br />
carried out according to what is indicated in the previous<br />
section regarding the brake adjustment. After an inspection,<br />
make sure that the air gap is properly adjusted.