Guide d'utilisation Fr - 3 User's guide Gb - 19 Manual de ... - Num'Axes
Guide d'utilisation Fr - 3 User's guide Gb - 19 Manual de ... - Num'Axes
Guide d'utilisation Fr - 3 User's guide Gb - 19 Manual de ... - Num'Axes

Create successful ePaper yourself
Turn your PDF publications into a flip-book with our unique Google optimized e-Paper software.
<strong>Gui<strong>de</strong></strong> d’utilisation <strong>Fr</strong> - 3User’s <strong>gui<strong>de</strong></strong> <strong>Gb</strong> - <strong>19</strong><strong>Manual</strong> <strong>de</strong> instrucciones Es - 35Gebrauchsanleitung D - 49<strong>Manual</strong>e d’uso It - 65
DECLARATION « CE » DE CONFORMITEDECLARATION « » DECLARATION « CE » DE OF CONFORMITECONFORMITY« EC » Directive DECLARATION R&TTE OF <strong>19</strong>99/5/CE CONFORMITYDirective R&TTE <strong>19</strong>99/5/CENUM’AXESdéclare que<strong>de</strong>clares NUM’AXES thatdéclare queles colliers <strong>de</strong>clares dressage thattraining collarsles colliers CANICOM <strong>de</strong> dressage 200the training collarssatisfont à toutes les dispositions CANICOM <strong>de</strong> 500la Directive N° <strong>19</strong>99/5/CEdu 07/04/99 du Conseil Européencomply satisfont to all dispositions à toutes les of dispositions the European <strong>de</strong> la Council Directive Directives R&TTE below N° <strong>19</strong>99/5/CE N° <strong>19</strong>99/5/CEdu 07/04/99 du Conseil Européencomply to all dispositions et sont of conformes the European aux Council normes Directives suivantesbelow N° <strong>19</strong>99/5/CEand comply with standards below :et sont conformes ETSI EN aux 300 normes 220 suivantesand comply with standards below :ETSI EN 300 220EN 301 489-3 V1.4.1Les rapports <strong>de</strong> tests sont disponibles à l’adresse ci-<strong>de</strong>ssous :Test reports are available at the following address:NUM’AXES745 rue <strong>de</strong> la Bergeresse – Z.A.C. <strong>de</strong>s Aulnaies – BP 3015745161 OLIVET CEDEX – FRANCETél. Tél. + +33 (0)2 2 38 63 64 40 / Fax + 33 2 (0)2 38 38 63 63 31 31 00 0011/04/2005 08/2007 –– M. M. Pascal GOUACHE – - Prési<strong>de</strong>nt du du Directoire
<strong>Gui<strong>de</strong></strong> d’utilisation<strong>Fr</strong> - 3AVERTISSEMENT !Tout porteur d’appareil individuel d’assistance cardiaque (stimulateur cardiaque, pacemaker oudéfibrillateur) est invité à prendre les précautions d’usage dans l’utilisation du CANICOM 500.Cet appareil émet <strong>de</strong>s champs magnétiques statiques (aimant situé dans la télécomman<strong>de</strong>) ainsique <strong>de</strong>s on<strong>de</strong>s électromagnétiques hautes fréquences (fréquence = 869 Mhz, puissance Maxid’émission = 250 mW).Cet appareil répond à la norme européenne ETSI EN 300 220.Nous vous remercions d’avoir choisi un appareil <strong>de</strong> la gamme NUM’AXES.Avant d’utiliser le CANICOM 500, lire attentivement les explications <strong>de</strong> ce <strong>gui<strong>de</strong></strong> que vous conserverezpour toute référence ultérieure.Avant la mise en place du collier CANICOM, il est recommandé <strong>de</strong> faire examiner votre chien par unvétérinaire afin <strong>de</strong> vérifier qu’il n’y a pas <strong>de</strong> contre-indications.Vérifiez régulièrement le cou <strong>de</strong> votre chien car les frottements répétés <strong>de</strong>s électro<strong>de</strong>s sur la peaupeuvent parfois provoquer <strong>de</strong>s irritations. Dans ce cas, retirez-lui le collier jusqu’à leur disparitioncomplète. Ne laissez pas le collier plus <strong>de</strong> 8 heures par jour au cou <strong>de</strong> votre animal et profitez <strong>de</strong> lapose ou du retrait du collier pour vérifier qu’il n’a aucun signe d’irritation.Commencez toujours par le niveau <strong>de</strong> stimulation le plus faible et déterminez le niveau d’intensité àpartir duquel votre chien réagit en augmentant progressivement.N’hésitez pas à faire appel aux conseils d’un dresseur professionnel pour un dressage adapté à votrechien.
Table <strong>de</strong>s matières<strong>Fr</strong> - 1 <strong>Fr</strong> - 4PageComposition du CANICOM 500.......................................................................................................................................05Présentation du produit..................................................................................................................................................05Première mise en service...............................................................................................................................................06Utilisation <strong>de</strong> la télécomman<strong>de</strong>......................................................................................................................................08Usure/remplacement <strong>de</strong> la pile <strong>de</strong> la télécomman<strong>de</strong>..................................................................................................10Usure/remplacement <strong>de</strong> la pile du collier récepteur...................................................................................................11Changement <strong>de</strong>s électro<strong>de</strong>s...........................................................................................................................................11Vérification <strong>de</strong> votre CANICOM 500................................................................................................................................11Pour obtenir les meilleures performances...................................................................................................................12Ajustement du collier......................................................................................................................................................12L’initiation au collier <strong>de</strong> dressage..................................................................................................................................12La différence entre la stimulation « continue » et la stimulation « flash » ................................................................13Précautions d’emploi......................................................................................................................................................13Entretien...........................................................................................................................................................................14En cas <strong>de</strong> dysfonctionnement.........................................................................................................................................14Caractéristiques techniques...........................................................................................................................................15Autonomie du collier CANICOM.....................................................................................................................................16Garantie............................................................................................................................................................................16Conditions <strong>de</strong> garantie....................................................................................................................................................16Enregistrement <strong>de</strong> votre produit....................................................................................................................................16Accessoires......................................................................................................................................................................16Collecte et recyclage <strong>de</strong> votre appareil en fin <strong>de</strong> vie.....................................................................................................17
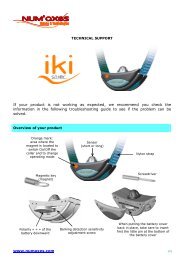
<strong>Fr</strong>-6Première mise en service◆ Mise en place <strong>de</strong> la pile dans le collier CANICOM- Dévissez les 4 vis du couvercle du collier CANICOM à l’ai<strong>de</strong> d’un tournevis.- Insérez la pile 3V Lithium CR2 en respectant la polarité indiquée près du logement <strong>de</strong> la pile(cf. Fig. 4).- Un bip sonore (son grave) est émis, indiquant une mise en place correcte <strong>de</strong> la pile.Si vous n’enten<strong>de</strong>z aucun bip après avoir inséré la pile, ôtez la immédiatement <strong>de</strong> son support.Vérifiez sa polarité avant une nouvelle insertion.- Avant <strong>de</strong> replacer le couvercle, contrôlez la présence du joint d’étanchéité dans sa rainure.- Repositionnez le couvercle.- Revissez modérément les 4 vis.Fig. 4Polarité « - » <strong>de</strong> la pilePolarité « + » <strong>de</strong> la pileJoint d’étanchéité◆ Mettre en/hors service la télécomman<strong>de</strong>La pile est déjà présente dans la télécomman<strong>de</strong> lorsque vous achetez le produit.- Mise en service : appui prolongé <strong>de</strong> 1 secon<strong>de</strong> sur le bouton rouge Marche/Arrêt (() situé surle côté <strong>de</strong> la télécomman<strong>de</strong> (cf. Fig.1). Des indications apparaissent sur l’écran LCD.- Mise hors service : appui prolongé <strong>de</strong> 1 secon<strong>de</strong> sur le bouton rouge Marche/Arrêt (() (cf.Fig.1).L’écran LCD s’éteint.◆ Mettre en/hors service le collierUn aimant situé sur le côté <strong>de</strong> la télécomman<strong>de</strong> permet <strong>de</strong> mettre en ou hors service le collier CANICOM.- Mise en service : mettre en contact le repère situé sur le côté <strong>de</strong> la télécomman<strong>de</strong> avec le repère rougedu collier pendant une durée <strong>de</strong> 1 secon<strong>de</strong> (cf. Fig. 5). Le voyant du collier s’allume puis clignote envert: le collier CANICOM est en Marche.- Mise hors service : mettre en contact le repère situé sur le côté <strong>de</strong> la télécomman<strong>de</strong> avec le repère((
<strong>Fr</strong>-10Usure/remplacement <strong>de</strong> la pile <strong>de</strong> la télécomman<strong>de</strong>En cas d’usure <strong>de</strong> la pile, les performances (portée radio) <strong>de</strong> la télécomman<strong>de</strong> se trouventdiminuées. Ne tar<strong>de</strong>z pas à la remplacer !Pour pouvoir contrôler la pile, mettez en service votre télécomman<strong>de</strong> CANICOM 500 et observez letémoin d’usure <strong>de</strong> la pile affiché sur l’écran LCD. Les divers symboles <strong>de</strong> cet indicateur ont lessignifications suivantes :La pile est en bon état.La pile est faible : prévoyez sans tar<strong>de</strong>r une pile <strong>de</strong> rechange.La pile est usagée : votre CANICOM 500 se met en sécurité, le système « se bloque » : vous<strong>de</strong>vez remplacer la pile.NUM’AXES vous recomman<strong>de</strong> d’utiliser <strong>de</strong>s piles <strong>de</strong> même modèle et <strong>de</strong> même marque que celles quivous ont été fournies lors <strong>de</strong> l’achat <strong>de</strong> votre produit. Des piles d’autres marques pourraient ne pasfonctionner ou ne pas être totalement compatibles avec votre produit.Vous pouvez vous procurez les piles adéquates auprès <strong>de</strong> NUM’AXES ou <strong>de</strong> votre distributeur.Remplacez la pile usagée en procédant <strong>de</strong> la façon suivante :- Au dos <strong>de</strong> la télécomman<strong>de</strong>, ôtez la vis et la trappe à pile.- Enlevez la pile usagée.- Insérez la pile neuve (3V Lithium CR 2) dans son supporten respectant la polarité indiquée près du logement<strong>de</strong> la pile (cf. Fig. 6).- Repositionnez la trappe à pile.- Fixez la trappe en utilisant la vis.- Vérifiez le bon fonctionnement <strong>de</strong> votre télécomman<strong>de</strong>.Fig. 6Mise en place ou remplacement<strong>de</strong> la pile dans la télécomman<strong>de</strong>CANICOM 500ATTENTIONRespectez bien les polarités
<strong>Fr</strong> - 11• Usure/remplacement <strong>de</strong> la pile du collierPour contrôler l’état <strong>de</strong> la pile du collier, observez le voyant <strong>de</strong> mise en/hors service situé en faça<strong>de</strong> ducollier :• La pile est en bon état : clignotement lent vert.• La pile est faible : clignotement rapi<strong>de</strong> rouge. Prévoyez sans trop tar<strong>de</strong>r le remplacement <strong>de</strong> la pile.Remplacez-la par une pile neuve <strong>de</strong> même type (3V Lithium CR2) (cf. § 1ère mise en service : Mise enplace <strong>de</strong> la pile dans le collier CANICOM).Vérifiez le bon fonctionnement <strong>de</strong> votre collier.NUM’AXES vous recomman<strong>de</strong> d’utiliser <strong>de</strong>s piles <strong>de</strong> même modèle et <strong>de</strong> même marque que celles quivous ont été fournies lors <strong>de</strong> l’achat <strong>de</strong> votre produit. Des piles d’autres marques pourraient ne pasfonctionner ou ne pas être totalement compatibles avec votre produit.Vous pouvez vous procurez les piles adéquates auprès <strong>de</strong> NUM’AXES ou <strong>de</strong> votre distributeur.• Changement <strong>de</strong>s électro<strong>de</strong>sDeux jeux d’électro<strong>de</strong>s <strong>de</strong> longueurs différentes sont livrés d’origine. La longueur <strong>de</strong>s électro<strong>de</strong>s doit êtresuffisante pour faire un bon contact avec la peau du chien et pour que le collier fonctionne correctement.Si votre chien a <strong>de</strong>s poils longs et que les électro<strong>de</strong>s courtes montées en usine ne conviennent pas,remplacez-les par les électro<strong>de</strong>s longues fournies avec les accessoires. Un serrage modéré à la mainsans outil est suffisant (ne pas utiliser <strong>de</strong> clé).• Vérification <strong>de</strong> votre CANICOM 500Vous pouvez à tout moment vérifier le bon fonctionnement <strong>de</strong> votre ensemble CANICOM 500 <strong>de</strong> la façonsuivante :- Avant d’effectuer cette opération, assurez-vous que votre collier est en position « arrêt ».- Vous pouvez alors placer chaque fil <strong>de</strong> la lampe néon test sous chacune <strong>de</strong>s électro<strong>de</strong>s (en les dévissantpuis en les revissant <strong>de</strong> façon à pincer les fils <strong>de</strong> la lampe test sous les électro<strong>de</strong>s).- Mettez la télécomman<strong>de</strong> et le collier en position « marche ».- Appuyez sur la touche « F » ou « C » et modifiez le niveau d’intensité <strong>de</strong>s stimulations : la lampe tests’allume avec plus ou moins d’intensité lumineuse. Votre appareil est en parfait état <strong>de</strong> fonctionnement.
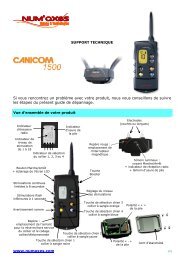
<strong>Fr</strong>-15Si le problème persiste, appelez le Service Après-Vente NUM’AXES au 02 38 63 64 40.Avec l’ai<strong>de</strong> <strong>de</strong> nos techniciens, <strong>de</strong> nombreux problèmes peuvent être résolus par téléphone.Selon l’ampleur du dysfonctionnement, vous <strong>de</strong>vrez peut-être retourner votre produit au ServiceAprès-Vente NUM’AXES afin qu’il soit réparé et testé. Ne retournez pas votre produità votre distributeur.Retournez-le à l’adresse suivante : NUM’AXESZAC <strong>de</strong>s Aulnaies - 745 rue <strong>de</strong> la Bergeresse -BP 3015745161 OLIVET ce<strong>de</strong>xPour toutes réparations, le service après-vente a impérativement besoin :- <strong>de</strong> votre produit complet- <strong>de</strong> la preuve d’achat (facture ou ticket <strong>de</strong> caisse)Si vous omettez l’un <strong>de</strong> ces éléments, le Service Après-Vente vous facturera la réparation.Une somme forfaitaire <strong>de</strong> 25 € TTC sera facturée en cas <strong>de</strong> retour SAV non justifié (par exemple pile horsservice, pile mise en place dans le mauvais sens, codage ou recodage télécomman<strong>de</strong>/collier non effectué).Caractéristiques techniquesTélécomman<strong>de</strong>Collier récepteurAlimentation 1 pile lithium 3 V type CR2 1 pile <strong>de</strong> 3V type CR2Autonomie En fonctionnement intensif : En veille : environ 7 moisenviron 30 000 comman<strong>de</strong>s En fonctionnement intensif :environ 2 mois<strong>Fr</strong>équence (Puissance) 869,525 MHz (250 mW) 869,525 MHzAntenne 35 mm IntégréePortée radio500 m environEtanchéité Au ruissellement A l’immersionSécurité et codage radio Assurés par microcontrôleur Assurés par microcontrôleurTémoin d’usure <strong>de</strong>s piles Par indicateur sur écran LCD Par voyant lumineuxNiveaux <strong>de</strong> stimulation 15Température d’utilisation Entre – 20°C et +40°C Entre – 20°C et +40°CDimensions : H x l x ép. 108 mm x 55 mm x 24 mm 38 mm x 68 mm x 43 mmPoids (avec la pile) 85 g 75 g (sans la sangle)Collier réglable à l’encolure <strong>de</strong>20 à 50 cm
• Autonomie du collier CANICOM<strong>Fr</strong> - 16 1- 7 mois en veille : à raison d'une mise en marche <strong>de</strong> 4 heures par jour- 2 mois en fonctionnement intensif : soit environ 5 000 déclenchements <strong>de</strong> 2 secon<strong>de</strong>s au niveau 15Pour préserver la pile située dans le collier, il est nécessaire <strong>de</strong> le mettre hors service dès que vous nel'utilisez plus.• GarantieNUM’AXES garantit le produit contre les défauts <strong>de</strong> fabrication pendant les 2 années qui suiventl’acquisition. Les frais <strong>de</strong> transport aller-retour du produit sont à la charge exclusive <strong>de</strong> l’acheteur.• Conditions <strong>de</strong> garantie1. La garantie sera assurée uniquement si la preuve d’achat (facture ou ticket <strong>de</strong> caisse) est présentéesans rature à NUM’AXES.2. Cette garantie ne couvre aucun <strong>de</strong>s points suivants :- le renouvellement <strong>de</strong> la pile- le renouvellement <strong>de</strong> la sangle- les risques <strong>de</strong> transport directs ou indirects liés au retour du produit chez NUM’AXES- l’endommagement du produit résultant :- <strong>de</strong> la négligence ou faute <strong>de</strong> l’utilisateur (ex. : morsures, cassures, fêlures)- d’une utilisation contraire aux instructions ou non prévue- <strong>de</strong> réparations faites par <strong>de</strong>s réparateurs non agréés- la perte ou le vol3. Si le produit est reconnu défectueux, NUM’AXES le réparera ou l’échangera selon son choix.4. NUM’AXES garantit le délai d’intervention <strong>de</strong> 48 heures (hors délais postaux).5. NUM’AXES ne pourra être tenu pour responsable <strong>de</strong>s dommages qui pourraient résulter d’unemauvaise utilisation ou d’une panne du produit.6. NUM’AXES se réserve le droit <strong>de</strong> modifier les caractéristiques <strong>de</strong> ses produits en vue d’y apporter <strong>de</strong>saméliorations techniques ou <strong>de</strong> respecter <strong>de</strong> nouvelles réglementations.7. Les informations contenues dans ce <strong>gui<strong>de</strong></strong> peuvent faire l’objet <strong>de</strong> modifications sans préavis.8. Photos et <strong>de</strong>ssins non contractuels.• Enregistrement <strong>de</strong> votre produitVous pouvez enregistrer votre produit sur notre site interne www.numaxes.com.• AccessoiresVous pouvez vous procurer les accessoires (pile, sangle…) à tout moment auprès <strong>de</strong> NUM’AXES ou <strong>de</strong>votre distributeur.
<strong>Fr</strong>-17Collecte et recyclage <strong>de</strong> votre appareil en fin <strong>de</strong> vieLe pictogramme apposé sur votre produit signifie que l’équipement ne peut être mêlé aux orduresménagères.Il doit être remis à un point <strong>de</strong> collecte approprié pour le traitement, la valorisation et le recyclage <strong>de</strong>sdéchets électroniques ou rapporté chez votre distributeur.En adoptant cette démarche, vous faites un geste pour l’environnement, vous contribuez à la préservation<strong>de</strong>s ressources naturelles et à la protection <strong>de</strong> la santé humaine.Pour plus d’informations sur les lieux <strong>de</strong> collecte <strong>de</strong>s équipements usagés, vous pouvez contacter votremairie, le service <strong>de</strong>s traitements <strong>de</strong> déchets ménagers ou nous retourner le produit.745 745 rue rue <strong>de</strong> <strong>de</strong> la la Bergeresse – Z.A.C. <strong>de</strong>s Aulnaies –– B.P. B.P. 3015745161 OLIVET CEDEX - FRANCETél. Tél. + + 33 33 (0)2 38 63 64 40 / Fax +33 (0)2 38 38636331310000ventes@numaxes.com info@numaxes.com / www.numaxes.com/
User’s <strong>gui<strong>de</strong></strong><strong>Gb</strong> - <strong>19</strong>WARNINGAny person with individual <strong>de</strong>vice for cardiac assistance (pacemaker, <strong>de</strong>fibrillator) must takeprecautions when they use CANICOM 500.This <strong>de</strong>vice emits some static magnetic fields (a magnet is located in the remote control).<strong>Fr</strong>equency = 869 Mhz, at = 250 mW.The <strong>de</strong>vice complies with the European Standard ETSI EN 300 220.Thank you for choosing a NUM’AXES product. Before using your CANICOM 500, please read theinstructions in this <strong>gui<strong>de</strong></strong> carefully and keep it for future reference.Before using CANICOM 500, we advise you to have your dog checked by your vet to ensure it is fit towear a collar.Check your dog’s neck regularly, the repeated rubbing of the contact points against the animal’s skin maycause irritation. If this happens, remove the collar until all signs of skin irritation have disappeared.Do not leave the collar more than 8 hours per day on your dog.Start with the lowest level of stimulation and <strong>de</strong>fine the level from which your dog reacts by increasinggradually.Do not hesitate to contact a professional trainer for any further advice.
In<strong>de</strong>x<strong>Fr</strong> - 1 <strong>Gb</strong> - 20Contents of the product CANICOM 500..........................................................................................................................21Description of the product..............................................................................................................................................21First use from new..........................................................................................................................................................22How to use the remote control.......................................................................................................................................24Checking/replacing battery of remote control..............................................................................................................26Checking/replacing battery of receiver collar...............................................................................................................27Changing the contact points...........................................................................................................................................27How to check that your CANICOM 500 is functioning properly....................................................................................27Getting the best results...................................................................................................................................................27Fitting the collar .............................................................................................................................................................28Starting out with the training collar...............................................................................................................................28The difference between « continuous » and « flash » stimulation .............................................................................29Cautions for use .............................................................................................................................................................29Maintenance.....................................................................................................................................................................30Troubleshooting .............................................................................................................................................................30Technical specifications..................................................................................................................................................31Receiver battery life.........................................................................................................................................................31Guarantee.........................................................................................................................................................................32Guarantee conditions......................................................................................................................................................32Register your product......................................................................................................................................................32Spare parts.......................................................................................................................................................................32Collection and recycling of your <strong>de</strong>vice at the end of its life.........................................................................................33Page
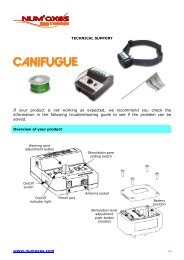
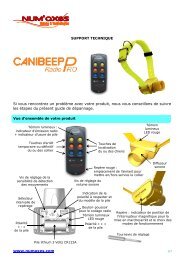
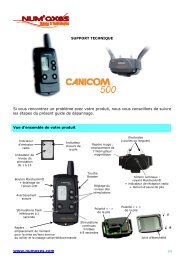
<strong>Gb</strong> <strong>Gb</strong>- 2121• Contents of the product CANICOM 500Insi<strong>de</strong> the packaging you will find:- 1 CANICOM receiver collar receiver CANICOM collar fitted with short contact points- 1 CANICOM remote control 500 remote CANICOM control500fitted with 1 lithium 3 Volts CR2 battery- 1 lithium 3 Volts CR2 battery for the collar- 1 neonneon testtest lamppair of long contact points- 1 pair of long contact pointscarry strap- 1Thiscarryuser’sstrap<strong>gui<strong>de</strong></strong>- This user’s <strong>gui<strong>de</strong></strong>Description of the productREMOTE CONTROLDiagram. 1On/Off switch+ LCD screenretro-lightningRed indicator: Areawhere the On/Offswitch magnet islocatedBooster buttonRECEIVER COLLARDiagram 22 contact points(short or long)LCD SCREENDiagram. 3On/Off indicator+ indicator ofradio reception+ battery levelindicatorBeeperbuttonFlashstimulationsshorterthan 1 secondStimuationleveladjustmentRadiotransmissionindicatorBatterylevelindicatorArea wherethe magnet islocatedto switchOn/Offthe collar andto (re)co<strong>de</strong>LCDscreenContinuous stimulationslimited to 8 secondsStimulation levelindicator (from 1 to 15)
<strong>Gb</strong> <strong>Gb</strong>- 2222• First use from newFitting the battery in inthe thereceiver collar- Unscrew the 4 screws of the top ofCANICOM using a ascrewdriver.- Insert the battery (3V Lithium CR2) paying attention to follow polarity indicated on onthe thebatteryhousing (ref. Diagram 4).4).- A beep beepsound sound (low (low pitch) pitch) is emitted, is emitted, indicating indicating the correct installation the correct of the installation battery.of the battery.IfIf you do not nothear hearany anybeep beepafter afterhaving havinginserted insertedthe thebattery, battery,remove removeit it immediatelyimmediately thefrom batteryits housing.from itshousing. Check the polarity before trying againCheck the polarity before trying againBefore replacing the lid, check that the rubber seal is in its groove.-ScrewBeforeupputtingthe thescrewslid backwithincareplace,(dochecknot overtightenthat the rubberthem).seal is in its groove.- Screw up the 4 screws with care (do not overtighten them).Polarity « - » of the batteryPolarity « + » of the batteryDiagram 4SealActivate/<strong>de</strong>activate Activate/<strong>de</strong>activatethe theremote remotecontrolRemote Remote control control is is supplied supplied with with battery battery fitted. fitted.Activate: the On/Off red button ((- Activate: press for 1 second the On/Off red ) locatedbutton (( (( on the) located si<strong>de</strong> ofon thethe remotesi<strong>de</strong> of controlthe remote for 1controlsecond (ref.Diagram.1).(ref. Diagram.1). IndicationsIndications appearappear on theon LCDthe LCDscreen.screen.Deactivate: press the On/Off red button ((- Deactivate: press for 1 second the On/Off red )buttonof the remote(( (( ) of controlthe remote for 1control second(ref. (ref.Diagram.1).Diagram.1). TheLCDThe LCDscreen screen is off.is off.To increase the battery life of the remote control, we recommend you to <strong>de</strong>activate the unit ififyou are notTo increase the battery life of the remote control, we recommend you to <strong>de</strong>activate the unit if you areusing your CANICOM 500 for a long period.not using your CANICOM 500 for a long period. Activate/<strong>de</strong>activate the receiver collar Activate/<strong>de</strong>activate the receiver collarmagnet located in the remote control is used to either switch on/off the receiver collar.A magnet located in the remote control is used to either switch on/off the receiver collar.((( (( (
<strong>Gb</strong> - 23- Activate: approach the the area wherearea thewhere the On/Off switchOn/Off magnetswitch magnetis locatedis insi<strong>de</strong>located theinsi<strong>de</strong>the remotethe controlremote untilcontrol until untilcoming inin in contact onon on red red indicator located on on the the receiver receivercollar, collarhold hold for 1for for second1 second (ref.(ref. (ref. Diagram 5),5), 5), theindicator the the indicator light on light theon collar the the collar will flash will will flash in green in in green indicating indicating that the that that collar the the collar is On. is is On. On.- Deactivate: approach the the area area where the the the On/Off switch switch magnet is is located is located insi<strong>de</strong> insi<strong>de</strong> the the the remote remote control controluntilcoming until coming contact in in contact redon on indicator red red indicator located located on the on on the the receiver receiver collar collar, forhold 1 second for for 1 second (ref. Diagram (ref. (ref. Diagram5), theindicator 5), 5), the the indicator light willlight light flashwill will fromflash green from from togreen red and to to then red red and and off: then then collar off: off: the the iscollar off. is is off. off.To To increase the the battery life life life of of of the the the receiver collar, we we we recommend you you you <strong>de</strong>activate the unit the the unit if unit youif if are you you no are are longer no nousing longer your using CANICOM your your CANICOM 500 for a500 500 longfor for period. a long long period.Approach until coming incontact those 2 areasduring 1 secondDiagram 5Activate/Deactivate a receivercollar with a CANICOM 500remote controlREMOTE CONTROLCOLLARCoding Coding of the remote control and receiver collarCoding of of the the remote remote control control and and receiver receiver collar collarEach Each remote remote control control has has its its own individualindividual individual radioradio radio operatoroperator operator co<strong>de</strong>.co<strong>de</strong>. co<strong>de</strong>. TheThe The codingcoding coding ofofthethe of the remote remote control control withwith with thethethe receiver receiver collar collar enables enables to couple the two your units remote to work control together.with the receiver provi<strong>de</strong>d.IMPORTANT: IMPORTANT: before before beginningbeforebeginning thebeginningthe codingthecoding (firstcoding(first use(firstuse ofuseof the the receiverofreceiver orthe receiveror re-coding), re-coding), makeor re-coding),make sure sure nomakeno othersureotherperson noperson is is using using his his CANICOM CANICOM 500 500 or or other other products products from from the the NUM'AXES NUM'AXES range range close close by: by: your your receiver receiverother collar collarperson could could acci<strong>de</strong>ntally acci<strong>de</strong>ntallyis using hisrecord recordCANICOM the the500 co<strong>de</strong> co<strong>de</strong>orof ofother his his remote remoteproducts control. control.from the If If that thatNUM'AXES occurs, occurs, re-co<strong>de</strong> re-co<strong>de</strong>range close the the remote remoteby: yourreceiver controlcontrolwithwith collar thethe could receiverreceiver acci<strong>de</strong>ntally collar.collar. record the co<strong>de</strong> of his remote control. If that occurs, re-co<strong>de</strong> theremote control with the receiver collar.
<strong>Gb</strong> - 24CODING PROCEDURE FOR THE 1ST USE1. Activate the remote control: press for 1 second the On/Off red button (( ) located on the si<strong>de</strong> of theremote control.2. Activate the receiver collar: approach the area where the On/Off switch magnet is located in theremote control until coming in contact on red indicator located on the receiver collar, hold for 1second.3. Move the remote control away from the receiver collar.4. Press the button of the remote control. A beep sound is emitted, the collar is then synchronizedwith your remote control.RE-CODING PROCEDURE (for all codings other than the 1st)1. Activate the remote control: press for 1 second the On/Off red button (( ) located on the si<strong>de</strong> of theremote control.2. Receiver collar in position « <strong>de</strong>activate » (indicator off): approach the area where the On/Off switchmagnet is located in the remote control until coming in contact on red indicator located on the receivercollar, hold for 6 seconds. The indicator lights in fixed green, then flashes in red.3. Move the remote control away from the receiver collar.4. Press the button of the remote control. A beep sound is emitted, the collar is then synchronizedwith your remote control.Reprogram a receiver collarReceiver can be re-co<strong>de</strong>d in<strong>de</strong>finitely, either with the same remote control, or with a new CANICOMremote control.Ref. § Re-coding procedure.• How to use the remote controlThe CANICOM 500 remote control is <strong>de</strong>signed to operate with 1 receiver collar. button: beeperIf you press the « Beeper » button the receiver collar will emit sound signals. There is no time limit forthis function: the beeper will continue to sound for as long as the button is pressed.A « transmission » symbol will appear on the LCD screen of the remote control; the indicator light on thecollar goes from flashing green to permanent green for as long as the button is pressed.It’s up to you to use the beeper <strong>de</strong>pending on the way you want to train your dog. With the beeper buttonyou can:- send a sound to your dog when it is disobedient,- draw its attention,…It’s very important to always use the beeper button in the same way in or<strong>de</strong>r not to disturb your dog.((
(<strong>Gb</strong> - 25 F button: Flash stimulationPress the «F» button to send a warning to your dog using stimulations transmitted by the two contactpoints located on the receiver collar for a <strong>de</strong>fined length of time of less than one second.A « transmission » symbol will appear on the LCD screen of the remote control; the indicator light on thecollar goes from flashing green to permanent red while the stimulations are being sent. C button: Continuous stimulationPress the «C» button to send a warning to your dog using stimulations transmitted by the two contactpoints located on the receiver collar, this will last for as long as the button is pressed but limited to8 seconds maximum.If you press the «C» button for more than 8 seconds, the collar will automatically go into safety mo<strong>de</strong> fora few seconds before restarting itself normally.Nota: Beeps can be associated to the stimulation by pressing first the “C” button and then thebutton. « Booster » buttonPress the Booster button to stop your dog instantaneously. You can choose the stimulation level youthink to be the best for an immediate effect. As a result, you do not need to press the « + » button. Thosestimulations are transmitted by the two contact points located on the collar for as a long as the buttonis pressed but no more than 8 seconds max.If you press the « Booster » button for more than 8 seconds, the collar will automatically go into safetymo<strong>de</strong> for a few seconds before restarting itself normally.« Booster » button configuration:- select the stimulation level 01- press the ”-“ button until the stimulation level flashes on the LCD screen- press the ”+“ or ”-“ button to modify the stimulation level- press the « Booster » button to confirm the level selected « + » and « - » : stimulation level control buttonsUse the “+”/”-“ buttons for rapid adjustment of the stimulation level of the receiver collar.15 levels are available.Level 1: very weak stimulation. Level 15: strong stimulation.Always start with the lowest level of stimulation. Retro-lightning of the LCD screenYou can light the LCD screen for approximately 6 seconds by pressing briefly the On/off switch ( ((approx. 1/2 second).)
<strong>Gb</strong> <strong>Gb</strong>- 2626• Checking/replacing battery of remote controlPerformance (radio range) of the remote control may <strong>de</strong>teriorate as battery batteries becomes weak. BeBeprepared to replace the battery.To check the condition of the battery, turn on onthe theremote control and CANICOM look at the 500 battery and look level at the indicatorbatterylevel on the indicator LCD screen. on the The LCD symbols screen. which The symbols appear indicate which appear the following:indicate the following:Battery fully charged.Weak battery: prepare to replace the battery.Dead battery: your CANICOM 500 functions in safety mo<strong>de</strong> and the system locks up.The battery must be replaced.NUM’AXES advises to use the same type and same brand of ofbatteries as asthose thosesupplied in inyour your newnewpurchased product. Other brands of ofbatteries may not notoperate, or ormay may not not be be completely compatiblewith your product.You can purchase the suitable batteries from NUM’AXES or from your distributor.Remove the old battery and replace it with a new one ::- On the back of the remote control, unscrew the thescrew and andremove the battery the battery cover.cover.- Remove the old battery.- InsertInsert thethe newnew batterybattery (3-V(3-V lithiumlithium CRCR 2)2) payingpaying attentionattention toto followfollow polaritypolarity indicated indicatedon onthe thebatterybatteryhousing. (ref. Diagram 6).housing. (ref. Diagram 6).Put the lid back in place.- PutPut thethe batterytop back,cover usingback thein screw.place.- Retighten Check the the remote screw.control operates correctly.- Check the remote control operates correctly.Diagram. 6Replacing batteryof CANICOM 500WARNINGMake sure the polarity is correct
<strong>Gb</strong> - 27• Checking/Replacing battery of receiver collarTo check the condition of the receiver collar battery, observe the On/Off indicator located on the front ofthe receiver collar:• Battery fully charged: flashes slowly green.• Weak battery: flashes quickly red. Replace it with a new battery 3-V Lithium CR2 (See § Fitting thebattery in the receiver collar). Check the receiver collar operates correctly.NUM’AXES advises to use the same type and same brand of batteries as those supplied in your newpurchased product. Other brands of batteries may not operate, or may not be completely compatible withyour product.You can purchase the suitable batteries from NUM’AXES or from your distributor.• Changing the contact pointsTwo different series of contact points are supplied. The length of the contact points must be sufficient tohave proper contact with the dog’s skin, enabling the <strong>de</strong>vice to operate correctly.If you have a long-haired dog and the short contact points fitted to the collar in the factory are ina<strong>de</strong>quate,remove and replace them with the long ones supplied with the kit. Carefully tighten them manually (donot use a key).• How to check that your CANICOM 500 is functioning properlyYou can check that your CANICOM 500 is operating correctly at any time.- Before doing so, make sure that the receiver collar is turned « off ».- Place the neon test lamp in contact with each of the contact points (by unscrewing them then by screwingthem up in or<strong>de</strong>r to grip wires of the lamp un<strong>de</strong>r the contact points).- Turn « on » the remote control and receiver collar.- Press the « F » or « C » button and modify the level of intensity of the stimulations: the test lamp willcome on with more or less intensity.• Getting the best resultsThe training instructions you send to your dog are sent from the remote control to the receiver collar byradio waves. These radio waves are sensitive and the range reaches approximately 500 meters (<strong>de</strong>pendingon geography and environment).The performances of your CANICOM 500 will be optimal if you respect the followingrecommendations:
<strong>Gb</strong> - 28- To obtain a good radio range, do not cover the antenna when you hold the remote control in your hand.- The position of the receiver collar around the neck of the dog should be in the following way: the “On/Off”indicator is visible and is not in contact with the breast of the dog.- Check the batteries (remote control and receiver collar) before using the unit and replace them as soonas the level of load is weak.- The performances of the batteries <strong>de</strong>crease slightly un<strong>de</strong>r temperatures lower than 0°C. If possiblekeep the remote control warm (e.g. in the pocket) before using it.• Fitting the collarThe strap must be adjusted so that the contact points are in contact with the skin of the dog.- If the strap is too loose, the collar is likely to move and repeated friction can irritate the skin of your dog.Furthermore, it will not function correctly.- If the collar is too tight, the dog will have breathing difficulties.Do not leave the collar positioned at the same place for long periods (i.e. over 3 hours) because this cancause irritations. If your dog must carry the collar for long periods, change regularly the position on theneck of your dog.Never leave the collar more than 8 hours per day on your dog. Check your dog’s neck regularly. Ifirritations appear, remove the collar until all signs of skin irritation have disappeared.• Starting out with the training collar- You can start using the collar with 6 month-old puppies that have already received some basic training:« stay », « sit », or at least « no ».- Do not use the collar with dogs that are not in good physical shape (i.e. cardiac problems, epilepsy) orhave behavioural problems.- Your dog will need to get used to the collar; for a few days let the dog wear the collar but do not use it.- Positive and effective training takes time. Do not rush:- Choose a familiar area, a place your dog is used to.- Define the level of stimulation from which your dog reacts by starting with the level of thelowest intensity and increasing gradually.- Choose the right moment to press the button: at the exact time your dog does somethingwrong.- Give your dog plenty of encouragement: it will learn faster and its <strong>de</strong>sire to respond willonly increase.- Do not hesitate to contact a professional trainer for any further advice.
<strong>Gb</strong> - 29• The difference between « continuous » and « flash » stimulationBoth functions are extremely interesting and useful, since they can be adapted to any dog and anysituation.« continuous » stimulationShould be typically used for training at a location that is familiar to the dog (at the beginning). Becausethe stimulation is continuous, use the lowest intensity and take advantage of the length of the stimulationrather than of the intensity, so your dog has time to un<strong>de</strong>rstand.« flash » stimulationUse this function to correct your dog.The low stimulation will attract its attention, it will feel something unpleasant at the precise moment itis behaving badly.• Cautions for use- This appliance is not inten<strong>de</strong>d for use by persons (including children) with reduced physical, sensory ormental capabilities, or lack of experience and knowledge, unless they have been given supervision orinstruction concerning use of the appliance by a person responsible for their safety.- Children should be supervised to ensure that they do not play with the appliance.- Before using CANICOM, we advise you to have your dog checked by your vet to ensure it is fit to wear acollar.- The CANICOM receiver collar is totally waterproof. Your dog can swim in water. In or<strong>de</strong>r to maintainwater tightness, we recommend the replacement of the seal located in the receiver collar every year.- The remote control is showerproof only: it is only <strong>de</strong>signed to remain a short time in the rain. Put it ina dry place as soon as possible. If the remote control falls into the water, it could be damaged in anirreversible way.- Your dog should not wear a medal, metallic collar, or any other kind of collar together with a CANICOMcollar- Avoid placing the remote control close to objects sensitive to magnetic fields which could be irreversiblydamaged.- Do not place or keep the unit in places exposed to high temperatures.- Remove the battery from the receiver collar and the remote control if you are not using the appliance for3 months or more. The collar will memorize the configuration chosen (coding).- It is necessary to replace the batteries every two years, even if the unit has not been used for longperiods.- Never leave a discharged battery in the unit (remote control and collar): leakage could damage yourCANICOM 500.
• Maintenance<strong>Gb</strong> <strong>Gb</strong>- 3030- Avoid cleaning the unit with volatile liquids such as assolvents or orcleaning fluids. Use Usea asoft soft cloth clothandandneutral <strong>de</strong>tergent.- In or<strong>de</strong>r to to maintain water tightness, we we recommend the the replacement of theof seal the located seal located in the receiver in thecollar receiver every collar year. every year.• TroubleshootingShould your CANICOM 500 500stop stopworking workingor or<strong>de</strong>velop <strong>de</strong>velopa afault, first firstread readthis thisuser’s user’s<strong>gui<strong>de</strong></strong> <strong>gui<strong>de</strong></strong>over, over, then thencheckcheckthethe batteriesbatteries (see(see § Checking/replacingChecking/replacing batterybattery ofof remoteremote controlcontrol andand § CheckingChecking replacingreplacing batterybatteryofreceiver collar) and replace them if necessary and retry. Also check that you are using the productof receiver collar) and replace them if necessary and retry. Also check that you are using the productcorrectly.Ifcorrectly.you encounter any problems, re-co<strong>de</strong> the receiver collar with the remote control (ref. re-codingprocedure).If you encounter any problem, re-co<strong>de</strong> the receiver collar with the remote control (ref. re-codingRe-initialise procedure).the system by removing the battery from its housing, then with a metallic tool (e.g.screwdriver, Re-initialise scissors) the system touch by each removing of the the 2 battery contacts from its forhousing, 2 seconds then approximately with a metallic (ref. Diagram tool (e.g.7).Insert screwdriver, the battery scissors) again: touch Oneeach beepof isthe emitted, 2 battery indicating contacts the for battery 2 seconds is inapproximately correct position. (ref. Diagram 7).Insert the battery again: One beep is emitted, indicating the battery is in correct position.Diagram 7Reset: connectthe 2 supports ofthe batteryRestart your CANICOM using the remote control.If the problem persists, contact your distributor. or check out on www.numaxes.com.According You Depending can also toon contact the the extent NUM’AXES of of the the malfunction, at +33.2.38.69.96.27 you may or have by to email to return export@numaxes.comyour product for check service and and repair.Depending For all repairs, on the please extent supply of the the malfunction, following: you may have to return your product for service and repair.For - the all complete repairs, please productsupply the following:- the complete proof of of purchase product(invoice or sales receipt)If- If theyouyou proofomitomit ofoneone purchase ofofthesethese(invoice items,items,or thethesales AfterAfterreceipt) SalesSalesServiceServicewillwillhavehavetotoinvoiceinvoiceyouyouforforanyanyrepairrepaircostscostsincurred.If incurred. you omit one of these items, the After Sales Service will have to invoice you for any repair costsincurred.
Technical specifications<strong>Gb</strong> <strong>Gb</strong>- 3131Remote controlReceiver collarPower 1 3-V lithium battery CR2 1 3-V battery CR2Battery life Continuous use: In stand by: approximatelyapproximately 30 000 triggers 7 monthsContinuous use: approximately2 months<strong>Fr</strong>equency (Power) 869.525 MHz (250 mW) 869.525 MHzAntenna 35 mm IntegratedRangeapproximately 500 mHermetic seal ShowerproofWater tight WaterproofRadio operator safety and coding by microcontrollermicrocontrolor by microcontrollermicrocontrolorIndicator of wear of the batteries Indicator on LCD screen Indicator lightLevels of stimulations 15Use temperature between – 20°C and +40°C between – 20°C and +40°CDimensions : H x L x D. 108 mm x 55 mm x 24 mm 38 mm x 68 mm x 43 mmWeight (with the battery) 85 g 75 g (without strap)Collar adjustable to neck sizesfrom 20 to 50 cmReceiver battery life- 7 months in stand by: for a use of 4 hours a day- 2 months in continuous use: about 5 000 stimulations of 2 seconds at level 15To increase the battery life of the receiver collar, we recommend you to <strong>de</strong>activate the unit if you are notusing it for a long period.
<strong>Gb</strong> - 32• GuaranteeNUM’AXES guarantees the products against all production <strong>de</strong>fects for two years after purchase.All postage and packing charges will be the purchaser’s sole responsibility.• Guarantee conditions1. The guarantee will be valid only if the proof of purchase (invoice or sales receipt), without cancellation,is submitted to the distributor or to NUM’AXES. The guarantee is limited to the original purchaser.2. This guarantee does not cover the following:- Changing the battery- Changing the strap- Direct or indirect risks incurred when sending the article back to the distributor or NUM’AXES- Damage to the article caused by:- negligence or incorrect use (ex: bites, breakage, cracking)- use contrary to the instructions or not envisioned therein- repairs performed by unauthorized persons- Loss or theft3. If the product is found to be <strong>de</strong>fective, NUM’AXES will either <strong>de</strong>ci<strong>de</strong> to repair or replace it.4. No claim may be advanced against NUM’AXES, particularly in relation to incorrect use or breakdown.5. NUM’AXES reserves the right to modify the characteristics of its products with a view to makingtechnical improvements or to comply with new regulations.6. The information contained in this <strong>gui<strong>de</strong></strong> may be subject to amendment without prior notice.7. Photos and drawings are not contractual.• Register your productYour product can be registered on our website at www.numaxes.com.• Spare partsYou can purchase spare parts (batteries, straps…) from your supplier at any time.
<strong>Gb</strong> - 33Collection and recycling of your <strong>de</strong>vice at the end of its lifeThe pictogram which appears on your product means that this one can not be thrown withhousehold refuse.You have to bring the <strong>de</strong>vice to a collection location suitable for treatment, <strong>de</strong>velopment, recycling, ofelectronic wastes or bring it back to your distributor.Adopting this process, you do something for the environment, you contribute to the preservation ofnatural resources and to the protection of human health.www.numaxes.cominternationalsales@numaxes.comexport@numaxes.com
<strong>Manual</strong> <strong>de</strong> instruccionesEs - 35NOTA PREVIASe recomienda a todo portador <strong>de</strong> un aparato individual <strong>de</strong> asistencia cardio vascular (estimuladorcardíaco, marcapasos, <strong>de</strong>sfebrilador) tomar precauciones en la utilización <strong>de</strong>l CANICOM 500.Este aparato emite campos magnéticos estáticos (imán situado en el mando a distancia) así comoondas electromagnéticas <strong>de</strong> altas frecuencía (frecuencía = 869Mhz, una potencia <strong>de</strong> emisíonmáxima = 250 mW).Este aparato se ajusta a la normativa europea ETSI EN 300 220.Todo nuestro agra<strong>de</strong>cimiento por haber elegido un aparato <strong>de</strong> la gama NUM’AXES. Para obtener <strong>de</strong> él unrendimiento máximo, lea atentamente, antes <strong>de</strong> usar al CANICOM 500, las instrucciones <strong>de</strong>l manual, queconservará para cualquiera consulta posterior.Antes <strong>de</strong> colocar a su perro el CANICOM, se recomienda que sea examinado por un veterinario con el fin<strong>de</strong> cerciorarse <strong>de</strong> que el animal esté en condiciones <strong>de</strong> llevar el collar.Verificar regularmente el cuello <strong>de</strong> su perro, porque los frotamientos repetidos <strong>de</strong> los electrodos sobrela piel pue<strong>de</strong>n provocar a veces irritaciones. En este caso, retirarle el collar hasta que <strong>de</strong>saparezcanlas irritaciones.No <strong>de</strong>jar nunca el collar más <strong>de</strong> 8 horas por día sobre el cuello <strong>de</strong> su perro. Cada vez que le quite ole ponga su collar, verificar que no hay ningún signo <strong>de</strong> irritaciones.Empiece siempre con el nivel <strong>de</strong> estímulo más bajo, <strong>de</strong>termine el nivel <strong>de</strong> intensidad <strong>de</strong>s<strong>de</strong> el cual superro reacciona y aumente paulatinamente.Le aconsejamos buscar la ayuda <strong>de</strong> adiestradores profesionales para un adiestramiento adaptado asu perro.
Es - 36ÍndicePáginaComposición <strong>de</strong>l CANICOM 500......................................................................................................................................37Presentación <strong>de</strong>l CANICOM 500.....................................................................................................................................37Primera puesta en servicio.............................................................................................................................................38Utilización <strong>de</strong>l mando a distancia...................................................................................................................................40Desgaste/sustitución <strong>de</strong> la pila <strong>de</strong>l mando a distancia.................................................................................................42Desgaste/sustitución <strong>de</strong> la pila <strong>de</strong>l collar receptor......................................................................................................43Cambio <strong>de</strong> los eléctrodos................................................................................................................................................43Verificación <strong>de</strong> su CANICOM 500....................................................................................................................................44Para obtener los mejores resultados............................................................................................................................44Ajuste <strong>de</strong>l collar...............................................................................................................................................................44Iniciación al collar <strong>de</strong> adiestramiento............................................................................................................................45La diferencia entre estímulo « continuo » y « flash »...................................................................................................45Precauciones <strong>de</strong> uso.......................................................................................................................................................45Mantenimiento.................................................................................................................................................................46En caso <strong>de</strong> malfuncionamiento......................................................................................................................................46Características técnicas..................................................................................................................................................47Autonomía collar receptor CANICOM............................................................................................................................47Garantía............................................................................................................................................................................47Condiciones <strong>de</strong> la garantía..............................................................................................................................................47Inscriba su producto........................................................................................................................................................48Accesorios........................................................................................................................................................................48Reciclaje <strong>de</strong> aparatos electrónicos al final <strong>de</strong> su vida..................................................................................................48
Es Es- 3737• Composición <strong>de</strong>l CANICOM 500Al abrir el embalaje, encontrará:- 1 collar - 1 collar CANICOM CANICOM equipado con electrodos cortos- 1 mando - 1 mando CANICOM CANICOM 500 equipado 500 equipado con con una una pila pila <strong>de</strong> litio <strong>de</strong> litio 3 Volts 3 Volts CR2 CR2- 1 pila - 1 <strong>de</strong> pila litio <strong>de</strong> 3litio Volts 3 Volts CR2 CR2 para para el collar el collar- 1 lámpara - 1 lámpara <strong>de</strong> prueba <strong>de</strong> pruebaCOLLAR RECEPTOR- 1 juego- 1 juego <strong>de</strong> electrodos<strong>de</strong> electrodos largoslargosFig. 2- 1 correa <strong>de</strong> seguridad- 1 correa <strong>de</strong> seguridad- este manual <strong>de</strong> instrucciones- este manual <strong>de</strong> instruccionesPresentación <strong>de</strong>l CANICOM 500MANDO A DISTANCIAFig. 1BotónEncendido/Apagado+ Iluminacíon <strong>de</strong> lapantalla LCDAviso sonoroEstímulosflash inferioresa 1 segundoIndicador rojo :Zona en la cual sesitúa el interruptormagnéticoTecla <strong>de</strong> estímulosprogramables«Booster»Ajuste <strong>de</strong>lnivel <strong>de</strong> losestímulosIndicador <strong>de</strong>emisión radioPANTALLA LCDFig. 32 electrodos(cortos olargos)Luz luminosaEncendido/Apagado+ indicador <strong>de</strong>recepción radio+ indicador <strong>de</strong><strong>de</strong>sgaste <strong>de</strong>la pilaIndicador<strong>de</strong> carga<strong>de</strong> la pilaMarca paraponer En/Fuera<strong>de</strong> servicio elcollar ycodificaciónradioPantallaLCDEstímulos continuoslimitados a 8 segundosIndicador <strong>de</strong>l nivel <strong>de</strong>estímulo (<strong>de</strong> 1 a 15)
Es Es- 3838• Primera puesta en en servicioColocar la pila en el collar- Desenrosque Colocarlosla pila4 tornillos en el collar<strong>de</strong> la tapa <strong>de</strong>l collar CANICOM usando un <strong>de</strong>stornillador.Desenroscar los tornillos <strong>de</strong> la tapa <strong>de</strong>l collar CANICOM usando un <strong>de</strong>stornillador.- Introduzca la pila (3 volts <strong>de</strong> litio CR2) respetando la orientación indicada cerca <strong>de</strong>l alojamiento <strong>de</strong>Introduzca la pila (3 volts <strong>de</strong> litio CR2) respetando la orientación indicada cerca <strong>de</strong>l alojamiento<strong>de</strong>la pila la pila(cf. (cf.Fig. Fig.4).4).Se Se emite una señal sonora que indica la la colocación correcta <strong>de</strong> <strong>de</strong> la la pila. pila.Si no huviera ningúna señal <strong>de</strong>spues <strong>de</strong> insertar la pila, sacarla y colocarla correctamente, teniendocuidado <strong>de</strong> la polaridad <strong>de</strong> la pila.- Antes <strong>de</strong> colocar la tapa, compruebe que la la junta torica tórica se se encuentra bien encolocada la ranura en <strong>de</strong> la la ranura trampilla. <strong>de</strong>- Apriete la trampilla.ligeramente los 4 tornillos.- Apriete ligeramente los 4 tornillos.Polaridad « - » <strong>de</strong> la pilaPolaridad « + » <strong>de</strong> la pilaFig. 4JuntatóricatoricaPuesta en/fuera <strong>de</strong> servicio <strong>de</strong>l mando a distanciaLa pila se Puesta encuentra en/fuera ya en <strong>de</strong>el servicio mando cuando <strong>de</strong>l mando adquiere a distancia el producto.La- Puesta pila seen encuentraservicio :yá presionar en el mandocontinuamente cuando adquirédurante el producto.1 segundo el botón rojo Encendido/ApagadoPuesta en servicio : presionar continuamente durante 1 segundo el botón rojo Encendido/Apagado(() situado en el lado <strong>de</strong>l mando a distancia (cf.fig.1). Aparecen las indicaciones sobre la pantalla(() situado en el lado <strong>de</strong>l mando distancia (cf.fig.1). Aparecen las indicaciones sobre la pantallaLCD.LCD.- Puesta fuera fuera<strong>de</strong> <strong>de</strong> servicio servicio : presionar : presionar continuamente continuamente durante durante 1 segundo 1 el segundo botón rojo el Encendido/botón rojoEncendido/Apagado (() <strong>de</strong>l mando (() a <strong>de</strong>l distancia. mando aSe distancia. apagan las Seindicaciones apagan las indicaciones sobre la pantalla sobre LCD.la pantalla LCD.(( (( ((Si no utiliza el CANICOM 500 durante un cierto tiempo, es esconveniente ponerlo fuera <strong>de</strong> <strong>de</strong>servicio paraparapreservar la duración <strong>de</strong> la pila.
Es Es- 3939Puesta en/fuera <strong>de</strong> <strong>de</strong>servicio <strong>de</strong>l <strong>de</strong>l collar receptorUn imán situado en el mando a distancia permite poner en enservicio o ofuera <strong>de</strong> <strong>de</strong>servicio el el collar receptorCANICOM.- Puesta en servicio : : acercar la lamarca marcaque quese seencuentra en enel el lado ladoizquierdo <strong>de</strong>l <strong>de</strong>l mando mando hasta hasta tocar tocar elelindicador rojo <strong>de</strong>l collar receptor durante 1 segundo segundo (cf. (cf. Fig. Fig. 5). 5). La Laluz luzindicadora indicadoraparpa<strong>de</strong>a en en ver<strong>de</strong> ver<strong>de</strong> :::elel collarcollar receptorreceptor CANICOMCANICOM estáestá enen servicio.servicio.Poner en contacto estas 2 zonasdurante 1 segundoFig. 5Puesta En/Fuera <strong>de</strong> servicio <strong>de</strong>lcollar con un mando CANICOM 500MANDO A DISTANCIACOLLAR RECEPTOR- Puesta fuera <strong>de</strong> servicio : : acercar la lamarca que se seencuentra en enel ellado izquierdo <strong>de</strong>l <strong>de</strong>l mando hastahastatocar el indicador rojo <strong>de</strong>l collar receptor durante 1 segundo (cf.Fig. 5). 5). La Laluz luzindicadora cambia <strong>de</strong><strong>de</strong>ver<strong>de</strong> parpa<strong>de</strong>o parpa<strong>de</strong>ante a rojo a rojo continuo y y <strong>de</strong>spués se apaga se apaga : el: collar el collar receptor está está apagado.Si no utiliza el CANICOM 500 durante un cierto tiempo, es esconveniente ponerlo fuera <strong>de</strong> <strong>de</strong>servicio paraparapreservar la duración <strong>de</strong> la pila.Sincronización <strong>de</strong>l mando a distancia a y <strong>de</strong>l y <strong>de</strong>l collar receptorLa sincronización permite acoplar su collar receptor con el mando a distancia suministrado.IMPORTANTE : : Antes <strong>de</strong> <strong>de</strong> empezar con con la codificación la codificación (primera (primera o posteriores) o posteriores) se <strong>de</strong>be se tener <strong>de</strong>be en tener cuentaencuenta que ninguna que ninguna otra persona otra persona cercana esté cercana utilizando está utilizando un CANICOM un 500 CANICOM o cualquier 500, su otro collar producto receptor <strong>de</strong>podría la gama registrar NUM’AXES, el código su collar <strong>de</strong>receptor ése mando podría a distancia registrar vecino.Reprogramar el código <strong>de</strong> ese mando <strong>de</strong> nuevo a distancia el mando vecino.conel Reprogramar collar si occure <strong>de</strong> nuevo estael situación. mando con el collar si occure esta situación.
Es - 40PROCEDIMIENTO PARA LA PRIMERA CODIFICACIÓN1. Poner en servicio el mando a distancia : presionar continuamente durante 1 segundo el botón rojoEncendido/Apagado (( ) situado en el lado <strong>de</strong>l mando.2. Poner en servicio el collar receptor : acercar la marca que se encuentra en el lado izquierdo <strong>de</strong>lmando hasta tocar el indicador rojo <strong>de</strong>l collar receptor durante 1 segundo.3. Alejar el mando a distancia <strong>de</strong>l collar receptor.4. Apoyar sobre la tecla “aviso sonoro” <strong>de</strong>l mando a distancia.Se emite un aviso sonoro.El collar receptor está sincronizado con su mando a distancia.(PROCEDIMIENTO PARA UNA NUEVA CODIFICACIÓN (para todas las codificaciones posteriores a unaprimera)1. Poner en servicio el mando a distancia : presionar continuamente durante 1 segundo el botón rojoEncendido/Apagado (( ) situado en el lado <strong>de</strong>l mando.2. Collar en posición “fuera <strong>de</strong> servicio” (apagado, luz apagada) : acercar la marca que se encuentraen el lado izquierdo <strong>de</strong>l mando hasta tocar el indicador rojo <strong>de</strong>l collar receptor durante 6 segundos.La luz se encien<strong>de</strong> en ver<strong>de</strong> fijo, y <strong>de</strong>spués en rojo parpa<strong>de</strong>ante.3. Alejar el mando a distancia <strong>de</strong>l collar receptor.4. Apoyar sobre la tecla “aviso sonoro” <strong>de</strong>l mando a distancia.Se emite un aviso sonoro.El collar receptor está sincronizado <strong>de</strong> nuevo con su mando a distancia.(Reprogramar un collar receptorSe pue<strong>de</strong> reprogramar su collar receptor in<strong>de</strong>finidamente, bien sea con el mismo mando a distancia ocon otro nuevo mando <strong>de</strong> la gama CANICOM.Cf. Procedimiento para una nueva codificación.• Utilización <strong>de</strong>l mando a distanciaEl mando a distancia <strong>de</strong>l CANICOM 500 ha sido estudiado para controlar 1 collar receptor. Tecla : Aviso sonoroLa presión sobre el pulsador “aviso sonoro” permite emitir a distancia un aviso previo sonoro alcollar.No hay limitación <strong>de</strong> tiempo en esta función : las señales sonoras están emitidas mientras que mantegapulsado el botón.Un símbolo “emisión” aparece en la pantalla LCD <strong>de</strong>l mando ; la luz ver<strong>de</strong> parpa<strong>de</strong>ante <strong>de</strong>l collarreceptor pasa a ver<strong>de</strong> fijo mientras mantenga pulsado el botón.Es posible utilizar el aviso sonoro <strong>de</strong> varias maneras según el tipo <strong>de</strong> adiestramiento que esté realizando.
Es - 41Pue<strong>de</strong> :- avisar el perro <strong>de</strong> su error,- llamar su atención a distancia, ...Es muy importante utilizar siempre la misma forma <strong>de</strong> adiestrar con el fin <strong>de</strong> no molestar a superro. Tecla F : estímulo flashPresionando el botón “F” pue<strong>de</strong> poner en guardia a distancia a su perro, gracias al envío <strong>de</strong> estímulosbreves, transmitidos por los dos electrodos <strong>de</strong>l collar receptor, <strong>de</strong> una duración <strong>de</strong> menos <strong>de</strong> 1segundo.Un símbolo “emisión” aparece en la pantalla LCD <strong>de</strong>l mando; la luz <strong>de</strong>l collar receptor pasa <strong>de</strong>l ver<strong>de</strong>parpa<strong>de</strong>ante al rojo fijo durante el tiempo <strong>de</strong> sancíon. Tecla C : estímulo continuoPresionando el botón “C” pue<strong>de</strong> poner en guardia a distancia a su perro, gracias al envío <strong>de</strong> estímuloscontinuos, transmitidos por los dos electrodos <strong>de</strong>l collar receptor, <strong>de</strong> una duración limitada a 8segundos máximo.Un símbolo “emisión” aparece en la pantalla LCD <strong>de</strong>l mando; la luz <strong>de</strong>l collar receptor ver<strong>de</strong> parpa<strong>de</strong>antepasa al rojo fijo durante el tiempo <strong>de</strong> sanción.Si usted presiona el pulsador “C” durante más <strong>de</strong> 8 segundos, el collar se pone en seguridad. Se paradurante algunos segundos y vuelve a funcionar normalmente.Nota : se pue<strong>de</strong>n acoplar los avisos sonoros a la sanción pulsando 1ero el botón “C” y seguidamenteel botón aviso sonoro. Tecla “Booster”: estímulos programados para ór<strong>de</strong>nes <strong>de</strong> urgenciaEl botón “Booster” le permitirá parar el perro a distancia <strong>de</strong> forma instantánea, con el envío <strong>de</strong> estímulos<strong>de</strong> un nivel <strong>de</strong>finido previamente como eficaz para su perro. De esta forma, se evita alcanzar el nivela<strong>de</strong>cuado pulsando repetidamente el botón “+”. Estos estímulos serán emitidos <strong>de</strong> manera continuamediante los dos electrodos <strong>de</strong>l collar y tendrán una duración limitada a 8 segundos.Si usted presiona el pulsador “Booster” por más <strong>de</strong> 8 segundos, el collar se pone en seguridad. Se paradurante algunos segundos y vuelve a funcionar normalmente.
Es - 42Programacíon <strong>de</strong>l <strong>de</strong>l “Booster”:- -- seleccionar el nivel nivel <strong>de</strong> <strong>de</strong> <strong>de</strong> estímulo 01 01 01- apoyar -- pulsar sobre el el botón el botón “-” hasta “-” hasta que la que la indicacíon la indicacíon <strong>de</strong>l nivel <strong>de</strong>l nivel parpa<strong>de</strong>a parpa<strong>de</strong>a sobre sobre la la pantella la pantella LCD LCD- apoyar -- pulsar sobre el el botón el botón “+” o o “+” “-” o para “-” para modificar modificar el el nivel <strong>de</strong> nivel <strong>de</strong> estímulo <strong>de</strong> estímulo- apoyar-- pulsar sobreel el botón el botón “Booster” “Booster” para para validar validarel el nivel nivel seleccionado seleccionado Botones <strong>de</strong> <strong>de</strong> regulación “+” y y “-“ Botones <strong>de</strong> regulación “+” e “-“:Los botones <strong>de</strong> <strong>de</strong> regulación +/ +/ -- permiten regular rápidamente el el nivel <strong>de</strong> <strong>de</strong> los estímulos.Los botones <strong>de</strong> regulación +/ - permiten regular rápidamente el nivel <strong>de</strong> los estímulos.Dispone <strong>de</strong> <strong>de</strong> 15 15 niveles.Dispone <strong>de</strong> 15 niveles.Nivel 11 : : indica el el más suave. nivel 15 15 : : indica el el más fuerteNivel 1 : indica el más suave. nivel 15 : indica el más fuerteEmpiece siempre con el el nivel <strong>de</strong> <strong>de</strong> estímulo más bajo.Empiece siempre con el nivel <strong>de</strong> estímulo más bajo. Iluminar la la pantalla LCD IluminarPodrán iluminarla pantallala la pantallaLCDLCD cerca <strong>de</strong> <strong>de</strong> 66 segundos con un un apoyo breve (cerca 1/2 segundo) sobre la laPodrán tecla iluminarEncendido/Apagadola pantalla(((( LCD ). ).cerca <strong>de</strong> 6 segundos con un apoyo breve (cerca 1/2 segundo) sobre latecla Encendido/Apagado (().• Desgaste/sustitución <strong>de</strong> la la pila <strong>de</strong>l mando a distancia( ((Desgaste/sustitución <strong>de</strong> la pila <strong>de</strong>l mando a distanciaEn En caso <strong>de</strong> <strong>de</strong> <strong>de</strong>sgaste <strong>de</strong> <strong>de</strong> la la pila, las prestaciones (alcance radio) <strong>de</strong>l mando disminuirán. ¡Sustituir la la pila!En Para caso comprobar <strong>de</strong> <strong>de</strong>sgaste la la <strong>de</strong> pila, pila, poner las en en prestaciones servicio su su mando (alcance a a distancia radio) <strong>de</strong>l CANICOM mando disminuirán. 500 y y controlar Sustituir el el indicador la pila!<strong>de</strong>Para nivel comprobar <strong>de</strong> <strong>de</strong> carga <strong>de</strong> la <strong>de</strong> pila, pila poner sobre enla la servicio pantalla su LCD. mando Los a diferentes distancia CANICOM símbolos 500 en dicho y controlar indicador el indicador tienen las<strong>de</strong>nivel siguientes <strong>de</strong> carga significados <strong>de</strong> la pila : sobre : la pantalla LCD. Los diferentes símbolos en dicho indicador tienen lassiguientes significados :Pila en buen estado.Pila débil : pensar en sustituir la pila.Pila gastada : su CANICOM 500 está en modalidad <strong>de</strong> seguridad, el sistema se “bloquea”; se<strong>de</strong>be sustituir la pila.NUM’AXES recomienda la la la utilización <strong>de</strong> <strong>de</strong> <strong>de</strong> pilas pilas <strong>de</strong> mo<strong>de</strong>lo y y marca y marca idénticos que a las que estánproporcionadas con con su su su equipo <strong>de</strong> <strong>de</strong> <strong>de</strong> educación canina. Pilas <strong>de</strong> <strong>de</strong> otras marcas podrían no funcionar o noser ser compatibles compatibles con con sus sus productos.productos.Pue<strong>de</strong>n Pue<strong>de</strong>nconseguirse conseguirselas laspilas pilasa<strong>de</strong>cuadas a<strong>de</strong>cuadasdirectamente directamenteen enNUM’AXES NUM’AXESo eno ensu sudistribuidor.distribuidor.Sustituir la pila gastada por una pila nueva :la :- SacarSustituirel tornillola pilaygastadala tapapor<strong>de</strong> launapilapilasituadosnueva :en la parte posterior <strong>de</strong>l mando.- Sacar -- Sacar lael pila el tornillo gastada. y y la la tapa <strong>de</strong> <strong>de</strong> la la pila situados en la la parte posterior <strong>de</strong>l mando.- Insertar -- Sacar la la la pila nueva gastada. (3V <strong>de</strong> Litio CR 2) en su alojamiento : respetando la orientación indicada cerca<strong>de</strong>l -- Insertar alojamiento la la pila <strong>de</strong> nueva la pila (3V <strong>de</strong> (cf. <strong>de</strong> Fig. Litio 6).CR 2) 2) en su su alojamiento respetando la la orientación indicada cerca<strong>de</strong>l alojamiento <strong>de</strong> <strong>de</strong> la la pila (cf. Fig. 6).
- Apretar el tornillo sujetador para fijar la tapa<strong>de</strong>l alojamiento <strong>de</strong> la pila.- Comprobar el buen funcionamiento funcionamento <strong>de</strong> su mando.Fig. 6Sustitución <strong>de</strong> la pila en el mandoCANICOM 500ATENCIÓNRespetar las polarida<strong>de</strong>s indicadasEs Es- 4343Desgaste/sustitución <strong>de</strong> la pila <strong>de</strong>l collar receptor• Desgaste/sustitución <strong>de</strong> la pila <strong>de</strong>l collar receptorPara comprobar el estado <strong>de</strong> la pila sobre el collar receptor, visualizar la luz luminosa situada en frente<strong>de</strong> la caja receptora.•Para Pilacomprobar en buen estadoel estado : la luz<strong>de</strong> la ver<strong>de</strong>pila sobreparpa<strong>de</strong>a el collar lentamente.receptor, visualizar la luz luminosa situada en frente<strong>de</strong> Pilala caja débilreceptora.: la luz roja parpa<strong>de</strong>a rápidamente. Prever la sustitución <strong>de</strong> la pila cuanto antes, por una <strong>de</strong>l• Pilamismo en buentipo (3Vestado <strong>de</strong> Litio: la CR2)luz ver<strong>de</strong> (Veáseparpa<strong>de</strong>a § Colocarlentamente.la pila en el collar).Comprobar• Pila débil : ella estadoluz roja <strong>de</strong>parpa<strong>de</strong>a funcionamentorápidamente. <strong>de</strong>l collar.Prever la sustitución <strong>de</strong> la pila cuanto antes, por una <strong>de</strong>lmismo tipo (3V <strong>de</strong> Litio CR2) (Véase § Colocar la pila en el collar).NUM’AXESComprobar elrecomienda estado <strong>de</strong> funcionamiento la utilización<strong>de</strong>l<strong>de</strong> collar.pilas <strong>de</strong> mo<strong>de</strong>lo y marca idénticos que las que estánproporcionadas con su equipo <strong>de</strong> educación canina. Pilas <strong>de</strong> otras marcas podrían no funcionar o noserNUM’AXES compatiblesrecomienda con sus productos.la utilización <strong>de</strong> pilas <strong>de</strong> mo<strong>de</strong>lo y marca idénticos a las que estánPue<strong>de</strong>nproporcionadas conseguirsecon su lasequipo pilas a<strong>de</strong>cuadas<strong>de</strong> educación directamentecanina. Pilas en<strong>de</strong> NUM’AXESotras marcas o enpodríansu distribuidor.no funcionar o noser compatibles con sus productos.Pue<strong>de</strong>n conseguirse las pilas a<strong>de</strong>cuadas directamente en NUM’AXES o en su distribuidor.Cambio <strong>de</strong> los electrodos• Cambio <strong>de</strong> los electrodosCon el equipo se entregan dos juegos <strong>de</strong> electrodos <strong>de</strong> longitu<strong>de</strong>s distintas. La longitud <strong>de</strong> los electrodosha <strong>de</strong> ser suficiente para hacer un buen contacto con la piel <strong>de</strong>l perro y para que el aparato funcionecorrectamente.Con el equipo se entregan dos juegos <strong>de</strong> electrodos <strong>de</strong> longitu<strong>de</strong>s distintas. La longitud <strong>de</strong> los electrodosSi ha <strong>de</strong> su ser perro suficiente tiene para pelo hacer largo un y buen los electrodos contacto con cortos la piel montados <strong>de</strong>l perro <strong>de</strong> y para fábrica que el noaparato son a<strong>de</strong>cuados, funcione<strong>de</strong>senrósquelos correctamente.y cámbielos por los electrodos largos que se suministran con los accesorios. Essuficiente Si perro tiene un ajuste pelo largo manual y los yelectrodos mo<strong>de</strong>rado cortos (no usar montados hierramienta). <strong>de</strong> fábrica no son a<strong>de</strong>cuados, <strong>de</strong>senrósquelosy cámbielos por los electrodos largos que se suministran con los accesorios. Es suficiente un ajustemanual y mo<strong>de</strong>rado (no usar herramienta).
Es - 44• Verificación <strong>de</strong> su CANICOM 500En cualquier momento pue<strong>de</strong> comprobar que su CANICOM 500 funciona correctamente <strong>de</strong> la siguientemanera :- Antes <strong>de</strong> empezar esta operación, asegurarse <strong>de</strong> que el collar receptor esté fuera <strong>de</strong> servicio“apagado”.- Entonces, pue<strong>de</strong> poner en contacto la lámpara <strong>de</strong> prueba con cada uno <strong>de</strong> los electrodos. Desenrosquey <strong>de</strong>spues enrosque <strong>de</strong> manera que se sujeten los hilos <strong>de</strong> la lámpara <strong>de</strong> prueba bajo los electrodos.- Poner en servicio “encendido” el mando y el collar receptor.- Apoyar sobre el botón “F” o “C” modificando el nivel <strong>de</strong> intensidad <strong>de</strong> los estímulos : la lámpara <strong>de</strong>prueba se encien<strong>de</strong> con una cierta luminosidad.• Para obtener los mejores resultadosLas ór<strong>de</strong>nes <strong>de</strong> adiestramiento que envién a su perro son transmitidas <strong>de</strong>l mando a distancia al collarreceptor por ondas radio.Estas ondas radio son sensibles y “alcazan” una distancia <strong>de</strong> 500 metros (esta distancia pue<strong>de</strong> variarsegún el entorno y la configuración <strong>de</strong>l terreno don<strong>de</strong> se encuentre).Las prestaciones <strong>de</strong> su CANICOM 500 serán óptimas si respetan las siguientes recomendaciones :- Para un alcance correcto <strong>de</strong> las ondas, <strong>de</strong>be sostener su mando <strong>de</strong> manera que la antena esté al<strong>de</strong>scubierto.- Siempre fijar el collar receptor alre<strong>de</strong>dor <strong>de</strong>l cuello <strong>de</strong>l perro <strong>de</strong> manera que la luz <strong>de</strong> puesta en servicioesté visible y no contra el pecho <strong>de</strong>l perro.- Comprobar el estado <strong>de</strong> la pila <strong>de</strong>l mando tanto como <strong>de</strong>l collar receptor antes <strong>de</strong> utilizar el aparato ycambiarla cuando el nivel <strong>de</strong> carga esté débil.- Cuando la temperatura es inferior a 0°C, la pila es menos eficaz que a temperatura ambiente. Guardarel mando al abrigo (ej. un bolsillo <strong>de</strong> chaqueta) antes <strong>de</strong> utilizarlo.• Ajuste <strong>de</strong>l collarDebe asegurarse que los electrodos estén en contacto con la piel <strong>de</strong>l perro.- Si la correa está <strong>de</strong>masiado suelta, el collar va moverse y los frotamientos repetidos <strong>de</strong> los electrodossobre la piel <strong>de</strong>l perro podrían provocar irritaciones y no funcionaría correctamente.- Si el collar está <strong>de</strong>masiado apretado, su perro tendrá dificulta<strong>de</strong>s para respirar.Si su perro tiene que llevar el collar durante un cierto tiempo, cámbiarlo <strong>de</strong> posición regularmentealre<strong>de</strong>dor <strong>de</strong> su cuello para que no le provoque irritaciones. También, se recomienda no <strong>de</strong>jar puesto elcollar varias horas consecutivas.No <strong>de</strong>jar nunca el collar más <strong>de</strong> 8 horas por día sobre el cuello <strong>de</strong> su perro. Cada vez que le quite o leponga su collar, verificar que no hay ningún signo <strong>de</strong> irritaciones.
Es - 45• Iniciación al collar <strong>de</strong> adiestramiento- El período <strong>de</strong> iniciación pue<strong>de</strong> empezar con cachorros <strong>de</strong> 6 meses, que ya hayan recibido una educaciónbásica con los rudimentos <strong>de</strong>l adiestramiento : “sentado”, “quieto” o por lo menos, algún rapapolvo...- No se <strong>de</strong>be poner el collar al perro con mala salud (con problemas cardíacos, epilepsia, u otros) o quetengan trastornos <strong>de</strong> comportamiento.- Es necesario un cierto tiempo para que se acostumbre al collar : póngale el collar sin utilizarlo.- No salte etapas para efectuar un adiestramiento positivo y tranquilo :- Escoja un terreno que su perro esté acostumbrado a frecuentar.- Determine el nivel <strong>de</strong> estímulo <strong>de</strong>s<strong>de</strong> el cual su perro reacciona empezando por el nivel<strong>de</strong> intensidad más bajo y aumente paulatinamente.- Es preciso elegir el momento propicio para presionar el botón : exactamente cuando elperro hace algo incorrecto.- Anímelo con caricias: enten<strong>de</strong>rá más rápidamente y aumentará su voluntad <strong>de</strong> obe<strong>de</strong>cer.- Le aconsejamos buscar la ayuda <strong>de</strong> adiestradores profesionales para un adiestramiento adaptado a su perro.• La diferencia entre estímulos « continuo » y « flash »Estas dos funciones son muy interesantes porque se pue<strong>de</strong>n modular y adaptar a cualquier sujeto segúnlas situaciones específicas.Estímulo « continuo »En general se <strong>de</strong>be utilizar para una lección <strong>de</strong> adiestramiento en un terreno familiar para el perro(cuando se empieza).Dado su duración “continua”, el usuario tiene siempre que usar la intensidad más débil y controlar biensu duración, <strong>de</strong> manera que el perro tenga tiempo <strong>de</strong> enten<strong>de</strong>r.Estímulo « flash »Es para llamar a la or<strong>de</strong>n.Sirve para llamar la atención <strong>de</strong>l perro cuando comete un error. Durante la caza se recomienda emplearal estímulo “flash”, ya que dura poco y evita molestar al perro en acción.• Precauciones <strong>de</strong> uso- Este aparato no está diseñado para que lo utilicen personas (niños incluidos) con capacida<strong>de</strong>s físicas,sensoriales o mentales reducidas, o falta <strong>de</strong> experiencia y <strong>de</strong> conocimientos, salvo que estén supervisadaso hayan recibido instrucciones para la utilización <strong>de</strong>l aparato por una persona responsable <strong>de</strong> su seguridad.- Los niños <strong>de</strong>ben ser vigilados para asegurarse que no jueguen con el aparato.- Antes <strong>de</strong> colocar a su perro el CANICOM, es recomendable que esté sea examinado por un veterinariocon el fin <strong>de</strong> cerciorarse <strong>de</strong> que el animal esté en condiciones <strong>de</strong> llevar el collar.- El collar receptor CANICOM es un producto perfectamente estanco a la inmersión. Su perro pue<strong>de</strong>bañarse en los ríos sin perjudicar el collar receptor CANICOM. Para preservar su estanqueidad serecomienda cambiar la junta cada año.- El mando es estanco al agua (no sumergible) : en lo posible protegerlo <strong>de</strong>l agua. Pue<strong>de</strong> causar dañosirreversibles en caso <strong>de</strong> que el mando se sumerja en el agua.
Es Es- 4646- No es conveniente utilizar una medalla metálica u otro collar cuando su superro lleve su sucollar CANICOM.- Alejar el mando <strong>de</strong> a objetos sensibles a los campos magnéticos : : dicho mando integra un unimánpermanente que causaría daños irreparables.- Procurar no guardar ni <strong>de</strong>jar nunca el aparato expuesto a altas temperaturas.- Si prevé no usar el el CANICOM 500 500 durante durante un unperíodo períodoprolongado prolongado<strong>de</strong>l <strong>de</strong>lor<strong>de</strong>n or<strong>de</strong>n<strong>de</strong> <strong>de</strong>3 3meses (fin (fin<strong>de</strong><strong>de</strong>temporadatemporada <strong>de</strong> <strong>de</strong>caza), caza),se serecomienda recomiendaretirar retirarla lapila pila<strong>de</strong>l <strong>de</strong>lmando mandoa adistancia distanciay y<strong>de</strong>l <strong>de</strong>lcollar collarreceptor. receptor.LaLacodificación <strong>de</strong>l collar se conserva durante numerosos meses incluso in ausencia <strong>de</strong> la pila.- codificaciónCada 2 años <strong>de</strong>les preciso collar secambiar conservala piladurante también numeroscuando mesesel aparato inclusohaya in ausenciasido poco <strong>de</strong>usado.la pila.- CadaNo <strong>de</strong>jar añosnunca espilas precisoagotadas cambiar<strong>de</strong>ntro la pila<strong>de</strong>l tambiénaparato (mando cuandoy elcollar) aparato; pue<strong>de</strong>n hayaperjudicarsido poco usado.su CANICOM 500.- No No <strong>de</strong>jar <strong>de</strong>je el nunca CANICOM pilas500 agotadas al alcance <strong>de</strong>ntro los <strong>de</strong>l niños. aparato Ni uste<strong>de</strong>s (mando ni ylos collar) niños ; <strong>de</strong>ben pue<strong>de</strong>n consi<strong>de</strong>rarlo perjudicarcomo su CANICOM un juguete. 500.-• NoMantenimiento<strong>de</strong>je el CANICOM 500 al alcance <strong>de</strong> los niños. Ni uste<strong>de</strong>s ni los niños <strong>de</strong>ben consi<strong>de</strong>rarlo como juguete.Mantenimiento- Evitar Mantenimientoel uso <strong>de</strong> líquidos volátiles como disolventes o la gasolina para limpiar el aparato. Secarlo con- un Evitar paño el suave uso <strong>de</strong> seco liquidos líquidos y empapado volatiles volátiles <strong>de</strong> como solución disolventes <strong>de</strong> <strong>de</strong>tergente oo la la gasolina neutra.para limpiar el el aparato. Secarlo con con un- Para paño un paño preservar suave suave seco seco su y estanqueidad, y empapado <strong>de</strong> se <strong>de</strong> recomienda solución <strong>de</strong> <strong>de</strong>tergente cambiar neutra. la junta neutra. <strong>de</strong>l collar cada año.- Para preservar su estanqueidad, se recomienda cambiar la junta <strong>de</strong>l collar cada año.• En caso <strong>de</strong> malfuncionamientoEn caso <strong>de</strong> malfuncionamientoAntes <strong>de</strong> atribuir un fallo al alaparato es espreciso consultar este manual para paracomprobar que quel el problemano Antes sea <strong>de</strong> <strong>de</strong>bido atribuir a una fallo pila al agotada aparato (en (en es preciso este caso, consultar véase veáseDesgaste/sustitución este manual para comprobar <strong>de</strong> <strong>de</strong>la lapila pila que <strong>de</strong>l <strong>de</strong>l problema mando mandoaadistancia no sea <strong>de</strong>bido y Desgaste a una /sustitución pila agotada <strong>de</strong> (en la lapila este <strong>de</strong>l <strong>de</strong>l caso, collar véase receptor) Desgaste/sustitución o a errores <strong>de</strong> <strong>de</strong>uso.la pila <strong>de</strong>l mando aEn distanciacaso caso <strong>de</strong> <strong>de</strong> yinconvenientes,Desgaste inconvenientes, /sustituciónse se aconseja aconseja <strong>de</strong> la pilarepetir repetir <strong>de</strong>l collarla la codificación codificación receptor)<strong>de</strong>lo <strong>de</strong>l acollarerrores collar receptor receptor <strong>de</strong> uso.(cf. (cf. Procedimiento Procedimiento paraEn caso <strong>de</strong> inconvenientes, se aconseja repetir la codificación <strong>de</strong>l collar receptor (cf. Procedimientounaparanuevauna nuevacodificación).codificación).Proce<strong>de</strong>r para una nueva a un « codificación).reset » <strong>de</strong>l collar receptor sacando la pila <strong>de</strong> su alojamiento, pues con una piezaProce<strong>de</strong>rmetálica Proce<strong>de</strong>r (por aunun ej.««reset<strong>de</strong>stornillador, reset» <strong>de</strong>l» <strong>de</strong>lcollarcollar tijeras)receptorreceptor ponersacandosacando en contactola pilala<strong>de</strong>pila durantesu<strong>de</strong>alojamiento,su 2 alojamiento, segundospueslosconpues dosunacon ganchospiezaunametálicapieza que(por sujetan metálica ej. <strong>de</strong>stornillador, la (por pila ej. (Fig. <strong>de</strong>stornillador, 7). tijeras) Insertar poner la tijeras) pila en contacto <strong>de</strong> poner nuevo en durante : contacto se emite 2 segundos durante aviso los 2 sonoro segundos ganchos indicando los dos quela ganchos sujetan colocación laquepila(Fig. correcta sujetan 7). Insertar la <strong>de</strong> pila pila. (Fig. pila7). nueva Insertar : emite la pila un<strong>de</strong> aviso nuevo sonoro : se indicando emite un una aviso puesta sonoro en servicio indicando correcta colocación <strong>de</strong> la pila.Puesta correcta en <strong>de</strong> servicio la pila. su CANICOM ayudandose <strong>de</strong>l mando.Si Puesta el inconveniente servicio persiste, su CANICOM póngase ayudandose en encontacto <strong>de</strong>l mando. con consu sudistribuidor DISTRIBUIDOR. o con NUM’AXES (+33.2.38.69.96.27Según o Si export@numaxes.com)el inconveniente la magnitud <strong>de</strong> persiste, su problema, póngase pue<strong>de</strong> en que tenga con que su DISTRIBUIDOR.hacernos llegar su producto para ser reparadoySegún testado la magnitud en nuestra <strong>de</strong> fábrica. su problema, pue<strong>de</strong> que tenga que hacernos llegar su producto para ser reparadoPara y testado cualquier en nuestra reparación, fábrica.el Servicio Post Venta necesita obligatoriamente:Para -cualquier el aparatoreparación, completo el Servicio Post Venta necesita obligatoriamente:- el la aparato fecha <strong>de</strong>completocompra (factura o ticket <strong>de</strong> compra)Si olvida - la fecha usted <strong>de</strong> unocompra <strong>de</strong> estos (factura elementos, o ticket <strong>de</strong> compra)el Si olvida Servicio usted Postuno Venta <strong>de</strong> estos le facturará elementos,arreglo.el Servicio Post Venta le facturará el arreglo.Fig. 7Reset : Poner en contactolos dos ganchos <strong>de</strong> la pila
• Características técnicasEs Es- 4747Mando a distanciaCollar receptorAlimentación 1 pila <strong>de</strong> Litio 3V tipo CR2 1 pila <strong>de</strong> Litio 3V tipo CR2Autonomía En funcionamiento intensivo : En « stand by » : cerca <strong>de</strong>Cerca <strong>de</strong> 30 000 presiones 7 mesesEn funcionamiento intensivo :cerca <strong>de</strong> 2 meses<strong>Fr</strong>ecuencia (Potencia) 869,525 MHz (250 mW) 869,525 MHzAntena 35 mm IntegradaAlcance radioCerca <strong>de</strong> 500 mEstanqueidad Al chorreo Al inmersiónSeguridad y codificación radio Asegurado por microcontrolador Asegurado pormicrocontroladorIndicador <strong>de</strong> carga <strong>de</strong> la pila Por indicador sobre pantalla LCD Por indicador luminosoNiveles <strong>de</strong> estímulos 15Temperatura <strong>de</strong> utilización Entre – 20°C y +40°C Entre – 20°C y +40°CDimensiones : A x L x P. 108 mm x 55 mm x 24 mm 38 mm x 68 mm x 43 mmPeso (con la pila) 85 g 75 g (sin la correa)Collar ajustable al cuello <strong>de</strong> 20 a50 cm• Autonomía collar receptor CANICOMAutonomía collar receptor CANICOM- 7 meses en stand by : para una puesta en marcha <strong>de</strong> 4 horas por día- 2 mesesmeses enen funcionamientostand by : para unaintensivo puesta: o ensea marchaunos 5 <strong>de</strong>000 4 horasestímulos por día<strong>de</strong> 2 segundos al nivel 15Para meses preservar en funcionamiento la duración <strong>de</strong> la intensivo pila, es conveniente : o sea unascuando 5 000 no estímulos use el CANICOM <strong>de</strong> 2 segundos ponerlo alfuera nivel<strong>de</strong> 15servicio.Para preservar la duración <strong>de</strong> la pila, es conveniente cuando no use el CANICOM ponerlo fuera <strong>de</strong> servicio.• GarantíaGarantíaNUM’AXES garantiza el producto contra los <strong>de</strong>fectos <strong>de</strong> <strong>de</strong> fabricación durante los los 2 años 2 años consecutivosa suadquisición. a su adquisición. Los Los gastos gastos <strong>de</strong>l <strong>de</strong>l transporte ida/vuelta <strong>de</strong>l <strong>de</strong>l producto corren exclusivamente a cargo <strong>de</strong>l<strong>de</strong>lcomprador.• Condiciones <strong>de</strong> la garantía1. La garantía será válida únicamente presentando NUM’AXES la fecha <strong>de</strong> compra (factura o ticket <strong>de</strong>1. La compra)garantíasinserátachaduras.válida únicamente presentando a NUM’AXES la fecha <strong>de</strong> compra (factura o ticket <strong>de</strong>compra) sin tachaduras.2. Dicha garantía no cubre ninguno <strong>de</strong> los siguientes puntos:2. Dicha garantía no cubre ninguno <strong>de</strong> los siguientes puntos:
Es - 48- la renovación <strong>de</strong> la pila- el lacambio renovación<strong>de</strong> la<strong>de</strong> correala pila- los el cambioriesgos<strong>de</strong> <strong>de</strong>la transporte,correadirectos o indirectos, <strong>de</strong>rivados <strong>de</strong> la <strong>de</strong>volución <strong>de</strong>l producto a suDISTRIBUIDOR los riesgos <strong>de</strong> <strong>de</strong>transporte, o a NUM’AXESdirectos directos indirectos, o indirectos, <strong>de</strong>rivados <strong>de</strong>rivados la <strong>de</strong> <strong>de</strong>volución la <strong>de</strong>volución <strong>de</strong>l producto <strong>de</strong>l producto su a su- el DISTRIBUIDOR<strong>de</strong>terioro <strong>de</strong>l producto o aNUM’AXESresultante <strong>de</strong>:elel<strong>de</strong>terioro<strong>de</strong>terioro- la negligencia<strong>de</strong>l<strong>de</strong>lproductoproducto o errorresultanteresultante <strong>de</strong>l usuario<strong>de</strong>:<strong>de</strong>: (por ejemplo: mor<strong>de</strong>duras, roturas, fisuras, etc.),- unala negligenciala negligencia utilización contrariaerror <strong>de</strong>lo error <strong>de</strong>l ausuariolas usuario instrucciones(por ejemplo:(por ejemplo: o nomor<strong>de</strong>duras,previstaroturas, fisuras, etc.),mor<strong>de</strong>duras, roturas, fisuras, etc.),- lasunaunareparaciones utilización contrariautilización contraria realizadas lasa las porinstruccionesinstrucciones personas no habilitadasno previstao no prevista- la pérdida las reparaciones- las reparaciones o el roborealizadas por personas no habilitadasrealizadas por personas no habilitadas3. Si se la- lareconoce pérdida pérdida oque el roboel el robo producto es <strong>de</strong>fectuoso, NUM’AXES lo reparará o lo cambiará, según <strong>de</strong>cida.3. 4.3.NoSi seSi se se reconoce podrá recurrir elque el contraproductoproducto el fabricantees <strong>de</strong>fectuoso, NUM’AXES lo reparará lo cambiará, según <strong>de</strong>cida.4. No se podrá recurrir contra el fabricante es <strong>de</strong>fectuoso, NUM’AXESNUM’AXES NUM’AXES en casoen caso lo<strong>de</strong> <strong>de</strong> reparará daños resultadodaños resultado o lo cambiará, <strong>de</strong> una<strong>de</strong> una según malamala <strong>de</strong>cida.4. Noutilizaciónutilización se podrá<strong>de</strong>l producto<strong>de</strong>l recurrir producto contrao <strong>de</strong> una <strong>de</strong> una elavería.avería. fabricante NUM’AXES en caso <strong>de</strong> daños resultando <strong>de</strong> una mala5. NUM’AXES se reserva el <strong>de</strong>recho <strong>de</strong> modificar las características <strong>de</strong> sus productos para realizar5. utilización NUM’AXES <strong>de</strong>l se reserva productoel o<strong>de</strong>recho una avería.mejoras técnicas o respetar nuevas<strong>de</strong>normativas.modificar las características <strong>de</strong> sus productos para realizar5.6. LaNUM’AXES mejorasinformacióntécnicas se<strong>de</strong>reserva estarespetarguíael <strong>de</strong>rechopue<strong>de</strong>nuevassernormativas. <strong>de</strong>objetomodificar<strong>de</strong> modificacioneslas característicassin previo<strong>de</strong>aviso.sus productos para realizar7.6.Fotos mejoras La informacióny dibujos técnicas no<strong>de</strong> ocontractuales.esta respetar guía pue<strong>de</strong> nuevas ser normativas. objeto <strong>de</strong> modificaciones sin previo aviso.6. 7. La Fotos información dibujos no <strong>de</strong>contractuales.esta guía pue<strong>de</strong> ser objeto <strong>de</strong> modificaciones sin previo aviso.7. • Fotos Inscriba y dibujos su no producto contractuales.AccesoriosPue<strong>de</strong> inscribir su producto en nuestro sitio web www.numaxes.com.Pue<strong>de</strong> Accesorios encargar a su distribuidor, en cualquier momento, los accesorios (pila, correa, junta <strong>de</strong>Pue<strong>de</strong> • Accesorioscollar…). encargar en su distribuidor, en cualquier momento, los accesorios (pila, correa, junta <strong>de</strong> receptor…).Pue<strong>de</strong> encargar a su distribuidor, en cualquier momento, los accesorios (pila, correa, junta <strong>de</strong> collar…).• ReciclajeReciclaje <strong>de</strong><strong>de</strong> aparatosaparatos electrónicoselectrónicos al alal final finalfinal <strong>de</strong> <strong>de</strong><strong>de</strong> su susu vida vidavidaEl pictograma que aparece en su producto, significa que el equipo no pue<strong>de</strong> mezclarse con basurasdomésticas. Debe ser entregado en un punto <strong>de</strong> recogida a<strong>de</strong>cuado para el tratamiento, la valorización yel reciclaje <strong>de</strong> las basuras electrónicas o bien <strong>de</strong>volverlo a su distribuidor.Adoptando este comportamiento, hará un gesto con el medio ambiente, contribuyendo así a lapreservación <strong>de</strong> los recursos naturales y a la protección <strong>de</strong> la salud humana.www.numaxes.cominternationalsales@numaxes.comexport@numaxes.com
GebrauchsanleitungD - 49VORSICHTTräger von Herzschrittmachern müssen die üblichen Vorsichtsmaßnahmen treffen bei <strong>de</strong>rBedienung Ihres CANICOM 500.Dieses Gerät strahlt statische Magnetfel<strong>de</strong>r sowie elektromagnetische Hochfrequenzenwellenab (ein Magnet befin<strong>de</strong>t sich im Handsen<strong>de</strong>r) (<strong>Fr</strong>equenz = 869 Mhz, maximale Sen<strong>de</strong>leistung =250 mW).Dieses Gerät entspricht <strong>de</strong>r europäischen Normen ETSI EN 300 220.Wir danken Ihnen, dass Sie sich für ein Gerät aus <strong>de</strong>r NUM’AXES Produktreihe entschie<strong>de</strong>n haben. Siesollten vor <strong>de</strong>m Gebrauch von CANICOM 500 die Anweisungen dieser Anleitung sorgfältig durchlesen unddiese zur Konsultation bei später auftreten<strong>de</strong>n <strong>Fr</strong>agen aufbewahren.Wir empfehlen Ihnen, vor <strong>de</strong>m Einsatz eines Canicom-Trainers einen Tierarzt aufzusuchen, <strong>de</strong>r IhrenHund auf gesundheitliche Einschränkungen untersucht.Die wie<strong>de</strong>rholte Reibung <strong>de</strong>r Kontakte auf <strong>de</strong>r Haut kann zu Hautirritationen führen. Überprüfen Sie<strong>de</strong>n Hals Ihres Hun<strong>de</strong>s bitte regelmäßig auf wun<strong>de</strong> Stellen o<strong>de</strong>r Reizungen. Sollten Hautirritationenauftreten, unterbrechen Sie die Anwendung <strong>de</strong>s Gerätes, bis die Reizungen abgeklungen sind. LassenSie das Halsband nicht mehr als 8 Stun<strong>de</strong>n lang pro Tag am Hals Ihres Hun<strong>de</strong>s und prüfen Sieregelmäßig dass, es keine Irritation gibt.Verwen<strong>de</strong>n Sie bei Ihrer Ausbildung immer <strong>de</strong>n geringst möglichen Impuls. Beobachten Sie dieReaktionen Ihres Hun<strong>de</strong>s genau.Bei <strong>Fr</strong>agen und Problemen empfehlen wir Ihnen, sich an einen Hun<strong>de</strong>ausbil<strong>de</strong>r zu wen<strong>de</strong>n.
InhaltsverzeichnisD <strong>Fr</strong> -- 50 1SeiteLieferumfang .............................................................................................................................................................51Vorstellung <strong>de</strong>s Gerätes..................................................................................................................................................51Erste Inbetriebnahme.....................................................................................................................................................52Bedienung <strong>de</strong>s Handsen<strong>de</strong>rs..........................................................................................................................................54Auswechseln <strong>de</strong>r Batterie <strong>de</strong>s Handsen<strong>de</strong>rs................................................................................................................56Auswechseln <strong>de</strong>r Batterie <strong>de</strong>s Empfänger-Halsban<strong>de</strong>s..............................................................................................57Auswechseln <strong>de</strong>r Kontakte.............................................................................................................................................57Prüfung Ihres CANICOM 500..........................................................................................................................................58So erzielen Sie die besten Ergebnisse...........................................................................................................................58Justierung <strong>de</strong>s Halsban<strong>de</strong>s ...........................................................................................................................................58Die Gewöhnung an das Halsband zur Hun<strong>de</strong>erziehung...............................................................................................59Der Unterschied zwischen "Dauer-" und "Kurzimpuls"...............................................................................................59Vorsichtsmaßnahmen.....................................................................................................................................................59Pflege................................................................................................................................................................................60Beim Nicht-Funktionieren Ihres Gerätes......................................................................................................................60Technische Merkmale.....................................................................................................................................................61Autonomie <strong>de</strong>s CANICOM – Halsban<strong>de</strong>s.......................................................................................................................62Garantie............................................................................................................................................................................62Garantiebedingungen......................................................................................................................................................62Registrieren Ihres Produktes.........................................................................................................................................63Zubehöre..........................................................................................................................................................................63Sammeln und Recycling <strong>de</strong>r Geräte am En<strong>de</strong> ihres Lebens .......................................................................................63
D-51LieferumfangBeim Öffnen <strong>de</strong>r Verpackung fin<strong>de</strong>n Sie:- Das Canicom-Halsband (<strong>de</strong>r Funk-Empfänger), <strong>de</strong>r wasserfest ist mit Kurzen Elektro<strong>de</strong>n- Eine 3V Lithium - Batterie CR2 für das Canicom-Halsband- Einen Handsen<strong>de</strong>r CANICOM 500 (<strong>de</strong>r Funk-Sen<strong>de</strong>r), <strong>de</strong>r wasserfest ist und mit einer 3V LithiumBatterie CR2- 1 Testlampe- 1 Paar langer Kontakte- 1 Tragriemen- Dieses Buch zur GebrauchsanleitungDas Empfänger-HalsbandAbb. 22 Kontakte(kurze o<strong>de</strong>rlange)Vorstellung <strong>de</strong>s GerätesDer Sen<strong>de</strong>rAbb. 1Ein-/Ausschaltentaste+ Beleuchtung <strong>de</strong>sBildchirmsBildschirmsTon-SignalPosition <strong>de</strong>sMagnetschaltersLCD-BildschirmBooster-TasteAbb. 3Sen<strong>de</strong>anzeigeLeuchtzeichen fürEin-/ Ausschalten+ Anzeiger <strong>de</strong>sFunkempfängers+ Kontroll-Lampe <strong>de</strong>sBatteriezustan<strong>de</strong>sKurzimpulsals 1 Sekun<strong>de</strong>MarkierungzumEin-/Ausschalten<strong>de</strong>s Halsban<strong>de</strong>s+ (neue)KodierungEinstellung<strong>de</strong>r StufenLCD BildschirmDauerimpuls auf 8Sekun<strong>de</strong>n beschränktBatterriestandsanzeigeAnzeige <strong>de</strong>r Impulsstufe(von 1 bis 15)
D-52Erste Inbetriebnahme◆ Legen Sie die Batterie in das CANICOM Empfänger-Halsband ein.So gehen Sie vor:- Lösen Sie die vier Schrauben <strong>de</strong>s CANICOM-Deckels mittels eines Schraubenziehers.- Legen Sie die Batterie (Typ 3V-Lithium CR2) gemäß <strong>de</strong>r neben <strong>de</strong>m Batteriefach aufgezeigtenPolarität ein. (siehe Abb. 4).- Es ertönt ein (tiefer) Piepton, <strong>de</strong>r auf die richtige Installation <strong>de</strong>r Batterie hinweist.Sollten Sie nach <strong>de</strong>m Einlegen <strong>de</strong>r Batterie keinen Piepton hören, entnehmen Sie bitte sofortdie Batterie. Prüfen Sie die Polarität, bevor Sie die Batterie neu einlegen.- Bevor Sie <strong>de</strong>n Deckel wie<strong>de</strong>r aufsetzen, achten Sie darauf, dass die Dichtung sorgfältig in <strong>de</strong>rhierfür vorgesehenen Nut liegt. Drehen Sie die vier Schrauben fest.Polarität « - » <strong>de</strong>r BatteriePolarität « + » <strong>de</strong>r BatterieAbb. 4Dichtung◆ Ein- und Ausschalten <strong>de</strong>s Handsen<strong>de</strong>rsBeim Kauf <strong>de</strong>s Gerätes befin<strong>de</strong>t sich die Batterie bereits im CANICOM 500 Handsen<strong>de</strong>r.- Zum Einschalten: Drücken Sie eine Sekun<strong>de</strong> lang auf die auf <strong>de</strong>r Seite <strong>de</strong>s Handsen<strong>de</strong>rsliegen<strong>de</strong>n rote Ein- / Ausschaltens-Taste (() (siehe Abb.1). Auf <strong>de</strong>m LCD-Bildschirmerscheinen die Symbole.- Zum Ausschalten: Drücken Sie eine Sekun<strong>de</strong> lang auf die Ein- / Ausschaltens-Taste ((). DerLCD-Bildschirm erlischt.Wir empfehlen Ihnen bei längerem Nicht-Gebrauch die Batterie im Handsen<strong>de</strong>r zu entfernen.◆ Ein- und Ausschalten <strong>de</strong>s Empfänger-Halsban<strong>de</strong>sDank <strong>de</strong>m im Handsen<strong>de</strong>r befindlichen Magnet können Sie das CANICOM ein- und ausschalten.- Zum Einschalten: Halten Sie die Markierung, die auf <strong>de</strong>r linken Seite <strong>de</strong>s Handsen<strong>de</strong>rs liegt, eineSekun<strong>de</strong> lang an die rote Markierung <strong>de</strong>s Halsban<strong>de</strong>s. Die LED am Halsband beginnt grün zu blinken.Das Gerät ist nun eingeschaltet.((
D-53- Zum Ausschalten: Halten Sie die Markierung, die auf <strong>de</strong>r linken Seite <strong>de</strong>s Handsen<strong>de</strong>rs liegt, eineSekun<strong>de</strong> lang an die rote Markierung <strong>de</strong>s Halsban<strong>de</strong>s. Die LED am Halsband leuchtet rot auf. Das Gerätist nun ausgeschaltet.Wir empfehlen Ihnen, bei längerem Nicht-Gebrauch die Batterie im Halsband zu entfernen.Halten Sie die bei<strong>de</strong>nZonen 1 Sek.lang aneinan<strong>de</strong>rAbb. 5Zum Ein-und Ausschalten miteinem CANICOM 500Handsen<strong>de</strong>rDER SENDERDAS EMPFÄNGER-HALSBAND◆ <strong>Fr</strong>equenzabstimmung von Handsen<strong>de</strong>r und EmpfängerJe<strong>de</strong>r Sen<strong>de</strong>r hat seine eigene, einzigartige Funk-Kodierung (Adresse). Dank <strong>de</strong>r <strong>Fr</strong>equenzabstimmung<strong>de</strong>s Handsen<strong>de</strong>rs mit <strong>de</strong>m Empfänger-Halsband arbeitet Ihr Handsen<strong>de</strong>r mit <strong>de</strong>m geliefertenEmpfänger-Halsband.WICHTIG: Bitte vergewissern Sie sich vor <strong>de</strong>r <strong>Fr</strong>equenzabstimmung, dass sich kein an<strong>de</strong>resNUM’AXES Gerät in Ihrer Umgebung in Betrieb befin<strong>de</strong>t. Es könnte ansonsten zuFalschprogrammierungen durch die Kodierung <strong>de</strong>r frem<strong>de</strong>n Komponente kommen. In diesemFall wären Sie dann gezwungen, <strong>de</strong>n Sen<strong>de</strong>r mit <strong>de</strong>m Empfänger-Halsband neu zuprogrammieren.VERFAHREN ZUR FREQUENZABSTIMMUNG:1. Schalten Sie <strong>de</strong>n Handsen<strong>de</strong>r ein: Drücken Sie eine Sekun<strong>de</strong> lang auf die auf <strong>de</strong>r Seite <strong>de</strong>sHandsen<strong>de</strong>rs liegen<strong>de</strong>n rote Ein- / Ausschaltens-Taste (().(
D - 542. Das Empfänger-Halsband ist außer Betrieb (ausgeschaltet, die LED ist aus): Halten Sie die Markierung<strong>de</strong>s Handsen<strong>de</strong>rs 6 Sek. lang an die rote Markierung <strong>de</strong>s Empfänger-Halsban<strong>de</strong>s. Die LED amEmpfänger-Halsband leuchtet erst grün, dann blinkt sie schnell rot.3. Entfernen Sie <strong>de</strong>n Handsen<strong>de</strong>r vom Empfänger-Halsband.4. Drücken Sie auf die -Taste <strong>de</strong>s Handsen<strong>de</strong>rs. Ein Ton-Signal ist zu hören: das Empfänger-Halsbandhat jetzt die Kodierung <strong>de</strong>s Handsen<strong>de</strong>rs kennen gelernt und reagiert auf diesen Handsen<strong>de</strong>r. Neue Programmierung eines Empfänger-Halsban<strong>de</strong>sSie können Ihr Empfänger-Halsband ohne Beschränkung neu programmieren. Diese neueProgrammierung können Sie entwe<strong>de</strong>r mit <strong>de</strong>mselben Handsen<strong>de</strong>r o<strong>de</strong>r mit einem neuen Handsen<strong>de</strong>r<strong>de</strong>s CANICOM – Sortiments durchführen.(siehe Verfahren zur <strong>Fr</strong>equenzabstimmung)• Bedienung <strong>de</strong>s Handsen<strong>de</strong>rsMit <strong>de</strong>m Canicom 500-Handsen<strong>de</strong>r können Sie einen Hund arbeiten. - Taste : Ton-SignalDrücken Sie auf die «Ton-Taste » , um ein Ton-Signal am Hun<strong>de</strong>halsband auszulösen. Bei dieserFunktion gibt es keine Zeitbeschränkung: Pieptöne wer<strong>de</strong>n solange abgegeben, wie Sie auf die Ton-Tastedrücken.Die Sen<strong>de</strong>anzeige erscheint auf <strong>de</strong>m LCD-Bildschirm <strong>de</strong>s Handsen<strong>de</strong>rs; das Leuchtzeichen <strong>de</strong>sEmpfänger-Halsban<strong>de</strong>s än<strong>de</strong>rt sich von grünen Blinken auf grünen ständigen Leuchten, solange Sie aufdiese Taste drücken.Das Tonsignal hat mehrere Benutzungsmöglichkeiten. Es kommt auf die Dressurmetho<strong>de</strong>n an, die Siebenutzen. Es dient dazu:- <strong>de</strong>n Hund auf einen Fehler hinzuweisen.- die Aufmerksamkeit <strong>de</strong>s Hun<strong>de</strong>s aus einer gewissen Entfernung zu wecken.- <strong>de</strong>n herkömmlichen Warnpfiff zur Ermahnung zu ersetzen.- <strong>de</strong>n Hund zu belohnen.Entschei<strong>de</strong>n Sie sich, in welcher Weise Sie das Tonsignal einsetzen wollen. Bleiben Sie bei dieserEntscheidung, um <strong>de</strong>n Hund nicht zu verwirren! F-Taste: Kurz-Impuls (Flash)Durch Drücken <strong>de</strong>r F-Taste wird ein ca. 1/8 Sekun<strong>de</strong> kurzer Stromimpuls am Halsband abgegeben. Eswird dabei ein Impuls <strong>de</strong>r auf <strong>de</strong>m Bildschirm angezeigten Stärke abgegeben.Die Sen<strong>de</strong>anzeige erscheint auf <strong>de</strong>m LCD-Bildschirm <strong>de</strong>s Handsen<strong>de</strong>rs; das Leuchtzeichen <strong>de</strong>sEmpfänger-Halsban<strong>de</strong>s än<strong>de</strong>rt sich von grünen Blinken auf roten ständigen Leuchten, solange Sie aufdiese Taste drücken.
D - 55 C-Taste : Dauer-Impuls (Continuous)Durch Drücken <strong>de</strong>r C-Taste wird ein andauern<strong>de</strong>r Stromimpuls am Halsband abgegeben. Dieser Impulswird solange abgegeben, wie Sie die C-Taste drücken – maximal jedoch 8 Sekun<strong>de</strong>n. Es wird dabei einImpuls <strong>de</strong>r im Bildschirm angezeigten Stärke abgegeben.Drüken Sie die C-Taste länger als 8 Sekun<strong>de</strong>n, schaltet das Halsband automatisch für einige Sekun<strong>de</strong>nin einen Sicherheitsmodus. Es wird dann kein Signal mehr abgege<strong>de</strong>n. Nach einigen Sekun<strong>de</strong>n ist dasGerät wie<strong>de</strong>r betriebsbereit.Die Sen<strong>de</strong>anzeige erscheint auf <strong>de</strong>m LCD-Bildschirm <strong>de</strong>s Handsen<strong>de</strong>rs; das Leuchtzeichen <strong>de</strong>sEmpfänger-Halsban<strong>de</strong>s än<strong>de</strong>rt sich von grünen Blinken auf roten ständigen Leuchten, solange Sie aufdiese Taste drücken.Bemerkung: Sie können einen Reizimpuls mit einem Piepton verbin<strong>de</strong>n, in<strong>de</strong>m Sie zuerst auf die C-Tasteund zweitens auf die - Taste drücken. Booster-TasteÜber die Booster-Taste können Sie eine vorgewählte Impulsstufe abgeben, ohne diese über die +/- Tastewählen zu müssen. Die Impulse wer<strong>de</strong>n solange abgegeben, wie Sie die B-Taste drüken maximal jedoch8 Sek. Drüken Sie die Booster-Taste länger als 8 Sekun<strong>de</strong>n, schaltet das Halsband automatisch für einigeSekun<strong>de</strong>n in einen Sicherheitsmodus. Es wird dann kein Signal mehr abgegeben. Nach einigen Sekun<strong>de</strong>nist das Gerät wie<strong>de</strong>r betriebsbereit.Programmierung <strong>de</strong>r Booster-Taste :- Wählen Sie die Impulsstufe 01- Drüken Sie die “-”-Taste und warten Sie, biss die Zahlenanzeige auf <strong>de</strong>m Display beginnt, zu blinken- Lassen Sie die “-”-Taste los- Drüken Sie auf die +/- Taste, um die Impulsstärke einzustellen- Drüken Sie auf die Booster-Taste zur Bestätigung <strong>de</strong>r Impulsstärke Einstellen <strong>de</strong>r Stufen mit « + » und « - »Mit <strong>de</strong>n +/- -Tasten können Sie die Impulsstärke <strong>de</strong>s Empfänger-Halsban<strong>de</strong>s sehr schnell regulieren.Sie verfügen über 15 Stufen.Bei <strong>de</strong>r ersten Stufe ist die Stärke sehr schwach.Die 15. Stufe entspricht <strong>de</strong>r stärksten Impulsstärke.Wir empfehlen Ihnen, immer mit <strong>de</strong>r geringsten Impulsstärke anzufangen. Aufteilung <strong>de</strong>r StrömeDas CANICOM 500 verfügt über 15 Stromstufen, die Sie über die +/- Tasten wählen können. Die Aufteilung<strong>de</strong>r Ströme ist nicht linear son<strong>de</strong>rn logarythmisch. Die Stufe 1-6 steigen nur sehr langsam an. Ab <strong>de</strong>rStufe 7 steigen die Stufen <strong>de</strong>utlich stärker an. Die I<strong>de</strong>e dahinter: Im nicht trieblichen Bereich haben Sie
D-56die Möglichkeit, sehr fein dosiert auf Ihren Hund einzuwirken, ihm „auf die Schulter zu tippen“. DieDosierbarkeit <strong>de</strong>r Stromstärke im Notfall ist hingegen nicht mehr so entschei<strong>de</strong>nd. Hier soll <strong>de</strong>r Hun<strong>de</strong>in <strong>de</strong>utlich spürbares „Stop“-Zeichen bekommen.Wun<strong>de</strong>rn Sie sich also nicht, wenn Ihr Hund beispielsweise bei einer Stufe 6 noch nicht stark reagiert. Eshan<strong>de</strong>lt sich immer noch um eine sehr feine Einwirkung. Natürlich gilt <strong>de</strong>nnoch: Nutzen Sie immer <strong>de</strong>ngeringstmöglichen Impuls. Geben Sie Ihrem Hund die Chance, auf eine Stufe 1 o<strong>de</strong>r 2 zu regieren.Beobachten Sie, wie Ihr Hund auf diese geringen Stufen reagiert. Erst wenn Sie sichergestellt haben,dass <strong>de</strong>r Kontakt zur Haut vorhan<strong>de</strong>n und das Gerät betriebsbereit ist erhöhen Sie die Stromstufe!❖ Beleuchtung <strong>de</strong>s LCD LCD-Bildschrims- BildschirmsDas kurz Drücken (ca. 1/2 Sek.) auf die Ein-/Ausschalten-Taste ((Bildschirm 6 Sek. lang zu beleuchten.) ermöglicht Ihnen <strong>de</strong>n LCD-(Auswechseln <strong>de</strong>r Batterie <strong>de</strong>s Handsen<strong>de</strong>rsMit einer schwachen Batterie vermin<strong>de</strong>rt sich die Leistung (die Funkreichweite) <strong>de</strong>s Handsen<strong>de</strong>rs.Ersetzen Sie die Batterie daher frühzeitig.Sie können <strong>de</strong>n Batteriezustand kontrollieren, in<strong>de</strong>m Sie Ihren CANICOM 500 – Handsen<strong>de</strong>r einschalten.Das La<strong>de</strong>zustands-Symbol <strong>de</strong>r Batterie erscheint auf <strong>de</strong>m LCD-Bildschirm. Die verschie<strong>de</strong>nen Symboledieses Zeichen be<strong>de</strong>uten wie folgt:Die Batterie ist im guten Zustand.Die Batterieleistung ist schwach: Sorgen Sie für eine Ersatzbatterie.Die Batterie ist leer: Ihr CANICOM 500 blockiert. Es ist keine Signalabgabe mehr möglich.Wechseln Sie die Batterie aus.NUM’AXES empfehlt Ihnen Batterie gleicher Marke und gleicher Art wie die Batterie, die beim Kauf <strong>de</strong>sGerätes mitgeliefert wur<strong>de</strong>n, zu benützen. Ihr Gerät könnte mit Batterien an<strong>de</strong>rer Marken schlechtfunktionieren o<strong>de</strong>r nicht vollkompatibel sein.Entsprechen<strong>de</strong> Batterie erwerben Sie bei NUM’AXES o<strong>de</strong>r Ihrem Fachhändler.Ersetzen Sie die leere Batterie mit einer neuen Batterie. So gehen Sie vor:- Lösen Sie die Schraube auf <strong>de</strong>r Rückseite <strong>de</strong>s Handsen<strong>de</strong>rs und nehmen Sie <strong>de</strong>n Batterie<strong>de</strong>ckel ab.- Entfernen Sie die leere Batterie.- Legen Sie die neue Batterie (3V Lithium CR 2) ein, entsprechend <strong>de</strong>r aufgedruckten Polarität.- Legen Sie <strong>de</strong>n Batterie<strong>de</strong>ckel zurück.- Ziehen Sie die Schraube fest.- Kontrollieren Sie das einwandfreie Funktionieren Ihres Handsen<strong>de</strong>rs.
D-57Abb. 6Einlegen o<strong>de</strong>r Auswechseln <strong>de</strong>rBatterie in das CANICOM 500VORSICHTAchten Sie bitte auf die PolaritätAuswechseln <strong>de</strong>r Batterie <strong>de</strong>s Empfänger-Halsban<strong>de</strong>sDen La<strong>de</strong>zustand <strong>de</strong>r im Halsband befindlichen Batterie zeigt die auf <strong>de</strong>r Vor<strong>de</strong>rseite <strong>de</strong>s Gehäuses <strong>de</strong>sEmpfänger-Halsban<strong>de</strong>s liegen<strong>de</strong> LED an:- Die Batterie ist in gutem Zustand: Langsames grünes Blinken.- Die Batteriestärke ist schwach: Schnelles rotes Blinken. Ersetzen Sie die Batterie mit einer neuenBatterie gleicher Art: 3V Lithium CR2 (Siehe §Erste Inbetriebnahme : Legen Sie die Batterie in dasCANICOM Empfänger-Halsband ein). Prüfen Sie das einwandfreie Funktionieren <strong>de</strong>s Empfänger-Halsban<strong>de</strong>s.NUM’AXES empfehlt Ihnen Batterie gleicher Marke und gleicher Art wie die Batterie, die beim Kauf <strong>de</strong>sGerätes mitgeliefert wur<strong>de</strong>n, zu benützen. Ihr Gerät könnte mit Batterien an<strong>de</strong>rer Marken schlechtfunktionieren o<strong>de</strong>r nicht vollkompatibel sein.Entsprechen<strong>de</strong> Batterie erwerben Sie bei NUM’AXES o<strong>de</strong>r Ihrem Fachhändler.Auswechseln <strong>de</strong>r KontakteEs wer<strong>de</strong>n 2 Sätze Kontakte unterschiedlicher Länge mit <strong>de</strong>m Gerät geliefert. Achten Sie bitte darauf,dass die Länge <strong>de</strong>r Kontakte ausreichend ist, damit sie in Kontakt mit <strong>de</strong>r Haut <strong>de</strong>s Hun<strong>de</strong>s sind. Nur sofunktioniert das Gerät perfekt.Falls die vormontierten kurzen Kontakte wegen <strong>de</strong>r Felldichte Ihres Hun<strong>de</strong>s nicht ausreichen, ersetzenSie diese mit <strong>de</strong>n als Zubehöre mitgelieferten langen Kontakten. Ziehen Sie die Kontakte nur handfestan, da Sie sonst die Aufnahme auf <strong>de</strong>r Platine beschädigen könnten.
D-58Prüfung Ihres CANICOM 500So können Sie die Funktion Ihres Canicom 500 Trainingssystemes überprüfen:- Versichern Sie sich, dass das Empfänger-Halsband «ausgeschaltet» ist.- Sie können dann je einen Draht <strong>de</strong>r Kontroll-Lampe unter je<strong>de</strong>r Kontakte klemmen (schrauben Siebei<strong>de</strong> ab und zurück, so dass die Drahte <strong>de</strong>r Kontroll-Lampe unter <strong>de</strong>n Kontakten geklemmt wer<strong>de</strong>n).- Schalten Sie <strong>de</strong>n Handsen<strong>de</strong>r und das Empfänger-Halsband ein.- Drücken Sie auf die « F » o<strong>de</strong>r « C »-Taste, und dann än<strong>de</strong>rn Sie die Stufe <strong>de</strong>r Impulsstärke: dieKontroll-Lampe leuchtet mit mehr o<strong>de</strong>r weniger Leuchtstärke. Ihr Gerät funktioniert einwandfrei.So erzielen Sie die besten ErgebnisseDie Signale zwischen Handsen<strong>de</strong>r und Halsband wer<strong>de</strong>n über Funkwellen übertragen. Die maximaleReichweite beträgt je nach Gelän<strong>de</strong> bis zu 500 Metern.Achten Sie bitte auf folgen<strong>de</strong> Hinweise, um die besten Leistungen Ihres CANICOM 500 zu erzielen:- Halten Sie <strong>de</strong>n Handsen<strong>de</strong>r so, dass die aus <strong>de</strong>m Gehaüse herausragen<strong>de</strong> Antenne nicht von Ihrer Handver<strong>de</strong>ckt wird.- Legen Sie das Empfänger-Halsband so an, dass die LED-Leuchte nicht zum Hun<strong>de</strong>körper son<strong>de</strong>rn inRichtung Schnauze zeigt.- Kontrollieren Sie <strong>de</strong>n Batteriezustand (das Empfänger-Halsband und <strong>de</strong>r Handsen<strong>de</strong>r), bevor Sie dasGerät benutzen, und ersetzen Sie die Batterie, sobald das Ladungsniveau schwach wird.- Die Batteriestärke vermin<strong>de</strong>rt sich leicht, wenn die Temperaturen unter 0°C fallen. Wir empfehlenIhnen, bei Kälte <strong>de</strong>n Handsen<strong>de</strong>r in <strong>de</strong>r Tasche anzuwärmen.Justierung <strong>de</strong>s Halsban<strong>de</strong>sDas Halsband muss so stramm am Hun<strong>de</strong>hals sitzen, dass je<strong>de</strong>rzeit gewährleistet ist, dass bei<strong>de</strong>Kontakte die Haut <strong>de</strong>s Hun<strong>de</strong>s berühren.Die Justierung <strong>de</strong>s Halsban<strong>de</strong>s ist sehr wichtig:• Wenn das Halsband zu locker ist, funktioniert das Gerät nicht korrekt. Außer<strong>de</strong>m kann sich dasHalsband bewegen und die wie<strong>de</strong>rholten Reibungen <strong>de</strong>r Kontakten auf <strong>de</strong>r Haut <strong>de</strong>s Tiers könnenReizungen verursachen.• Wenn das Halsband zu fest sitzt, wird <strong>de</strong>r Hund gewürgt.Vermei<strong>de</strong>n Sie das Halsband über längere Zeit hinweg am Hals <strong>de</strong>s Hun<strong>de</strong>s zu lassen, weil esIrritationen verursachen kann.Lassen Sie das Halsband nicht mehr als 8 Stun<strong>de</strong>n lang pro Tag am Hals Ihres Hun<strong>de</strong>s und prüfen Sieregelmäßig dass, es keine Irritation gibt.Es sollten maximal zwei Finger zwischen Hun<strong>de</strong>hals und Halsband passen. Natürlich sollte das Halsband<strong>de</strong>n Hund jedoch nicht würgen. Das Halsband sollte nicht zum Anbringen einer Leine verwen<strong>de</strong>t wer<strong>de</strong>n.Durch Zug an <strong>de</strong>r Leine Könnten die Kontakte über die Haut <strong>de</strong>s Hun<strong>de</strong>s gezogen wer<strong>de</strong>n.
D <strong>Fr</strong> -- 59 1• Die Gewöhnung an das Halsband zur Hun<strong>de</strong>erziehung- Bereits ab einem Alter von 6Monaten kann ein junger Hund langsam an das Halsband gewöhnt wer<strong>de</strong>n.Er sollte eine Grun<strong>de</strong>rziehung erhalten haben und auf einfache Befehle wie "Sitz!", "Platz!" o<strong>de</strong>r an<strong>de</strong>reErmahnungen reagieren.- Arbeiten Sie nicht mit diesem Halsband, wenn Ihr Tier krank (Herzprobleme, Epilepsie usw. ...) o<strong>de</strong>raber stark verhaltensgestört ist.- Eine gewisse Gewöhnung an das Hun<strong>de</strong>halsband ist immer erfor<strong>de</strong>rlich: Legen Sie Ihrem Hund dasHalsband zunächst einige Zeit an, ohne von seinen Funktionen Gebrauch zu machen. Noch besser:Lernen Sie Ihrem Hund, dass das Halsband etwas Schönes ist. Er trägt es, wenn Sie mit Ihm Gassigehen, er was zu fressen bekommt, o<strong>de</strong>r Sie mit Ihm spielen. So lernt <strong>de</strong>r Hund sehr schnell, dasHalsband nicht als Strafmittel son<strong>de</strong>rn als etwas Angenehmes kennen.- Überspringen Sie keine Lernstufe: Nur so erziehen Sie Ihren Hund positiv und wirkungsvoll:- Wählen Sie anfangs eine vertraute Umgebung, in <strong>de</strong>r sich Ihr Hund auskennt.- Beginnen Sie immer mit <strong>de</strong>m geringstmöglichen Stromimpuls und achten Sie auf dieReaktion Ihres Hun<strong>de</strong>s.- Wählen Sie beim Betätigen <strong>de</strong>r Funktionstaste stets <strong>de</strong>n richtigen Zeitpunkt. Lösen Sie dieSanktion genau in <strong>de</strong>m Moment aus, in <strong>de</strong>m Ihr Hund sich falsch verhält, nicht erst später.- Ermutigen Sie ihn durch Streicheln: Das trägt zum besseren Verständnis bei und wird <strong>de</strong>nWillen zum Gehorsam bei Ihrem Hund verstärken.- Sie können ebenfalls einen Ausbil<strong>de</strong>r kontaktieren, <strong>de</strong>r Sie Ratschläge geben wird.• Der Unterschied zwischen "Dauer-" und "Kurzimpuls"Diese bei<strong>de</strong>n interessanten Funktionen sind von großer Be<strong>de</strong>utung und bieten Ihnen die Möglichkeit,situationsgemäß mit Ihrem Hund zu han<strong>de</strong>ln.Der DauerimpulsDieser Impuls kann beispielsweise angewandt wer<strong>de</strong>n, um ein Kommando, das <strong>de</strong>r Hund bereits kennt,zu unterstützten. Der Hund lernt, dass er das unangenehme Gefühl (<strong>de</strong>n Impuls) abstellen kann, in <strong>de</strong>mer das Kommando <strong>de</strong>s Führers befolgt.Der KurzimpulsKann wie ein „Tippen auf die Schulter“ als Ermahnung o<strong>de</strong>r Erinnerung eingesetzt wer<strong>de</strong>n.• Vorsichtsmaßnahmen- Das System darf von Leuten mit physisch o<strong>de</strong>r sensoriellen vermin<strong>de</strong>rten Fähigkeiten (inkl.Kin<strong>de</strong>r) nicht benutzt wer<strong>de</strong>n o<strong>de</strong>r Leute, die über ungenügend Erfahrung und Wissen verfügenso lange sie nicht unter Beobachtung einer verantwortlichen Person stehen o<strong>de</strong>r bis sieausgebil<strong>de</strong>t sind, um das System richtig zu benutzen.- Versichern Sie sich, dass Kin<strong>de</strong>r nicht mit <strong>de</strong>m System spielen.- Vor <strong>de</strong>m Anlegen vom CANICOM-Halsband sollten Sie Ihren Tierarzt aufsuchen, <strong>de</strong>r Ihren Tierarztaufsuchen, <strong>de</strong>r Ihren Hund auf die Tauglichkeit zum Tragen <strong>de</strong>s Halsban<strong>de</strong>s untersucht.- Das CANICOM Empfänger-Halsband ist wasserfest. Ihr Hund kann daher ohne Probleme auch mal ineinen See springen. Wir empfehlen Ihnen jedoch, die Dichtung im Deckel <strong>de</strong>s Empfängers einmal proJahr auszuwechseln.
D - 60- Der Handsen<strong>de</strong>r ist spritzwassergeschützt. Ein leichter Regenguss kann ihm nichts anhaben. StärkereWassereinwirkung könnte ihn jedoch irreparabel zerstören!- Die NUM’AXES-Halsbän<strong>de</strong>r CANICOM dürfen nicht zusammen mit einem an<strong>de</strong>ren Halsbän<strong>de</strong>rngetragen wer<strong>de</strong>n.- Bringen Sie <strong>de</strong>n Magnetschalter auf keinen Fall in die Nähe von Gegenstän<strong>de</strong>n, die empfindlich aufMagnetfel<strong>de</strong>r reagieren, um dadurch möglicherweise irreparabel Schä<strong>de</strong>n zu vermei<strong>de</strong>n.- Achten Sie darauf, dass das Gerät nicht an Orten gelagert wird, die hohen Temperaturen ausgesetztsind.- Die Batterie muss alle zwei Jahre ausgewechselt wer<strong>de</strong>n, auch wenn das Gerät über längere Zeithinweg nicht benutzt wur<strong>de</strong>.- Im Falle einer verlängerte Nicht-Benutzung <strong>de</strong>s Gerätes (z.B. mehr als drei Monate, am En<strong>de</strong> <strong>de</strong>rJagdsaison) empfehlen wir Ihnen die Batterie aus <strong>de</strong>m Halsband und <strong>de</strong>m Handsen<strong>de</strong>r zu nehmen. DieKodierung <strong>de</strong>s Halsban<strong>de</strong>s (<strong>Fr</strong>equenzabstimmung) wird beibehalten auch ohne eingelegte Batterie.- Lassen Sie niemals die verbrauchte Batterie im Handsen<strong>de</strong>r o<strong>de</strong>r im Halsband; sie könnte auslaufenund Ihr CANICOM 500 beschädigen.• Pflege- Benutzen Sie zur Reinigung keine Lösungsmittel o<strong>de</strong>r Benzin. Waschen Sie das Halsband regelmäßigmit klarem Wasser ab und reiben Sie es mit einem weichen Tuch trocken.- Wir empfehlen Ihnen, die Dichtung einmal pro Jahr zu wechseln, damit die Abdichtung <strong>de</strong>s Empfänger-Halsban<strong>de</strong>s behaltet wird.• Beim Nicht-Funktionieren Ihres GerätsWenn Ihr Gerät einmal nicht ordnungsgemäß funktioniert, sollten Sie dieses Handbuch nochmalsaufmerksam durchlesen und sicherstellen, dass das Problem nicht auf <strong>de</strong>r unzureichen<strong>de</strong>nBatteriekapazität o<strong>de</strong>r einem Anwendungsfehler beruht.(Bitte beachten Sie in diesem Fall die Hinweise zum Auswechseln <strong>de</strong>r Batterie <strong>de</strong>s Handsen<strong>de</strong>rs und <strong>de</strong>sEmpfänger-Halsban<strong>de</strong>s).Haben Sie <strong>de</strong>n Ladungszustand <strong>de</strong>r Batterien überprüft, führen Sie eine neue Kodierung <strong>de</strong>s Halsban<strong>de</strong>sdurch (s. Verfahren zur <strong>Fr</strong>equenzabstimmung).Es besteht auch die Möglichkeit, das Empfänger-Halsband auf Werkseinstellung zurückzusetzen. ÖffnenSie dazu das Empfänger-Halsband und entnehmen Sie die Batterie. Verursachen Sie mit einemmetallischen Gegenstand einen Kurzschluss zwischen <strong>de</strong>n bei<strong>de</strong>n Batteriepolen (min<strong>de</strong>stens 2Sekun<strong>de</strong>n). Wenn Sie anschließend wie<strong>de</strong>r die Batterie einlegen, sollte <strong>de</strong>r oben beschriebene Batterie-
D-61Piepton zu hören sein. Das Gerät ist auf Werkseinstellung zurückgesetzt. Schalten Sie das Empfänger-Halsband mit <strong>de</strong>m Handsen<strong>de</strong>r ein.Abb. 7Reset : Verbin<strong>de</strong>n Sie diebei<strong>de</strong>n Batteriepole mit einemmetallischen GegenstandSollte das Gerät auch weiterhin nicht einwandfrei arbeiten, wen<strong>de</strong>n setzen Sie sich bitte mit Ihrem Fachhändlero<strong>de</strong>r in Verbindung. mit NUM’AXES (+33.2.38.69.96.27 o<strong>de</strong>r export@numaxes.com).Je nach <strong>de</strong>r Fehlfunktion wer<strong>de</strong>n Sie beratet, das Produkt zurückzuschicken, so das es repariert undgetestet wird.Der Kun<strong>de</strong>ndienst braucht unbedingt für alle Reparaturen:- das komplette Produkt- <strong>de</strong>r Kaufbeweis (Rechnung o<strong>de</strong>r Kassenbeleg)Der Kun<strong>de</strong>ndienst wird Ihnen die Reparatur berechnen, wenn alle Beweise nicht vorliegen.Technische MerkmaleSen<strong>de</strong>rEmpfängerSpannungsversorgung 1 Batterie Lithium 3 V CR2 1 Batterie Lithium 3V CR2Durchschnittliche Ca. 30 000 Sen<strong>de</strong>-Signale Im Standbyzustand : ca. 7 MonateBatterieleistung Bei durchschnittlicher Nutzung :ca. 2 Monate<strong>Fr</strong>equenz 869,525 MHz (250 mW) 869,525 MHzAntenne 35 mm IntegriertReichweiteCa. 500 MVerhalten im Wasser Spritzwassergeschützt WasserdichtSicherheit und Durch Mikroelektronik Durch MikroelektronikFunkkodierungenBatterieanzeige Anzeige auf <strong>de</strong>m Bildschirm Anzeigelampe
D-62Sen<strong>de</strong>rEmpfängerImpulsstufen 15Betriebstemperatur zwischen – 20°C und + 40°C Zwischen – 20°C und + 40°CAbmessungenHxLxB 108mmx55mmx24mm 38mmx68mmx43mmGewicht (mit <strong>de</strong>r Batterie) 85 g 75 g (ohne <strong>de</strong>m Gurt)Verstellbare Halsweite <strong>de</strong>sHalsban<strong>de</strong>s von 20 bis 50 cmAutonomie <strong>de</strong>s CANICOM – Halsban<strong>de</strong>s- 7 Monate im Standby, d.h. wenn das Gerät 4 Stun<strong>de</strong>n pro Tag im Betrieb wird.- 2 Monate bei intensiver Nutzung, d.h. ungefähr 5.000 Auslösungen von je 2 Sekun<strong>de</strong>n auf Stufe 15.Wir empfehlen Ihnen nach je<strong>de</strong>m Gebrauch das Halsband auszuschalten, um die Batterie zu schonen.GarantieNUM’AXES garantiert das Produkt gegen Fabrikationsfehler für eine Zeit von 2 Jahren ab Kaufdatum. Die<strong>Fr</strong>achtkosten für Hin- und Rücksendung <strong>de</strong>s Produkts trägt ausschließlich <strong>de</strong>r Käufer.Der Hersteller übernimmt keine Verantwortung für Schä<strong>de</strong>n, die durch unsachgemäßen Gebrauch <strong>de</strong>sGerätes entstan<strong>de</strong>n sind.• Garantiebedingungen1. 1. Die Die Garantie kann nur dann gewährt wer<strong>de</strong>n, wenn <strong>de</strong>r <strong>de</strong>r Kaufbeweis (Rechnung o<strong>de</strong>r Kassenbeleg) <strong>de</strong>mHändlerHändlero<strong>de</strong>ro<strong>de</strong>r<strong>de</strong>r<strong>de</strong>rFirmaFirmaNUM’AXESNUM’AXESvorliegt.vorliegt.2.2.DieDieGarantieGarantieerstreckterstrecktsichsichnichtnichtaufauffolgen<strong>de</strong>folgen<strong>de</strong>Bereiche:Bereiche:- Erneuerung- Erneuerung<strong>de</strong>r Batterie<strong>de</strong>r Batterieo<strong>de</strong>r <strong>de</strong>so<strong>de</strong>rNylon-Bands.<strong>de</strong>s Nylon-Bands.- Transportrisiken direkter o<strong>de</strong>r indirekter Art, die durch Rücksendung <strong>de</strong>s Produkts an NUM’AXES- Transportrisiken direkter o<strong>de</strong>r indirekter Art, die durch Rücksendung <strong>de</strong>s Produkts an NUM’AXESentstehen.entstehen.- Beschädigungen <strong>de</strong>s Produkts, die durch Fahrlässigkeit o<strong>de</strong>r Bedienungsfehler bedingt sind- Beschädigungen(unsachgemäße<strong>de</strong>sBedienung,Produkts, dieNichtbeachtungdurch Fahrlässigkeit<strong>de</strong>r Betriebsanleitung,o<strong>de</strong>r Bedienungsfehlero<strong>de</strong>r ungewolltebedingtSchä<strong>de</strong>nsindz.B.(unsachgemäßeBruch o<strong>de</strong>rBedienung,Risse, Wassereinbruch,NichtbeachtungReparaturen,<strong>de</strong>r Betriebsanleitung,die von nichto<strong>de</strong>rautorisiertenungewollteStellenSchä<strong>de</strong>n z.B.Bruch o<strong>de</strong>r durchgeführt Risse, Wassereinbruch, wer<strong>de</strong>n). Reparaturen, die von nicht autorisierten Stellen durchgeführtwer<strong>de</strong>n). - Verlust o<strong>de</strong>r Diebstahl.3. Wird - Der das Verlust Produkt o<strong>de</strong>r als Fehlerhaft Diebstahl. anerkannt, kann NUM’AXES es ersetzen o<strong>de</strong>r reparieren.4. 3. Rechtsmittel Wird das Produkt gegen als NUM’AXES, Fehlerhaftinsbeson<strong>de</strong>re anerkannt, kann bei unsachgemäßem NUM’AXES es ersetzen Gebrauch o<strong>de</strong>r o<strong>de</strong>r reparieren. technischem Defekt4. <strong>de</strong>s NUM’AXES Gerätes, garantiert können in keiner Interventionsfrist Form geltend gemacht von 2 Tagen wer<strong>de</strong>n. (Postfristen ausgeschlossen).5. NUM’AXES Rechtsmittel behält gegen sich NUM’AXES, das Recht vor, insbeson<strong>de</strong>re die Eigenschaften bei unsachgemäßem seiner Produkte zur Gebrauch technischen o<strong>de</strong>r Verbesserungtechnischembzw. Defekt zur <strong>de</strong>s Einhaltung Gerätes, von können neuen inVorschriften keiner Formzu geltend verän<strong>de</strong>rn. gemacht wer<strong>de</strong>n.
Es - 48D - 63D-636. NUM’AXES behält sich das Recht vor, die Eigensch- la renovación <strong>de</strong> la pilaVerbesserung bzw. zur Einhaltung von neuen Vorschriften6. Die -in el diesercambioGebrauchsanleitung<strong>de</strong> la correaangegebenen 7. Informationen Die in dieser Gebrauchsanleitung können ohne Voranmeldung angegebenen geän<strong>de</strong>rt Informatiower<strong>de</strong>n.- los riesgos <strong>de</strong> <strong>de</strong>transporte, directos directos o indirectos, o indirectos, wer<strong>de</strong>n. <strong>de</strong>rivados <strong>de</strong>rivados la <strong>de</strong> <strong>de</strong>volución la <strong>de</strong>volución <strong>de</strong>l producto <strong>de</strong>l producto a su a su7. Die Photos DISTRIBUIDOR ound Zeichnungen a NUM’AXESkönnen von <strong>de</strong>n Produkten 8. Die Photos abweichen. und Zeichnungen können von <strong>de</strong>n Produkten ab-elel<strong>de</strong>terioro<strong>de</strong>terioro <strong>de</strong>l<strong>de</strong>lproductoproductoresultanteresultante<strong>de</strong>:<strong>de</strong>:- la negligencia o error <strong>de</strong>l usuario (por ejemplo: mor<strong>de</strong>duras, roturas, fisuras, etc.),• Registrieren -launanegligenciautilización Ihres Produktescontrariaerror <strong>de</strong>lausuariolas instrucciones(por ejemplo: Zubehöre o no previstamor<strong>de</strong>duras, roturas, fisuras, etc.),Ihr Produkt -unakann las reparacionesutilizaciónauf unserercontrariarealizadas Website unterlasporinstruccionespersonas www.numaxes.com Sieno können habilitadaso no previstaje<strong>de</strong>rzeit registriert diewer<strong>de</strong>n.Zubehöre (Batterie, Gurt…) bei Ihrem- la pérdida las reparaciones o el robo realizadas por personas no habilitadas• 3. ZubehöreSi -se lareconoce pérdida que el robo el producto es <strong>de</strong>fectuoso, NUM’AXES lo reparará o lo cambiará, según <strong>de</strong>cida.3. 4. Si No se se reconoce podrá recurrir que elcontra producto el fabricante es <strong>de</strong>fectuoso, NUM’AXES NUM’AXES Sammeln en caso lo<strong>de</strong> reparará und daños Recycling resultado o lo cambiará, <strong>de</strong> <strong>de</strong>r una según Geräte mala <strong>de</strong>cida. am En<strong>de</strong> ihSie 4. No utilización können se podrá je<strong>de</strong>rzeit <strong>de</strong>l recurrir producto die Zubehöre contra o <strong>de</strong> una el (Batterie, avería. fabricante Gurt…) NUM’AXES bei Ihrem enVertreiber caso <strong>de</strong>erwerben.daños resultando <strong>de</strong> una mala5. utilización NUM’AXES <strong>de</strong>l se reserva productoel o<strong>de</strong>recho una avería. <strong>de</strong> modificar las características <strong>de</strong> sus productos para realizar• 5. NUM’AXES Sammeln mejoras técnicas se und reserva o Recycling respetar el <strong>de</strong>recho nuevas <strong>de</strong>r Geräte normativas. <strong>de</strong> modificar am En<strong>de</strong> las características ihres Lebens <strong>de</strong> sus productos para realizarDieses 6. mejoras La información Gerät técnicas entspricht <strong>de</strong> oesta respetar <strong>de</strong>r guía EU-Richtlinie pue<strong>de</strong> nuevas ser normativas. objeto 2002/96/CE. <strong>de</strong> Das modificaciones auf Die <strong>de</strong>m durchgestrichene Produkt sin previo stehen<strong>de</strong> aviso. Abfalltonne Logo , be<strong>de</strong>utet, die auf dasdiesem 6. 7. La Fotos información Gerät y dibujos abgebil<strong>de</strong>t no contractuales.estaist, guía be<strong>de</strong>utet, pue<strong>de</strong> ser dass objeto dieses <strong>de</strong> entsorgen Produkt modificaciones nach sollen. <strong>de</strong>m sinEn<strong>de</strong> previoseiner aviso. Betriebszeit getrenntvon 7. Fotos <strong>de</strong>n Haushaltsabfällen y dibujos no contractuales. zu entsorgen ist. Entwe<strong>de</strong>rBitte bringensollte esSieandaseinerGerätSammelstellezur Entsorgungfür elektrischezu einer Sammund • Accesorioselektronische Altgeräte abgegeben wer<strong>de</strong>n o<strong>de</strong>r, bei kauf eines neuen Geräts, <strong>de</strong>m Verkäuferzurückgegeben wer<strong>de</strong>n. Der Verbraucher ist in Abfallprodukte je<strong>de</strong>m Falle verantwortlich zuständig ist für o<strong>de</strong>rdie geben OrdnungsgemäßeSie das Gerät an IhAccesoriosEntsorgungPue<strong>de</strong> encargarPue<strong>de</strong> encargar <strong>de</strong>s en Gerätsa susu distribuidor, nachdistribuidor,En<strong>de</strong> en<strong>de</strong>r encualquier Betriebszeit.cualquiermomento,Umweltschutz momento,Nur losbei accesorios Abgabelos undaccesorios zur(pila, <strong>de</strong>s Erhaltung Geräts(pila,correa,<strong>de</strong>r ancorrea,junta einer Bo<strong>de</strong>nschätze<strong>de</strong> receptor…). geeignetenjunta <strong>de</strong> bei.Sammelstellecollar…).ist es möglich das Produkt so zu verarbeiten, zu recyceln und umweltgerecht zu entsorgen,dass• Reciclaje einerseits Werkstoffe und Materialien wie<strong>de</strong>r verwen<strong>de</strong>t wer<strong>de</strong>n können und an<strong>de</strong>rerseits negativeFolgen für Umwelt <strong>de</strong>und aparatosGesundheit electrónicosausgeschlossen al al final finalwer<strong>de</strong>n. <strong>de</strong> <strong>de</strong> su suNähere vida vidaAuskunft bekommen Sie bei Ihremörtlichen Amt für Abfallentsorgung o<strong>de</strong>r in <strong>de</strong>r Verkaufstelle dieses Geräts.El pictograma que aparece en su producto, significa que el equipo no pue<strong>de</strong> mezclarse con basurasdomésticas. Debe ser entregado en un punto <strong>de</strong> recogida a<strong>de</strong>cuado para el tratamiento, la valorización yel reciclaje <strong>de</strong> las basuras electrónicas o bien <strong>de</strong>volverlo a su distribuidor.Adoptando este comportamiento, hará un gesto con el medio ambiente, contribuyendo así a lapreservación <strong>de</strong> los recursos naturales y a la protección <strong>de</strong> la salud humana.www.numaxes.cominternationalsales@numaxes.comwww.numaxes.comexport@numaxes.comwww.numaxes.cominternationalsales@numa
<strong>Manual</strong>e d’usoIT - 65AVVERTIMENTO DESTINATO AI PORTATORI DI APPARECCHI CARDIACITutti i portatori di apparecchi cardiaci (stimolatori cardiaci, pacemaker o <strong>de</strong>fibrillatori) sono invitatia pren<strong>de</strong>re le dovute precauzioni per utilizzare CANICOM 500.Questo apparecchio emette campi magnetici statici (il magnete è situato all’ interno <strong>de</strong>ltelecomando) e on<strong>de</strong> elettromagnetiche ad alta frequenza (frequenza 869 MHz, massima potenzad’emissione 250 mW).CANICOM 500 è conforme alle normative Europee ETSI EN 300 220.Grazie per avere scelto un prodotto <strong>de</strong>lla gamma NUM’AXES.Si consiglia di leggere attentamente le istruzioni di questo manuale per conoscere tutte le prestazioni edottenere i migliori risultati.Consigliamo di far sottoporre il cane ad una visita veterinaria preventiva prima di utilizzare il collareper l’ad<strong>de</strong>stramento.Lo sfregamento <strong>de</strong>gli elettrodi sempre nella stessa zona <strong>de</strong>l collo <strong>de</strong>l vostro cane potrebbe causareeventuali irritazioni. Nel caso in cui compaiono irritazioni al collo <strong>de</strong>l cane, sospen<strong>de</strong>te l’utilizzo <strong>de</strong>lcollare fino alla completa scomparsa.Non lasciare il collare per più di otto ore al giorno al vostro cane.E’ buona regola cominciare al utilizzare la stimolazione sempre dal livello più basso e, se necessario,aumentare progressivamente.Quando lo riterrete necessario non esitate a chie<strong>de</strong>re ad un ad<strong>de</strong>stratore professionista consigliadatti al vostro cane.
It - 66IndicePaginaComposizione <strong>de</strong>l CANICOM 500....................................................................................................................................67Presentazione <strong>de</strong>l prodotto.............................................................................................................................................67Primo utilizzo...................................................................................................................................................................68Codifica telecomando/collare.........................................................................................................................................69Utilizzo <strong>de</strong>l telecomando.................................................................................................................................................70Verifica pila telecomando................................................................................................................................................71Sostituzione pila telecomando........................................................................................................................................72Verifica/sostituzione pila collare....................................................................................................................................72Sostituzione elettrodi......................................................................................................................................................73Verifica <strong>de</strong>l corretto funzionamento CANICOM 500......................................................................................................73Per ottenere le migliori prestazioni...............................................................................................................................73Posizionamento <strong>de</strong>l collare............................................................................................................................................73Regole di base per l’utilizzo <strong>de</strong>l CANICOM 500.............................................................................................................74Precauzioni per l’uso.......................................................................................................................................................74Manutenzione...................................................................................................................................................................75In caso di malfunzionamento..........................................................................................................................................75Caratteristiche tecniche..................................................................................................................................................76Autonomia collare CANICOM.........................................................................................................................................76Garanzia...........................................................................................................................................................................76Condizioni di garanzia.....................................................................................................................................................77Registrazione <strong>de</strong>l prodotto..............................................................................................................................................77Accessori..........................................................................................................................................................................77Raccolta e riciclaggio <strong>de</strong>l vostro vecchio apparecchio.................................................................................................78
It It- 6767• Composizione <strong>de</strong>l prodottoLa confezione <strong>de</strong>l CANICOM 500 compren<strong>de</strong>:- Collare - Collare CANICOM- Pila - Pila lithium lithium CR2 CR2 da da 3V 3V per per il collare il il collare- - Telecomando CANICOM CANICOM 500 500 equipaggiatodi una di una pila pila lithium lithium CR2 CR2 da da 3V 3V- Lampadina- Lampadina testtest- Coppia elettrodi lunghi- Coppia elettrodi lunghi- Collarino porta telecomando- Certificato- Collarinodiportagaranziatelecomando- <strong>Manual</strong>e - <strong>Manual</strong>e d’uso d’usoPresentazione <strong>de</strong>l prodottoTELECOMANDOFig. 1Pulsante rossoaccensione/spegnimento+ luce displayAvvertimentosonoroStimolazioneFlashinferiore a1 secondoMagneteaccensione espegnimentocollare+ codificatelecomando/collareIndicatorerosso:interruttoremagneticoPulsante Boosterdi emergenzaRegolazionelivellostimolazioneSchermo LCDStimolazione continuamax 8 secondiCOLLARE RICEVITOREFig. 2IndicatoreemissioneradioDISPLAYFig. 3ElettrodiLed collare:acceso/spento+ricezione radio+usura <strong>de</strong>lla pilaIndicatorecarica<strong>de</strong>lla pilaLivello di stimolazione(da 1 a 15)
• Primo utilizzoIt It- 6868 Preparazione <strong>de</strong>l collare CANICOM- Con Preparazione un cacciavite a<strong>de</strong>l croce collare svitare CANICOMle 4 viti <strong>de</strong>l coperchio collare CANICOM.- Con Inserire un cacciavite la pila al litio a croce da 3V svitare tipo CR2 le 4 viti rispettando <strong>de</strong>l coperchio la polarità collare indicata CANICOM.en vano pila (Fig. 4).- Inserire Un bip sonoro la pila di al tonalità litio da 3V grave tipo indicherà CR2 rispettando che la pila polarità è stataindicata inserita nel correttamente.vano pila (Fig. 4).- Un Nel bip caso sonoro in cui di non tonalità uditegrave alcun indicherà bip sonoro che dopo la pila avere è stata inserito inserita lacorrettamente.pila, toglietela immediatamente eNel verificare caso in la cui polarità non udite corretta alcun prima bip di sonoro inserirla dopo diavere nuovo.inserito la pila, toglietela immediatamente e-verificareRichiu<strong>de</strong>te la ilpolarità coperchio,corretta assicurandoviprima di inserirlache la guarnizionedi nuovo.di tenuta stagna sia in posizione corretta.Riavvitate mo<strong>de</strong>ratamente le 4 viti.- Richiu<strong>de</strong>te il coperchio, assicurandovi che la guarnizione di tenuta stagna sia pulita e in posizionecorretta.- Riavvitate mo<strong>de</strong>ratamente le 4 viti.Fig. 4Polarità - <strong>de</strong>lla pilaPolarità + <strong>de</strong>lla pilaCOLLAREGuarnizione a tenuta stagnaAccensione/spegnimento <strong>de</strong>l telecomando e <strong>de</strong>l collare Accensione/spegnimento <strong>de</strong>l telecomando e <strong>de</strong>l collareN.B.: AlAl momento <strong>de</strong>ll’acquisto<strong>de</strong>ll’acquisto lala pilapila è già giàinserita inseritanel neltelecomando.telecomando.Il magnete situato nel telecomando permette di accen<strong>de</strong>re e spegnere il il collare CANICOM.- Per accen<strong>de</strong>re il iltelecomando: premere per per1 1secondo il il pulsante il pulsante rosso rosso((( situato situato in inalto altosul sul latolatosinistro (Fig. 1).- Per spegnere il iltelecomando: premere per per 1 secondo 1 il il pulsante il pulsante rosso rosso (((.. .- Per accen<strong>de</strong>re il collare: portare a contatto il magnete <strong>de</strong>l telecomando con l’indicatore rosso<strong>de</strong>l<strong>de</strong>l collare collare per per circa circa 1 1 secondo (Fig. 5); 5); il il led <strong>de</strong>l collare si illumina di colore ver<strong>de</strong> e ecomincia aalampeggiare. Il collare è acceso.- Per spegnere il ilcollare: portare a acontatto il il magnete <strong>de</strong>l <strong>de</strong>l telecomando con conl’indicatore rosso rosso<strong>de</strong>l<strong>de</strong>lcollare per circa 1 secondo (Fig. (Fig. 5); 5); il il led leddiventa diventarosso rossoed edil il collare collaresi si spegne.spegne.( (( (((
It - 69Mettere a conttato queste 2zone per circa un secondoFig. 5Punti di contatto per accensione,spegnimento e codifica <strong>de</strong>l collarecon il telecomando CANICOM 500TELECOMANDOCOLLARE RECIVITORECodifica telecomando/collareCiascun telecomando ha un codice radio.La codifica <strong>de</strong>l telecomando con il collare può essere effettuata sia alla prima attivazione <strong>de</strong>l vostroCANICOM 500, sia nel caso in cui dobbiate sostituire uno <strong>de</strong>i due componenti.Con questa operazione il collare potrà funzionare solo con il vostro telecomando.IMPORTANTE: prima di effettuare la procedura di codifica telecomando/collare, assicuratevi chenessuno vicino a voi stia utilizzando un CANICOM 500 o qualsiasi altro prodotto radiocomandato <strong>de</strong>llagamma NUM’AXES perché il vostro collare potrebbe registrare il codice <strong>de</strong>ll’altro telecomando.Se ciò dovesse acca<strong>de</strong>re, rifate di nuovo l’operazione di codifica <strong>de</strong>l telecomando con il vostro collare.PROCEDURA DI CODIFICA TELECOMANDO/COLLARE1 . Accen<strong>de</strong>re il telecomando: premere per un secondo il pulsante rosso ( situato sul lato sinistro <strong>de</strong>ltelecomando.2 . Portare a contatto il magnete <strong>de</strong>l telecomando con l’indicatore rosso <strong>de</strong>l collare (il led <strong>de</strong>l collarediventa ver<strong>de</strong>). Mantenere il contatto per circa 6 secondi fino a quando il led si colora di rosso elampeggia.3 . Allontanare il telecomando dal collare.(
It - 704 . Premere il tasto <strong>de</strong>l telecomando. Il collare emetterà un suono e sarà sincronizzato con iltelecomando.Codificare nuovamente un collare:Non c’è alcun limite alla codifica <strong>de</strong>l prodotto, sia con lo stesso telecomando, sia con nuovo telecomando<strong>de</strong>lla gamma CANICOM.• Utilizzo <strong>de</strong>l telecomandoIl telecomando CANICOM 500 è predisposto per gestire un collare. Tasto : avvertimento sonoroPremendo il tasto “bip sonoro” potrete inviare a distanza un avvertimento sonoro sul collare. I bipsonori sono emessi ogni volta che viene premuto questo tasto. La durata <strong>de</strong>l suono è in funzione <strong>de</strong>ltempo che viene mantenuto premuto il tasto.È molto importante durante l’ad<strong>de</strong>stramento l’utilizzo <strong>de</strong>l “bip sonoro” per comunicare con il vostroausiliare. Potete segnarargli un errore commesso, attirarre la sua attenzione, preavvisare uncomando...È buona regola utilizzare il bip sonoro sempre allo stesso modo, per non creare confusione al vostro cane. Tasto “F”: stimolazione flashPremendo il tasto “F”<strong>de</strong>l telecomando potrete attivare a distanza una stimolazione flash attraverso glielettrodi <strong>de</strong>l collare. La stimolazione flash ha una durata di circa 2 <strong>de</strong>cimi di secondo ogni volta chepremete il tasto “F”. Tasto “C”: stimolazione continuaPremendo il tasto “C” potrete attivare a distanza una stimolazione continua attraverso i due elettrodi<strong>de</strong>l collare. La durata equivale al tempo che viene mantenuto premuto il pulsante, per un massimo di 8secondi (dispositivo di sicurezza anti-shock). Se il tasto “C” è mantenuto premuto per più di 8 secondi, ilcollare si blocca ed rimane in pausa per alcuni secondi, poi ripren<strong>de</strong> a funzionare regolarmente. Tasto Booster (stimolazione d’emergenza programmabile)Il tasto Booster (tasto B in alto a <strong>de</strong>stra <strong>de</strong>l telecomando) opportunamente programmato, è utilissimonel caso in cui dovete fermare il cane senza esitare, inviando una stimolazione efficace e commisurataalla sensibilità <strong>de</strong>l vostro cane.In qualsiasi situazione di emergenza, potrete intervenire immediatamente sul cane, senza per<strong>de</strong>re tempo
It It- 7171prezioso o commettere errori per cambiare il il livello di stimolazione.Se il tasto “Booster” è mantenuto premuto per più di di8 8secondi, il il ilcollare si si blocca ed edrimane in inpausaper alcuni secondi, poi ripren<strong>de</strong> a funzionare regolarmente.Programmazione <strong>de</strong>l tasto Booster:- scegliere il livello di stimolazione 01- mantenere premuto il tasto “-”fino “-”a fino a quando il il display lampeggia- con i tasti +/- modificare il livello di stimolazione sul valore <strong>de</strong>si<strong>de</strong>rato- confermare premendo il tasto Booster Tasti di regolazione <strong>de</strong>l <strong>de</strong>llivello di di stimolazione “+” “+” e ”-“e ”-“I tasti “+”/”-“ permettono di regolare rapidamente il il illivello di distimolazione <strong>de</strong>l <strong>de</strong>l collare, secondo necessità:sono disponibili 15 livelli.Livello 1 stimolazione appena percettibile - Livello 15 massima stimolazioneI livelli da 1 a 4 emettono una unastimolazione appena appenapercettibile. percettibile. I Ilivelli livelli5/8, 5/8, una unastimolazione stimolazionemedia. media. I I Ilivelli 9/12, una stimolazione media/alta. Oltre Oltreil illivello livello12 12si si hanno hannostimolazioni forti forti da dautilizzare utilizzaresolo solo susucani di di stazza importante o comunque molto moltotolleranti tollerantied edinsensibili insensibilialle allestimolazioni.L’utilizzoL’utilizzo <strong>de</strong>l<strong>de</strong>l collarecollare perper l’ad<strong>de</strong>stramento ha lo loscopo scopodi dieducare educareil il ilcane, cane,comunicandogli comunicandoglila lavostravostraapprovazioneapprovazione o perl’errore rimarcare che hal’errore commesso,che harispettandone commesso, rispettandoneil carattere e lail il sensibilità,carattere e permettendola sensibilità,dimantenerepermettendo unodi mantenerestretto conttatouno strettoin tutteconttato le situazioniin tutte di lavoro.le situazioni di lavoro.Si consiglia pertanto di utilizzare con molta discrezione i livelli di stimolazione in funzione <strong>de</strong>lSi consiglia pertanto di utilizzare con molta discrezione i livelli di stimolazione in funzione <strong>de</strong>lcarattere <strong>de</strong>lla sensibilità <strong>de</strong>l vostrevostrecane.carattere e <strong>de</strong>lla sensibilità <strong>de</strong>l vostro cane. Luce display telecomando Luce display telecomandoCon il telecomando acceso, potete illuminare il display con una semplice pressione <strong>de</strong>l tasto rosso diCon il telecomando accensione ( acceso, potete illuminare il display con una semplice pressione <strong>de</strong>l tasto rosso diaccensione ((. Il. Ildisplay displayrimane rimaneacceso accesoper percirca circa5 secondi5 secondiogni ognivolta voltache chepremete premeteil il tasto.il tasto.(((• Verifica Pila telecomandopila telecomandoL’usuraL’usura <strong>de</strong>lla<strong>de</strong>lla pilapila comporta comportauna unadiminuzione diminuzione<strong>de</strong>lle <strong>de</strong>lleprestazioni prestazioni<strong>de</strong>l <strong>de</strong>ltelecomando, telecomando,soprattutto soprattuttoin intermini terminididiportata.portata. ControllateControllate sempre semprelo lostato stato<strong>de</strong>lla <strong>de</strong>llapila pilaindicato indicatosul suldisplay display<strong>de</strong>l <strong>de</strong>ltelecomando.telecomando.Pila carica.Pila <strong>de</strong>bole: preve<strong>de</strong>te di sostituirla.Pila scarica: il ilCANICOM 500 si siblocca ed è necessario sostituire subito la lapila.Il telecomando CANICOM 500 funziona ha 1 pila con litio 1 tipo pila CR2 litio da tipo 3V. CR2 da 3V.
Fig. 6Sostituzione pila CANICOM 500ATTENZIONERispettare la polaritàIt It- 7272NUM’AXES Si raccomanda raccomanda di utilizzare di utilizzare pile <strong>de</strong>llo pile stesso <strong>de</strong>llo stesso mo<strong>de</strong>llo mo<strong>de</strong>llo e <strong>de</strong>lla e <strong>de</strong>lla stessa stessa marca, marca, come come quella quelle chechetrovate già installata installate nel nei prodotto. prodotti. Pile Pile di di altre altre marche possono essere essere non noncompatibili e ecausaremalfunzionamenti.Potete procurarvi le pile a<strong>de</strong>guate al al vostro prodotto presso il il ilvostro rivenditore di difiducia oodirettamente da NUM’AXES.CANICOM Srl.• Sostituzione pila telecomandoSostituzione pila telecomando- Svitare il coperchio sul retro <strong>de</strong>l telecomando ed estrarre la pila.- Inserire la nuova pila rispettando la polarità indicata.- Riposizionare il tappo.- Riavvitare la vite <strong>de</strong>l coperchio.Utilizzate sempre pile di buona qualità per garantire un corretto funzionamento <strong>de</strong>l vostro telecomando.• Verifica/sostituzione pila collarePila collarePer verificare lo stato <strong>de</strong>lla pila, osservate il led con il collare acceso:Per • Con verificare la pila in lobuono stato stato, <strong>de</strong>lla pila, led osservate ver<strong>de</strong> lampeggia il led conogni il collare secondo.acceso:• Con la pila quasi in buono scarica, stato, il il led ledsi ver<strong>de</strong> colora lampeggia di rosso e ogni lampeggia secondo. rapidamente. Dovete quindi sostituire la• Con pila litio la pila tipo quasi CR2 scarica, 3V (cf. § il Preparazione led si colora<strong>de</strong>l di rosso collare e lampeggia CANICOM).rapidamente. Dovete quindi sostituire laUtilizzate pila litiosempre tipo CR2pile 3V di (cf. buona § Preparazione qualità per <strong>de</strong>l garantire collareun CANICOM). corretto funzionamento <strong>de</strong>l vostro collare.Utilizzate sempre pile di buona qualità per garantire un corretto funzionamento <strong>de</strong>l vostro collare.Si raccomanda di utilizzare pile <strong>de</strong>llo stesso mo<strong>de</strong>llo e <strong>de</strong>lla stessa marca, come quella cheNUM’AXES trovate installata raccomanda nel prodotto. di utilizzare Pile pile di altre <strong>de</strong>llo stesso marche mo<strong>de</strong>llo possono e <strong>de</strong>lla essere stessa non compatibili marca, comee quelle causarechetrovate malfunzionamenti.già installate nei prodotti. Pile di altre marche possono essere non compatibili e causaremalfunzionamenti.
It - 73Potete procurarvi le pile a<strong>de</strong>guate al vostro prodotto presso il vostro rivenditore di fiducia o direttamenteda NUM’AXES.•Sostituzione elettrodiSe il vostro cane è a pelo lungo, si consiglia di sostituire gli elettrodi corti con quelli più lunghi in dotazione,per ottenere un corretto posizionamento <strong>de</strong>l collare.Raccomandiamo di stringerli con cautela, per evitare la rottura <strong>de</strong>ll’involucro di plastica.• Verifica <strong>de</strong>l corretto funzionamento CANICOM 500In qualsiasi momento potete verificare il corretto funzionamento <strong>de</strong>l CANICOM 500 in questo modo:- Spegnete il collare- Svitate leggermente gli elettrodi <strong>de</strong>l collare e fissate i due terminali <strong>de</strong>lla lampadina test in dotazioneriavvitando gli elettrodi.- Accen<strong>de</strong>te il collare e il telecomando.- Premete il tasto stimolazioni “F” o “C” <strong>de</strong>l telecomando: la lampadina test si <strong>de</strong>ve illuminare, indicandoche il collare emette stimolazioni e quindi funziona correttamente.•Per ottenere le migliori prestazioniIl telecomando CANICOM 500 ha una portata di circa 500 metri. Le distanze possono subire lievi variazionisecondo la conformazione <strong>de</strong>l terreno in cui si opera.Di seguito elenchiamo alcuni consigli per ottenere le migliori prestazioni:- Le prestazioni <strong>de</strong>l vostro CANICOM 500 saranno ottimali se terrete il telecomando leggermente in altoe in modo da non coprire l’antenna.- Ricordiamo inoltre che una temperatura molto rigida inferiore a 0°C può diminuire sensibilmente leprestazioni <strong>de</strong>l prodotto. Si consiglia pertanto di conservare il telecomando in ambienti idonei.- E’ buona regola, prima di utilizzare il prodotto, controllare lo stato <strong>de</strong>lle batterie.•Posizionamento <strong>de</strong>l collare- Gli elettrodi <strong>de</strong>l collare <strong>de</strong>vono essere posizionati sotto il collo <strong>de</strong>l cane.- La cinghia <strong>de</strong>ve essere stretta in modo da assicurare il contatto <strong>de</strong>gli elettrodi con la pelle <strong>de</strong>l cane.
It - 74- La corretta posizione <strong>de</strong>l collare indossato dal cane, è con la spia luminosa rivolta verso il muso.Se avete la necessità di utilizzare il collare per molte ore, preoccupatevi ogni tanto di riposizionarloal collo <strong>de</strong>l vostro cane. Lo sfregamento <strong>de</strong>gli elettrodi sempre nella stessa zona <strong>de</strong>l collo, potrebbecausare eventuali irritazioni.Si consiglia di non lasciare il collare per piú di otto ore al giorno al vostro cane, avendo inoltre cura diverificare che non abbia provocato irritazioni.• Regole di base per l’utilizzo <strong>de</strong>l CANICOM 500- Il cane <strong>de</strong>ve avere almeno 6/8 mesi ad aver appreso i comandi base, come «seduto» o «terra».- Deve essere in buona salute, non avere problemi cardiaci, epilessia o disturbi comportamentali.- Si consiglia un breve periodo di adattamento, facendo indossare al cane il collare spento per qualchegiorno.- Per l’ad<strong>de</strong>stramento è fondamentale adottare alcuni importanti accorgimenti:- Scegliete un terreno che gli è familiare, mettendolo a suo agio.- Successivamente <strong>de</strong>terminate il livello di stimolazione a partire dal quale il vostro canerispon<strong>de</strong>. E’ buona regola cominciare al utilizzare la stimolazione sempre dal livello piùbasso e, se necessario, aumentare progressivamente.- Utilizzate la correzione al momento giusto facendogli capire l’errore commesso, perpermettergli di associare la correzione al comportamento scorretto.- Incoraggiate il vostro cane con <strong>de</strong>lle carezze, compren<strong>de</strong>rà più rapidamente.- Quando lo riterrete necessario non esitate a chie<strong>de</strong>re ad un ad<strong>de</strong>stratore professionista consigli adattial vostro cane.• Precauzioni per l’uso- Questo dispositivo non è <strong>de</strong>stinato ad essere utilizzato da persone (compresi i bambini) con ridottecapacità fisiche, sensoriali o mentali o persone prive di esperienza e conoscenza, a meno che non sianoaiutati da una persona responsabile <strong>de</strong>lla loro sicurezza, che li sorveglia ed istruisce per l'uso <strong>de</strong>ldispositivo.- Assicurarsi che i bambini non giochino con l'apparecchio.- Il collare ricevitore CANICOM è impermeabile all’immersione. Il vostro cane può attraversare i corsid'acqua senza alcuna preoccupazione. Per preservare inalterate le prestazioni <strong>de</strong>l vostro collare, siconsiglia di sostituire la guarnizione <strong>de</strong>l coperchio pila ogni anno.- Il telecomando è impermeabile allo scorrimento <strong>de</strong>ll’acqua: è previsto l’utilizzo anche sotto la pioggiasenza tuttavia sottoporlo ad eccessiva esposizione. Attenzione: se il telecomando ca<strong>de</strong> in acqua,l’immersione totale potrebbe causare danni irreversibili non coperti in garanzia.- Evitate di avvicinare il telecomando a oggetti sensibili ai campi magnetici, rischiate di danneggiarli inmodo irreversibile.- Abbiate cura di tenere sempre l’apparecchio in un luogo idoneo. Non lasciatelo vicino a fonti di calore,esposto al sole o a temperature troppo fred<strong>de</strong> per un periodo di tempo prolungato.
It - 75It - 75It - 75- Nel caso in cui l’apparecchio rimanga inutilizzato per un periodo superiore ai 3 mesi (ad esempio finedi periodo di caccia), si consiglia di togliere le pile sia dal collare che dal telecomando. La codificatelecomando/collare viene mantenuta per molti mesi anche in assenza <strong>de</strong>lle pile.telecomando/collare viene mantenuta per molti mesi anche in assenza <strong>de</strong>lle pile.Raccomandiamo di sostituire le batterie almeno ogni anni anche se l’apparecchio stato utilizzato- telecomando/collare Raccomandiamo di sostituire viene mantenuta le batterie peralmeno molti mesi ogni anche 2 anni inanche assenza se <strong>de</strong>lle l’apparecchio pile. è stato utilizzatopoco.Raccomandiamopoco.Non lasciate mai di le sostituire pile scariche le batterie all’interno almeno <strong>de</strong>ll’apparecchio ogni 2 anni anche (telecomando se l’apparecchio collare), è stato perché utilizzato possono poco.- Non lasciate mai le pile scariche all’interno <strong>de</strong>ll’apparecchio (telecomando e collare), perché possonoNon danneggiarlo.danneggiarlo.lasciate mai le pile scariche all’interno <strong>de</strong>ll’apparecchio (telecomando e collare), perché possono danneggiarlo.Consigliamo di far sottoporre il cane ad una visita veterinaria preventiva prima di diutilizzare il il collare per- Consigliamo di far sottoporre il cane ad una visita veterinaria preventiva prima di utilizzare il collare perperl’ad<strong>de</strong>stramento.l’ad<strong>de</strong>stramento.Quando utilizzate il collare CANICOM, togliete dal collo <strong>de</strong>l cane qualsiasi altro collare di dimetallo,- Quando utilizzate il collare CANICOM, togliete dal collo <strong>de</strong>l cane qualsiasi altro collare di catenelle medaglie che possono provocare malfunzionamenti <strong>de</strong>l <strong>de</strong>l prodotto.catenelle o medaglie che possono provocare malfunzionamenti <strong>de</strong>l prodotto.Nel caso in in cui cui compaiono irritazioni irritazioni al collo al <strong>de</strong>l collo cane, <strong>de</strong>l sospen<strong>de</strong>te cane, sospen<strong>de</strong>te l’utilizzo <strong>de</strong>l l’utilizzo collare<strong>de</strong>l finocollare alla completa fino alla scomparsa. completa- Nel caso in cui compaiono irritazioni al collo <strong>de</strong>l cane, sospen<strong>de</strong>te l’utilizzo fino alla completaNonscomparsa.scomparsa. lasciate mai l’apparecchio alla portata <strong>de</strong>i bambini.- Non lasciate mai l’apparecchio alla portata <strong>de</strong>i bambini.• ManutenzioneManutenzione- Per la pulizia <strong>de</strong>l vostro apparecchio utilizzate Per la pulizia <strong>de</strong>l vostro apparecchio utilizzate solosolo unun pannopanno morbidomorbido e eunauna soluzionesoluzione <strong>de</strong>tergente<strong>de</strong>tergenteneutra, evitando assolutamente l’uso di diluenti o benzina.neutra, evitando assolutamente l’uso di diluenti - Per preservare l’impermeabilità <strong>de</strong>l collare, raccomandiamobenzina.di sostituire la guarnizione ogni anno.Per preservare l’impermeabilità <strong>de</strong>l collare, raccomandiamo di sostituire la guarnizione ogni anno.• InIncaso casodi dimalfunzionamentomalfunzionamentoPrima di affermare che il collare “non funziona”, assicuratevi che il problema riscontrato non sia dovutoPrima di affermare che il collare “non funziona”, assicuratevi che il problema riscontrato non sia dovutoPrima ad errori di affermare di utilizzo o che semplicemente il collare “nonalla funziona”, batteria assicuratevi scarica. che il problema riscontrato non sia dovutoad errori di utilizzo semplicemente alla batteria scarica.ad NelNelerrori casocasodi ininutilizzo cui riscontratecui riscontrateo semplicemente problemi diproblemialla trasmissionedi trasmissionebatteria scarica. radio, provate a fare la procedura di codifica <strong>de</strong>lradio, provate fare la procedura di codifica <strong>de</strong>lNel collarecollare caso seguendoseguendo in cui riscontrate le istruzionile istruzioni problemi riportateriportate dinel nel trasmissione paragrafo specifico.paragrafo specifico. radio, provate a fare la procedura di codifica <strong>de</strong>lcollare Proce<strong>de</strong>te,Proce<strong>de</strong>te, seguendo necessario, necessario, le istruzioni ad effettuaread effettuare riportate nel un resetun reset paragrafo <strong>de</strong>lla<strong>de</strong>lla specifico. memoria <strong>de</strong>ll’apparecchio in questo modo:memoria <strong>de</strong>ll’apparecchio in questo modo:Proce<strong>de</strong>te, Togliete la batteriaTogliete la batteria se necessario, e poi, con poi, con adl’aiuto effettuare di un di un unoggetto reset <strong>de</strong>lla metallico,metallico, memoria (un cacciavite,(un cacciavite, <strong>de</strong>ll’apparecchio per esempio)per esempio) in questo cortocircuitatecortocircuitatemodo:Togliete per un paioper un paio la batteria di secondidi secondi e poi, i 2i con supporti supporti l’aiuto <strong>de</strong>lla di <strong>de</strong>lla un pila oggetto (Fig.pila (Fig. metallico, 7). Inserite7). Inserite (unnuovamente nuovamente cacciavite, per la batteriala esempio) rispettandobatteria rispettando cortocircuitate lalaperpolarità.polarità. un paioSe uditeSe udite secondiun bip sonoroun bip isonoro 2 supportisignificasignifica <strong>de</strong>llacheche pilala batteria batteria (Fig. 7).è Inseritestata inseritastata inserita nuovamentecorrettamente.correttamente. la batteria rispettando leRiaccen<strong>de</strong>te il vostro CANICOM con l’aiuto <strong>de</strong>l telecomando.polarità. Riaccen<strong>de</strong>te Se udirete il vostro unCANICOM bip sonoro con significa l’aiuto che <strong>de</strong>l telecomando.la batteria è stata inserita correttamente.Riaccen<strong>de</strong>te il vostro CANICOM con l’aiuto <strong>de</strong>l telecomando.Fig. 7RESET : cortocircuitare i 2 supporti <strong>de</strong>lla pila
It 76It - 76Se il problema pertiste contattate vostro rivenditore di fiducia o NUM’AXES (+33.2.38.69.96.27 o export@numaxes.com) Se il problemaprima persiste di inviare contattate il prodotto il Servizio in riparazione. Assistenza CANICOM Srl.In Secaso il problema di malfunzionamento, persiste contattate il prodotto il Servizio <strong>de</strong>ve essere Assistenza inviato CANICOM al Centro Srl. Assistenza CANICOM Srl cheNel provve<strong>de</strong>rà In caso caso di in malfunzionamento, cui allasia riparazione necessario e/o inviare il sostituzione. prodotto il prodotto <strong>de</strong>veal essere servizio inviato assistenza al Centro clienti, Assistenza documentate CANICOM con una Srl chiara che<strong>de</strong>scrizione provve<strong>de</strong>rà alla il difetto riparazione riscontrato. e/o sostituzione.Caratteristiche tecnicheCaratteristiche tecnicheTelecomandoCollareAlimentazione 1Telecomandopila litio 3V tipo CR2 1Collarepila litio 3V tipo CR2Autonomia AlimentazioneAutonomiaUtilizzo 1 pila litio intensivo: 3V tipo CR2 circa 30.000 comandiUtilizzo intensivo: circa 30.000 comandiUtilizzo 1 pila litio intensivo: 3V tipo CR2 circa 2 mesiUtilizzo In funzione intensivo: stand-by: circa circa 2 mesi 7 mesi<strong>Fr</strong>equenza (Potenza) 869,525 MHz (250 mW) In 869,525 funzione MHz stand-by: circa 7 mesiAntenna <strong>Fr</strong>equenza (Potenza) 35 869,525 mm MHz (250 mW) Integrata 869,525 MHzPortata Antennaradio500 35 mm m circaIntegrataTenuta Portatastagna radio500 Allo mscorrimento circa <strong>de</strong>ll’acqua Ermetico all’immersioneSicurezza Tenuta stagna e codifica radio Controllata Allo scorrimento da microprocessore <strong>de</strong>ll’acqua Controllata Ermetico all’immersioneda microprocessoreIndicatore Sicurezza estato codifica <strong>de</strong>llaradio pila Controllata Indicatore schermo da microprocessore LCD Controllata Led luminoso da microprocessoreLivelli Indicatore stimolazione stato <strong>de</strong>lla pila 15 Indicatore schermo LCD Led luminosoTemperatura Livelli stimolazione d' utilizzo Tra 15 – 20°C / + 40°C Tra – 20°C / + 40°CDimensioni: Temperatura Hd' xutilizzo L x P Tra 108 – mm 20°C x 55/ mm + 40°C x 24 mm 38mmx68mmx43mmTra – 20°C / + 40°CPeso Dimensioni: (batteria H inclusa) x L x PPeso (batteria inclusa)108 85 gmm x 55 mm x 24 mm85 g75 38mmx68mmx43mmgCinghia 75 g regolabile da 20 a 50 cmCinghia regolabile da 20 a 50 cmAutonomia collare CANICOMAutonomia collare CANICOM- 2 mesi in utilizzo intensivo : pari a 5 000 stimolazioni di 2 secondi al massimo livelloSe - 2 il mesi ricevitore in utilizzo non intensivo viene utilizzato : pari aper 5 000 un lungo stimolazioni periodo, di si 2 secondi consigliaaldi massimo spegnerelivelloil collare.Se il ricevitore non viene utilizzato per un lungo periodo, si consiglia di spegnere il collare.GaranziaGaranziaLe condizioni specifiche ed i termini di garanzia di 2 anni, sono riportati sul certificato CANICOMNUM’AXES allegato Le condizioni ad garantisce ogni specifiche prodotto. il prodotto ed i termini contro di garanzia diffeti di di fabbricazione 2 anni, sonoper riportati 24 mesi suldalla certificato data di CANICOM acquisto.Le allegato spese ad di trasporte, ogni prodotto. andata e ritorno, per l’envio <strong>de</strong>l prodotto a NUM’AXES, sono a carico <strong>de</strong>ll’utilizzatore.
It - 77• Condizioni di garanzia1. La garanzia è riconosciuta solo se il prodotto inviato in riparazione è corredato di prova di acquisto(fattura o biglietto di cassa), senza alcuna manomissione.2. La garanzia non copren<strong>de</strong>:- La sostituzione <strong>de</strong>lla pila- La sostituzione <strong>de</strong>lla cinghia- I rischi di trasporto, lo smarrimento o il furto connessi con l’invio <strong>de</strong>l prodotto a/da NUM’AXES,- I danni causati da:- Negligenza o colpa <strong>de</strong>ll’utilizzatore (ad esempio: morsi, rotture, fessure, manomissione…)- Utilizzo non conforme alle istruzioni o non previsto- Riparazioni o modifiche effettuate da personale non autorizzato3. Se il prodotto è riconosciuto difettoso, NUM’AXES lo riparerà o lo sostituirà a suo insindacabilegiudizio.4. Contro NUM’AXES non è ammesso alcun ricorso, in particolare, in caso di cattivo uso, manomissioneo uso non conforme <strong>de</strong>l prodotto.5. Il produttore NUM’AXES si riserva il diritto di modificare le caratteristiche <strong>de</strong>i prodotti, al fine diapportare miglioramenti tecnici o a<strong>de</strong>guarli a nuove regolamentazioni.6. Le informazioni <strong>de</strong>l presente manuale possono essere oggetto di modifica senza preavviso.7. Fotografie e disegni non contrattuali.• Registrazione <strong>de</strong>l prodottoIl prodotto può essere registrato sul nostro sito web www.numaxes.com.• AccessoriSono disponibili presso il vostro rivenditore di fiducia accessori e parti di ricambio (coppia di elettrodicorti o lunghi, cinghia collare, pile, collare CANICOM…).
It - 78Raccolta e riciclaggio <strong>de</strong>l vostro vecchio apparecchioL’immagine apposta sul prodotto significa che l’apparecchio non può essere smaltito con i rifiuti.In caso di rottamazione, il prodotto <strong>de</strong>ve essere consegnato presso un punto di raccolta a<strong>de</strong>guato per iltrattamento, la valorizzazione e il riciclaggio <strong>de</strong>gli scarti elettronici o riconsegnato al vostro rivenditore.In questo modo contribuite alla conservazione <strong>de</strong>lle risorse naturali e alla protezione <strong>de</strong>lla salute umana.Distributore per l’Italia – Servizio Assistenza Clientiwww.numaxes.comCANICOM SrlVia Romana,export@numaxes.com615 - 55100 Arancio LUCCATel. +39 0583 462363 - Fax +39 0583 462411www.canicomitalia.com - info@canicomitalia.com
print : www.easyflyer.fr
Indice c D