2193664-01.indd 2 6/5/08 12:28:11 PM
2193664-01.indd 2 6/5/08 12:28:11 PM
2193664-01.indd 2 6/5/08 12:28:11 PM

Create successful ePaper yourself
Turn your PDF publications into a flip-book with our unique Google optimized e-Paper software.
10 <strong>11</strong><br />
13<br />
15<br />
17<br />
<strong>12</strong><br />
18<br />
19<br />
16<br />
14<br />
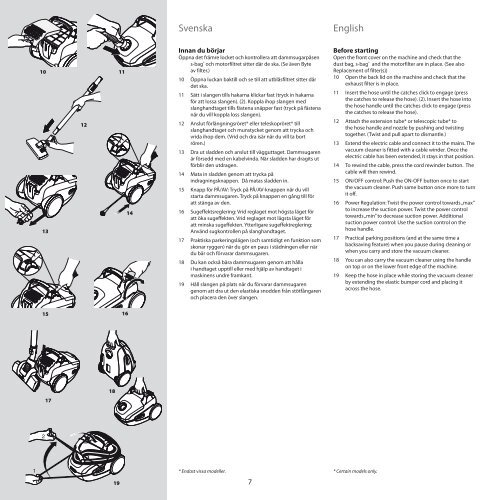
Svenska<br />
Innan du börjar<br />
Öppna det främre locket och kontrollera att dammsugarpåsen<br />
s-bag ® och motorfiltret sitter där de ska. (Se även Byte<br />
av filter.)<br />
10 Öppna luckan baktill och se till att utblåsfiltret sitter där<br />
det ska.<br />
<strong>11</strong> Sätt i slangen tills hakarna klickar fast (tryck in hakarna<br />
för att lossa slangen). (2). Koppla ihop slangen med<br />
slanghandtaget tills fästena snäpper fast (tryck på fästena<br />
när du vill koppla loss slangen).<br />
<strong>12</strong> Anslut förlängningsröret* eller teleskopröret* till<br />
slanghandtaget och munstycket genom att trycka och<br />
vrida ihop dem. (Vrid och dra isär när du vill ta bort<br />
rören.)<br />
13 Dra ut sladden och anslut till vägguttaget. Dammsugaren<br />
är försedd med en kabelvinda. När sladden har dragits ut<br />
förblir den utdragen.<br />
14 Mata in sladden genom att trycka på<br />
indragningsknappen. Då matas sladden in.<br />
15 Knapp för PÅ/AV: Tryck på PÅ/AV-knappen när du vill<br />
starta dammsugaren. Tryck på knappen en gång till för<br />
att stänga av den.<br />
16 Sugeffektsreglering: Vrid reglaget mot högsta läget för<br />
att öka sugeffekten. Vrid reglaget mot lägsta läget för<br />
att minska sugeffekten. Ytterligare sugeffektreglering:<br />
Använd sugkontrollen på slanghandtaget.<br />
17 Praktiska parkeringslägen (och samtidigt en funktion som<br />
skonar ryggen) när du gör en paus i städningen eller när<br />
du bär och förvarar dammsugaren.<br />
18 Du kan också bära dammsugaren genom att hålla<br />
i handtaget upptill eller med hjälp av handtaget i<br />
maskinens undre framkant.<br />
19 Håll slangen på plats när du förvarar dammsugaren<br />
genom att dra ut den elastiska snodden från stötfångaren<br />
och placera den över slangen.<br />
* Endast vissa modeller.<br />
7<br />
English<br />
Before starting<br />
Open the front cover on the machine and check that the<br />
dust bag, s-bag ® and the motorfilter are in place. (See also<br />
Replacement of filter(s))<br />
10 Open the back lid on the machine and check that the<br />
exhaust filter is in place.<br />
<strong>11</strong> Insert the hose until the catches click to engage (press<br />
the catches to release the hose). (2). Insert the hose into<br />
the hose handle until the catches click to engage (press<br />
the catches to release the hose).<br />
<strong>12</strong> Attach the extension tube* or telescopic tube* to<br />
the hose handle and nozzle by pushing and twisting<br />
together. (Twist and pull apart to dismantle.)<br />
13 Extend the electric cable and connect it to the mains. The<br />
vacuum cleaner is fitted with a cable winder. Once the<br />
electric cable has been extended, it stays in that position.<br />
14 To rewind the cable, press the cord rewinder button. The<br />
cable will then rewind.<br />
15 ON/OFF control: Push the ON-OFF button once to start<br />
the vacuum cleaner. Push same button once more to turn<br />
it off.<br />
16 Power Regulation: Twist the power control towards „max”<br />
to increase the suction power. Twist the power control<br />
towards „min” to decrease suction power. Additional<br />
suction power control: Use the suction control on the<br />
hose handle.<br />
17 Practical parking positions (and at the same time a<br />
backsaving feature) when you pause during cleaning or<br />
when you carry and store the vacuum cleaner.<br />
18 You can also carry the vacuum cleaner using the handle<br />
on top or on the lower front edge of the machine.<br />
19 Keep the hose in place while storing the vacuum cleaner<br />
by extending the elastic bumper cord and placing it<br />
across the hose.<br />
* Certain models only.<br />
<strong>2193664</strong>-<strong>01.indd</strong> 7 6/5/<strong>08</strong> <strong>12</strong>:<strong>28</strong>:15 <strong>PM</strong>