Instruction Book − Riding Mower Model ... - Safe Motor AS
Instruction Book − Riding Mower Model ... - Safe Motor AS
Instruction Book − Riding Mower Model ... - Safe Motor AS

Create successful ePaper yourself
Turn your PDF publications into a flip-book with our unique Google optimized e-Paper software.
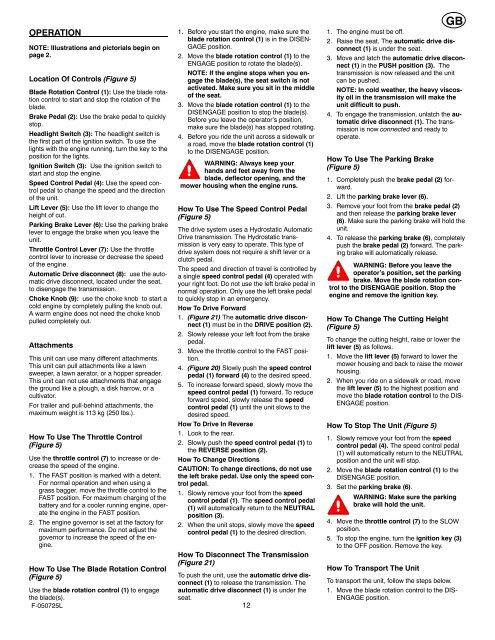
OPERATION<br />
NOTE: Illustrations and pictorials begin on<br />
page 2.<br />
Location Of Controls (Figure 5)<br />
Blade Rotation Control (1): Use the blade rotation<br />
control to start and stop the rotation of the<br />
blade.<br />
Brake Pedal (2): Use the brake pedal to quickly<br />
stop.<br />
Headlight Switch (3): The headlight switch is<br />
the first part of the ignition switch. To use the<br />
lights with the engine running, turn the key to the<br />
position for the lights.<br />
Ignition Switch (3): Use the ignition switch to<br />
start and stop the engine.<br />
Speed Control Pedal (4): Use the speed control<br />
pedal to change the speed and the direction<br />
of the unit.<br />
Lift Lever (5): Use the lift lever to change the<br />
height of cut.<br />
Parking Brake Lever (6): Use the parking brake<br />
lever to engage the brake when you leave the<br />
unit.<br />
Throttle Control Lever (7): Use the throttle<br />
control lever to increase or decrease the speed<br />
of the engine.<br />
Automatic Drive disconnect (8): use the automatic<br />
drive disconnect, located under the seat,<br />
to disengage the transmission.<br />
Choke Knob (9): use the choke knob to start a<br />
cold engine by completely pulling the knob out.<br />
A warm engine does not need the choke knob<br />
pulled completely out.<br />
Attachments<br />
This unit can use many different attachments.<br />
This unit can pull attachments like a lawn<br />
sweeper, a lawn aerator, or a hopper spreader.<br />
This unit can not use attachments that engage<br />
the ground like a plough, a disk harrow, or a<br />
cultivator.<br />
For trailer and pull-behind attachments, the<br />
maximum weight is 113 kg (250 lbs.).<br />
How To Use The Throttle Control<br />
(Figure 5)<br />
Use the throttle control (7) to increase or decrease<br />
the speed of the engine.<br />
1. The F<strong>AS</strong>T position is marked with a detent.<br />
For normal operation and when using a<br />
grass bagger, move the throttle control to the<br />
F<strong>AS</strong>T position. For maximum charging of the<br />
battery and for a cooler running engine, operate<br />
the engine in the F<strong>AS</strong>T position.<br />
2. The engine governor is set at the factory for<br />
maximum performance. Do not adjust the<br />
governor to increase the speed of the engine.<br />
How To Use The Blade Rotation Control<br />
(Figure 5)<br />
Use the blade rotation control (1) to engage<br />
the blade(s).<br />
F-050725L<br />
1. Before you start the engine, make sure the<br />
blade rotation control (1) is in the DISEN-<br />
GAGE position.<br />
2. Move the blade rotation control (1) to the<br />
ENGAGE position to rotate the blade(s).<br />
NOTE: If the engine stops when you engage<br />
the blade(s), the seat switch is not<br />
activated. Make sure you sit in the middle<br />
of the seat.<br />
3. Move the blade rotation control (1) to the<br />
DISENGAGE position to stop the blade(s).<br />
Before you leave the operator’s position,<br />
make sure the blade(s) has stopped rotating.<br />
4. Before you ride the unit across a sidewalk or<br />
a road, move the blade rotation control (1)<br />
to the DISENGAGE position.<br />
WARNING: Always keep your<br />
hands and feet away from the<br />
blade, deflector opening, and the<br />
mower housing when the engine runs.<br />
How To Use The Speed Control Pedal<br />
(Figure 5)<br />
The drive system uses a Hydrostatic Automatic<br />
Drive transmission. The Hydrostatic transmission<br />
is very easy to operate. This type of<br />
drive system does not require a shift lever or a<br />
clutch pedal.<br />
The speed and direction of travel is controlled by<br />
a single speed control pedal (4) operated with<br />
your right foot. Do not use the left brake pedal in<br />
normal operation. Only use the left brake pedal<br />
to quickly stop in an emergency.<br />
How To Drive Forward<br />
1. (Figure 21) The automatic drive disconnect<br />
(1) must be in the DRIVE position (2).<br />
2. Slowly release your left foot from the brake<br />
pedal.<br />
3. Move the throttle control to the F<strong>AS</strong>T position.<br />
4. (Figure 20) Slowly push the speed control<br />
pedal (1) forward (4) to the desired speed.<br />
5. To increase forward speed, slowly move the<br />
speed control pedal (1) forward. To reduce<br />
forward speed, slowly release the speed<br />
control pedal (1) until the unit slows to the<br />
desired speed.<br />
How To Drive In Reverse<br />
1. Look to the rear.<br />
2. Slowly push the speed control pedal (1) to<br />
the REVERSE position (2).<br />
How To Change Directions<br />
CAUTION: To change directions, do not use<br />
the left brake pedal. Use only the speed control<br />
pedal.<br />
1. Slowly remove your foot from the speed<br />
control pedal (1). The speed control pedal<br />
(1) will automatically return to the NEUTRAL<br />
position (3).<br />
2. When the unit stops, slowly move the speed<br />
control pedal (1) to the desired direction.<br />
How To Disconnect The Transmission<br />
(Figure 21)<br />
To push the unit, use the automatic drive disconnect<br />
(1) to release the transmission. The<br />
automatic drive disconnect (1) is under the<br />
seat.<br />
12<br />
GB<br />
1. The engine must be off.<br />
2. Raise the seat. The automatic drive disconnect<br />
(1) is under the seat.<br />
3. Move and latch the automatic drive disconnect<br />
(1) in the PUSH position (3). The<br />
transmission is now released and the unit<br />
can be pushed.<br />
NOTE: In cold weather, the heavy viscosity<br />
oil in the transmission will make the<br />
unit difficult to push.<br />
4. To engage the transmission, unlatch the automatic<br />
drive disconnect (1). The transmission<br />
is now connected and ready to<br />
operate.<br />
How To Use The Parking Brake<br />
(Figure 5)<br />
1. Completely push the brake pedal (2) forward.<br />
2. Lift the parking brake lever (6).<br />
3. Remove your foot from the brake pedal (2)<br />
and then release the parking brake lever<br />
(6). Make sure the parking brake will hold the<br />
unit.<br />
4. To release the parking brake (6), completely<br />
push the brake pedal (2) forward. The parking<br />
brake will automatically release.<br />
WARNING: Before you leave the<br />
operator’s position, set the parking<br />
brake. Move the blade rotation control<br />
to the DISENGAGE position. Stop the<br />
engine and remove the ignition key.<br />
How To Change The Cutting Height<br />
(Figure 5)<br />
To change the cutting height, raise or lower the<br />
lift lever (5) as follows.<br />
1. Move the lift lever (5) forward to lower the<br />
mower housing and back to raise the mower<br />
housing.<br />
2. When you ride on a sidewalk or road, move<br />
the lift lever (5) to the highest position and<br />
move the blade rotation control to the DIS-<br />
ENGAGE position.<br />
How To Stop The Unit (Figure 5)<br />
1. Slowly remove your foot from the speed<br />
control pedal (4). The speed control pedal<br />
(1) will automatically return to the NEUTRAL<br />
position and the unit will stop.<br />
2. Move the blade rotation control (1) to the<br />
DISENGAGE position.<br />
3. Set the parking brake (6).<br />
WARNING: Make sure the parking<br />
brake will hold the unit.<br />
4. Move the throttle control (7) to the SLOW<br />
position.<br />
5. To stop the engine, turn the ignition key (3)<br />
to the OFF position. Remove the key.<br />
How To Transport The Unit<br />
To transport the unit, follow the steps below.<br />
1. Move the blade rotation control to the DIS-<br />
ENGAGE position.