MULTI-TECH II - Britax Römer
MULTI-TECH II - Britax Römer
MULTI-TECH II - Britax Römer

You also want an ePaper? Increase the reach of your titles
YUMPU automatically turns print PDFs into web optimized ePapers that Google loves.
9-25kg<br />
3f<br />
3g<br />
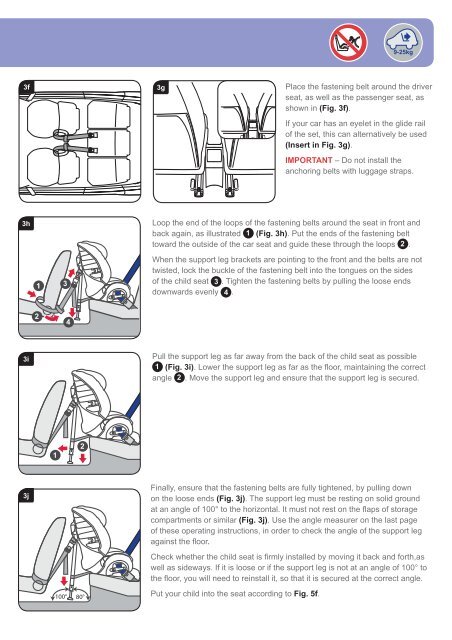
Place the fastening belt around the driver<br />
seat, as well as the passenger seat, as<br />
shown in (Fig. 3f).<br />
If your car has an eyelet in the glide rail<br />
of the set, this can alternatively be used<br />
(Insert in Fig. 3g).<br />
IMPORTANT – Do not install the<br />
anchoring belts with luggage straps.<br />
3h<br />
1<br />
3<br />
Loop the end of the loops of the fastening belts around the seat in front and<br />
back again, as illustrated 1 (Fig. 3h). Put the ends of the fastening belt<br />
toward the outside of the car seat and guide these through the loops 2 .<br />
When the support leg brackets are pointing to the front and the belts are not<br />
twisted, lock the buckle of the fastening belt into the tongues on the sides<br />
of the child seat 3 . Tighten the fastening belts by pulling the loose ends<br />
downwards evenly 4 .<br />
2<br />
4<br />
3i<br />
Pull the support leg as far away from the back of the child seat as possible<br />
1 (Fig. 3i). Lower the support leg as far as the fl oor, maintaining the correct<br />
angle 2 . Move the support leg and ensure that the support leg is secured.<br />
1<br />
2<br />
3j<br />
Finally, ensure that the fastening belts are fully tightened, by pulling down<br />
on the loose ends (Fig. 3j). The support leg must be resting on solid ground<br />
at an angle of 100° to the horizontal. It must not rest on the fl aps of storage<br />
compartments or similar (Fig. 3j). Use the angle measurer on the last page<br />
of these operating instructions, in order to check the angle of the support leg<br />
against the fl oor.<br />
Check whether the child seat is fi rmly installed by moving it back and forth,as<br />
well as sideways. If it is loose or if the support leg is not at an angle of 100° to<br />
the fl oor, you will need to reinstall it, so that it is secured at the correct angle.<br />
100° 80°<br />
Put your child into the seat according to Fig. 5f.