MULTI-TECH II - Britax Römer
MULTI-TECH II - Britax Römer
MULTI-TECH II - Britax Römer

You also want an ePaper? Increase the reach of your titles
YUMPU automatically turns print PDFs into web optimized ePapers that Google loves.
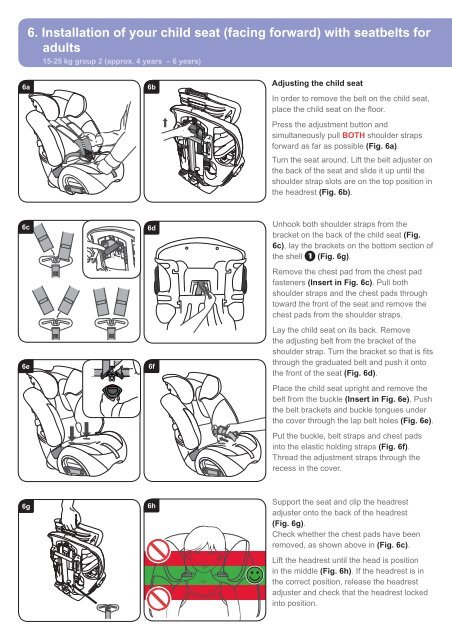
6. Installation of your child seat (facing forward) with seatbelts for<br />
adults<br />
15-25 kg group 2 (approx. 4 years – 6 years)<br />
6a<br />
6b<br />
Adjusting the child seat<br />
In order to remove the belt on the child seat,<br />
place the child seat on the fl oor.<br />
Press the adjustment button and<br />
simultaneously pull BOTH shoulder straps<br />
forward as far as possible (Fig. 6a).<br />
Turn the seat around. Lift the belt adjuster on<br />
the back of the seat and slide it up until the<br />
shoulder strap slots are on the top position in<br />
the headrest (Fig. 6b).<br />
6c<br />
6e<br />
6d<br />
6f<br />
Unhook both shoulder straps from the<br />
bracket on the back of the child seat (Fig.<br />
6c), lay the brackets on the bottom section of<br />
the shell (Fig. 6g).<br />
Remove the chest pad from the chest pad<br />
fasteners (Insert in Fig. 6c). Pull both<br />
shoulder straps and the chest pads through<br />
toward the front of the seat and remove the<br />
chest pads from the shoulder straps.<br />
Lay the child seat on its back. Remove<br />
the adjusting belt from the bracket of the<br />
shoulder strap. Turn the bracket so that is fi ts<br />
through the graduated belt and push it onto<br />
the front of the seat (Fig. 6d).<br />
Place the child seat upright and remove the<br />
belt from the buckle (Insert in Fig. 6e). Push<br />
the belt brackets and buckle tongues under<br />
the cover through the lap belt holes (Fig. 6e).<br />
Put the buckle, belt straps and chest pads<br />
into the elastic holding straps (Fig. 6f).<br />
Thread the adjustment straps through the<br />
recess in the cover.<br />
6g<br />
6h<br />
Support the seat and clip the headrest<br />
adjuster onto the back of the headrest<br />
(Fig. 6g).<br />
Check whether the chest pads have been<br />
removed, as shown above in (Fig. 6c).<br />
Lift the headrest until the head is position<br />
in the middle (Fig. 6h). If the headrest is in<br />
the correct position, release the headrest<br />
adjuster and check that the headrest locked<br />
into position.